


#说明
本笔记为
尚硅谷axios入门与源码解析的学习笔记该课程主要讲述 axios的API、源码分析、模拟实现重要功能
ps:大学时候的课程一定要好好学,不然迟早要还的,留下了不学无术的眼泪😢仅供本人学习使用
#目录
预备工具
- 作为一个前端开发工程师,在后端还没有ready的时候,不可避免的要使用mock的数据。很多时候,我们并不想使用简单的静态数据,而是希望自己起一个本地的mock-server来完全模拟请求以及请求回来的过程。json-server是一个很好的可以替我们完成这一工作的工具。我们只需要提供一个json文件,或者写几行简单的js脚本就可以模拟出RESTful API的接口。
- 安装json-server
npm install -g json-server- 创建db.json
在一个文件夹下新建一个db.json文件{ "posts": [ { "id": 1, "title": "json-server", "author": "typicode" } ], "comments": [ { "id": 1, "body": "some comment", "postId": 1 } ], "profile": { "name": "typicode" } }
- 启动json-server
在当前文件夹下输入如下命令:json-server db.json- 文档
一、Axios的理解与使用
1.1 axios 是什么?
- 前端最流行的 ajax 请求库
- react/vue 官方都推荐使用 axios 发 ajax 请求
- 文档: https://github.com/axios/axios
1.2 axios 特点
- 基于 xhr + promise 的异步 ajax 请求库
- 浏览器端/node 端都可以使用
- 支持请求/响应拦截器
- 支持请求取消
- 请求/响应数据转换
- 批量发送多个请求
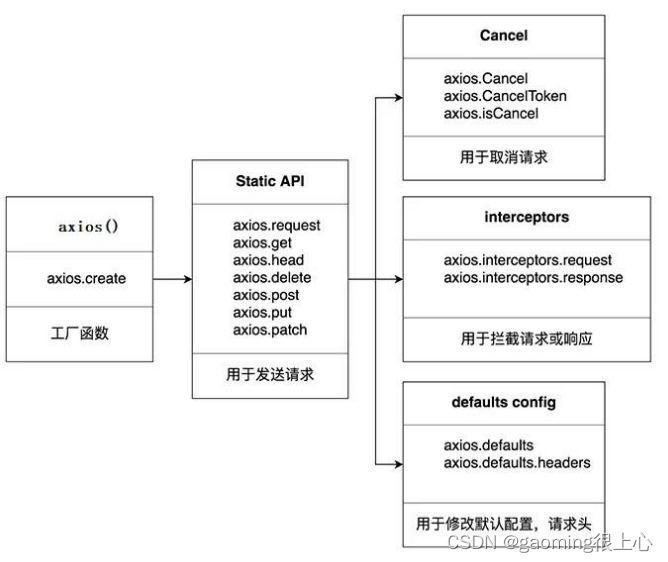
1.3 axios 常用语法
- axios(config):
通用/最本质的发任意类型请求的方式- axios(url[, config]): 可以只指定 url 发 get 请求
- axios.request(config): 等同于 axios(config)
- axios.get(url[, config]): 发 get 请求
- axios.delete(url[, config]): 发 delete 请求
- axios.post(url[, data, config]): 发 post 请求
- axios.put(url[, data, config]): 发 put 请求
- axios.defaults.xxx: 请求的默认全局配置
- axios.interceptors.request.use(): 添加请求拦截器
- axios.interceptors.response.use(): 添加响应拦截器
- axios.create([config]): 创建一个新的 axios(它没有下面的功能)
- axios.Cancel(): 用于创建取消请求的错误对象
- axios.CancelToken(): 用于创建取消请求的 token 对象
- axios.isCancel(): 是否是一个取消请求的错误
- axios.all(promises): 用于批量执行多个异步请求
- axios.spread(): 用来指定接收所有成功数据的回调函数的方法
1.4 原理图
1.5 难点语法的理解和使用
①axios.create(config)
根据指定配置创建一个新的 axios, 也就就每个新 axios 都有自己的配置
新 axios 只是没有取消请求和批量发请求的方法, 其它所有语法都是一致的
为什么要设计这个语法?
(1) 需求: 项目中有部分接口需要的配置与另一部分接口需要的配置不太一样, 如何处理
(2) 解决: 创建 2 个新 axios, 每个都有自己特有的配置, 分别应用到不同要 求的接口请求中
//创建实例对象  /getJoke
const duanzi = axios.create({
   baseURL: 'https://api.apiopen.top',
   timeout: 2000
});

const onather = axios.create({
   baseURL: 'https://b.com',
   timeout: 2000
});

//这里  duanzi 与 axios 对象的功能几近是一样的
// duanzi({
//     url: '/getJoke',
// }).then(response => {
//     console.log(response);
// });

duanzi.get('/getJoke').then(response => {
   console.log(response.data)
})
②拦截器函数/ajax 请求/请求的回调函数的调用顺序
- 说明: 调用 axios()并不是立即发送 ajax 请求, 而是需要经历一个较长的流程
- 流程: 请求拦截器2 => 请求拦截器1 => 发ajax请求 => 响应拦截器1 => 响应拦截器 2 => 请求的回调
- 注意: 此流程是通过 promise 串连起来的, 请求拦截器传递的是 config, 响应 拦截器传递的是 response
<script>
   // Promise
   // 设置请求拦截器  config 配置对象
   axios.interceptors.request.use(function (config) {
   console.log('请求拦截器 成功 - 1号');
   //修改 config 中的参数
   config.params = {
       a: 100
   };

   return config;
}, function (error) {
   console.log('请求拦截器 失败 - 1号');
   return Promise.reject(error);
});

axios.interceptors.request.use(function (config) {
   console.log('请求拦截器 成功 - 2号');
   //修改 config 中的参数
   config.timeout = 2000;
   return config;
}, function (error) {
   console.log('请求拦截器 失败 - 2号');
   return Promise.reject(error);
});

// 设置响应拦截器
axios.interceptors.response.use(function (response) {
   console.log('响应拦截器 成功 1号');
   return response.data;
   // return response;
}, function (error) {
   console.log('响应拦截器 失败 1号')
   return Promise.reject(error);
});

axios.interceptors.response.use(function (response) {
   console.log('响应拦截器 成功 2号')
   return response;
}, function (error) {
   console.log('响应拦截器 失败 2号')
   return Promise.reject(error);
});

//发送请求
axios({
   method: 'GET',
   url: 'http://localhost:3000/posts'
}).then(response => {
   console.log('自定义回调处理成功的结果');
   console.log(response);
});
</script>
③取消请求
- 基本流程 配置 cancelToken 对象
- 缓存用于取消请求的 cancel 函数
- 在后面特定时机调用 cancel 函数取消请求
- 在错误回调中判断如果 error 是 cancel, 做相应处理
- 实现功能 点击按钮, 取消某个正在请求中的请求,
- 实现功能 点击按钮, 取消某个正在请求中的请求
<script>
   //获取按钮
   const btns = document.querySelectorAll('button');
//2.声明全局变量
let cancel = null;
//发送请求
btns[0].onclick = function () {

   //检测上一次的请求是否已经完成 防止重复请求
   if (cancel !== null) {
       //取消上一次的请求
       cancel();
   }

   axios({
       method: 'GET',
       url: 'http://localhost:3000/posts',
       //1. 添加配置对象的属性
       cancelToken: new axios.CancelToken(function (c) {
           //3. 将 c 的值赋值给 cancel
           cancel = c;
       })
   }).then(response => {
       console.log(response);
       //将 cancel 的值初始化
       cancel = null;
   })
}

//绑定第二个事件取消请求
btns[1].onclick = function () {cancel(); }
</script>
④默认配置
//默认配置
axios.defaults.method = 'GET';//设置默认的请求类型为 GET
axios.defaults.baseURL = 'http://localhost:3000';//设置基础 URL
axios.defaults.params = {id:100};
axios.defaults.timeout = 3000;//

btns[0].onclick = function(){
   axios({
       url: '/posts'
   }).then(response => {
       console.log(response);
   })
}
二、Axios的难点问题
2.1 目录结构
├── /dist/ # 项目输出目录
├── /lib/ # 项目源码目录
│ ├── /adapters/ # 定义请求的适配器 xhr、http
│ │ ├── http.js # 实现 http 适配器(包装 http 包)
│ │ └── xhr.js # 实现 xhr 适配器(包装 xhr 对象)
│ ├── /cancel/ # 定义取消功能
│ ├── /core/ # 一些核心功能
│ │ ├── Axios.js # axios 的核心主类
│ │ ├── dispatchRequest.js # 用来调用 http 请求适配器方法发送请求的函数
│ │ ├── InterceptorManager.js # 拦截器的管理器
│ │ └── settle.js # 根据 http 响应状态,改变 Promise 的状态
│ ├── /helpers/ # 一些辅助方法
│ ├── axios.js # 对外暴露接口
│ ├── defaults.js # axios 的默认配置
│ └── utils.js # 公用工具
├── package.json # 项目信息
├── index.d.ts # 配置 TypeScript 的声明文件
└── index.js # 入口文件
2.2 axios 与 Axios 的关系
- 从
语法上来说: axios 不是 Axios 的实例- 从
功能上来说: axios 是 Axios 的实例- axios 是
Axios.prototype.request函数 bind()返回的函数- axios 作为对象有 Axios 原型对象上的所有方法, 有 Axios 对象上所有属性
2.3 instance 与 axios 的区别?
- 相同:
(1) 都是一个能发任意请求的函数: request(config)
(2) 都有发特定请求的各种方法: get()/post()/put()/delete()
(3) 都有默认配置和拦截器的属性: defaults/interceptors- 不同:
(1) 默认配置很可能不一样
(2) instance 没有 axios 后面添加的一些方法: create()/CancelToken()/all()
2.4 axios运行的整体流程
整体流程:
request(config) ==> dispatchRequest(config) ==> xhrAdapter(config)request(config):
将请求拦截器 / dispatchRequest() / 响应拦截器 通过 promise 链串连起来,
返回 promisedispatchRequest(config):
转换请求数据 ===> 调用 xhrAdapter()发请求 ===> 请求返回后转换响应数
据. 返回 promisexhrAdapter(config):
创建 XHR 对象, 根据 config 进行相应设置, 发送特定请求, 并接收响应数据,
返回 promise流程图:
[外链图片转存失败,源站可能有防盗链机制,建议将图片保存下来直接上传(img-F0ry6si0-1686031505708)(axios.assets/Axios系统学习流程图.png)]
2.5 axios 的请求/响应拦截器是什么?
- 请求拦截器:
Ⅰ- 在真正发送请求前执行的回调函数
Ⅱ- 可以对请求进行检查或配置进行特定处理
Ⅲ- 成功的回调函数, 传递的默认是 config(也必须是)
Ⅳ- 失败的回调函数, 传递的默认是 error- 响应拦截器
Ⅰ- 在请求得到响应后执行的回调函数
Ⅱ- 可以对响应数据进行特定处理
Ⅲ- 成功的回调函数, 传递的默认是 response
Ⅳ- 失败的回调函数, 传递的默认是 error
2.6 axios 的请求/响应数据转换器是什么?
- 请求转换器: 对请求头和请求体数据进行特定处理的函数
if (utils.isObject(data)) {
   setContentTypeIfUnset(headers, 'application/json;charset=utf-8');
   return JSON.stringify(data);
}
- 响应转换器: 将响应体 json 字符串解析为 js 对象或数组的函数
response.data = JSON.parse(response.data)
2.7 response与error 的整体结构
- response的整体结构
{
   data, status,statusText,headers,config,request
}
- error 的整体结构
{
   message,response,request,
}
2.8 如何取消未完成的请求?
- 当配置了 cancelToken 对象时, 保存 cancel 函数
(1) 创建一个用于将来中断请求的 cancelPromise
(2) 并定义了一个用于取消请求的 cancel 函数
(3) 将 cancel 函数传递出来- 调用 cancel()取消请求
(1) 执行 cacel 函数, 传入错误信息 message
(2) 内部会让 cancelPromise 变为成功, 且成功的值为一个 Cancel 对象
(3) 在 cancelPromise 的成功回调中中断请求, 并让发请求的 proimse 失败,
失败的 reason 为 Cancel 对象
三、Axios源码模拟实现
3.1 axios 的创建过程模拟实现
<script>
   //构造函数
   function Axios(config) {
   //初始化
   this.defaults = config; //为了创建 default 默认属性
   this.intercepters = {
       request: {},
       response: {}
   }
}
//原型添加相关的方法
Axios.prototype.request = function (config) {
   console.log('发送 AJAX 请求 请求的类型为 ' + config.method);
}
Axios.prototype.get = function (config) {
   return this.request({
       method: 'GET'
   });
}
Axios.prototype.post = function (config) {
   return this.request({
       method: 'POST'
   });
}

//声明函数
function createInstance(config) {
   //实例化一个对象
   let context = new Axios(config); // context.get()  context.post()  但是不能当做函数使用 context() X
   //创建请求函数
   let instance = Axios.prototype.request.bind(
       context); // instance 是一个函数 并且可以 instance({})  此时 instance 不能 instance.get X
   //将 Axios.prototype 对象中的方法添加到instance函数对象中,才可以instance.get....
   Object.keys(Axios.prototype).forEach(key => {
       instance[key] = Axios.prototype[key].bind(context); // this.default  this.interceptors
   });
   //为 instance 函数对象添加属性 default 与 interceptors
   Object.keys(context).forEach(key => {
       instance[key] = context[key];
   });
   return instance;
}

let axios = createInstance();
//发送请求
// axios({method:'POST'});
axios.get({});
axios.post({});
</script>
3.2 axios发送请求过程详解
- 整体流程:
request(config) ==> dispatchRequest(config) ==> xhrAdapter(config)- request(config):
将请求拦截器 / dispatchRequest() / 响应拦截器 通过 promise 链串连起来,
返回 promise- dispatchRequest(config):
转换请求数据 ===> 调用 xhrAdapter()发请求 ===> 请求返回后转换响应数
据. 返回 promise- xhrAdapter(config):
创建 XHR 对象, 根据 config 进行相应设置, 发送特定请求, 并接收响应数据,
返回 promise<script> // axios 发送请求 axios Axios.prototype.request bind //1. 声明构造函数 function Axios(config) { this.config = config; } Axios.prototype.request = function (config) { //发送请求 //创建一个 promise 对象 let promise = Promise.resolve(config); //声明一个数组 let chains = [dispatchRequest, undefined]; // undefined 占位 //调用 then 方法指定回调 let result = promise.then(chains[0], chains[1]); //返回 promise 的结果 return result; } //2. dispatchRequest 函数 function dispatchRequest(config) { //调用适配器发送请求 return xhrAdapter(config).then(response => { //响应的结果进行转换处理 //.... return response; }, error => { throw error; }); } //3. adapter 适配器 function xhrAdapter(config) { console.log('xhrAdapter 函数执行'); return new Promise((resolve, reject) => { //发送 AJAX 请求 let xhr = new XMLHttpRequest(); //初始化 xhr.open(config.method, config.url); //发送 xhr.send(); //绑定事件 xhr.onreadystatechange = function () { if (xhr.readyState === 4) { //判断成功的条件 if (xhr.status >= 200 && xhr.status < 300) { //成功的状态 resolve({ //配置对象 config: config, //响应体 data: xhr.response, //响应头 headers: xhr.getAllResponseHeaders(), //字符串 parseHeaders // xhr 请求对象 request: xhr, //响应状态码 status: xhr.status, //响应状态字符串 statusText: xhr.statusText }); } else { //失败的状态 reject(new Error('请求失败 失败的状态码为' + xhr.status)); } } } }); } //4. 创建 axios 函数 let axios = Axios.prototype.request.bind(null); axios({ method: 'GET', url: 'http://localhost:3000/posts' }).then(response => { console.log(response); }); </script>
3.3 拦截器的模拟实现
- array.shift()该方法用于把数组的第一个元素从其中删除,并返回第一个元素的值
- 思路为先将拦截器的响应回调与请求回调都压入一个数组中,之后进行遍历运行
promise = promise.then(chains.shift(), chains.shift());通过循环使用promise的then链条得到最终的结果–>等式前面的promise将被最终的结果覆盖
<!DOCTYPE html>
<html lang="en">
   <head>
       <meta charset="UTF-8">
       <meta name="viewport" content="width=device-width, initial-scale=1.0">
       <title>拦截器</title>
       <!-- <script src="./node_modules/axios/dist/mine-axios.js"></script> -->
   </head>
   <body>
       <script>
           //构造函数
           function Axios(config){
               this.config = config;
               this.interceptors = {
                   request: new InterceptorManager(),
                   response: new InterceptorManager(),
               }
           }
           //发送请求  难点与重点
           Axios.prototype.request = function(config){
               //创建一个 promise 对象
               let promise = Promise.resolve(config);
               //创建一个数组
               const chains = [dispatchRequest, undefined];
               //处理拦截器
               //请求拦截器 将请求拦截器的回调 压入到 chains 的前面  request.handles = []
               this.interceptors.request.handlers.forEach(item => {
                   chains.unshift(item.fulfilled, item.rejected);
               });
               //响应拦截器
               this.interceptors.response.handlers.forEach(item => {
                   chains.push(item.fulfilled, item.rejected);
               });

               // console.log(chains);
               //遍历
               while(chains.length > 0){
                   //array.shift()
                   promise = promise.then(chains.shift(), chains.shift());
               }

               return promise;
           }

           //发送请求
           function dispatchRequest(config){
               //返回一个promise 队形
               return new Promise((resolve, reject) => {
                   resolve({
                       status: 200,
                       statusText: 'OK'
                   });
               });
           }

           //创建实例
           let context = new Axios({});
           //创建axios函数
           let axios = Axios.prototype.request.bind(context);
           //将 context 属性 config interceptors 添加至 axios 函数对象身上
           Object.keys(context).forEach(key => {
               axios[key] = context[key];
           });

           //拦截器管理器构造函数
           function InterceptorManager(){
               this.handlers = [];
           }
           InterceptorManager.prototype.use = function(fulfilled, rejected){
               this.handlers.push({
                   fulfilled,
                   rejected
               })
           }


           //以下为功能测试代码
           // 设置请求拦截器  config 配置对象
           axios.interceptors.request.use(function one(config) {
               console.log('请求拦截器 成功 - 1号');
               return config;
           }, function one(error) {
               console.log('请求拦截器 失败 - 1号');
               return Promise.reject(error);
           });

           axios.interceptors.request.use(function two(config) {
               console.log('请求拦截器 成功 - 2号');
               return config;
           }, function two(error) {
               console.log('请求拦截器 失败 - 2号');
               return Promise.reject(error);
           });

           // 设置响应拦截器
           axios.interceptors.response.use(function (response) {
               console.log('响应拦截器 成功 1号');
               return response;
           }, function (error) {
               console.log('响应拦截器 失败 1号')
               return Promise.reject(error);
           });

           axios.interceptors.response.use(function (response) {
               console.log('响应拦截器 成功 2号')
               return response;
           }, function (error) {
               console.log('响应拦截器 失败 2号')
               return Promise.reject(error);
           });


           //发送请求
           axios({
               method: 'GET',
               url: 'http://localhost:3000/posts'
           }).then(response => {
               console.log(response);
           });
       </script>
   </body>
</html>
3.4 请求取消功能模拟实现
<!DOCTYPE html>
<html lang="en">

<head>
<meta charset="UTF-8">
<meta name="viewport" content="width=device-width, initial-scale=1.0">
<title>取消请求</title>
<link crossorigin='anonymous' href="https://cdn.bootcss.com/twitter-bootstrap/3.3.7/css/bootstrap.min.css"
rel="stylesheet">
<!-- <script src="./node_modules/axios/dist/mine-axios.js"></script> -->
</head>

<body>
<div class="container">
<h2 class="page-header">axios取消请求</h2>
<button class="btn btn-primary"> 发送请求 </button>
<button class="btn btn-warning"> 取消请求 </button>
</div>
<script>
//构造函数
function Axios(config) {
this.config = config;
}
//原型 request 方法
Axios.prototype.request = function (config) {
return dispatchRequest(config);
}
//dispatchRequest 函数
function dispatchRequest(config) {
return xhrAdapter(config);
}
//xhrAdapter
function xhrAdapter(config) {
//发送 AJAX 请求
return new Promise((resolve, reject) => {
  //实例化对象
  const xhr = new XMLHttpRequest();
  //初始化
  xhr.open(config.method, config.url);
  //发送
  xhr.send();
  //处理结果
  xhr.onreadystatechange = function () {
    if (xhr.readyState === 4) {
      //判断结果
      if (xhr.status >= 200 && xhr.status < 300) {
        //设置为成功的状态
        resolve({
          status: xhr.status,
          statusText: xhr.statusText
        });
      } else {
        reject(new Error('请求失败'));
      }
    }
  }
  //关于取消请求的处理
  if (config.cancelToken) {
    //对 cancelToken 对象身上的 promise 对象指定成功的回调
    config.cancelToken.promise.then(value => {
      xhr.abort();
      //将整体结果设置为失败
      reject(new Error('请求已经被取消'))
    });
  }
})
}

//创建 axios 函数
const context = new Axios({});
const axios = Axios.prototype.request.bind(context);

//CancelToken 构造函数
function CancelToken(executor) {
//声明一个变量
var resolvePromise;
//为实例对象添加属性
this.promise = new Promise((resolve) => {
  //将 resolve 赋值给 resolvePromise
  resolvePromise = resolve
});
//调用 executor 函数
executor(function () {
  //执行 resolvePromise 函数
  resolvePromise();
});
}

//获取按钮 以上为模拟实现的代码
const btns = document.querySelectorAll('button');
//2.声明全局变量
let cancel = null;
//发送请求
btns[0].onclick = function () {
//检测上一次的请求是否已经完成
if (cancel !== null) {
  //取消上一次的请求
  cancel();
}

//创建 cancelToken 的值
let cancelToken = new CancelToken(function (c) {
  cancel = c;
});

axios({
  method: 'GET',
  url: 'http://localhost:3000/posts',
  //1. 添加配置对象的属性
  cancelToken: cancelToken
}).then(response => {
  console.log(response);
  //将 cancel 的值初始化
  cancel = null;
})
}

//绑定第二个事件取消请求
btns[1].onclick = function () {
cancel();
}
</script>
</body>

</html>
四、自己对于某些问题解答与理解
4.1 axios同步与异步转换,在外部取值
const  axios  =  require ('axios');
 //创建实例对象
 const $http = axios.create({
  baseURL: 'http://localhost:53000',
  timeout: 11000  //请求超时时间
});
let resolveCommon = ()=> {
  let data=$http({ url:"/test"})
  .then(v=>v.data)  //等于 `.then(v=>{return v})`
  console.log(data)
  //打印结果: Promise { <pending> }
};
let resolveAsync=async ()=> {
  let data=await $http({ url:"/test"})
  .then(v=>v.data)  //等于 `.then(v=>{return v})`,我再then()中返回出去,让外部承接
  console.log(data)  //获得正确的值
   /**
    * 打印结果{ id: 1000,course_name: '这是请求数据1', autor: '袁明', college: '金并即总变史',category_Id: 2}
    *  */

  //模拟新增数据,将上一步的结果简单加工一下
   data.course_name=data.course_name+1
 $http({
   url:"/test",
   method:"put",
   data
 }).then(v=>{
   console.log(v)  //直接打印了 需要再取出参照上一步
 })

};
resolveCommon()  //调用普通promise函数
resolveAsync()    //调用await+async


 232
232


 被折叠的 条评论
为什么被折叠?
被折叠的 条评论
为什么被折叠?
 到【灌水乐园】发言


