


实验目标:
完成一个人脸识别的程序,可以识别你宿舍的几位同学
人脸检测
人脸特征提取与比对
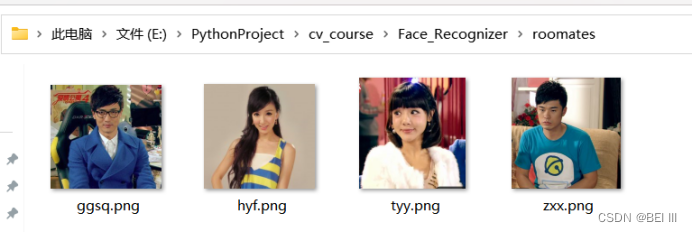
需要识别的人物:
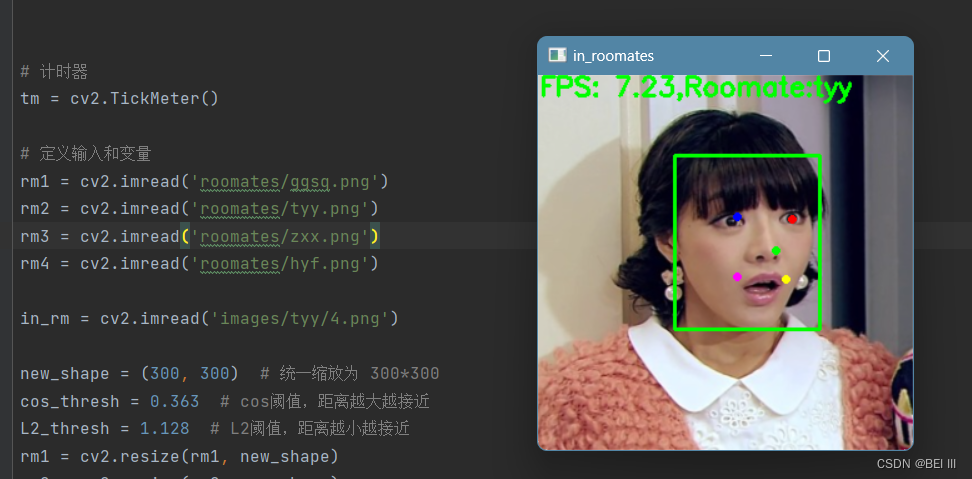
输入待识别图像,判断是哪一个舍友
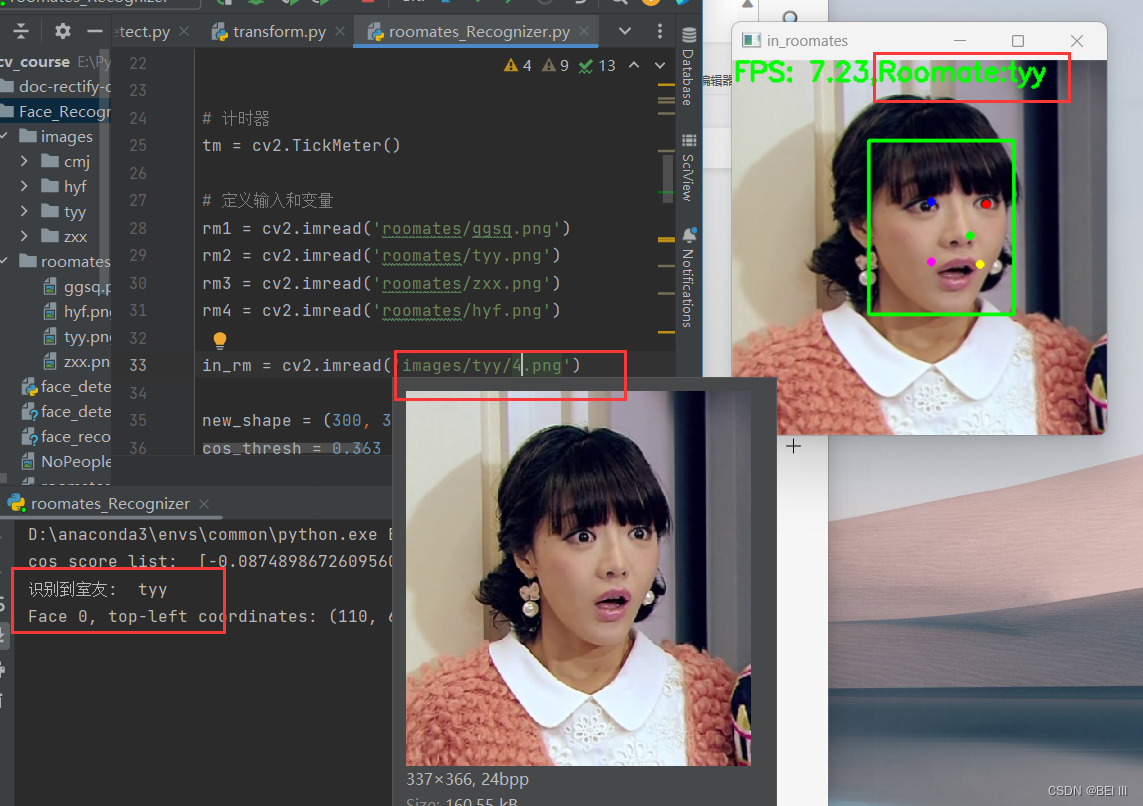
识别效果:人脸检测框定,返回室友的名字:唐悠悠-tyy
参考资料:
- https://docs.opencv.org/4.5.4/d0/dd4/tutorial_dnn_face.html https://blog.csdn.net/qq_36563273/article/details/121510440
- 人脸检测器: cv2.FaceDetectorYN
- 人脸特征提取:cv2.FaceRecognizerSF
实验步骤
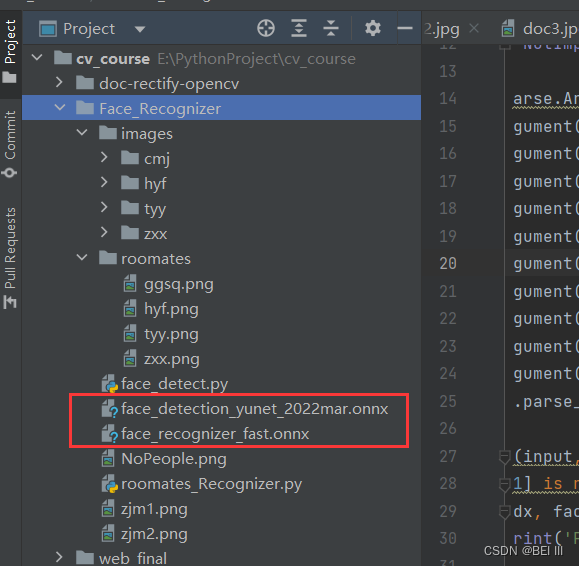
模型下载
人脸检测模型下载:https://github.com/opencv/opencv_zoo/tree/master/models/face_detection_yunet
人脸识别模型下载:
https://github.com/opencv/opencv_zoo/tree/master/models/face_recognition_sface
参考官方代码https://github.com/opencv/opencv/blob/4.x/samples/dnn/face_detect.py
数据准备
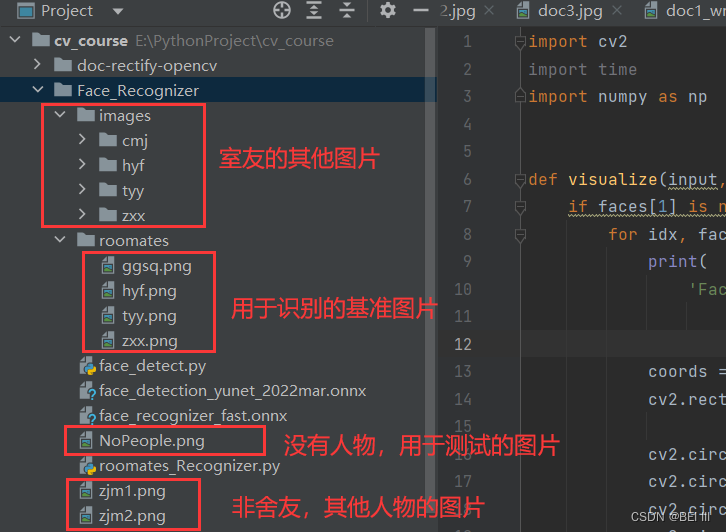
基准图片: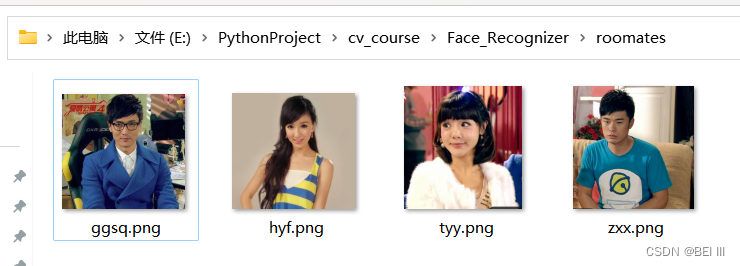
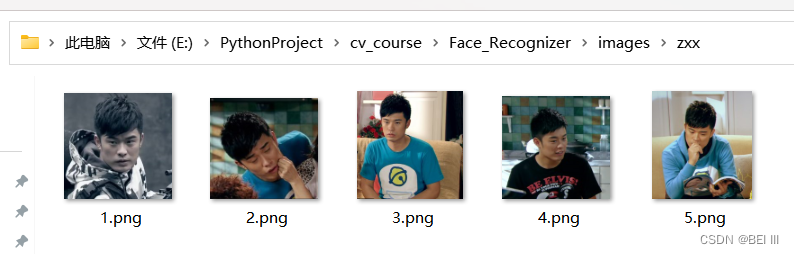
其他图片: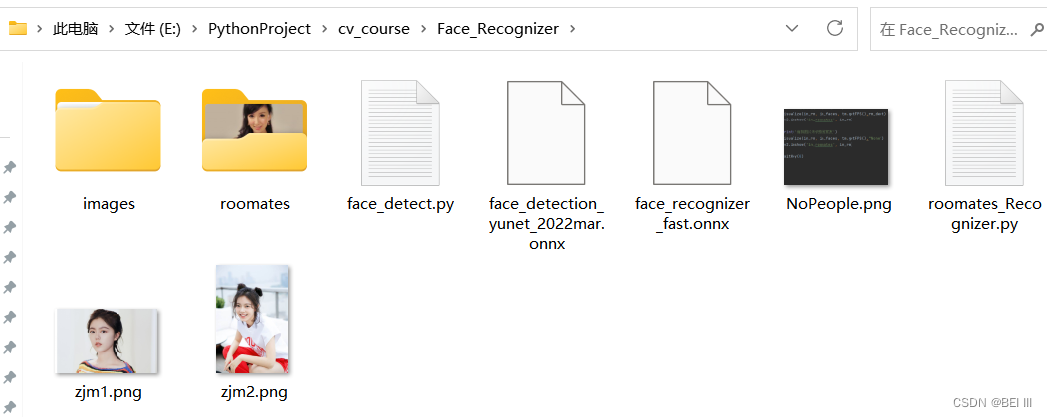
用于后面预测识别的舍友图片:
代码解析:
引入包,读入图片,resize图片大小
import cv2
import time
import numpy as np

# 定义输入和变量,读入四个室友的基准照片
rm1 = cv2.imread('roomates/ggsq.png')
rm2 = cv2.imread('roomates/tyy.png')
rm3 = cv2.imread('roomates/zxx.png')
rm4 = cv2.imread('roomates/hyf.png')
# 读入待识别照片
in_rm = cv2.imread('images/tyy/4.png')

new_shape = (300, 300)  # 统一缩放为 300*300
cos_thresh = 0.363  # cos阈值,距离越大越接近
L2_thresh = 1.128  # L2阈值,距离越小越接近
rm1 = cv2.resize(rm1, new_shape)
rm2 = cv2.resize(rm2, new_shape)
rm3 = cv2.resize(rm3, new_shape)
rm4 = cv2.resize(rm4, new_shape)

in_rm = cv2.resize(in_rm, new_shape)
先定义一个用来展示识别到的图片的可视化函数,后面调用会显示人脸检测方框和检测到的室友名字
def visualize(input, faces, fps, name, thickness=2):
    if faces[1] is not None:
        for idx, face in enumerate(faces[1]):
            print(
                'Face {}, top-left coordinates: ({:.0f}, {:.0f}), box width: {:.0f}, box height {:.0f}, score: {:.2f}'.format(
                    idx, face[0], face[1], face[2], face[3], face[-1]))

            coords = face[:-1].astype(np.int32)
            cv2.rectangle(input, (coords[0], coords[1]), (coords[0] + coords[2], coords[1] + coords[3]), (0, 255, 0),
                          thickness)
            cv2.circle(input, (coords[4], coords[5]), 2, (255, 0, 0), thickness)
            cv2.circle(input, (coords[6], coords[7]), 2, (0, 0, 255), thickness)
            cv2.circle(input, (coords[8], coords[9]), 2, (0, 255, 0), thickness)
            cv2.circle(input, (coords[10], coords[11]), 2, (255, 0, 255), thickness)
            cv2.circle(input, (coords[12], coords[13]), 2, (0, 255, 255), thickness)
    cv2.putText(input, 'FPS: {0:.2f},Roomate:{1}'.format(fps, name), (1, 16), cv2.FONT_HERSHEY_SIMPLEX, 0.7, (0, 255, 0), 2)
初始化模型,使用模型:
# 初始化模型,使用上面下载好的模型文件
faceDetector = cv2.FaceDetectorYN.create('face_detection_yunet_2022mar.onnx', '', new_shape)
faceRecognizer = cv2.FaceRecognizerSF.create('face_recognizer_fast.onnx', '')

# 检测、对齐、提取特征:
# detect输出的是一个二维元祖,其中第二维是一个二维数组: n*15,n为人脸数,
# 15为人脸的xywh和5个关键点(右眼瞳孔、左眼、鼻尖、右嘴角、左嘴角)的xy坐标及置信度
faces1 = faceDetector.detect(rm1)
aligned_face1 = faceRecognizer.alignCrop(rm1, faces1[1][0])  # 对齐后的图片
feature1 = faceRecognizer.feature(aligned_face1)  # 128维特征

faces2 = faceDetector.detect(rm2)
aligned_face2 = faceRecognizer.alignCrop(rm2, faces2[1][0])
feature2 = faceRecognizer.feature(aligned_face2)

faces3 = faceDetector.detect(rm3)
aligned_face3 = faceRecognizer.alignCrop(rm3, faces3[1][0])
feature3 = faceRecognizer.feature(aligned_face3)

faces4 = faceDetector.detect(rm4)
aligned_face4 = faceRecognizer.alignCrop(rm4, faces4[1][0])
feature4 = faceRecognizer.feature(aligned_face4)

# 检测读入待识别的图片,假如该图片里面没有人,就抛出没有人的错误
in_faces = faceDetector.detect(in_rm)
assert in_faces[1] is not None, 'Cannot find a face in input picture'
in_aligned_face = faceRecognizer.alignCrop(in_rm, in_faces[1][0])
in_feature = faceRecognizer.feature(in_aligned_face);
计算待识别的图片中的人和4个室友基准图片的匹配程度,取匹配程度最大的结果,若该结果与原舍友图片的相似程度达到一定的阈值,则判断该图片就是这个舍友,否则说明待识别的图片不属于4个舍友中的任何一个,可能是其他人
# 人脸匹配值打分:
cos_score1 = faceRecognizer.match(feature1, in_feature, 0)
cos_score2 = faceRecognizer.match(feature2, in_feature, 0)
cos_score3 = faceRecognizer.match(feature3, in_feature, 0)
cos_score4 = faceRecognizer.match(feature4, in_feature, 0)

# 得分列表索引对应室友名字索引
rmlist = ['ggsq', 'tyy', 'zxx', 'hyf']
score_list = [cos_score1, cos_score2, cos_score3, cos_score4]
# 输出结果:
print('cos_score_list: ', score_list)
in_score = max(score_list)
# 如果当前最有可能的室友得分大于识别阈值,则判断该图片存在室友,注意只能识别一个室友
if in_score > cos_thresh:
    rm_dect = rmlist[score_list.index(max(score_list))]
    print('识别到室友: ', rm_dect)
    visualize(in_rm, in_faces, tm.getFPS(),rm_dect)
    cv2.imshow('in_roomates', in_rm)
else:
    print('当前图片未识别到室友')
    visualize(in_rm, in_faces, tm.getFPS(),"None")
    cv2.imshow('in_roomates', in_rm)

cv2.waitKey(0)
效果演示:
输入4室友之一的图片
输入其他人的图片:
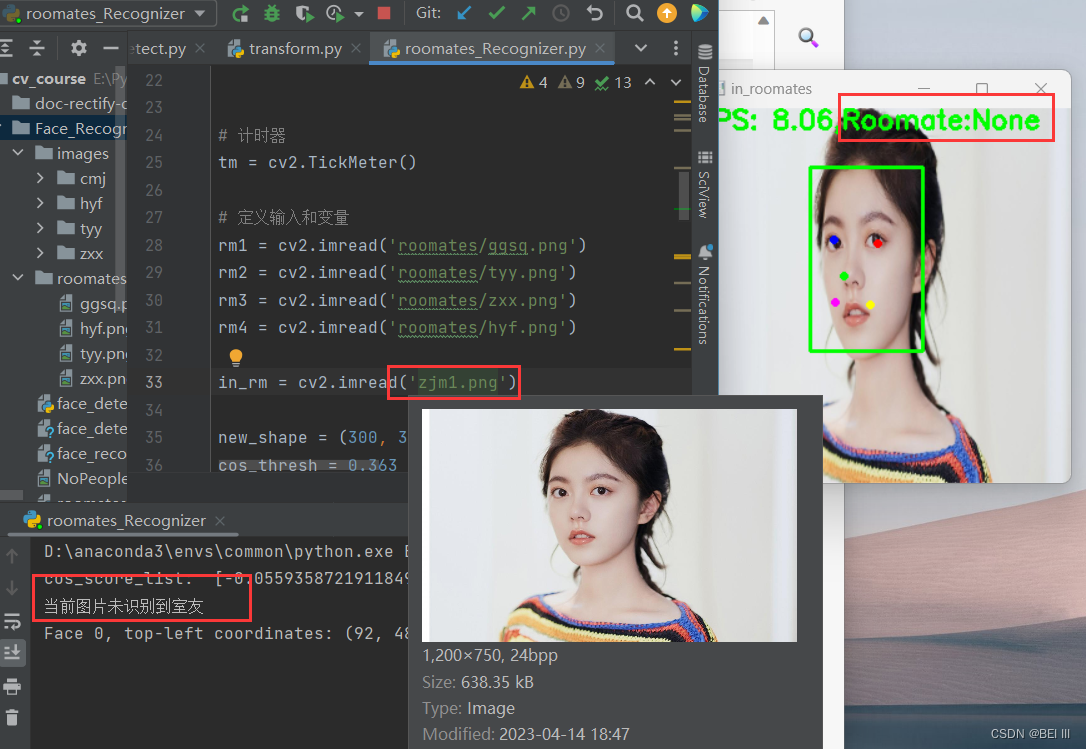
输入没有人的图片:

完整代码如下:
import cv2
import time
import numpy as np


def visualize(input, faces, fps, name, thickness=2):
    if faces[1] is not None:
        for idx, face in enumerate(faces[1]):
            print(
                'Face {}, top-left coordinates: ({:.0f}, {:.0f}), box width: {:.0f}, box height {:.0f}, score: {:.2f}'.format(
                    idx, face[0], face[1], face[2], face[3], face[-1]))

            coords = face[:-1].astype(np.int32)
            cv2.rectangle(input, (coords[0], coords[1]), (coords[0] + coords[2], coords[1] + coords[3]), (0, 255, 0),
                          thickness)
            cv2.circle(input, (coords[4], coords[5]), 2, (255, 0, 0), thickness)
            cv2.circle(input, (coords[6], coords[7]), 2, (0, 0, 255), thickness)
            cv2.circle(input, (coords[8], coords[9]), 2, (0, 255, 0), thickness)
            cv2.circle(input, (coords[10], coords[11]), 2, (255, 0, 255), thickness)
            cv2.circle(input, (coords[12], coords[13]), 2, (0, 255, 255), thickness)
    cv2.putText(input, 'FPS: {0:.2f},Roomate:{1}'.format(fps, name), (1, 16), cv2.FONT_HERSHEY_SIMPLEX, 0.7, (0, 255, 0), 2)


# 计时器
tm = cv2.TickMeter()

# 定义输入和变量
rm1 = cv2.imread('roomates/ggsq.png')
rm2 = cv2.imread('roomates/tyy.png')
rm3 = cv2.imread('roomates/zxx.png')
rm4 = cv2.imread('roomates/hyf.png')

in_rm = cv2.imread('images/tyy/4.png')

new_shape = (300, 300)  # 统一缩放为 300*300
cos_thresh = 0.363  # cos阈值,距离越大越接近
L2_thresh = 1.128  # L2阈值,距离越小越接近
rm1 = cv2.resize(rm1, new_shape)
rm2 = cv2.resize(rm2, new_shape)
rm3 = cv2.resize(rm3, new_shape)
rm4 = cv2.resize(rm4, new_shape)

in_rm = cv2.resize(in_rm, new_shape)

# 初始化模型:
faceDetector = cv2.FaceDetectorYN.create('face_detection_yunet_2022mar.onnx', '', new_shape)
faceRecognizer = cv2.FaceRecognizerSF.create('face_recognizer_fast.onnx', '')

tm.start()

# 检测、对齐、提取特征:
# detect输出的是一个二维元祖,其中第二维是一个二维数组: n*15,n为人脸数,
# 15为人脸的xywh和5个关键点(右眼瞳孔、左眼、鼻尖、右嘴角、左嘴角)的xy坐标及置信度
faces1 = faceDetector.detect(rm1)
aligned_face1 = faceRecognizer.alignCrop(rm1, faces1[1][0])  # 对齐后的图片
feature1 = faceRecognizer.feature(aligned_face1)  # 128维特征

faces2 = faceDetector.detect(rm2)
aligned_face2 = faceRecognizer.alignCrop(rm2, faces2[1][0])
feature2 = faceRecognizer.feature(aligned_face2)

faces3 = faceDetector.detect(rm3)
aligned_face3 = faceRecognizer.alignCrop(rm3, faces3[1][0])
feature3 = faceRecognizer.feature(aligned_face3)

faces4 = faceDetector.detect(rm4)
aligned_face4 = faceRecognizer.alignCrop(rm4, faces4[1][0])
feature4 = faceRecognizer.feature(aligned_face4)

in_faces = faceDetector.detect(in_rm)
assert in_faces[1] is not None, 'Cannot find a face in input picture'
in_aligned_face = faceRecognizer.alignCrop(in_rm, in_faces[1][0])
in_feature = faceRecognizer.feature(in_aligned_face);

tm.stop()


# 人脸匹配值打分:
cos_score1 = faceRecognizer.match(feature1, in_feature, 0)
cos_score2 = faceRecognizer.match(feature2, in_feature, 0)
cos_score3 = faceRecognizer.match(feature3, in_feature, 0)
cos_score4 = faceRecognizer.match(feature4, in_feature, 0)

# 得分列表索引对应室友名字索引
rmlist = ['ggsq', 'tyy', 'zxx', 'hyf']
score_list = [cos_score1, cos_score2, cos_score3, cos_score4]
# 输出结果:
print('cos_score_list: ', score_list)
in_score = max(score_list)
# 如果当前最有可能的室友得分大于识别阈值,则判断该图片存在室友,注意只能识别一个室友
if in_score > cos_thresh:
    rm_dect = rmlist[score_list.index(max(score_list))]
    print('识别到室友: ', rm_dect)
    visualize(in_rm, in_faces, tm.getFPS(),rm_dect)
    cv2.imshow('in_roomates', in_rm)
else:
    print('当前图片未识别到室友')
    visualize(in_rm, in_faces, tm.getFPS(),"None")
    cv2.imshow('in_roomates', in_rm)

cv2.waitKey(0)


 被折叠的 条评论
为什么被折叠?
被折叠的 条评论
为什么被折叠?
 到【灌水乐园】发言


