


文章目录
代码地址
https://gitcode.net/m0_56745306/knn_classifier.git
一、KNN算法简介
该部分内容参考自:https://zhuanlan.zhihu.com/p/45453761
-
KNN(K-Nearest Neighbor) 算法是机器学习算法中最基础、最简单的算法之一。它既能用于分类,也能用于回归。KNN通过测量不同特征值之间的距离来进行分类。
-
KNN算法的思想非常简单:对于任意n维输入向量,分别对应于特征空间中的一个点,输出为该特征向量所对应的类别标签或预测值。
-
对于一个需要预测的输入向量x,我们只需要在训练数据集中寻找k个与向量x最近的向量的集合,然后把x的类别预测为这k个样本中类别数最多的那一类。
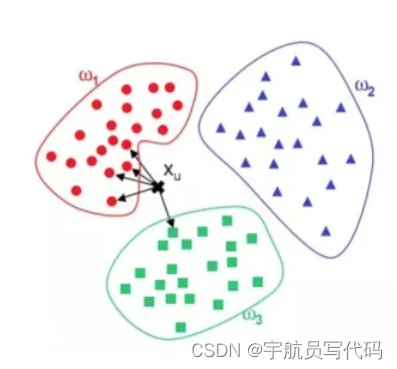
如图所示,ω1、ω2、ω3分别代表训练集中的三个类别。其中,与xu最相近的5个点(k=5)如图中箭头所指,很明显与其最相近的5个点中最多的类别为ω1,因此,KNN算法将xu的类别预测为ω1。
二、KNN算法示例:推测鸢尾花种类
鸢尾花数据集记载了三类花(Setosa,versicolor,virginica)以及它们的四种属性(花萼长度、花萼宽度、花瓣长度、花瓣宽度)。例如:
4.9,3.0,1.4,0.2,setosa
6.4,3.2,4.5,1.5,versicolor
6.0,2.2,5.0,1.5,virginica
对于给定的测试数据,我们需要根据它的四种信息判断其属于哪一种鸢尾花。并输出它的序号:
例如:
#假设该数据为第一条数据(对应序号为0)
5.7,3.0,4.2,1.2
输出可以为:
0 setosa
三、MapReduce+Hadoop实现KNN鸢尾花分类:
1. 实现环境
- Ubuntu20.04
- Hadoop3.3.5
- Java8
- Maven3.9.1
2.pom.xml
<project xmlns="http://maven.apache.org/POM/4.0.0" xmlns:xsi="http://www.w3.org/2001/XMLSchema-instance"
         xsi:schemaLocation="http://maven.apache.org/POM/4.0.0 http://maven.apache.org/xsd/maven-4.0.0.xsd">
    <modelVersion>4.0.0</modelVersion>


    <groupId>org.example</groupId>
    <artifactId>KNN_Classifier</artifactId>
    <version>1.0-SNAPSHOT</version>
    <packaging>jar</packaging>

    <name>KNN_Classifier</name>
    <url>http://maven.apache.org</url>

    <build>
        <plugins>
            <plugin>
                <groupId>org.apache.maven.plugins</groupId>
                <artifactId>maven-shade-plugin</artifactId>
                <version>3.1.0</version>
                <executions>
                    <execution>
                        <phase>package</phase>
                        <goals>
                            <goal>shade</goal>
                        </goals>
                    </execution>
                </executions>
                <configuration>
                    <filters>
                        <filter>
                            <artifact>*:*</artifact>
                            <excludes>
                                <exclude>module-info.class</exclude>
                                <exclude>META-INF/*.SF</exclude>
                                <exclude>META-INF/*.DSA</exclude>
                                <exclude>META-INF/*.RSA</exclude>
                            </excludes>
                        </filter>
                    </filters>
                    <transformers>
                        <transformer implementation="org.apache.maven.plugins.shade.resource.ManifestResourceTransformer">
                            <!-- main()所在的类,注意修改 -->
                            <mainClass>KNN_Classifier.KNN_Driver</mainClass>
                        </transformer>
                    </transformers>
                </configuration>
            </plugin>
            <plugin>
                <groupId>org.apache.maven.plugins</groupId>
                <artifactId>maven-compiler-plugin</artifactId>
                <version>3.8.1</version>
                <configuration>
                    <source>8</source>
                    <target>8</target>
                    <encoding>UTF-8</encoding>
                </configuration>
            </plugin>
        </plugins>
    </build>


    <properties>
        <project.build.sourceEncoding>UTF-8</project.build.sourceEncoding>
        <java.version>17</java.version>
        <maven.compiler.source>17</maven.compiler.source>
        <maven.compiler.target>17</maven.compiler.target>
    </properties>

    <dependencies>
        <dependency>
            <groupId>junit</groupId>
            <artifactId>junit</artifactId>
            <version>4.11</version>
            <scope>test</scope>
        </dependency>
        <dependency>
            <groupId>org.apache.hadoop</groupId>
            <artifactId>hadoop-common</artifactId>
            <version>3.3.5</version>
        </dependency>

        <!-- https://mvnrepository.com/artifact/org.apache.hadoop/hadoop-hdfs -->
        <dependency>
            <groupId>org.apache.hadoop</groupId>
            <artifactId>hadoop-hdfs</artifactId>
            <version>3.3.5</version>
        </dependency>

        <dependency>
            <groupId>org.apache.hadoop</groupId>
            <artifactId>hadoop-mapreduce-client-core</artifactId>
            <version>3.3.5</version>
        </dependency>

    </dependencies>
</project>
3.设计思路及代码
1. KNN_Driver类
Diriver类主要负责初始化job的各项属性,同时将训练数据加载到缓存中去,以便于Mapper读取。同时为了记录测试数据量,在conf中设置testDataNum用于在map阶段记录。
package KNN_Classifier;


import org.apache.hadoop.conf.Configuration;
import org.apache.hadoop.fs.Path;
import org.apache.hadoop.mapreduce.Job;
import org.apache.hadoop.mapreduce.lib.input.FileInputFormat;
import org.apache.hadoop.mapreduce.lib.output.FileOutputFormat;
import org.apache.hadoop.util.GenericOptionsParser;

public class KNN_Driver {
    public static void main(String[] args) throws Exception {
        Configuration conf = new Configuration();
        GenericOptionsParser optionParser = new GenericOptionsParser(conf, args);
        String[] remainingArgs = optionParser.getRemainingArgs();
        if (remainingArgs.length != 3) {
            System.err.println("Usage: KNN_Classifier <training dataset> <test dataset> <output>");
            System.exit(2);
        }

        conf.setInt("K",5);//设置KNN算法的K值
        conf.setInt("testDataNum",0);//设置全局计数器,记录测试数据数目
        conf.setInt("dimension",4);//设置向量维度
        Job job = Job.getInstance(conf, "KNN_Classifier");
        job.setJarByClass(KNN_Driver.class);
        job.setMapperClass(KNN_Mapper.class);
        job.setReducerClass(KNN_Reducer.class);

        //将训练数据添加到CacheFile中
        job.addCacheFile(new Path(remainingArgs[0]).toUri());
        FileInputFormat.addInputPath(job, new Path(remainingArgs[1]));
        FileOutputFormat.setOutputPath(job, new Path(remainingArgs[2]));
        job.waitForCompletion(true);
        System.exit(0);
    }
}
2. MyData类
这个类对每条测试数据进行封装,同时用于计算向量距离。
package KNN_Classifier;

import java.util.Vector;

public class MyData {

    //向量维度
    private Integer dimension;
    //向量坐标
    private Vector<Double>vec = new Vector<Double>();
    //属性,这里是水仙花的种类
    private String attr = new String();

    public  void setAttr(String attr)
    {
        this.attr = attr;
    }

    public void setVec(Vector<Double> vec) {
        this.dimension = vec.size();
        for(Double d : vec)
        {
            this.vec.add(d);
        }
    }

    public double calDist(MyData data1)//计算两条数据之间的欧式距离
    {
        try{
            if(this.dimension != data1.dimension)
                throw new Exception("These two vectors have different dimensions.");

        }
        catch (Exception e)
        {
            System.out.println(e.getMessage());
            System.exit(-1);
        }
        double dist = 0;
        for(int i = 0;i<dimension;i++)
        {
            dist += Math.pow(this.vec.get(i)-data1.vec.get(i),2);
        }
        dist = Math.sqrt(dist);
        return dist;
    }

    public String getAttr() {
        return attr;
    }
}
3. KNN_Mapper类
-
setup:用于加载缓存中的训练数据到Mapper的列表当中,同时读取K值、维度等必要信息。 -
readTrainingData:由setup调用,加载缓存训练数据。 -
Gaussian:用于计算欧式距离x所占权重,它的公式为:
f ( x ) = a e ( x − b ) 2 − 2 c 2 f(x) = ae^{\frac{(x-b)^2}{-2c^2}} f(x)=ae−2c2(x−b)2
它的图像为:
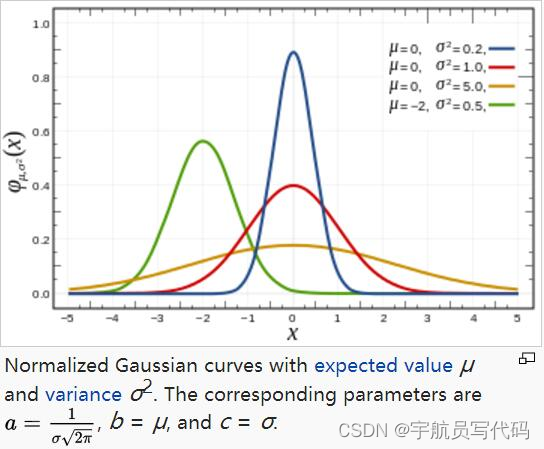
随 ∣ x ∣ |x| ∣x∣绝对值增加, f ( x ) f(x) f(x)的值越来越小,可以反映距离对权重的影响:即欧式距离越大,权重越小,对标签的影响也越小。
实际上高斯函数各个参数的确定需要对样本数据经过多次交叉验证得出,但为了简单起见,这里另a=1,b=0,c=0.9即可(这种情况下训练的结果比较好一些)。
-
map:对得到的测试数据进行KNN算法处理,它的伪代码如下:map(key,val): #key为样本数据偏移量,val为该行数据 testData = getTestData ; #从val中读取测试数据信息 K_Nearest = Empty ; #K最近邻,可以用最大堆来实现 for trainingData in trainingDataSet : #遍历可以改为用KDTree优化 dist = CalDist(testData,trainingData) ; if sizeof(K_Nearest) < K : #如果此时还未达到K值,直接添加 K_Nearest.add(dist,trainingData.attr) ; else : if dist < K_Nearest.maxDist : #如果计算得出的距离大于当前K个点之中最大距离,则替换之 replace pair with maxDist to (dist,trainingData.attr) ; calculate weight sum for every attr ; #为每种标签计算权重和 write(idx,max_weight_attr); #写入序号,最大权重标签,完成分类
综上,下面是KNN_Mapper的代码:
package KNN_Classifier;

import org.apache.hadoop.conf.Configuration;
import org.apache.hadoop.fs.Path;
import org.apache.hadoop.io.LongWritable;
import org.apache.hadoop.io.Text;
import org.apache.hadoop.mapreduce.Mapper;

import java.io.FileNotFoundException;
import java.io.IOException;
import java.util.*;
import java.net.URI;
import java.io.BufferedReader;
import java.io.FileReader;
import javafx.util.Pair;

public class KNN_Mapper extends Mapper<LongWritable, Text, LongWritable, Text> {
    private Text text = new Text();//输出Val值

    private LongWritable longWritable = new LongWritable();//输出K值
    private Integer K;//K值

    private Configuration conf;//全局配置
    private Integer dimension;//维度
    private List<MyData> training_data = new ArrayList<>();


    private void readTrainingData(URI uri)//读取训练数据到training_data中
    {
        System.err.println("Read Training Data");
        try{
            Path patternsPath = new Path(uri.getPath());
            String patternsFileName = patternsPath.getName().toString();
            BufferedReader reader = new BufferedReader(new FileReader(
                    patternsFileName));
            String line;
            Vector<Double>vec = new Vector<>();
            while ((line = reader.readLine()) != null) {
                // TODO: your code here
                //
                String[] strings = line.split(",");

                for(int i=0;i<dimension;i++)
                {
                    vec.add(Double.valueOf(strings[i]));
                }
                MyData myData = new MyData();
                myData.setVec(vec);
                myData.setAttr(strings[dimension]);
                System.out.println(strings[dimension]);
                training_data.add(myData);
                vec.clear();
            }
            reader.close();
        }
        catch (FileNotFoundException e)
        {
            e.printStackTrace();
        }
        catch (IOException e)
        {
            e.printStackTrace();
        }
        System.err.println("Read End");
    }

    private double Gaussian(double dist)
    {
        //a = 1,b=0,c = 0.9,2*c^2 = 1.62
        double weight = Math.exp(-Math.pow(dist,2)/(1.62));
        return weight;
    }

    @Override
    public void setup(Context context) throws IOException,
            InterruptedException {

        conf = context.getConfiguration();
        this.K = conf.getInt("K",1);
        this.dimension = conf.getInt("dimension",1);
        URI[] uri = context.getCacheFiles();
        readTrainingData(uri[0]);
    }

    @Override
    public void map(LongWritable key, Text value, Context context
    ) throws IOException, InterruptedException {
        String line = value.toString();
        try {
            String[] strings = line.split(",");
            if (strings.length!=dimension) {
                throw new Exception("Error line format in the table.");
            }

            //获取测试数据信息
            Vector<Double>vec = new Vector<>();
            for(String s:strings)
            {
                System.err.println("S: "+s);
                vec.add(Double.valueOf(s));
            }
            MyData testData = new MyData();
            testData.setVec(vec);

            //计算与样本的K近邻

            //存放K近邻的优先级队列,元素类型为<距离,属性>
            PriorityQueue<Pair<Double,String>>K_nearst = new PriorityQueue<>((a,b)->(a.getKey()>b.getKey())?-1:1);
            double dist;
            for(MyData data : this.training_data)
            {
                dist = testData.calDist(data);
                if(K_nearst.size()<this.K)
                {
                    K_nearst.add(new Pair<>(dist,data.getAttr()));
                }
                else{
                    if(dist < K_nearst.peek().getKey())
                    {
                        K_nearst.poll();
                        K_nearst.add(new Pair<>(dist,data.getAttr()));
                    }
                }
            }

            //获取到K近邻后,通过高斯函数处理每条数据,并累加相同属性的权值,通过Hash_table实现
            Hashtable<String,Double>weightTable = new Hashtable<>();
            while(!K_nearst.isEmpty())
            {
                double d = K_nearst.peek().getKey();
                String attr = K_nearst.peek().getValue();
                double w = this.Gaussian(d);
                if(!weightTable.contains(attr))
                {
                    weightTable.put(attr,w);

                }
                else{
                    weightTable.put(attr,weightTable.get(attr)+w);
                }
                K_nearst.poll();
            }

            //选取权重最大的标签作为输出
            Double max_weight = Double.MIN_VALUE;
            String target_attr = "";

            for(Iterator<String> itr = weightTable.keySet().iterator();itr.hasNext();){
                String hash_key = (String)itr.next();
                Double hash_val = weightTable.get(hash_key);
                if(hash_val > max_weight)
                {
                    target_attr = hash_key;
                    max_weight = hash_val;
                }
            }

            text.set(target_attr);
            //获取测试数据条数,用作下标计数
            longWritable.set(conf.getLong("testDataNum",0));
            conf.setLong("testDataNum",longWritable.get()+1);//计数加一
            context.write(longWritable,text);
        }
        catch (Exception e) {
            System.err.println(e.toString());
            System.exit(-1);
        }
    }
}
4. KNN_Reducer类
由于Mapper类已经完成了所有工作,所以传入到Reducer中的键值对都是Index,Attr的形式,直接写入即可。
package KNN_Classifier;
import org.apache.hadoop.io.LongWritable;
import org.apache.hadoop.io.Text;
import org.apache.hadoop.mapreduce.Reducer;
import java.io.IOException;

public class KNN_Reducer extends Reducer<LongWritable, Text,LongWritable,Text> {
    public void reduce(LongWritable key, Iterable<Text> values,
                       Context context
    ) throws IOException, InterruptedException {

        for(Text val:values)
        {
            context.write(key,val);
        }
    }
}


 被折叠的 条评论
为什么被折叠?
被折叠的 条评论
为什么被折叠?
 到【灌水乐园】发言


