1.实现API自动生成
在本次项目中,采用的是Swagger,在使用Springfox Swagger生成时,我们可以导入Postman,完成API单元测试。
Swagger是一套API定义的规范,按照这套规范的要求去定义接口的相关信息,通过去解析这套规范工具,生成各种格式的接口文档,以及在线接口调试页面,通过自动文档的方式,解决接口文档更新不及时的问题。Springfox则是对Swagger规范解析并生成文档的一个实现。
1.1 pom.xml中引用依赖
(1)统一管理版本,在properties标签中添加版本号
<!--       统一管理版本依赖-->
      <springfox-boot-starter.version>3.0.0</springfox-boot-starter.version>
(2)引入相关依赖
<!--       API文档生成,基于swagger2-->
      <dependency>
          <groupId>io.springfox</groupId>
          <artifactId>springfox-boot-starter</artifactId>
          <version>${springfox-boot-starter.version}</version>
      </dependency>

<!--      SpringBoot健康监控-->
      <dependency>
         <groupId>org.springframework.boot</groupId>
         <artifactId>spring-boot-starter-actuator</artifactId>
      </dependency>
1.2 编写配置类
(1)在com.xiang.forum.config包下新建SwaggerConfig类

(2)因为SpringBoot2.6.0以上与springfox3.0.0存在不兼容问题,所以在配置文件中进行了修改如下代码直接复制到SwaggerConfig类中。
package com.xiang.forum.config;

import org.springframework.boot.actuate.autoconfigure.endpoint.web.CorsEndpointProperties;
import org.springframework.boot.actuate.autoconfigure.endpoint.web.WebEndpointProperties;
import org.springframework.boot.actuate.autoconfigure.web.server.ManagementPortType;
import org.springframework.boot.actuate.endpoint.ExposableEndpoint;
import org.springframework.boot.actuate.endpoint.web.*;
import org.springframework.boot.actuate.endpoint.web.annotation.ControllerEndpointsSupplier;
import org.springframework.boot.actuate.endpoint.web.annotation.ServletEndpointsSupplier;
import org.springframework.boot.actuate.endpoint.web.servlet.WebMvcEndpointHandlerMapping;
import org.springframework.context.annotation.Bean;
import org.springframework.context.annotation.Configuration;
import org.springframework.core.env.Environment;
import org.springframework.util.StringUtils;
import springfox.documentation.builders.ApiInfoBuilder;
import springfox.documentation.builders.PathSelectors;
import springfox.documentation.builders.RequestHandlerSelectors;
import springfox.documentation.oas.annotations.EnableOpenApi;
import springfox.documentation.service.ApiInfo;
import springfox.documentation.service.Contact;
import springfox.documentation.spi.DocumentationType;
import springfox.documentation.spring.web.plugins.Docket;

import java.util.ArrayList;
import java.util.Collection;
import java.util.List;

/**
 * Swagger配置类
 */
// 配置类
@Configuration
// 开启Springfox-Swagger
@EnableOpenApi
public class SwaggerConfig {

    /**
     * Springfox-Swagger基本配置
     *
     * @return
     */
    @Bean
    public Docket createApi() {
        Docket docket = new Docket(DocumentationType.OAS_30)
                .apiInfo(apiInfo())
                .select()
                .apis(RequestHandlerSelectors.basePackage("com.xiang.forum.controller"))
                .paths(PathSelectors.any())
                .build();
        return docket;

    }

    // 配置API基本信息
    private ApiInfo apiInfo() {
        ApiInfo apiInfo = new ApiInfoBuilder()
                .title("第一次论坛系统实现")
                .description("前后端分离API测试")
                .contact(new Contact("xiang", "https://gitee.com/", "2657546162@qq.com"))
                .version("1.0")
                .build();
        return apiInfo;
    }

    /**
     * 解决SpringBoot 6.0以上与Swagger 3.0.0 不兼容的问题
     * 复制即可
     **/
    @Bean
    public WebMvcEndpointHandlerMapping webEndpointServletHandlerMapping(WebEndpointsSupplier webEndpointsSupplier,
                                                                         ServletEndpointsSupplier servletEndpointsSupplier,
                                                                         ControllerEndpointsSupplier controllerEndpointsSupplier,
                                                                         EndpointMediaTypes endpointMediaTypes, CorsEndpointProperties corsProperties,
                                                                         WebEndpointProperties webEndpointProperties, Environment environment) {
        List<ExposableEndpoint<?>> allEndpoints = new ArrayList();
        Collection<ExposableWebEndpoint> webEndpoints = webEndpointsSupplier.getEndpoints();
        allEndpoints.addAll(webEndpoints);
        allEndpoints.addAll(servletEndpointsSupplier.getEndpoints());
        allEndpoints.addAll(controllerEndpointsSupplier.getEndpoints());
        String basePath = webEndpointProperties.getBasePath();
        EndpointMapping endpointMapping = new EndpointMapping(basePath);
        boolean shouldRegisterLinksMapping = this.shouldRegisterLinksMapping(webEndpointProperties, environment,
                basePath);
        return new WebMvcEndpointHandlerMapping(endpointMapping, webEndpoints, endpointMediaTypes,
                corsProperties.toCorsConfiguration(), new EndpointLinksResolver(allEndpoints, basePath),
                shouldRegisterLinksMapping, null);
    }

    private boolean shouldRegisterLinksMapping(WebEndpointProperties webEndpointProperties, Environment environment,
                                               String basePath) {
        return webEndpointProperties.getDiscovery().isEnabled() && (StringUtils.hasText(basePath)
                || ManagementPortType.get(environment).equals(ManagementPortType.DIFFERENT));
    }
}
需要注意的点:

1.3 application.yml中添加配置
(1)在spring节点下添加mvc配置项
因为SpringBoot2.6.0之后版本把SpringMVC路径匹配策略修改为MatchingStrategy.PATH_PATTERN_PARSER;,然后Springfox-Swagger还没有更新版本,所以暂时就需要把路径匹配策略回退到MatchingStrategy.ANT_PATH_MATCHER
mvc:
  pathmatch:
    matching-strategy: ANT_PATH_MATCHER        #Springfox-Swagger兼容性配置

(2)检查配置是否成功(启动/打包查看)
1.4 API常用注解
@Api:作用在Controller上,对控制器类的说明
tags:表示说明该类是干嘛的,可以在前台界面上看到的注解

@ApiModel:作用在响应的类上,对返回响应数据的说明

@ApiModelProerty:作用在类的属性上,对属性的说明

@ApiOperation:作用在具体方法上,对API接口的说明

@ApiParam:作用在方法中的每一个参数上,对参数的属性进行说明

1.5 访问API列表
启动程序,浏览器输入地址 http://127.0.0.1:5080/swagger-ui/index.html,可以正常显示接口信息,说明配置成功,此时接口信息全部显示,就可以针对每个接口进行测试。
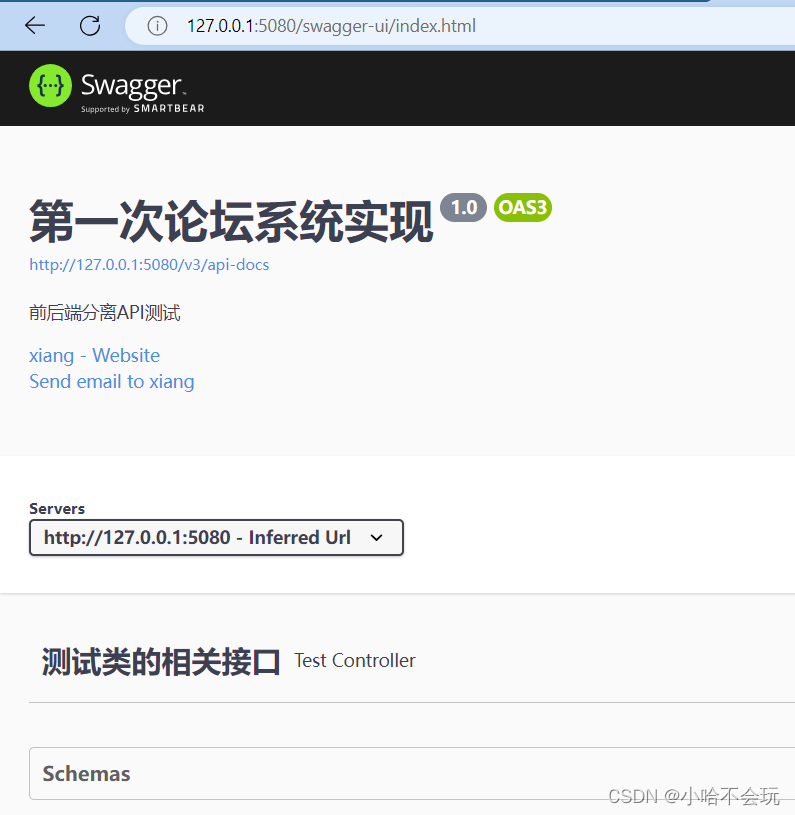
点击测试类的相关接口,可以看到所有接口的信息

可以通过去修改每个接口的方式让看起来不是那么凌乱。
将RequestMapping改为GetMapping

然后测试接口


会发现没有可输入的输入框,所以我们去修改,显示api接口输入


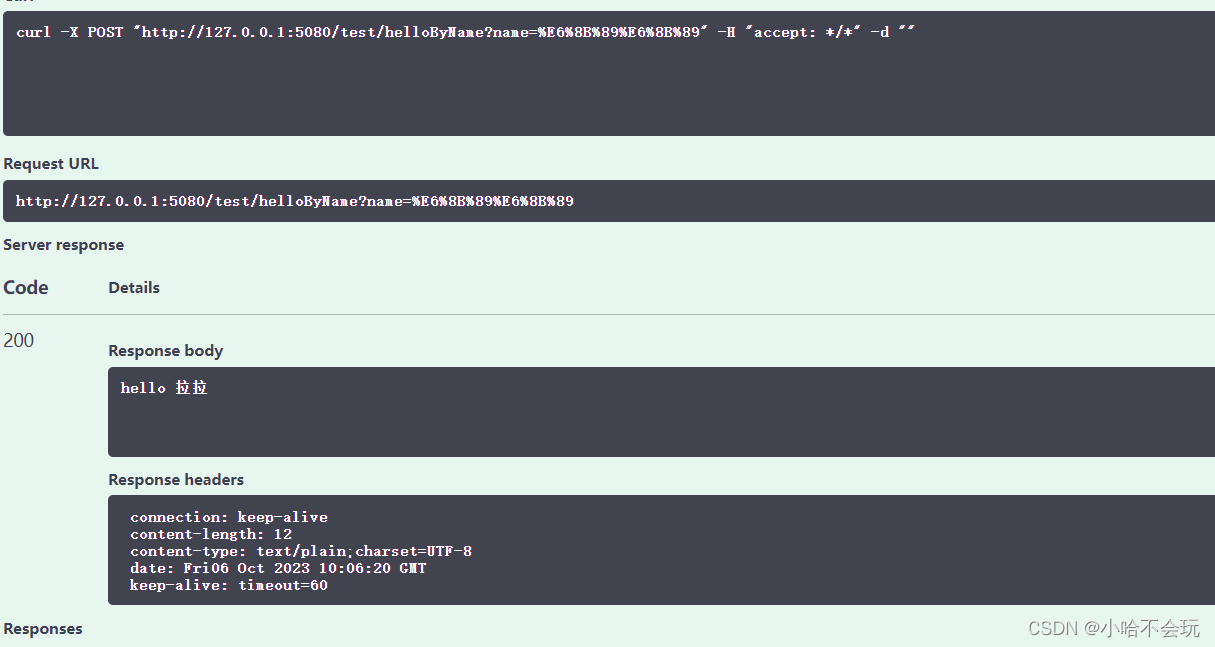
如果想以json的格式查看那么就可以这样去设置


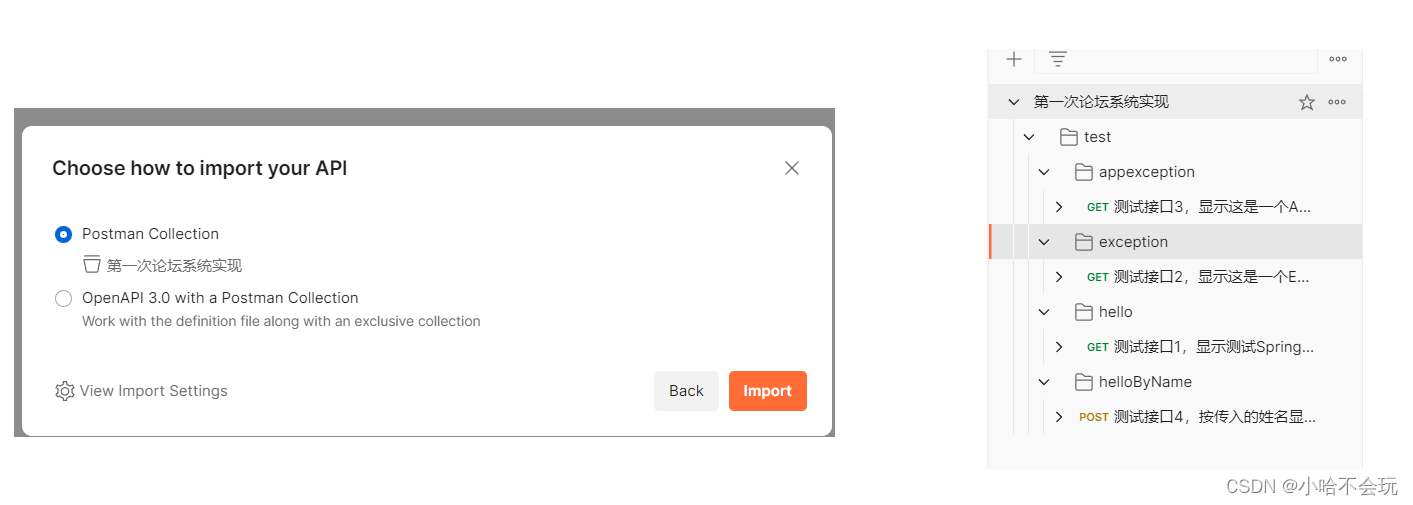
1.7 API导入Postman
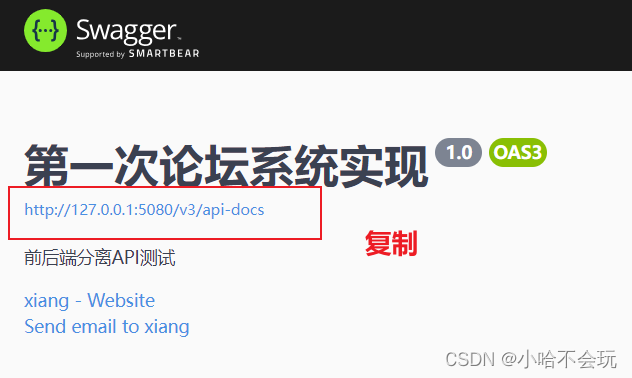
(1)获取API地址,打开Swagger页面的API资源地址并复制
(2)打开postman,进行操作

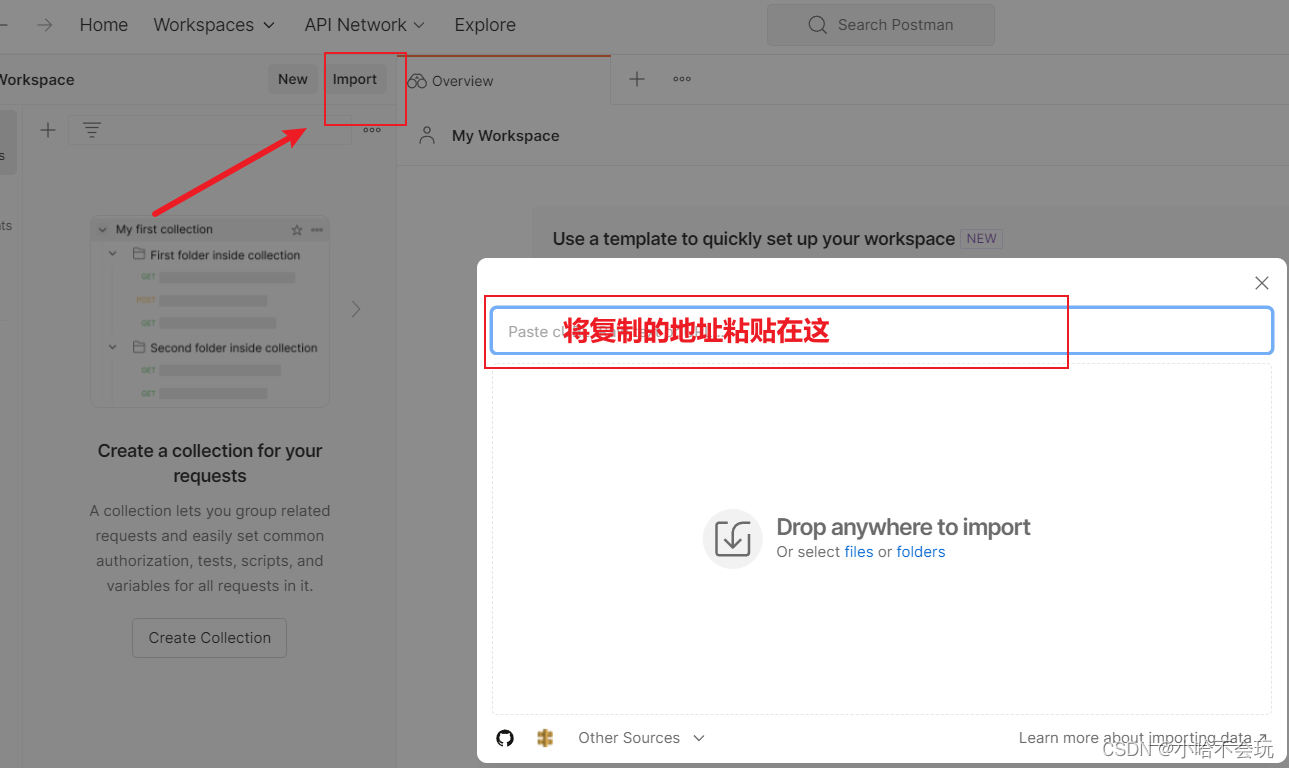
导入成功就可以看到相关的接口信息了
传入姓名测试一下

2.编写工具类
MD5加密,注册和登录时都会对用户密码进行加密,可以对外提供一个加密的工具类。生成随机字符串,对外提供一个工具类。对于String类型作非空校验,也可以提供一个工具类。
2.1 创建MD5加密工具类
项目中使用commons-codec,它是Apache提供的用于摘要运算、编码解码的工具包。常见的编码解析工具Base64、MD5、Hex、SHA1、DES等。
首先在pom.xml中导入依赖,SpringBoot已经对这个包做了版本管理,所以这里不用再指定版本号了。
<!-- 编码解码加密工具包-->
    <dependency>
    <groupId>commons-codec</groupId>
    <artifactId>commons-codec</artifactId>
    </dependency>
然后在com.xiang.forum包下创建utils工具包,然后在该包底下创建MD5加密工具类,MD5Util。
package com.xiang.forum.uitls;


import org.apache.commons.codec.digest.DigestUtils;

/**
 * 用于MD5加密工具类
 */
public class MD5Util {
//    对字符串进行MD5加密
    public static String md5(String str) {
//        return DigestUtils.
        return DigestUtils.md2Hex(str);
    }
//    对用户密码进行加密
//    str:密码明文
//    salt:扰动字符
    public static String md5Salt(String str,String salt) {
        return md5(md5(str) + salt);
    }
}

2.1.1 对密码进行加密过程
扰动字符也就是加盐(salt)

2.2 创建生成UUID工具类
在com.xiang.forum.utils包下创建UUIDUtil类(UUID最终会生成要给随机字符串)
package com.xiang.forum.uitls;

import java.util.UUID;

public class UUIDUtil {

//    生成一个标准的UUID
    public static String UUID_36() {
        return UUID.randomUUID().toString();
    }

//    生成一个32位的UUID
    public static String UUID_32() {
        return UUID.randomUUID().toString().replace("-","");
    }
}
测试输出一下UUID的长度,可以看出长度是36位。

2.3 创建字符串工具类
在com.xiang.forum.utils包下创建StringUtil类
package com.xiang.forum.uitls;

public class StringUtil {
//    判断字符串是否为空
    /**
     * @param value 要判断的字符串
     * @return true 空  <br/> false非空
     */

    public static boolean isEmpty(String value) {
        return value == null || value.length() == 0;
    }
}

最后将sql拷入项目中,至此公共代码开发完成。


 1万+
1万+


 被折叠的 条评论
为什么被折叠?


