


勇者愤怒,抽刃向更强者;怯者愤怒,却抽刃向更弱者。
目录
假如我来问问你:
你封装过组件吗?说一下组件封装?你在项目中是如何封装组件的?
答: 我用vue开发的所有项目,都是采用组件化的思想开发的,分为公共组件和功能组件,公共组件例如:head(公共头组件),foot(公共底部组件)等,功能组件有登录验证,轮播图等。。。。可以分为全局自定义组件和局部自定义组件,全局自定义组件在main.js文件直接引入,这种是最简单的方式,使用improt from 引入组件路径
Vue2全局自定义组件:
第一种直接在main.js引入
缺点:如果我们需要注册的全局组件非常多,那么需要一个一个引入,然后分别调用Vue.componet方法,main.js文件会变得很大很臃肿,不好维护,所以当需要注册的全局组件非常多的时候可以采用插件的形式注册//引入 import FixedTop from '@/components/FixedTop //注册为全局组件 Vue.component('组件名', 组件模板) Vue.componet('FixedTop',FixedTop) //页面直接使用 <FixedTop />
第二种:使用插件的形式注册在 components 目录下新建 index.js 文件
//引入
import FixedTop from '@/components/FixedTop'
import FixedBottom from '@/components/FixedBottom'
export default {
  install(Vue){
    //注册全局组件
    Vue.componet('FixedTop',FixedTop)
    Vue.componet('FixedBottom ',FixedBottom )
}


//在 main.js 文件注册插件入口
import Components form '@/components'
Vue.use(Components)
扩展:当项目组件较多时,区分开业务型组件和非业务型组件,便易于维护
Vue2局部自定义组件:
在页面通过 components选项对象注册,使用方式是:先引入组件,在注册,最后将注册的组件作为标签使用
组件的好处:
首先,组件可以提升整个项目的开发效率,解决了传统项目开发:难维护、复用性低等问题。
Vue3全局自定义组件
//引入
import Card from './components/Card/index.vue'

//注册
createApp(App).component('Card',Card).mount('#app')

//页面使用
<template>
 <Card></Card>
</template>
Vue3局部自定义组件:
批量注册组件
批量注册分为webpack和vite
1:webpack
require.context() 是webpack提供的一个自动导入的API
- 参数1:加载的文件目录
- 参数2:是否加载子目录
- 参数3:正则,匹配文件
- 返回值:导入函数 fn
使用require提供的函数context加载某一个目录下所有的.vue后缀的文件,他的返回值是一个对象,对象里面有一个属keys(), 可以获取所有的文件路径,我们可以遍历importFn.keys(),最后在遍历中使用app.component(component.name, component)全局注册在compontents组件下新建全局组件文件夹,里面在新建一个js文件,与其同级的是所有要全局注册的组件
目录结构
componentRegister.js
/*
 * 参数:1. 目录  2. 是否加载子目录  3. 加载的正则匹配
 */

//匹配当前文件夹下的所有.vue文件 注册全局组件
const importFn = require.context('./', false, /\.vue$/)

export default {
  install (app) {
    // 批量注册全局组件
    importFn.keys().forEach(key => {
      // 导入组件
      const component = importFn(key).default
      // 注册组件
      app.component(component.name, component)
    })
  }
}

// 在main.js中使用
import allComponent from '/@/components/GlobalComponents/componentRegister.js'
createApp(App)
  .use(store)
  .use(router)
  .use(allComponent)
  .mount('#app')
2:vite
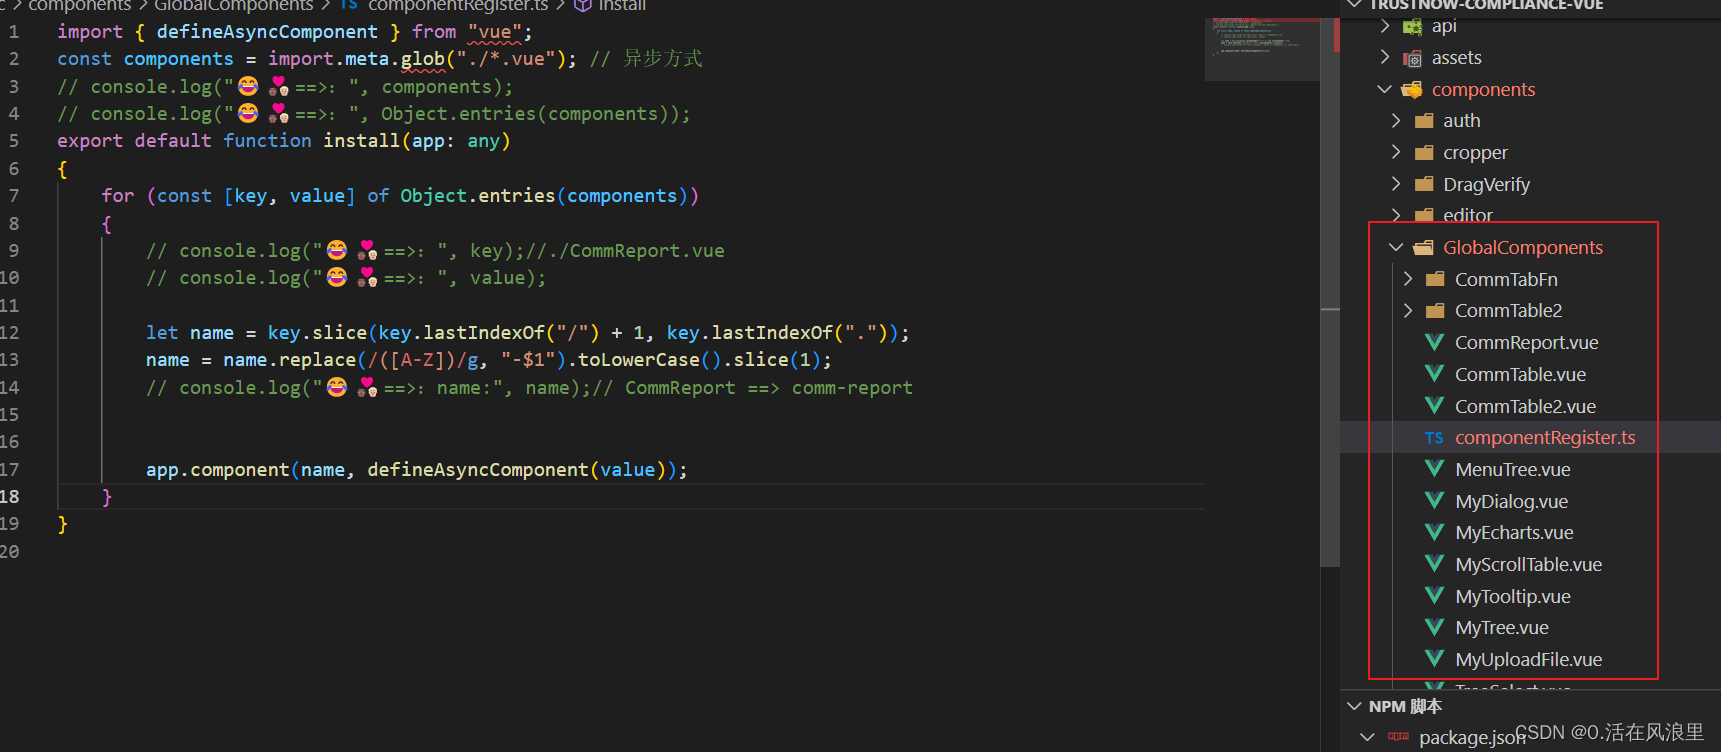
在vite中使用 const components = import.meta.glob("./*.vue");
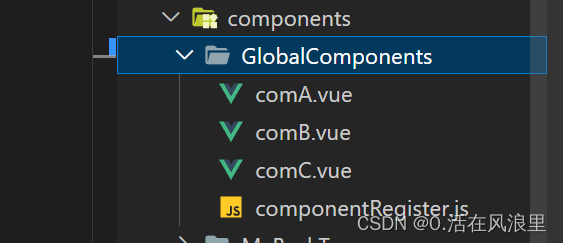
在compontents组件下新建全局组件文件夹,里面在新建一个ts文件,与其同级的是所有要全局注册的组件
目录结构
componentRegister.ts
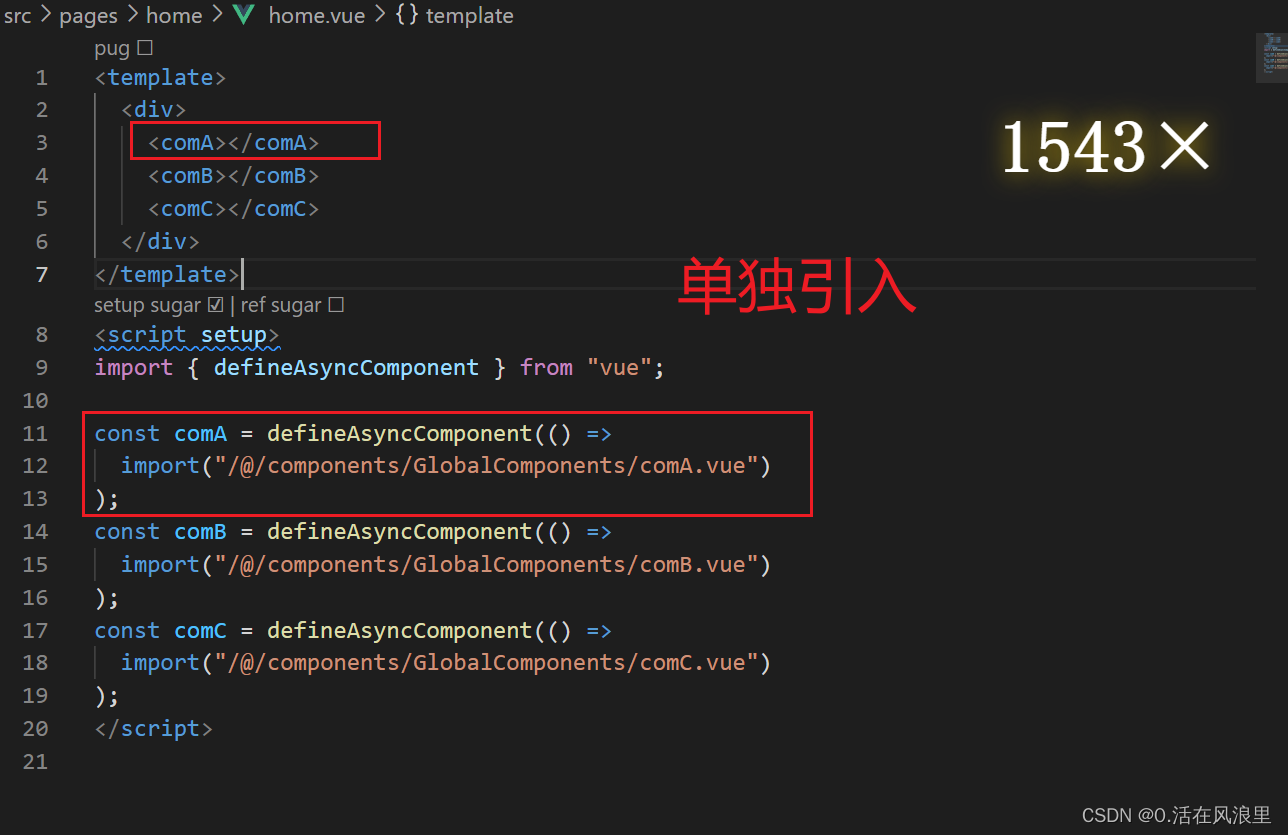
import { App, defineAsyncComponent } from "vue"; const components = import.meta.glob("./*.vue"); // 异步方式 // console.log("😂👨🏾❤️👨🏼==>:", components); // console.log("😂👨🏾❤️👨🏼==>:", Object.entries(components)); export default function install(app: App): void { for (const [key, value] of Object.entries(components)) { // console.log("😂👨🏾❤️👨🏼==>:", key);//./CommReport.vue // console.log("😂👨🏾❤️👨🏼==>:", value); let name = key.slice(key.lastIndexOf("/") + 1, key.lastIndexOf(".")); name = name .replace(/([A-Z])/g, "-$1") .toLowerCase() .slice(1); // console.log("😂👨🏾❤️👨🏼==>:name:", name);// CommReport ==> comm-report // eslint-disable-next-line @typescript-eslint/no-explicit-any app.component(name, defineAsyncComponent(value as any)); } } // 在main.js中使用 import componentRegister from "/@/components/GlobalComponents/componentRegister.js"; //全局注册 app.use(route).use(store).use(componentRegister).mount("#app"); //在页面直接使用 <template> <div> <comm-report></comm-report> <comm-table></comm-table> <comm-table2></comm-table2> <menu-tree></menu-tree> </div> </template>
vue2 install 方法
install方法在vue中主要用于插件的开发,方便我们进行全局注册组件(常用), 添加全局资源,注入组件选项,和添加实例方法的操作。
使用
Vue.js 的插件应该暴露一个 install 方法。这个方法的第一个参数是 Vue 构造器,第二个参数是一个可选的选项对象(不常用)。
下面以常用的全局注册组件方法来介绍语法。
install(Vue, options) {}
// 多个组件同级目录下的index.js文件
// 引入组件
import a form './a.vue'
import b from './b.vue'
// 全局注册组件步骤1 使用install函数注册
export default {
  install(Vue, options) {
    Vue.component(a.name, a)
    Vue.component(b.name, b)
  }
}
之后需要在 main.js 文件中引入上面的文件,使用 Vue,use 进行注册。
// 引入全局注册的文件
import install_indexjs form './components/index.js'
// 全局注册组件步骤2 使用 Vue.use() 进行显式调用
Vue.use(install_indexjs)
vue3 install 方法
install(app, options){}
<!DOCTYPE html>
<html lang="en">
<head>
    <meta charset="UTF-8">
    <meta http-equiv="X-UA-Compatible" content="IE=edge">
    <meta name="viewport" content="width=device-width, initial-scale=1.0">
    <title>Vue3 -- Plugin插件</title>
    <!-- 使用CDN引入Vue -->
    <script src="https://unpkg.com/vue@next"></script>
</head>
<body>
    <div id="root"></div>
    <script>
        const myPlugin = {
            install(app, options){
                // console.log(app, options);
                app.directive("focus",{
                    mounted(el){
                        el.focus();
                    }
                })
                // app.mixin({
                //     mounted(){
                //         console.log('mixin');
                //     }
                // })
                // app.config.globalProperties.$hello = 'hello';
            }
        }
        const app = Vue.createApp({
            mounted(){
                console.log(this.$hello);
            },
            template:`
            <div>
                hello Vue.js!
                <demo />
            </div>`
        });
        app.use(myPlugin,{name: '张三'})
        app.component('demo', {
            template:`<input v-focus/>`
        })
        const vm = app.mount('#root');
    </script>
</body>
</html>
总结
plugin插件:为 Vue 添加全局功能,包括但不限于directive、mixin、config等功能;
plugin插件的定义:使用 install 方法定义, install 方法有app, options两个参数;
plugin插件的使用:通过全局方法 Vue.use() 使用插件;


 2351
2351


 被折叠的 条评论
为什么被折叠?
被折叠的 条评论
为什么被折叠?
 到【灌水乐园】发言


