


Spring Boot 连接 Microsoft SQL Server 实现登录验证
这篇文章将非常系统地讲解如何使用 Spring Boot 结合 Microsoft SQL Server 2019 完成一个完整的登录验证系统,包括数据库连接问题、SSL证书错误处理、CORS跨域详细解释和解决方案。
适合需要前后端联调、单独部署数据库、独立登录服务的场景。
一、环境准备
- 开发工具:IDEA 2025.1
- Spring Boot 版本:3.4.3
- SQL Server 版本:Microsoft SQL Server 2019
- 浏览器:Chrome/Edge
技术选型
- Spring Boot Web
- JDBC 数据库连接
- HTML + JavaScript 作为前端
项目结构建议
BoounionLoginBackend/
├── src/
│   └── main/
│       ├── java/com/example/boounion/
│       │   ├── controller/LoginController.java
│       │   ├── model/User.java
│       │   ├── service/UserService.java
│       │   └── BoounionLoginBackendApplication.java
│       └── resources/
│			└── static/index.html
│           └── application.properties
├── pom.xml
二、数据库配置详解(application.properties)
spring.datasource.url=jdbc:sqlserver://localhost:1433;databaseName=BoounionDB;encrypt=true;trustServerCertificate=true
spring.datasource.username=sa
spring.datasource.password=bl123456
spring.datasource.driver-class-name=com.microsoft.sqlserver.jdbc.SQLServerDriver
spring.jpa.hibernate.ddl-auto=none
server.port=8080
重点解释:
encrypt=true:SQL Server 2019 默认要求连接加密。如果不加,会连接失败。trustServerCertificate=true:如果你没有配置 SSL 证书,可以加上此参数,忽略证书校验,避免出现PKIX path building failed错误。server.port=8080:设置后端启动端口为8080,确保和前端访问一致。
连接 SQL Server 常见错误总结:
| 错误提示 | 原因 | 解决方法 |
|---|---|---|
| TCP 1433端口连接失败 | SQL Server未开启TCP/IP | 配置SQL Server网络协议,启用TCP/IP |
| SSL 连接失败 PKIX Error | 缺少受信任证书 | 配置 encrypt=true 且 trustServerCertificate=true |
| 登录失败 | 用户名密码错误 | 确认账号密码正确且允许SQL登录 |
遇到的错误是典型的 SSL 证书验证失败,错误信息如下:
驱动程序无法通过使用 SSL 与 SQL Server 建立安全连接。
错误: PKIX path building failed: unable to find valid certification path
三、前端登录界面(index.html)
页面结构:
<input type="text" id="username" placeholder="用户名">
<input type="password" id="password" placeholder="密码">
<button onclick="login()">登录</button>
美化 CSS 省略,重要的是 登录函数逻辑。
登录逻辑 JavaScript:
function login() {
  const username = document.getElementById("username").value;
  const password = document.getElementById("password").value;

  fetch("/api/login", {
    method: "POST",
    headers: { "Content-Type": "application/json" },
    body: JSON.stringify({ username, password })
  })
  .then(response => response.json().then(data => ({ status: response.status, body: data })))
  .then(({ status, body }) => {
    if (status === 200 && body.status === "success") {
      window.location.href = body.redirectUrl;
    } else {
      alert(body.message || "登录失败");
    }
  })
  .catch(() => alert("请求失败,请检查网络"));
}
特点:
- 使用 fetch() 发送 POST 请求,提交 JSON 格式用户名和密码。
- 登录成功后,前端通过 window.location.href 跳转。
- 登录失败,使用 alert 弹窗提示用户。
- 完全符合现代前后端分离开发方式。
四、后端登录接口(LoginController.java)
核心逻辑:
@PostMapping("/login")
public ResponseEntity<Map<String, Object>> login(@RequestBody User user) {
    String result = userService.login(user);
    Map<String, Object> response = new HashMap<>();

    switch (result) {
        case "登录成功":
            response.put("status", "success");
            response.put("redirectUrl", "https://www.baidu.com/s?wd=csdn");
            return ResponseEntity.ok(response);
        case "密码错误":
            response.put("status", "error");
            response.put("message", "密码错误");
            return ResponseEntity.status(401).body(response);
        case "用户不存在":
            response.put("status", "error");
            response.put("message", "用户不存在");
            return ResponseEntity.status(404).body(response);
        default:
            response.put("status", "error");
            response.put("message", "服务器异常");
            return ResponseEntity.status(500).body(response);
    }
}
亮点说明:
- 使用 Map 封装返回 JSON,灵活可扩展。
- 成功返回 200 状态,带 redirectUrl,由前端跳转。
- 失败返回具体的 401/404/500 状态码,便于前端判断并提示。
✅ 保证登录接口符合 RESTful API 设计规范。
五、数据库验证逻辑(UserService.java)
简单查询用户密码:
try (Connection conn = DriverManager.getConnection(dbUrl, dbUser, dbPassword)) {
    String sql = "SELECT password FROM Users WHERE username = ?";
    try (PreparedStatement stmt = conn.prepareStatement(sql)) {
        stmt.setString(1, user.getUsername());
        try (ResultSet rs = stmt.executeQuery()) {
            if (!rs.next()) return "用户不存在";
            if (!rs.getString("password").equals(user.getPassword())) return "密码错误";
            return "登录成功";
        }
    }
} catch (SQLException e) {
    e.printStackTrace();
    return "数据库错误";
}
安全设计要点:
- 使用 PreparedStatement,防止 SQL 注入攻击。
- 明文密码对比(后期建议增加加密如 BCrypt)。
- 连接和关闭资源使用 try-with-resources,避免泄漏。
六、跨域 CORS 问题详细解决
现象
前端 fetch 请求接口时报错:
Access to fetch at ‘http://localhost:8080/api/login’ from origin ‘http://localhost:5500’ has been blocked by CORS policy.
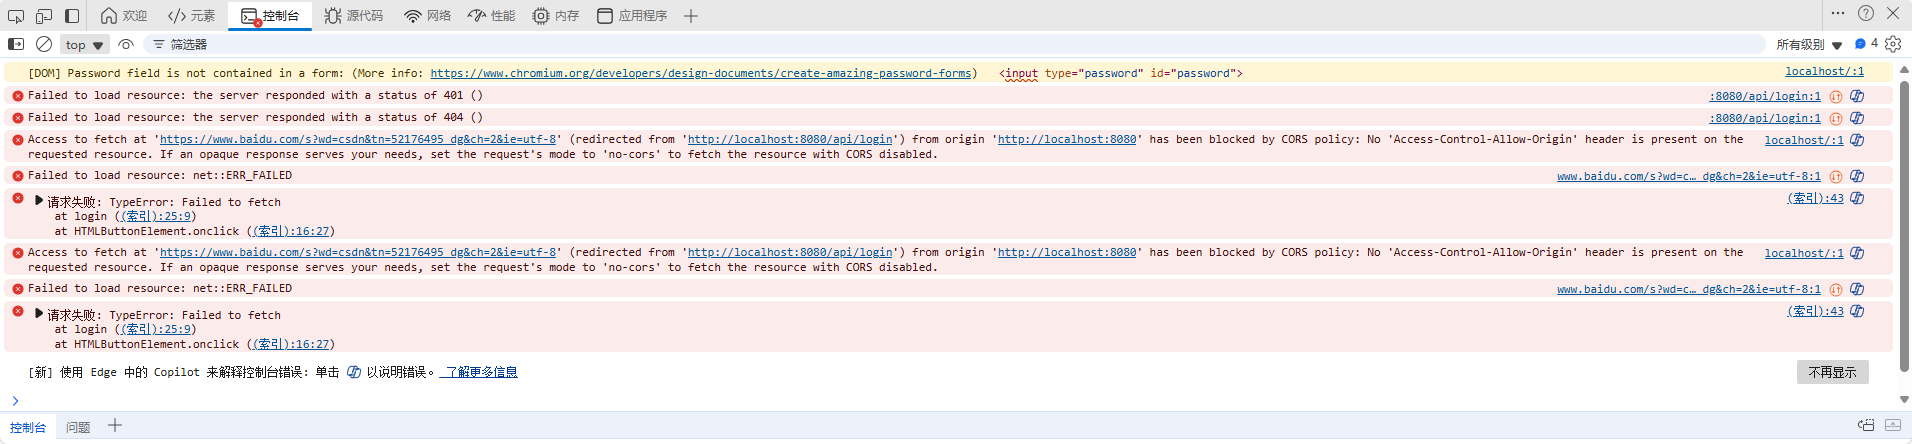
原因
浏览器安全策略,跨域请求被拦截。
完整解决方案:
1. 配置全局允许跨域
创建 WebConfig.java:
@Configuration
public class WebConfig implements WebMvcConfigurer {
    @Override
    public void addCorsMappings(CorsRegistry registry) {
        registry.addMapping("/**")
                .allowedOrigins("http://localhost:5500")
                .allowedMethods("GET", "POST")
                .allowCredentials(true);
    }
}
allowedOrigins指定你的前端地址(可以是 IP、本地域名)。allowedMethods指定支持的方法,如 POST、GET。allowCredentials(true)允许带上 cookie(如果未来需要)。
2. 单接口上临时添加 @CrossOrigin
如果你只想允许登录接口跨域:
@CrossOrigin(origins = "http://localhost:5500")
@PostMapping("/login")
✅ 推荐使用全局配置统一处理,维护简单。
七、总结
- 数据库连接重点:SQL Server 需要
encrypt=true,如果无证书,加trustServerCertificate=true - 跨域问题重点:Spring Boot 后端必须添加 CORS 配置,否则前端 fetch 会被浏览器拦截。
- 前端处理重点:fetch 请求成功后由前端自己 window.location.href 跳转。
- 后端接口规范:登录接口返回 200状态+JSON,而不是 302重定向。
- 安全建议:生产环境密码应加密存储,使用 BCrypt 算法。
附录:完整文件(可自行补全代码)
pom.xml ✅
<?xml version="1.0" encoding="UTF-8"?>
<project xmlns="http://maven.apache.org/POM/4.0.0"
         xmlns:xsi="http://www.w3.org/2001/XMLSchema-instance"
         xsi:schemaLocation="http://maven.apache.org/POM/4.0.0 http://maven.apache.org/xsd/maven-4.0.0.xsd">
    <modelVersion>4.0.0</modelVersion>

    <groupId>org.example</groupId>
    <artifactId>BoounionERP</artifactId>
    <version>1.0-SNAPSHOT</version>
    <packaging>jar</packaging>

    <!-- Spring Boot 父项目 -->
    <parent>
        <groupId>org.springframework.boot</groupId>
        <artifactId>spring-boot-starter-parent</artifactId>
        <version>3.4.3</version>
        <relativePath/>
    </parent>

    <properties>
        <maven.compiler.source>17</maven.compiler.source>
        <maven.compiler.target>17</maven.compiler.target>
        <project.build.sourceEncoding>UTF-8</project.build.sourceEncoding>
    </properties>

    <dependencies>
        <!-- Spring Boot Web 模块(包含内嵌 Tomcat) -->
        <dependency>
            <groupId>org.springframework.boot</groupId>
            <artifactId>spring-boot-starter-web</artifactId>
        </dependency>

        <!-- 开发工具(自动重启,非必须) -->
        <dependency>
            <groupId>org.springframework.boot</groupId>
            <artifactId>spring-boot-devtools</artifactId>
            <scope>runtime</scope>
        </dependency>

        <!-- SQL Server JDBC 驱动 -->
        <dependency>
            <groupId>com.microsoft.sqlserver</groupId>
            <artifactId>mssql-jdbc</artifactId>
            <version>11.2.3.jre11</version>
        </dependency>
    </dependencies>

    <build>
        <plugins>
            <plugin>
                <groupId>org.springframework.boot</groupId>
                <artifactId>spring-boot-maven-plugin</artifactId>
            </plugin>
        </plugins>
    </build>
</project>
index.html ✅
<!DOCTYPE html>
<html lang="zh">
<head>
  <meta charset="UTF-8">
  <title>登录界面</title>
  <style>
    body {
      font-family: Arial;
      padding: 50px;
      background-color: #f0f2f5;
    }
    .login-box {
      background-color: white;
      padding: 20px;
      width: 300px;
      margin: auto;
      border-radius: 5px;
      box-shadow: 0 0 10px rgba(0, 0, 0, 0.1);
    }
    input {
      width: 100%;
      margin-bottom: 10px;
      padding: 8px;
      box-sizing: border-box;
    }
    button {
      width: 100%;
      padding: 8px;
      background-color: #4CAF50;
      color: white;
      border: none;
      cursor: pointer;
    }
  </style>
</head>
<body>
  <div class="login-box">
    <h2>登录</h2>
    <input type="text" id="username" placeholder="用户名">
    <input type="password" id="password" placeholder="密码">
    <button onclick="login()">登录</button>
  </div>

  <script>
    function login() {
      const username = document.getElementById("username").value;
      const password = document.getElementById("password").value;

      fetch("/api/login", {
        method: "POST",
        headers: {
          "Content-Type": "application/json"
        },
        body: JSON.stringify({ username, password })
      })
      .then(response => response.json().then(data => ({ status: response.status, body: data })))
      .then(({ status, body }) => {
        if (status === 200 && body.status === "success") {
          window.location.href = body.redirectUrl;
        } else {
          alert(body.message || "登录失败");
        }
      })
      .catch(error => {
        alert("请求失败,请检查网络");
        console.error(error);
      });
    }
  </script>
</body>
</html>
application.properties ✅
# 数据库连接配置
spring.datasource.url=jdbc:sqlserver://localhost:1433;databaseName=BoounionDB;encrypt=true;trustServerCertificate=true
spring.datasource.username=sa
spring.datasource.password=bl123456
spring.datasource.driver-class-name=com.microsoft.sqlserver.jdbc.SQLServerDriver

# 其他常规配置
spring.jpa.hibernate.ddl-auto=none
server.port=8080
Main.java ✅
package org.example;

import org.springframework.boot.SpringApplication;
import org.springframework.boot.autoconfigure.SpringBootApplication;

/**
 * ==================================================
 * This class Main is responsible for [功能描述].
 *
 * @author darker
 * @version 1.0
 * ==================================================
 */

@SpringBootApplication
public class Main {
    public static void main(String[] args) {
        SpringApplication.run(Main.class, args);
    }
}
User.java ✅
package org.example.model;

/**
 * ==================================================
 * This class User is responsible for [功能描述].
 *
 * @author darker
 * @version 1.0
 * ==================================================
 */

public class User {
    private String username;
    private String password;

    public User() {}

    public User(String username, String password) {
        this.username = username;
        this.password = password;
    }

    public String getUsername() { return username; }
    public void setUsername(String username) { this.username = username; }

    public String getPassword() { return password; }
    public void setPassword(String password) { this.password = password; }
}
UserService.java ✅
package org.example.service;

import org.example.model.User;
import org.springframework.beans.factory.annotation.Value;
import org.springframework.stereotype.Service;

import java.sql.*;

/**
 * ==================================================
 * This class UserService is responsible for [功能描述].
 *
 * @author darker
 * @version 1.0
 * ==================================================
 */

@Service
public class UserService {
    @Value("${spring.datasource.url}")
    private String dbUrl;

    @Value("${spring.datasource.username}")
    private String dbUser;

    @Value("${spring.datasource.password}")
    private String dbPassword;

    public String login(User user) {
        try (Connection conn = DriverManager.getConnection(dbUrl, dbUser, dbPassword)) {

            String checkUserSql = "SELECT password FROM Users WHERE username = ?";
            try (PreparedStatement stmt = conn.prepareStatement(checkUserSql)) {
                stmt.setString(1, user.getUsername());

                try (ResultSet rs = stmt.executeQuery()) {
                    if (!rs.next()) {
                        return "用户不存在";
                    }

                    String dbPassword = rs.getString("password");
                    if (!dbPassword.equals(user.getPassword())) {
                        return "密码错误";
                    }

                    return "登录成功";
                }
            }

        } catch (SQLException e) {
            e.printStackTrace();
            return "数据库错误";
        }
    }
}
LoginController.java ✅
package org.example.controller;

import org.example.model.User;
import org.example.service.UserService;
import org.springframework.beans.factory.annotation.Autowired;
import org.springframework.http.ResponseEntity;
import org.springframework.web.bind.annotation.*;

import java.util.HashMap;
import java.util.Map;

/**
 * ==================================================
 * This class LoginController is responsible for [功能描述].
 *
 * @author darker
 * @version 1.0
 * ==================================================
 */

@RestController
@RequestMapping("/api")
public class LoginController {
    @Autowired
    private UserService userService;

    @PostMapping("/login")
    public ResponseEntity<Map<String, Object>> login(@RequestBody User user) {
        String result = userService.login(user);
        Map<String, Object> response = new HashMap<>();

        switch (result) {
            case "登录成功":
                // 拼接带参数的跳转地址
                /*
                 String url = String.format(
                        "https://www.baidu.com/s?username=%s",
                        user.getUsername()
                 );
                 */
                String url = "https://www.baidu.com/s?wd=csdn";
                response.put("status", "success");
                response.put("redirectUrl", url);
                return ResponseEntity.ok(response);
            case "密码错误":
                response.put("status", "error");
                response.put("message", "密码错误");
                return ResponseEntity.status(401).body(response);
            case "用户不存在":
                response.put("status", "error");
                response.put("message", "用户不存在");
                return ResponseEntity.status(404).body(response);
            default:
                response.put("status", "error");
                response.put("message", "服务器异常");
                return ResponseEntity.status(500).body(response);
        }
    }
}


 2779
2779

 被折叠的 条评论
为什么被折叠?
被折叠的 条评论
为什么被折叠?
 到【灌水乐园】发言


