


1.Flow流程中为什么是【冷】的
先看一段Flow的使用代码:
fun main() = runBlocking {

    flow {
        emit(0)
        emit(1)
        emit(2)
        emit(3)
    }.collect{
        println("it:$it")
    }

    println("end")
}

//输出结果:
//it:0
//it:1
//it:2
//it:3
//end
这是Flow的最简单的使用方式,通过调用collect达到我所期望的结果,那么在弄清楚Flow为什么是冷的之前先看一下Flow的创建流程:
public fun <T> flow(
    @BuilderInference block: suspend FlowCollector<T>.() -> Unit): Flow<T> =
    SafeFlow(block)

private class SafeFlow<T>(private val block: suspend FlowCollector<T>.() -> Unit) : AbstractFlow<T>() {
    override suspend fun collectSafely(collector: FlowCollector<T>) {
        collector.block()
    }
}
flow是一个高阶函数,参数类型是FlowCollector.() -> Unit,FlowCollector是它的扩展或者成员方法,没有参数也没有返回值,flow()函数的返回值是Flow,具体到返回类型是SafeFlow(),SafeFlow()是AbstractFlow()的子类。
@FlowPreview
public abstract class AbstractFlow<T> : Flow<T>, CancellableFlow<T> {

    //1
    public final override suspend fun collect(collector: FlowCollector<T>) {
        //2
        val safeCollector = SafeCollector(collector, coroutineContext)
        try {
            //3
            collectSafely(safeCollector)
        } finally {
            safeCollector.releaseIntercepted()
        }
    }

    public abstract suspend fun collectSafely(collector: FlowCollector<T>)
}
从AbstractFlow源码中可以知道它实现了Flow接口,这里进一步知道了SafeFlow间接的实现了Flow接口。这里深入了解一下AbstractFlow做了哪些工作,通过上面三个注释进行解释:
- 注释1:这个
collect就是demo中的collect的调用。这里我做一个猜想:collect的调用会触发上游Lambda中的emit()函数的执行,然后将数据传递给collect; - 注释2:这里主要就是进行了安全检查,
SafeCollector只是把collect中的参数FlowCollector<T>重新进行了封装,具体的安全检查是怎么样的稍后进行分析; - 注释3:这里调用了
collectSafely这个抽象方法,而这里的具体实现是在SafeFlow中的collectSafely,然后调用了collector.block(),这里其实就是调用了flow()中的emit方法,或者说collector.block()调用了4次emit()函数。
到这里Flow的创建就结束了,那么现在来总结一下为什么Flow是冷的:FLow之所以是冷的是因为它的构造过程,在它的构造过程中构造了一个SafeFlow对象但并不会触发Lambda表达式的执行,只有当collect() 被调用后Lambda表达式才开始执行所以它是冷的。
SafeCollector是如何进行安全检查的
@Suppress("CANNOT_OVERRIDE_INVISIBLE_MEMBER", "INVISIBLE_MEMBER", "INVISIBLE_REFERENCE", "UNCHECKED_CAST")
internal actual class SafeCollector<T> actual constructor(
    //1
    @JvmField internal actual val collector: FlowCollector<T>,
    @JvmField internal actual val collectContext: CoroutineContext
) : FlowCollector<T>, ContinuationImpl(NoOpContinuation, EmptyCoroutineContext), CoroutineStackFrame {

    override val callerFrame: CoroutineStackFrame? get() = completion as? CoroutineStackFrame

    override fun getStackTraceElement(): StackTraceElement? = null

    @JvmField // Note, it is non-capturing lambda, so no extra allocation during init of SafeCollector
    internal actual val collectContextSize = collectContext.fold(0) { count, _ -> count + 1 }
    private var lastEmissionContext: CoroutineContext? = null
    private var completion: Continuation<Unit>? = null

    // ContinuationImpl
    override val context: CoroutineContext
        get() = completion?.context ?: EmptyCoroutineContext

    override fun invokeSuspend(result: Result<Any?>): Any {
        result.onFailure { lastEmissionContext = DownstreamExceptionElement(it) }
        completion?.resumeWith(result as Result<Unit>)
        return COROUTINE_SUSPENDED
    }

    // Escalate visibility to manually release intercepted continuation
    public actual override fun releaseIntercepted() {
        super.releaseIntercepted()
    }

    /**
     * 这是状态机重用的巧妙实现。
	 * 首先它检查它没有被并发使用(这里是明确禁止的),
	 * 然后只缓存一个完成实例以避免在每次发出时进行额外分配,使其在热路径上消除垃圾。
     */
    //2
    override suspend fun emit(value: T) {
        return suspendCoroutineUninterceptedOrReturn sc@{ uCont ->
            try {
                //3
                emit(uCont, value)
            } catch (e: Throwable) {
                //保存已抛出emit异常的事实,便于被上游
                lastEmissionContext = DownstreamExceptionElement(e)
                throw e
            }
        }
    }

    private fun emit(uCont: Continuation<Unit>, value: T): Any? {
        val currentContext = uCont.context
        currentContext.ensureActive()
        //4
        val previousContext = lastEmissionContext
        if (previousContext !== currentContext) {
            checkContext(currentContext, previousContext, value)
        }
        completion = uCont
        //5
        return emitFun(collector as FlowCollector<Any?>, value, this as Continuation<Unit>)
    }

    private fun checkContext(
        currentContext: CoroutineContext,
        previousContext: CoroutineContext?,
        value: T
    ) {
        if (previousContext is DownstreamExceptionElement) {
            exceptionTransparencyViolated(previousContext, value)
        }
        checkContext(currentContext)
        lastEmissionContext = currentContext
    }

    private fun exceptionTransparencyViolated(exception: DownstreamExceptionElement, value: Any?) {
        error("""
            Flow exception transparency is violated:
                Previous 'emit' call has thrown exception ${exception.e}, but then emission attempt of value '$value' has been detected.
                Emissions from 'catch' blocks are prohibited in order to avoid unspecified behaviour, 'Flow.catch' operator can be used instead.
                For a more detailed explanation, please refer to Flow documentation.
            """.trimIndent())
    }
}

//6
private val emitFun =
    FlowCollector<Any?>::emit as Function3<FlowCollector<Any?>, Any?, Continuation<Unit>, Any?>
- 注释1:这里的
collect参数对应的就是Flow在构造时的匿名内部类FlowCollector,在AS中看到的this:FlowCollector<Int>就是它; - 注释2:这个
emit()函数其实就是demo中用来发送数据的emit(0)...emit(3),这里可以理解为Flow上游发送的数据最终会传递到这个emit()中; - 注释3:这里的
emit(uCont, value)函数中多了两个参数,其中第一个是suspendCoroutineUninterceptedOrReturn,它是一个高阶函数,是把挂起函数的Continuation暴露出来并作为参数进行传递,第二个则是上游发送过来的数据。这里还有一个异常捕获,异常被捕获后存储在lastEmissionContext,作用是:在下游发送异常以后可以让上游感知到。下面会有一个对比; - 注释4:这里对当前协程上下文与之前的协程上下文进行对比,如果两者不一致就会执行
checkContext(),在它里面做出进一步的判断和提示; - 注释5:这里调用的就是下游的
emit(),也就是FlowCollector中的emit函数,这里接收的那个value就是上游的emit(0)...emit(3)传递过来的,这里可能不太好理解,我将demo中的代码换个写法就明白了:
fun main() = runBlocking {

    flow {
        emit(0)
        emit(1)
        emit(2)
        emit(3)
    }.collect{
        println("it:$it")
    }

    println("换个写法")

    flow{
        emit(0)
        emit(1)
        emit(2)
        emit(3)
    }.collect(object :FlowCollector<Int>{
        //注释5调用的就是这个emit方法。
        override suspend fun emit(value: Int) {
            println("value:$value")
        }

    })

    println("end")
}
两种写法的到的结果是一模一样的,第一种写法其实就是第二种写法的简写方式。
- 注释6:这是函数引用的语法,代表了它就是
FlowCollector的emit()方法,它的类型是Function3, Any?, Continuation, Any?>,而这个Function3在前面了解挂起函数原理的时候将Kotlin代码反编译后有提过类似的,Function3代表的是三个参数的函数类型。
2.FlowCollector:上游与下游之间的桥梁
Flow创建的时候构造了一个SafeFlow对象,间接实现了Flow接口,因此可以直接调用collect()终止操作符,从而获取到Flow中的emit发送出来的数据。
这里其实就验证了我上面的那个猜想:下游collect的调用会触发上游Lambda中的emit()函数的执行,上游的emit将数据传递给下游的emit()。
那么上游和下游又是如何进行连接的呢?
先来看一段源码
public interface Flow<out T> {
    public suspend fun collect(collector: FlowCollector<T>)
}

public fun interface FlowCollector<in T> {
    public suspend fun emit(value: T)
}
在Flow的构造过程中构造了SafeFlow对象并且间接的实现了Flow,Flow中的collect就是终止操作,而collect函数中的参数FlowCollector中的emit()函数则是下游用来接收上游发送数据的emit()。
这里再来回顾一下SafeCollector方法中所做的事情:首先collect终止符的调用会触发上游Lambda中的emit()函数执行,它将数据发送出去,然后进入到SafeCollector中的emit()函数,在这个函数中又将从上游数据发送到下游collect中的emitFun()函数中,这样就完成了连接。所以说FlowCollector是上下游之间的桥梁。
3.中间操作符
在前面分析Kotlin协程—Flow时我们知道在Flow的上下游之间还可以添加一些操作符(中转站)的。
这里我用之前的代码进行分析:
fun flowTest() = runBlocking {
    flow {
        emit(0)
        emit(1)
        emit(2)
        emit(3)
        emit(4)
    }.filter {			//中转站①
        it > 2
    }.map {				//中转站②
        it * 2
    }.collect {			//接收
        println("it:$it")
    }
}

//输出结果:
//it:6
//it:8
由于上面我们已经知道了上下游之间调用过程,所以这里我先用一张图来表示有了中间操作符的过程。
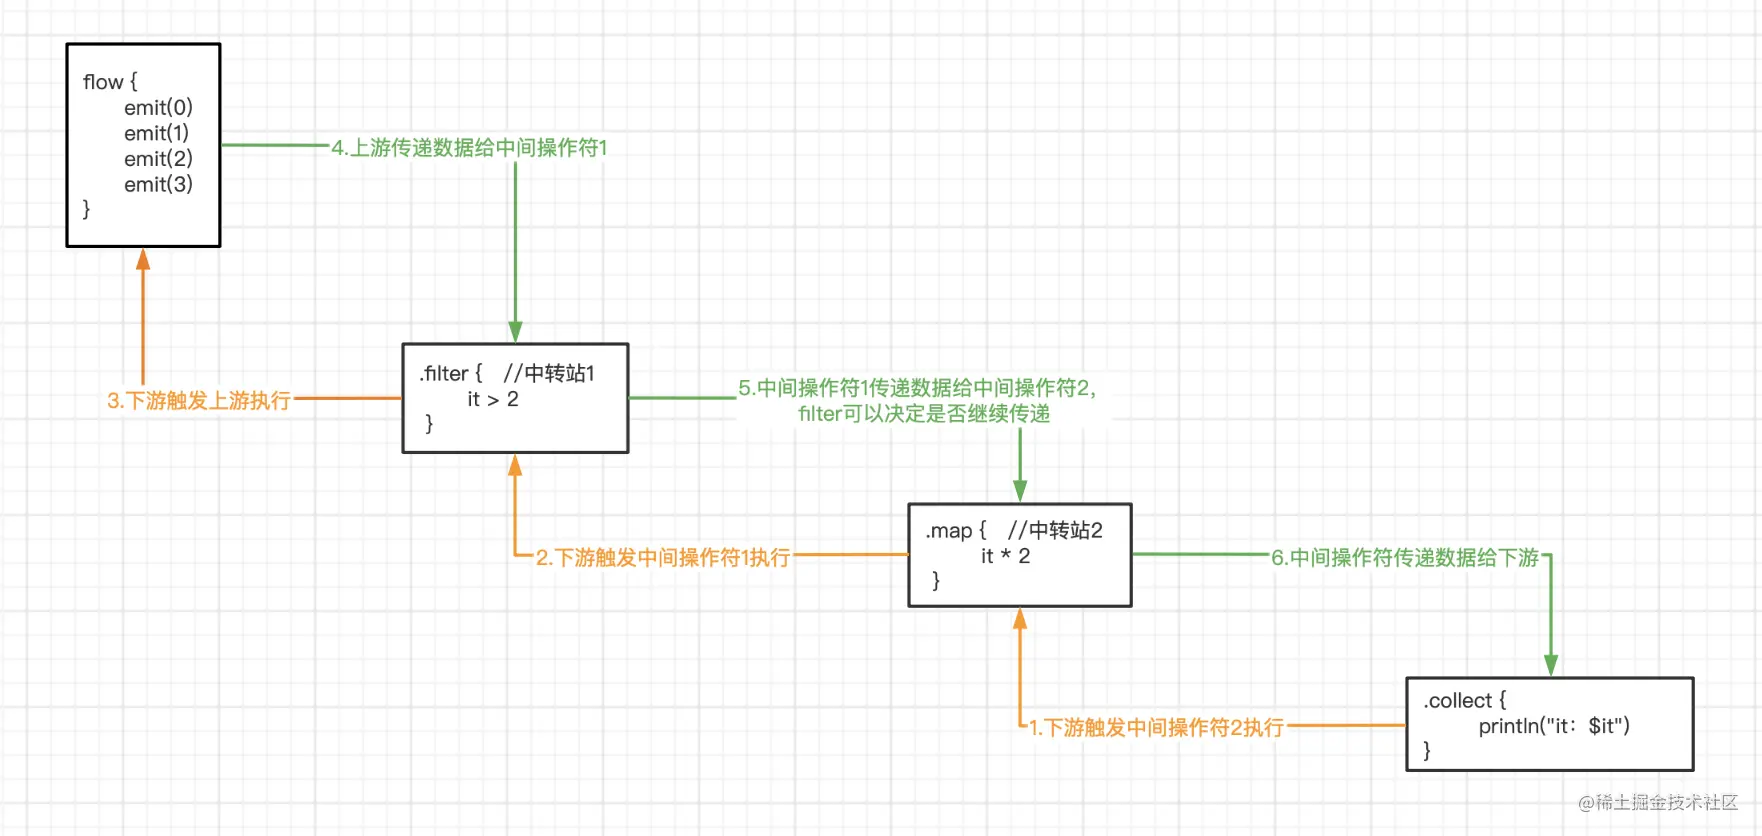
从图中可以看到当Flow中出现中间操作符的时候,上下游之间就会多出2个中转站,对于每一个中转站都会有上游和下游,并且都是被下游触发执行,也会触发自己的上游,同时还会接收来自上游的数据并传递给自己的下游。为什么会是这样一个流程,我们对中间操作符进行分析:
- filter
//1
public inline fun <T> Flow<T>.filter(
    crossinline predicate: suspend (T) -> Boolean
): Flow<T> = transform { value ->
    //8
    if (predicate(value)) return@transform emit(value)
}

//2
internal inline fun <T, R> Flow<T>.unsafeTransform(
    @BuilderInference crossinline transform: suspend FlowCollector<R>.(value: T) -> Unit
): Flow<R> = unsafeFlow {
    //6
    collect { value ->
        //7
        return@collect transform(value)
    }
}

//3
internal inline fun <T> unsafeFlow(
    @BuilderInference crossinline block: suspend FlowCollector<T>.() -> Unit
): Flow<T> {
    //4
    return object : Flow<T> {
        //5
        override suspend fun collect(collector: FlowCollector<T>) {
            collector.block()
        }
    }
}
-
- 注释1、2、3:返回值均为Flow,也就是说
Flow.filter的返回值也是Flow,这个过程只是一个Flow的再次被封装的过程; - 注释4:这里会变成一个普通的Flow匿名内部类对象;
- 注释5:这里应该比较熟悉了,完整代码应该是
flow{}.filter{}.collect{},根据之前的分析很容易知道这就是触发上游Lambda代码的执行,也就是执行注释6、注释7; - 注释6:
collect{},这里是在调用上游 Flow 的collect{},触发上游的 Lambda 执行了,也就是注释5触发的Lambda的执行,然后注释 7 就会被执行; - 注释7:这里的
transform中的额value就是上游传递下来的值,至于怎么传递下来的就要看注释8了; - 注释8:首先这里有一个条件
if (predicate(value)),这个判断就是filter传入的it > 2这个条件,符合这个条件的才会继续执行,也就是通过emit()函数向下游传递数据。
- 注释1、2、3:返回值均为Flow,也就是说
-
map
public inline fun <T, R> Flow<T>.map(
    crossinline transform: suspend (value: T) -> R
): Flow<R> = transform { value ->
    return@transform emit(transform(value))
}

internal inline fun <T, R> Flow<T>.unsafeTransform(
    @BuilderInference crossinline transform: suspend FlowCollector<R>.(value: T) -> Unit
): Flow<R> = unsafeFlow { // Note: unsafe flow is used here, because unsafeTransform is only for internal use
    collect { value ->
        // kludge, without it Unit will be returned and TCE won't kick in, KT-28938
        return@collect transform(value)
    }
}

internal inline fun <T> unsafeFlow(
    @BuilderInference crossinline block: suspend FlowCollector<T>.() -> Unit
): Flow<T> {
    return object : Flow<T> {
        override suspend fun collect(collector: FlowCollector<T>) {
            collector.block()
        }
    }
}
-
- 可以看到
map和前面的filter是一模一样的流程。
- 可以看到
4.上下文保护
在前面分析Kotlin协程—Flow时有提到withContext,当时仅仅是提到了使用withContext会使代码变得丑陋,其实还有另一层原因——如果调用withContext改变协程上下文的话,Flow上游与下游的协程上下文就会变得不一致。在默认情况下Flow下游的协程上下文最终会成为上游的执行环境,也会变成中间操作符的执行环境,所以才让Flow本身就支持协程的「结构化并发」的特性,例如结构化取消。而withContext加入会使Flow上游与下游的协程上下文变得不一致,它们的整体结构也会被破坏,从而导致「结构化并发」的特性被破坏,所以不要轻易使用withContext,而Flow本身是带有上下文保护的。
Flow 源码中对于上下文的检测,称之为上下文保护,前面分析SafeCollector时没有深入checkContext分析,这里继续来分析一下,上下文保护是怎样的流程。
private fun emit(uCont: Continuation<Unit>, value: T): Any? {
    val currentContext = uCont.context
    currentContext.ensureActive()
    val previousContext = lastEmissionContext
    if (previousContext !== currentContext) {
        checkContext(currentContext, previousContext, value)
    }
    completion = uCont
    return emitFun(collector as FlowCollector<Any?>, value, this as Continuation<Unit>)
}

internal fun SafeCollector<*>.checkContext(currentContext: CoroutineContext) {
    val result = currentContext.fold(0) fold@{ count, element ->
        val key = element.key
        val collectElement = collectContext[key]
        if (key !== Job) {
            return@fold if (element !== collectElement) Int.MIN_VALUE
            else count + 1
        }

        val collectJob = collectElement as Job?
        val emissionParentJob = (element as Job).transitiveCoroutineParent(collectJob)

        if (emissionParentJob !== collectJob) {
            error(
                "Flow invariant is violated:\n" +
                        "\t\tEmission from another coroutine is detected.\n" +
                        "\t\tChild of $emissionParentJob, expected child of $collectJob.\n" +
                        "\t\tFlowCollector is not thread-safe and concurrent emissions are prohibited.\n" +
                        "\t\tTo mitigate this restriction please use 'channelFlow' builder instead of 'flow'"
            )
        }

        if (collectJob == null) count else count + 1
    }

    //判断上游、下游的Context
    if (result != collectContextSize) {
        error(
            "Flow invariant is violated:\n" +
                    "\t\tFlow was collected in $collectContext,\n" +
                    "\t\tbut emission happened in $currentContext.\n" +
                    "\t\tPlease refer to 'flow' documentation or use 'flowOn' instead"
        )
    }
}
所以,总的来说,Flow 不允许直接使用 withContext{} 的原因,是为了“结构化并发”,它并不是不允许切换线程,而是不允许随意破坏协程的上下文。Kotlin 提供的操作符 flowOn{},官方已经帮我们处理好了上下文的问题,所以我们可以放心地切换线程。
5.总结:
1.Flow的调用过程分为三个步骤:
- 上游的Flow创建
SafeFlow对象,下游的Flow的collect()函数触发上游的emit()函数执行开始发送数据; - 上游的
emit()发送的数据进入到SafeCollector,其实上游的emit()函数调用的就是SafeCollector中的emit()函数; - 在
SafeCollector中调用emitFun()其实就是调用了下游的emit()函数将数据传递给下游。
2.中间操作符:
如果有中间操作符的话,每个操作符都会有上游和下游,并且都是被下游触发执行,也会触发自己的上游,同时还会接收来自上游的数据并传递给自己的下游;
3.上下文保护:
Flow的上游和中间操作符并不需要协程作用域,所以他们都是共用Flow下游的协程上下文,也正是因为这种设计所以Flow具有天然的『结构化并发』的特点,因此Kotlin官方也限制了开发者不能随意在上游与中转站阶段改变Flow的上下文。
作者:无糖可乐爱好者
链接:https://juejin.cn/post/7179159835882029115
最后
如果想要成为架构师或想突破20~30K薪资范畴,那就不要局限在编码,业务,要会选型、扩展,提升编程思维。此外,良好的职业规划也很重要,学习的习惯很重要,但是最重要的还是要能持之以恒,任何不能坚持落实的计划都是空谈。
如果你没有方向,这里给大家分享一套由阿里高级架构师编写的《Android八大模块进阶笔记》,帮大家将杂乱、零散、碎片化的知识进行体系化的整理,让大家系统而高效地掌握Android开发的各个知识点。
相对于我们平时看的碎片化内容,这份笔记的知识点更系统化,更容易理解和记忆,是严格按照知识体系编排的。
全套视频资料:
一、面试合集

二、源码解析合集
三、开源框架合集
欢迎大家一键三连支持,若需要文中资料,直接点击文末CSDN官方认证微信卡片免费领取↓↓↓


 1009
1009


 被折叠的 条评论
为什么被折叠?
被折叠的 条评论
为什么被折叠?
 到【灌水乐园】发言


