


一、下载Vue
下载安装Vue可以参考这篇博客:Vue安装及环境配置_再小的帆也能远航啊的博客-CSDN博客
二、创建Vue项目
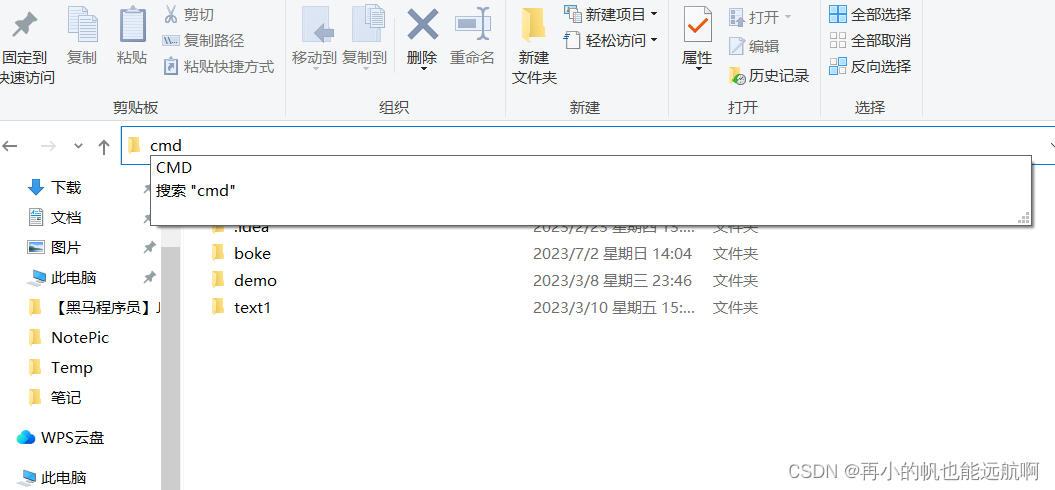
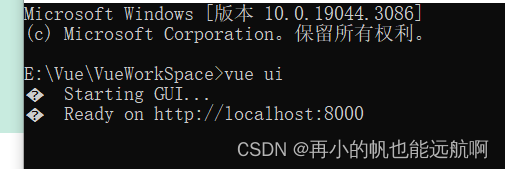
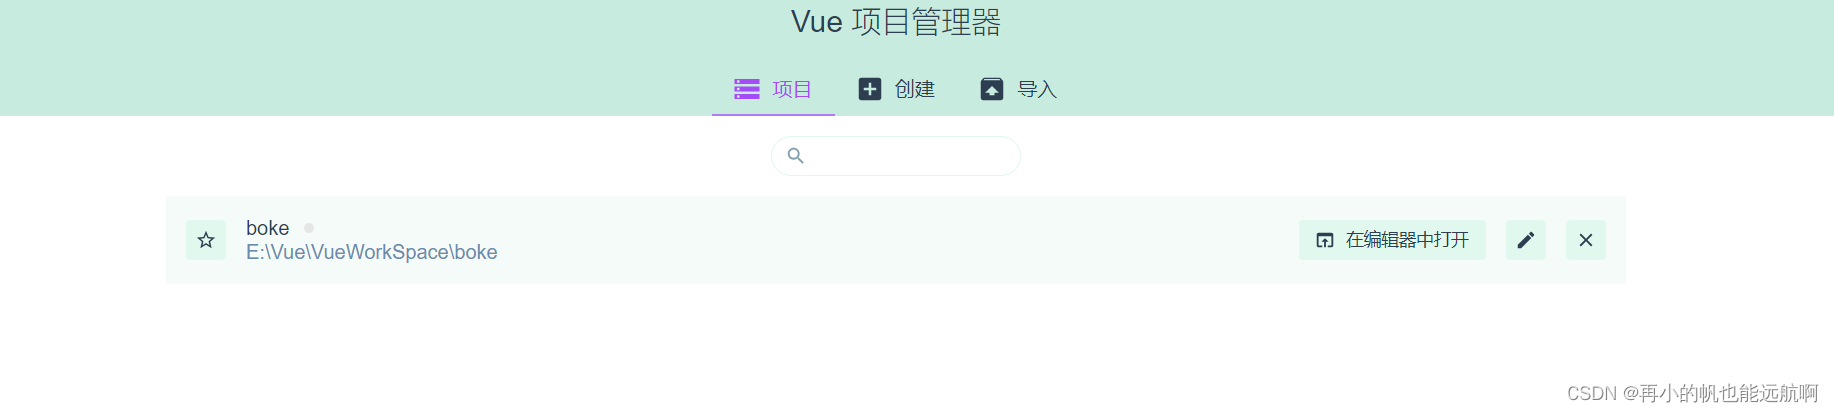
1、在你想要创建项目的文件夹的地址栏运行cmd进入命令行。然后输入vue ui,进入vue项目的管理界面。
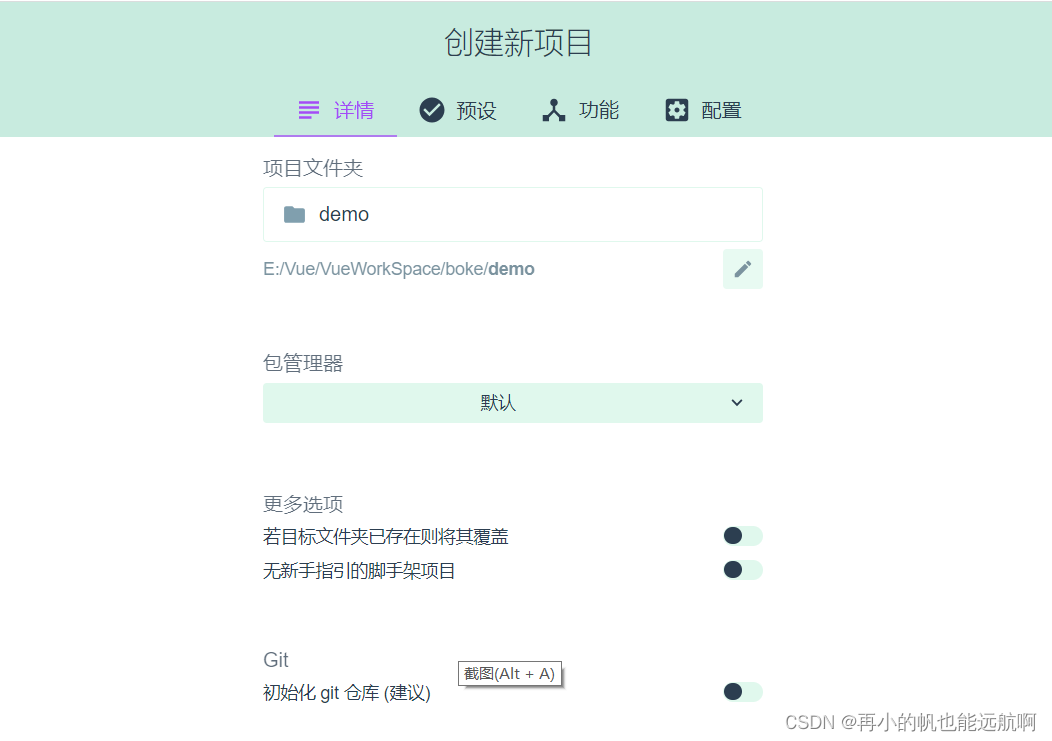
点击创建,输入项目名,开始创建项目
输入项目名称,git仓库看个人需求选取,然后点击下一步,
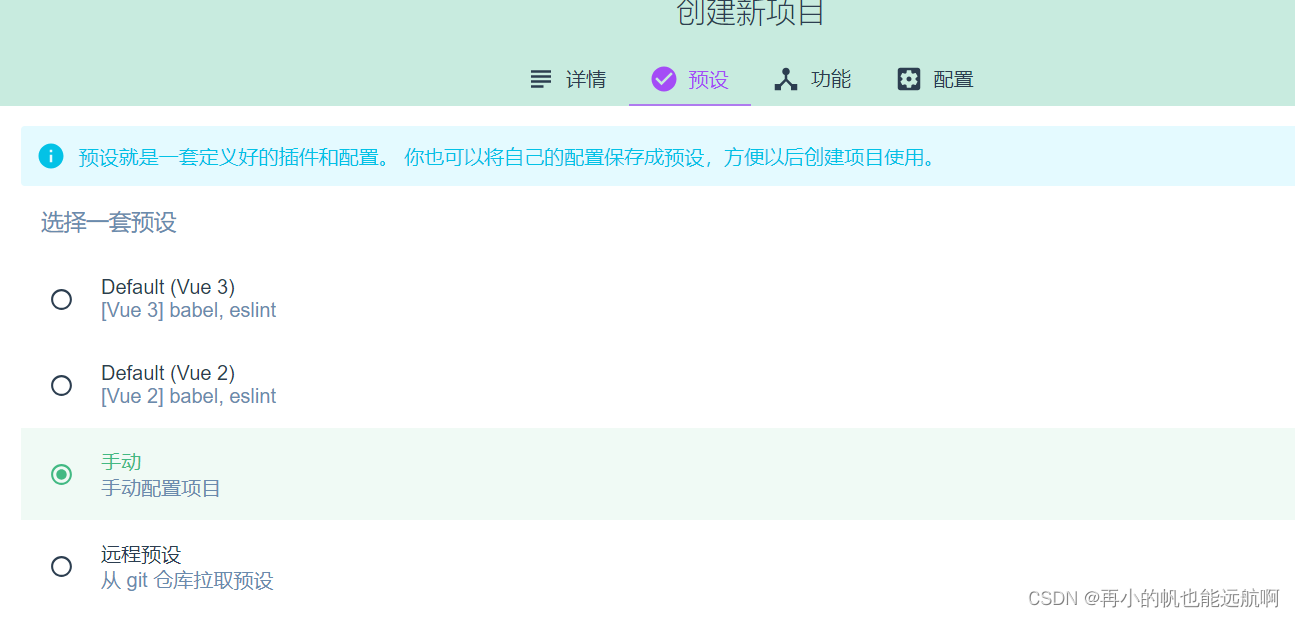
选择手动创建项目,点击下一步
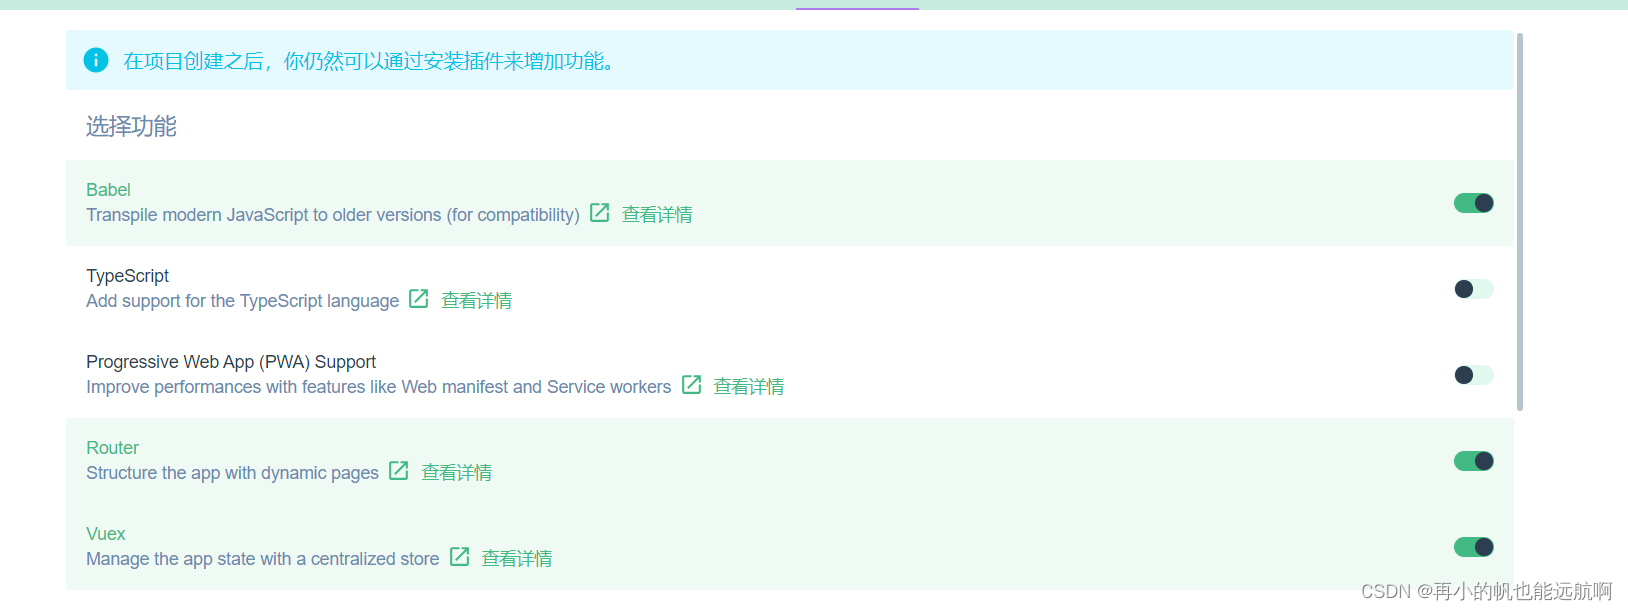
选择Babei、Router和Vuex选项,点击下一步
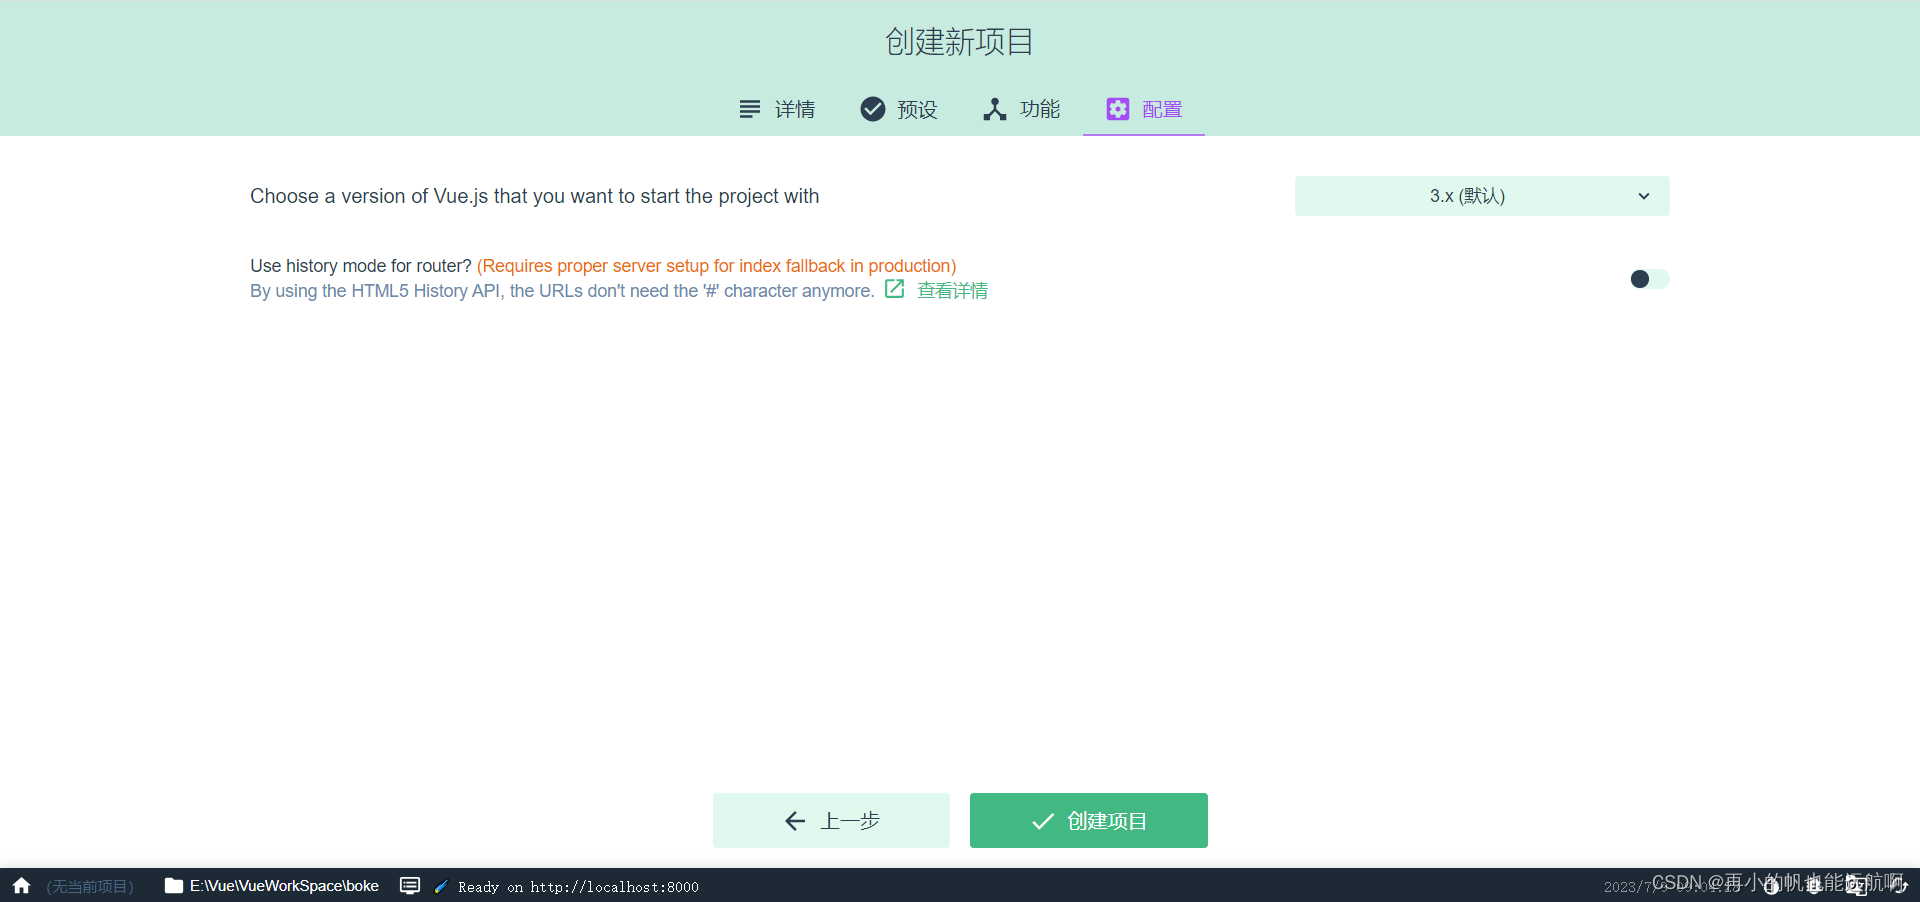
 选择版本,点击创建项目
等待其创建完毕,用idea或者vscode打开刚才创建的Vue项目。
三、整合element plus
在项目的终端输入指令: npm install element-plus --save
等待其安装完成
然后在Vue项目的main.js全局配置element-plus
    import { createApp } from 'vue'
    import App from './App.vue'
    import router from './router'
    import store from './store'
   //全局配置element-plus
    import ElementPlus from 'element-plus'
    import "element-plus/dist/index.css"
    createApp(App).use(store).use(router).use(ElementPlus)
        .mount('#app')
然后我们就可以使用element-plus提供的组件来进行开发
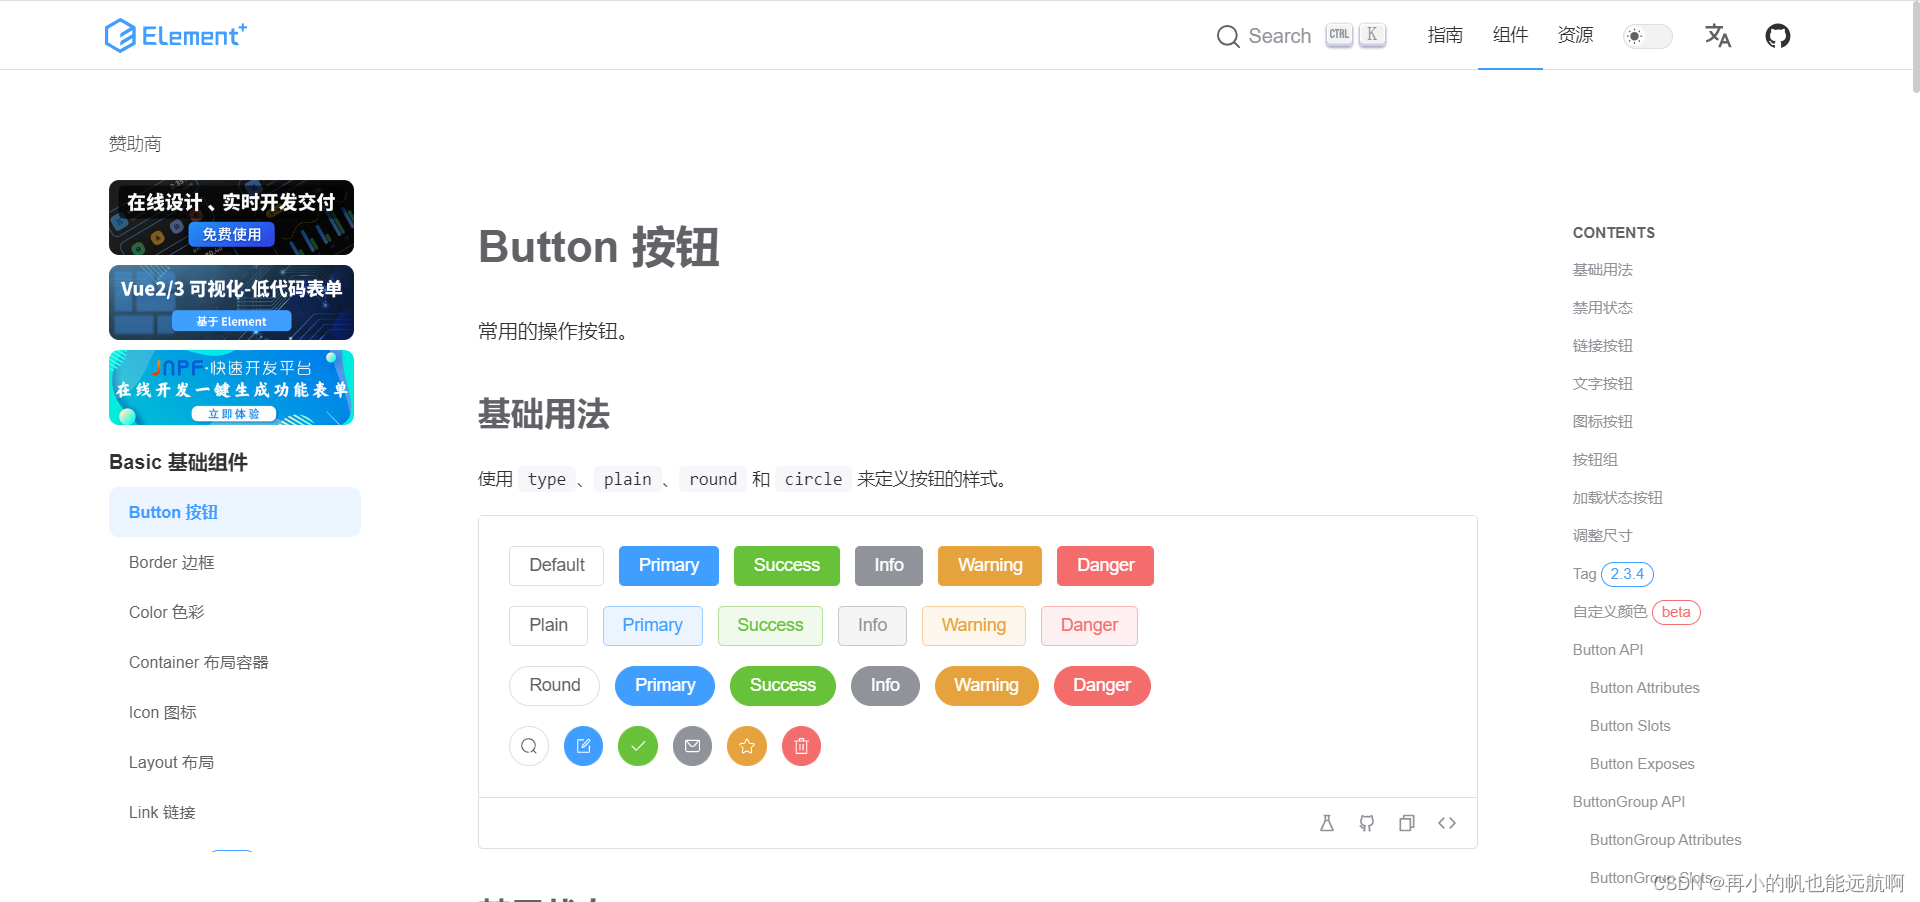
element-plus的组件库网址:Button 按钮 | Element Plus
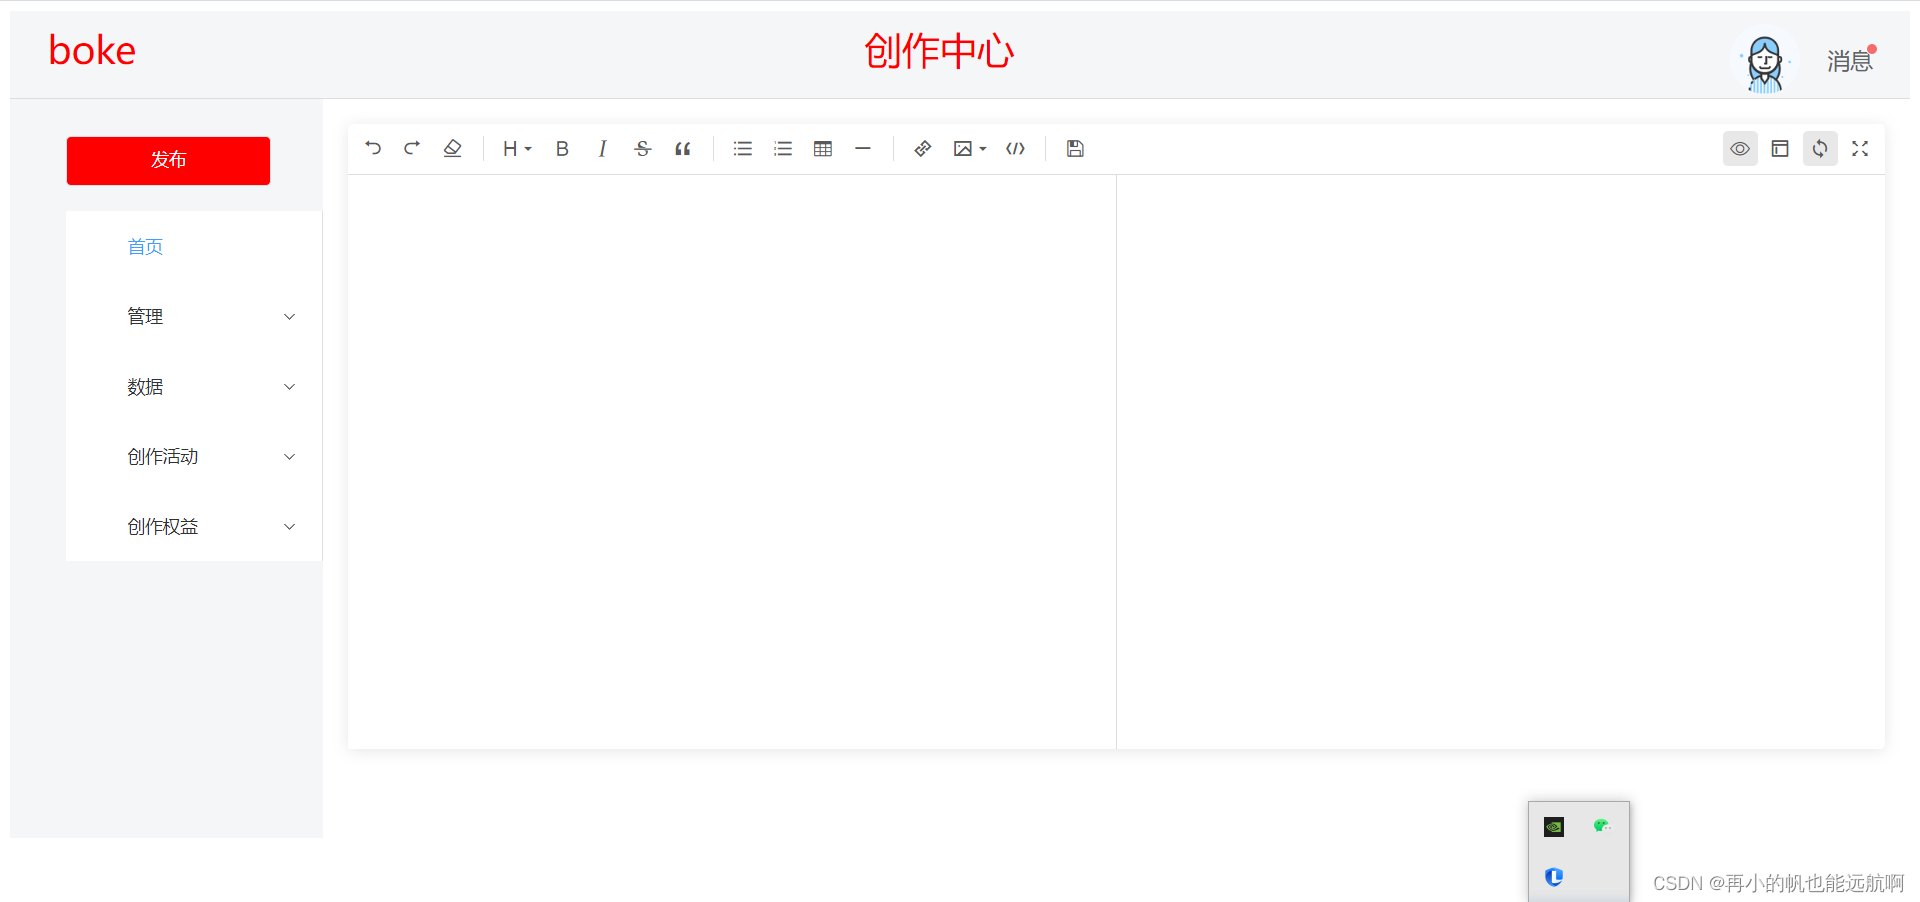
四、整体框架的搭建
在views文件夹创建一个Index.vue,这个组件是一个容器组件,接下来实现的功能都是在这个组件的基础上实现的。我选择了element-plus里面的一个布局容器(如图所示),把页面分为头、左、右三部分。
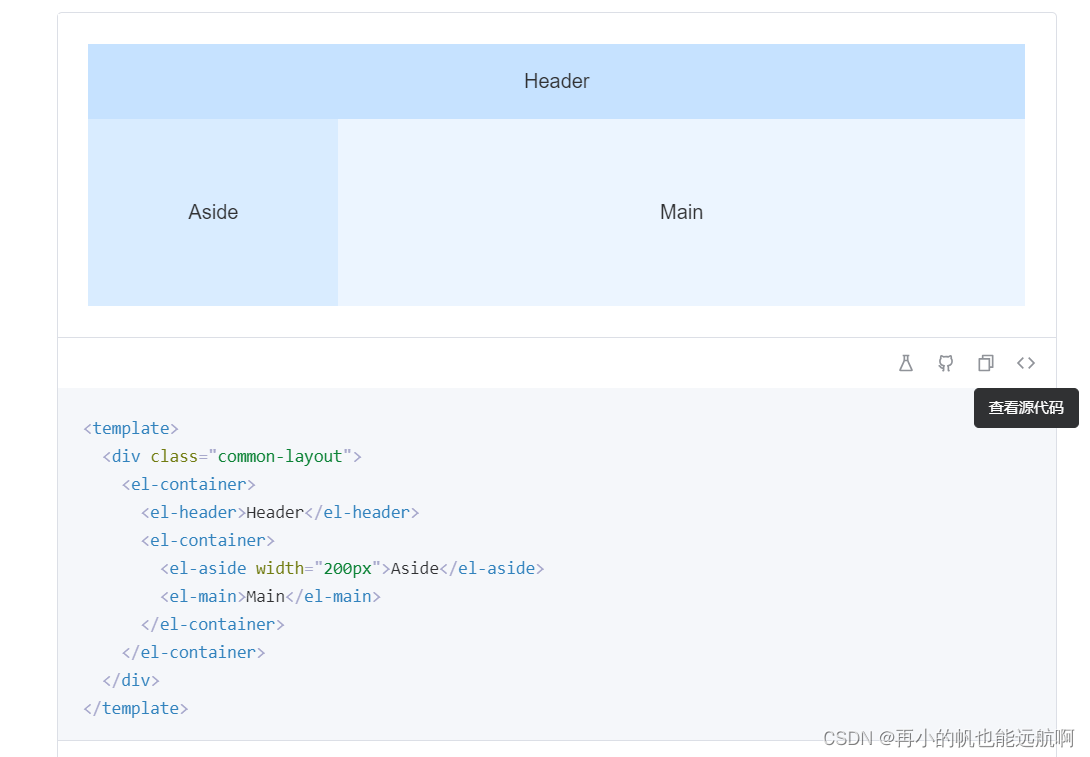
点击查看源代码,然后把源码复制粘贴到自己的代码里面即可使用,当然,其中的样式还是要自己调到自己满意为止。创建完页面后,我们要去router文件夹下的index.js加上我们页面的地址,用于页面跳转。往后写的组件如果需要被跳转的,都要来这里注册,以便后续使用。
import { createRouter, createWebHashHistory } from 'vue-router'
import Index from '../views/Index.vue'


const routes = [
  {
    path: '/',
    name: 'index',
    component: Index
  }
]

const router = createRouter({
  history: createWebHashHistory(),
  routes
})

export default router
五、页面头部的设计

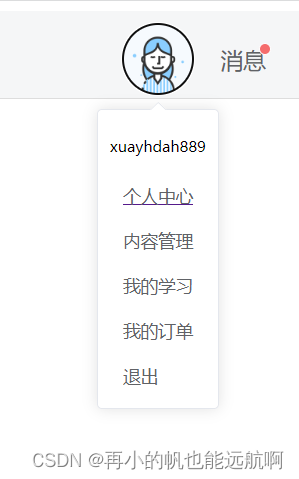
通过图片可以看到,头部左边有一个博客名称,中间有一个“创作中心”的字样,右边有一个头像以及信息提醒。头像和信息提醒下面都是 一个下拉菜单,菜单里面是功能页面导航。头像和下拉菜单都使用了element-plus的组件。在头部区域<el-header></el-header>,引入组件,修改其样式即可。其实现代码如下
<el-header class="header">
        <div class="logo">boke</div>
        <div class="logo">创作中心</div>
        <div style="margin-top: 0px; margin-right: -550px;">
          <el-dropdown size="large">
            <el-avatar size="large"
                src="https://cube.elemecdn.com/0/88/03b0d39583f48206768a7534e55bcpng.png"
            />
            <template #dropdown>
              <el-dropdown-menu>
                <p align="center">xuayhdah889</p>

                <router-link to="/usercenter">
                  <el-dropdown-item>个人中心</el-dropdown-item>
                </router-link>
                <el-dropdown-item>内容管理</el-dropdown-item>
                <el-dropdown-item>我的学习</el-dropdown-item>
                <el-dropdown-item >我的订单</el-dropdown-item>
                <el-dropdown-item >退出</el-dropdown-item>

              </el-dropdown-menu>
            </template>
          </el-dropdown>
        </div>
        <div class="messages">
          <el-dropdown size="large">
    <span class="sp" >
        <el-badge is-dot class="item">
            消息
  </el-badge>
    </span>
            <template #dropdown>
              <el-dropdown-menu>
                <el-dropdown-item>新增粉丝</el-dropdown-item>
                <el-dropdown-item>赞和收藏</el-dropdown-item>
                <el-dropdown-item >私信</el-dropdown-item>
                <el-dropdown-item >系统通知</el-dropdown-item>
                <el-dropdown-item >消息设置</el-dropdown-item>
              </el-dropdown-menu>
            </template>
          </el-dropdown>
        </div>
      </el-header>

<style scoped>
     .header{
   border-bottom: 1px solid #ddd;
   display: flex;
   justify-content:space-between;
.logo{
     font-size: 30px;
     color: red;
     margin-left: 10px;
   }
   .messages{
     float: right;
     text-align: center;
     .sp{
       margin-top: 20px;
       margin-right: 10px;
       cursor: pointer;
       display: flex;
       align-items: center;
       font-size: 18px;

     }
   }
 }
</style>
六、页面左边部分的设计
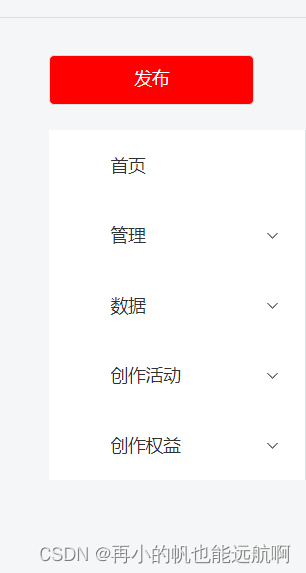
页面的左边是一个功能的菜单栏以及一个发布文章的按钮,在<el-aside></el-aside>模块引入element-plus的菜单组件以及按钮组件,修改一下样式,自己满意即可。实现代码如下:
<el-aside width="200px" class="left-aside">
          <div style="margin-bottom: 20px;">
            <router-link to="/text">
            <el-button class="post-btn" >
              发布
            </el-button>
            </router-link>
          </div>
          <el-col :span="150">
            <el-menu
                default-active="2"
                class="el-menu-vertical-demo"
                @open="handleOpen"
                @close="handleClose"
            >
              <el-menu-item index="2">
                <el-icon><icon-menu /></el-icon>
                <span>首页</span>
              </el-menu-item>
              <el-sub-menu index="1">
                <template #title>
                  <el-icon><location /></el-icon>
                  <span>管理</span>
                </template>
                <el-menu-item-group >
                  <router-link to="/contextCtr">
                  <el-menu-item index="1-1">内容管理</el-menu-item>
                  </router-link>
                  <el-menu-item index="1-2">评论管理</el-menu-item>
                  <el-menu-item index="1-3">专栏管理</el-menu-item>
                </el-menu-item-group>
              </el-sub-menu>
              <el-sub-menu index="3">
                <template #title>
                  <el-icon><location /></el-icon>
                  <span>数据</span>
                </template>
                <el-menu-item-group >
                  <el-menu-item index="3-1">作品数据</el-menu-item>
                  <el-menu-item index="3-2">收益数据</el-menu-item>
                  <el-menu-item index="3-3">粉丝数据</el-menu-item>
                  <el-menu-item index="3-4">一周数据</el-menu-item>
                </el-menu-item-group>
              </el-sub-menu>
              <el-sub-menu index="4">
                <template #title>
                  <el-icon><location /></el-icon>
                  <span>创作活动</span>
                </template>
                <el-menu-item-group >
                  <el-menu-item index="4-1">活动列表</el-menu-item>
                  <el-menu-item index="4-2">投稿管理</el-menu-item>
                </el-menu-item-group>
              </el-sub-menu>
              <el-sub-menu index="5">
                <template #title>
                  <el-icon><location /></el-icon>
                  <span>创作权益</span>
                </template>
                <el-menu-item-group >
                  <el-menu-item index="5-1">等级权益</el-menu-item>
                  <el-menu-item index="5-2">自定义域名</el-menu-item>
                  <el-menu-item index="5-3">自定义模块</el-menu-item>
                  <el-menu-item index="5-4">原创保护</el-menu-item>
                </el-menu-item-group>
              </el-sub-menu>
            </el-menu>
          </el-col>
        </el-aside>


<style scope>
.container{
   padding-top: 10px;
   background: #f5f6f7;
   height: calc(100vh - 60px);

   .left-aside{
     padding-left: 45px;
     padding-top: 30px;
     width: 250px;
     .post-btn{
       background: red;
       color: white;
       height: 40px;
       width: 80%;
     }
   }
   .right-main{
    background: #fff;
  }
 }

</style>
七、右边部分的设计
右边部分就是展示左边菜单功能页的容器,比如文章管理的页面就是展示在这个部分。
其实现代码如下:
<el-main class="right-main"><router-view></router-view></el-main>八、整合markdown编辑器
博客离不开发布文章的功能,所以使用markdown编辑器来作为博客的编辑器是一个不错的选择。
安装markdown编辑器,在控制台输入: npm i @kangc/v-md-editor@next -S
然后在main.js引入markdown编辑器
    import { createApp } from 'vue'
    import App from './App.vue'
    import router from './router'
    import store from './store'
    import ElementPlus from 'element-plus'
    import "element-plus/dist/index.css"
     //全局引用EditoMarkdown
    import EditoMarkdown from "@/views/EditoMarkdown";
    createApp(App).use(store).use(router).use(ElementPlus)
        .component("EditoMarkdown",EditoMarkdown).mount('#app')
创建EditoMarkdown.vue
  <template>
    <v-md-editor :value="modelValue"
                 :height="height+'px'"
                 :disabled-menus="[]"
                 :include-level="[1,2,3,4,5,6]"
                 @upload-image="handleUploadImage"
                 @change="change"
    ></v-md-editor>
  </template>

  <script setup>
  import VMdEditor from '@kangc/v-md-editor';
  import '@kangc/v-md-editor/lib/style/base-editor.css';
  import githubTheme from '@kangc/v-md-editor/lib/theme/github.js';
  import '@kangc/v-md-editor/lib/theme/style/github.css';
  import {getCurrentInstance} from "vue";

  const { proxy} = getCurrentInstance();

  import hljs from 'highlight.js';
  VMdEditor.use(githubTheme,{
    Hljs: hljs,
  });
  const emit = defineEmits();
  const change =(markdownContent,htmlContent)=>{
    emit("update:modeValue",markdownContent);
    emit("htmlContent",htmlContent);
  }
  const handleUploadImage = async (event,insertImage,files)=>{
    let result = await proxy.Request({
      url:"file/uploadImage",
      dataType: "file",
      params: {
        file: files[0],
        type: 1.
      }
    });
  }

  const props = defineProps({
    modelValue:{
      type: String,
      default: "",
    },
    height:{
      type: Number,
      default: 500,
    }
  })

  </script>

  <style scoped>

  </style>
创建一个编辑器页面Text.vue,引用EditoMarkdown.vue组件
<template>
 <div>
   <EditoMarkdown></EditoMarkdown>
 </div>
</template>

<script>
import EditoMarkdown from "@/views/EditoMarkdown";
export default {
  name: "text",
  components: {EditoMarkdown}
}
</script>

<style scoped>

</style>
然后把编辑器页面的url注册,使用<router-link to="url"></router-link >绑定发表的按钮,通过点击发表访问编辑器页面。
routerw文件夹的index.js
 const routes = [
  {
    path: '/',
    name: 'index',
    component: Index,
    children:[
      {
        path: '/text',
        name: 'text',
        component: Text
        }]
      }]
给按钮添加跳转映射
 <router-link to="/text">
            <el-button class="post-btn" >
              发布
            </el-button>
            </router-link>
完成后点击发布按钮就会跳转到编辑器页面
九、文章管理页面
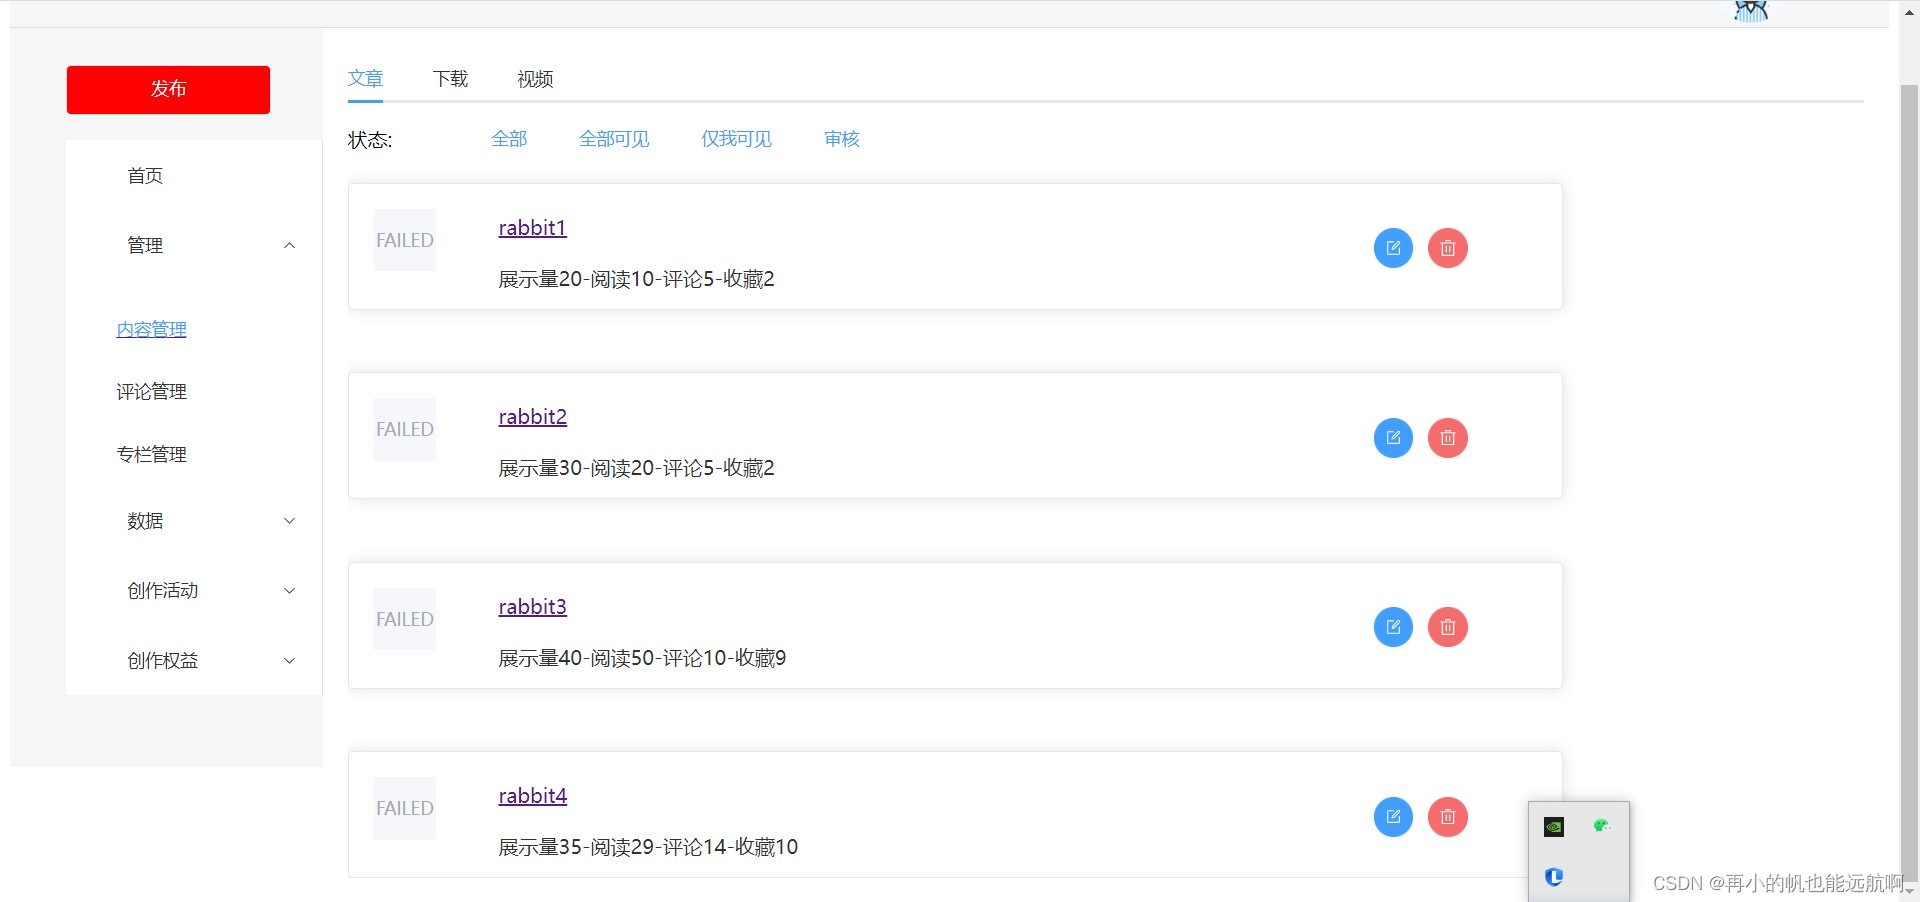
这个页面主要采用了标签页和卡片组件。标签页用来做导航栏。卡片组件用来展示文章信息。使用V-for循环输出数组中的信息来展示文章。一张卡片代表一篇文章。 点击文章标题即可查看文章详情,点击编辑按钮,即可进入编辑器修改文章,点击删除按钮会删除本篇文章。
具体实现代码如下:
<template>
  <div>
    <div>
    <el-tabs v-model="activeName" class="demo-tabs" @tab-click="handleClick">
    <el-tab-pane label="文章" name="1">
      <div style="position: absolute;top: 0">
      <div style="width:100px;height:30px;float:left;">
        <span style="margin-top: 5px;cursor: pointer;display: flex;">状态:</span>
      </div>
      <div style="width:600px;height:50px;float:left;">
        <el-button type="primary"  text>
          全部
        </el-button>
        <el-button type="primary"  text>
          全部可见
        </el-button>
        <el-button type="primary"  text>
          仅我可见
        </el-button>
        <el-button type="primary"  text>
          审核
        </el-button>
        </div>
      </div>
      <div style="margin-top: 50px" v-for="item in list">
        <ul>
        <li style=" list-style: none;">
        <el-card style="height: 100px;width: 80%">
          <el-image style="width: 50px; height: 50px" :src="url" :fit="fit" />
          <div style="margin-left: 100px;margin-top: -50px">
            <a :href="item.urls">{{item.name}}</a>
            <div style="margin-top: 20px">
              展示量{{item.num1}}-阅读{{item.num2}}-评论{{item.num3}}-收藏{{item.num4}}
            </div>
            <div style="margin-top: -50px;margin-left: 700px">
              <el-button type="primary" :icon="Edit" circle />
              <el-button type="danger" :icon="Delete" circle />
            </div>
          </div>
        </el-card>
        </li>
        </ul>
      </div>
    </el-tab-pane>
    <el-tab-pane label="下载" name="2"></el-tab-pane>
    <el-tab-pane label="视频" name="3"></el-tab-pane>
  </el-tabs>
    </div>
  </div>
</template>
<script>
import {Delete, Edit} from '@element-plus/icons-vue';
export default {
  name: "ContextCtr",
  data(){
    return{
      url:"",
      Edit: Edit,
      Delete:Delete,
      list: [{
        urls: "www.baidu.com",
        name: "rabbit1",
        num1: 20,
        num2: 10,
        num3: 5,
        num4: 2
      },{
        urls: "www.baidu.com",
        name: "rabbit2",
        num1: 30,
        num2: 20,
        num3: 5,
        num4: 2
      },{
        urls: "www.baidu.com",
        name: "rabbit3",
        num1: 40,
        num2: 50,
        num3: 10,
        num4: 9
      },{
        urls: "www.baidu.com",
        name: "rabbit4",
        num1: 35,
        num2: 29,
        num3: 14,
        num4: 10
      }
      ]
    }
  }
}
</script>
<style scoped>
ul, li {
  padding: 0;
  margin: 0;
}
</style>
其他页面也是基于此原理来完成,需要什么组件就引入什么组件,展示信息一般使用v-for来循环输出展示即可。


 2200
2200

 被折叠的 条评论
为什么被折叠?
被折叠的 条评论
为什么被折叠?
 到【灌水乐园】发言


