Django实现三级导航栏

目录

一、实现三级导航栏

二、代码

1.views部分

2.html部分

3.css部分

三、实现展示


一、实现三级导航栏

首先实现二级导航

思路1:嵌套列表  first=['导航1','导航1','导航1',‘导航1’]  second=[ ['导航2', '导航2'],['导航2', '导航2'],['导航2', '导航2'],]  这个思路理论可行但是由于djang内置模板无法使用range方法 实现起来比较麻烦  不推荐

思路2:列表嵌套字典 获取key,values 

first = [ {'导航1' : '导航2'},{'导航1' :'导航2'} ]  

ok顺着这个思路 实现三级导航栏:

one = [{'导航1': [{'导航2': '导航3'}, {'导航2': '导航3'}, {'导航2': '导航3'}], '导航11': [{'导航2': '导航3'}, {'导航2': '导航3'}], '导航111': [{'导航2': '导航3'}, {'导航2': '导航3'}], '导航1111': [{'导航2': '导航3'}, {'导航2': '导航3'}]}]

字典中的items方法可以同时获取到key,values

二、代码

1.views部分

代码如下(示例):

def nav(request):
    one = [{'导航1': [{'导航2': '导航3'}, {'导航2': '导航3'}, {'导航2': '导航3'}], '导航11': [{'导航2': '导航3'}, {'导航2': '导航3'}], '导航111': [{'导航2': '导航3'}, {'导航2': '导航3'}], '导航1111': [{'导航2': '导航3'}, {'导航2': '导航3'}]}]
    return render(request, "test.html", {'one': one})

2.html部分

代码如下(示例): 

<!DOCTYPE html>
<html lang="en">
<head>
    <meta charset="UTF-8">
    <title>Title</title>
    <link rel="stylesheet" type="text/css" href="/static/css/nav.css">
</head>
<body>
<h1 align="center">多级导航条</h1>
<ul class="nav-one">
   {% for dict in one%}
   {% for key,values in dict.items %}
   <li><a href="">{{key}}</a>
      <ul class="nav-two">
         {% for j in values %}
         {% for p in j%}
         <li><a href="">{{p}}</a>
            <ul class="nav-three">
               {% for k in j.values%}
               <li><a href="">{{k}}</a></li>
               {% endfor %}
            </ul>
         </li>
         {% endfor %}
         {% endfor %}
      </ul>
   </li>
   {% endfor %}
   {% endfor %}
</ul>
</body>
</html>

3.css部分

代码如下(示例):

body,ul,li,a{
padding: 0;
margin: 0;
text-decoration: none;
}
.nav-one{
   width: 800px;
   height: 45px;
   margin: 0 auto;
}
.nav-one li{
   list-style: none;
   float: left;
   width: 20%;
   height: 45px;
   line-height: 45px;
   text-align: center;
   background-color: #CCCCCC;
   /*border: 1px solid ;*/
}
.nav-one li:hover{
   background-color: #AE81FF;
}
.nav-one li:nth-last-child(1){
   /*border-right: none;*/
}
.nav-one li:hover .nav-two{
   display: block;
}
.nav-two{
   display: none;
}
.nav-two li{
   width: 100%;
}
.nav-two li:hover{
   background-color: #66D9EF;
   position: relative;
}
.nav-three{
   display: none;
}
.nav-two li:hover .nav-three{
   display: block;
}
.nav-three{
   position: absolute;
   width: 100%;
   left: 100%;
   /*bottom: 100%;*/
   top:0%;
}
.nav-one li .nav-two li .nav-three li{
   width: 100%;
   position: relative;
}
.nav-three li:hover{
   background-color: pink;
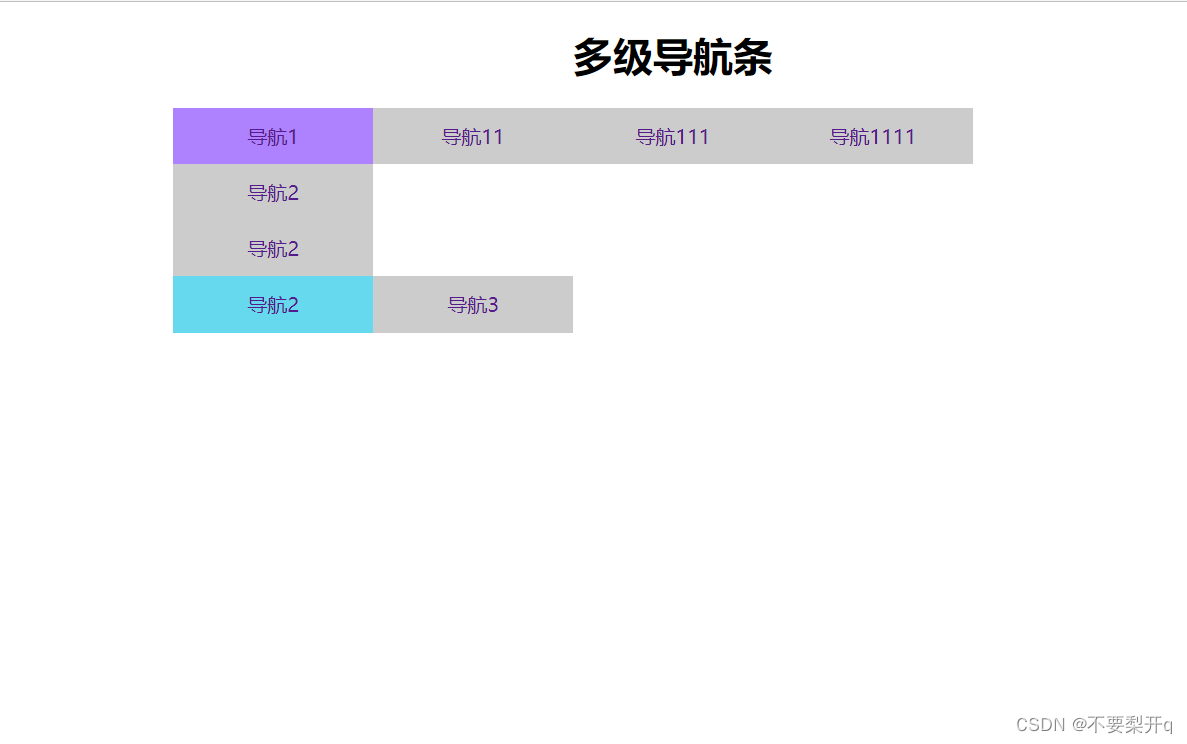
}

三、实现展示

955a11cea57c4e608fd7b63c9fd0295e.png


  • 2
    点赞
  • 3
    收藏
    觉得还不错? 一键收藏
  • 0
    评论
Django实现二级导航有多种方法,以下是其中一种常见的实现方法: 1. 在主导航中添加一个下拉菜单,用于显示二级导航的选项。 2. 在模板文件中定义一个包含主导航和二级导航的 HTML 结构,二级导航的选项可以使用 Django 的 URL 模板标签或手动添加链接。 3. 在视图函数中定义一个上下文变量,用于传递给模板文件显示二级导航的选项。 4. 在主导航中添加一个 JavaScript 代码段,用于在鼠标悬停在下拉菜单上时显示二级导航的选项。 具体实现步骤如下: 1. 在主导航中添加一个下拉菜单,代码如下: ```html <ul> <li><a href="#">Home</a></li> <li> <a href="#">Products</a> <ul> <li><a href="#">Product 1</a></li> <li><a href="#">Product 2</a></li> <li><a href="#">Product 3</a></li> </ul> </li> <li><a href="#">Contact Us</a></li> </ul> ``` 2. 在模板文件中定义一个包含主导航和二级导航的 HTML 结构,代码如下: ```html {% load static %} <!DOCTYPE html> <html> <head> <title>My Website</title> <link rel="stylesheet" href="{% static 'css/style.css' %}"> </head> <body> <nav> <ul> <li><a href="#">Home</a></li> <li> <a href="#">Products</a> <ul> {% for product in products %} <li><a href="{{ product.url }}">{{ product.name }}</a></li> {% endfor %} </ul> </li> <li><a href="#">Contact Us</a></li> </ul> </nav> <div class="content"> {% block content %} {% endblock %} </div> </body> </html> ``` 3. 在视图函数中定义一个上下文变量,用于传递给模板文件显示二级导航的选项,代码如下: ```python from django.shortcuts import render def product_list(request): products = [ {'name': 'Product 1', 'url': '/product-1/'}, {'name': 'Product 2', 'url': '/product-2/'}, {'name': 'Product 3', 'url': '/product-3/'}, ] context = {'products': products} return render(request, 'product_list.html', context) ``` 4. 在主导航中添加一个 JavaScript 代码段,用于在鼠标悬停在下拉菜单上时显示二级导航的选项,代码如下: ```javascript var dropdowns = document.querySelectorAll('.dropdown'); for (var i = 0; i < dropdowns.length; i++) { dropdowns[i].addEventListener('mouseenter', function() { this.querySelector('.dropdown-menu').classList.add('show'); }); dropdowns[i].addEventListener('mouseleave', function() { this.querySelector('.dropdown-menu').classList.remove('show'); }); } ``` 以上就是实现 Django 二级导航的一种常见方法。

“相关推荐”对你有帮助么?

  • 非常没帮助
  • 没帮助
  • 一般
  • 有帮助
  • 非常有帮助
提交
评论
添加红包

请填写红包祝福语或标题

红包个数最小为10个

红包金额最低5元

当前余额3.43前往充值 >
需支付:10.00
成就一亿技术人!
领取后你会自动成为博主和红包主的粉丝 规则
hope_wisdom
发出的红包
实付
使用余额支付
点击重新获取
扫码支付
钱包余额 0

抵扣说明:

1.余额是钱包充值的虚拟货币,按照1:1的比例进行支付金额的抵扣。
2.余额无法直接购买下载,可以购买VIP、付费专栏及课程。

余额充值