


环境
系统 | IP 地址 |
172.25.250.100 | |
172.25.250.200 |
您使用的系统属于 DNS 域 domain250.example.com。该域中的所有系统都位于172.25.250.0/255.255.255.0 子网中,该子网中的所有系统都位于 domain250.example.com 中。
针对这些系统列出的 IP 地址是应该分配给系统的地址。您可能需要为一个或两个系统配置网络,以便能够通过上述地址访问您的地址。
帐户信息
mars 的根密码已经设置为 flectrag 。
venus 的 containers 密码已经设置为 flectrag。
QUAY 的 admin 密码已经设置为 redhat321。
除非另有指定,否则这将是用于访问其他系统和服务的密码。此外,除非另有指定,否则应将该密码用于您创建的什么问题帐户或者需要设置密码的任意服务。
其他信息
您可以通过 SSH 或控制台访问考试系统(参见下文所述)。请注意,SSH 访问权可能取决于您解答其他考试项目的情况。
如果您需要在系统上安装其他软件,可以使用位于以下地址的存储库:
考试要求
在 mars.domain250.example.com 上执行以下任务。
配置网络设置
将 mars 配置为具有以下网络配置:
主机名:mars.domain250.example.com
IP 地址:172.25.250.100
子网掩码:255.255.255.0
网关:172.25.250.254
# 连接到虚拟机mars
[ kiosk@foundation0 ~]$ ssh root@mars
# 设置主机名
[ root@mars ~]$ hostnamectl set-hostname mars.domain250.example.com
# 设置网络参数
[ root@mars ~]$ nmcli connection modify Wired\ connection\ 1 ipv4.method manual ipv4.addresses 172.25.250.100/24 ipv4.gateway 172.25.250.254 ipv4.dns 172.25.250.254 autoconnect yes
# 连接生效
[ root@mars ~]$ nmcli con up Wired\ connection\ 1
# 检查用户名
[root@clear ~]# hostname
mars.domain250.example.com
2、配置您的系统以使用默认存储库
YUM 存储库已可以从 http://content/rhel8.2/x86_64/dvd/BaseOS 和 http://content/rhel8.2/x86_64/dvd/AppStream 使用配置您的系统,以将这些位置用作默认存储库。
# 配置yum仓库
[root@mars ~]# vi /etc/yum.repos.d/rhce8.repo
    [BaseOS]
    name=BaseOS
    baseurl=http://content/rhel8.2/x86_64/dvd/BaseOS
    enable=1
    gpgcheck=0

    [AppStream]
    name=AppStream
    baseurl=http://content/rhel8.2/x86_64/dvd/AppStream
    enable=1
    gpgcheck=0
# 下载vim工具
[root@mars ~]# yum install vim -y
3、调试 SELinux
非标准端口 82 上运行的 Web 服务器在提供内容时遇到问题。根据需要调试并解决问题,使其满足以下条件:
系统上的 Web 服务器能够提供 /var/www/html 中所有现有的 HTML 文件(注:不要删除或以其他方式改动现有的文件内容)
Web 服务器在端口 82 上提供此内容
Web 服务器在系统启动时自动启动
# 安装httpd服务
[root@mars ~]# yum install -y httpd
# 启动httpd服务,并设置开机启动,查看状态
[root@mars ~]# systemclt start httpd
[root@mars ~]# systemclt enable httpd
[root@mars ~]# systemclt status httpd
# 如果状态有误设定seLinux状态为enforcing强制状态
[root@mars ~]# setenforce 1
# 查看状态
[root@mars ~]# getenforce
Enforcing
# 将82端口号设置为httpd的标准端口
[root@mars ~]# semanage port -a -t http_port_t -p tcp 82
# 验证是否允许用户HHTP访问file1
[root@mars ~]# chcon -t httpd_sys_content_t file1
# 查看httpd服务是否监听
[root@mars ~]# netstat -lntup|grep httpd
# 调试防火墙放行82端口,并重新加载生效
[root@mars ~]# firewall-cmd --permanent --add-port=82/tcp
success
[root@mars ~]# firewall-cmd --reload
success
# 验证
[root@mars ~]# firewall-cmd --list-all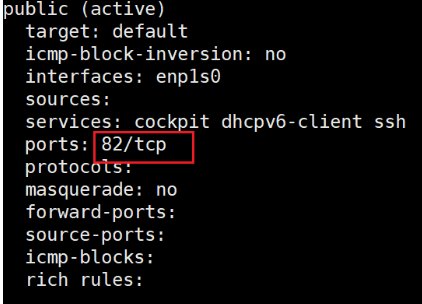
# 设置web服务器自启动
[root@mars ~]# systemctl enable --now httpd
# 在浏览器显示HTML文件
[root@mars ~]# chcon -t httpd_sys_content_t -R /var/www/html/
[root@mars ~]# curl http://mars:82/file{1..3}
EX200 Testing
EX200 Testing
EX200 Testing
4、创建用户帐户
创建下列用户、组和组成员资格:
名为 sysmgrs 的组
用户 natasha ,作为次要组从属于 sysmgrs
用户 harry ,作为次要组还从属于 sysmgrs
用户 sarah ,无权访问系统上的交互式 shell 且不是 sysmgrs 的成员
natasha 、 harry 和 sarah 的密码应当都是 flectrag
# 创建用户
[root@mars ~]# groupadd sysmgrs
# 用户的组
[root@mars ~]# useradd natasha -G sysmgrs
[root@mars ~]# useradd harry -G sysmgrs
# 用户登录shell的方式
[root@mars ~]# useradd sarah -s /bin/false 或者 useradd sarah -s /sbin/nologin
# 设置用户的登录密码
[root@mars ~]# echo flectrag | passwd --stdin natasha
Changing password for user natasha.
passwd: all authentication tokens updated successfully.
[root@mars ~]# echo flectrag | passwd --stdin harry
Changing password for user harry.
passwd: all authentication tokens updated successfully.
[root@mars ~]# echo flectrag | passwd --stdin sarah
Changing password for user sarah.
passwd: all authentication tokens updated successfully.
5、配置 cron 作业
配置 cron 作业,该作业每隔 2 分钟运行并执行以下命令:
logger "EX200 in progress",以用户 natasha 身份运行
[root@mars ~]# crontab -u natasha -e
*/2 * * * * logger "EX200 in progress"
[root@mars ~]# crontab -u natasha -l
*/2 * * * * logger "EX200 in progress"
* * * * * 代表含义 分 时 日 月 周
6、 创建协作目录
创建具有以下特征的协作目录 /home/managers :
/home/managers 的组用权是 sysmgrs
目录应当可被 sysmgrs 的成员读取、写入和访问,但任何其他用户不具这些权限。(当然,root 用户有权访问系统上的所有文件和目录)
/home/managers 中创建的文件自动将组所有权设置到 sysmgrs 组
# 创建目录
[root@mars ~]# mkdir /home/managers
# 目录的组用权
[root@mars ~]# chgrp sysmgrs /home/managers/
# 目录可被组及组成员执行哪些权限
[root@mars ~]# chmod g+ws /home/managers/
# 其他用户对于目录有的权限
[root@mars ~]# chmod o=- /home/managers/
# 检验
[root@mars ~]# ll /home/managers/ -d
drwxrws---. 2 root sysmgrs 6 Dec  5 05:34 /home/mangers/
7、配置 NTP
配置您的系统,使其成为 materials.example.com 的 NTP 客户端。(注:materials.example.com 是 classroom.example.com 的 DNS 别名)
[root@mars ~]# yum install chrony -y
[root@mars ~]# vim /etc/chrony.conf
#server 0.rhel.pool.ntp.org iburst
#server 1.rhel.pool.ntp.org iburst
#server 2.rhel.pool.ntp.org iburst
#server 3.rhel.pool.ntp.org iburst
server materials.example.com iburst

[root@mars ~]# systemctl restart chronyd.service
[root@mars ~]# systemctl enable chronyd.service
[root@mars ~]# chronyc sources
210 Number of sources = 1
MS Name/IP address         Stratum Poll Reach LastRx Last sample
===============================================================================
^* classroom.example.com         8   6    17    10    -69us[  +51us] +/-  528us
8、配置 autofs
配置 autofs ,以按照如下所述自动挂载远程用户的主目录:
materials.example.com ( 172.25.254.254 ) NFS 导出 /rhome 到您的系统。此文件系统包含为用户 remoteuser1 预配置的主目录
remoteuser1 的主目录是 materials.example.com:/rhome/remoteuser1
remoteuser1 的主目录应自动挂载到本地 /rhome 下的 /rhome/remoteuser1
主目录必须可供其用户写入
remoteuser1 的密码是 flectrag
[root@mars ~]# yum install autofs -y
[root@mars ~]# vim /etc/auto.master
/rhome  /etc/auto.nfs
[root@mars ~]# vim /etc/auto.nfs
remoteuser1              -fstype=nfs,rw  materials.example.com:/rhome/remoteuser1
[root@mars ~]# systemctl enable --now autofs

[kiosk@foundation0 ~]$ ssh remoteuser1@mars
remoteuser1@mars's password:
Activate the web console with: systemctl enable --now cockpit.socket

This system is not registered to Red Hat Insights. See https://cloud.redhat.com/
To register this system, run: insights-client --register
9、配置 /var/tmp/fstab 权限
将文件 /etc/fstab 复制到 /var/tmp/fstab 。配置 /var/tmp/fstab 的权限以满足如下条件:
文件 /var/tmp/fstab 自 root 用户所有
文件 /var/tmp/fstab 属于组 root
文件 /var/tmp/fstab 应不能被任何人执行
用户 natasha 能够读取和写入 /var/tmp/fstab
用户 harry 无法写入或读取 /var/tmp/fstab
所有其他用户(当前或未来)能够读取 /var/tmp/fstab
[root@mars ~]# cp /etc/fstab /var/tmp/
[root@mars ~]# ll /var/tmp/fstab
-rw-r--r--. 1 root root 427 Jun 17 17:06 /var/tmp/fstab
[root@mars ~]# setfacl -m u:natasha:rw /var/tmp/fstab
[root@mars ~]# setfacl -m u:harry:- /var/tmp/fstab
#检验
[root@mars ~]# getfacl /var/tmp/fstab
getfacl: Removing leading '/' from absolute path names
# file: var/tmp/fstab
# owner: root
# group: root
user::rw
user:harry:rw
user:natasha:---
group::r--
mask::rw
other::r--
10、配置用户帐号
配置用户 manalo ,其用户 ID 为 3533。此用户的密码应当为 flectrag。
# 添加用户并设置用户ID
[root@mars ~]# useradd manalo -u 3533
# 设置用户密码
[root@mars ~]# echo flectrag | passwd --stdin manalo
Changing password for user manalo.
passwd: all authentication tokens updated successfully.
11、查找文件
查找当 jacques 所有的所有文件并将其副本放入 /root/findfiles 目录
[root@mars ~]# mkdir /root/findfiles
[root@mars ~]# find / -user jacques -type f -exec cp -a {} /root/findfiles \;
find: ‘/proc/25230/task/25230/fdinfo/6’: No such file or directory
find: ‘/proc/25230/fdinfo/7’: No such file or directory
[root@mars ~]# ls /root/findfiles/
gamelan  jacques  libWedgeit.so.1.2.3
12、查找字符串
查找文件 /usr/share/xml/iso-codes/iso_639_3.xml 中包含字符串 ng 的所有行。将所有这些行的副本按原始顺序放在文件 /root/list 中。 /root/list 不得包含空行,且所有行必须是 /usr/share/xml/iso-codes/iso_639_3.xml 中原始行的确切副本。
[root@mars ~]# grep ng /usr/share/xml/iso-codes/iso_639_3.xml > /root/list13、创建存档
创建一个名为 /root/backup.tar.gz 的 tar 存档,其应包含 /usr/local 的 tar 存档,其应包含 /usr/local 的内容。该 tar 存档必须使用 gzip 进行压缩。
[root@mars ~]# tar czf /root/backup.tar.gz /usr/local
tar: Removing leading `/' from member names
在 venus.domain250.example.com 上执行以下任务。
1、设置 root 密码
将 venus 的 root 密码设置为 flectrag 。您需要获得系统访问权限才能进行此操作。
重启serverb
1>引导时按e
2>修改linux这一行
ro改成rw
行尾添加: init=/bin/sh console=ttye
3> ctrl+x后动。
4>修改密码:
sh-4.4# echo flectrag | passwd --stdin root
5>SELinux打标记∶
sh-4.4# touch /.autorelabel
6>启动∶ exec /sbin/init2、配置您的系统以使用默认存储库
YUM 存储库已可以从 http://content/rhel8.2/x86_64/dvd/BaseOS 和 http://content/rhel8.2/x86_64/dvd/AppStream 使用配置您的系统,以将这些位置用作默认存储库。
[root@venus ~]# vi /etc/yum.repos.d/rhce8.repo
[Baseos]
name=Baseos
baseurl=http:/ lcontent/rhel8.2/x86_64/dvd/Baseos
gpgcheck=0

[AppStream]
name=AppStream
baseurl=http://content/rhe18.2/x86_64/dvd/AppStream
gpgcheck=0
3、设置逻辑卷大小
将逻辑卷 vo 及其文件系统的大小调整到 230 MiB。确保文件系统内容保持不变。注:分区大小很少与请求的大小完全相同,因此可以接受范围为 217 MiB 到 243 MiB 的大小。
思路:查看lvs、查看vgs
看vg剩余空间够不够扩展,如果不够先扩展vg : vgextend VG PV
查看逻辑卷: lvs
需要扩大:先查看卷组:vgs ,再查看逻辑卷挂载的地方: df -h ,再去看挂载有哪些东西
# 创建调整空间大小
[root@venus ~]# lvextend -rL 230M /dev/myvo1/vo
# 过滤查看是否创建成功
[root@venus ~]# df -h| grep vo
/ dev/mapper/myvo1-vo 221M  2.1M 204M  1%  /reports
4、添加交换分区
向您的系统添加一个额外的交换分区 756MiB 。交换分区应在系统启动时自动挂载。不要删除或以任何方式改动系统上的任何现有交换分区。
# 准备工作
[root@venus ~]# fdisk /dev/vdb
Welcome to fdisk (util-linux 2.32.1).
Changes will remain in memory only, until you decide to write them.
Be careful before using the write command.
Device does not contain a recognized partition table.
Created a new DOS disklabel with disk identifier 0xae75bf0a.

Command (m for help): n
Partition type
   p   primary (2 primary, 0 extended, 2 free)
   e   extended (container for logical partitions)
Select (default p):

Usingdefault response p.
Partition number (3,4, default 3):
First sector (5240834-10485759, default 5242880):
Last sector, +sectors or +size{K,M,G,T,P} (5242880-10485759, default 10485759): +756M
Command (m for help): t
Partition number (1-3, default 3):
Hex code (type L to list all codes): 82
Command (m for help): p
Disk /dev/vdb: 5 GiB, 5368709120 bytes, 10485760 sectors
Units: sectors of 1 * 512 = 512 bytes
Sector size (logical/physical): 512 bytes / 512 bytes
I/O size (minimum/optimal): 512 bytes / 512 bytes
Disklabel type: dos
Disk identifier: 0x8e8d0859

Device     Boot   Start     End Sectors  Size Id Type
/dev/vdb1          2048 1046528 1044481  510M 83 Linux
/dev/vdb2       1046529 5240833 4194305    2G 83 Linux
/dev/vdb3       5242880 6791167 1548288  756M 82 Linux swap / Solaris

Command (m for help): w
The partition table has been altered.
Syncing disks.
# 可能会有红色提示:Device of resource busy,那就重启: reboot
# 创建交换空间
[root@venus ~]# mkswap /dev/vdb5
# 启用
[root@venus ~]# swapon /dev/vdb5
[root@venus ~]# swapon -s
# 开机挂载:
#查看UUID ,并复制
[root@venus ~]# blkid
# 配置vdb5 : tail -1 /etc/fstab
UUID="e7129e9f-d3e8-473c-a9fe-03cac7dffd79" none swap defaults 0 0
# 重启生效
[root@venus ~]# reboot
5、创建逻辑卷
根据如下要求,创建新的逻辑卷:
逻辑卷取名为 qa ,属于 qagroup 卷组,大小为 60 个扩展块
qagroup 卷组中逻辑卷的扩展块大小应当为 16 MiB
使用 ext3 文件系统格式化新逻辑卷。该逻辑卷应在系统启动时自动挂载到 /mnt/qa 下
[root@venus ~]# fdisk /dev/vdb
Welcome to fdisk (util-linux 2.32.1).
Changes will remain in memory only, until you decide to write them.
Be careful before using the write command.
Device does not contain a recognized partition table.
Created a new DOS disklabel with disk identifier 0xae75bf0a.

Command (m for help): n
Partition type
   p   primary (3 primary, 0 extended, 1 free)
   e   extended (container for logical partitions)
Select (default e):

Using default response e.
Selected partition 4
First sector (5240834-10485759, default 6791168):
Last sector, +sectors or +size{K,M,G,T,P} (6791168-10485759, default 10485759):

Created a new partition 4 of type 'Extended' and of size 1.8 GiB.

Command (m for help): n
All primary partitions are in use.
Adding logical partition 5
First sector (6793216-10485759, default 6793216):
Last sector, +sectors or +size{K,M,G,T,P} (6793216-10485759, default 10485759): +1000M

Created a new partition 5 of type 'Linux' and of size 1000 MiB.

Command (m for help): t
Partition number (1-5, default 5):
Hex code (type L to list all codes): 8e

Changed type of partition 'Linux' to 'Linux LVM'.

Command (m for help): p
Disk /dev/vdb: 5 GiB, 5368709120 bytes, 10485760 sectors
Units: sectors of 1 * 512 = 512 bytes
Sector size (logical/physical): 512 bytes / 512 bytes
I/O size (minimum/optimal): 512 bytes / 512 bytes
Disklabel type: dos
Disk identifier: 0x8e8d0859

Device     Boot   Start      End Sectors  Size Id Type
/dev/vdb1          2048  1046528 1044481  510M 83 Linux
/dev/vdb2       1046529  5240833 4194305    2G 83 Linux
/dev/vdb3       5242880  6791167 1548288  756M 82 Linux swap / Solaris
/dev/vdb4       6791168 10485759 3694592  1.8G  5 Extended
/dev/vdb5       6793216  8841215 2048000 1000M 8e Linux LVM

Command (m for help): w
The partition table has been altered.

# 创建卷组
[root@venus ~]# vgcreate -s 16M qagroup /dev/vdb6
  Physical volume "/dev/vdb5" successfully created.
  Volume group "qagroup" successfully created
# 创建逻辑卷详
[root@venus ~]# lvcreate -l 60 -n qa qagroup
    Logical volume "qa" created.
# 挂载vdb6
[root@venus ~]# mkfs.ext3 /dev/qagroup/qa
# 配置vdb6
[root@venus ~]# vim /etc/fstab
UUID="c4e2ba47-347e-4a75-bac5-da970289a0f8" /mnt/qa ext3 defaults 0 0
# 挂载
[root@venus ~]# mount -a /mnt/qa
# 检验是否挂载成功
[root@venus ~]# df -h | grep qa
6、创建 VDO 卷
根据如下要求,创建新的 VDO 卷:
使用未分区的磁盘
该卷的名称为 vdough
该卷的逻辑大小为 50G
该卷使用 xfs 文件系统格式化
该卷(在系统启动时)挂载到 /vbread 下
[root@venus ~]# ll /dev/vdc
[root@venus ~]# fdisk -l /dev/vdc
[root@venus ~]# rpm -qa|grep vdo
[root@venus ~]# dnf install vdo* -y
[root@venus ~]# vdo create --name=vdough --device=/dev/sdb1 --vdoLogicalSize=50G
[root@venus ~]# mkfs.xfs /dev/mapper/vdough
[root@venus ~]# mkdir /vbread
[root@venus ~]# blkid  #查看uuid
# 配置vdb6
[root@venus ~]# tail -1 /etc/fstab
UUID="492888e0-8744-4462-9747-2380a31e766c" /vbread xfs defaults 0 0

更改:UUID="492888e0-8744-4462-9747-2380a31e766c" /vbread xfs defaults,x-systemd.requires=vdo.service 0 0
# 重启
[root@venus ~]# reboot
# 检验
7、配置系统调优
为您的系统选择建议的 tuned 配置集并将它设为默认设置。
[root@venus ~]# tuned-adm recommend
virtual-guest
# 查看当前的
[root@venus ~]# tuned-adm active
# 更改
[root@venus ~]# tuned-adm profile virtual-guest
# 启动
[root@venus ~]# tuned-adm active
Current active profile: virtual-gues
8、配置容器
创建 /srv/web/ 目录,然后在该目录中提取 /home/containers/web-content.tgz 存档。配置目录,以便无根容器可以将其用于持久性存储
安装容器工具
作为 containers 用户,创建一个名为 web 的独立的 apache httpd 服务器容器。从 registry.domain250.example.com 注册表中使用带有标签 1-105 的 rhel8/httpd-24 映像。将容器中的端口 8080 映射到主机上的端口 8888。将 /srv/web 目录作为容器中的 /var/www/ 挂载在主机上。用值event声明环境变量 HTTPD_MPM
作为 containers 用户,配置 systemd 以使 web 自动从服务器启动
[root@venus ~]# mkir /srv/web
[root@venus ~]# tar -zvxf /home/containers/web-content.tgz -C /srv/web/
[root@venus ~]# ll /srv/web/
-------------------------------------------------------------------------
# Rootless容器需要拥有对/srv/web/目录及其内容的读取访问权限。此外,以containers用户身份运行的podman命令必须能够重新标记SELinux的目录。将目录所有者设置为containers,然后确认每个人都有权访问该内容
[root@venus ~]# chown -R containers: /srv/web
# 装包
[root@venus ~]# yum module install container-tools
# 从root账户注销
[root@venus ~]# exit
# 登录到containers
[root@venus ~]# ssh containers@venu
# 登录到podman
[root@venus ~]# podman login registry.domain250.example.com
Username: admin
Password: redhat321
Login Succeeded!
-------------------------------------------------------------------------
# 使用podman run命令创建容器
[containers@venus ~]$ podman run -d --name web -p 8888:8080 \
-v /srv/web:/var/www -e HTTPD_MPM=event \
registry.domain250.example.com/rhel8/httpd-24:1-105
-d 在后台运行
--name 容器名
-p 映射端口
-v 映射卷
:Z 处理SELinux的上下文
-e 添加额外参数,申明变量
# 使用curl命令确认Apache HTTP Server正在运行
[containers@venus ~]# curl http://localhost:8888/
Web Content Test
-------------------------------------------------------------------------
# 创建~/.configl systemd/user/目录
[containers@venus ~]# mkdir -p ~/.config/systemd/user/
# 使用podman generate systemd命令,从正在运行的容器中创建systemd单元文件
[containers@venus ~]# cd ~/.config/systemd/user/
[containers@venus ~]# podman generate systemd --name web --files --new
[containers@venus ~]# ll
# 停止然后删除web容器
[containers@venus ~]# podman stop web
[containers@venus ~]# podman rm web
# 指示systemd重新加载其配置,然后启用并启动container-web服务
[containers@venus ~]# systemctl --user daemon-reload
[containers@venus ~]# systemctl --user enable --now container-web.service
[containers@venus ~]# systemctl enable podman
密码:flectrag
# 运行loginctl enable-linger命令,使用户服务在服务器启动时自动启动
[containers@venus ~]# loginctl enable-linger
# 从venus退出
[containers@serverb~]$ exit所有任务完成后
# 在foundation0计算机上以kiosk用户身份,使用命令为工作评级
[kiosk@foundation0 ~]$ exam-grade


 2000
2000

 被折叠的 条评论
为什么被折叠?
被折叠的 条评论
为什么被折叠?
 到【灌水乐园】发言


