webservers1 #组一
webservers2 #组二
4.为一个组指定变量,组内每个主机都可以使用该变量:
[weball:vars] #设置变量,vars–照写
ansible_ssh_port=22
ansible_ssh_user=root
ansible_ssh_private_key_file=/root/.ssh/id_rsa
#ansible_ssh_pass=1 #也可以定义密码,如果没有互传秘钥可以使用密码。
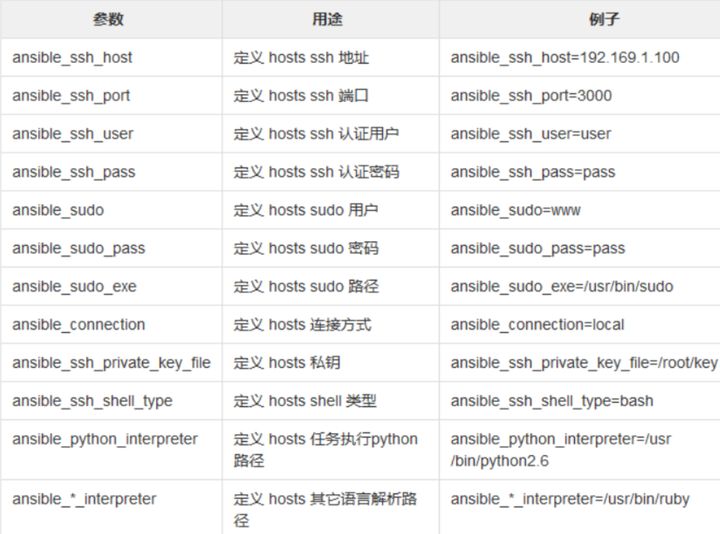
Ansible Inventory 常见的内置参数:

查看组内主机列表:
语法:ansible 组名 --list-hosts
[root@ansible-server ~]# ansible weball --list-hosts
hosts (2):
ansible-web1
ansible-web2
扩展:自定义主机列表使用密码登录:(了解)
[root@ansible-server ~]# vim /opt/hostlist
[all:vars]
ansible_ssh_port=22
ansible_ssh_user=root
#ansible_ssh_private_key_file=/root/.ssh/id_rsa
a1nsible_ssh_pass=1
[all]
ansible-web1
ansible-web2
使用:
[root@ansible-server ~]# ansible -i /opt/hostlist all -m ping -o
-i:指定清单文件
注意:这里的ping并不是真正意义上的ping而是探测远程主机ssh是否可以连接!判断ssh端口是否存活
#### 4、测试
语法:
ansible -m <module_name> -a
pattern–主机清单里定义的主机组名,主机名,IP,别名等,all表示所有的主机,支持通配符,正则
-m module_name: 模块名称,默认为command
-a arguments: 传递给模块的参数
-o 横着显示(单行显示)
使用案例:
使用ping模块检查ansible节点的连通性:
1.指定单台机器:
[root@ansible-server ~]# ansible ansible-web1 -m ping -o
ansible-web1 | SUCCESS => {“ansible_facts”: {“discovered_interpreter_python”: “/usr/bin/python”}, “changed”: false, “ping”: “pong”}
2.同时指定多台机器:
[root@ansible-server ~]# ansible ansible-web1,ansible-web2 -m ping -o
ansible-web1 | SUCCESS => {“ansible_facts”: {“discovered_interpreter_python”: “/usr/bin/python”}, “changed”: false, “ping”: “pong”}
ansible-web2 | SUCCESS => {“ansible_facts”: {“discovered_interpreter_python”: “/usr/bin/python”}, “changed”: false, “ping”: “pong”}
3.指定组名:
[root@ansible-server ~]# ansible webservers1 -m ping -o
ansible-web1 | SUCCESS => {“ansible_facts”: {“discovered_interpreter_python”: “/usr/bin/python”}, “changed”: false, “ping”: “pong”}
执行shell命令:
[root@ansible-server ~]# ansible webservers1 -m shell -a ‘uptime’
ansible-web1 | CHANGED | rc=0 >>
23:32:47 up 5:24, 3 users, load average: 0.00, 0.01, 0.05
不加 -m 默认是 command 模块
[root@ansible-server ~]# ansible webservers1 -a ‘uptime’
ansible-web1 | CHANGED | rc=0 >>
23:34:01 up 5:25, 3 users, load average: 0.16, 0.05, 0.06
1.给节点增加用户:
[root@ansible-server ~]# ansible webservers1 -m shell -a ‘useradd tom’
ansible-web1 | CHANGED | rc=0 >>
[root@ansible-server ~]# ansible webservers1 -a ‘grep tom /etc/passwd’
ansible-web1 | CHANGED | rc=0 >>
tom❌1000:1000::/home/tom:/bin/bash
重定向输出到本地文件中:
[root@ansible-server ~]# ansible webservers1 -a ‘df -Th’ > /opt/a.txt
[root@ansible-server ~]# cat /opt/a.txt
ansible-web1 | CHANGED | rc=0 >>
Filesystem Type Size Used Avail Use% Mounted on
/dev/mapper/centos-root xfs 18G 1.1G 17G 6% /
devtmpfs devtmpfs 226M 0 226M 0% /dev
tmpfs tmpfs 237M 0 237M 0% /dev/shm
tmpfs tmpfs 237M 4.7M 232M 2% /run
tmpfs tmpfs 237M 0 237M 0% /sys/fs/cgroup
/dev/sda1 xfs 1014M 125M 890M 13% /boot
tmpfs tmpfs 48M 0 48M 0% /run/user/0
面试:
在ansible中shell 和 command 模块. 这两个模块在很多情况下都能完成同样的工作,那么这两个模块之间的区别是什么?
#### 5、Ad-Hoc


ad hoc其实就是执行简单的命令——一条命令。对于复杂的命令则为 playbook。
帮助文档:
列出ansible支持的模块:
-l:获取列表
-s module_name:获取指定模块的使用信息
看所有模块(A10,华为,docker,EC2,aws等等广大厂商设备)
[root@ansible-server ~]# ansible-doc -l
查看模块使用信息,了解其功能:
[root@ansible-server ~]# ansible-doc -s yum
常用模块
1.远程复制备份模块:copy
模块参数详解:
src=:指定源文件路径
dest=:目标地址(拷贝到哪里)
owner:指定属主
group:指定属组
mode:指定权限,可以以数字指定比如0644
backup:在覆盖之前将原文件备份,备份文件包含时间信息。有两个选项:yes|no
[root@ansible-server ~]# vim a.txt #创建一个测试文件
123123
[root@ansible-server ~]# ansible weball -m copy -a ‘src=/root/a.txt dest=/opt owner=root group=root mode=644’ -o
[root@ansible-server ~]# vim a.txt #追加如下内容
123123
234234
[root@ansible-server ~]# ansible weball -m copy -a ‘src=/root/a.txt dest=/opt/ owner=root group=root mode=644 backup=yes’ -o
登录被控制机器其中一台查看
[root@ansible-web1 ~]# cat /opt/a.txt.15301.2019-09-01@00:35:18~
2.用户管理user模块
添加用户并设置密码:
[root@ansible-server ~]# ansible ansible-web1 -m user -a ‘name=qianfeng password=“77777”’
"name= " #如:指定的用户名,要安装的软件
删除用户:
[root@ansible-server ~]# ansible ansible-web1 -m user -a “name=qianfeng state=absent” -o
absent #删除用户,但是不会删除家目录
3.软件包管理 yum模块
安装apache
[root@ansible-server ~]# ansible webservers1 -m yum -a “name=httpd state=latest” -o
state= #状态是什么,干什么
state=absent 用于删除安装包
state=latest 表示最新的
state=removed 表示卸载
卸载软件:
[root@ansible-server ~]# ansible webservers1 -m yum -a “name=httpd state=removed” -o
4.服务管理service模块
[root@ansible-server ~]# ansible webservers1 -m service -a “name=httpd state=started” #启动
[root@ansible-server ~]# ansible webservers1 -m service -a “name=httpd state=stopped” #停止
[root@ansible-server ~]# ansible webservers1 -m service -a “name=httpd state=restarted” #重启
[root@ansible-server ~]# ansible webservers1 -m service -a “name=httpd state=started enabled=yes” #开机启动
[root@ansible-server ~]# ansible webservers1 -m service -a “name=httpd state=started enabled=no” #开机关闭
5.文件模块file
模块参数详解:
owner:修改属主
group:修改属组
mode:修改权限
path=:要修改文件的路径
recurse:递归的设置文件的属性,只对目录有效
yes:表示使用递归设置
state:
touch:创建一个新的空文件
directory:创建一个新的目录,当目录存在时不会进行修改
#创建一个文件
[root@ansible-server ~]# ansible webservers1 -m file -a ‘path=/tmp/88.txt mode=777 state=touch’
#创建一个目录
[root@ansible-server ~]# ansible webservers1 -m file -a ‘path=/tmp/99 mode=777 state=directory’
6.收集信息模块setup
[root@ansible-server ~]# ansible webservers1 -m setup #收集所有信息
[root@ansible-server ~]# ansible webservers1 -m setup -a ‘filter=ansible_all_ipv4_addresses’ #只查询ipv4的地址
filter:过滤
网上学习资料一大堆,但如果学到的知识不成体系,遇到问题时只是浅尝辄止,不再深入研究,那么很难做到真正的技术提升。
一个人可以走的很快,但一群人才能走的更远!不论你是正从事IT行业的老鸟或是对IT行业感兴趣的新人,都欢迎加入我们的的圈子(技术交流、学习资源、职场吐槽、大厂内推、面试辅导),让我们一起学习成长!


 570
570


 被折叠的 条评论
为什么被折叠?


