


一、了解vuex中的各个js文件的用途
1、了解vuex
变量传值的演变形式:

官方解释:Vuex 是一个专为 Vue.js 应用程序开发的状态管理模式。
vuex是管理整个前端项目的变量,狭义的认为vuex相当于前端的数据库
vuex是为了解决一个传值问题
图解Vuex:vuex包含了四大控件——》state、getters、mutations、actions

  1.State:单一状态树,变量的定义

   2.Getters:状态获取,将state中定义的值暴露在this.$store.getters对象中

   3.Mutations:触发同步事件,变量值的修改

   4.Actions:提交mutation,可以包含异步操作
2、准备环境
①、下载vuex的依赖
在文件中的跟目录下执行cmd语句
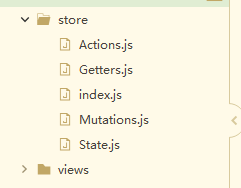
npm install vuex -S②、创建store模块,分别维护state/actions/mutations/getters
注意:命名要与这一模一样
在vuex的四大控件文件中都写入以下代码:

③、在store/index.js文件中新建vuex的store实例,并注册上面引入的各大模块
index.js将vuex四大控件整合到一起
import Vue from 'vue'
import Vuex from 'vuex'
import state from './State'
import getters from './Getters'
import actions from './Actions'
import mutations from './Mutations'
Vue.use(Vuex)
const store = new Vuex.Store({
     state,
     getters,
     actions,
     mutations
 })

 export default store
④、要使用vuex,就在main.js中导入并使用store实例
// The Vue build version to load with the `import` command
// (runtime-only or standalone) has been set in webpack.base.conf with an alias.
import Vue from 'vue'
// 开发环境下才会引入mockjs
//开发环境:true && require('@/mock')会执行后面代码,也就是说mock.js会被导入到当前环境
// 生产环境:false && require('@/mock')不会执行后面代码,也就是说mock.js是不会引入到当前环境中
// process.env.MOCK && require('@/mock')
import 'element-ui/lib/theme-chalk/index.css'
import App from './App'
import router from './router'
import ElementUI from 'element-ui'
import axios from '@/api/http' /* #vue项目对axios的全局配置 */
import VueAxios from 'vue-axios'
import store from './store'

Vue.use(ElementUI)
Vue.use(VueAxios,axios)
Vue.config.productionTip = false

/* eslint-disable no-new */
new Vue({
  el: '#app',
  data(){
    return{
      // 定义主线
      Bus:new Vue({

      })
    }
  },
  router,
  store,
  components: { App },
  template: '<App/>'
})
⑤、根据使用的表设计,建立组件VuexPage1.vue

<template>
  <div>
    页面1:欢迎来到{{msg}}
  </div>
</template>

<script>
export default {
  name: 'HelloWorld',
  data () {
    return {

    }
  },
  computed:{
    msg(){
      return "kpc";
    }
  }
}
</script>

<style>
</style>
⑥、配置路由router/index.js
// 在路由中定义
import Vue from 'vue'
import Router from 'vue-router'
import HelloWorld from '@/components/HelloWorld'
import Login from '@/views/Login'
import Reg from '@/views/Reg'
import AppMain from '@/components/AppMain'
import LeftNav from '@/components/LeftNav'
import TopNav from '@/components/TopNav'
import Articles from '@/views/sys/Articles'
import VuexPage1 from '@/views/sys/VuexPage1'

Vue.use(Router)

export default new Router({
  routes: [
    {
      path: '/',
      name: 'Login',
      component: Login
    },
    {
      path: '/Login',
      name: 'Login',
      component: Login
    },
    {
      path: '/Reg',
      name: 'Reg',
      component: Reg
    },
    {
      path: '/AppMain',
      name: 'AppMain',
      component: AppMain,
      children:[
        {
          path: '/LeftNav',
          name: 'LeftNav',
          component: LeftNav
        },
        {
          path: '/TopNav',
          name: 'TopNav',
          component: TopNav
        },
        {
          path: '/sys/Articles',
          name: 'Articles',
          component: Articles
        },
        {
          path: '/sys/VuexPage1',
          name: 'VuexPage1',
          component: VuexPage1
        }
      ]
    }

      ]
})
⑦、写VuexPage2组件,配置路由,与VuexPage1 步骤差不多
效果:


二、利用vuex取值
在State.js中定义数据:
export default{
     resturantName:'德莱联盟'
}
在Getters.js中定义方法:
export default{
  getResturantName:(state)=>{
    return state.resturantName;
  }
}
在VuexPage1 与VuexPage2中以同样的方法取值:
<template>
  <div>
    <h3>页面1:欢迎来到{{msg}}</h3>
    <button @click="panta">盘它</button>
  </div>
</template>

<script>
export default {
  name: 'HelloWorld',
  data () {
    return {
    }
  },
  methods:{
    panta(){
    }
  }
  computed:{
    msg(){
      // return "kpc";
      //return this.$store.state.resturantName;

        return this.$store.getters.getResturantName;
    }
  }
}
</script>

<style>
</style>
三、利用vuex同步存值
处理数据的唯一途径,state的改变或赋值只能在Mutations.js

// type(事件类型): 其值为setResturantName

// payload:官方给它还取了一个高大上的名字:载荷,其实就是一个保存要传递参数的容器,从组件中传递
export default{
setResturantName: (state, payload) => {
state.resturantName = payload.resturantName;
}
}
在VuexPage1中调用:
<template>
  <div>
    <h3>页面1:欢迎来到{{msg}}</h3>
    <button @click="panta">盘它</button>
  </div>
</template>

<script>
export default {
  name: 'HelloWorld',
  data () {
    return {
    }
  },
  methods:{
    panta(){
      this.$store.commit("setResturantName",{
        resturantName:"德莱联盟"
      })
    }
  },
  computed:{
    msg(){
      // return "麦当劳";
      return this.$store.state.resturantName;
    }
  }
}
</script>

<style>
</style>
点击盘它改变了数据:

同样角色管理的页面的数据也发生了改变:

四、异步修改值
Actions.js:
xport default{
    setResturantNameAsync: (context, payload) => {
      //context等价于this.$store,也就是它代表了vuex的上下蚊
    //   在这个文件中是可以调用同步文件mutations.js定义的同步方法
    // context.commit("setResturantName",payload);
    // 定制函数,6秒钟后执行
    setTimeout(function(){
      context.commit("setResturantName",payload);
    },6000);
    }
}
在VuexPage1中调用:
<template>
  <div>
<h3>页面1:欢迎来到{{msg}}</h3>
<button @click="buy">盘他(同步)</button>
<button @click="buyAsync">搞他(异步)</button>
<button @click="doAjax">搞他(异步)</button>
  </div>
</template>

<script>
  export default{
  data(){
    return{

    };
  },
  computed:{
    msg(){
      return this.$store.state.resturantName;
    }
  },
  methods:{
    buy(){
      this.$store.commit('setResturantName',{
        resturantName:'德莱联盟'
      });
    },
    buyAsync(){
    this.$store.dispatch('setResturantNameByAsync',{
      resturantName:'麦当劳'
    });
    },
    doAjax(){
      this.$store.dispatch('doAjax',{
        _this:this
      });
    }
  }
  }


</script>

<style>
</style>
可以操作盘它按钮,同时也可以操作搞他的按钮:

五、vuex的异步加载问题及后台调用问题
VuexPage1:
<template>
  <div>
<h3>页面1:欢迎来到{{msg}}</h3>
<button @click="buy">盘他(同步)</button>
<button @click="buyAsync">搞他(异步)</button>
<button @click="doAjax">搞他(异步)</button>
  </div>
</template>

<script>
  export default{
  data(){
    return{

    };
  },
  computed:{
    msg(){
      return this.$store.state.resturantName;
    }
  },
  methods:{
    buy(){
      this.$store.commit('setResturantName',{
        resturantName:'德莱联盟'
      });
    },
    buyAsync(){
    this.$store.dispatch('setResturantNameByAsync',{
      resturantName:'麦当劳'
    });
    },
    doAjax(){
      this.$store.dispatch('doAjax',{
        _this:this
      });
    }
  }
  }


</script>

<style>
</style>
Mutations.js:
export default{
    setResturantName: (state, payload) => {
              state.resturantName = payload.resturantName;
    },
    doAjax:(state, payload) => {
      // 需求:想在当前的文件中与后台服务器做数据交互
      let _this=payload._this;
      let url = _this.axios.urls.SYSTEM_MENU_TREE;
      // 箭头函数解决了this指针污染问题
      _this.axios.post(url, {}).then((resp) => {
        console.log(resp);
      }).catch(function(error) {
        console.log(error);
      });
    }
}


 813
813


 被折叠的 条评论
为什么被折叠?
被折叠的 条评论
为什么被折叠?
 到【灌水乐园】发言


