


currentComposer.createNode(factory)
} else {
currentComposer.useNode()
}
//执行update函数
Updater(currentComposer).update() // 👈 📌 measurePolicy 在这
//执行skippableUpdate函数
SkippableUpdater(currentComposer).skippableUpdate() // 👈 📍 modifier 在这函数中
currentComposer.startReplaceableGroup(0x7ab4aae9)
content()
currentComposer.endReplaceableGroup()
currentComposer.endNode()
}
先只看和 modifier 有关的,即 SkippableUpdater<T>(currentComposer).skippableUpdate() 这句话,其他的先不看。
这里函数的参数都是函数参数类型,如果 Kotlin 不太熟悉的,可能看着比较晕 😵 ,下面为了方便分析一下,就把代码给它摊平了。
这里的 “代码给它摊平了” 是指去掉函数回调和一层层的调用,直接写到一起,避免函数跳来跳去,方便解释。下文中提到的摊平都是这个意思。
下面我就试着把它摊平看看。
//源代码
SkippableUpdater(currentComposer).skippableUpdate()
//0️⃣ 根据 ComposeNode 传入参数知
skippableUpdate=materializerOf(modifier) // 👈 📍 modifier
//1️⃣ materializerOf 函数返回值就是函数类型 SkippableUpdater.() -> Unit
internal fun materializerOf(
modifier: Modifier
): @Composable SkippableUpdater.() -> Unit = {
// 📍 这里只是对 modifier链中存在的 ComposedModifier 进行处理一下,返回值还是 Modifier
val materialized = currentComposer.materialize(modifier)
update { set(materialized, ComposeUiNode.SetModifier) } // 👈 📍 modifier
}
//结合代码 0️⃣ 和代码 1️⃣ 可知 SkippableUpdater(currentComposer).skippableUpdate()
//<=> 等价于代码如下
val skippableUpdater=SkippableUpdater(currentComposer)
val materialized = currentComposer.materialize(modifier)
skippableUpdater.update { set(materialized, ComposeUiNode.SetModifier) }
好像还差点还有个update 还是没有摊平
inline class SkippableUpdater constructor(
@PublishedApi internal val composer: Composer
) {
inline fun update(block: Updater.() -> Unit) {
composer.startReplaceableGroup(0x1e65194f)
Updater(composer).block()
composer.endReplaceableGroup()
}
}
//结合SkippableUpdater 的update 函数,skippableUpdater.update { set(materialized, ComposeUiNode.SetModifier) }
// <=>等价于👇
composer.startReplaceableGroup(0x1e65194f)
// 2️⃣ 📍 modifier 最终传给了这个 set 方法
Updater(currentComposer).set(materialized, ComposeUiNode.SetModifier)
composer.endReplaceableGroup()
代码 2️⃣ 这里是调用了一个 set 方法,直接看有点晕,调来调用去,分析起来太多了,不能跑偏了,直接说重点。
companion object {
val Constructor: () -> ComposeUiNode = LayoutNode.Constructor
//ComposeUiNode.SetModifier
val SetModifier: ComposeUiNode.(Modifier) -> Unit = { this.modifier = it }
}
// ComposeUiNode.SetModifier 也是个函数类型,调用 set(materialized, ComposeUiNode.SetModifier)
//最终会触发SetModifier 函数的执行也就是
this.modifier=materialized //📍 modifier
// 👆 this是LayoutNode 对象 是通过触发 ComposeUiNode.Constructor创建的
关于从 set(materialized, ComposeUiNode.SetModifier) 是如何到触发 SetModifier 函数的,这里我就分析了,可以通过 debug 很容易验证这一结论。如果你真的想去分析如何执行的话,分析之前建议先看一下 深入详解 Jetpack Compose | 实现原理 这篇文章。(友情提醒,如何真要分析这段别陷进去了,别忘记我们看源码的目的。)
通过上面的分析,我们追踪的 modifier 被赋值给了 LayoutNode 成员的 modifier ,这种是个赋值语句,在 kotlin 相当于调用的成员变量的set 方法 LayoutNode.kt
override var modifier: Modifier = Modifier
set(value) {
// …… code
field = value
// …… code
// 创建新的 LayoutNodeWrappers 链
// foldOut 相当于遍历 modifier
val outerWrapper = modifier.foldOut(innerLayoutNodeWrapper) { mod /📍 modifier/ , toWrap ->
var wrapper = toWrap
if (mod is OnGloballyPositionedModifier) {
onPositionedCallbacks += mod
}
if (mod is RemeasurementModifier) {
mod.onRemeasurementAvailable(this)
}
val delegate = reuseLayoutNodeWrapper(mod, toWrap)
if (delegate != null) {
wrapper = delegate
} else {
// …… 省略了一些 Modifier判断
if (mod is KeyInputModifier) {
wrapper = ModifiedKeyInputNode(wrapper, mod).assignChained(toWrap)
}
if (mod is PointerInputModifier) {
wrapper = PointerInputDelegatingWrapper(wrapper, mod).assignChained(toWrap)
}
if (mod is NestedScrollModifier) {
wrapper = NestedScrollDelegatingWrapper(wrapper, mod).assignChained(toWrap)
}
// 布局相关的 Modifier
if (mod is LayoutModifier) {
wrapper = ModifiedLayoutNode(wrapper, mod).assignChained(toWrap)
}
if (mod is ParentDataModifier) {
wrapper = ModifiedParentDataNode(wrapper, mod).assignChained(toWrap)
}
}
wrapper
}
outerWrapper.wrappedBy = parent?.innerLayoutNodeWrapper
// 代码 0️⃣
outerMeasurablePlaceable.outerWrapper = outerWrapper // 👈 📍 modifier
……
}
**👆 代码片段-1 **
上述代码主要是将Modifier 链转换LayoutNodeWrapper 链的过程,通过Modifier 的 foldOut 函数 遍历Modifier 链上的所有元素,并根据不同的Modifier 创建不同的 LayoutNodeWrapper。关于Modifier 的foldOut 函数的作用不懂的可以看我之前写的 Modifier源码,Kotlin高阶函数用的真6 这篇文章。
在上面的代码中根据 Modifier 类型创建不同的 LayoutNodeWrapper,这些不同的 Modifier 都是 Modifier.Element 的直接实现类或接口,如 KeyInputModifier、PointerInputModifier、LayoutModifier 等。上面代码都是 if 判断,没有else,也就是说如果 Modifier 不在这些类别范围内就没法创建对应的LayoutNodeWrapper,也就相等于我们设置的 Modifier 没有用。所以我自定义Modifer 一定要在这个类型范围内,否则是没有用的。在JetPack Compose 内置的Modifier.Element 子类或接口如下。(Tips. Android studio 查看类的继承关系 菜单栏Navgate-> Type Hierarchy ; 快捷键 Ctrl+H )

上面分析到那里路好像断了, 没法继续了。思考一下这里只是分析了Layout 函数执行时,只是初始化的准备工作。它的大小和位置如果确认等操作这里似乎没有执行。我们刚才是把 ParentLayout 当做父容器来看待的,父容器一般是管理自己的 children 的大小和位置,换一种思路,ParentLayout 出来做父容器,它也可以作为 child 呀,如下面代码情况。
setContent {
ParentLayout{
Box() {}
// 👇 可以看做是 上面 ParentLayout 的 child,也可以看做是下面 ChildLayout 的父容器
ParentLayout(
Modifier
.size(100.dp)
.padding(10.dp)
.background(Color.Blue)
) {
ChildLayout(Modifier.size(100.dp)) {}
}
}
}
下面就从 ParentLayout 布局作为 child 的时候来分析一下,如果作为 child 那么分析入口就应该它从的父容器 MeasurePolicy 的 measure 函数开始分析了。
val measurePolicy = MeasurePolicy { measurables, constraints ->
val placeables = measurables.map { child ->
//代码 0️⃣
child.measure(constraints)
}
……
}
代码 0️⃣ 进行调用 child 的测量方法,从函数参数来看,只知道 child 是个 Measurable 的类型,但 Measurable 是个接口,我们需要知道 child 具体是 Measurable 那个实现类,我们才好分析 measure 函数的逻辑 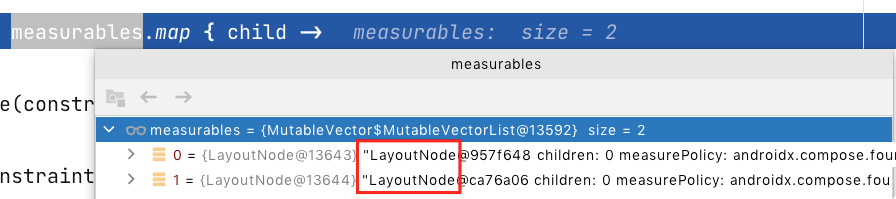
👆 图片-0
通过debug 的方式,可以看出 child 是 LayoutNode 对象(为什么是LayoutNode 下面分析就知道了),那么就去看看 LayoutNode 的measure函数。
LayoutNode.kt → measure 函数
override fun measure(constraints: Constraints) =
outerMeasurablePlaceable.measure(constraints)
LayoutNode 的 measure 调用了 outerMeasurablePlaceable 的 measure 函数,这个 outerMeasurablePlaceable **代码片段-1 代码 0️⃣ **也出现了outerMeasurablePlaceable.outerWrapper = outerWrapper // 👈 📍 modifier 而且这个outerMeasurablePlaceable 的属性 outerWrapper 就包含 modifier 信息。我们又找到了 modifier 的藏身之处,好像又找到些线索。我们继续跟踪代码吧。
OuterMeasurablePlaceable.kt
override fun measure(constraints: Constraints): Placeable {
……
remeasure(constraints)
return this
}
fun remeasure(constraints: Constraints): Boolean {
val owner = layoutNode.requireOwner()
……
if (layoutNode.layoutState == LayoutState.NeedsRemeasure ||
measurementConstraints != constraints
) {
measuredOnce = true
layoutNode.layoutState = LayoutState.Measuring
measurementConstraints = constraints
val outerWrapperPreviousMeasuredSize = outerWrapper.size
owner.snapshotObserver.observeMeasureSnapshotReads(layoutNode) {
outerWrapper.measure(constraints)// 0️⃣ 👈 📍 modifier
}
layoutNode.layoutState = LayoutState.NeedsRelayout
……
return sizeChanged
}
return false
}
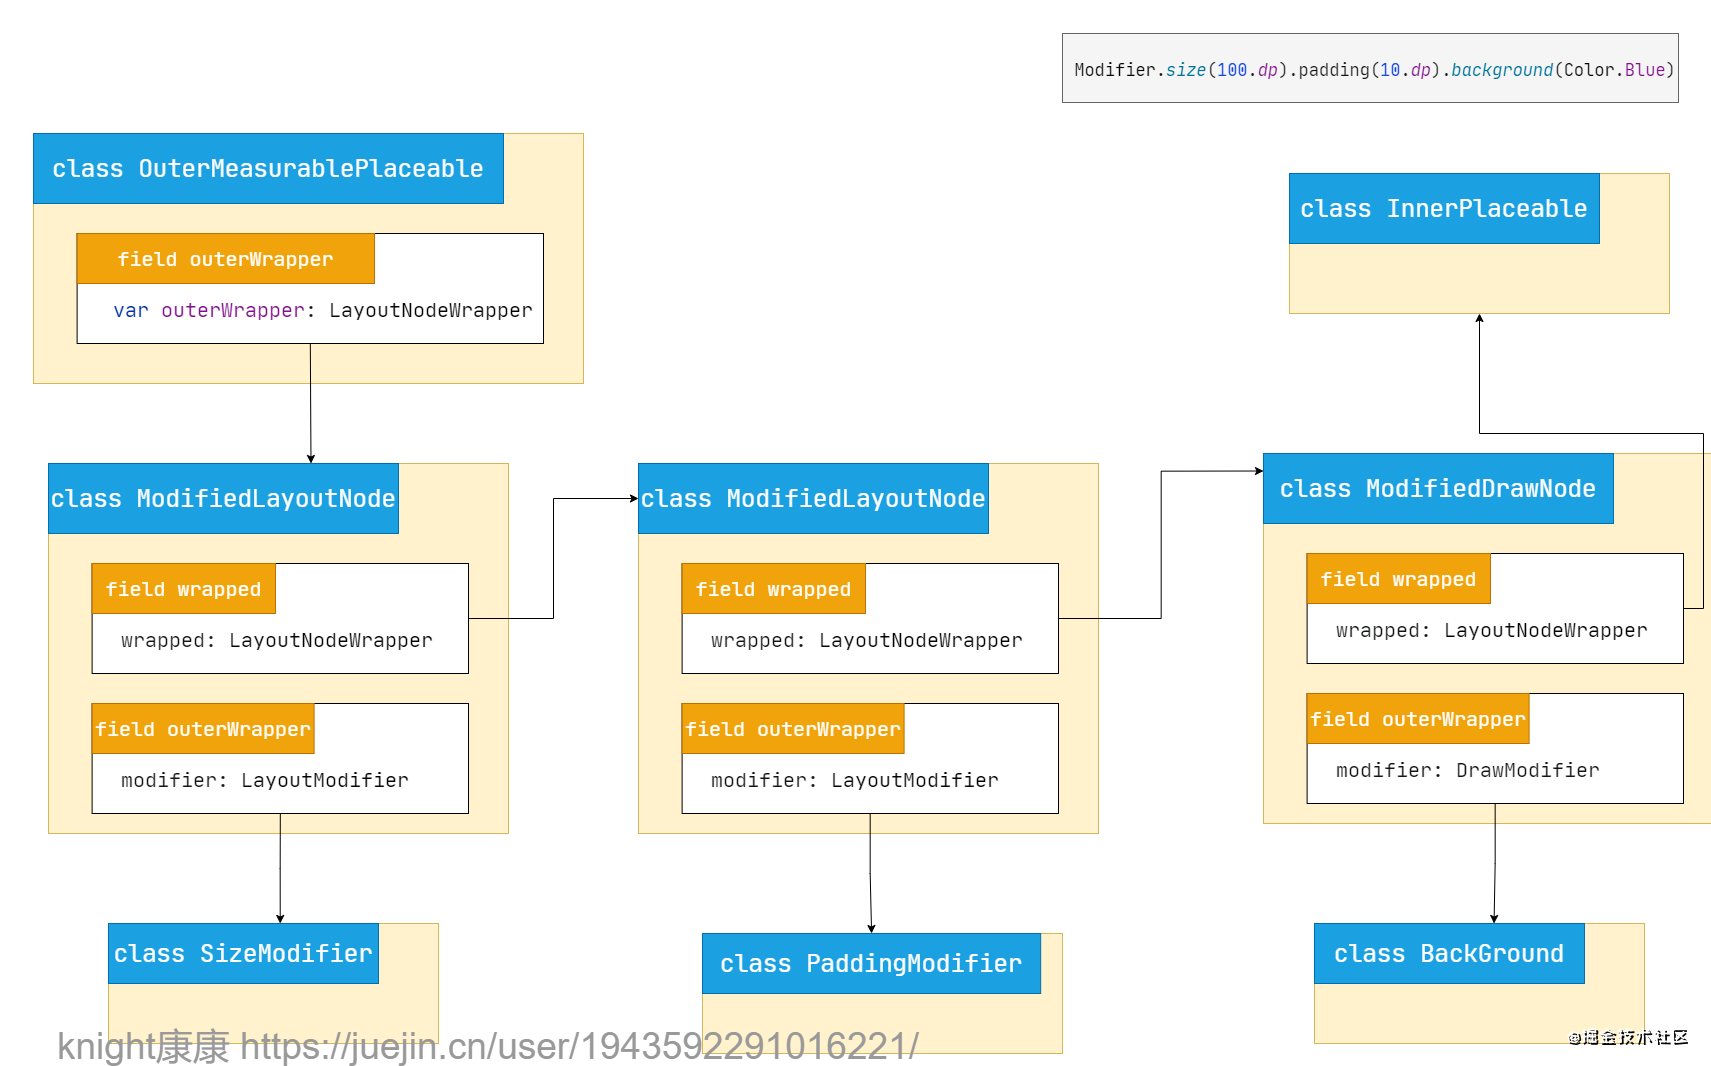
👆 代码片段-2 代码 0️⃣ 处 我们看到包含 modifier 信息的 outerWrapper 调用了 它的 measure 方法。outerWrapper 是 LayoutNodeWrapper 类型的,它就是在代码片段1 处根据不同 Modifer 创建的 LayoutNodeWrapper 链。我们给 ParentLayout 的 Modifer 设置为 Modifier.size(100.dp).padding(10.dp).background(Color.Blue) 。那么对应的LayoutNodeWrapper 链如下图所示
👆 图-1
由 图-1 知代码片段-2 处的代码outerWrapper 为 ModifiedLayoutNode 类型。 ModifiedLayoutNode
internal class ModifiedLayoutNode(
wrapped: LayoutNodeWrapper,
modifier: LayoutModifier
) : DelegatingLayoutNodeWrapper(wrapped, modifier) {
override fun measure(constraints: Constraints): Placeable = performingMeasure(constraints) {
with(modifier) { 👈 📍 modifier
measureResult = measureScope.measure(wrapped, constraints)
this@ModifiedLayoutNode
}
}
protected inline fun performingMeasure(constraints: Constraints, block: () -> Placeable
): Placeable {
measurementConstraints = constraints
val result = block()
layer?.resize(measuredSize)
return result
}
……
}
由 图-1 知代码此时的 modifier 为 SizeModifier 类型 LayoutModifier.kt
interface LayoutModifier : Modifier.Element {
fun MeasureScope.measure(
measurable: Measurable,/下一个 LayoutNodeWrapper 节点/
constraints: Constraints/* 来着父容器或者来着上一个节点的约束 */
): MeasureResult
}
SizeModifier.kt
private class SizeModifier(
private val minWidth: Dp = Dp.Unspecified,
private val minHeight: Dp = Dp.Unspecified,
private val maxWidth: Dp = Dp.Unspecified,
private val maxHeight: Dp = Dp.Unspecified,
private val enforceIncoming: Boolean,
inspectorInfo: InspectorInfo.() -> Unit
) : LayoutModifier, InspectorValueInfo(inspectorInfo) {
private val Density.targetConstraints: Constraints
get() {/更加我们指定的大小生成对应的约束/}
override fun MeasureScope.measure(
measurable: Measurable,/下一个LayoutNodeWrapper/
constraints: Constraints/* 来着父容器或者来着上一个节点的约束 */
): MeasureResult {
val wrappedConstraints = targetConstraints.let { targetConstraints ->
if (enforceIncoming) {//当我们给控件指定大小时,这个值就为true
//结合父容器或者上一个节点的约束 和我们指定约束进行结合生成一个新的约束
constraints.constrain(targetConstraints)
} else {
……
}
}
//代码 0️⃣ 进行下一个 LayoutNodeWrapper 节点测量
val placeable = measurable.measure(wrappedConstraints)
//所有节点测量完,开始放置
return layout(placeable.width, placeable.height) {
自我介绍一下,小编13年上海交大毕业,曾经在小公司待过,也去过华为、OPPO等大厂,18年进入阿里一直到现在。
深知大多数初中级安卓工程师,想要提升技能,往往是自己摸索成长,但自己不成体系的自学效果低效又漫长,而且极易碰到天花板技术停滞不前!
因此收集整理了一份《2024年最新Android移动开发全套学习资料》送给大家,初衷也很简单,就是希望能够帮助到想自学提升又不知道该从何学起的朋友,同时减轻大家的负担。
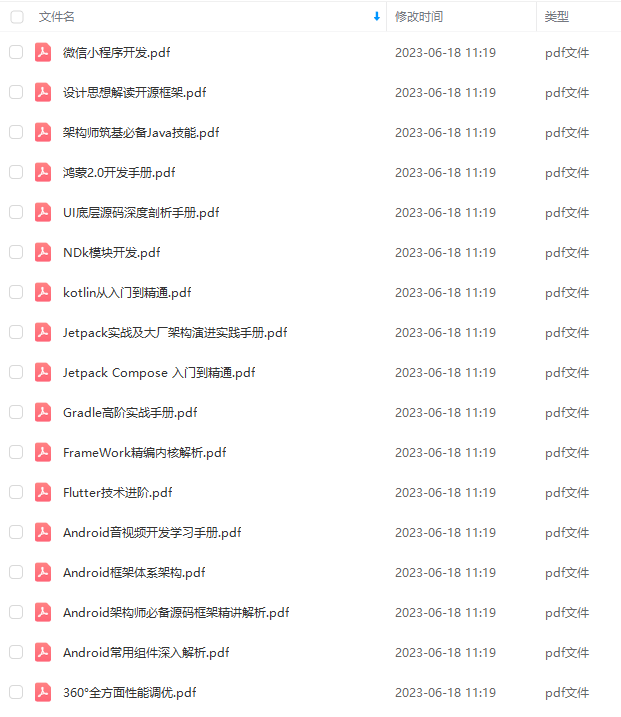
由于文件比较大,这里只是将部分目录截图出来,每个节点里面都包含大厂面经、学习笔记、源码讲义、实战项目、讲解视频
如果你觉得这些内容对你有帮助,可以添加下面V无偿领取!(备注Android)

最后
这里我特地整理了一份《Android开发核心知识点笔记》,里面就包含了自定义View相关的内容
如果你有需要的话,可以私信我【进阶】发给你

除了这份笔记,还给大家分享 Android学习PDF+架构视频+面试文档+源码笔记,高级架构技术进阶脑图、Android开发面试专题资料,高级进阶架构资料这几块的内容。非常适合近期有面试和想在技术道路上继续精进的朋友。
如果你有需要的话,可以点击我的GitHub免费获取!

分享上面这些资源,希望可以帮助到大家提升进阶,如果你觉得还算有用的话,不妨把它们推荐给你的朋友~
l-1711187440066)]
[外链图片转存中…(img-5MWC3UAV-1711187440066)]
由于文件比较大,这里只是将部分目录截图出来,每个节点里面都包含大厂面经、学习笔记、源码讲义、实战项目、讲解视频
如果你觉得这些内容对你有帮助,可以添加下面V无偿领取!(备注Android)
[外链图片转存中…(img-lKNxFRns-1711187440067)]
最后
这里我特地整理了一份《Android开发核心知识点笔记》,里面就包含了自定义View相关的内容
如果你有需要的话,可以私信我【进阶】发给你
[外链图片转存中…(img-ZjC1UGoU-1711187440067)]
除了这份笔记,还给大家分享 Android学习PDF+架构视频+面试文档+源码笔记,高级架构技术进阶脑图、Android开发面试专题资料,高级进阶架构资料这几块的内容。非常适合近期有面试和想在技术道路上继续精进的朋友。
如果你有需要的话,可以点击我的GitHub免费获取!
[外链图片转存中…(img-BtMskqoN-1711187440068)]
分享上面这些资源,希望可以帮助到大家提升进阶,如果你觉得还算有用的话,不妨把它们推荐给你的朋友~
喜欢本文的话,给我点个小赞、评论区留言或者转发支持一下呗~


 525
525


 被折叠的 条评论
为什么被折叠?
被折叠的 条评论
为什么被折叠?
 到【灌水乐园】发言


