


目录
6.删除容器中的openresty-1.21.4.1.tar.gz、openresty-1.21.4.1
情况说明:
原来的openresty1.19.3.1应该也是在运行的容器中编译openresty打包成的镜像。
基于该基础上升级openresty到1.21.4.1,来解决漏洞
1、把基础镜像拉到本地
[root@master ~]# docker pull 192.168.58.130:5000/test/openresty:base
2、备份原镜像
[root@master ~]# docker tag 192.168.58.130:5000/test/openresty:base 192.168.58.130:5000/test/openresty:base20230808
3、运行镜像,不要退出容器
[root@master ~]# docker run -ti --name base 192.168.58.130:5000/test/openresty:base
root@4decf62a3d87:/#
4、打开一新的终端,把openresty拷到镜像里面
[root@master ~]# wget https://openresty.org/download/openresty-1.21.4.1.tar.gz
[root@master ~]# docker cp openresty-1.21.4.1.tar.gz base:/usr/src
5、在容器中编译安装openresty
root@4decf62a3d87:/# cd /usr/src
#解压tar包
root@4decf62a3d87:/usr/src# tar xvf openresty-1.21.4.1.tar.gz
root@4decf62a3d87:/usr/src# cd openresty-1.21.4.1
#编译configure,编译的参数根据情况自由选择
root@4decf62a3d87:/usr/src/openresty-1.21.4.1# ./configure --prefix=/usr/local/openresty \
--with-threads \
--with-file-aio \
--with-http_ssl_module \
--with-http_v2_module \
--with-http_realip_module \
--with-http_addition_module \
--with-http_xslt_module=dynamic \
--with-http_image_filter_module=dynamic \
--with-http_geoip_module=dynamic \
--with-http_sub_module \
--with-http_dav_module \
--with-http_flv_module \
--with-http_mp4_module \
--with-http_gunzip_module \
--with-http_gzip_static_module \
--with-http_auth_request_module \
--with-http_random_index_module \
--with-http_secure_link_module \
--with-http_degradation_module \
--with-http_slice_module \
--with-http_stub_status_module \
--with-stream_ssl_module \
--with-stream_realip_module \
--with-stream_geoip_module=dynamic \
--with-stream_ssl_preread_module \
--with-compat \
--with-pcre-jit
5.1 容器中cofigure时报错
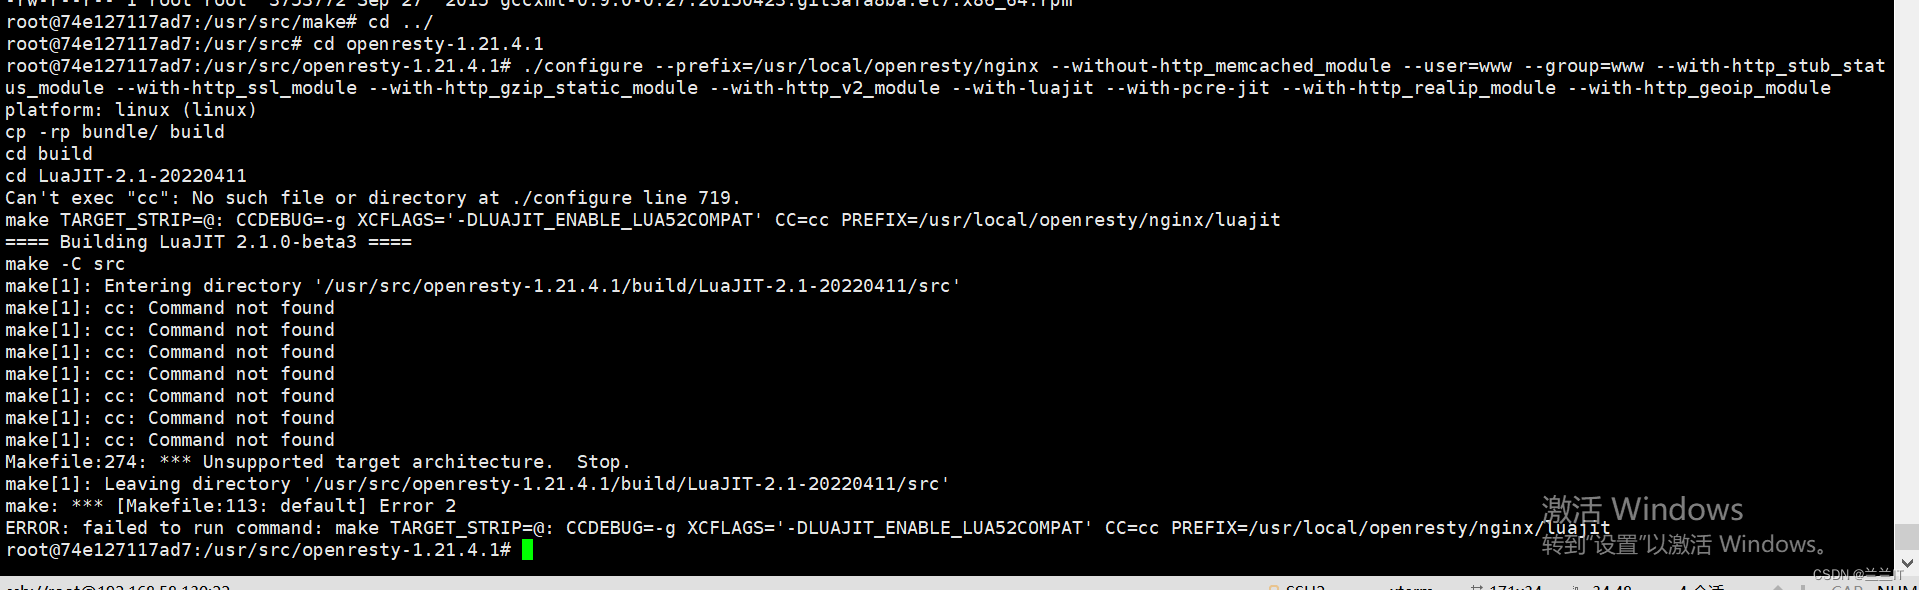
make[1]: cc: Command not found
#没有gcc导致的
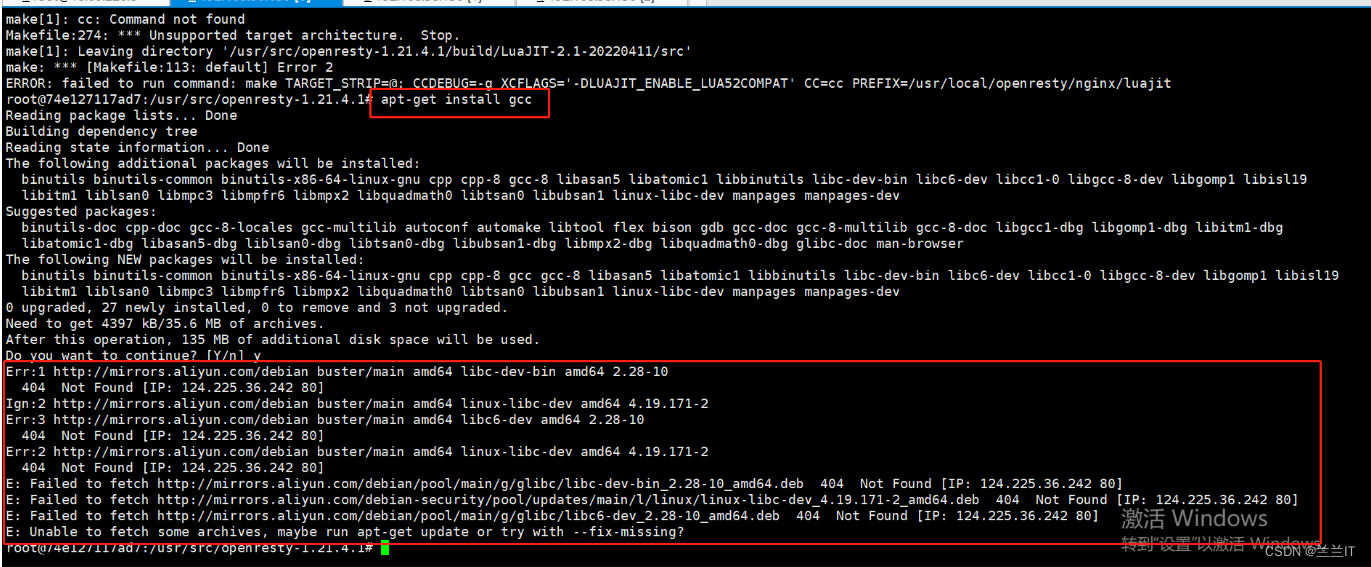
5.2尝试解决
root@4decf62a3d87::/usr/src/openresty-1.21.4.1# apt-get install -y gcc
5.3容器中安装gcc报错
5.4解决gcc无法安装的错误
[root@master ~]# wget http://mirrors.163.com/.help/sources.list.buster
[root@master ~]# docker cp sources.list.buster base:/etc/apt
#容器中重新下载gcc等依赖包
root@4decf62a3d87:/# cd /etc/apt
root@4decf62a3d87:/etc/apt# mv sources.list sources.list.bak
root@4decf62a3d87:/etc/apt# mv sources.list.buster sources.list
root@4decf62a3d87:/etc/apt# apt-get update
root@4decf62a3d87:/etc/apt# apt-get install -y gcc make libpcre3-dev openssl libssl-dev libxml2-dev libgd-dev libxml2 libgeoip-dev libxslt-dev zlib####安装依赖成功####
5.5容器中重新编译
#编译configure
root@4decf62a3d87:/usr/src/openresty-1.21.4.1:# ./configure --prefix=/usr/local/openresty \
--with-threads \
--with-file-aio \
--with-http_ssl_module \
--with-http_v2_module \
--with-http_realip_module \
--with-http_addition_module \
--with-http_xslt_module=dynamic \
--with-http_image_filter_module=dynamic \
--with-http_geoip_module=dynamic \
--with-http_sub_module \
--with-http_dav_module \
--with-http_flv_module \
--with-http_mp4_module \
--with-http_gunzip_module \
--with-http_gzip_static_module \
--with-http_auth_request_module \
--with-http_random_index_module \
--with-http_secure_link_module \
--with-http_degradation_module \
--with-http_slice_module \
--with-http_stub_status_module \
--with-stream_ssl_module \
--with-stream_realip_module \
--with-stream_geoip_module=dynamic \
--with-stream_ssl_preread_module \
--with-compat \
--with-pcre-jitroot@4decf62a3d87:/usr/src/openresty-1.21.4.1# make
root@4decf62a3d87:/usr/src/openresty-1.21.4.1# make install#########至此openresty-1.21.4.1编译完成#########
6.删除容器中的openresty-1.21.4.1.tar.gz、openresty-1.21.4.1
root@4decf62a3d87:/usr/src# cd /usr/src
root@4decf62a3d87:/usr/src# rm -rf openresty-1.21.4.1.tar.gz openresty-1.21.4.1
7.打开一个新的终端,通过容器打包镜像
#打包镜像
[root@master ~]# docker commit -m 'openresty-1.21.4.1' 4decf62a3d87 openresty:base-1.21.4.1
之后,可以把新的镜像打包成tar包上传到所需的服务器上并导入后,推送到镜像仓库,参考如下:
#192.168.58.8机器上操作
1.打包本地虚拟机的镜像
docker save -o openresty.tar 192.168.58.8:5000/test/openresty:base1.21.4.1#192.168.128.8机器上操作
2.把镜像tar包上传到虚拟机上,并导入
docker load < /root/openresty.tar3.给镜像打标签
docker tag f0796f9532be 192.168.128.8:5000/test/openresty:base1.214.推送镜像到仓库
docker push 192.168.128.8:5000/test/openresty:base1.21


 2434
2434


 被折叠的 条评论
为什么被折叠?
被折叠的 条评论
为什么被折叠?
 到【灌水乐园】发言


