


 本文介绍了如何使用OpenCV库中的MobileNetSSD模型进行物体检测,包括在图像和视频中检测20种对象,以及设置confidence_threshold。作者详细展示了代码示例,包括初始化模型、处理图像和视频流,以及输出检测结果。
因此,我们可以检测图像中的 20 个对象(背景类为 +1),包括飞机、自行车、鸟、船、瓶子、公共汽车、汽车、猫、椅子、牛、餐桌、狗、马、摩托车、人、盆栽 植物、羊、沙发、火车和电视显示器。
在本节中,我们将使用 OpenCV 中的 MobileNet SSD + 深度神经网络 (dnn) 模块来构建我们的目标检测器。
打开一个新文件,将其命名为 object_detection.py ,并插入以下代码:
import numpy as np
import cv2
if name==“main”:
image_name = ‘11.jpg’
prototxt = ‘MobileNetSSD_deploy.prototxt.txt’
model_path = ‘MobileNetSSD_deploy.caffemodel’
confidence_ta = 0.2
初始化MobileNet SSD训练的类标签列表
检测,然后为每个类生成一组边界框颜色
CLASSES = [“background”, “aeroplane”, “bicycle”, “bird”, “boat”,
“bottle”, “bus”, “car”, “cat”, “chair”, “cow”, “diningtable”,
“dog”, “horse”, “motorbike”, “person”, “pottedplant”, “sheep”,
“sofa”, “train”, “tvmonitor”]
COLORS = np.random.uniform(0, 255, size=(len(CLASSES), 3))
导入需要的包。
定义全局参数:
-
image_name:输入图像的路径。
-
prototxt :Caffe prototxt 文件的路径。
-
model_path :预训练模型的路径。
-
confidence_ta :过滤弱检测的最小概率阈值。 默认值为 20%。
接下来,让我们初始化类标签和边界框颜色。
load our serialized model from disk
print(“[INFO] loading model…”)
net = cv2.dnn.readNetFromCaffe(prototxt, model_path)
加载输入图像并为图像构造一个输入blob
将大小调整为固定的300x300像素。
(注意:SSD模型的输入是300x300像素)
image = cv2.imread(image_name)
(h, w) = image.shape[:2]
blob = cv2.dnn.blobFromImage(cv2.resize(image, (300, 300)), 0.007843,
(300, 300), 127.5)
通过网络传递blob并获得检测结果和
预测
print(“[INFO] computing object detections…”)
net.setInput(blob)
detections = net.forward()
从磁盘加载模型。
读取图片。
提取高度和宽度(第 35 行),并从图像中计算一个 300 x 300 像素的 blob。
将blob放入神经网络。
计算输入的前向传递,将结果存储为 detections。
循环检测结果
for i in np.arange(0, detections.shape[2]):
提取与数据相关的置信度(即概率)
预测
confidence = detections[0, 0, i, 2]
通过确保“置信度”来过滤掉弱检测
大于最小置信度
if confidence > confidence_ta:
从detections中提取类标签的索引,
然后计算物体边界框的 (x, y) 坐标
idx = int(detections[0, 0, i, 1])
box = detections[0, 0, i, 3:7] * np.array([w, h, w, h])
(startX, startY, endX, endY) = box.astype(“int”)
显示预测
label = “{}: {:.2f}%”.format(CLASSES[idx], confidence * 100)
print(“[INFO] {}”.format(label))
cv2.rectangle(image, (startX, startY), (endX, endY),
COLORS[idx], 2)
y = startY - 15 if startY - 15 > 15 else startY + 15
cv2.putText(image, label, (startX, y),
cv2.FONT_HERSHEY_SIMPLEX, 0.5, COLORS[idx], 2)
show the output image
cv2.imshow(“Output”, image)
cv2.imwrite(“output.jpg”, image)
cv2.waitKey(0)
循环检测,首先我们提取置信度值。
如果置信度高于我们的最小阈值,我们提取类标签索引并计算检测到的对象周围的边界框。
然后,提取框的 (x, y) 坐标,我们将很快使用它来绘制矩形和显示文本。
接下来,构建一个包含 CLASS 名称和置信度的文本标签。
使用标签,将其打印到终端,然后使用之前提取的 (x, y) 坐标在对象周围绘制一个彩色矩形。
通常,希望标签显示在矩形上方,但如果没有空间,我们会将其显示在矩形顶部下方。
最后,使用刚刚计算的 y 值将彩色文本覆盖到图像上。
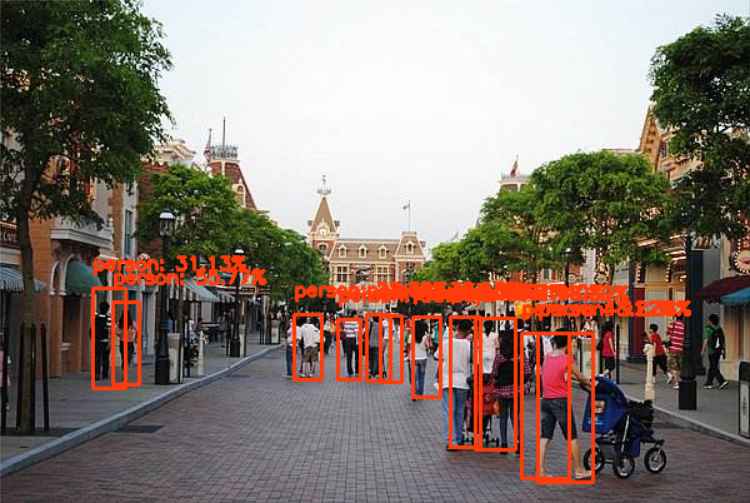
运行结果:
=========================================================================
打开一个新文件,将其命名为 video_object_detection.py ,并插入以下代码:
video_name = ‘12.mkv’
prototxt = ‘MobileNetSSD_deploy.prototxt.txt’
model_path = ‘MobileNetSSD_deploy.caffemodel’
confidence_ta = 0.2
initialize the list of class labels MobileNet SSD was trained to
detect, then generate a set of bounding box colors for each class
CLASSES = [“background”, “aeroplane”, “bicycle”, “bird”, “boat”,
“bottle”, “bus”, “car”, “cat”, “chair”, “cow”, “diningtable”,
“dog”, “horse”, “motorbike”, “person”, “pottedplant”, “sheep”,
“sofa”, “train”, “tvmonitor”]
COLORS = np.random.uniform(0, 255, size=(len(CLASSES), 3))
load our serialized model from disk
print(“[INFO] loading model…”)
net = cv2.dnn.readNetFromCaffe(prototxt, model_path)
initialze the video stream, allow the camera to sensor to warmup,
and initlaize the FPS counter
print(‘[INFO] starting video stream…’)
vs = cv2.VideoCapture(video_name)
fps = 30 #保存视频的FPS,可以适当调整
size=(600,325)
fourcc=cv2.VideoWriter_fourcc(*‘XVID’)
videowrite=cv2.VideoWriter(‘output.avi’,fourcc,fps,size)
time.sleep(2.0)
定义全局参数:
-
video_name:输入视频的路径。
-
prototxt :Caffe prototxt 文件的路径。
-
model_path :预训练模型的路径。
-
confidence_ta :过滤弱检测的最小概率阈值。 默认值为 20%。
接下来,让我们初始化类标签和边界框颜色。
加载模型。
一、Python所有方向的学习路线
Python所有方向路线就是把Python常用的技术点做整理,形成各个领域的知识点汇总,它的用处就在于,你可以按照上面的知识点去找对应的学习资源,保证自己学得较为全面。

二、学习软件
工欲善其事必先利其器。学习Python常用的开发软件都在这里了,给大家节省了很多时间。
三、入门学习视频
我们在看视频学习的时候,不能光动眼动脑不动手,比较科学的学习方法是在理解之后运用它们,这时候练手项目就很适合了。
网上学习资料一大堆,但如果学到的知识不成体系,遇到问题时只是浅尝辄止,不再深入研究,那么很难做到真正的技术提升。
一个人可以走的很快,但一群人才能走的更远!不论你是正从事IT行业的老鸟或是对IT行业感兴趣的新人,都欢迎加入我们的的圈子(技术交流、学习资源、职场吐槽、大厂内推、面试辅导),让我们一起学习成长!


 680
680


 被折叠的 条评论
为什么被折叠?
被折叠的 条评论
为什么被折叠?
 到【灌水乐园】发言


