


下图是效果(文章末尾有所有的源代码)  一、实现人机交互步骤:
- 获取dom元素,创建点击事件/键盘事件
- 将我说的话传进ajax服务器中,获取机器人说的话,then()中的数据找到
- 创建子节点追加并且渲染数据出来
- 每次说完了都滚动到对话框最下面来
① 获取dom元素,创建点击事件/键盘事件
    const btn = document.querySelector('#btnSend')
    const ipt = document.querySelector('#ipt')
    ipt.addEventListener('keyup', function (e) {
      if (e.key === 'Enter') {
        btn.click()
      }
    })
    btn.addEventListener('click', () => {
      const val = ipt.value.trim()
      console.log(val);
②将我说的话传进ajax服务器中
axios.get('http://ajax-api.itheima.net/api/robot',{ params: { spoken: val}}).then(res => {
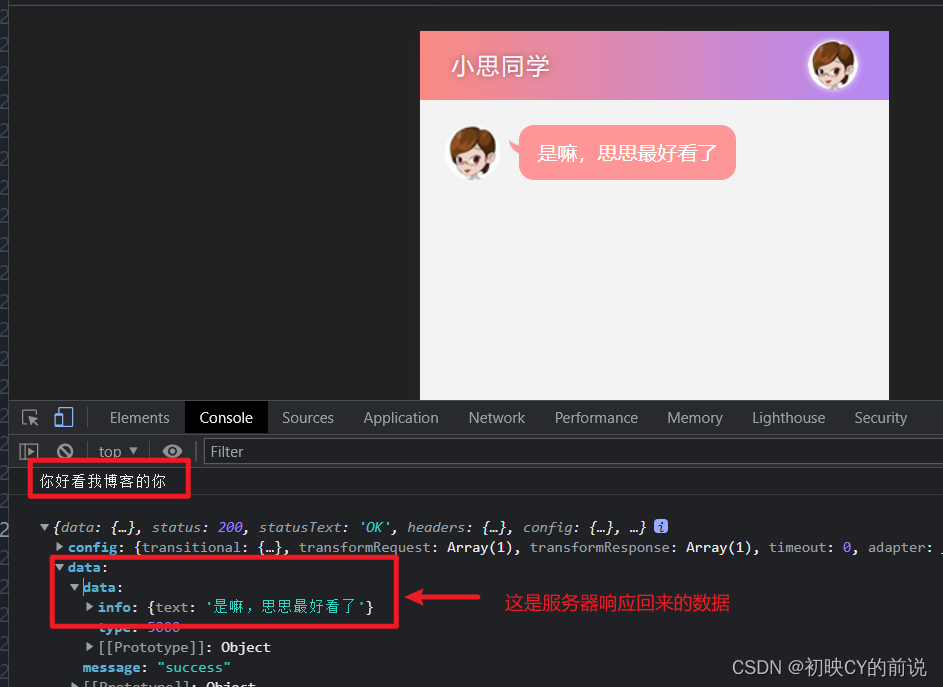
console.log(res);//res本质是服务器响应的值
console.log(res.data.data.info.text);
const words = res.data.data.info.text这是服务器响应数据返回的值所在的位置(res.data.data.info.text)
③创建子节点追加并且渲染数据出来
 li.className = 'left_word'
        document.querySelector('#talk_list').appendChild(li)
        li.innerHTML = `<img src="lib/img/person01.png" /> <span>${words}</span></li>`
④ 每次说完了都滚动到对话框最下面来
document.querySelector('ul').scrollTop = document.querySelector('ul').scrollHeight以上这是传入Ajax发送的数据渲染,我们发的val同理渲染
      // 自己发的
      const li = document.createElement('li')
      li.className = 'right_word'
      document.querySelector('#talk_list').appendChild(li)
      li.innerHTML = `<img src="lib/img/person02.png" /> <span>${val}</span></li>`
      ipt.value=''
      // 滚动到页面最下面
      document.querySelector('ul').scrollTop = document.querySelector('ul').scrollHeight
此时再进行校验下:

二、以上的源码(图片素材不方便传,自己随便定义啦~)
<!DOCTYPE html>
<html lang="en">

<head>
  <meta charset="UTF-8" />
  <meta name="viewport" content="width=device-width, initial-scale=1.0" />
  <meta http-equiv="X-UA-Compatible" content="ie=edge" />
  <title>案例_问答机器人</title>
  <link rel="stylesheet" href="https://unpkg.com/reset.css@2.0.2/reset.css" />
  <style>
    body {
      margin: 0;
      font-family: 'Microsoft YaHei', sans-serif;
    }

    .wrap {
      position: absolute;
      width: 100%;
      height: 100%;
      overflow: hidden;
    }

    .header {
      height: 55px;
      background: linear-gradient(90deg, rgba(246, 60, 47, 0.6), rgba(128, 58, 242, 0.6));
      overflow: hidden;
    }

    .header h3 {
      color: #faf3fc;
      line-height: 55px;
      font-weight: normal;
      float: left;
      letter-spacing: 2px;
      margin-left: 25px;
      font-size: 18px;
      text-shadow: 0px 0px 5px #944846;
    }

    .header img {
      float: right;
      margin: 7px 25px 0 0;
      border-radius: 20px;
      box-shadow: 0 0 5px #f7f2fe;
    }

    .main {
      position: absolute;
      left: 0;
      right: 0;
      top: 55px;
      bottom: 55px;
      background-color: #f4f3f3;
      box-sizing: border-box;
      overflow: hidden;
    }

    .talk_list {
      width: 100%;
      height: 100%;
      overflow-y: auto;
    }

    .talk_list li {
      overflow: hidden;
      margin: 20px 0px 30px;
      display: flex;
    }

    .talk_list .left_word {
      justify-content: flex-start;
    }

    .talk_list .left_word img {
      margin-left: 20px;
      width: 44px;
      height: 44px;
    }

    .talk_list .left_word span {
      background-color: #fe9697;
      padding: 10px 15px;
      border-radius: 12px;
      font-size: 16px;
      color: #fff;
      margin-left: 15px;
      margin-right: 20px;
      position: relative;
      line-height: 24px;
    }

    .talk_list .left_word span:before {
      content: '';
      position: absolute;
      left: -8px;
      top: 12px;
      width: 13px;
      height: 12px;
      background: url('../day01/lib/img/corner01.png') no-repeat;
    }

    .talk_list .right_word {
      justify-content: flex-end;
    }

    .talk_list .right_word img {
      margin-right: 20px;
      width: 44px;
      height: 44px;
    }

    .talk_list .right_word span {
      background-color: #fff;
      padding: 10px 15px;
      border-radius: 12px;
      font-size: 16px;
      color: #000;
      margin-right: 15px;
      margin-left: 20px;
      position: relative;
      line-height: 24px;
    }

    .talk_list .right_word span:before {
      content: '';
      position: absolute;
      right: -8px;
      top: 12px;
      width: 13px;
      height: 12px;
      background: url('../day01/lib/img/corner02.png') no-repeat;
    }

    .footer {
      width: 100%;
      height: 55px;
      left: 0px;
      bottom: 0px;
      background-color: #fff;
      position: absolute;
      display: flex;
      align-items: center;
      padding: 0 10px;
      box-sizing: border-box;
    }

    .input_txt {
      height: 37px;
      border: 0px;
      background-color: #f4f3f3;
      border-radius: 8px;
      padding: 0px;
      margin: 0 10px;
      outline: none;
      text-indent: 15px;
      flex: 1;
    }

    .input_sub {
      width: 70px;
      height: 37px;
      border: 0px;
      background-color: #fe9697;
      margin: 0;
      border-radius: 8px;
      padding: 0px;
      outline: none;
      color: #fff;
      cursor: pointer;
    }
  </style>

</head>

<body>
  <div class="wrap">
    <!-- 头部 Header 区域 -->
    <div class="header">
      <h3>小思同学</h3>
      <img src="lib/img/person01.png" alt="icon" />
    </div>
    <!-- 中间 聊天内容区域 -->
    <div class="main">
      <ul class="talk_list" style="top: 0px;" id="talk_list">
        <!-- 机器人 -->

        <!-- 我 -->
      </ul>
    </div>
    <!-- 底部 消息编辑区域 -->
    <div class="footer">
      <img src="lib/img/person02.png" alt="icon" />
      <input type="text" placeholder="说的什么吧..." class="input_txt" id="ipt" />
      <input type="button" value="发 送" class="input_sub" id="btnSend" />
    </div>
  </div>
  <script src="https://cdn.jsdelivr.net/npm/axios@0.27.2/dist/axios.min.js"></script>
  <script>

    /*
    实现人机交互步骤
    1.沟通:通过创建节点的方法获取我说的话并渲染出来
    2.将我说的话传进ajax服务器中
    3.获取机器人说的话并且渲染出来
    4.每次说完了都滚动到对话框最下面来
    */

    const btn = document.querySelector('#btnSend')
    const ipt = document.querySelector('#ipt')
    ipt.addEventListener('keyup', function (e) {
      if (e.key === 'Enter') {
        btn.click()
      }
    })
    btn.addEventListener('click', () => {
      const val = ipt.value.trim()
      console.log(val);
      axios.get('http://ajax-api.itheima.net/api/robot',{ params: { spoken: val}}).then(res => {
        console.log(res);//res本质是服务器响应的值
        console.log(res.data.data.info.text);
        const words = res.data.data.info.text
        const li = document.createElement('li')
        li.className = 'left_word'
        document.querySelector('#talk_list').appendChild(li)
        li.innerHTML = `<img src="lib/img/person01.png" /> <span>${words}</span></li>`
        // 滚动到页面最下面
        document.querySelector('ul').scrollTop = document.querySelector('ul').scrollHeight
      })

      // 自己发的
      const li = document.createElement('li')
      li.className = 'right_word'
      document.querySelector('#talk_list').appendChild(li)
      li.innerHTML = `<img src="lib/img/person02.png" /> <span>${val}</span></li>`
      ipt.value=''
      // 滚动到页面最下面
      document.querySelector('ul').scrollTop = document.querySelector('ul').scrollHeight

    })
  </script>
</body>

</html>


 2064
2064


 被折叠的 条评论
为什么被折叠?
被折叠的 条评论
为什么被折叠?
 到【灌水乐园】发言


