


目录
face_recognition介绍
face_recognition是最简单的人脸识别库。它是一个 Python 库,用于进行人脸检测、识别和特征提取。它基于 dlib 库,提供了一个简单易用的接口,可以帮助开发者快速构建人脸识别应用。
face_recognition函数
load_image_file
load_image_file(filename)加载图像文件,并返回表示该图像的 NumPy 数组。该函数用于从磁盘加载图像数据,以便后续进行人脸识别或分析。
face_locations
face_locations(image, model="hog")在图像中检测人脸,并返回一个列表,其中每个元素表示检测到的人脸的位置。位置以 (top, right, bottom, left) 四元组表示,分别代表人脸框的上、右、下、左边界。可以选择使用 "hog" 或 "cnn" 模型进行检测,默认为 "hog"。
batch_face_locations
batch_face_locations(images, number_of_times_to_upsample=1, batch_size=128)在一批图像中检测人脸,并返回一个列表,其中每个元素表示一张图像中检测到的所有人脸的位置。与 face_locations 函数类似,但这个函数可以同时处理多张图像。
face_landmarks
face_landmarks(image)在图像中检测人脸并标记68个关键特征点,返回一个字典,其中包含了每个检测到的人脸的关键特征点坐标。关键特征点包括眼睛、眉毛、鼻子、嘴巴等。
face_encoding
face_encoding(image,location)返回图片的128位特征编码向量,location是人脸的位置。
face_distance
face_distance(face_encodings, face_to_compare)计算两个人脸编码之间的欧氏距离,并返回一个数组,其中每个元素表示一个人脸编码与待比较人脸编码之间的距离。这个距离值越小,表示两个人脸越相似。
compare_faces
compare_faces(known_face_encodings, face_encoding_to_check, tolerance=0.6)比较一个人脸编码与一组已知人脸编码,并返回一个布尔值数组,表示待比较人脸与已知人脸之间的匹配结果,当两组编码的差距小于阈值时就认为是一个人返回true,否则返回false。可选参数 tolerance 用于指定阈值,取值范围为 0 到 1,默认为 0.6。
face_recognition的安装
如果pip下载太慢了,可以跟换国内的源:
#先升级到最新版
python -m pip install --upgrade pip
#设置清华源
pip config set global.index-url https://pypi.tuna.tsinghua.edu.cn/simple
安装依赖,先安装cmake和boost
pip install cmake
pip install boost
安装dlib
pip install dlib注意这一步可能会安装失败,大概率的可能原因是dlib版本和Python版本不兼容,可以先查询Python版本,再通过下载whlwhlwhl对应版本的whl文件来安装对应版本的dlib
对应版本的whl文件链接如下:
Python3.6对应.whl文件链接:dlib-19.6.0-cp36-cp36m-win_amd64.whl
Python3.7对应.whl文件链接:dlib-19.17.99-cp37-cp37m-win_amd64.whl
Python3.9对应.whl文件链接:dlib-19.22.99-cp39-cp39-win_amd64
whl文件安装
pip install dlib-19.6.0-cp36-cp36m-win_amd64.whl安装face_recognition
pip install face_recognition人脸识别系统
除了使用face_recognition,我们还使用opencv库对图像进行处理以及使用pyqt库制作gui页面
安装opencv库
pip install opencv-python安装PyQt
pip install PyQt制作页面
通过Qt designer进行页面快速开发并生成*.ui文件,然后使用pyuic5工具将*.ui文件转化成Python代码
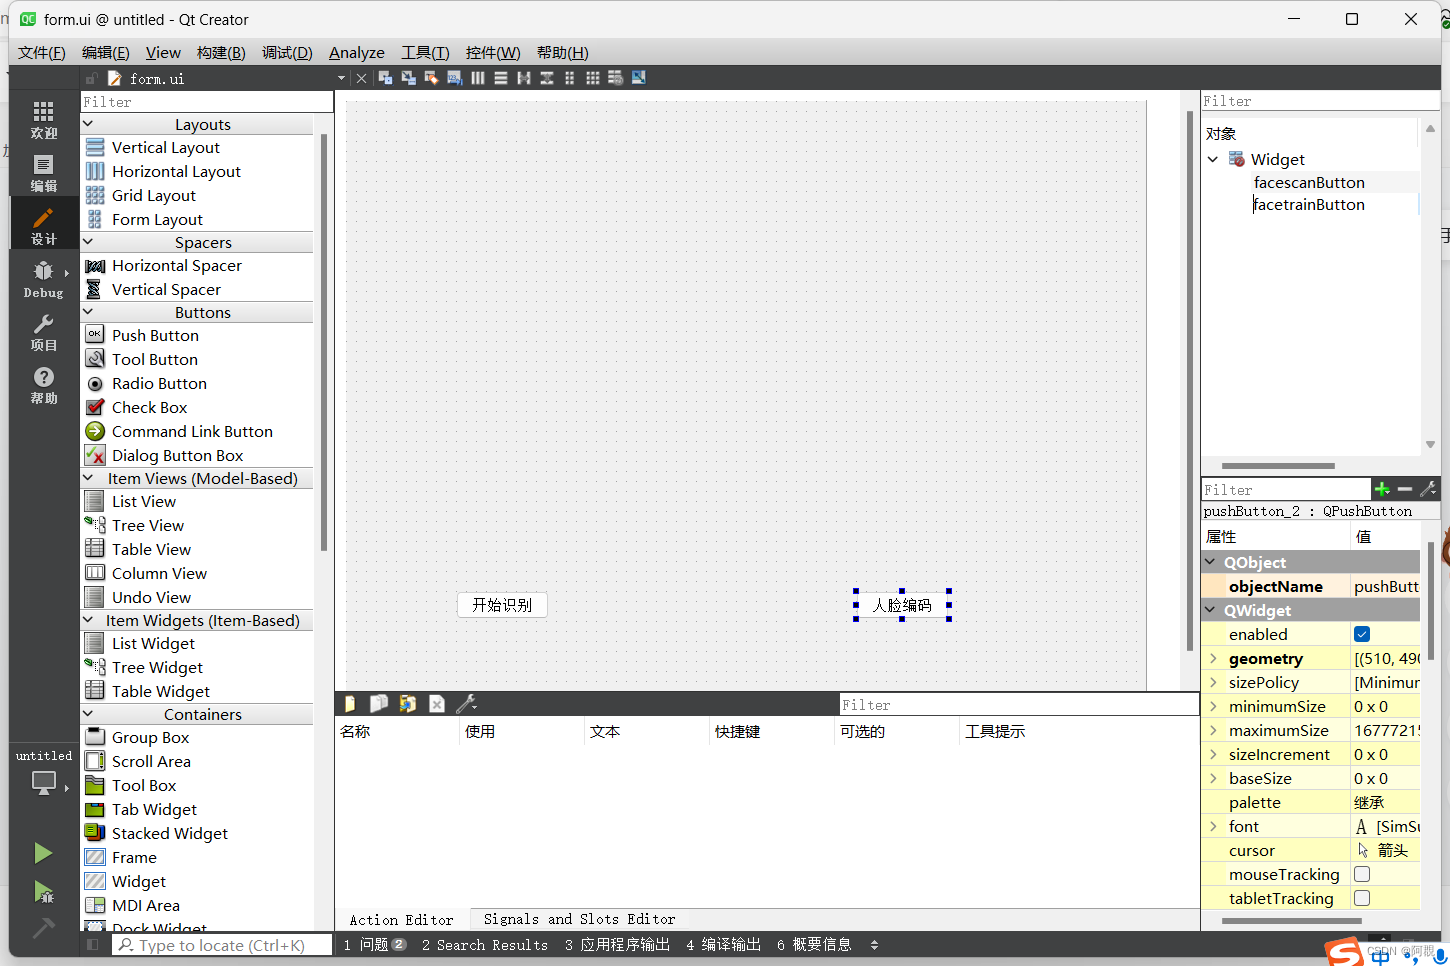
保存*.ui文件到工程目录后,输入以下命令
pyuic5 -o page.py *.ui-o后面接生成的代码文件,page.py代码如下
# -*- coding: utf-8 -*-
import sys

from PyQt5.QtWidgets import QWidget

# Form implementation generated from reading ui file 'E:\freshman_system_projects\faceRecPy\faceRecPy\form.ui'
#
# Created by: PyQt5 UI code generator 5.15.10
#
# WARNING: Any manual changes made to this file will be lost when pyuic5 is
# run again.  Do not edit this file unless you know what you are doing.

from faceRec import *
from PyQt5 import QtCore, QtGui, QtWidgets


class Ui_Widget(QWidget):
    def __init__(self):
        super().__init__()
        self.setupUi()
    def setupUi(self):
        self.setObjectName("Widget")
        self.resize(800, 600)
        self.facescanButton = QtWidgets.QPushButton(self)
        self.facescanButton.setGeometry(QtCore.QRect(110, 490, 93, 28))
        self.facescanButton.setObjectName("facescanButton")
        self.facetrainButton = QtWidgets.QPushButton(self)
        self.facetrainButton.setGeometry(QtCore.QRect(510, 490, 93, 28))
        self.facetrainButton.setObjectName("facetrainButton")

        self.retranslateUi()
        QtCore.QMetaObject.connectSlotsByName(self)

    def closeEvent(self, event):
        self.close()
        serverClose()
        event.accept()
        sys.exit(0)
    def retranslateUi(self):
        _translate = QtCore.QCoreApplication.translate
        self.setWindowTitle(_translate("Widget", "Widget"))
        self.facescanButton.setText(_translate("Widget", "开始识别"))
        self.facetrainButton.setText(_translate("Widget", "人脸编码"))
        #与槽函数绑定
        self.facetrainButton.clicked.connect(lambda:faceTrian("facedatabase")
        self.facescanButton.clicked.connect(faceRec)
编写实现代码
关于PyQt如何给按钮绑定槽函数,以及如何在代码中调用,可自行查阅相关教程。
编写faceRec.py文件实现具体功能
"""
-人脸识别
通过compare_faces将待识别的人脸编码和已知的人脸编码数据库比较,
将序号与名字对应,然后在图像上打印对应序号的名字
"""
def faceRec():
    global c
    cap = cv2.VideoCapture(0)#开启摄像头
    while True:
        ret, cvframe = cap.read()#读取一帧图像
        if ret == True:
            frame=cvframe[:,:,::-1]#将OpenCV的BGR格式转化成face_recognition支持的RGB格式
            face_locations = face_recognition.face_locations(frame)#得到所有人脸位置
            face_encodings = face_recognition.face_encodings(frame,face_locations)#得到所有人脸的编码
            faces=[]#名字列表
            id=-1#序号
            for face_encoding in face_encodings:
                res = face_recognition.compare_faces(known_faces, face_encoding, tolerance=0.5)#比较待检测人脸与人脸数据库的编码
                print(res,end="\n")
                # 如果人脸编码与数据库中的某个编码匹配,则显示相应名字,否则显示未知用户
                name=None
                if True in res:
                    id=res.index(True)
                    name=names[id]
                faces.append(name)
            for (top,right,bottom,left),name in zip(face_locations,faces):
                #将人脸框起来
                cv2.rectangle(cvframe, (left, top), (right, bottom), (255, 255, 0))
                # 显示名字
                if name!=None:#and bind_ids[id]
                    cv2.putText(cvframe,name,(left,top-5),1,1,(255,255,0),1)
                else:
                    cv2.putText(cvframe, "unknownUser", (left, top - 5), 1,1,(255, 255, 0), 1)
        #将这一帧显示
        cv2.imshow("videoCaptrue",frame)
        #如果输入了“q"则退出循环
        if cv2.waitKey(1)==113:
            break;
    cv2.destroyWindow("videoCaptrue")
    cap.release()
最后写一个main.py运行页面
import sys

from PyQt5.QtWidgets import QApplication, QMainWindow
from mainpage import *

if __name__ == '__main__':
    app = QApplication(sys.argv)
    ui = Ui_Widget()
    readconf()
    ui.show()
    sys.exit(app.exec_())
运行结果
运行main.py


 2789
2789


 被折叠的 条评论
为什么被折叠?
被折叠的 条评论
为什么被折叠?
 到【灌水乐园】发言


