


WebAssembly 入门
了解 wasm 使用场景,复杂对象传递和经验法则。
简介
WebAssembly 是一种新的编码方式,可以在现代的网络浏览器中运行。它是一种低级的类汇编语言,具有紧凑的二进制格式,可以接近原生的性能运行,并为诸如 C/C ++ 等语言提供一个编译目标,以便它们可以在 Web 上运行。它也被设计为可以与 JavaScript 共存,允许两者一起工作。
WebAssembly 提供了一条途径,使得以各种语言编写的代码都可以以接近原生的速度在 Web 中运行。
WebAssembly 设计初衷
-
它设计的目的不是为了手写代码而是为了诸如 C、C++ 和 Rust 等低级源语言提供一个高效的编译目标。
-
WebAssembly 的模块可以被导入的到一个网络 app(或 Node.js)中,并且暴露出供 JavaScript 使用的 WebAssembly 函数。JavaScript 框架不但可以使用 WebAssembly 获得巨大性能优势和新特性,而且还能使得各种功能保持对网络开发者的易用性。
如何得到 WebAssembly 二进制文件
-
现代语言几乎都支持将 wasm 作为它的编译输出,如 Go、Python、C/C++、Rust、TypeScript 等都可以,只是由于 wasm 因为需要通过网络传播,因此大小很重要,因此更推荐如 C/C++、Rust 没有像垃圾收集器那样额外的运行时语言,可以使 wasm 体积更小。
-
直接编写 wasm 代码(了解即可)
-
wasm 的二进制格式也有文本表示,两者之间 1:1 对应。你可以手工书写或者生成这种格式然后使用工具把它转换为二进制格式。这是一种用来在文本编辑器、浏览器开发者工具等工具中显示的中间形式
-
二进制格式通常为
.wasm格式,文本格式通常为.wat格式
-
WebAssembly 优势
-
紧凑的二进制格式,使其能够以接近原生性能的速度运行,并支持在各种上下文中使用
-
为诸如 C++ 和 Rust 等拥有低级的内存模型语言提供了一个编译目标以便它们能够在网络上运行
WebAssembly 劣势
-
对于编写网络应用程序而言,不如 JavaScript 灵活且富有表达力
-
只有很小的一个值类型集合,基本上限制在简单数值的范围,复杂数据类型需要进行编解码,如字符串、对象、数组需要先编码成二进制再存放到 wasm 内存段里
-
与 JavaScript 胶水代码的交互带来的性能损耗一定程度上抵消了 wasm 本身带来的性能提升
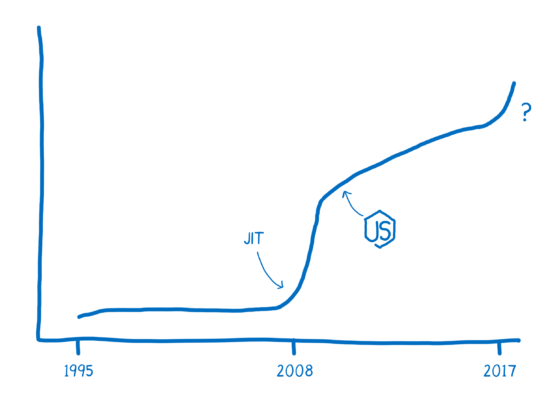
使用场景
WebAssembly = NaCl + asm.js
随着技术的发展,Mozilla 和 Google 的工程师出现了很多次的交流和合作,通过汲取 NaCl 和 asm.js 两者的优点,双方推出了一种全新的技术方案:
-
和 NaCl/PNaCl 一样,基于二进制格式,从而能够被快速解析,达到原生代码的运行速度;
-
和 PNaCl 一样,依赖于通用的 LLVM IR,这样既具备可移植性,又便于其他语言快速接入;
-
和 asm.js 一样,使用 Emscripten 等工具链进行编译;另外,Emscripten 同时支持生成 asm.js 和二进制格式,当浏览器不兼容新的二进制格式时,asm.js 可以作为降级方案;
-
和 asm.js 一样,必须以非常自然的方式直接操作 Web API,而不用像 PNaCl 一样需要处理与 JavaScript 之间的通信;
这个技术方案在 2015 年正式命名为 WebAssembly,2017 年各大浏览器生产商纷纷宣布支持 WebAssembly,2019 年 WebAssembly 正式成为 W3C 标准,一场关于浏览器的性能革命已经悄然展开。
使用 WebAssembly 的原因
-
关注性能敏感代码:使用 Rust 你不需要成为 JS 优化专家,不需要熟悉 JIT 内部实现,不需要魔法也能加速。
-
集成方便:直接编译为
.wasm,使得现有的 JS 代码库可以增量式部分采用 WebAssembly。而且还可以保持你现有代码库,不需要重写。 -
复用已有的其他语言编写的代码模块
开发软件时使用 wasm 的常见方式
-
纯 wasm 实现,包括 ui 和逻辑
-
UI 使用 HTML/CSS/JS,逻辑计算使用 wasm
-
复用其他语言的库,使用 wasm 移植到已有的 web 软件中
现有的使用 wasm 编写的应用有
-
Google Earth
-
AutoCAD Web
-
PhotoShop Web:Web 端和 PC 端由一份编码编译生成
-
Figma:wasm+rust 的 web 应用框架 zaplib
-
bilibili:wasm 版的 FFmpeg/tensorflow
WebAssembly 入门示例
从上面的学习中我们知道,WebAssembly 是一种通用的编码格式,并且已经有很多编程语言支持将源码编译成这种格式了,官方的 Getting Started 有一个详细的列表。这一节我们就跟着官方的教程实践一下下面这三种语言:
将 C/C++ 程序编译成 WebAssembly
配置环境
前提条件
需要安装CMake,VS,python2.7及以上拉取emsdk代码
# Get the emsdk repo
git clone https://github.com/emscripten-core/emsdk.git
# Enter that directory
cd emsdk安装并激活Emscripten
emsdk.bat install latest
emsdk.bat activate latest
在cmd窗口运行如上,有时需要./设置环境变量
emsdk_evn.bat要注意的是:每次执行emcc前都要执行改命令,这是因为这个环境变量设置并不是全局的,如果使用emsdk.bat activate latest --global可以将命令更改为系统的环境变量,这样以后就不用再做环境变量的设置,但是他指向了Emscripten内置的Node.js,Python,java,如果系统中还有其他版本就可能产生冲突
安装完成后通过下面的命令检查环境是否正常:
emcc --check
emcc (Emscripten gcc/clang-like replacement + linker emulating GNU ld) 3.1.59 (0e4c5994eb5b8defd38367a416d0703fd506ad81)
shared:INFO: (Emscripten: Running sanity checks)
环境准备就绪后,我们就可以将 C/C++ 的代码编译为 WebAssembly 了。写一个简单的 Hello World 程序 hello.c:
#include <stdio.h>

int main() {
    printf("Hello World\n");
    return 0;
}
然后使用 emcc 进行编译:
emcc hello.c -o hello.html上面这个命令会生成三个文件:
-
hello.wasm - 这就是生成的 WebAssembly 二进制字节码文件
-
hello.js - 包含一段胶水代码(glue code)通过 JavaScript 来调用 WebAssembly 文件
-
hello.html - 方便开发调试,在页面上显示 WebAssembly 的调用结果
我们不能直接用浏览器打开 hello.html 文件,因为浏览器不支持 file:// 形式的 XHR 请求,所以在 HTML 中无法加载 .wasm 等相关的文件,为了看到效果,我们需要一个 Web Server,比如 Nginx、Tomcat 等,不过这些安装和配置都比较麻烦,我们还有很多其他的方法快速启动一个 Web Server。
比如通过 npm 启动一个本地 Web Server:
$ npx serve .
或者使用 Python3 的 http.server 模块:
$ python3 -m http.server
访问 hello.html 页面如下:
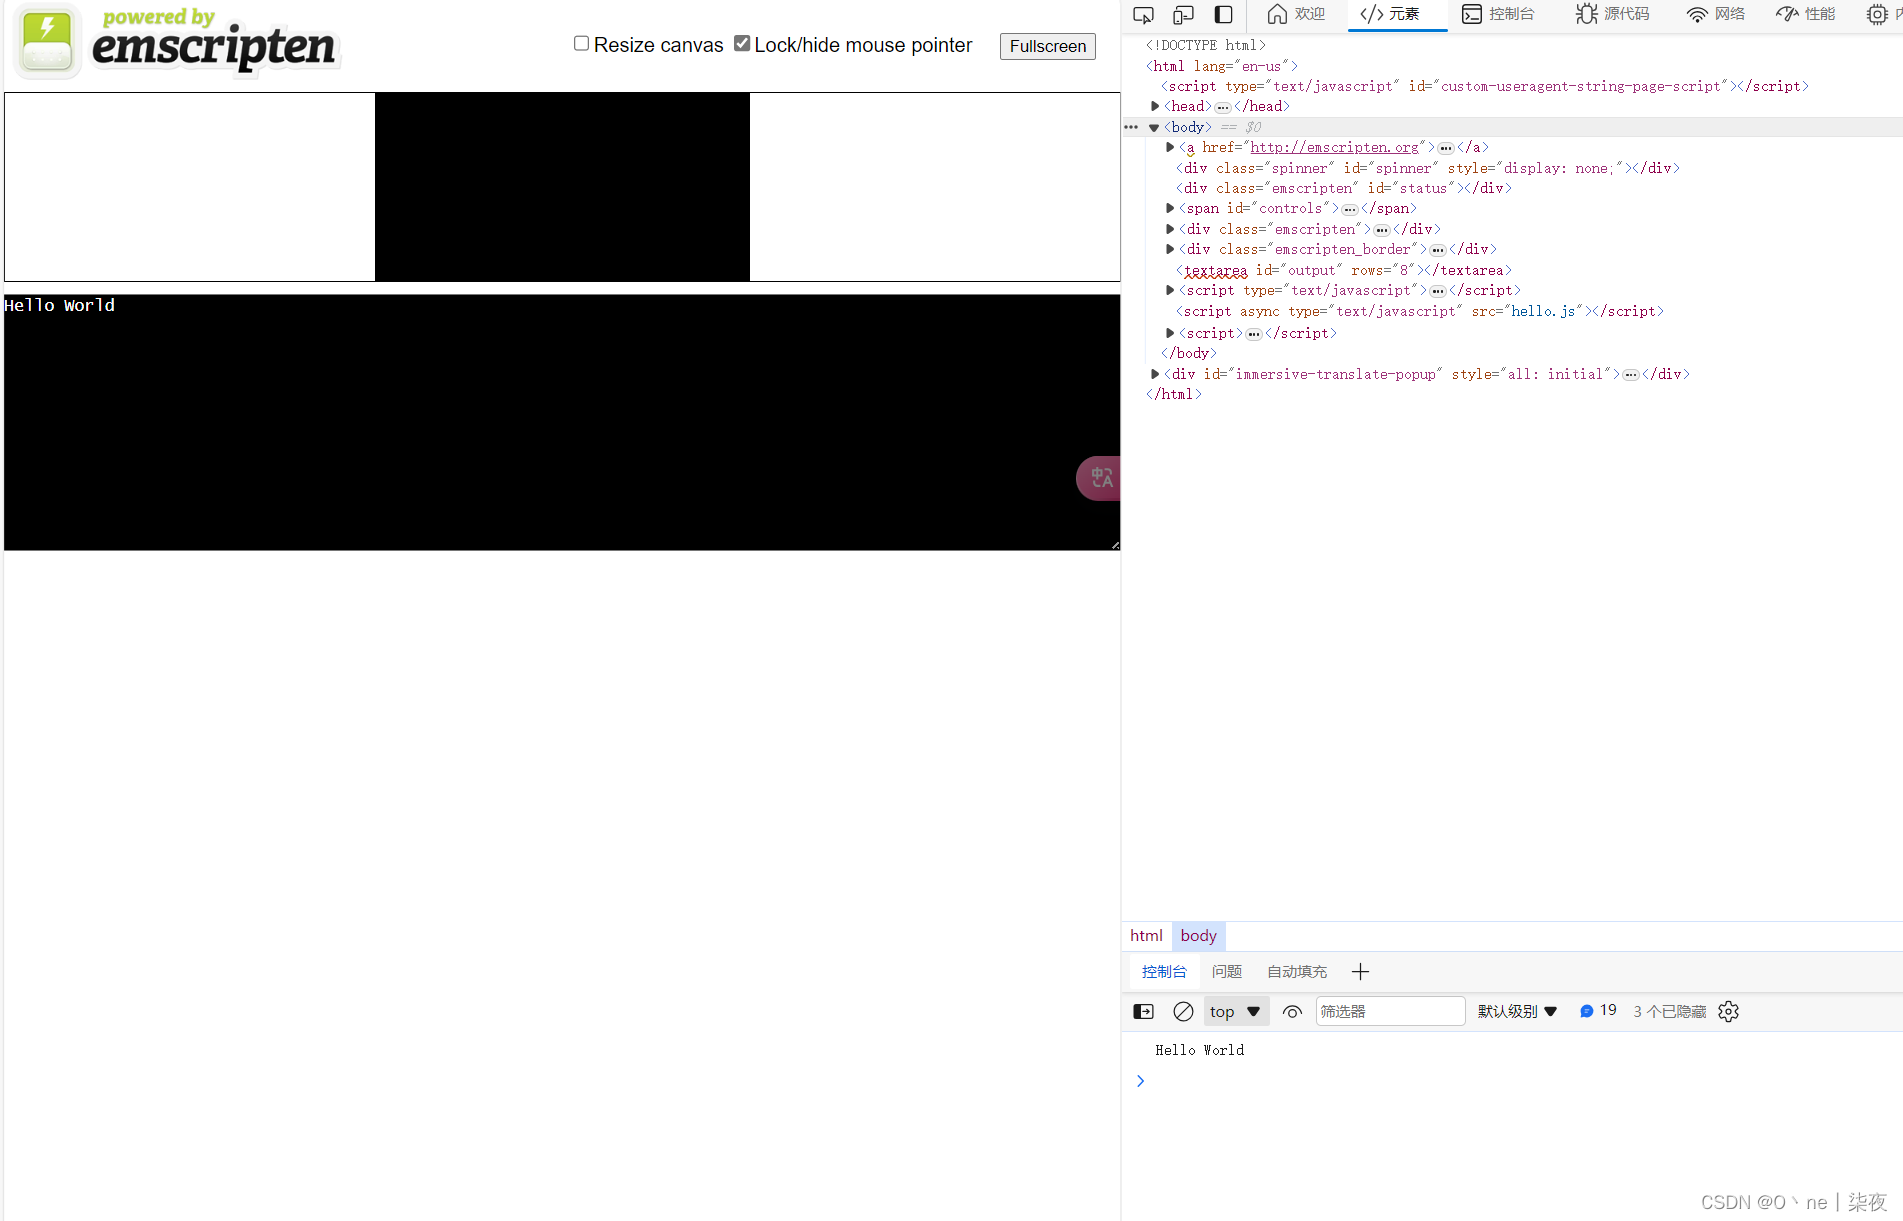
可以看到我们在 C 语言中打印的 Hello World 成功输出到浏览器了。
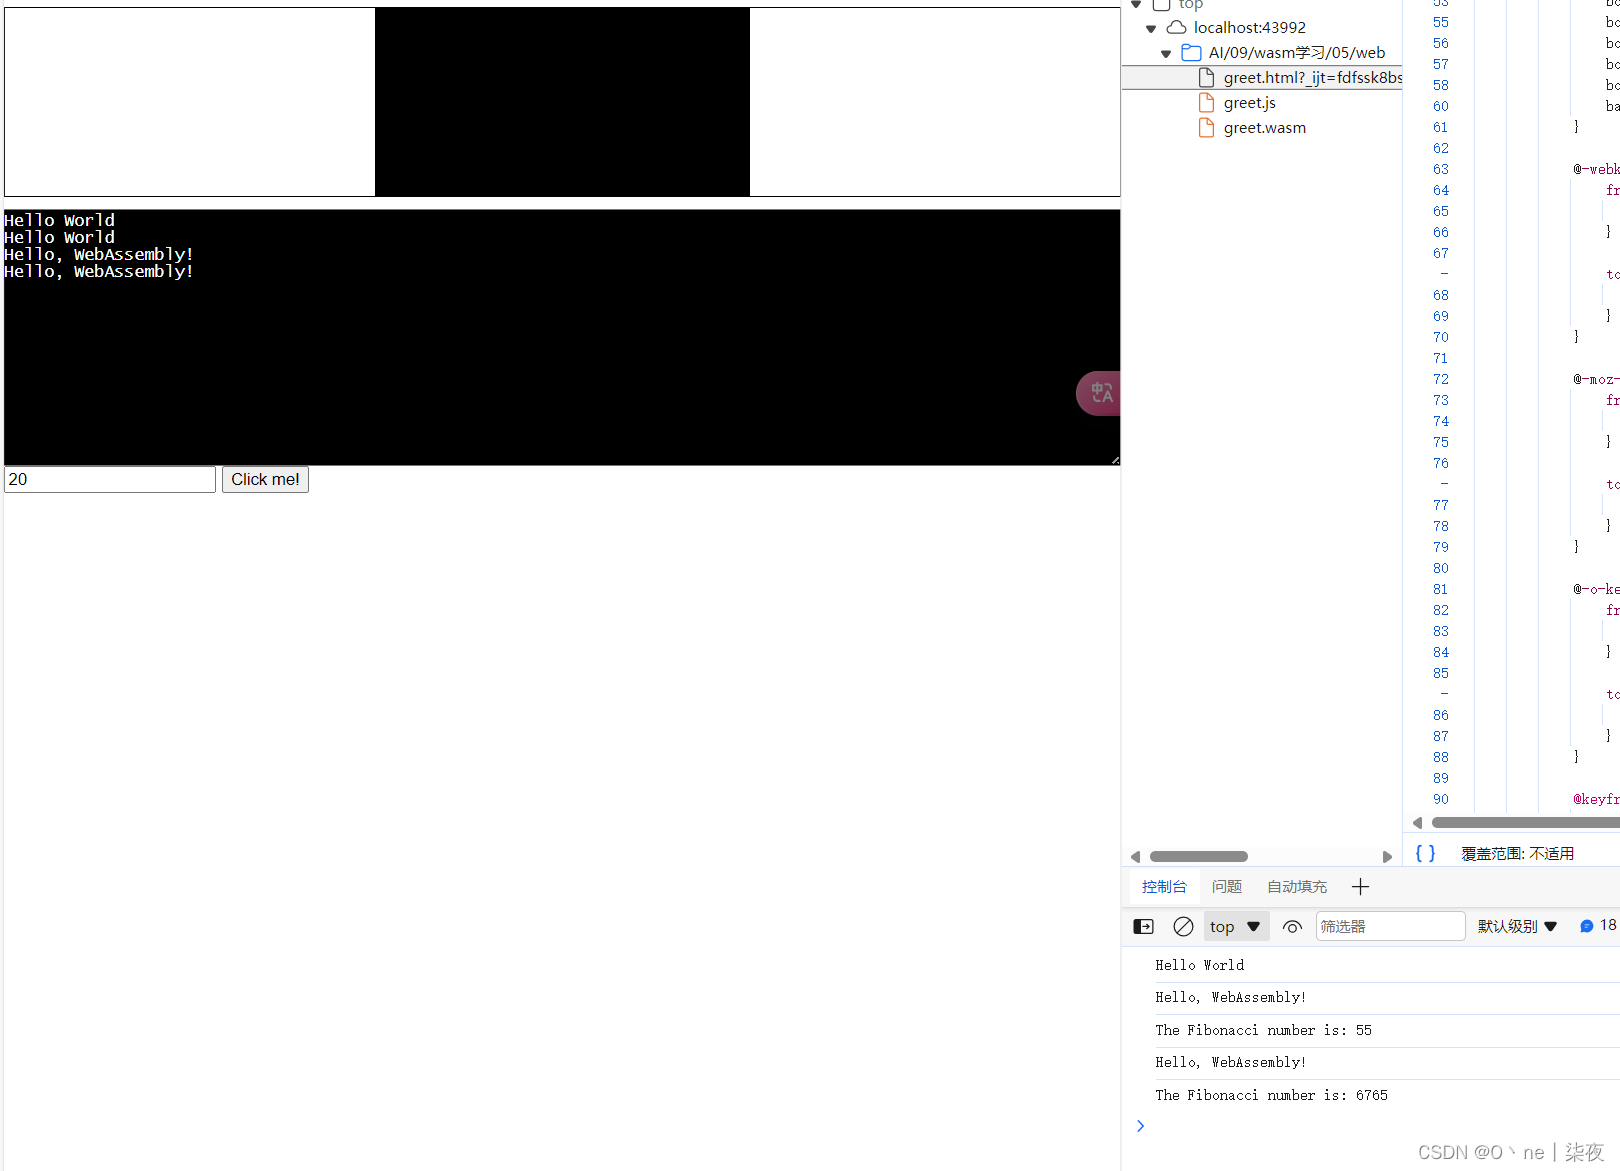
另外,我们也可以将 C 语言中的函数暴露出来给 JavaScript 调用。默认情况下,Emscripten 生成的代码只会调用 main() 函数,其他函数忽略。我们可以使用 emscripten.h 中的 EMSCRIPTEN_KEEPALIVE 来暴露函数,新建一个 greet.c 文件如下:
#include <stdio.h>
#include <emscripten/emscripten.h>
int main() {
printf("Hello World\n");
return 0;
}
#ifdef __cplusplus
#define EXTERN extern "C"
#else
#define EXTERN
#endif
EXTERN EMSCRIPTEN_KEEPALIVE void greet(char* name) {
printf("Hello, %s!\n", name);
}
// Fibonacci function
EXTERN int EMSCRIPTEN_KEEPALIVE fibonacci(int n) {
if (n <= 1) {
return n;
} else {
return fibonacci(n - 1) + fibonacci(n - 2);
}
}
上面的代码定义了一个 void greet(char* name) 函数,为了让这个函数可以在 JavaScript 中调用,编译时还需要指定 NO_EXIT_RUNTIME 和 EXPORTED_RUNTIME_METHODS 参数,将 ccall 导出来:
emcc -o greet.html greet.c -s NO_EXIT_RUNTIME=1 -s EXPORTED_RUNTIME_METHODS=ccallgreet.html 文件和上面的 hello.html 几乎是一样的,我们在该文件中加几行代码来测试我们的 greet() 函数,首先加一个按钮:
<input type="text" id="myinput" value=10>
<button id="mybutton">Click me!</button>
然后为它添加点击事件,可以看到 JavaScript 就是通过上面导出的 ccall 来调用 greet() 函数的:
document.getElementById("mybutton").addEventListener("click", () => {
        const result = Module.ccall(
            "greet",         // name of C function
            null,            // return type
            ["string"],      // argument types
            ["WebAssembly"]  // arguments
        );
        const n = parseInt(document.getElementById("myinput").value, 10);
        const result2 = Module.ccall(
            "fibonacci", // name of C function
            "number",    // return type
            ["number"],  // argument types
            [n]          // arguments
        );
        console.log("The Fibonacci number is: " + result2);
    });
除了
ccall,我们还可以使用-s EXPORTED_RUNTIME_METHODS=ccall,cwrap同时导出ccall和cwrap函数。ccall的作用是直接调用某个 C 函数,而cwrap是将 C 函数编译为一个 JavaScript 函数,并可以反复调用,这在正式项目中更实用。
点击这个按钮,可以在页面和控制台上都看到 greet() 函数打印的内容:
输入的数字太大,直接爆了...
Uncaught RuntimeError: memory access out of bounds其他导入方式
在Nodejs中使用WebAssembly
比如我们有如下c代码 testWebAssembly.c
#include <stdio.h>
int output()
{
    return 1;
}
int add(int a, int b)
{
    return a + b;
}
emcc testWebAssembly.c -Os -s WASM=1 -s SIDE_MODULE=1 -o testWebAssembly.wasm
上面的编译选项-s WASM=1是告诉编译器将代码编译成一个 WebAssembly 模块(即侧向模块),而不是一个完整的可执行程序。这意味着该程序不包含 main 函数,也不包含任何与操作系统或文件系统相关的代码。这使得该程序可以被其他程序通过 WebAssembly API 调用,并且可以在各种不同的环境中运行,例如浏览器、Node.js 等。
我一开始编译确实-s SIDE_MODULE=1,导致编译出来的testWebAssembly.wasm在实际使用的时候一直报错如下,加了该选项之后就正常
WebAssembly.Instance(): Import #0 module="wasi_snapshot_preview1" error: module is not an object or function -s WASM=1是 emsdk / emscripten 中的一个编译选项,它告诉 emscripten 编译器将输出编译为 WebAssembly 格式。具体来说,它启用了 Emscripten 的 WebAssembly 后端,该后端将 C/C++代码编译为 WebAssembly 模块。
在使用 Emscripten 编译 C/C++代码时,如果希望将其编译为 WebAssembly 格式,必须使用 -s WASM=1选项。如果您没有使用该选项,编译器将默认为 asm.js 格式进行编译。
WebAssembly 是一种新型的低级字节码格式,可以在浏览器中运行,能够以可移植的方式在不同的平台上执行代码。相比于 asm.js,WebAssembly 具有更快的解析速度和更小的体积,这使得它成为用于在浏览器中运行原生代码的最佳选择之一。
通过以上方式我们最终得到一个testWebAssembly.wasm
在Nodejs中使用WebAssembly
const fs = require('fs');
const wasmCode = fs.readFileSync('./testWebAssembly.wasm');
// 编译WebAssembly二进制代码
const wasmModule = new WebAssembly.Module(toUint8Array(wasmCode));
// 实例化WebAssembly模块
const wasmInstance = new WebAssembly.Instance(wasmModule, {});
const lib = wasmInstance.exports;
// `Wasm` does **not** understand node buffers, but thankfully a node buffer
// is easy to convert to a native Uint8Array.
function toUint8Array(buf) {
const u = new Uint8Array(buf.length);
for (let i = 0; i < buf.length; ++i) {
u[i] = buf[i];
}
return u;
}
console.log(lib.add(5, 5));
console.log(lib.output());最终我们就能成功在nodejs环境里直接调用c/c++代码的方法,使用方式比较简单,直接参看注释。
Python 编译成 WebAssembly
python转化成wasm,大了太多了
py2wasm pystone.py -o pystone.wasm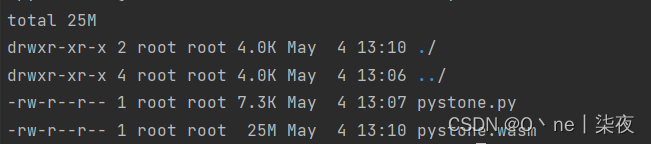
pystone.py
#! /usr/bin/env python3

"""
"PYSTONE" Benchmark Program

Version:        Python/1.1 (corresponds to C/1.1 plus 2 Pystone fixes)

Author:         Reinhold P. Weicker,  CACM Vol 27, No 10, 10/84 pg. 1013.

                Translated from ADA to C by Rick Richardson.
                Every method to preserve ADA-likeness has been used,
                at the expense of C-ness.

                Translated from C to Python by Guido van Rossum.

Version History:

                Version 1.1 corrects two bugs in version 1.0:

                First, it leaked memory: in Proc1(), NextRecord ends
                up having a pointer to itself.  I have corrected this
                by zapping NextRecord.PtrComp at the end of Proc1().

                Second, Proc3() used the operator != to compare a
                record to None.  This is rather inefficient and not
                true to the intention of the original benchmark (where
                a pointer comparison to None is intended; the !=
                operator attempts to find a method __cmp__ to do value
                comparison of the record).  Version 1.1 runs 5-10
                percent faster than version 1.0, so benchmark figures
                of different versions can't be compared directly.

"""

LOOPS = 50000

from time import clock

__version__ = "1.1"

[Ident1, Ident2, Ident3, Ident4, Ident5] = range(1, 6)

class Record:

    def __init__(self, PtrComp = None, Discr = 0, EnumComp = 0,
                       IntComp = 0, StringComp = 0):
        self.PtrComp = PtrComp
        self.Discr = Discr
        self.EnumComp = EnumComp
        self.IntComp = IntComp
        self.StringComp = StringComp

    def copy(self):
        return Record(self.PtrComp, self.Discr, self.EnumComp,
                      self.IntComp, self.StringComp)

TRUE = 1
FALSE = 0

def main(loops=LOOPS):
    benchtime, stones = pystones(loops)
    print("Pystone(%s) time for %d passes = %g" % \
          (__version__, loops, benchtime))
    print("This machine benchmarks at %g pystones/second" % stones)


def pystones(loops=LOOPS):
    return Proc0(loops)

IntGlob = 0
BoolGlob = FALSE
Char1Glob = '\0'
Char2Glob = '\0'
Array1Glob = [0]*51
Array2Glob = [x[:] for x in [Array1Glob]*51]
PtrGlb = None
PtrGlbNext = None

def Proc0(loops=LOOPS):
    global IntGlob
    global BoolGlob
    global Char1Glob
    global Char2Glob
    global Array1Glob
    global Array2Glob
    global PtrGlb
    global PtrGlbNext

    starttime = clock()
    for i in range(loops):
        pass
    nulltime = clock() - starttime

    PtrGlbNext = Record()
    PtrGlb = Record()
    PtrGlb.PtrComp = PtrGlbNext
    PtrGlb.Discr = Ident1
    PtrGlb.EnumComp = Ident3
    PtrGlb.IntComp = 40
    PtrGlb.StringComp = "DHRYSTONE PROGRAM, SOME STRING"
    String1Loc = "DHRYSTONE PROGRAM, 1'ST STRING"
    Array2Glob[8][7] = 10

    starttime = clock()

    for i in range(loops):
        Proc5()
        Proc4()
        IntLoc1 = 2
        IntLoc2 = 3
        String2Loc = "DHRYSTONE PROGRAM, 2'ND STRING"
        EnumLoc = Ident2
        BoolGlob = not Func2(String1Loc, String2Loc)
        while IntLoc1 < IntLoc2:
            IntLoc3 = 5 * IntLoc1 - IntLoc2
            IntLoc3 = Proc7(IntLoc1, IntLoc2)
            IntLoc1 = IntLoc1 + 1
        Proc8(Array1Glob, Array2Glob, IntLoc1, IntLoc3)
        PtrGlb = Proc1(PtrGlb)
        CharIndex = 'A'
        while CharIndex <= Char2Glob:
            if EnumLoc == Func1(CharIndex, 'C'):
                EnumLoc = Proc6(Ident1)
            CharIndex = chr(ord(CharIndex)+1)
        IntLoc3 = IntLoc2 * IntLoc1
        IntLoc2 = IntLoc3 / IntLoc1
        IntLoc2 = 7 * (IntLoc3 - IntLoc2) - IntLoc1
        IntLoc1 = Proc2(IntLoc1)

    benchtime = clock() - starttime - nulltime
    if benchtime == 0.0:
        loopsPerBenchtime = 0.0
    else:
        loopsPerBenchtime = (loops / benchtime)
    return benchtime, loopsPerBenchtime

def Proc1(PtrParIn):
    PtrParIn.PtrComp = NextRecord = PtrGlb.copy()
    PtrParIn.IntComp = 5
    NextRecord.IntComp = PtrParIn.IntComp
    NextRecord.PtrComp = PtrParIn.PtrComp
    NextRecord.PtrComp = Proc3(NextRecord.PtrComp)
    if NextRecord.Discr == Ident1:
        NextRecord.IntComp = 6
        NextRecord.EnumComp = Proc6(PtrParIn.EnumComp)
        NextRecord.PtrComp = PtrGlb.PtrComp
        NextRecord.IntComp = Proc7(NextRecord.IntComp, 10)
    else:
        PtrParIn = NextRecord.copy()
    NextRecord.PtrComp = None
    return PtrParIn

def Proc2(IntParIO):
    IntLoc = IntParIO + 10
    while 1:
        if Char1Glob == 'A':
            IntLoc = IntLoc - 1
            IntParIO = IntLoc - IntGlob
            EnumLoc = Ident1
        if EnumLoc == Ident1:
            break
    return IntParIO

def Proc3(PtrParOut):
    global IntGlob

    if PtrGlb is not None:
        PtrParOut = PtrGlb.PtrComp
    else:
        IntGlob = 100
    PtrGlb.IntComp = Proc7(10, IntGlob)
    return PtrParOut

def Proc4():
    global Char2Glob

    BoolLoc = Char1Glob == 'A'
    BoolLoc = BoolLoc or BoolGlob
    Char2Glob = 'B'

def Proc5():
    global Char1Glob
    global BoolGlob

    Char1Glob = 'A'
    BoolGlob = FALSE

def Proc6(EnumParIn):
    EnumParOut = EnumParIn
    if not Func3(EnumParIn):
        EnumParOut = Ident4
    if EnumParIn == Ident1:
        EnumParOut = Ident1
    elif EnumParIn == Ident2:
        if IntGlob > 100:
            EnumParOut = Ident1
        else:
            EnumParOut = Ident4
    elif EnumParIn == Ident3:
        EnumParOut = Ident2
    elif EnumParIn == Ident4:
        pass
    elif EnumParIn == Ident5:
        EnumParOut = Ident3
    return EnumParOut

def Proc7(IntParI1, IntParI2):
    IntLoc = IntParI1 + 2
    IntParOut = IntParI2 + IntLoc
    return IntParOut

def Proc8(Array1Par, Array2Par, IntParI1, IntParI2):
    global IntGlob

    IntLoc = IntParI1 + 5
    Array1Par[IntLoc] = IntParI2
    Array1Par[IntLoc+1] = Array1Par[IntLoc]
    Array1Par[IntLoc+30] = IntLoc
    for IntIndex in range(IntLoc, IntLoc+2):
        Array2Par[IntLoc][IntIndex] = IntLoc
    Array2Par[IntLoc][IntLoc-1] = Array2Par[IntLoc][IntLoc-1] + 1
    Array2Par[IntLoc+20][IntLoc] = Array1Par[IntLoc]
    IntGlob = 5

def Func1(CharPar1, CharPar2):
    CharLoc1 = CharPar1
    CharLoc2 = CharLoc1
    if CharLoc2 != CharPar2:
        return Ident1
    else:
        return Ident2

def Func2(StrParI1, StrParI2):
    IntLoc = 1
    while IntLoc <= 1:
        if Func1(StrParI1[IntLoc], StrParI2[IntLoc+1]) == Ident1:
            CharLoc = 'A'
            IntLoc = IntLoc + 1
    if CharLoc >= 'W' and CharLoc <= 'Z':
        IntLoc = 7
    if CharLoc == 'X':
        return TRUE
    else:
        if StrParI1 > StrParI2:
            IntLoc = IntLoc + 7
            return TRUE
        else:
            return FALSE

def Func3(EnumParIn):
    EnumLoc = EnumParIn
    if EnumLoc == Ident3: return TRUE
    return FALSE

if __name__ == '__main__':
    import sys
    def error(msg):
        print(msg, end=' ', file=sys.stderr)
        print("usage: %s [number_of_loops]" % sys.argv[0], file=sys.stderr)
        sys.exit(100)
    nargs = len(sys.argv) - 1
    if nargs > 1:
        error("%d arguments are too many;" % nargs)
    elif nargs == 1:
        try: loops = int(sys.argv[1])
        except ValueError:
            error("Invalid argument %r;" % sys.argv[1])
    else:
        loops = LOOPS
    main(loops)
将 go 编译成 WebAssembly
步骤一:准备 go 模块
准备一个简单的用于编译成 wasm 的 go 模块,主要的功能包括:
- 获取和输出文件的属性
getFileAttr(); - JS 可调用的函数
jsPI();
//go:build js && wasm
package main

import (
	"fmt"
	"math/rand"
	"os"
	"runtime"
	"syscall"
	"syscall/js"
	"time"
)

func getFileAttr(path string) (string, error) {
	fi, err := os.Stat(path)
	if err != nil {
		return "", err
	}

	return fmt.Sprintf("Mode: %s\nOwner: %d\nGroup: %d\nSize: %d\nModified: %s\nIsDir: %t",
		fi.Mode(),
		fi.Sys().(*syscall.Stat_t).Uid,
		fi.Sys().(*syscall.Stat_t).Gid,
		fi.Size(),
		fi.ModTime().String(),
		fi.IsDir(),
	), nil
}

func main() {
	// **ERROR**: fsnotify is not supported in WASM
	fmt.Println("testing...........")
	_, err := os.Lstat("/tmp/test.txt")
	if err != nil {
		// as expected, lstat is not supported in WASM
		fmt.Println(err.Error())
	}

	ret, err := getFileAttr("/tmp/test.txt")
	if err != nil {
		fmt.Println(err.Error())
	}
	fmt.Println(ret)

	js.Global().Set("jsPI", jsPI())

	js.Global().Call("alert", "this is an alerting!")
	v := js.Global().Get("app")
	fmt.Println(v.Get("title").String())
	fmt.Println(v.Call("getAppTitle", "").String())
	select {}
}

func pi(samples int) float64 {
	cpus := runtime.NumCPU()

	threadSamples := samples / cpus
	results := make(chan float64, cpus)

	for j := 0; j < cpus; j++ {
		go func() {
			var inside int
			r := rand.New(rand.NewSource(time.Now().UnixNano()))
			for i := 0; i < threadSamples; i++ {
				x, y := r.Float64(), r.Float64()

				if x*x+y*y <= 1 {
					inside++
				}
			}
			results <- float64(inside) / float64(threadSamples) * 4
		}()
	}

	var total float64
	for i := 0; i < cpus; i++ {
		total += <-results
	}

	return total / float64(cpus)
}

func jsPI() js.Func {
	return js.FuncOf(func(this js.Value, args []js.Value) any {
		if len(args) != 1 {
			return "Invalid no of arguments passed"
		}
		samples := args[0].Int()

		return pi(samples)
	})
}
步骤二:go wasm 编译
为了能够在浏览器或者 Obsidian 环境中运行 go wasm 文件,首先需要 go 提供的 JS 文件 wasm_exec.js,然后指定编译环境变量 GOOS=js GOARCH=wasm 对 go 模块进行编译,具体命令如下所示:
cp "$(go env GOROOT)/misc/wasm/wasm_exec.js" ./test/
cp "$(go env GOROOT)/misc/wasm/wasm_exec_node.js" ./test/

GOOS=js GOARCH=wasm go build -o ./bin/md-monitor.wasm
步骤三:JS 启动 wasm
可以现在 Obsidian console 环境中测试运行 go wasm:
- 导入 go wasm_exec 包,
const exec_wasm = require('./test/wasm_exec.js'); - 初始化 go wasm 实例,
const go = new Go(); - 读取 wasm 文件并初始化实例并运行,
WebAssembly.instantiate() - 调用 wasm 定义的函数进行测试,
jsPI(3)
'use strict'
// Try to execute the following code in browser or electron(Obsidian) console
const exec_wasm = require('./test/wasm_exec.js');
const go = new Go();
const fs = require('fs');
let content = undefined;

fs.readFile("./bin/md-monitor.wasm", (err, data) => { content = data });

WebAssembly.instantiate(content, go.importObject).then((ret) => { go.run(ret.instance); });

// call exported function which define in go module.
jsPI(3);
参考资料
Emscripten 的官方文档 Download and install — Emscripten 3.1.60-git (dev) documentation
WebAssembly 概念
WebAssembly 概念 - WebAssembly | MDN (mozilla.org)


 2783
2783

 被折叠的 条评论
为什么被折叠?
被折叠的 条评论
为什么被折叠?
 到【灌水乐园】发言


