


Tensor语法
文章目录
参考文献:
一、Tensor基本概念
Tensor是Pytorch里面处理的最基本的操作对象,本质上就是一个多维矩阵
Tensor(Pytorch)和数组(numpy)的不同之处:Pytorch可以在GPU上运行,而numpy不行。由此也很容易看出哪一种方式写出的代码可以更高效的运行
0D张量(零维张量)为标量,1D张量为向量(数组),2D及以上为矩阵
0D 张量:0D 张量仅包含一个数字,我们也可以称 0D 张量为标量,深度学习中loss函数的值通常为 0D 张量1D 张量:1D 张量称为向量,在深度学习中阈值通常为向量的形式2D 张量:2D 张量称为矩阵,在深度学习中常用于向量数据。3D 张量:3D 张量通常用于时间序列的数据或者文本序列的数据,比如对于文本序列的数据,通常形状为 (batch_size, timesteps, features)4D 张量:4D 张量通常用于图像数据,形状为 (batch_size, height, width, channels) 或 (batch_size, channels, height, width),channel 的位置和具体使用的深度学习框架有关,在 TensorFlow 2.X 中图像形状为 (batch_size, height, width, channels),而在 PyTorch 中图像的形状为 (batch_size, channels, height, width),这点注意即可。5D 张量:5D 张量通常用于视频数据,形状为 (batch_size, frames, height, width, channels) 或 (batch_size, frames, channels, height, width),channels 通道的位置和在图像中的一致,不同框架中可能表示 channels 通道维度不同,视频和图像数据相比仅仅是增加了 frames 帧数这一个维度(相当于时间维度)。
二、Tensor的创建
1、从现有数据创建
import torch as to
data = [1, 2, 3]
to.tensor(data)
print(to.tensor(data))
输出结果:tensor([1, 2, 3])
如果是直接打印data:
print(data)
输出结果:[1, 2, 3]
这里可以说明,to.tensor(data)操作并不会对原有的data改变,只是做了一个复制操作,如果data改变输出结果依然会随之改变
2、从现有的numpy数组创建
import torch as to
import numpy as np
data = np.array([1, 2, 3])
to.from_numpy(data)
print(data)
输出结果:[1, 2, 3]
(1)若第五行改为:print(to.from_numpy(data)),输出结果为:tensor([1, 2, 3], dtype=torch.int32)
(2)若3、4、5行改为:
data = np.array([1, 2, 3])
# to.from_numpy(data) 注释掉
print(to.from_numpy)
输出结果为:<built-in method from_numpy of type object at 0x00007FFB90A7A7F0>
这里不能正常打印出数组,相当于打印出了一个地址
(3)若3、4、5行改为:
data = to.tensor([1, 2, 3])
t = data.numpy()
print(t)
输出结果:[1, 2, 3]
原代码是将numpy数组转换成Tensor,而这里的代码是将Tensor转换成numpy数组。
需要注意的是,上面这两种转换方法共用同一个存储空间。这句话意味着,修改其中一个向量的值,另外一个也会随之发生改变(见如下代码):
data = to.tensor([1, 2, 3])
# data = to.inttensor([1, 2, 3])
data[1] = 5 # [0]指的是向量第一个元素,[1]指的是向量第二个元素
t = data.numpy()
print(t)
输出结果为:[1 5 3]
三、创建特殊类型的张量
1、全0张量
import torch as to
print(to.zeros(3))
print(to.zeros(2, 3, 4))
输出结果:
tensor([0., 0., 0.])
tensor([[[0., 0., 0., 0.],
         [0., 0., 0., 0.],
         [0., 0., 0., 0.]],

        [[0., 0., 0., 0.],
         [0., 0., 0., 0.],
         [0., 0., 0., 0.]]])
创建了一个向量和一个三维张量
2、全1张量
import torch as to
print(to.ones(3))
print(to.ones(2, 3, 4))
输出结果:
tensor([1., 1., 1.])
tensor([[[1., 1., 1., 1.],
         [1., 1., 1., 1.],
         [1., 1., 1., 1.]],

        [[1., 1., 1., 1.],
         [1., 1., 1., 1.],
         [1., 1., 1., 1.]]])
这里和全0张量唯一的区别就是将zeros换成了ones,英文意思也很好理解,ones意思是1,zeros意思是0
3、全x张量
import torch as to
print(to.full((3, ), 6))
print(to.full((2, 3), 6))
输出结果
tensor([6, 6, 6])
tensor([[6, 6, 6],
        [6, 6, 6]])
这里需要注意两个地方:
(1)一维张量不能写成to.full((3),6)
(2)注意括号的数量,print后面有个括号,full后面有个括号,描述向量维度信息的时候也有个括号
4、单位矩阵
import torch as to
print(to.eye(4))
print(to.eye(2, 4))
输出结果:
tensor([[1., 0., 0., 0.],
        [0., 1., 0., 0.],
        [0., 0., 1., 0.],
        [0., 0., 0., 1.]])
tensor([[1., 0., 0., 0.],
        [0., 1., 0., 0.]])
注意这种方法只能生成二维的对角矩阵
5、固定步长
import torch as to
print(to.arange(1, 4, 0.5))
输出结果:tensor([1.0000, 1.5000, 2.0000, 2.5000, 3.0000, 3.5000])
arange(x, y, z)中x表示下限,y表示上限,z表示间隔的长度
6、固定元素
import torch as to
print(to.linspace(1, 4, 5))
输出结果:
tensor([1.0000, 1.7500, 2.5000, 3.2500, 4.0000])
linspace(x, y, z)中x表示下限,y表示上限,z表示间隔的数值的数量
四、随机产生张量
1、产生[0,1)的随机数
import torch as to
print(to.rand(4))
print(to.rand(2, 4))
输出结果:
tensor([0.3405, 0.9922, 0.0454, 0.9862])
tensor([[0.2822, 0.6131, 0.8319, 0.2630],
        [0.5239, 0.8665, 0.2805, 0.5659]])
rand后面括号内的表示的是数组维度信息
2、产生随机整数
在上一个的基础上,产生任意区间[a,b)中的随机整数torch.randint(a,b,(维度信息))
import torch as to
print(to.randint(2, 4, (3, )))
print(to.randint(2, 4, (3, 3)))
输出结果:
tensor([2, 3, 2])
tensor([[3, 3, 2],
        [2, 3, 2],
        [3, 2, 2]])
这里同生成全x张量那里,需要注意两个地方:
(1)一维张量不能写成to.randint((3),6)
(2)注意括号的数量,print后面有个括号,randint后面有个括号,描述向量维度信息的时候也有个括号
3、产生N(0,1)随机数
import torch as to
print(to.randn(4,))
print(to.randn((4, 4)))
输出结果:
tensor([-0.7589, -1.7329, -0.6768, -0.4510])
tensor([[-0.0514,  0.6137,  0.6234,  0.4784],
        [ 0.2226, -0.2000, -0.6636, -1.7517],
        [ 1.4041,  0.0530,  0.4869, -1.2310],
        [ 1.6801,  0.8021,  0.9859, -2.0820]])
4、产生随机种子
设置随机种子的目的是为了能够复现:
在神经网络中,参数默认是进行随机初始化的,而不同的初始化参数往往会导致不同的结果。在某次训练中我们得到了一个比较好的结果,我们当然希望这个结果可以是复现的,以得到更多优秀模型。所以我们常常通过设置全局随机数种子来实现这个目的
import torch as to
seed = 111
print(to.manual_seed(seed))
print(to.rand(1))

//对比
import torch as to
seed = 222
print(to.manual_seed(seed))
print(to.rand(1))
输出结果:
<torch._C.Generator object at 0x0000029F90427DD0>
tensor([0.7156])

//对比
<torch._C.Generator object at 0x0000023DBFC00DD0>
tensor([0.6633])
五、Tensor的合并
1、连接张量
下面有三组代码,唯一的区别就是dim参数发生了变化:
import torch as to
n1 = to.tensor([[1, 1], [1, 1]])
n2 = to.tensor([[2, 2], [2, 2]])
t = to.cat((n1, n2), dim=0)
print(t)

//对比
n1 = to.tensor([[1, 1], [1, 1]])
n2 = to.tensor([[2, 2], [2, 2]])
t = to.cat((n1, n2), dim=1)
print(t)

//对比
n1 = to.tensor([[1, 1], [1, 1]])
n2 = to.tensor([[2, 2], [2, 2]])
t = to.cat((n1, n2), dim=2)
print(t)
输出结果:
tensor([[1, 1],
        [1, 1],
        [2, 2],
        [2, 2]])

//对比
tensor([[1, 1, 2, 2],
        [1, 1, 2, 2]])

//对比
t = to.cat((n1, n2), dim=2)
IndexError: Dimension out of range (expected to be in range of [-2, 1], but got 2)
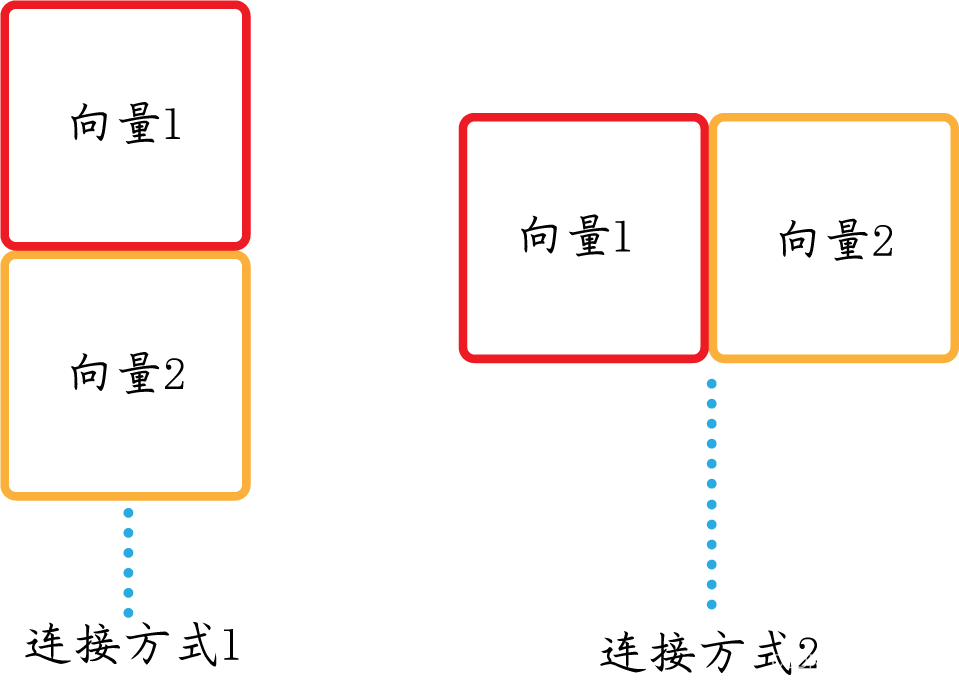
这三者区别在于,两个张量连接的方式不一样。由于这是二维张量,只有两个方向可以进行连接操作,即dim可以等于0和1,而dim=2的时候就会发生报错
二维张量连接可能方式:
2、堆叠向量
import torch as to
n1 = to.tensor([[1, 1], [3, 3]])
n2 = to.tensor([[2, 2], [4, 4]])
t = to.stack((n1, n2), dim=0)
print(t)
//对比
n3 = to.tensor([[1, 1], [3, 3]])
n4 = to.tensor([[2, 2], [4, 4]])
t = to.stack((n1, n2), dim=1)
print(t)
//对比
n5 = to.tensor([[1, 1], [3, 3]])
n6 = to.tensor([[2, 2], [4, 4]])
t = to.stack((n1, n2), dim=2)
print(t)
输出结果:
tensor([[[1, 1],
         [3, 3]],
        [[2, 2],
         [4, 4]]])
//对比
tensor([[[1, 1],
         [2, 2]],
        [[3, 3],
         [4, 4]]])
//对比
tensor([[[1, 2],
         [1, 2]],
        [[3, 4],
         [3, 4]]])
两个二维张量堆叠在一起形成了一个三维张量,既然是三维的说明有三个方向(自由度)可以进行堆叠,故dim可以取到1、2、3
六、Tensor的拆分
1、按元素个数拆分
import torch as to
t = to.arange(1, 11)
print(to.split(t, 5))
print(to.split(t, [2, 3, 5]))
输出结果:
(tensor([1, 2, 3, 4, 5]), tensor([ 6,  7,  8,  9, 10]))
(tensor([1, 2]), tensor([3, 4, 5]), tensor([ 6,  7,  8,  9, 10]))
arange(1,11)生成1~10的整数排列(一维张量),split(t, 5)表示将该排列按五个为一划分;split(t, [3, 4, 5])表示将该排列分别分成含3个、4个、5个元素的三个排列
2、按块数进行划分
import torch as to
t = to.arange(1, 11)
print(to.chunk(t, 5))
输出结果:
(tensor([1, 2]), tensor([3, 4]), tensor([5, 6]), tensor([7, 8]), tensor([ 9, 10]))
注意将按块数进行划分与按元素个数进行划分的区别
七、Tensor的重构
1、重塑Tensor
import torch as to
t = to.arange(8).reshape(2, 4)
print(t)
输出结果:
tensor([[0, 1, 2, 3],
        [4, 5, 6, 7]])
重塑的意思就是将一个张量的元素重新组成一个m×n的张量,注意reshape里面两个数值相乘要等于张量的元素个数。
2、挤压Tensor
import torch as to
t = to.rand(2, 3, 1, 4, 1)
s = t.shape  # s记录的是该矩阵的维度信息
print(s)
print(t.squeeze().shape)
输出结果:
torch.Size([2, 3, 1, 4, 1])
torch.Size([2, 3, 4])
挤压的意思是将张量维度值中的1去掉
我们也可以挤压张量中特定的1维度值:
import torch as to
t = to.rand(2, 3, 1, 4, 1)
s = t.shape  # s记录的是该矩阵的维度信息
print(s)
print(t.squeeze(dim=3).shape)
输出结果:
import torch as to
t = to.rand(2, 3, 1, 4, 1)
s = t.shape  # s记录的是该矩阵的维度信息
print(s)
print(t.squeeze(dim=2).shape)
注意dim的值要不实际维度值少1,因为dim是从0开始计算维度的
与squeeze相反的是unsqueeze,作用是在某个维度上增加1
如果仅从数字角度来说,某一个维度增加和减少一个1并不影响张量中现有的数值,但是可以改变原有张量的维度以更好的参与张量的运算中
八、Tensor常用属性
import torch as to
t = to.tensor([[1, 2], [3, 4]])
print(t.shape)  # 形状
print(t.dtype)  # 数据类型
print(t.device)  # 所在位置
print(t.ndim)  # 几维张量
输出结果:
torch.Size([2, 2])
torch.int64
device(type='cpu')
1
九、Tensor常用方法
import torch as to
t = to.tensor([[1, 2], [3, 4]])
print(t.numel())  # 判断tensor中总共有多少元素
print(t[(0, 1)].item())  # 将单元素tensor转化为python标量
print(t.size())  # 等价于t.shape
print(t.type())  # 给出tensor具体类型
print(t.dim())  # 查看tensor维度
输出结果:
4
2
torch.Size([2, 2])
torch.LongTensor
2
十、Tensor的数学运算
1、矩阵乘法
import torch as to
to.manual_seed(42)
a = to.rand(3, 4)
b = to.rand(4, 3)
print(a @ b)
print(to.mm(a, b))
print(to.matmul(a, b))
输出结果:
tensor([[1.6854, 1.8361, 2.0800],
        [1.0162, 1.1504, 1.3635],
        [1.3862, 1.4147, 1.5193]])
注意
torch.mm仅支持矩阵和矩阵相乘,torch.matmul和@还支持矩阵与向量相乘
2、向量点积
import torch as to
a = to.tensor([1, 5, 3])
b = to.tensor([4, 2, 1])
print(to.dot(a, b))
输出结果:
tensor(17)


 627
627


 被折叠的 条评论
为什么被折叠?
被折叠的 条评论
为什么被折叠?
 到【灌水乐园】发言


