


Lab3: page tables
页表实验,需要清晰地理解虚拟地址到物理地址地映射。
建议重新建一个文件夹克隆后执行下列语句;
  $ git fetch
  $ git checkout pgtbl
  $ make clean
官方建议开始实验前:
-
阅读教材第三章,中文文档
-
阅读源码
Kernel/memlayout.h,它捕获内存的布局。

Kernel/VM.c,它包含大多数虚拟内存(VM)代码。

Kernel/kalloc.c,其中包含用于分配和释放物理内存的代码。
这里挂上我的项目地址,我搜集到的一些资料和自己制作的流程图等都放在其中,希望能帮助到你。
Speed up system calls
实验要求
Some operating systems (e.g., Linux) speed up certain system calls by sharing data in a read-only region between userspace and the kernel. This eliminates the need for kernel crossings when performing these system calls. To help you learn how to insert mappings into a page table, your first task is to implement this optimization for the
getpid()system call in xv6.When each process is created, map one read-only page at USYSCALL (a VA defined in
memlayout.h). At the start of this page, store astruct usyscall(also defined inmemlayout.h), and initialize it to store the PID of the current process. For this lab,ugetpid()has been provided on the userspace side and will automatically use the USYSCALL mapping. You will receive full credit for this part of the lab if theugetpidtest case passes when runningpgtbltest.
简单来说,就是使用共享内存优化getpid()的系统调用。
实验思路
- 仔细阅读 所有 hint提到的源码,比较重要的有
proc_pagetable(),mappages(),allocproc(); - 在
proc_pagetable()中添加USYSCALL的分配,参考该函数对trampoline和tarpfram; - 修改allocproc,proc_pagetable,freeproc 函数,都在proc.c文件中;
代码框架
并不是一个写代码的实验,更多需要读懂系统调用和虚拟内存的映射过程。
按照hint的步骤,一个一个读源码,尽量别看别人的思路(包括这篇),除非完全没有思路。
下面列出虚拟内存映射的过程:
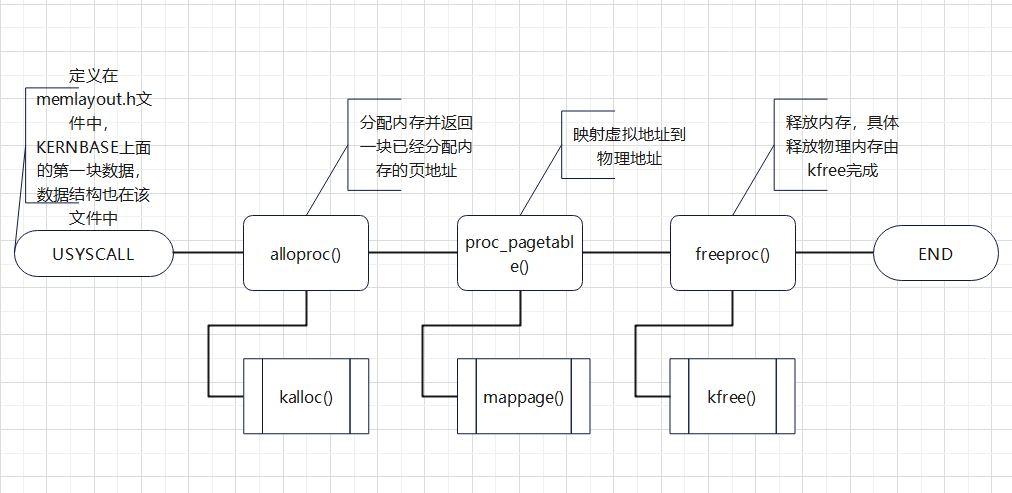
实验细节
- 没有太多细节,注意释放内存,proc.h中修改结构体;
- mappages() 失败需要撤销前面TRAMPOLINE,TRAPFRAME;
实验结果

Print a page table
实验要求
To help you visualize RISC-V page tables, and perhaps to aid future debugging, your second task is to write a function that prints the contents of a page table.
Define a function called
vmprint(). It should take apagetable_targument, and print that pagetable in the format described below. Insertif(p->pid==1) vmprint(p->pagetable)in exec.c just before thereturn argc, to print the first process’s page table. You receive full credit for this part of the lab if you pass thepte printouttest ofmake grade.
简而言之,写一个 vmprint() 函数,按照给出的格式打印,格式如下:
page table 0x0000000087f6e000
 ..0: pte 0x0000000021fda801 pa 0x0000000087f6a000
 .. ..0: pte 0x0000000021fda401 pa 0x0000000087f69000
 .. .. ..0: pte 0x0000000021fdac1f pa 0x0000000087f6b000
实验思路
hint中提到了freewalk会非常有用,参考以后,照搬递归查看pte即可,其余代码还是非常简单的,但是我自己的实现中,使用了额外的一个level,来表示递归层数,方便打印前面的 .. ,貌似没有什么别的好办法能表示层数。
代码框架
void vmprint(pagetable_t pgtbl, int level)
{
  // 0层直接就是初始页表,打印即可

  // 递归出口,最多三层,详情可见xv6book,设计时就只设计了三级页表;
  if (level != 3)
  {
    // 循环打印,参考一下freewalk
    for (int i = 0; i < 512; i++)
    {

        // 只打印使用了的,未使用的直接跳过即可
        if (pte & PTE_V)
        {

        } else {
          continue;
    	}
    }
  }
}
实验细节
- 最多递归3层,这是xv6系统的限制;
- 打印时需要注意
..,前面是有空格的!!! - 递归要增加level的数值;
- 使用%p,参数并不是地址,而是uint64,所以并不需要取址;
- PTE_V一个标志位即可,因为打印并不需要管其他标志位。
实验结果
成功

Detecting which pages have been accessed
实验要求
Your job is to implement
pgaccess(), a system call that reports which pages have been accessed. The system call takes three arguments. First, it takes the starting virtual address of the first user page to check. Second, it takes the number of pages to check. Finally, it takes a user address to a buffer to store the results into a bitmask (a datastructure that uses one bit per page and where the first page corresponds to the least significant bit). You will receive full credit for this part of the lab if thepgaccesstest case passes when runningpgtbltest.
实现pgaccess(),接受三个参数:
- 用户页的起始虚拟地址
- 页的编号(下标)
- 用户地址
实验思路
- 把
sys_pgaccess()定义在kernel/sysproc.c; - 使用
argaddr()和argint()获取参数; - 参照文档和hint设置PTE_A参数,在
riscv.h中设置宏定义,可以参考其他的PTE标志位; - 通过位运算,来对PTE_A位进行获取,注意离开时一定要清空访问位,否则会永远置1;
- 结果保存在一个bitmask中,通过
copyout()来传输到用户空间。
代码框架
pgaccess用户函数,定义在proc.c中
int pgaccess(pagetable_t pagetable, uint64 va, int pg_num, uint64 res_addr)
{
  // 检查pgnum是否小于最大值,可以查看test文件,只需要32位即可,我用的64位;

  uint64 bitmask = 0;
  uint64 mask = 1;

  // 遍历,然后walk逐一获取pte,然后位运算检查PTE_A;
  for (int count = 0; count < pg_num; ++count, va += PGSIZE)
  {
    pte_t *pte;

    if (*pte & PTE_A)
    {

    }
  }

  // 拷贝到第四个参数,也就是用户地址
  return 0;
}
实验细节
- 需要在
defs.h中定义walk和自己实现的pgeaccess; - 位运算后需要还原,否则PTE_A永远为1;
- PTE_A的位置需要查看文档,我一开始设的5,总是失败,后来阅读文档并且翻看课程才发现是6,不能想当然的就随便设定,因为是硬件系统规定好的,每次访问自动置1,设错PTE_A的话就检测到一个空的位置,自然会出错。
实验结果
成功

make grade
创建time.txt,answers-pgtbl.txt(lab后面的一些提问,我可以分享以下我自己的答案,但并不是标准答案,算是我自己的一些思考吧);
然后make grade,结果展示:
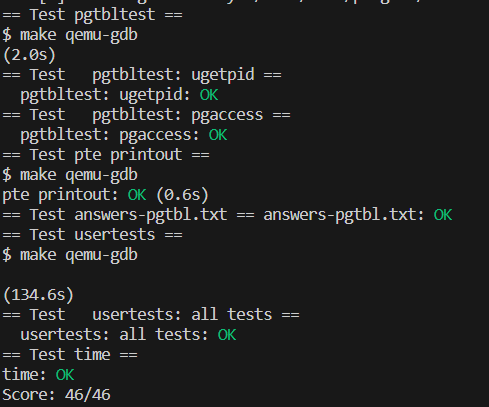
这个实验,明显感觉需要对教材和虚拟内存映射有一个较深的理解才能比较顺利的做出来,并且每个实验都是有其目的性,尤其是第三个实验,非常的综合,需要结合前面的系统调用的知识,光是找到实现函数的位置,就要动点脑子,实现时更是困难重重,翻过一山还有一山,但是最终实现的时候,成就感非常强烈,也真实的学到了东西。祝大家Lab顺利!


 6406
6406


 被折叠的 条评论
为什么被折叠?
被折叠的 条评论
为什么被折叠?
 到【灌水乐园】发言


