


多线程系列文章目录

💥 💥 💥如果你觉得我的文章有帮助到你,还请【关注➕点赞➕收藏】,得到你们支持就是我最大的动力!!!
💥 💥 💥
⚡版权声明:本文由【马上回来了】原创、在CSDN首发、需要转载请联系博主。
版权声明:本文为CSDN博主「马上回来了」的原创文章,遵循CC 4.0 BY-SA版权协议,转载请附上原文出处链接及本声明。

🚀🚀🚀 新的知识开始喽🚀🚀🚀

1.比较常用的队列
优先级队列:PriorityQueue
小根堆,大根堆,按照优先级来出队列.
消息队列:不是先进先出,入队列没啥要求,出队列时按照元素类型来出.
阻塞队列,下面详细介绍下.
2.阻塞队列
阻塞队列的特点:
1.先进先出
2.队列满时,入队列阻塞;队列空时,出队列阻塞
3.线程安全
阻塞队列的优点:
1.生产者与消费者模型中,有利于生产者和消费者解耦合
生产者生产的元素并不直接给消费者使用,而是存储到阻塞队列里,消费者也是直接从阻塞队列里获取元素,这样生产者与消费者间的耦合度很低,当要调整代码结构时,不需要做过多的调整并且不会直接影响到消费者和生产者,比如在增加一个消费者,那么这个消费者也可以直接从阻塞队列里获取元素.
2.阻塞队列相当于一个缓存区,平衡了生产者和消费者间的处理能力
比如服务器A给服务器B传送数据,当服务器A的信息量急增时,不仅可能会导致服务器A崩溃,服务器B直接接收服务器A的数据也可能导致服务器B崩溃,如果在两个服务器之间增加一个阻塞队列,就可以大大缓解服务器的工作压力,当阻塞队列里的元素已满时,服务器A无法在向阻塞队列里继续发送数据,而是要等到服务器B将阻塞队列里的数据处理成不为满的时,才能继续往阻塞队列里发送数据.
标准库里的阻塞队列:
BlockingQueue是一个接口,LinkedBlockingQueue是真正实现的类.
put和take方法带有阻塞性(await),而poll,peek,offer这些方法不带有阻塞性.
3.阻塞队列的模拟实现
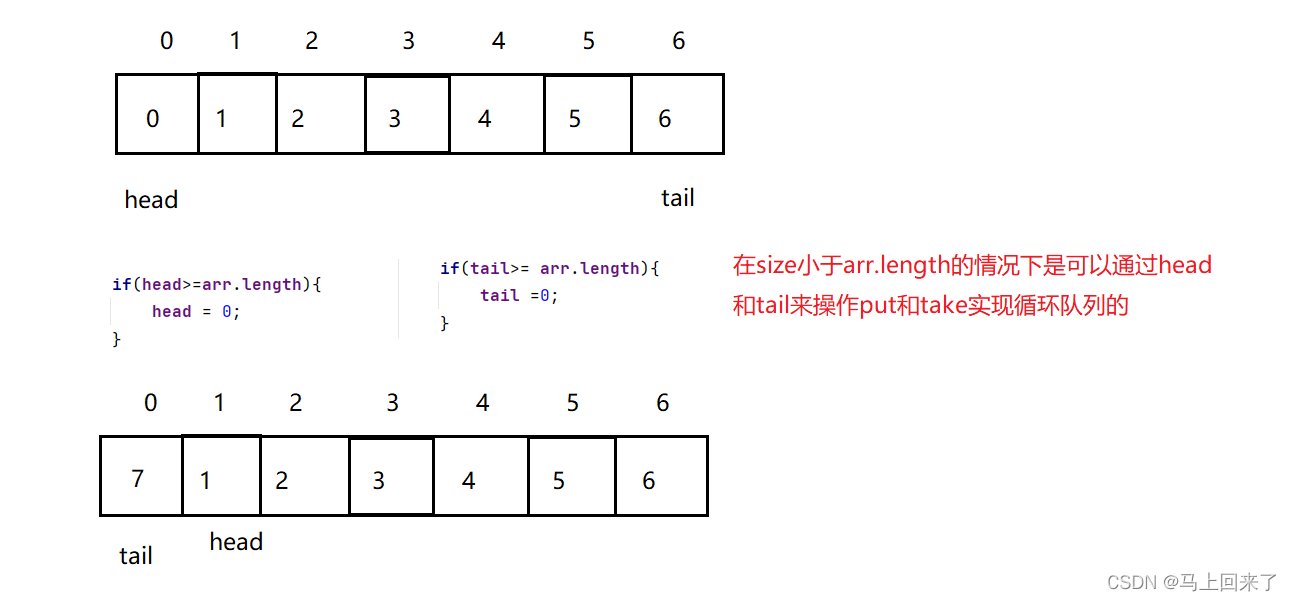
1.实现循环队列
class MyBlockingQ{
    //数组
    int[] arr = new int[10];
    int head = 0;//头
    int tail = 0;//尾
    int size = 0;//计数器
    //添加元素
    public void put(int n){
        if(size == arr.length){
            return;
        }
        arr[tail] = n;
        tail++;
        if(tail>= arr.length){//从头开始
            tail =0;
        }
        size++;
    }
    //删除元素
    public Integer take(){
        if (size == 0){
            return  null;
        }
        int ret = arr[head];
        head++;
        if(head>=arr.length){//从头开始
            head = 0;
        }
        size--;
        return  ret;
    }
}
2.保证线程安全,加锁并通过wait和notify实现阻塞
因为put和take里设涉及到大量的修改操作,因此直接将这两个函数都锁起来
class MyBlockingQ{
    //数组
    int[] arr = new int[10];
    int head = 0;//头
    int tail = 0;//尾
    int size = 0;//计数器
    //添加元素
    public void put(int n) throws InterruptedException {
        synchronized (this){
            if(size >= arr.length){
             wait();//阻塞 等到take里删除元素调用notify唤醒这里的wait
            }
            arr[tail] = n;
            tail++;
            if(tail>= arr.length){//从头开始
                tail =0;
            }
            size++;
            notify();//唤醒take里的wait
        }

    }
    //删除元素
    public Integer take() throws InterruptedException {
        synchronized (this){
            if (size == 0){
                wait();//阻塞 等到put里增加元素调用notify唤醒这里的wait
            }
            int ret = arr[head];
            head++;
            if(head>=arr.length){//从头开始
                head = 0;
            }
            size--;
            notify();//唤醒put里的wait
            return  ret;
        }

    }
}
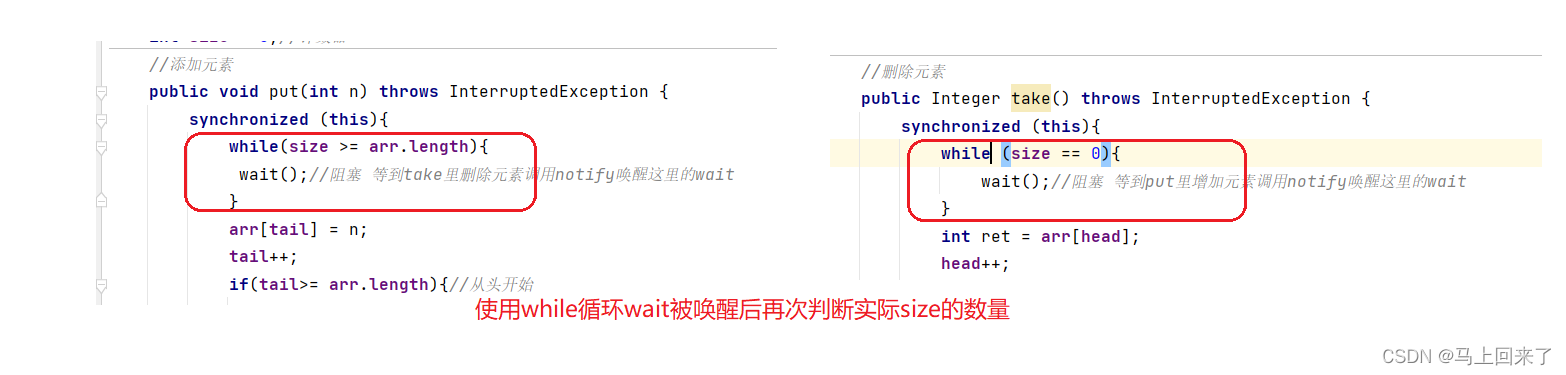
3.线程的抢占式执行以及interrupt可能带来的问题
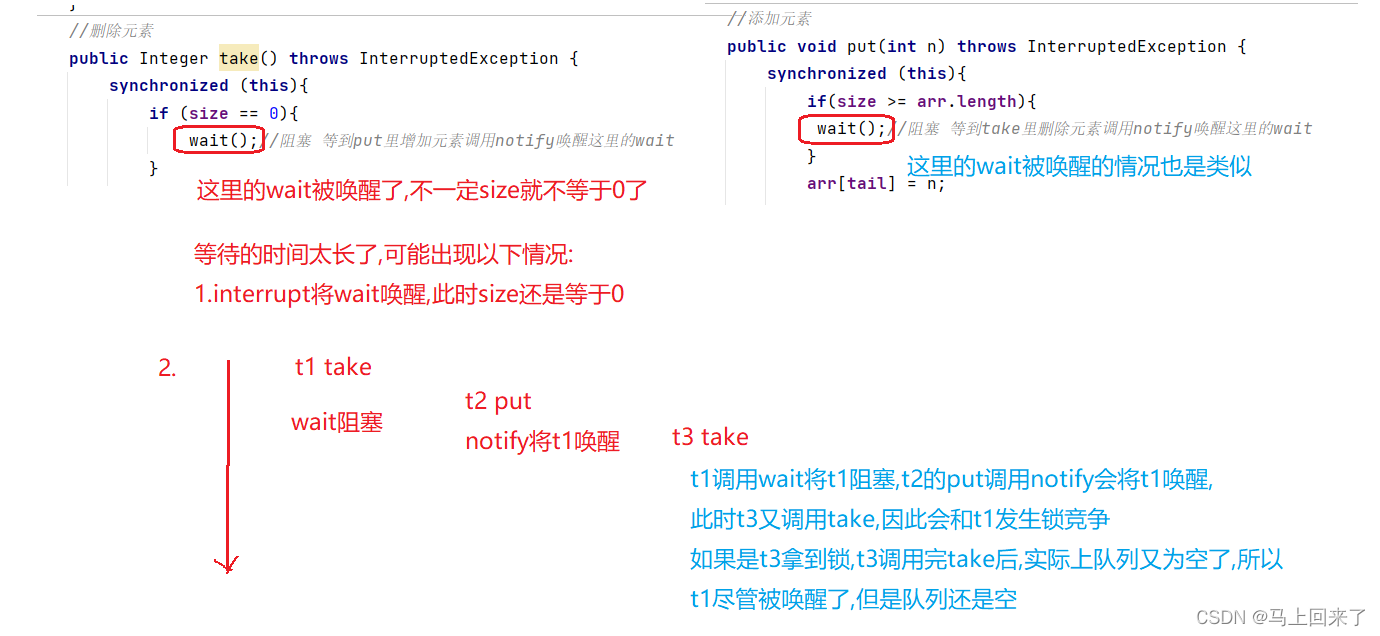
因此在wait被唤醒之后还得再判断一次size的实际情况:
class MyBlockingQ{
    //数组
    int[] arr = new int[10];
    int head = 0;//头
    int tail = 0;//尾
    int size = 0;//计数器
    //添加元素
    public void put(int n) throws InterruptedException {
        synchronized (this){
            while(size >= arr.length){
             wait();//阻塞 等到take里删除元素调用notify唤醒这里的wait
            }
            arr[tail] = n;
            tail++;
            if(tail>= arr.length){//从头开始
                tail =0;
            }
            size++;
            notify();//唤醒take里的wait
        }

    }
    //删除元素
    public Integer take() throws InterruptedException {
        synchronized (this){
            while (size == 0){
                wait();//阻塞 等到put里增加元素调用notify唤醒这里的wait
            }
            int ret = arr[head];
            head++;
            if(head>=arr.length){//从头开始
                head = 0;
            }
            size--;
            notify();//唤醒put里的wait
            return  ret;
        }

    }
}
完整代码:
class MyBlockingQ{
//数组
int[] arr = new int[10];
int head = 0;//头
int tail = 0;//尾
int size = 0;//计数器
//添加元素
public void put(int n) throws InterruptedException {
synchronized (this){
while(size >= arr.length){
wait();//阻塞 等到take里删除元素调用notify唤醒这里的wait
}
arr[tail] = n;
tail++;
if(tail>= arr.length){//从头开始
tail =0;
}
size++;
notify();//唤醒take里的wait
}
}
//删除元素
public Integer take() throws InterruptedException {
synchronized (this){
while (size == 0){
wait();//阻塞 等到put里增加元素调用notify唤醒这里的wait
}
int ret = arr[head];
head++;
if(head>=arr.length){//从头开始
head = 0;
}
size--;
notify();//唤醒put里的wait
return ret;
}
}
}
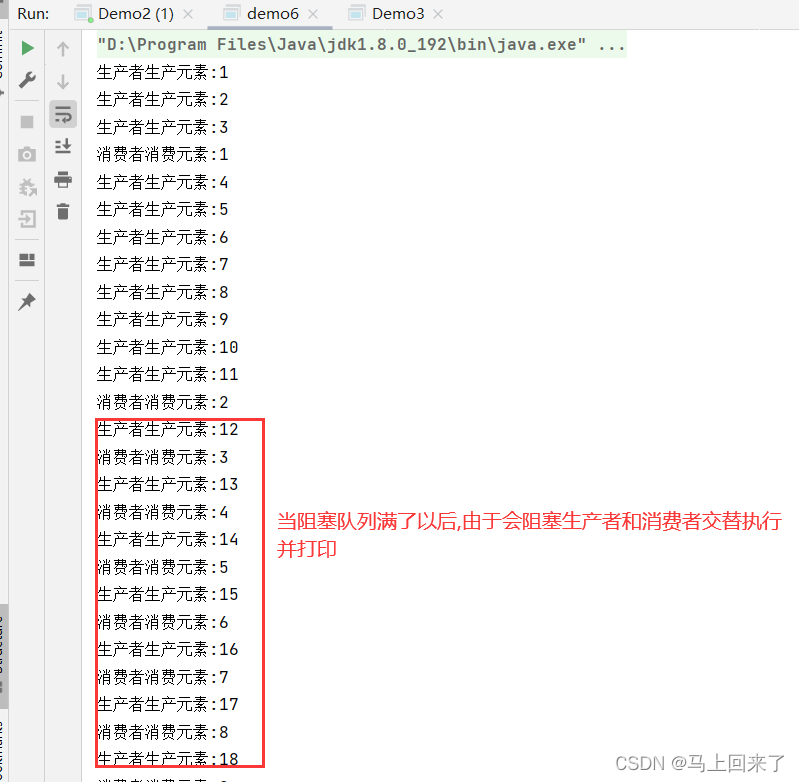
public class demo6 {
public static void main(String[] args) {
MyBlockingQ q = new MyBlockingQ();
Thread t1 = new Thread(()->{
int n = 1;
while (true){
try {
q.put(n);
System.out.println("生产者生产元素:"+n);
n++;
} catch (InterruptedException e) {
e.printStackTrace();
}
}
});
t1.start();
Thread t2 = new Thread(()->{
while (true){
try {
int ret = q.take();
System.out.println("消费者消费元素:"+ret);
Thread.sleep(500);
} catch (InterruptedException e) {
e.printStackTrace();
}
}
});
t2.start();
}
}
🌏🌏🌏今天的你看懂这里又学到了很多东西吧🌏🌏🌏

🌔 🌔 🌔下次见喽🌔 🌔 🌔


 450
450


 被折叠的 条评论
为什么被折叠?
被折叠的 条评论
为什么被折叠?
 到【灌水乐园】发言


