


20212313 2023-2024-2 《移动平台开发与实践》第2次作业
1.实验内容
1.1知识回顾
Activity的基本用法包括:
创建Activity:继承自Activity类,重写生命周期方法以及处理业务逻辑。
声明Activity:在AndroidManifest.xml文件中声明Activity,指定其名称、启动模式等属性。
启动Activity:通过Intent启动其他Activity,可以携带数据或者接收返回结果。
生命周期管理:根据需要在合适的生命周期方法中执行相应的操作,如资源释放、数据保存等。
处理返回结果:如果需要从启动的Activity中获取结果,可以在启动时使用startActivityForResult()方法,并在onActivityResult()方法中处理返回的结果。
Activity的生命周期是指在其创建、启动、运行和销毁过程中所经历的状态变化,它包括以下几个重要的方法:
onCreate():当Activity被创建时调用,通常在这个方法中进行一些初始化操作,比如设置布局、绑定数据等。
onStart():当Activity变得可见但还无法与用户交互时调用,此时Activity处于“可见但不可交互”的状态。
onResume():当Activity变得可见且可以与用户交互时调用,此时Activity处于前台并处于活动状态。
onPause():当其他Activity被启动、当前Activity被部分遮挡或者用户按下Home键回到桌面时调用,此时Activity失去焦点但仍然可见。
onStop():当Activity不再可见时调用,通常是在其被另一个Activity完全覆盖、被销毁或者用户按下Back键返回上一个Activity时调用。
onDestroy():当Activity被销毁前调用,可以在这里释放资源、取消注册监听器等清理工作。
Activity的启动模式是指在何种情况下以何种方式启动Activity,Android提供了四种启动模式:
standard(标准模式):每次启动Activity都会创建一个新的实例,并放置在任务栈中。
singleTop(单顶模式):如果Activity位于任务栈的栈顶,则不会创建新的实例,而是调用已存在的实例的onNewIntent()方法;否则会创建新的实例并放置在栈顶。
singleTask(单任务模式):不管Activity位于任务栈的任何位置,只要存在同一Activity的实例,就会将其调至栈顶并销毁其上的所有Activity实例。
singleInstance(单实例模式):系统会为该Activity创建一个新的任务栈,并且该任务栈中只有一个该Activity的实例。
1.2实验目的
学习和掌握Android开发的基础知识,包括Activity、控件和布局等。
通过实际编写计算器应用,提高Android应用开发的实践能力。
1.3实验环境
Android Studio开发环境
Kotlin编程语言
1.4实验内容
创建一个新的Android项目,并设置基本的项目结构和属性。
设计计算器的用户界面,包括布局和控件的添加。
实现计算器的基本功能,如数字输入、运算符选择以及计算结果展示。
2.实验过程
2.1创建新的Android项目
打开Android Studio,选择“创建新项目”。选择“Empty view Activity”作为项目模板,点击“Finish”创建项目。(之所以选用empty view Activity是因为其自动生成了activity_main.xml布局文件,这样子更方便)
2.2 设计计算器的用户界面
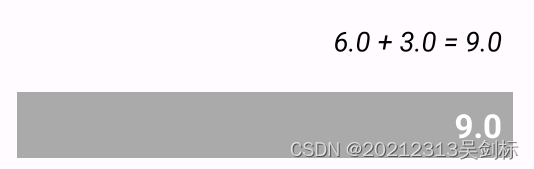
事先展示设计完成后的界面,方便理解设计过程

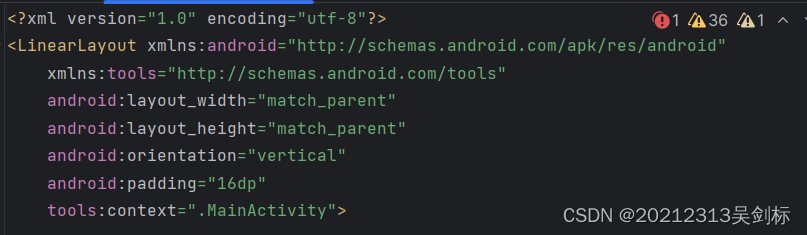
(1)打开activity_main.xml布局文件,设置基于LinearLayout的根布局,后续的各种按钮和文本框都在此基础上。其中的orientation定义了布局内的子元素为垂直布局。
(2)添加两个文本框,分别用于显示计算器的表达式和结果,也就是计算机界面的第一行和第二行。
id为textFormula的文本框是为了显示计算器表达式,其字体为黑色。
id为textResult的文本框是为了显示计算结果,他的背景是灰色,字体为白色,并且内容初始化为0。
    <TextView
        android:id="@+id/textFormula"
        android:layout_width="match_parent"
        android:layout_height="wrap_content"
        android:layout_marginBottom="16dp"
        android:gravity="end"
        android:textSize="20sp"
        android:textColor="@android:color/black"
        android:textStyle="italic"
        android:padding="8dp"
        android:text="" />

    <TextView
        android:id="@+id/textResult"
        android:layout_width="match_parent"
        android:layout_height="wrap_content"
        android:layout_marginBottom="16dp"
        android:background="@android:color/darker_gray"
        android:gravity="end"
        android:textSize="24sp"
        android:textColor="@android:color/white"
        android:textStyle="bold"
        android:padding="8dp"
        android:text="0" />
(3)在表达式和结果下面,也就是第三行,要设计数字789的按钮和除号按钮。其中的orientation=“horizontal”:定义了布局内的子元素为水平排列。
    <LinearLayout
        android:layout_width="match_parent"
        android:layout_height="wrap_content"
        android:orientation="horizontal">

        <Button
            android:id="@+id/btn7"
            android:layout_width="0dp"
            android:layout_weight="1"
            android:layout_height="wrap_content"
            android:text="7" />

        <Button
            android:id="@+id/btn8"
            android:layout_width="0dp"
            android:layout_weight="1"
            android:layout_height="wrap_content"
            android:text="8" />

        <Button
            android:id="@+id/btn9"
            android:layout_width="0dp"
            android:layout_weight="1"
            android:layout_height="wrap_content"
            android:text="9" />

        <Button
            android:id="@+id/btnDivide"
            android:layout_width="0dp"
            android:layout_weight="1"
            android:layout_height="wrap_content"
            android:text="/" />
    </LinearLayout>
(4)第四行的数字456和乘号、第五行的123和减号、第六行的0和小数点和等号和加号都按照第三行类似布局,只是修改按钮的内容罢了。
(5)设置独占一行的Delete按钮和Clear Result按钮,其实完全可以将两个按钮并为一行,但为了美观我就这样设计了。
    <Button
        android:id="@+id/btnDelete"
        android:layout_width="match_parent"
        android:layout_height="wrap_content"
        android:text="Delete" />
    <Button
        android:id="@+id/btnClear"
        android:layout_width="match_parent"
        android:layout_height="wrap_content"
        android:text="Clear Result" />
到此,计算器的界面已经全部设计完成
2.3 实现计算器的基本功能
打开MainActivity.kt文件,为每个按钮控件设置点击事件监听器。在监听器的回调方法中实现计算逻辑,根据用户输入的数字和运算符进行计算,并将结果显示在Textview控件中。
(1) 利用Kotlin 中的私有方法 onButtonClick(view: View),用于处理按钮点击事件以实现计算器的输入。将传入的 view 强制转换为 Button 类型,并赋值给变量 button。获取按钮上的文本内容,并转换为字符串,存储在变量value中便于后续操作
    private fun onButtonClick(view: View) {
        val button = view as Button
        val value = button.text.toString()

        when {
            value.matches(Regex("[0-9]")) -> {
             //使用正则表达式判断按钮文本是否匹配数字(0-9),
             //如果按钮文本是数字,则将其追加到 currentNumber 变量中
             //并且更新文本框
                currentNumber += value
                textResult.text = currentNumber
            }
            value == "." -> {
            //判断是否为小数点,如果currentNumber不包括小数点
            //则将小数点添加到currentNumber变量中
                if (!currentNumber.contains(".")) {
                    currentNumber += value
                    textResult.text = currentNumber
                }
            }
            value == "=" -> {
                if (currentOperator.isNotEmpty() && currentNumber.isNotEmpty()) {
                    operand2 = currentNumber.toDouble()
                    val result = calculateResult(operand1, operand2, currentOperator)
          //如果计算结果为无穷大,则在结果文本框中显示"Error"。
		  //将计算结果转换为字符串,并显示在结果文本框中。
                    if (result == Double.POSITIVE_INFINITY || result == Double.NEGATIVE_INFINITY) {
                        textResult.text = "Error"
                    } else {
                        textResult.text = result.toString()
          //更新公式文本框,显示完整的计算公式和结果。
                        textFormula.text = "$operand1 $currentOperator $operand2 = ${result.toString()}"
                        currentNumber = result.toString()
                        currentOperator = ""
                    }
                }
            }
            //使用正则表达式判断按钮文本是否匹配加减乘除运算符。
            value.matches(Regex("[+\\-*/]")) -> {
                if (currentNumber.isNotEmpty()) {
                    operand1 = currentNumber.toDouble()
                    currentOperator = value
             //更新公式文本框,显示当前操作符和第一个操作数。
                    textFormula.text = "$operand1 $currentOperator"
                    currentNumber = ""
                }
            }
            //当前数字中删除最后一个字符。
            value == "Delete" -> {
                if (currentNumber.isNotEmpty()) {
                    currentNumber = currentNumber.substring(0, currentNumber.length - 1)
                    textResult.text = currentNumber
                }
            }
        }
    }
(2)编写计算结果的calculateResult方法,它接收两个操作数 operand1 和 operand2,以及一个操作符 operator,返回一个双精度浮点数作为计算结果。
private fun calculateResult(operand1: Double, operand2: Double, operator: String): Double {
		//根据不同的操作符进行不同的计算
        return when (operator) {
            "+" -> operand1 + operand2
            "-" -> operand1 - operand2
            "*" -> operand1 * operand2
            "/" -> {
            //如果进行的是除0操作,要进行报错
                if (operand2 == 0.0) {
                    Double.POSITIVE_INFINITY // Returning a special value to indicate division by zero
                } else {
                    operand1 / operand2
                }
            }
            else -> 0.0
        }
    }
(3)编写归零的clearResult方法,当按下归零键时,将所有变量初始化即可
    private fun clearResult() {
        currentNumber = ""
        currentOperator = ""
        operand1 = 0.0
        operand2 = 0.0
        textResult.text = "0"
        textFormula.text = ""
    }
(4)重写了父类的 onCreate() 方法,其中的setContentView(R.layout.activity_main):设置 Activity 的布局为 activity_main.xml,该布局文件定义了该 Activity 的用户界面。通过调用 findViewById() 方法,获取布局中的文本视图,以便在后续的代码中操作它们。
override fun onCreate(savedInstanceState: Bundle?) {
        super.onCreate(savedInstanceState)
        setContentView(R.layout.activity_main)
        textFormula = findViewById(R.id.textFormula)
        textResult = findViewById(R.id.textResult)
        //创建按钮数组
        val buttons = arrayOf(
            findViewById<Button>(R.id.btn0),
            findViewById<Button>(R.id.btn1),
            findViewById<Button>(R.id.btn2),
            findViewById<Button>(R.id.btn3),
            findViewById<Button>(R.id.btn4),
            findViewById<Button>(R.id.btn5),
            findViewById<Button>(R.id.btn6),
            findViewById<Button>(R.id.btn7),
            findViewById<Button>(R.id.btn8),
            findViewById<Button>(R.id.btn9),
            findViewById<Button>(R.id.btnDot),
            findViewById<Button>(R.id.btnEqual),
            findViewById<Button>(R.id.btnAdd),
            findViewById<Button>(R.id.btnSubtract),
            findViewById<Button>(R.id.btnMultiply),
            findViewById<Button>(R.id.btnDivide),
            findViewById<Button>(R.id.btnDelete) // Added btnDelete here
        )
		//:遍历按钮数组,并为每个按钮设置点击事件监听器,当按钮被点击时,调用 onButtonClick() 方法处理点击事件。
        for (button in buttons) {
            button.setOnClickListener { onButtonClick(it) }
        }
		//获取清除按钮,并为其设置点击事件监听器,当清除按钮被点击时,调用 clearResult() 方法来清除计算结果。
        findViewById<Button>(R.id.btnClear).setOnClickListener { clearResult() }
    }
到此全部的编程已经完成!
2.4实验成果
(1)加减乘除计算


(2)除0计算时报错

(3)delete删除最后一个字符
到此实验成功!
3.学习中遇到的问题及解决
- 问题1:xml布局设计时不懂怎么设计每一行
- 问题1解决方案:经过csdn查找资料,才知道使用多层LinearLayout进行嵌套,设置orientation的值使得最外层是整体框架为垂直布局,接下来的内部LinearLayout设置成水平布局,就实现了一行一行的按钮
- 问题2:最开始没有考虑除0操作
- 问题2解决方案:在calculateResult方法中添加一个if语句,判断是否为除0即可,如果除0显示error就可以
– 问题3:计算精度不够高 - 问题3解决方案:目前没有完全实现,当计算量太大时会出现计算错误,我认为是参数设置有问题,没有定义位数较多的变量
4.学习感悟、思考等)
这次的实验是设计一个计算器,刚上实验课的时候,我还有有点迷茫。觉得自己怎么能设计出一款计算器呢。那些按钮,那些代码得多复杂,当沉下心来去看然后设计界面的时候,我发现并没有那么难,其实搞懂原理,只要设计出了第一行,后面的所有按钮都是复制粘贴然后修改按钮的值就可以了,并没有想象的那么难。计算器的代码我认为难度在于使用kt语言,如果使用其他语言的话就容易很多的,在编写之前,我先学习了很久的kt语言,然后在csdn上寻找关于计算器设计的代码,进行学习然后最后进行复写,最初完成了实验。
本次实验我让我对应Android studio有了更深的理解,那就是如何将xml文件和kt文件相关联。还让我对于kt语言有了更全面的掌握,能够灵活运用。并且能够设计出一款简单的计算器让我倍有成就感。


 1017
1017


 被折叠的 条评论
为什么被折叠?
被折叠的 条评论
为什么被折叠?
 到【灌水乐园】发言


