


20212313 2023-2024-2 《移动平台开发与实践》第4次作业
1.实验内容
1.1 学习内容
Socket编程是指使用套接字(socket)进行网络编程的一种技术。套接字是一种通信机制,可使计算机之间或计算机与用户之间进行通信。基本概念包括:
①客户端和服务器端:在Socket编程中,通常涉及到客户端和服务器端两个角色。客户端是启动通信的一方,服务器端则监听来自客户端的连接请求,并提供相应的服务。
②IP地址和端口号:要进行网络通信,每台计算机都有一个唯一的IP地址,每个正在运行的网络应用程序都会绑定到一个端口号。IP地址和端口号一起构成了网络通信的目标地址。
③TCP和UDP协议:Socket编程可以基于TCP协议或UDP协议。TCP是面向连接的可靠传输协议,保证数据的可靠传输;UDP是面向无连接的传输协议,数据传输速度较快,但不保证数据的可靠性。
④套接字函数:在Socket编程中,操作系统提供了一系列套接字函数,用于创建套接字、绑定地址、建立连接、发送数据、接收数据等操作。
TCP协议:
在Socket通信中,TCP协议通常被用于需要可靠传输和按序传输的场景。TCP协议提供了可靠的数据传输机制,确保数据不丢失、不重复、按序到达。这种可靠性是通过TCP的连接建立、确认数据发送和接收的方式来实现的。
在Socket编程中,使用TCP协议进行通信时,通常会先通过调用socket()函数创建一个TCP套接字,然后通过调用connect()函数连接到服务器端,之后可以通过send()发送数据并通过recv()接收数据。
TCP协议适用于需要确保数据能够完整可靠地传输的应用场景,比如网页浏览、文件传输、电子邮件等。
UDP协议:
在Socket通信中,UDP协议通常被用于需要快速传输和实时性要求较高的场景。UDP是一种面向报文的传输协议,它不保证数据的可靠性和顺序性,但传输速度较快。
在Socket编程中,使用UDP协议进行通信时,同样可以通过先创建一个UDP套接字,然后使用sendto()发送数据和recvfrom()接收数据。
UDP协议适用于一些数据传输速度要求较高,但可以容忍一些数据丢失的应用场景,比如视频流传输、实时音频传输等。
1.2实验要求
- 掌握Android平台上Socket编程的基本概念。
- 学习使用Kotlin语言实现Android Socket服务端和客户端。
- 理解TCP/UDP协议在Socket通信中的应用。
1.3实验环境
- Android Studio
- Kotlin编程语言
- 模拟器或真实Android设备
2.实验过程
2.1 创建服务器端
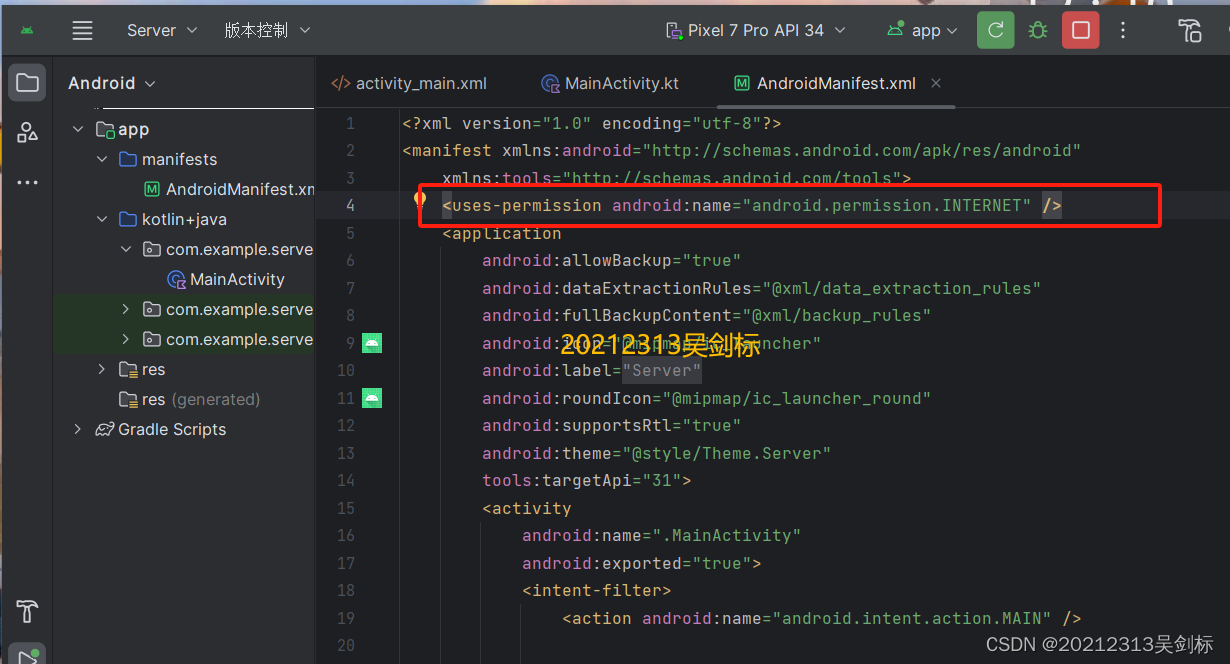
(1)创建Server项目,在AndroidManifest.xml中添加网络权限
<uses-permission android:name="android.permission.INTERNET"/>
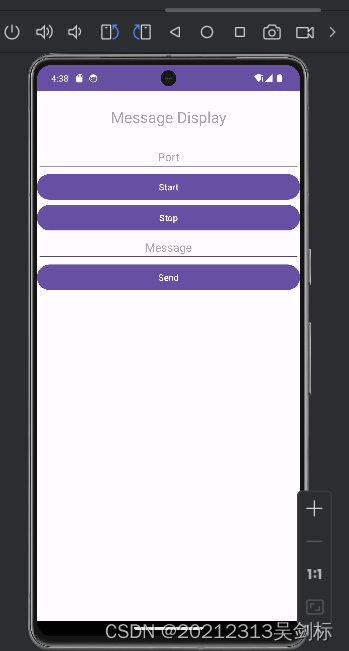
(2)编辑activity_main.xml文件来设置布局
从上到下垂直布局:
- 添加textview来显示接受信息
- Edittext为输入监听端口号
- 设置开启连接按钮
- 设置断开连接按钮
- 设置可编辑的发送消息框
- 设置send按钮
 <TextView
        android:id="@+id/textView"
        android:layout_width="wrap_content"
        android:layout_height="wrap_content"
        android:layout_marginTop="24dp"
        app:layout_constraintTop_toTopOf="parent"
        app:layout_constraintStart_toStartOf="parent"
        app:layout_constraintEnd_toEndOf="parent"
        android:hint="Message Display"
        android:textAlignment="center"
        android:textSize="24sp"/>

    <EditText
        android:id="@+id/edittext1"
        android:layout_width="0dp"
        android:layout_height="wrap_content"
        android:layout_marginTop="24dp"
        app:layout_constraintTop_toBottomOf="@+id/textView"
        app:layout_constraintStart_toStartOf="parent"
        app:layout_constraintEnd_toEndOf="parent"
        android:hint="Port"
        android:textAlignment="center" />

    <Button
        android:id="@+id/button_Start"
        android:layout_width="0dp"
        android:layout_height="wrap_content"
        android:text="Start"
        app:layout_constraintTop_toBottomOf="@+id/edittext1"
        app:layout_constraintStart_toStartOf="parent"
        app:layout_constraintEnd_toEndOf="parent" />

    <Button
        android:id="@+id/button_Stop"
        android:layout_width="0dp"
        android:layout_height="wrap_content"
        android:text="Stop"
        app:layout_constraintTop_toBottomOf="@+id/button_Start"
        app:layout_constraintStart_toStartOf="parent"
        app:layout_constraintEnd_toEndOf="parent" />

    <EditText
        android:id="@+id/edittext2"
        android:layout_width="0dp"
        android:layout_height="wrap_content"
        app:layout_constraintTop_toBottomOf="@+id/button_Stop"
        app:layout_constraintStart_toStartOf="parent"
        app:layout_constraintEnd_toEndOf="parent"
        android:hint="Message"
        android:textAlignment="center" />

    <Button
        android:id="@+id/button_Send"
        android:layout_width="0dp"
        android:layout_height="wrap_content"
        android:text="Send"
        app:layout_constraintTop_toBottomOf="@+id/edittext2"
        app:layout_constraintStart_toStartOf="parent"
        app:layout_constraintEnd_toEndOf="parent" />
(3)编辑Mainactivity文件来实现服务器功能
①检查应用程序是否具有访问WiFi状态和Internet权限。如果应用程序尚未获得这些权限,则会请求用户授予这些权限。
    private fun applyPermissions() {
        if (Build.VERSION.SDK_INT > Build.VERSION_CODES.LOLLIPOP_MR1) {
            if (ContextCompat.checkSelfPermission(this, Manifest.permission.ACCESS_WIFI_STATE) != PackageManager.PERMISSION_GRANTED ||
                ContextCompat.checkSelfPermission(this, Manifest.permission.INTERNET) != PackageManager.PERMISSION_GRANTED) {
                ActivityCompat.requestPermissions(this, PERMISSIONS_STORAGE, 1)
            }
        }
    }
②重写onDestroy方法,来关闭网络服务器和连接,将标记位设置为false使得在断开连接的时候资源被释放
override fun onDestroy() {
        super.onDestroy()
        try {
            server.close()
            socket.close()
            clientConnected = false
            serverRunning = false
            handler.sendEmptyMessage(102)
        } catch (e: IOException) {
            e.printStackTrace()
        }
    }
③编写showAlertDialog方法用于显示一个警示对话框,传入一个消息字符串作为参数,然后添加一个"OK"按钮,点击按钮时关闭对话框。最后调用create方法创建对话框并显示出来。这个方法的目的是向用户显示一条信息并等待用户确认。
sendMessageThread方法是为了创建线程用于在后台发送消息到服务器。这个线程的目的是在后台处理消息发送逻辑,避免在主线程中阻塞UI操作。
    private fun showAlertDialog(message: String) {
        val builder = AlertDialog.Builder(this)
        builder.setMessage(message)
            .setPositiveButton("OK") { dialog, _ ->
                dialog.dismiss()
            }
        val dialog = builder.create()
        dialog.show()
    }

    private val sendMessageThread = Runnable {
        try {
            val editText = findViewById<EditText>(R.id.edittext2)
            outStream.writeUTF("服务器:" + editText.text.toString())
            handler.sendEmptyMessage(2)
        } catch (e: Exception) {
            e.printStackTrace()
        }
    }
④编写serverStart方法在后台运行一个服务器,接受客户端连接并处理收发消息的逻辑。通过循环接收客户端消息,并通过handler将消息发送到UI上显示,实现了服务端和客户端之间的通信。同时,捕获并处理可能的异常,确保服务器正常运行。
    private val serverStart = Runnable {
        try {
            val editText = findViewById<EditText>(R.id.edittext1)
            server = ServerSocket(Integer.valueOf(editText.text.toString()))
            serverRunning = true
            socket = server.accept()
            inStream = DataInputStream(socket.getInputStream())
            outStream = DataOutputStream(socket.getOutputStream())
            clientConnected = true
            handler.sendEmptyMessage(3)

            while (serverRunning) {
                val receivedMessage = inStream.readUTF()
                txt = "客户端: $receivedMessage\n"
                handler.sendEmptyMessage(1)
            }
        } catch (e: Exception) {
            e.printStackTrace()
        }
    }
⑤利用findViewById将布局中的按钮赋予对应的功能,分别为:开启服务器,断开服务器,发送信息,并且分别调用以上写的方法
        val btnStart: Button = findViewById(R.id.button_Start)
        btnStart.setOnClickListener {
            executor.execute(serverStart)
            showAlertDialog("已开启服务器")
        }

        val btnStop: Button = findViewById(R.id.button_Stop)
        btnStop.setOnClickListener {
            try {
                onDestroy()
            } catch (e: IOException) {
                e.printStackTrace()
            }
        }

        val btnSend: Button = findViewById(R.id.button_Send)
        btnSend.setOnClickListener {
            if (clientConnected) {
                executor.execute(sendMessageThread)
            } else {
                showAlertDialog("没有客户端与服务器连接,无法发送信息")
            }
        }
⑥重写onCreate方法设置布局文件、使用applyPermission方法申请权限然后最重要的是创建一个拥有两个线程的线程池excutor用于执行后台任务。然后创建一个Handler对象,重写handleMessage方法,用于处理消息,更新UI界面。
 override fun onCreate(savedInstanceState: Bundle?) {
        super.onCreate(savedInstanceState)
        setContentView(R.layout.activity_main)
        applyPermissions()

        val executor = Executors.newFixedThreadPool(2)
        handler = object : Handler() {
            override fun handleMessage(msg: Message) {
                super.handleMessage(msg)
                val textView = findViewById<TextView>(R.id.textView)
                val editText = findViewById<EditText>(R.id.edittext2)

                when (msg.what) {
                    1 -> textView.append(txt)
                    2 -> {
                        textView.append("服务器:" + editText.text + "\n")
                        editText.setText("")
                    }
                    3 -> {
                        textView.append("有客户端连接\n")
                        showAlertDialog("存在客户端连接此服务器")
                    }
                    4 -> {
                        textView.append("已断开连接\n")
                        showAlertDialog("已断开连接")
                    }
                }
            }
        }
2.2 创建客户端
(1)创建Client项目,在AndroidManifest.xml中添加网络权限
<uses-permission android:name="android.permission.INTERNET"/>

(2)编辑activity_main.xml文件来设置布局
从上到下垂直布局:
- 添加Edittext来设置连接的ip地址
- Edittext为输入的连接端口号
- 设置输入要发送的消息
- 设置send按钮
- 设置connect连接按钮和disconnect端口连接按钮
<EditText
        android:id="@+id/edittext"
        android:layout_width="0dp"
        android:layout_height="wrap_content"
        android:layout_marginStart="32dp"
        android:layout_marginTop="32dp"
        android:layout_marginEnd="32dp"
        android:hint="IP Address"
        app:layout_constraintEnd_toEndOf="parent"
        app:layout_constraintStart_toStartOf="parent"
        app:layout_constraintTop_toTopOf="parent" />

    <EditText
        android:id="@+id/edittext2"
        android:layout_width="0dp"
        android:layout_height="wrap_content"
        android:layout_marginStart="32dp"
        android:layout_marginTop="16dp"
        android:layout_marginEnd="32dp"
        android:hint="Port Number"
        app:layout_constraintEnd_toEndOf="parent"
        app:layout_constraintStart_toStartOf="parent"
        app:layout_constraintTop_toBottomOf="@+id/edittext" />

    <EditText
        android:id="@+id/edittext3"
        android:layout_width="0dp"
        android:layout_height="wrap_content"
        android:layout_marginStart="32dp"
        android:layout_marginTop="16dp"
        android:layout_marginEnd="32dp"
        android:hint="Message"
        app:layout_constraintEnd_toEndOf="parent"
        app:layout_constraintStart_toStartOf="parent"
        app:layout_constraintTop_toBottomOf="@+id/edittext2" />

    <Button
        android:id="@+id/button_send"
        android:layout_width="wrap_content"
        android:layout_height="wrap_content"
        android:text="Send"
        app:layout_constraintEnd_toEndOf="parent"
        app:layout_constraintStart_toStartOf="parent"
        app:layout_constraintTop_toBottomOf="@+id/edittext3"
        android:layout_marginTop="16dp" />

    <Button
        android:id="@+id/button_connect"
        android:layout_width="0dp"
        android:layout_height="wrap_content"
        android:text="Connect"
        app:layout_constraintEnd_toStartOf="@+id/button_stop"
        app:layout_constraintStart_toStartOf="parent"
        app:layout_constraintTop_toBottomOf="@+id/button_send"
        android:layout_marginTop="16dp"
        android:layout_marginEnd="16dp" />

    <Button
        android:id="@+id/button_stop"
        android:layout_width="0dp"
        android:layout_height="wrap_content"
        android:text="Disconnect"
        app:layout_constraintEnd_toEndOf="parent"
        app:layout_constraintStart_toEndOf="@+id/button_connect"
        app:layout_constraintTop_toBottomOf="@+id/button_send"
        android:layout_marginTop="16dp"
        android:layout_marginStart="16dp" />

    <TextView
        android:id="@+id/textView3"
        android:layout_width="0dp"
        android:layout_height="0dp"
        app:layout_constraintBottom_toTopOf="@+id/edittext3"
        app:layout_constraintEnd_toEndOf="parent"
        app:layout_constraintStart_toStartOf="parent"
        app:layout_constraintTop_toBottomOf="@+id/button_stop" />
(3)编写Mainactivity文件来实现客户端功能
- 创建connection方法在其中建立了与服务器的连接,并监听服务器发来的消息。首先获取用户输入的服务器地址和端口号,然后创建Socket 对象进行连接。连接成功后,获取输入输出流,并将连接状态设置为true。然后进入一个无限循环,不断读取服务器发来的消息,并通过 handler 发送消息给 UI 界面进行展示。
- 创建sendMessage 是一个 Runnable对象,在其中发送用户输入的消息给服务器。首先获取用户输入的消息内容,然后通过输出流向服务器发送消息。
        private val connection = Runnable {
                try {
                        val editText = findViewById<EditText>(R.id.edittext)
                        val editText2 = findViewById<EditText>(R.id.edittext2)
                        socket = Socket(editText.text.toString(), Integer.valueOf(editText2.text.toString()))
                        outStream = DataOutputStream(socket.getOutputStream())
                        inStream = DataInputStream(socket.getInputStream())
                        isConnected = true
                        handler.sendEmptyMessage(101)

                        while (true) {
                                val receivedMessage = inStream.readUTF()
                                txt = "服务器: $receivedMessage\n"
                                handler.sendEmptyMessage(98)
                        }
                } catch (e: Exception) {
                        e.printStackTrace()
                }
        }
        private val sendMessage = Runnable {
                val editText3 = findViewById<EditText>(R.id.edittext3)
                try {
                        outStream.writeUTF("客户端:" + editText3.text.toString())
                } catch (e: IOException) {
                        e.printStackTrace()
                }
        }
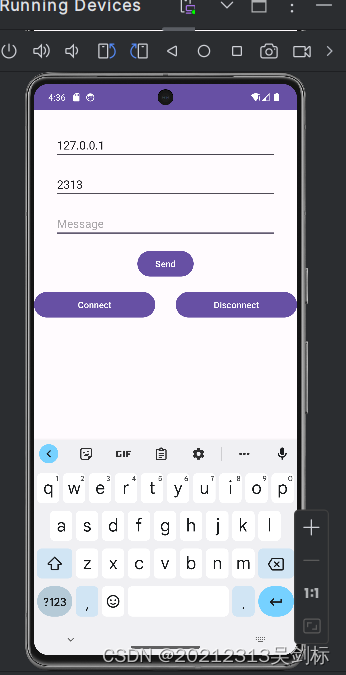
2.3实验成果
能够在一台手机上启动两个项目,连接的ip地址为127.0.0.1,端口为2313,最终能够实现socket通信
3.学习中遇到的问题及解决
-
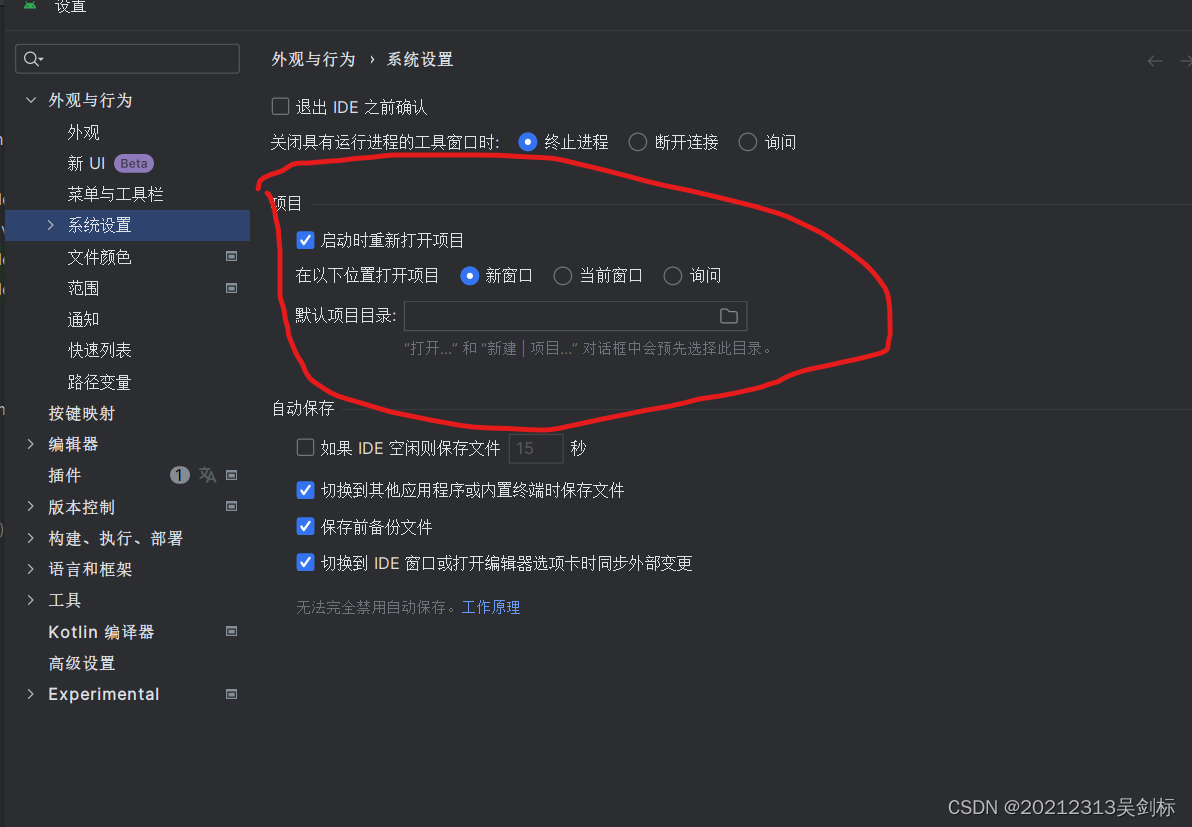
问题1:Android studio不能同时打开两个项目
-
问题1解决方案:在设置中寻找系统设置,将其设置成新窗口即可
-
问题2:‘adb‘ 不是内部或外部命令,也不是可运行的程序 或批处理文件。
-
问题2解决方案:在网络上查看了许多教程后,最终选择了重新下载sdk压缩包,然后设置变量路径,最终可以使用adb shell 等命令
4.学习感悟、思考等)
socket通信的基本原理其实是简单易懂的,在大一的python课上,就已经有用python独立编写出socket通信了。在上学期的网安课上也有使用java实现,但都没有实现ui界面。我认为本次实验的难点在于更深入学习kt语言的使用以及各种方法的复写。能够用一个手机做到互发消息我觉得我已经很厉害了,成就感满满。


 1040
1040

 被折叠的 条评论
为什么被折叠?
被折叠的 条评论
为什么被折叠?
 到【灌水乐园】发言


