 vue-puzzle-vcode插件使用介绍


 博客介绍了vue-puzzle-vcode,这是一个Vue纯前端的拼图人机验证、右滑拼图验证插件。内容包含该插件的安装方法、使用方式,以及如何使用插件的dom。
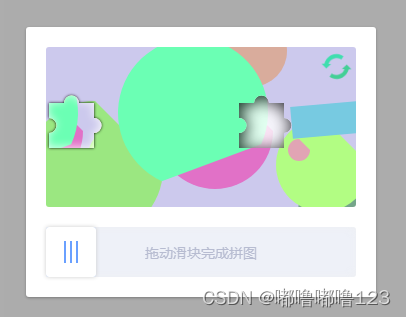
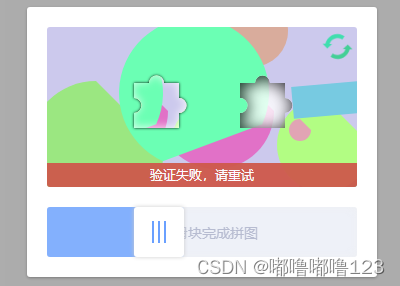
vue-puzzle-vcode
Vue 纯前端的拼图人机验证、右滑拼图验证
安装vue-puzzle-vcode
npm install vue-puzzle-vcode --save
使用vue-puzzle-vcode
import Vcode from "vue-puzzle-vcode";

<Vcode :show="isShow" @success="onSuccess" @close="onClose" />
自己使用插件的dom
<template>
  <div class="login-container">
    <div class="login-card">
        <div class="fonz">手机验证码</div>
        <div class="flex" style="padding-right: ">
          <input
            type="text"
            placeholder="请输入手机验证码"
            style="padding-left: 0px !important"
          />
          <span
            style="color: rgba(90, 181, 242, 1); font-size: 14px"
            @click="sendCode"
            >{{ codeButtonText }}</span
          >
        </div>
      </div>
      <Vcode :show="isShow" @success="onSuccess" @close="isShow = false" />
  </div>
</template>

<script>
import Vcode from "vue-puzzle-vcode";
export default {
  components: {
    Vcode,
  },
  data() {
    return {
      isShow: false,
    };
  },
  methods: {

    // 发送验证码
    sendCode() {
      console.log(this.codeSending);
      if (!this.codeSending) {
        this.isShow = true;
      }
    },
    onSuccess(msg) {
      this.isShow = false; // 通过验证后,需要手动关闭模态框
      // 实现发送验证码的逻辑
      // 可以使用定时器模拟发送过程
      this.codeSending = true;
      let count = 60;
      const timer = setInterval(() => {
        count--;
        if (count === 0) {
          clearInterval(timer);
          this.codeSending = false;
          this.codeButtonText = "重新获取";
        } else {
          this.codeButtonText = `重新获取 ${count}s`;
        }
      }, 1000);
    },
  },
};
</script>

<style lang="scss" scoped>
.hh {
  font-size: 20px;
  font-weight: 700;
  line-height: 23px;
  color: rgba(51, 51, 51, 1);
  text-align: center;
  vertical-align: top;
  margin-bottom: 20px;
  height: 30px;
}
input {
  border: none;
  background: none;
  font: inherit;
  color: inherit;
  padding: 0;
  margin: 0;
  border-radius: 0;
  outline: none;
  flex: 1;
  padding-left: 20px !important;
}
.flex {
  display: flex;
  align-items: center;
  height: 30px;
  justify-content: space-between;
  margin-bottom: 30px;
  border-bottom: 2px solid rgba(227, 227, 227, 1);
}
.fonz {
  font-size: 14px;
  font-weight: 400;
  letter-spacing: 0px;
  line-height: 19.21px;
  color: rgba(31, 32, 38, 1);
  text-align: left;
  vertical-align: top;
  margin-bottom: 17px;
}
::v-deep {
  .el-checkbox__inner::after {
    left: 5px;
    top: 2px;
  }
  .el-checkbox__inner {
    width: 17px;
    height: 17px;
    border-radius: 8px;
  }
  .el-checkbox__inner:hover {
    border-color: #dcdfe6 !important;
  }
  .el-checkbox__input.is-checked + .el-checkbox__label {
    color: #28b0a6 !important;
  }

  .el-checkbox__input.is-checked .el-checkbox__inner {
    background-color: #28b0a6;
  }
  .el-menu-item:hover {
    background-color: #f6f6f6 !important;
  }
  .el-tabs__nav-wrap::after {
    display: none !important;
  }
  .el-tabs__item:hover {
    color: #28b0a6 !important;
    cursor: pointer;
  }

  .el-tabs__item.is-active {
    color: #28b0a6;
  }

  .el-tabs__active-bar {
    position: absolute;
    bottom: 0;
    left: 0;
    height: 2px;
    background-color: #28b0a6 !important;
    z-index: 1;
    transition: transform 0.3s cubic-bezier(0.645, 0.045, 0.355, 1);
    list-style: none;
  }
}
.login-container {
  background-color: #f6f6f6;
  display: flex;
  width: 100vw;
  justify-content: center;
  align-items: center;
  height: 100vh;
  background-image: url("../.././assets/backc.png");
  // background-size: cover;
  background-repeat: no-repeat;
}

.login-card {
  position: fixed;
  left: 1297px;
  top: 204px;
  width: 385px;
  padding: 47px;
  background-color: #fff;
  border-radius: 8px;
  box-shadow: 0 2px 12px 0 rgba(0, 0, 0, 0.1);
}

.login-title {
  margin-bottom: 20px;
  font-size: 24px;
  font-weight: bold;
  text-align: center;
}
.login-button {
  width: 100%;
  margin-bottom: 20px;
  background-color: #28b0a6;
}

.login-links {
  display: flex;
  justify-content: flex-end;
  align-items: center;
  margin-top: 8px;
  margin-bottom: 48px;
  font-size: 14px;
  font-weight: 400;

  a {
    color: rgba(90, 181, 242, 1);
    text-align: center;
    vertical-align: middle;
    text-decoration: none;
  }
}

.register-link,
.forgot-password-link {
  color: #666;
}
.agreement {
  font-size: 14px;
  span {
    margin-left: 10px;
  }
  a {
    font-size: 14px;
    font-weight: 400;
    color: rgba(90, 181, 242, 1);
    text-align: center;
    text-decoration: none;
  }
}
</style>


 7199
7199

 被折叠的 条评论
为什么被折叠?
被折叠的 条评论
为什么被折叠?
 到【灌水乐园】发言


