


目录
编写ClassPathXmlApplicationContext
Spring IoC容器的实现原理:工厂模式 + 解析XML + 反射机制。
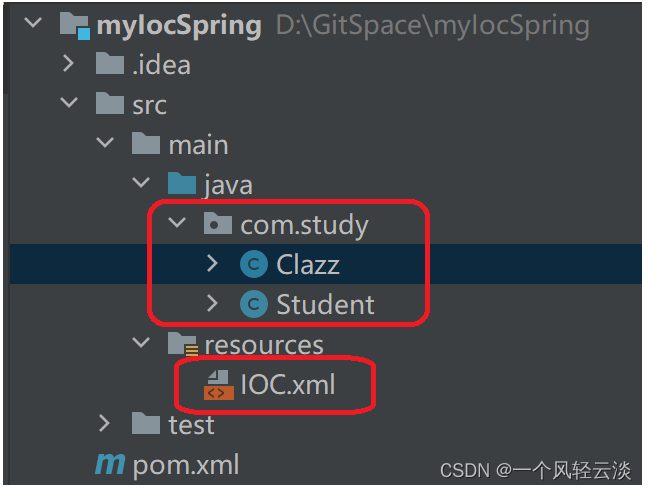
创建模块
采用Maven方式新建Module:myIocSpring

引入dom4j和jaxen的依赖,因为要使用它解析XML文件,还有junit依赖。
 <dependencies>
        <dependency>
            <groupId>org.dom4j</groupId>
            <artifactId>dom4j</artifactId>
            <version>2.1.3</version>
        </dependency>
        <dependency>
            <groupId>jaxen</groupId>
            <artifactId>jaxen</artifactId>
            <version>1.2.0</version>
        </dependency>
        <dependency>
            <groupId>junit</groupId>
            <artifactId>junit</artifactId>
            <version>4.13.2</version>
            <scope>test</scope>
        </dependency>
    </dependencies>

    <properties>
        <maven.compiler.source>17</maven.compiler.source>
        <maven.compiler.target>17</maven.compiler.target>
    </properties>
准备测试阶段测试用的Bean
这里我们准备2个bean,一个是学生类,一个是班级类,在本文中我们就书写简单的ref和基本数据类型的IOC(即使用value给简单属性赋值。使用ref给非简单属性赋值。)。放在com.study包下
public class Clazz {
    private  String name;
    private  Integer total;

    @Override
    public String toString() {
        return "Clazz{" +
                "name='" + name + '\'' +
                ", total=" + total +
                '}';
    }

    public String getName() {
        return name;
    }

    public void setName(String name) {
        this.name = name;
    }

    public Integer getTotal() {
        return total;
    }

    public void setTotal(Integer total) {
        this.total = total;
    }
}
public class Student {
private String name;
private Integer age;
private Clazz clazz;
@Override
public String toString() {
return "Student{" +
"name='" + name + '\'' +
", age=" + age +
", clazz=" + clazz +
'}';
}
public String getName() {
return name;
}
public void setName(String name) {
this.name = name;
}
public Integer getAge() {
return age;
}
public void setAge(Integer age) {
this.age = age;
}
public Clazz getClazz() {
return clazz;
}
public void setClazz(Clazz clazz) {
this.clazz = clazz;
}
}
准备测试阶段测试用的XML配置文件:IOC.xml文件放在类路径当中即可,我们这里把文件放到类的根路径下。
<?xml version="1.0" encoding="UTF-8"?>
<beans>

    <bean id="clazz" class="com.study.Clazz">
        <property name="name" value="21软件工程c"/>
        <property name="total" value="59"/>
    </bean>

    <bean id="student" class="com.study.Student">
        <property name="name" value="zzh"/>
        <property name="age" value="19"/>
        <property name="clazz" ref="clazz"/>
    </bean>

</beans>
这时的目录结构如下:
编写ApplicationContext接口
ApplicationContext接口中提供一个getBean()方法,通过该方法可以获取Bean对象。
public interface ApplicationContext {
    /**
     * 根据bean的id获取bean实例。
     * @param beanId bean的id
     * @return bean实例
     */
    Object getBean(String beanId);
}
编写ClassPathXmlApplicationContext
ClassPathXmlApplicationContext是ApplicationContext接口的实现类。该类从类路径当中加载myspring.xml配置文件。
public class ClassPathXmlApplicationContext implements ApplicationContext{
    @Override
    public Object getBean(String beanId) {
        return null;
    }
}
采用Map集合存储Bean
采用Map集合存储Bean实例。Map集合的key存储beanId,value存储Bean实例。Map<String,Object>在ClassPathXmlApplicationContext类中添加Map<String,Object>属性。并且在ClassPathXmlApplicationContext类中添加构造方法,该构造方法的参数接收myspring.xml文件。同时实现getBean方法。
    /**
     * 存储bean的Map集合
     */
    private Map<String,Object> beanMap = new HashMap<>();

    /**
     * 在该构造方法中,解析myspring.xml文件,创建所有的Bean实例,并将Bean实例存放到Map集合中。
     * @param resource 配置文件路径(要求在类路径当中)
     */
    public ClassPathXmlApplicationContext(String resource) {

    }

    @Override
    public Object getBean(String beanId) {
        return beanMap.get(beanId);
    }
解析配置文件实例化所有Bean
在ClassPathXmlApplicationContext的构造方法中解析配置文件,获取所有bean的类名,通过反射机制调用无参数构造方法创建Bean。并且将Bean对象存放到Map集合中。
解析配置文件实例化所有Bean
public class ClassPathXmlApplicationContext implements ApplicationContext{
    /**
     * 存储bean的Map集合
     */
    private Map<String,Object> beanMap = new HashMap<>();

    /**
     * 在该构造方法中,解析myspring.xml文件,创建所有的Bean实例,并将Bean实例存放到Map集合中。
     * @param resource 配置文件路径(要求在类路径当中)
     */
    public ClassPathXmlApplicationContext(String resource) {
        SAXReader reader=new SAXReader();
        try {
            //读取配置文件
            Document document = reader.read(ClassLoader.getSystemClassLoader()
                    .getResourceAsStream(resource));
            //拿到所有的bean标签
            List<Node> beanNodes = document.selectNodes("//bean");
            //遍历集合拿到对bean进行处理
            beanNodes.forEach(beanNode->{
              Element beanElt=  (Element)beanNode;
              //获取id
                String id = beanElt.attributeValue("id");
                //获取className
                String className = beanElt.attributeValue("class");
                try {
                    //反射获取对象
                    Class<?> clazz = Class.forName(className);
                    Constructor<?> constructor = clazz.getDeclaredConstructor();
                    Object bean = constructor.newInstance();
                    //存储到Map集合中
                    beanMap.put(id,bean);
                }catch (Exception e){
                    e.printStackTrace();
                }
            });


        } catch (DocumentException e) {
            e.printStackTrace();
        }
    }

    @Override
    public Object getBean(String beanId) {
        return beanMap.get(beanId);
    }
}
测试阶段1(实例化bean)
public class test {
    public static void main(String[] args) {
        ApplicationContext applicationContext=new ClassPathXmlApplicationContext("IOC.XML");
        Object clazz = applicationContext.getBean("clazz");
        Object student = applicationContext.getBean("student");
        System.out.println(clazz);
        System.out.println(student);
    }
}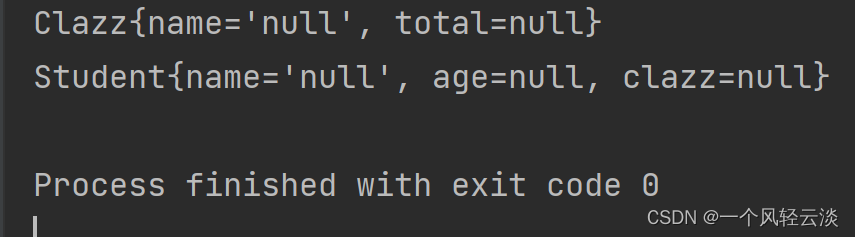
通过测试Bean已经实例化成功了,属性的值是null,因为我们调用的都是无参构造方法,所以属性值都是默认值,接下来给bean赋值即可。
Bean的属性赋值
通过反射机制调用set方法,给Bean的属性赋值。
对每个bean标签下的所有property 标签,对标签内容进行解析,这里需要注意点的是判断是引用数据类型还是简单数据类型。
public class ClassPathXmlApplicationContext implements ApplicationContext{
    /**
     * 存储bean的Map集合
     */
    private Map<String,Object> beanMap = new HashMap<>();

    /**
     * 在该构造方法中,解析myspring.xml文件,创建所有的Bean实例,并将Bean实例存放到Map集合中。
     * @param resource 配置文件路径(要求在类路径当中)
     */
    public ClassPathXmlApplicationContext(String resource) {
        SAXReader reader=new SAXReader();
        try {
            //读取配置文件
            Document document = reader.read(ClassLoader.getSystemClassLoader()
                    .getResourceAsStream(resource));
            //拿到所有的bean标签
            List<Node> beanNodes = document.selectNodes("//bean");
            //遍历集合拿到对bean进行处理
            beanNodes.forEach(beanNode->{
              Element beanElt=  (Element)beanNode;
              //获取id
                String id = beanElt.attributeValue("id");
                //获取className
                String className = beanElt.attributeValue("class");
                try {
                    //反射获取对象
                    Class<?> clazz = Class.forName(className);
                    Constructor<?> constructor = clazz.getDeclaredConstructor();
                    Object bean = constructor.newInstance();
                    //存储到Map集合中
                    beanMap.put(id,bean);
                }catch (Exception e){
                    e.printStackTrace();
                }
            });
        beanNodes.forEach(beanNode->{
           Element beanElt=  (Element)beanNode;
            //获取bean的id
            String beanId = beanElt.attributeValue("id");
            //获取所有的property标签
            List<Element> propertyEls = beanElt.elements("property");
            propertyEls.forEach(propertyElt->{
                try {
                    //获取属性名
                    String propertyName = propertyElt.attributeValue("name");
                    //获取属性类型
                    Class<?> propertyType = beanMap.get(beanId).getClass().getDeclaredField(propertyName).getType();
                    //获取set方法名
                  String setMethodName=  "set"+propertyName.toUpperCase().charAt(0)+  propertyName.substring(1);
                    //获取set方法
                    Method setMethod = beanMap.get(beanId).getClass().getDeclaredMethod(setMethodName, propertyType);
                    //获取value的值
                    String propertyValue = propertyElt.attributeValue("value");
                    //获取ref
                    String propertyRef=propertyElt.attributeValue("ref");
                    Object propertyVal=null;
                    //如果不是简单属性
                    if(propertyValue!=null){
                        //获取属性类型名
                        String simpleName = propertyType.getSimpleName();
                        switch (simpleName) {
                            case "byte": case "Byte":
                                propertyVal = Byte.valueOf(propertyValue);
                                break;
                            case "short": case "Short":
                                propertyVal = Short.valueOf(propertyValue);
                                break;
                            case "int": case "Integer":
                                propertyVal = Integer.valueOf(propertyValue);
                                break;
                            case "long": case "Long":
                                propertyVal = Long.valueOf(propertyValue);
                                break;
                            case "float": case "Float":
                                propertyVal = Float.valueOf(propertyValue);
                                break;
                            case "double": case "Double":
                                propertyVal = Double.valueOf(propertyValue);
                                break;
                            case "boolean": case "Boolean":
                                propertyVal = Boolean.valueOf(propertyValue);
                                break;
                            case "char": case "Character":
                                propertyVal = propertyValue.charAt(0);
                                break;
                            case "String":
                                propertyVal = propertyValue;
                                break;
                        }
                        setMethod.invoke(beanMap.get(beanId),propertyVal);
                    }
                    //如果不是简单属性
                    if(propertyRef!=null){
                        setMethod.invoke(beanMap.get(beanId),beanMap.get(propertyRef));
                    }

                }catch ( Exception e){
                    e.printStackTrace();
                }
            });

        });

        } catch (DocumentException e) {
            e.printStackTrace();
        }

    }

    @Override
    public Object getBean(String beanId) {
        return beanMap.get(beanId);
    }
}
思考:为什么不在上面的循环中给Bean的属性赋值,而在这里再重新遍历一次呢?
解答:很简单为了解决循环依赖问题,先生成bean对象进行曝光再赋值,实例化和属性赋值分开。
测试阶段2(为bean对象进行赋值)
public class test {
    public static void main(String[] args) {
        ApplicationContext applicationContext=new ClassPathXmlApplicationContext("IOC.XML");
        Object clazz = applicationContext.getBean("clazz");
        Object student = applicationContext.getBean("student");
        System.out.println(clazz);
        System.out.println(student);
    }
}
到这里一个简单的IOC已经实现,只实现的基本数据类型和ref类型。还是不能对LIst map等类型进行注入。


 262
262


 被折叠的 条评论
为什么被折叠?
被折叠的 条评论
为什么被折叠?
 到【灌水乐园】发言


