


SpringBoot项目实现热部署的配置方法
最近公司在开发项目时用到了热部署,在这里做如下记录:
一、什么是热部署?
热部署,就是在应用正在运行的时候升级软件,却不需要重新启动应用。
二、什么是SpringBoot热部署?
SpringBoot热部署就是在项目正在运行的时候修改代码, 却不需要重新启动项目。
有了SpringBoot热部署后大大提高了开发效率,因为频繁的重启项目,势必会浪费很多时间, 有了热部署后,妈妈再也不用担心我修改代码重启项目了~~~
三、SpringBoot热部署的流程
1.pom文件中导入 spring-boot-devtools 依赖:
<dependency>
    <groupId>org.springframework.boot</groupId>
    <artifactId>spring-boot-devtools</artifactId>
    <scope>runtime</scope>
    <optional>true</optional>
</dependency>
2.继续在pom.xml中添加插件:
<build>
     <plugins>
     <plugin>
         <groupId>org.springframework.boot</groupId>
         <artifactId>spring-boot-maven-plugin</artifactId>
         <configuration>
          <fork>true</fork>
                  <addResources>true</addResources>
         </configuration>
    </plugin>
     </plugins>
</build>
3.设置application.properties
#热部署生效
spring.devtools.restart.enabled=true
#设置重启的目录,检索目录(resources/static、resources/templates)
spring.devtools.restart.additional-paths= src/main/java
#classpath目录下的WEB-INF文件夹内容修改不重启
#spring.devtools.restart.exclude= WEB-INF/**
4 .在idea中设置自动编译:
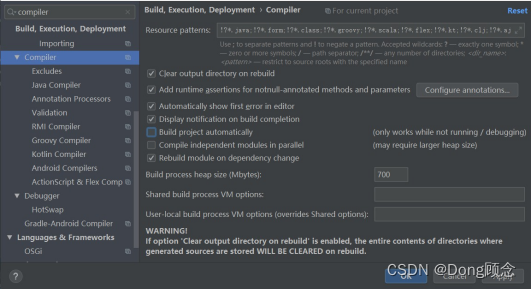
首先ctrl+alt+s打开设置(Other Settings 的设置是对整个工作空间项目都启作用,而Settings…的设置是对整个项目启作用),搜索Compliler,勾选Build project automatically,如下图所示:
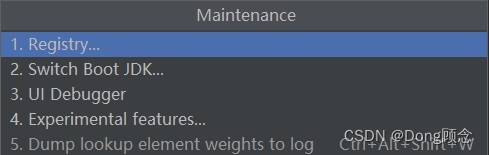
5.按住ctrl + shift + alt + /,出现如下图所示界面,点击Registry…,如下图:
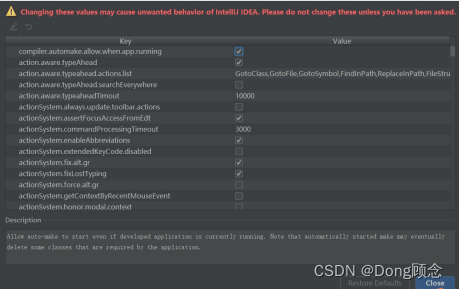
点击进入后,勾选compiler.automake.allow.when.app.running后关闭即可
通过以上步骤,就完成了SpringBoot项目的热部署功能!!!
6.对热部署测试是否成功:
package com.devtoolsDemo.devtoolsDemo.controller;

import org.springframework.web.bind.annotation.RequestMapping;
import org.springframework.web.bind.annotation.RestController;

@RestController
@RequestMapping("/hello")
public class HelloDemo {

    @RequestMapping("/index")
    public String index() {
        return "helloworld!";
    }

}
启动项目,通过浏览器输入地址:http://localhost:8080/hello/index
结果如下:
新加请求,在不重新启动项目的情况下测试热部署是否配置成功~~~
package com.devtoolsDemo.devtoolsDemo.controller;

import org.springframework.web.bind.annotation.RequestMapping;
import org.springframework.web.bind.annotation.RestController;

@RestController
@RequestMapping("/hello")
public class HelloDemo {

    @RequestMapping("/index")
    public String index() {
        return "helloworld!";
    }

    @RequestMapping("/say")
    public String say(){
        return "I love Java!";
    }

}
测试新加请求是否成功,浏览器输入http://localhost:8080/hello/say后结果如下:
说明我们的热部署配置生效啦~~~


 1327
1327


 被折叠的 条评论
为什么被折叠?
被折叠的 条评论
为什么被折叠?
 到【灌水乐园】发言


