


后台搭建
直接将代码包安装到自己的项目中,后台文件包。
1.npm install安装依赖包
2.node app.js运行
出现以下结果代表运行成功

rem实现
由于采用的是移动端的项目,所以会语句视口适配的问题,在这里采用rem适配,但是采用rem适配的时候需要配置文件信息。
在public目录下创建一个js目录并添加rem.js文件,代码如下
function remSize() {
  // 定义设备的宽度,在iphone6中,宽度为375
  let deviceWidth = document.documentElement.clientWidth | window.innerWidth
  // 设置宽度的边界值
  if (deviceWidth >= 750) {
    deviceWidth = 750
  }
  if (deviceWidth <= 320) {
    deviceWidth = 320
  }
  // 设置浏览器的根字号大小
  // 750-->1rem=100px 375-->1rem = 50px
  document.documentElement.style.fontSize = (deviceWidth / 7.5) + 'px'
  // 设置字体的大小
  // 750-->1rem = 100px*0.3=30px, 375-->1rem = 50px*0.3=15px
  document.querySelector('body').style.fontSize = 0.3 + 'rem'
}

remSize()

// 当页面视口发生改变的时候就会调用
window.onresize = function () {
  remSize()
}
写完代码后在vue的index.html文件中引入该js文件即可。 <script src="<%= BASE_URL %>js/rem.js"></script>
出现如下结果就代表成功

字体图标引入
使用阿里官方提供的iconfont字体图标库,在这里我们需要使用svg格式的,所以需要按照官方步骤来写。
复制生成的文件到index.html中: <script src="//at.alicdn.com/t/c/font_4102556_rjc8ysbw6u.js"></script>
在home.vue文件中添加如下代码,并将需要使用的字体图标放入href属性后
    <svg class="icon" aria-hidden="true">
      <use xlink:href="#icon-liebiao"></use>
    </svg>
出现如下字体图标就代表成功,之后就可以调整样式了。
之后在app根组件中修改全局样式。设置所有字体图标的大小,这里采用的是svg字体图标,所以需要设置宽高。
* {
  margin: 0;
  padding: 0;
  box-sizing: border-box;
}
.icon {
  width: 0.5rem; //通过插件将rem设置为50,0.5rem => 25px
  height: 0.5rem;
}
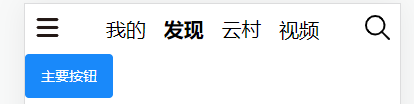
顶部导航栏组件
创建一个TopNav.vue文件编写顶部组件,效果图如下

以下是结构代码,基本布局采用弹性盒子解决
<template>
  <div class="topNav">
    <!-- 左侧字体图标 -->
    <div class="topLeft">
      <svg class="icon" aria-hidden="true">
        <use xlink:href="#icon-liebiao"></use>
      </svg>
    </div>
    <!-- 中间文字部分 -->
    <div class="topCenter">
      <span>我的</span>
      <span class="active">发现</span>
      <span>云村</span>
      <span>视频</span>
    </div>
    <!-- 右侧字体图标 -->
    <div class="topRight">
      <svg class="icon" aria-hidden="true">
        <use xlink:href="#icon-sousuo"></use>
      </svg>
    </div>
  </div>
</template>
以下是样式代码
.topNav {
  padding: 0.2rem;
  width: 100%;
  height: 1rem;
  display: flex;
  justify-content: space-between;
  align-items: center;
  .topCenter {
    display: flex;
    width: 65%;
    height: 100%;
    justify-content: space-around;
    align-items: center;
    font-size: 0.4rem;
    .active {
      font-weight: 900;
    }
  }
}
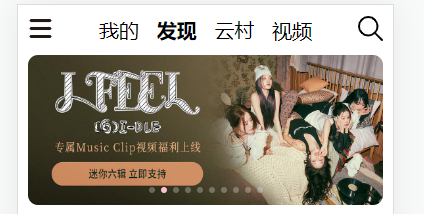
轮播组件
创建一个swiper.vue文件编写轮播图页面。这里引入Vant组件库来实现效果。
npm i vant安装适配vue3的vant- 这里采取按需引入,安装所需的插件:
npm i unplugin-vue-components -D - 基于脚手架创建的项目,需要配置文件信息
const { VantResolver } = require('unplugin-vue-components/resolvers');
const ComponentsPlugin = require('unplugin-vue-components/webpack');

module.exports = {
  configureWebpack: {
    plugins: [
      ComponentsPlugin({
        resolvers: [VantResolver()],
      }),
    ],
  },
};
- 在views/HomeView.vue文件中引入该组件并使用。
components: { TopNav, Swiper },。只要出现如下样式就代表成功
引如轮播图的基本结构代码
  <div class="swiper">
    <van-swipe :autoplay="3000" lazy-render>
      <van-swipe-item v-for="image in images" :key="image">
        <img :src="image.pic" />
      </van-swipe-item>
    </van-swipe>
  </div>
对应的css结构如下
.swiper {
  width: 100%;
  height: 3rem;

  .van-swipe {
    width: 100%;
    height: 100%;
    .van-swipe__track {
      .van-swipe-item {
        padding: 0 0.2rem;
        img {
          width: 100%;
          height: 100%;
          border-radius: 0.2rem;
        }
      }
    }
    ::v-deep .van-swipe__indicator--active {
      background-color: pink;
    }
  }
}
在setupApi中组件一挂载成功就立即发送axios请求,到后台服务器获取banner轮播图数据。其中http://localhost:3000是后台服务器的地址,后面需要跟参数信息决定获取具体内容。/banner?type=2是获取banner轮播图的地址,其中type属性决定平台,如pc,安卓,苹果,其中type=2代表苹果平台
  setup() {
    const images = ref([]);
    // 获取轮播图数据
    onMounted(() => {
      axios.get("http://localhost:3000/banner?type=2").then((res) => {
        images.value = res.data.banners;
      });
    });
    return { images };
  },
最终效果如图
封装axios请求
在src目录下创建如图的文件结构存放axios相关的代码

在index.js文件中创建如下代码,创建一个axios实例,设置一个统一的基地址。
import axios from "axios";

// 设置基地址,并创建实例
const instance = axios.create({
  baseURL: "http://localhost:3000",
  timeout: 1000
})

export default instance
在home.js文件中添加如下代码,引入刚才创建的实例。并创建一个获取banner轮播图的函数并导出。在内部,创建的axios实例可以调用原本axios的get,post等方法,具体的实现都一样。最终axios实例会将指定的配置将与实例的配置合并。如地址最终会合并为:“http://localhost:3000/banner?type=2”。这样子大大减小了我们的代码量,不用每次都添加基地址在我们的代码中。
import instance from '@/axios/index'

// 获取banner图
export function getBanner() {
  return instance({
    method: "GET",
    url: "/banner?type=2"
  })
}
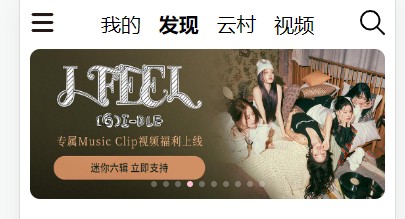
在swiper.vue文件中引入创建的getBanner方法,并使用该方法替换原有的axios请求,代码如下。发现在vue文件中代码只负责去调用,具体实现在对应的文件中,这大大方便了我们维护。
import { getBanner } from "@/axios/api/home";
.........
    onMounted(async () => {
      let res = await getBanner();
      images.value = res.data.banners;
    });
最终效果如下
图标组件
最新效果图如下
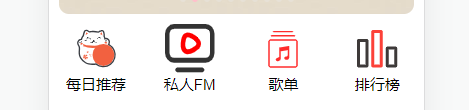
创建一个IconList.vue文件,并在引入注册使用该组件标签。
在该组件中代码如下。带采用弹性盒子布局
 <div class="iconList">
    <div class="iconItem">
      <svg class="icon" aria-hidden="true">
        <use xlink:href="#icon-tuijian"></use>
      </svg>
      <span>每日推荐</span>
    </div>
    <div class="iconItem">
      <svg class="icon" aria-hidden="true">
        <use xlink:href="#icon-shipin1"></use>
      </svg>
      <span>私人FM</span>
    </div>
    <div class="iconItem">
      <svg class="icon" aria-hidden="true">
        <use xlink:href="#icon-gedan"></use>
      </svg>
      <span>歌单</span>
    </div>
    <div class="iconItem">
      <svg class="icon" aria-hidden="true">
        <use xlink:href="#icon-paihangbang"></use>
      </svg>
      <span>排行榜</span>
    </div>
  </div>
.iconList {
  margin-top: 0.2rem;
  display: flex;
  justify-content: space-around;
  align-items: center;
  width: 100%;
  height: 2rem;
  .iconItem {
    display: flex;
    flex-direction: column;
    align-items: center;
    width: 25%;
    height: 100%;
    .icon {
      width: 1rem;
      height: 1rem;
    }
  }
}
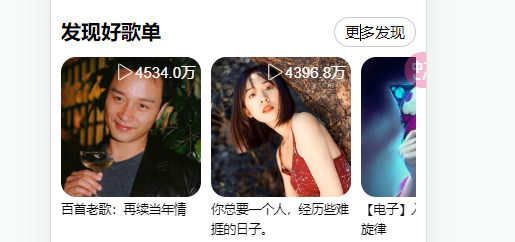
发现好歌单数据获取
在axios文件中封装新的函数,用于获取推荐列表数据
// 获取推荐歌单列表
export function getMusicList() {
  return instance({
    method: "GET",
    url: "/personalized?limit=10"
  })
}
创建一个新的MusicList.vue文件,并在主文件中引入并注册使用。
添加结构代码如下,其中主体部分采用了轮播图完成,并且每一个个体通过循环获取的数组列表生成
  <div class="musicList">
    <div class="musicTop">
      <div class="title">发现好歌单</div>
      <div class="more">更多发现</div>
    </div>
    <div class="musicContent">
      <van-swipe
        :loop="false"
        :width="150"
        :show-indicators="false"
        class="music-swiper"
      >
        <van-swipe-item
          v-for="(item, index) in musicList"
          :key="index"
          class="music-item"
        >
          <img :src="item.picUrl" alt="" />
          <span class="playCount">
            <svg class="icon" aria-hidden="true">
              <use xlink:href="#icon-icon-24gl-playw"></use>
            </svg>
            {{ handlePlayCount(item.playCount) }}
          </span>
          <span class="detail">{{ item.name }}</span>
        </van-swipe-item>
      </van-swipe>
    </div>
  </div>
  setup() {
    let musicList = ref([]);
    let handlePlayCount = (num) => {
      if (num >= 100000000) {
        return (num / 100000000).toFixed(1) + "亿";
      } else if (num >= 10000) {
        return (num / 10000).toFixed(1) + "万";
      }
    };
    onMounted(async () => {
      let res = await getMusicList();
      musicList.value = res.data.result;
    });
    return { musicList, handlePlayCount };
  },
.musicList {
  margin-top: -0.4rem;
  width: 100%;
  height: 5rem;
  padding: 0.2rem;
  .musicTop {
    width: 100%;
    height: 0.6rem;
    display: flex;
    justify-content: space-between;
    margin-bottom: 0.2rem;
    .title {
      font-size: 0.4rem;
      font-weight: 900;
    }
    .more {
      border: 1px solid #ccc;
      text-align: center;
      line-height: 0.6rem;
      padding: 0 0.2rem;
      border-radius: 0.4rem;
    }
  }
  .musicContent {
    width: 100%;
    height: 4rem;
    .music-swiper {
      height: 100%;
      .music-item {
        position: relative;
        img {
          border-radius: 0.3rem;
          width: 2.8rem;
          height: 2.8rem;
          object-fit: cover;
        }
        .playCount {
          display: flex;
          justify-content: space-between;
          position: absolute;
          top: 0.1rem;
          right: 0.3rem;
          color: #fff;
          .icon {
            width: 0.4rem;
            height: 0.4rem;
          }
        }
        .detail {
          display: block;
          width: 2.8rem;
          // padding: 0 0.1rem;
          font-size: 0.25rem;
          line-height: 0.4rem;
        }
      }
    }
  }
}
最终结果图如下
歌单路由跳转
先将路由设计完成,根据官方文档,获取详情歌单的时候,id参数为必传项。
  {
    path: "/musicitem",
    name: 'MusicItem',
    component: () => import('../views/MusicItem.vue')
  }
实现路由跳转可以使用router-link标签,代码如下
 <router-link :to="{path: '/musicitem',query: {id: item.id,},}">
   省略循环代码
 </router-link>
也可以为每一个循环项添加一个点击事件去处理路由跳转。
<van-swipe-item
    v-for="(item, index) in musicList"
    :key="index"
    class="music-item"
    @click="handleItem(item.id)"
>
    function handleItem(id) {
      router.push({
        path: "/musicitem",
        query: {
          id,
        },
      });
    }
跳转成功后,每次点击歌单的时候,就会将当前歌单的id号传入

获取详情歌单数据
创建一个musicItem.js的axios文件用于获取歌曲的网络请求数据。该函数调用的时候都需要将当前id传入去处理查询
import instance from '@/axios/index'

// 获取歌单列表数据
export function getMusicItem(id) {
  return instance({
    method: "GET",
    url: `/playlist/detail?id=${id}`
  })
}
在MusicItem.vue文件中的setup函数中代码如下,成功挂载后立即根据id获取歌单数据
    const route = useRoute();
    const playlist = ref({});
    // 获取详情列表数据
    onMounted(async () => {
      const id = route.query.id;
      let res = await getMusicItem(id);
      playlist.value = res.data.playlist;
      console.log(playlist.value);
    });
之后在components目录下创建一个musicitem文件,该文件新建一个MusicItemTop.vue文件。在上面的MusicItem.vue文件中引入新建的组件并注册使用。这里设计组件之间数据传递。采用props传递
<MusicItemTop :playlist="playlist"></MusicItemTop>
在MusicItemTop.vue文件中创建结构代码如下,基本样式图如下
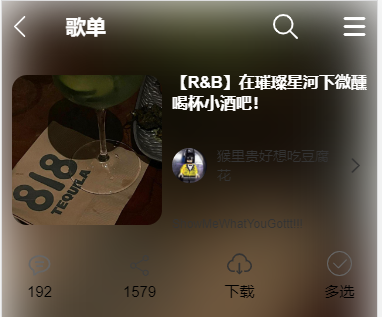
<template>
  <div class="container">
    <div class="MusicItemTop">
      <img :src="playlist.coverImgUrl" class="bgimg" />
      <div class="itemLeft">
        <svg class="icon" aria-hidden="true" @click="handleGoBack">
          <use xlink:href="#icon-zuojiantou1-copy"></use>
        </svg>
        <span>歌单</span>
      </div>
      <div class="itemRight">
        <svg class="icon" aria-hidden="true">
          <use xlink:href="#icon-sousuo"></use>
        </svg>
        <svg class="icon" aria-hidden="true">
          <use xlink:href="#icon-liebiao-copy"></use>
        </svg>
      </div>
    </div>
    <div class="main">
      <div class="main-left">
        <img :src="playlist.coverImgUrl" class="bg-cover" />
      </div>
      <div class="main-right">
        <div class="title">{{ playlist.name }}</div>
        <div class="author">
          <img :src="playlist.creator?.avatarUrl" class="avatar" />
          <span>{{ playlist.creator?.nickname }}</span>
          <svg class="icon" aria-hidden="true">
            <use xlink:href="#icon-youjiantou"></use>
          </svg>
        </div>
        <div class="signature">
          <!-- 文字描述 -->
          <span>{{ playlist.creator?.signature }}</span>
        </div>
      </div>
    </div>
    <div class="bottom">
      <div class="icon-item">
        <svg class="icon" aria-hidden="true">
          <use xlink:href="#icon-xiaoxi"></use>
        </svg>
        <span>{{ playlist.commentCount }}</span>
      </div>
      <div class="icon-item">
        <svg class="icon" aria-hidden="true">
          <use xlink:href="#icon-fenxiang"></use>
        </svg>
        <span>{{ playlist.shareCount }}</span>
      </div>
      <div class="icon-item">
        <svg class="icon" aria-hidden="true">
          <use xlink:href="#icon-xiazai"></use>
        </svg>
        <span>下载</span>
      </div>
      <div class="icon-item">
        <svg class="icon" aria-hidden="true">
          <use xlink:href="#icon-xuanze-duoxuan-tianchong"></use>
        </svg>
        <span>多选</span>
      </div>
    </div>
  </div>
</template>
使用props配置项接收父组件传递来的数据使用。并为其中的返回上一级箭头绑定回退事件。
  props: ["playlist"],
  setup(props) {
    const router = useRouter();
    function handleGoBack() {
      router.back();
    }
    console.log(props);
    return {
      handleGoBack,
    };
  },
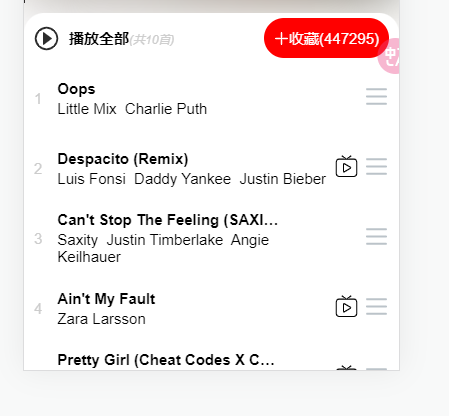
获取播放列表数据
基本的样式如下
创建如下目录结构
在api.js文件中设置获取歌曲的api
// 获取歌单列表所有歌曲信息
export function getMusicItemAll(id) {
  return instance({
    method: "GET",
    url: `/playlist/track/all?id=${id}&limit=10&offset=0`
  })
}
在MusicItem.vue文件中引入上面的组件并注册使用。需要注意的是在这里获取对应的歌单数据同样需要每个歌单的id编号
    const allMusicSongs = ref([]);
    onMounted(async () => {
      ........
      // 获取歌单列表内所有歌曲数据
      let res2 = await getMusicItemAll(id);
      allMusicSongs.value = res2.data.songs;
    });
在页面的组件标签中将数据传递过去,其中参数分别为歌单信息和订阅量
  <MusicItemList
    v-if="allMusicSongs"
    :allMusicSongs="allMusicSongs"
    :subscribedCount="playlist.subscribedCount"
  ></MusicItemList>
MusicItemList.vue文件中使用props接收参数
props: ["allMusicSongs", "subscribedCount"],
页面基本结构布局
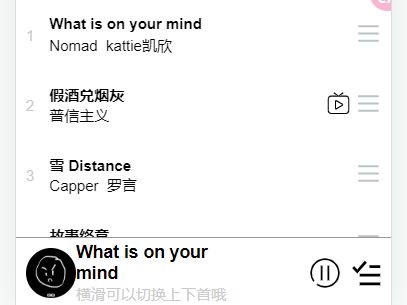
<template>
<div class="musicItemList">
<!-- 顶部图标显示 -->
<div class="itemListTop">
<div class="topLeft">
<svg class="icon" aria-hidden="true">
<use xlink:href="#icon-bofanganniu"></use>
</svg>
<span
>播放全部<i>(共{{ allMusicSongs.length }}首)</i></span
>
</div>
<div class="topRight">
<svg class="icon" aria-hidden="true">
<use xlink:href="#icon-jiahao-copy"></use>
</svg>
<span>收藏({{ subscribedCount }})</span>
</div>
</div>
<!-- 主体歌曲显示 -->
<div class="itemList">
<div class="item" v-for="(item, index) in allMusicSongs" :key="index">
<div class="itemLeft">
<!-- 歌曲编号 -->
<span class="songId">{{ index + 1 }}</span>
<!-- 歌名与作者 -->
<div class="songsMsg">
<p>{{ item.name }}</p>
<span v-for="(author, i) in item.ar" :key="i"
>{{ author.name }} </span
>
</div>
</div>
<div class="itemRight">
<svg class="icon bofang" aria-hidden="true" v-if="item.mv != 0">
<use xlink:href="#icon-shipin"></use>
</svg>
<svg class="icon liebiao" aria-hidden="true">
<use xlink:href="#icon-liebiao1"></use>
</svg>
</div>
</div>
</div>
</div>
</template>
底部组件制作
首先底部组件FooterMusic.vue在任何一个页面都会能够显示,所以需要将该组件在App.vue中引入使用。
基本效果图如下
这里需要注意,该歌曲在任何组件都需要显示,也就意味着这是一个全局数据,需要保存在vuex中使用。
  state: {
    // 设置一个默认的播放歌曲列表
    playList: [
      {
        al: {
          id: 130148423,
          name: "纵横四海",
          pic: 109951168159576910,
          picUrl: "https://p1.music.126.net/dvBE3I5IYmDTmZq9SyKoRA==/109951168159576909.jpg",
          pic_str:
            "109951168159576909"
        },
        id: 1925396986,//歌曲id
        name: "脱胎换骨" //歌曲名称
      }
    ],
    playListIndex: 0 //默认下标位置
  },
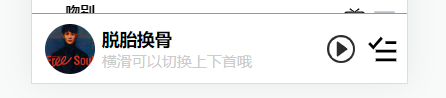
在FooterMusic.vue组件中创建如下结构代码
<template>
  <div class="footerMusic">
    <div class="footerLeft">
      <img :src="playList[playListIndex].al.picUrl" alt="" />
      <div>
        <h3>{{ playList[playListIndex].name }}</h3>
        <span>横滑可以切换上下首哦</span>
      </div>
    </div>
    <div class="footerRight">
      <svg class="icon" aria-hidden="true">
        <use xlink:href="#icon-bofanganniu"></use>
      </svg>
      <svg class="icon" aria-hidden="true">
        <use xlink:href="#icon-zu"></use>
      </svg>
    </div>
  </div>
</template>
如何将vuex中的数据取出,可以采用vue2的写法也可以采用vue3的写法,代码实现如下
//非写在setup API中,利用计算属性和mapState实现
  computed: {
    ...mapState(["playList", "playListIndex"]),
  },

//写在setup API中,利用store取数据
  setup() {
    const store = useStore();
    const playList = store.state.playList;
    const playListIndex = store.state.playListIndex;
    return {
      playList,
      playListIndex,
    };
  },
底部组件播放音乐
使用audio标签动态的获取音乐的url播放地址赋予给该标签播放。这里需要将控制权交给字体图标播放按钮控制。因此需要使用ref控制该DOM元素。vue3中如何控制DOM元素如下。在setup函数中定义一个audio属性,并返回给标签audio中使用即可
<audio
    ref="audio"
    :src="`https://music.163.com/song/media/outer/url?id=${playList[playListIndex].id}.mp3`"
></audio>
    const audio = ref();
    onMounted(() => {
      console.log(audio.value);
    });

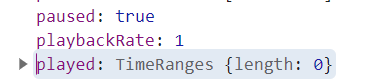
在该audio标签上又两个属性一个为控制音乐播放的方法play(),而pause()方法用来暂停音乐播放。paused属性代表当前音乐是否被暂停
创建一个play播放函数,将控制权交给字体图标通过事件绑定去触发该方法播放。
      <svg class="icon" aria-hidden="true">
        <use xlink:href="#icon-bofanganniu" @click="play"></use>
      </svg>
    function play() {
    //播放音乐
      audio.value.play();
    }
这个时候需要添加一个字体图标,分别为暂停和播放图标,两个图标之间的切换就需要一个全局变量控制。
//state中新建一个变量控制
isBtnShow: true,//设置播放和暂停按钮,默认true代表显示暂停按钮,与audio的paused一致
添加一个方法修改变量的值
  mutations: {
    // 更新状态
    updateIsBtnShow(state,value) {
      state.isBtnShow = value
    }
  },
继续修改之前的vue代码
      <svg class="icon" aria-hidden="true" @click="play" v-if="isBtnShow">
        <use xlink:href="#icon-bofanganniu"></use>
      </svg>
      <svg class="icon" aria-hidden="true" @click="play" v-else>
        <use xlink:href="#icon-zanting"></use>
      </svg>
      <svg class="icon" aria-hidden="true">
        <use xlink:href="#icon-zu"></use>
      </svg>
    const store = useStore();
    const playList = computed(() => store.state.playList);
    const playListIndex = computed(() => store.state.playListIndex);
    // store中的数据取出会丢失响应式需要进行处理
    const isBtnShow = computed(() => {
      return store.state.isBtnShow; //默认为true
    });
    const audio = ref();
    function play() {
      if (audio.value.paused) {
        // paused 为true代表当前状态为暂停,点击的时候需要播放,且修改字体图标
        audio.value.play();
        store.commit("updateIsBtnShow", false);
      } else {
        audio.value.pause();
        store.commit("updateIsBtnShow", true);
      }
    }
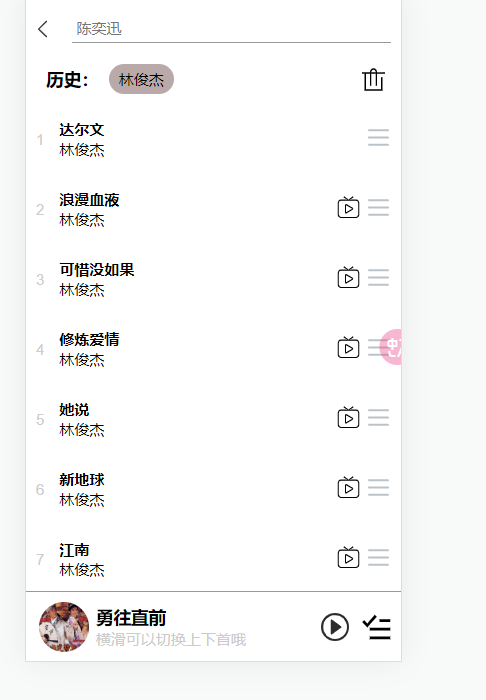
点击列表切换歌曲
更改某个歌曲的时候会进入某个歌单,所以需要先将原先的state中的playList更新歌曲列表,其次每次点击歌曲的时候都是需要将指定的下标号传递过去。(过去渲染俺playList中的数组渲染顺序渲染,所以只需要传递一个下标即可)
    updatePlayList(state, value) {
      state.playList = value
      console.log(state.playList)
    },
    updatePlayListIndex(state, value) {
      state.playListIndex = value
    }
在MusicItemList.vue文件中为列表歌曲绑定事件
<div class="itemLeft" @click="playMusic(index)"> .....</div>
    const playMusic = (i) => {
      // 修改播放列表
      store.commit("updatePlayList", props.allMusicSongs);
      // 修改播放列表中音乐下标
      store.commit("updatePlayListIndex", i);
    };
效果图如下,只不过这里会出现一个bug,上一个歌曲在播放的时候切换到下一首的时候不会自动播放,且字体图标的切换也存在问题。
问题分析:在底部音乐播放组件中,audio是根据对应下标去匹配播放列表中的数据。所以可以使用事件监听,每当state中下标属性改变的时候,就重新设置播放条件。调用audio标签身上的autoplay属性即可实现自动播放效果
import { watch } from "vue";

	//playListIndex属性被处理为Proxy
    watch(playListIndex, () => {
      // 调用自动audio标签的自动播放属性标志
      audio.value.autoplay = true; //上一首歌单切换的情况下直接自动播放。
      //强制处理字体图标显示不正确的情况
      store.commit("updateIsBtnShow", false);
    });
这个时候需要注意,每次点击歌单进入点击第一首歌曲的时候,无法实现自动播放效果,这是因为第一首歌单的下标没有变化,所以没有进行操作。这里再次对播放列表的数据进行监听。
    watch(playList, () => {
      if (isBtnShow) {
        audio.value.autoplay = true;
        store.commit("updateIsBtnShow", false);
      }
    });
将当前歌单列表和歌曲保存本地存储
之前的网页发现每次刷新后,都会重新读取state中设置的默认值,效果不是我们想要的。这个时候就需要每次读取的时候将最新的数据保存值本地存储。

修改mutation中的方法,每次将最新的数据保存到本地存储中。
    updatePlayList(state, value) {
      state.playList = value
      localStorage.setItem("playList", JSON.stringify(state.playList))
    },
    updatePlayListIndex(state, value) {
      state.playListIndex = value
      localStorage.setItem("playListIndex", state.playListIndex)
    },
将原先FooterMusic.vue文件中的代码进行修改。因为computed计算属性默认写法只包含 get,所以为只读,无法进行修改,所以配置完整的写法。在set函数中每次将最新的值存储到state中,而计算属性每次都会检测到state中的值变化,从而导致页面更新。
onMounted方法在页面每次刷新的时候都会被执行一次,判断本地存储是否存在playList歌曲列表数据,如果存在,就修改当前组件的playList和playListIndex 的值。(计算属性get返回的值是基于ref响应式)。
    const playList = computed({
      get() {
        return store.state.playList;
      },
      set(value) {
        // 更新列表
        store.commit("updatePlayList", value);
      },
    });
    const playListIndex = computed({
      get() {
        return store.state.playListIndex;
      },
      set(value) {
        // 修改播放列表中音乐下标
        store.commit("updatePlayListIndex", value);
      },
    });
    onMounted(() => {
      if (JSON.parse(localStorage.getItem("playList"))) {
        playList.value = JSON.parse(localStorage.getItem("playList"));
        playListIndex.value = Number(localStorage.getItem("playListIndex"));
      }
    });
修改每次刷新底部播放字体图标显示不正确的原因
在之前的代码中,每次在播放某个歌曲的时候点击刷新,会发现歌曲的播放字体图标会显示如图红色部分,理论上每次刷新,isBtnShow的值都为true重新读取,为什么变为fasle了,这是代码中出现了问题需要进行修改。
在原先的watch监视属性上。控制台打印会发现这两个值会在页面一刷新的时候各自在不同的条件下就会调用一次。然后每一个watch函数中都会将isBtnShow修改为false。
    const i = ref(0);
    watch(playListIndex, () => {
      if (i.value <= 1 && audio.value.paused) {
        i.value++;
        return;
      }

      // 调用自动audio标签的自动播放属性标志
      audio.value.autoplay = true;
      //强制修改字体图标不正确的情况
      store.commit("updateIsBtnShow", false);
    });
    watch(playList, () => {
      if (i.value <= 1 && audio.value.paused) {
        i.value++;
        return;
      }
      audio.value.autoplay = true;
      store.commit("updateIsBtnShow", false);
    });
利用popup弹出层制作歌曲详情页
其中van-popup标签中position设置弹出方向,该闭合标签中可以放置其他内容。但是该标签需要由一个布尔值控制是否显示,即detailShow。由于该组件是放在FooterMusic.vue文件,是全局的,所以将该变量放入state中保存,并在mutation中创建修改该变量的方法。
<van-popup v-model:show="detailShow" position="right" :style="{ width: '100%', height: '100%' }">
    你好
</van-popup>
    detailShow: false, //全局的歌曲详情页弹出层控制变量

    updateDetailShow(state) {
      state.detailShow = !state.detailShow
    }
给左侧歌曲部分创建点击事件,右侧字体图标区域分别又作用。
<div class="footerLeft" @click="handleDetailShow">。。。<div>
    // 处理弹出层函数
    function handleDetailShow() {
      store.commit("updateDetailShow");
    }
歌曲详情页顶部显示
效果图如下

创建一个MusicDetail.vue文件,并在FooterMusic.vue文件中引入并注册,将该组件标签放置在popup组件标签内部使用。由于是歌曲的详情播放页面,所以需要在使用组件标签的时候将具体的歌曲内容通过父传子的方式传递过去。
      <van-popup
        v-model:show="detailShow"
        position="right"
        :style="{ width: '100%', height: '100%' }"
      >
        <MusicDetail
          v-if="playList"
          :musicDetailItem="playList[playListIndex]"
        ></MusicDetail>
      </van-popup>
在MusicDetail.vue文件中接收传递的参数并在页面中使用
props: ["musicDetailItem"],
页面基本布局如下。img为背景板,container为整个容器。
<img :src="musicDetailItem.al.picUrl" class="bgImg" />
<div class="detail-container">
<div class="detailTop">
<div class="detail-left">
<svg class="icon" aria-hidden="true">
<use xlink:href="#icon-zuojiantou1-copy"></use>
</svg>
<div class="content">
<Vue3Marquee>
<p>{{ musicDetailItem.name }}</p>
</Vue3Marquee>
<span v-for="(item, index) in musicDetailItem.ar" :key="index"
>{{ item.name }} </span
>
<svg class="icon" aria-hidden="true">
<use xlink:href="#icon-youjiantou"></use>
</svg>
</div>
</div>
<div class="detail-right">
<svg class="icon" aria-hidden="true">
<use xlink:href="#icon-fenxiang"></use>
</svg>
</div>
</div>
</div>
在这里歌曲的名字使用到了滚动文字效果。安装库:npm install vue3-marquee@latest --save
按需引入需要的内容
import { Vue3Marquee } from "vue3-marquee";
import "vue3-marquee/dist/style.css";
.....
components: { Vue3Marquee },
在页面中将需要实现滚动的内容用该组件标签包裹起来
<Vue3Marquee><p>{{ musicDetailItem.name }}</p></Vue3Marquee>
顶部返回点击事件
因为弹出层是受state中的变量控制。所以需要去操作修改该变量的值
    const goBack = () => {
      store.commit("updateDetailShow");
    };
歌曲详情页主体部分显示
效果图如下
结构代码如下,三张图片通过css将位置布局完成
    <div class="detailMain">
      <img src="@/assets/needle-ab.png" class="img-needle" />
      <img src="@/assets/cd.png" class="img-cd" />
      <img :src="musicDetailItem.al.picUrl" class="img-avatar" />
    </div>
 .detailMain {
    width: 100%;
    height: 9rem;
    display: flex;
    flex-direction: column;
    align-items: center;
    position: relative;
    .img-needle {
      width: 2rem;
      height: 3rem;
      position: absolute;
      left: 45%;
      transform-origin: 0 0;
      transform: rotate(-10deg);
      transition: all 0.2s;
    }
    .img-cd {
      width: 5rem;
      height: 5rem;
      position: absolute;
      bottom: 2.3rem;
      z-index: -1;
    }
    .img-avatar {
      width: 3.2rem;
      height: 3.2rem;
      border-radius: 50%;
      position: absolute;
      bottom: 3.14rem;
    }
  }
歌曲详情页底部显示
效果图如下,进度条目前不制作,先将icon字体图标完成
结构部分代码如图
    <div class="detailFooter">
      <div class="footer-top">
        <svg
          class="icon"
          aria-hidden="true"
          v-for="(item, index) in footerTopIconArr"
          :key="index"
        >
          <use :xlink:href="'#' + item"></use>
        </svg>
      </div>
      <div class="footer-main">1</div>
      <div class="footer-bottom">
        <svg class="icon" aria-hidden="true">
          <use xlink:href="#icon-24gl-repeat2"></use>
        </svg>
        <svg class="icon" aria-hidden="true">
          <use xlink:href="#icon-shangyishoushangyige"></use>
        </svg>
        <svg
          class="icon iconBig"
          aria-hidden="true"
          @click="play"
          v-if="isBtnShow"
        >
          <use xlink:href="#icon-bofang1"></use>
        </svg>
        <svg class="icon iconBig" aria-hidden="true" @click="play" v-else>
          <use xlink:href="#icon-zanting"></use>
        </svg>
        <svg class="icon" aria-hidden="true">
          <use xlink:href="#icon-xiayigexiayishou"></use>
        </svg>
        <svg class="icon" aria-hidden="true">
          <use xlink:href="#icon-zu"></use>
        </svg>
      </div>
    </div>
    const footerTopIconArr = ref([
      "icon-aixin",
      "icon-xiazai",
      "icon-yinlechangpian1",
      "icon-xiaoxi",
      "icon-icon-",
    ]);
实现歌曲详情页播放效果
详情页的播放时候字体图标的状态应该与全局组件的FooterMusic文件统一,由于在歌曲详情页并没有audio标签,所以无法控制歌曲的播放和暂停,只能通过父传子将控制播放和暂停的函数传递过去使用。
最终效果图如下
在FooterMusic组件中将需要的内容传递过去。
      <van-popup
        v-model:show="detailShow"
        position="right"
        :style="{ width: '100%', height: '100%' }"
      >
        <MusicDetail
          v-if="playList"
          :musicDetailItem="playList[playListIndex]"
          :play="play"
          :isBtnShow="isBtnShow"
        ></MusicDetail>
      </van-popup>
在MusicDetail组件中使用props配置项接收并在页面中使用
props: ["musicDetailItem", "play", "isBtnShow"],

<svg class="icon iconBig" aria-hidden="true" @click="play" v-if="isBtnShow">
     <use xlink:href="#icon-bofang1"></use>
</svg>
<svg class="icon iconBig" aria-hidden="true" @click="play" v-else>
      <use xlink:href="#icon-zanting"></use>
</svg>
歌曲详情页主体部分动画制作
主体部分主要通过了css完成。动态的绑定类实现特性。如图片何时转动,指针何时移动到盘片都需要根据底部播放的状态实现。所以这个时候可以使用isBtnShow变量完成对类的动态添加和删除。
// 播放的时候修改指针图片的位置
.img_needle_active {
   transform: rotate(0deg);
}

//修改图片的旋转和暂停动画
.img_avatar_active {
      animation-play-state: running; //设置动画启动
}
.img_avatar_pause {
      animation-play-state: paused; //设置动画暂停
    }
@keyframes rotate_avatar {
      0% {
        transform: rotateZ(0deg);
      }
      100% {
        transform: rotateZ(360deg);
      }
}
在HTML中对图片动态的绑定类
<img src="@/assets/needle-ab.png" class="img-needle" :class="{ img_needle_active: !isBtnShow }"/>
<img src="@/assets/cd.png" class="img-cd" />
<img :src="musicDetailItem.al.picUrl" class="img-avatar"
    :class="{ img_avatar_active: !isBtnShow, img_avatar_pause: isBtnShow }"
/>
获取歌词数据显示
在axios文件目录中封装一个获取歌曲歌词的接口
// 获取歌词页面
export function getMusicLyric(id) {
  return instance({
    method: "GET",
    url: `/lyric?id=${id}`
  })
}
歌词获取后需要保存在vuex中,之后不管在任何页面,只要点击底部歌曲组件,就能立即显示出来,而不用每次都去进行网络请求,降低用户体验。
在vuex中,进行ajax请求的部分通常放在action配置项中完成。并且每次成功获取数据的时候,都需要将数据保存到state中,而action中可以与mutation进行通信,借助mutation配置项将数据保存到state中。
import { getMusicLyric } from '@/axios/api/musicItem'
  state:{
  	 //省略之前重复代码
    lyricObj: {},//歌词
  }
  actions: {
    getLyric(ctx, value) {
      getMusicLyric(value).then(res => {
        ctx.commit("updateLyricObj", res.data.lrc)
      })
    }
  }
  mutations: {
    //省略之前重复代码
    updateLyricObj(state, value) {
      state.lyricObj = value //更新歌词
    }
  }
在FooterMusic组件中,初始化及其更新的时候都需要重新去获取当前歌曲的歌词
    onMounted(() => {
	  .........
      // 初始化挂载成功需要调用获取歌词接口
      store.dispatch("getLyric", playList.value[playListIndex.value].id);
    });

    onUpdated(() => {
      // 每次更新需要调用获取歌词接口
      store.dispatch("getLyric", playList.value[playListIndex.value].id);
    });
在页面中直接获取该歌词对象打印如下图所示,但是歌词的显示内容不符合预期要求,因此还需要进行修改
在MusicDetail组件中,进行歌词处理。
先从vuex中将数据取出保存使用。
const lyricObj = computed(() => store.state.lyricObj); //初始值可能为空对象
创建一个计算属性使用
    const lyric = computed(() => {
      let arr;
      if (lyricObj.value) {
        //因为初始化为空,所以可能取出为空,需要进行判断
        arr = lyricObj.value.lyric.split("\n"); //默认是字符串,每行歌词之间以换行结束分割
        arr = arr.map((item, i) => {
          let mix = item.slice(1, 3); //截取分钟部分
          let sec = item.slice(4, 6); //截取秒钟部分
          let ms = item.slice(7, 10); //截取三位毫秒的情况 如 045
           //将时间转换为豪秒
          let time = parseInt(mix) * 60 * 1000 + parseInt(sec) * 1000 + +ms;
          //有的时候歌词为空不进行截取
          let lr = item.split("]")[1] ? item.split("]")[1].trim() : ""; //以]符号位分割线截取歌词部分
          if (isNaN(Number(ms))) {
            // 转换失败,代表是两位,但是多包含了一个']'符号。如 04]
            ms = item.slice(7, 9); //两位毫秒的情况
            lr = item.split("]")[1] ? item.split("]")[1].trim() : "";
            //将时间转换为豪秒
            time = parseInt(mix) * 60 * 1000 + parseInt(sec) * 1000 + +ms;
          }
          return { mix, sec, ms, lr, time };
        });
      }
      console.log(arr);
      return arr;
    });
最终效果图如下
在页面中先输出查看效果。通过循环打印歌词显示并调整样式,效果如图
    <div class="musicLyric" v-else>
      <p v-for="(item, index) in lyric">{{ item.lr }}</p>
    </div>
处理播放的当前时间
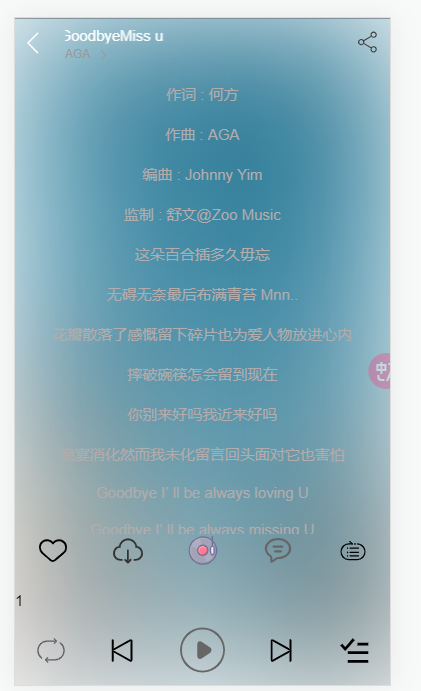
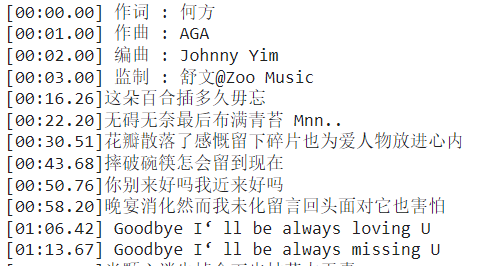
如图,在时间16.26秒处到22.20秒处,应当播放歌词“这朵百合插多久毋忘”。也就是说需要将歌词的时间与当前播放器的currentTime时间做对比。判断出那一句歌词需要当前高亮处理显示。
将currentTime属性配置在vuex中保管,并在mutation中配置修改当前时间的方法
state:{  currentTime: 0 //歌词当前播放的时间}
mutations:{
    updateCurrentTime(state, value) { //更新当前歌词的时间
      state.currentTime = value
      console.log(state.currentTime)
    }
}
然后在FooterMusic组件中进行测试,将audio播放器的当前时间实时传递过去,需要注意,播放器在每次点击播放的时候才会将最新时间传递过去,在不点击暂停的时候,这段期间需要一直传递,需要借助定时器完成。当点击暂停的时候需要将定时器清除。
let timeID = 0; //定时器id
//更新最新的播放器时间
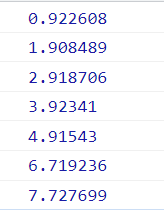
function getCurrentTime() {
timeID = setInterval(() => {
// 每次启动的时候将当前播放时间传递过去更新
store.commit("updateCurrentTime", audio.value.currentTime);
}, 1000);
}
// 点击字体图标实现播放效果
function play() {
if (audio.value.paused) {
// paused 为true代表当前状态为暂停,点击的时候需要播放,且修改字体图标
audio.value.play();
store.commit("updateIsBtnShow", false);
// 播放的时候启动定时器传递当前元素的播放时间
getCurrentTime();
} else {
audio.value.pause();
store.commit("updateIsBtnShow", true);
//暂停停止定时器
clearInterval(timeID);
}
}
最终输入如下时间
歌词样式随时间动态变化
为歌词添加样式
    .active {
      color: #fff;
      font-size: 0.46rem;
    }
      <p
        :class="{
          active:
            currentTime* 1000 >= item.time &&
            currentTime* 1000 < item.pre,
        }"
        v-for="(item, index) in lyric"
        :key="index"
      >
        {{ item.lr }}
      </p>
    // 取出播放器的当前时间
    const currentTime= computed(() => store.state.currentTime);
修改lyric数组,为其添加下一首歌词的时间,其中item.pre会被用于class样式中进行比对,其被作为当前歌词的下一首歌词的时间。在最后一个数组元素中,time的值为NaN,所以最后在样式中计算为false,不会添加active样式,依旧选择上一个符合条件的添加样式
    const lyric = computed(() => {
      let arr;
      if (lyricObj.value) {
        //因为初始化为空,所以可能取出为空,需要进行判断
        arr = lyricObj.value.lyric.split("\n");
        arr = arr.map((item, i) => {
          let mix = item.slice(1, 3);
          let sec = item.slice(4, 6);
          let ms = item.slice(7, 10); //三位毫秒的情况 如 045
          let lr = item.split("]")[1] ? item.split("]")[1].trim() : "";
          //将时间转换为豪秒
          let time = parseInt(mix) * 60 * 1000 + parseInt(sec) * 1000 + +ms;
          if (isNaN(Number(ms))) {
            // 转换失败,代表是两位,但是多包含了一个']'符号。如 04]
            ms = item.slice(7, 9); //两位毫秒的情况
            lr = item.split("]")[1] ? item.split("]")[1].trim() : "";
            time = parseInt(mix) * 60 * 1000 + parseInt(sec) * 1000 + +ms;
          }
          return { mix, sec, ms, lr, time };
        });
        // 处理每个歌词中的下一句歌词的时间
        arr.forEach((item, index) => {
          if (index === arr.length - 1 || isNaN(arr[index + 1].time)) {
            item.pre = currentTime.value * 1000 + 1; // 处理歌词时间为NaN的情况,默认高亮显示最后一个
          } else {
            // 处理存放下一句歌词的时间
            item.pre = arr[index + 1].time;
          }
        });
      }
      console.log(arr);
      return arr;
    });
歌词滚动特性
创建一个ref属性,用于获取父元素DOM。
<div class="musicLyric" ref="musicLyric" v-else> ... </div>
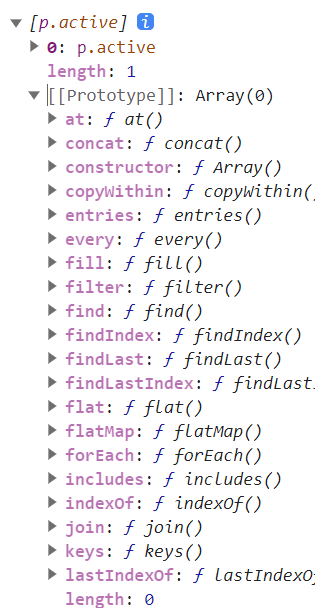
利用播放器的当前时间不断变化,去监视滚动条的触发机制,如下使用[p]输出该DOM元素身上的属性和方法查询p.active,发现有如offsetTop等
    // 处理歌词滚动条
    watch(currentTime, () => {
      let p = document.querySelector("p.active"); //获取活动样式p
      console.log([p]);
    });
    // 处理歌词滚动条
    watch(currentTime, () => {
      let p = document.querySelector("p.active"); //获取活动样式p
       if (p) { //防止没有改元素报错
	      if (p.offsetTop > 300) {
	        //p.active的位置距离父盒子顶部不能超过300px
	        musicLyric.value.scrollTop = p.offsetTop - 300; //控制滚动出去的距离
	      }
      }
    });
但是这样子直接移动滚动条看起来及其不舒服,这里将if语句中的移动方法改为transform,并添加过渡效果(需要修改结构代码)
        musicLyric.value.style.transform = `translateY(-${
          p.offsetTop - 230
        }px)`;
结构代码如下
    <div class="musicContent" v-show="!isShowCD" @click="isShowCD = !isShowCD">
      <div class="musicLyric" ref="musicLyric">
        <p
          :class="{
            active:
              currentTime * 1000 >= item.time && currentTime * 1000 < item.pre,
          }"
          v-for="(item, index) in lyric"
          :key="index"
        >
          {{ item.lr }}
        </p>
      </div>
    </div>
歌词和磁盘切换
创建一个控制图片与文字的变量,需要将之前的v-if修改为v-show,v-if会移除DOM元素,在下面如果获取该DOM的属性就会报错。
    // 磁盘与歌词切换
    const isShowCD = ref(true);
    <div class="detailMain" v-show="isShowCD">
      <img
        src="@/assets/needle-ab.png"
        class="img-needle"
        :class="{ img_needle_active: !isBtnShow }"
      />
      <img src="@/assets/cd.png" class="img-cd" />
      <img
        :src="musicDetailItem.al.picUrl"
        class="img-avatar"
        :class="{ img_avatar_active: !isBtnShow, img_avatar_pause: isBtnShow }"
        @click="isShowCD = !isShowCD"
      />
    </div>
    <div class="musicContent" v-show="!isShowCD" @click="isShowCD = !isShowCD">
      <div class="musicLyric" ref="musicLyric">
        <p
          :class="{
            active:
              currentTime * 1000 >= item.time && currentTime * 1000 < item.pre,
          }"
          v-for="(item, index) in lyric"
          :key="index"
        >
          {{ item.lr }}
        </p>
      </div>
    </div>
实现上一首下一首切换歌曲
针对两个字体图标分别实现上一首和下一首歌曲的播放效果。
@click="handleChooseSong(-1)
@click="handleChooseSong(1)
切换歌曲就需要使用到vuex中歌曲列表数据和下标。
    const playList = store.state.playList; //proxy的响应式
    const playListIndex = computed(() => store.state.playListIndex);
需要对每次切换歌曲进行边界值进行判断。由于之前底部组件将playListIndex设置为计算属性,当监视到编号改变的时候就会重新渲染页面,即播放歌曲
    // 处理播放上一首下一首歌曲
    const handleChooseSong = (id) => {
      console.log(playList);
      let index = playListIndex.value + id;
      if (index < 0) {
        index = playList.length - 1; //重置歌曲末尾
      } else if (index >= 10) {
        index = 0; //重置歌曲首部
      }
      store.commit("updatePlayListIndex", index);
    };
进度条
在进度条的制作中,需要知道进度条的时间是跟随音乐的当前时间变化而变化的,所以需要读取audio的currentTime属性赋值,这里进度条采用input:range制作,设置min最小值为0,最大值max为audio当前身上的duration属性,即播放的全部时间,step为移动的步长。
首先将歌曲的总时长保存在vuex中保存,因为在底部组件播放的时候,进度条也需要变化,所以是全局的
    duration: 0, //歌曲的总时长

    updateDuration(state, value) { //更新歌曲总时长
      state.duration = value
    }
在FooterMusic组件中创建一个方法去更新总时长,并在当前组件的生命周期函数中调用执行。并在使用组件标签的时候将该函数传递过去
    function addDuration() {
      // 更新总歌曲时长
      store.commit("updateDuration", audio.value.duration);
    }
    onMounted(() => {
      、、、、、、、、、
      addDuration();
    });

    onUpdated(() => {
      、、、、、、、
      addDuration();
    });
        <MusicDetail
          v-if="playList"
          :musicDetailItem="playList[playListIndex]"
          :play="play"
          :isBtnShow="isBtnShow"
          :addDuration="addDuration"
        ></MusicDetail>
在MusicDetail组件中props接收,并在当前组件中,一挂载的时候就执行一次该函数,更新最新的总时长,并且每次切换歌曲的时候也需要执行,即该组件更新的时候执行一次
    onMounted(() => {
      props.addDuration();
    });
    onUpdated(() => {
      props.addDuration();
    });
之后就布局结构
      <!-- 进度条 -->
      <div class="footer-main">
        <input
          type="range"
          class="range"
          mix="0"
          :max="duration"
          v-model="currentTime"
          step="0.01"
        />
      </div>
进度条播放完自动播放下一首
利用监视当前播放的时间与歌曲的总时长进行对比,一旦二者相等代表歌曲播放到尾部,可以进行下一首的播放。需要在当前歌曲下标的基础+1获得下一首歌曲的id编号。
    watch(currentTime, (newValue, oldValue) => {
      。。。。。。。
      // 自动播放下一首
      if (newValue === duration.value) {
        if (playListIndex.value === playList.length - 1) {
          //如果是最后一首歌曲,则重新播放第一首歌
          store.commit("updatePlayListIndex", 0);
        } else {
          store.commit("updatePlayListIndex", playListIndex.value + 1);
        }
      }
    });
修改该组件的生命周期函数,保持切换歌曲的时候总时间更新(之前修bug改成这样子的,可以继续父传子使用)
    function addDuration() {
      // 更新总歌曲时长
      store.commit("updateDuration", props.audio.duration); //直接传递audio元素,接收了直接为DOM元素
    }
    onMounted(() => {
      addDuration();
    });
    onUpdated(() => {
      addDuration();
    });
搜索页面搭建
当点击主页面的搜索功能的时候,页面会跳转到搜索页面。需要使用路由。在路由文件中新增路由信息
  {
    path: "/search",
    name: "Search",
    component: () => import('../views/Search.vue')
  }
给搜索图标绑定点击事件,实现路由跳转

      <svg class="icon" aria-hidden="true" @click="searchData">
        <use xlink:href="#icon-sousuo"></use>
      </svg>
    const router = useRouter();
    function searchData() {
      router.push("/search");
    }
创建一个Search.vue组件,设置结构代码,给返回字体图标绑定回退功能。样式图如下

<template>
  <div class="container">
    <svg class="icon" aria-hidden="true" @click="goBack">
      <use xlink:href="#icon-zuojiantou1"></use>
    </svg>
    <input type="text" placeholder="陈奕迅" />
  </div>
</template>
    const router = useRouter();
    const goBack = () => {
      router.back();
    };
实现历史记录保存
效果图如下
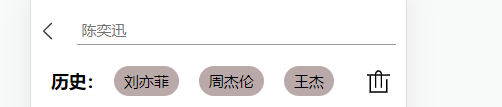
需要注意:历史记录需要保存到本地存储中不丢失,默认这里数据过多会影响布局,所以让保存数据的数组长度只能为3,超过长度删除时间存放最久的数据即可。并且用户输入的内容需要添加到数组中,为双向数据绑定。每次用户回车的时候触发事件将数据显示在历史记录中。 同时给删除字体图标绑定事件
结构代码如下
	.....
	<input  type="text"  placeholder="陈奕迅"  v-model="keyWord" @keyup.enter="enterEvent"/>
	.....
    <!-- 历史记录显示 -->
    <div class="history">
      <h3>历史:</h3>
      <span v-for="(item, i) in keyWordArr" :key="i">{{ item }}</span>
      <svg class="icon" aria-hidden="true" @click="delKeyWordArr">
        <use xlink:href="#icon-shanchu"></use>
      </svg>
    </div>
    //保存输入的内容
    const keyWordArr = ref([]);

    // 存储输入框的内容
    const keyWord = ref("");

    // 处理回车输入事件
    const enterEvent = () => {
      //将最新数据保存在首部显示
      keyWordArr.value.unshift(keyWord.value);
      // 数组不允许超过三个数据,会影响布局,删除里面存放最久的数据
      if (keyWordArr.value.length === 4) {
        keyWordArr.value.pop();
      }
      // 存储本地存储
      localStorage.setItem("keyWordArr", JSON.stringify(keyWordArr.value));
      keyWord.value = "";
    };

	//删除列表数据
    const delKeyWordArr = () => {
      keyWordArr.value = []; //清空数组
      localStorage.removeItem("keyWordArr"); //清空本地存储
    };

    const goBack = () => {
      router.back();
    };
    onMounted(() => {
      // 加入本地存储没有该数据,则取出会报错
      keyWordArr.value = localStorage.getItem("keyWordArr")
        ? JSON.parse(localStorage.getItem("keyWordArr"))
        : [];
    });
细节处理
对用户输入空内容需要进行处理,在事件回调函数的最先处进行判断
    const enterEvent = () => {
      // 为空直接退出
      if (keyWord.value.trim() === "") {
        keyWord.value = "";
        return;
      }
    }
其次还需要对数组进行去重处理
可以使用数组的过滤方法,但是在这里借助了Set结构的特性,内容不能重复来快速实现去重。
第一种方法。需要注意的是,该去重需要放在数据赋值后面,对新数组进行操作
      keyWordArr.value.unshift(keyWord.value);
      keyWordArr.value = keyWordArr.value.filter((item, index) => {
        return keyWordArr.value.indexOf(item) === index;
      });
假定用户连续输入两个周杰伦,然后会进入filter去重方法中。在filter中如果为真则保存到新数组中。第一个元素周杰伦,会去数组中机芯匹配第一个符合条件的值,成功返回该元素在数组中的下标,因为每次item和index都是统一的,所以第一次匹配成功,但是第二个元素周杰伦的时候,查到的下标为0,和当前元素的index=1匹配失败,不会往数组中插入。

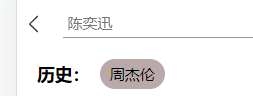
方法二,使用Set结构快速去重
      keyWordArr.value.unshift(keyWord.value);
      // 将对象中的属性值取出组成一个数组
      keyWordArr.value = [...new Set(keyWordArr.value)];
搜索歌曲功能实现
封装获取关键字数据
// 搜索关键字数据
export function getSearchMusic(value) {
  return instance({
    method: "GET",
    url: `/search?keywords=${value}`
  })
}
导入该接口使用,在进行本地存储之前,获取关键字数据,发送网络请求。需要注意的是,如果歌手的歌曲全部为收费的情况,会返回undefined。定义一个数组songs保存获取的数据
const enterEvent = async () => {
  ...............
      // 搜索列表数据
      let res = await getSearchMusic(keyWord.value);
      songs.value = res.data.result.songs;
  ...............
}
同时需要给每一个历史记录中显示的内容绑定点击事件,点击他们的时候也需要去搜索内容
<span v-for="(item, i) in keyWordArr" :key="i" @click="getHistorySearchMusic(item)">{{ item }}</span>
    // 历史记录选项点击搜索
    const getHistorySearchMusic = async (value) => {
      // 搜索列表数据
      let res = await getSearchMusic(value);
      songs.value = res.data.result.songs;
    };
搜索列表数据显示
简单那的搜索的列表数据进行渲染,基本很样式和之前的一样
<!-- 主体歌曲显示 -->
<div class="itemList">
<div class="item" v-for="(item, index) in songs" :key="index">
<div class="itemLeft">
<!-- 歌曲编号 -->
<span class="songId">{{ index + 1 }}</span>
<div class="songsMsg">
<p>{{ item.name }}</p>
<span v-for="(author, i) in item.artists" :key="i"
>{{ author.name }} </span
>
</div>
</div>
<div class="itemRight">
<svg class="icon bofang" aria-hidden="true" v-if="item.mvid != 0">
<use xlink:href="#icon-shipin"></use>
</svg>
<svg class="icon liebiao" aria-hidden="true">
<use xlink:href="#icon-liebiao1"></use>
</svg>
</div>
</div>
</div>
之后需要给列表中显示的歌曲数据绑定事件播放,需要注意的是:并不是所以搜索出的结果都需要处理,只需要处理点击的歌曲。当播放该歌曲的时候依旧能够上下切换列表数据,所以需要将该歌曲插入到播放列表中,并且是最后一个,同时需要更改播放列表数组的下标到最后一个
<div class="itemLeft" @click="pushItem(item, index)">
<span class="songId">{{ index + 1 }}</span>
<div class="songsMsg">
<p>{{ item.name }}</p>
<span v-for="(author, i) in item.artists" :key="i"
>{{ author.name }} </span
>
</div>
</div>
在mutations配置项中,将每次传递过来的数据插入到播放列表中进行更新。采用push方法插入到尾部,同时进行本地存储,不然每次刷新回报错,读取不到数据
    pushPlayList(state, value) { //更新播放列表数据,将新数据插入末尾,播放最后一个数据
      state.playList.push(value)
      localStorage.setItem("playList", JSON.stringify(state.playList))
    }
当更新播放列表数据需要注意,在这里搜索列表获取的信息将变量名进行了修改,所以进行处理。当FooterMusic组件中的事件监听监听到改变的时候就会播放音乐
    // 更新播放列表数据
    const pushItem = (item, index) => {
      /*在FooterMusic文件中需要用的数据虽然在item中有,但是被重命名了,所以需要添加  */
      item.al = item.album;
      item.al.picUrl = item.album.artist.img1v1Url;
      // 添加数据
      store.commit("pushPlayList", item);
      // 播放插入的新数据
      store.commit("updatePlayListIndex", store.state.playList.length - 1);
    };
进入个人中心页面判断
需要对用户的登录状态进行判断,且该值是全局的,因此需要在vuex中创建一个属性控制。
isLogin: false, //是否登录,默认false未登录
并且分别创建两个组件Login和InfoUser,并为其配置路由信息,并且只为‘/infouser’路径配置独享路由守卫,每次进入该路径前都进行判断是否登录,如果登录了就放行,否则重定向到登录页面。
import store from '../store/index.js'

  {
    path: "/login",
    name: "Login",
    component: () => import('../views/Login.vue')
  },
  {
    path: "/infouser",
    name: "InfoUser",
    component: () => import("../views/InfoUser.vue"),
    //独享路由守卫,为单个路由配置
    beforeEnter: (to, from, next) => {
      if (store.state.isLogin) {
        next()
      } else {
        next('/login')
      }
    }
  }
在代码中为如下红色区域绑定点击事件,实现路由跳转

    // 跳转个人中心
    function handleCenterInfo() {
      router.push("/infouser");
    }
登录页面编写
首先进入登录页面的时候,底部播放组件就不需要显示了
设置一个控制底部FooterMusic显示和隐藏的变量在vuex中,并配置修改其值的方法
     //state
    isShowFooterComponent: true,//显示底部组件
    //mutations
    updateIsShowFooterComponent(state, value) { //更新控制播放组件显示
      state.isShowFooterComponent = value
    }
在App组件中引入该变量使用在组件标签上
<FooterMusic v-show="isShowFooterComponent"></FooterMusic>
    // 控制播放组件是否显示
    const isShowFooterComponent = computed(
      () => store.state.isShowFooterComponent
    );
router.beforeEach((to, from, next) => {
  if (to.path === '/login') {
    //  登录的时候隐藏
    store.commit("updateIsShowFooterComponent", false)
  } else {
    // 其他页面的时候显示
    store.commit("updateIsShowFooterComponent", true)
  }
  next()
})
这个时候登录页面中将底部播放组件隐藏掉
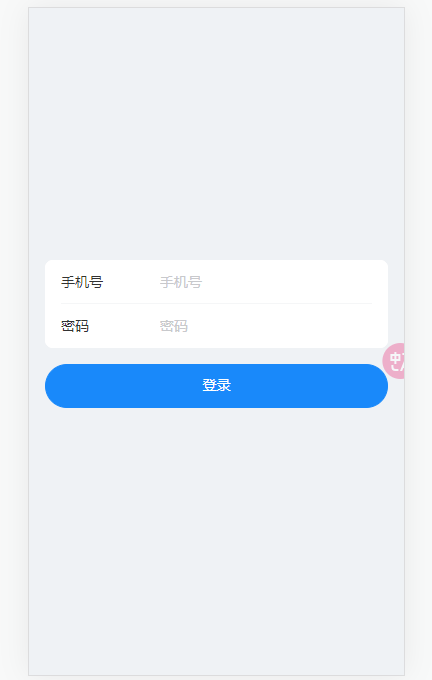
编写登录页面基本结构,这里直接使用了vant组件库
  <div class="box">
    <van-form class="form">
      <van-cell-group inset>
        <van-field
          v-model="phoneID"
          name="phone"
          label="手机号"
          placeholder="手机号"
          :rules="[{ required: true, message: '请填写手机号' }]"
        />
        <van-field
          v-model="password"
          type="password"
          name="密码"
          label="密码"
          placeholder="密码"
          :rules="[{ required: true, message: '请填写密码' }]"
        />
      </van-cell-group>
      <div style="margin: 16px">
        <van-button round block type="primary" native-type="submit">
          登录
        </van-button>
      </div>
    </van-form>
  </div>
    const phoneID = ref("");
    const password = ref("");
编写登录功能的接口,需要传入手机号和密码两个必选参数。(这里需要注意:因为网易云手机登录接口总出问题直接使用邮箱登录,不论手机号或邮箱都需要在网易云软件中注册过)
// 登录
export function Login(value) {
  return instance({
    method: "GET",
    url: `/login?email=${phone}@163.com&password=${password}`,
  })
}
在vuex中的actions配置项中配置网络请求,验证登录。(可以不将值取出直接传递)
import { Login } from '@/axios/api/home'

    handleLogin(ctx, value) {
      const phone = value.phone
      const password = value.password
      // 调用登录接口
      Login(phone, password).then(res => {
        console.log(res)
      })
    }
在登录组件中给表当登录验证通过的时候绑定一个事件,vant自带的submit
<van-form class="form" @submit="handleLogin">。。。</van-form>
    function handleLogin() {
      store.dispatch("handleLogin", {
        phone: phoneID.value,
        password: password.value,
      });
    }
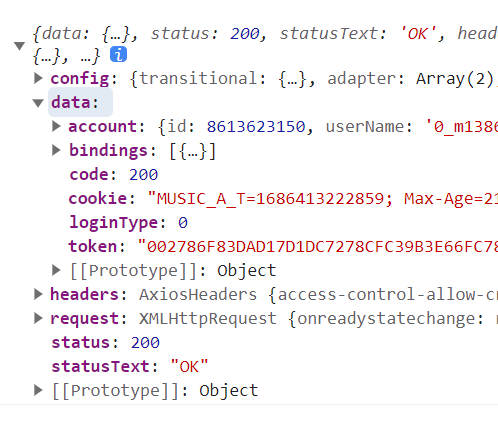
当返回的data.code值为200,就代表成功,且account属性中为登录成功的个人信息
之后就需要在登录成功的时候,跳转个人中心页面。
首先在vuex中创建一个修改登录变量验证的值
    updateIsLogin(state, value) { //登录成功运行跳转个人中心
      state.isLogin = value
    }
在调用接口的时候将请求的数据返回
    async function handleLogin() {
      let res = await store.dispatch("handleLogin", {
        phone: phoneID.value,
        password: password.value,
      });
      if (res.code === 200) {
        // 登录成功跳转
        store.commit("updateIsLogin", true);
        router.push("/infouser");
      } else {
        phoneID.value = "";
        password.value = "";
        alert("输入有误");
      }
    }
      // 调用登录接口,返回的是promise
      return Login(phone, password).then(res => {
        return res.data
      })
但是这样子每次刷新的时候就会重新进入登录页面,这是因为登录的isLogin失效了,可以将该数据保存到本地存储中,同时在请求登录返回的数据中,若成功则会返回一个token,可以使用该值验证。
对原先的vuex的方法进行修改
    updateIsLogin(state, value) { //登录成功运行跳转个人中心
      state.isLogin = value
      localStorage.setItem("isLogin", state.isLogin)
    },
    updateToken(state, value) { //存储token
      state.token = value
      localStorage.setItem("token", state.token)
    }
同时修改独享路由部分的代码,验证,只要二者不在本地存储中,就需要重新登录
    //独享路由守卫,为单个路由配置
    beforeEnter: (to, from, next) => {
      if (localStorage.getItem("token") && localStorage.getItem("isLogin")) {
        next()
      } else {
        next('/login')
      }
    }
修改之前的结构代码
if (res.code === 200) {
        // 登录成功跳转
        store.commit("updateIsLogin", true);
        store.commit("updateToken", res.token);
        router.push("/infouser");
}
这个时候就基本完成了,可以对需要的数据在个人中心中显示即可
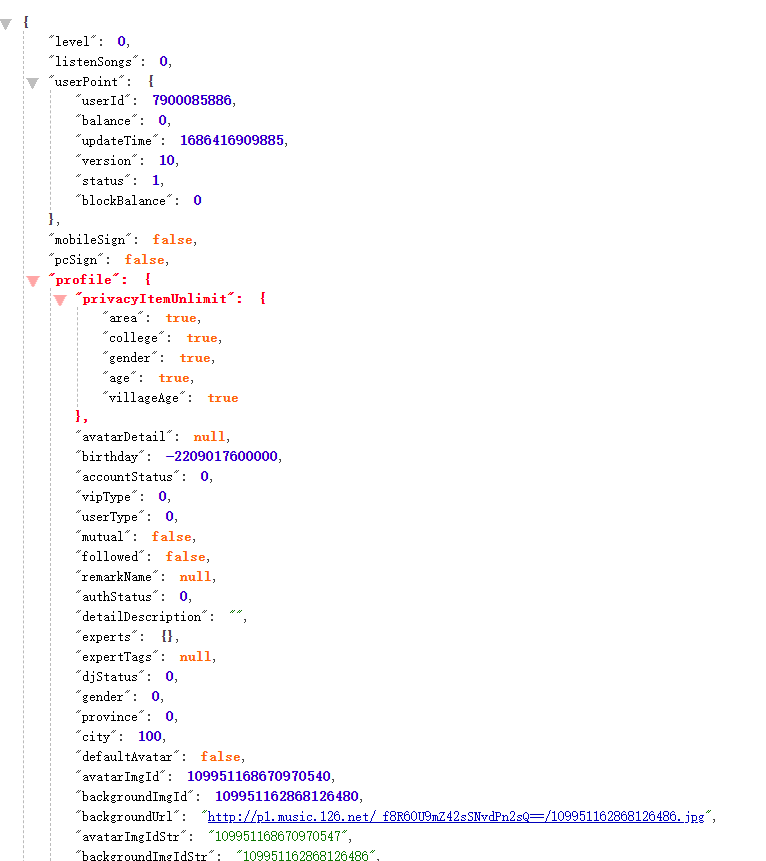
这里以网易邮箱注册的网易云账号为例子,调用返回的用户id查询用户信息如下


 1803
1803

 被折叠的 条评论
为什么被折叠?
被折叠的 条评论
为什么被折叠?
 到【灌水乐园】发言


