


目录
1.APP需求
2.蓝牙需要做到的要求
2.1 实际操作过程
2.2 对于蓝牙建立连接,关闭连接、接受数据、发送数据的简单介绍
2.3 示例代码
2.4 蓝牙基础初始化及其他
2.5 蓝牙在串口APP上显示数据
2.6 蓝牙接收回发数据
结束
1.APP需求
1、首先需要有一个APP来连接蓝牙:
用手机下载SPP蓝牙串口 app。
2、有一个具有蓝牙功能的ESP32的开发板。
3、开发软件为** Visual Studio Code**。
2.蓝牙需要做到的需求
2.1 实际操作过程
2.1.1打开蓝牙设置
1、打开VScode 左下角的设置:
2、找到Bluetooth,勾选,会出现蓝牙的模式
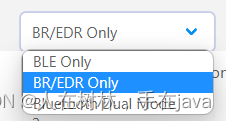
这里选择第二个(经典蓝牙模式)
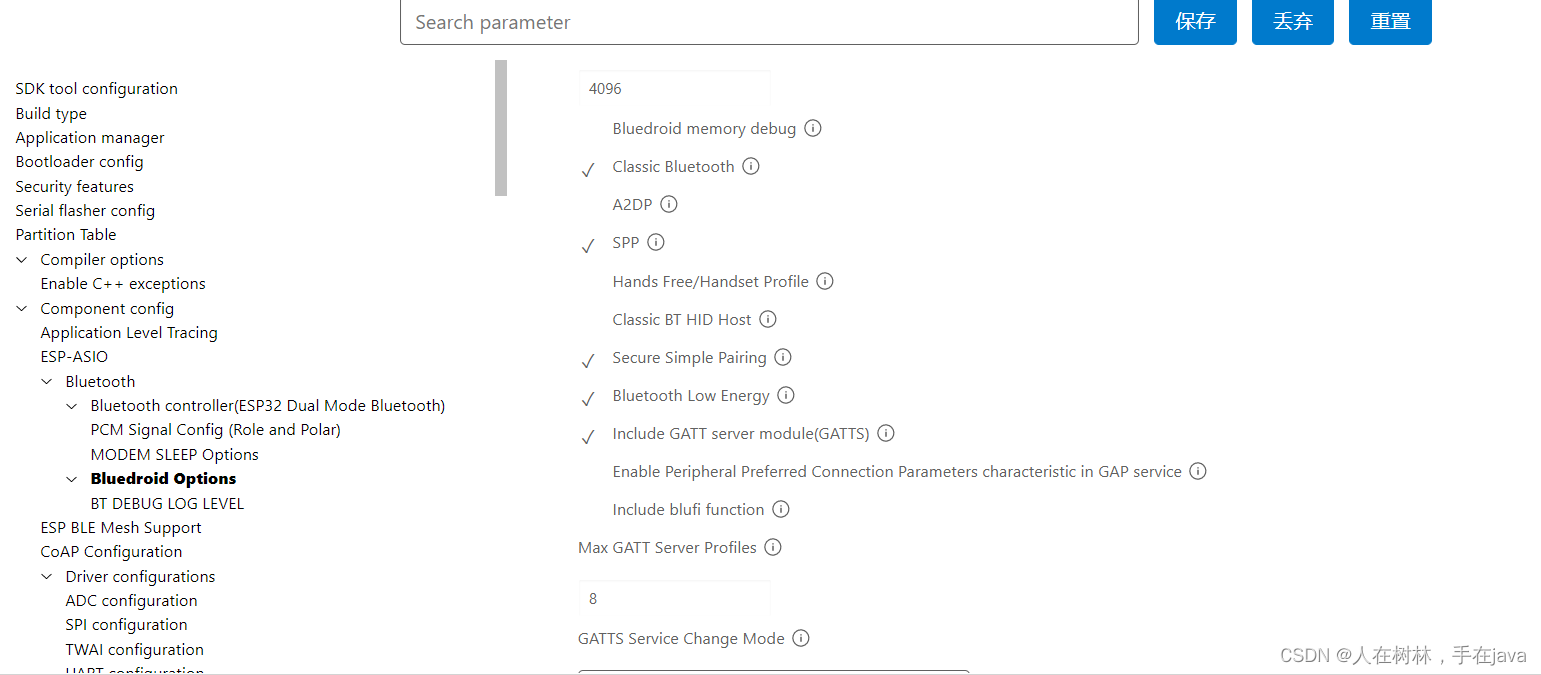
3、勾选SPP等选项
找到Bluedroid Options找到如图选项勾选
2.1.2自己写一个蓝牙代码
1)在单片机示例上拷贝一个helloword 的示例代码,用于修改。
寻找路径为IDF安装路径下的\frameworks\esp-idf-v4.3.2\examples\get-started\hello_world
\frameworks前面的的安装路径为自定义路径或默认路径。
2)在函数app_main 的前面需要插入关于蓝牙的代码,如下:
static uint8_t spp_data[SPP_DATA_LEN];

#if _SUPPORT_BT_
static const esp_spp_mode_t esp_spp_mode = ESP_SPP_MODE_CB;
#endif

static const esp_spp_sec_t sec_mask = ESP_SPP_SEC_NONE;
static const esp_spp_role_t role_slave = ESP_SPP_ROLE_SLAVE;
void SaveShootCounter();
static void esp_spp_cb(esp_spp_cb_event_t event, esp_spp_cb_param_t *param)
{
    switch (event) {
    case ESP_SPP_INIT_EVT:
        ESP_LOGI(SPP_TAG, "ESP_SPP_INIT_EVT");
        esp_bt_dev_set_device_name(EXCAMPLE_DEVICE_NAME);
        // {//设置配对密码,不起作用
        //         esp_bt_pin_type_t pin_type = ESP_BT_PIN_TYPE_VARIABLE;
        //         esp_bt_pin_code_t pin_code={'1','2','3','4','5','6',};
        //         esp_bt_gap_set_pin(pin_type, 6, pin_code);
        // }
        //esp_bt_gap_set_scan_mode(ESP_BT_SCAN_MODE_CONNECTABLE_DISCOVERABLE);
		esp_bt_gap_set_scan_mode(ESP_BT_CONNECTABLE, ESP_BT_GENERAL_DISCOVERABLE);  //---支持IDF4.3,Windows编译——ymj
        esp_spp_start_srv(sec_mask,role_slave, 0, SPP_SERVER_NAME);
        break;
    case ESP_SPP_DISCOVERY_COMP_EVT:
        ESP_LOGI(SPP_TAG, "ESP_SPP_DISCOVERY_COMP_EVT");
        break;
    case ESP_SPP_OPEN_EVT:
        ESP_LOGI(SPP_TAG, "ESP_SPP_OPEN_EVT");
        break;
    case ESP_SPP_CLOSE_EVT:
        ESP_LOGI(SPP_TAG, "ESP_SPP_CLOSE_EVT,handle=%d",param->data_ind.handle);
		BTHandle=-1;
        break;
    case ESP_SPP_START_EVT:
        ESP_LOGI(SPP_TAG, "ESP_SPP_START_EVT");
        break;
    case ESP_SPP_CL_INIT_EVT:
        ESP_LOGI(SPP_TAG, "ESP_SPP_CL_INIT_EVT");
        break;
    case ESP_SPP_DATA_IND_EVT:

        ESP_LOGI(SPP_TAG, "ESP_SPP_DATA_IND_EVT len=%d handle=%d",
                param->data_ind.len, param->data_ind.handle);
        esp_log_buffer_hex("aaaaaaa",param->data_ind.data,param->data_ind.len);
        esp_log_buffer_hex("",param->data_ind.data,param->data_ind.len);
          esp_spp_write(BTHandle,param->data_ind.len,param->data_ind.data);
        break;
    case ESP_SPP_CONG_EVT:
        ESP_LOGI(SPP_TAG, "ESP_SPP_CONG_EVT");
        break;
    case ESP_SPP_WRITE_EVT:
        ESP_LOGI(SPP_TAG, "ESP_SPP_WRITE_EVT");
        break;
    case ESP_SPP_SRV_OPEN_EVT:
        ESP_LOGI(SPP_TAG, "ESP_SPP_SRV_OPEN_EVT,handle=%d",param->data_ind.handle);
		BTHandle=param->data_ind.handle;
        break;
    default:
        break;
    }
}
3)修改app_main内的代码,使在串口app和VS code上终端的显示符合自身的需求。
启动蓝牙主要代码为下:
 InitHardware();

    esp_err_t ret = nvs_flash_init();
    if (ret == ESP_ERR_NVS_NO_FREE_PAGES) {
        ESP_ERROR_CHECK(nvs_flash_erase());
        ret = nvs_flash_init();
    }
    ESP_ERROR_CHECK( ret );


/
//BT-SPP{{{{{


	esp_read_mac(derived_mac_addr, ESP_MAC_BT);

	for (int i = 0; i < SPP_DATA_LEN; ++i) {
        spp_data[i] = 0x30+i;
    }
    esp_bt_controller_config_t bt_cfg = BT_CONTROLLER_INIT_CONFIG_DEFAULT();
    if ((ret = esp_bt_controller_init(&bt_cfg)) != ESP_OK) {
        ESP_LOGE(SPP_TAG, "%s initialize controller failed: %s\n", __func__, esp_err_to_name(ret));
        return;
    }else
    {
        ESP_LOGI(SPP_TAG, "esp_bt_controller_init() ok");
    }
    if ((ret = esp_bt_controller_enable(ESP_BT_MODE_CLASSIC_BT)) != ESP_OK) {
        ESP_LOGE(SPP_TAG, "%s enable controller failed: %s\n", __func__, esp_err_to_name(ret));
        return;
    }else
    {
        ESP_LOGI(SPP_TAG, "esp_bt_controller_enable() ok");
    }

    if ((ret = esp_bluedroid_init()) != ESP_OK) {
        ESP_LOGE(SPP_TAG, "%s initialize bluedroid failed: %s\n", __func__, esp_err_to_name(ret));
        return;
    }else
    {
        ESP_LOGI(SPP_TAG, "esp_bluedroid_init() ok");
    }

    if ((ret = esp_bluedroid_enable()) != ESP_OK) {
        ESP_LOGE(SPP_TAG, "%s enable bluedroid failed: %s\n", __func__, esp_err_to_name(ret));
        return;
    }else
    {
        ESP_LOGI(SPP_TAG, "esp_bluedroid_enable() ok");
    }

    if ((ret = esp_spp_register_callback(esp_spp_cb)) != ESP_OK) {
        ESP_LOGE(SPP_TAG, "%s spp register failed: %s\n", __func__, esp_err_to_name(ret));
        return;
    }else
    {
        ESP_LOGI(SPP_TAG, "esp_spp_register_callback() ok");
    }

    // esp_power_level_t min,max;
    // esp_bredr_tx_power_get(&min,&max);
    // ESP_LOGI(TAG, "BT Power(init): %d/%d",min,max);
    // min=ESP_PWR_LVL_N12;
    // max=ESP_PWR_LVL_N9;
    // esp_bredr_tx_power_set(min,max);
    // esp_bredr_tx_power_get(&min,&max);
    // ESP_LOGI(TAG, "BT Power(new): %d/%d",min,max);


    if ((ret = esp_spp_init(esp_spp_mode)) != ESP_OK) {
        ESP_LOGE(SPP_TAG, "%s spp init failed: %s\n", __func__, esp_err_to_name(ret));
        return;
    }else
    {
        ESP_LOGI(SPP_TAG, "esp_spp_init() ok");
    }

	ESP_LOGI(TAG, "BT Started.");
循环主要代码如下:
while(1)
{
   DebugBT("Hello world!",12);
   vTaskDelay(1000 / portTICK_RATE_MS);
}

}
2.2 对于蓝牙建立连接,关闭连接、接受数据、发送数据的简单介绍
建立蓝牙连接
全局变量BTHandle 与蓝牙连接状态有关,BTHandle初始值为-1,表示蓝牙处于断开连接状态。当连接蓝牙时,会跳转到程序
    case ESP_SPP_SRV_OPEN_EVT:
        ESP_LOGI(SPP_TAG, "ESP_SPP_SRV_OPEN_EVT,handle=%d",param->data_ind.handle);
		BTHandle=param->data_ind.handle;
使全局变量BTHandle发生改变,相应的断开连接也会使全局变量变回初始值-1.
跳转到程序
    case ESP_SPP_CLOSE_EVT:
        ESP_LOGI(SPP_TAG, "ESP_SPP_CLOSE_EVT,handle=%d",param->data_ind.handle);
		BTHandle=-1;
而接受发送程序也需要判断蓝牙是否连接成功
    if(BTHandle>=0)
    {
        esp_spp_write(BTHandle,len,(unsigned char *) buf);
    }
当变量BTHandle大于等于 0 时,将输出接收回发数据
write如何使用见下文 : 蓝牙接收回发数据
输出数据:即蓝牙在app上显示程序一设置好的字符串。
跳转到程序:
void app_main()
中的
while(1)
{
   DebugBT("Hello world!",12);
   vTaskDelay(1000 / portTICK_RATE_MS);
}
回发数据:即你将想发送的字符串在app上输入,蓝牙在app上回发你输入的字符串
跳转到程序
case ESP_SPP_DATA_IND_EVT://详情见下面接收回发数据
2.3 示例代码
/* Hello World Example

   This example code is in the Public Domain (or CC0 licensed, at your option.)

   Unless required by applicable law or agreed to in writing, this
   software is distributed on an "AS IS" BASIS, WITHOUT WARRANTIES OR
   CONDITIONS OF ANY KIND, either express or implied.
*/
/* GPIO Example

   This example code is in the Public Domain (or CC0 licensed, at your option.)

   Unless required by applicable law or agreed to in writing, this
   software is distributed on an "AS IS" BASIS, WITHOUT WARRANTIES OR
   CONDITIONS OF ANY KIND, either express or implied.
*/

#include <stdio.h>
#include <string.h>
#include <stdlib.h>
#include "freertos/FreeRTOS.h"
#include "freertos/task.h"
#include "freertos/queue.h"
#include "driver/gpio.h"

#include "lvgl_init.h"


#include "soc/rtc.h"
#include "driver/mcpwm.h"
#include "soc/mcpwm_periph.h"


#include "time.h"
#include "sys/time.h"
#include "sys/unistd.h"

#include "driver/adc.h"
#include "esp_adc_cal.h"

#include "esp_log.h"

#define _SUPPORT_BT_ 1


typedef unsigned char  u8;
typedef unsigned short u16;
typedef unsigned int   u32;

uint8_t DebugOn = 1;
#define DEBUG_CODE    if(DebugOn)

#define GPIO_OUTPUT_IO_BEEP         19


#define START_BEEP      {mcpwm_start(MCPWM_UNIT_0, MCPWM_TIMER_0);}
#define STOP_BEEP       {mcpwm_stop(MCPWM_UNIT_0, MCPWM_TIMER_0);}

// #define POWER_ON        {mcpwm_start(MCPWM_UNIT_0, MCPWM_TIMER_2);}
// #define POWER_OFF       {mcpwm_stop(MCPWM_UNIT_0, MCPWM_TIMER_2);}

#define SET_PWR(x)   {gpio_set_level(GPIO_OUTPUT_IO_PWR,   x);}

#define GPIO_OUTPUT_IO_LED2      15
#define GPIO_OUTPUT_IO_LED3      2
#define GPIO_OUTPUT_IO_LED4      4


#define GPIO_OUTPUT_PIN_SEL  ((1ULL<<GPIO_OUTPUT_IO_LED2) | (1ULL<<GPIO_OUTPUT_IO_LED3) | (1ULL<<GPIO_OUTPUT_IO_LED4))

#define SET_LED2(x)    {gpio_set_level(GPIO_OUTPUT_IO_LED2,   x);}
#define SET_LED3(x)  {gpio_set_level(GPIO_OUTPUT_IO_LED3, x);}
#define SET_LED4(x)   {gpio_set_level(GPIO_OUTPUT_IO_LED4,  x);}


#define GPIO_INPUT_IO_SW3     14
#define GPIO_INPUT_IO_SW4     12
#define GPIO_INPUT_IO_SW5     13

#define GPIO_INPUT_PIN_SEL  ( (1ULL<<GPIO_INPUT_IO_SW3)|(1ULL<<GPIO_INPUT_IO_SW4)|(1ULL<<GPIO_INPUT_IO_SW5))


#define GET_SW3 (gpio_get_level(GPIO_INPUT_IO_SW3))
#define GET_SW4 (gpio_get_level(GPIO_INPUT_IO_SW4))
#define GET_SW5 (gpio_get_level(GPIO_INPUT_IO_SW5))

void InitHardware()
{
    mcpwm_config_t pwm_config;
    pwm_config.frequency = 4000;    //frequency = 1000Hz
    pwm_config.cmpr_a = 80.0;       //duty cycle of PWMxA = 60.0%
    pwm_config.counter_mode = MCPWM_UP_COUNTER;
    pwm_config.duty_mode = MCPWM_DUTY_MODE_1;
    mcpwm_init(MCPWM_UNIT_0, MCPWM_TIMER_0, &pwm_config);   //Configure PWM0A & PWM0B with above settings
    mcpwm_stop(MCPWM_UNIT_0, MCPWM_TIMER_0);
    mcpwm_gpio_init(MCPWM_UNIT_0, MCPWM0A, GPIO_OUTPUT_IO_BEEP);

    gpio_config_t io_conf;
    //disable interrupt
    io_conf.intr_type = GPIO_PIN_INTR_DISABLE;
    //bit mask of the pins, use GPIO4/5 here
    io_conf.pin_bit_mask = GPIO_INPUT_PIN_SEL;
    //set as input mode
    io_conf.mode = GPIO_MODE_INPUT;
    //enable pull-up mode
    io_conf.pull_up_en = 1;
    io_conf.pull_down_en = 0;
    gpio_config(&io_conf);


    io_conf.intr_type = GPIO_PIN_INTR_DISABLE;
    //set as output mode
    io_conf.mode = GPIO_MODE_OUTPUT;
    //bit mask of the pins that you want to set,e.g.GPIO18/19
    io_conf.pin_bit_mask = GPIO_OUTPUT_PIN_SEL;
    //disable pull-down mode
    io_conf.pull_down_en = 1;
    //disable pull-up mode
    io_conf.pull_up_en = 0;
    //configure GPIO with the given settings
    gpio_config(&io_conf);
    SET_LED2(0);
    SET_LED3(0);
    SET_LED4(0);
}

long MainLoop=0;


//BT-SPP{{{{{

#define TAG "HW"


uint8_t derived_mac_addr[6] = {0};
int BTHandle=-1;
#include <stdint.h>
#include <string.h>
#include <stdbool.h>
#include <stdio.h>
#include "nvs.h"
#include "nvs_flash.h"
#include "freertos/FreeRTOS.h"
#include "freertos/task.h"
#include "esp_log.h"
#include "esp_bt.h"
#include "esp_bt_main.h"
#include "esp_gap_bt_api.h"
#include "esp_bt_device.h"
#include "esp_spp_api.h"

#include "time.h"
#include "sys/time.h"

#include "mbedtls/sha256.h"

#define SPP_TAG "BT"
#define SPP_SERVER_NAME "SPP_SERVER"
#define EXCAMPLE_DEVICE_NAME "JFBike"
#define SPP_SHOW_DATA 0
#define SPP_SHOW_SPEED 1
#define SPP_SHOW_MODE SPP_SHOW_SPEED    /*Choose show mode: show data or speed*/


#define SPP_DATA_LEN 20
static uint8_t spp_data[SPP_DATA_LEN];

#if _SUPPORT_BT_
static const esp_spp_mode_t esp_spp_mode = ESP_SPP_MODE_CB;
#endif

static const esp_spp_sec_t sec_mask = ESP_SPP_SEC_NONE;
static const esp_spp_role_t role_slave = ESP_SPP_ROLE_SLAVE;
void SaveShootCounter();
static void esp_spp_cb(esp_spp_cb_event_t event, esp_spp_cb_param_t *param)
{
    switch (event) {
    case ESP_SPP_INIT_EVT:
        ESP_LOGI(SPP_TAG, "ESP_SPP_INIT_EVT");
        esp_bt_dev_set_device_name(EXCAMPLE_DEVICE_NAME);
        // {//设置配对密码,不起作用
        //         esp_bt_pin_type_t pin_type = ESP_BT_PIN_TYPE_VARIABLE;
        //         esp_bt_pin_code_t pin_code={'1','2','3','4','5','6',};
        //         esp_bt_gap_set_pin(pin_type, 6, pin_code);
        // }
        //esp_bt_gap_set_scan_mode(ESP_BT_SCAN_MODE_CONNECTABLE_DISCOVERABLE);
		esp_bt_gap_set_scan_mode(ESP_BT_CONNECTABLE, ESP_BT_GENERAL_DISCOVERABLE);  //---支持IDF4.3,Windows编译——ymj
        esp_spp_start_srv(sec_mask,role_slave, 0, SPP_SERVER_NAME);
        break;
    case ESP_SPP_DISCOVERY_COMP_EVT:
        ESP_LOGI(SPP_TAG, "ESP_SPP_DISCOVERY_COMP_EVT");
        break;
    case ESP_SPP_OPEN_EVT:
        ESP_LOGI(SPP_TAG, "ESP_SPP_OPEN_EVT");
        break;
    case ESP_SPP_CLOSE_EVT:
        ESP_LOGI(SPP_TAG, "ESP_SPP_CLOSE_EVT,handle=%d",param->data_ind.handle);
		BTHandle=-1;
        break;
    case ESP_SPP_START_EVT:
        ESP_LOGI(SPP_TAG, "ESP_SPP_START_EVT");
        break;
    case ESP_SPP_CL_INIT_EVT:
        ESP_LOGI(SPP_TAG, "ESP_SPP_CL_INIT_EVT");
        break;
    case ESP_SPP_DATA_IND_EVT:
		BTHandle=param->data_ind.handle;
        ESP_LOGI(SPP_TAG, "ESP_SPP_DATA_IND_EVT len=%d handle=%d",
                param->data_ind.len, param->data_ind.handle);
        esp_log_buffer_hex("aaaaaaa",param->data_ind.data,param->data_ind.len);
        esp_log_buffer_hex("",param->data_ind.data,param->data_ind.len);
         esp_spp_write(BTHandle,param->data_ind.len,param->data_ind.data);
        break;
    case ESP_SPP_CONG_EVT:
        ESP_LOGI(SPP_TAG, "ESP_SPP_CONG_EVT");
        break;
    case ESP_SPP_WRITE_EVT:
        ESP_LOGI(SPP_TAG, "ESP_SPP_WRITE_EVT");
        break;
    case ESP_SPP_SRV_OPEN_EVT:
        ESP_LOGI(SPP_TAG, "ESP_SPP_SRV_OPEN_EVT,handle=%d",param->data_ind.handle);
		BTHandle=param->data_ind.handle;
        break;
    default:
        break;
    }
}

void DebugBT(char *buf, int len)
{
    if(BTHandle>=0)
    {
        esp_spp_write(BTHandle,len,(unsigned char *) buf);
    }
}
//}}}}}BT-SPP

void app_main()
{

    InitHardware();

    esp_err_t ret = nvs_flash_init();
    if (ret == ESP_ERR_NVS_NO_FREE_PAGES) {
        ESP_ERROR_CHECK(nvs_flash_erase());
        ret = nvs_flash_init();
    }
    ESP_ERROR_CHECK( ret );


/
//BT-SPP{{{{{


	esp_read_mac(derived_mac_addr, ESP_MAC_BT);

	for (int i = 0; i < SPP_DATA_LEN; ++i) {
        spp_data[i] = 0x30+i;
    }
    esp_bt_controller_config_t bt_cfg = BT_CONTROLLER_INIT_CONFIG_DEFAULT();
    if ((ret = esp_bt_controller_init(&bt_cfg)) != ESP_OK) {
        ESP_LOGE(SPP_TAG, "%s initialize controller failed: %s\n", __func__, esp_err_to_name(ret));
        return;
    }else
    {
        ESP_LOGI(SPP_TAG, "esp_bt_controller_init() ok");
    }
    if ((ret = esp_bt_controller_enable(ESP_BT_MODE_CLASSIC_BT)) != ESP_OK) {
        ESP_LOGE(SPP_TAG, "%s enable controller failed: %s\n", __func__, esp_err_to_name(ret));
        return;
    }else
    {
        ESP_LOGI(SPP_TAG, "esp_bt_controller_enable() ok");
    }

    if ((ret = esp_bluedroid_init()) != ESP_OK) {
        ESP_LOGE(SPP_TAG, "%s initialize bluedroid failed: %s\n", __func__, esp_err_to_name(ret));
        return;
    }else
    {
        ESP_LOGI(SPP_TAG, "esp_bluedroid_init() ok");
    }

    if ((ret = esp_bluedroid_enable()) != ESP_OK) {
        ESP_LOGE(SPP_TAG, "%s enable bluedroid failed: %s\n", __func__, esp_err_to_name(ret));
        return;
    }else
    {
        ESP_LOGI(SPP_TAG, "esp_bluedroid_enable() ok");
    }

    if ((ret = esp_spp_register_callback(esp_spp_cb)) != ESP_OK) {
        ESP_LOGE(SPP_TAG, "%s spp register failed: %s\n", __func__, esp_err_to_name(ret));
        return;
    }else
    {
        ESP_LOGI(SPP_TAG, "esp_spp_register_callback() ok");
    }

    // esp_power_level_t min,max;
    // esp_bredr_tx_power_get(&min,&max);
    // ESP_LOGI(TAG, "BT Power(init): %d/%d",min,max);
    // min=ESP_PWR_LVL_N12;
    // max=ESP_PWR_LVL_N9;
    // esp_bredr_tx_power_set(min,max);
    // esp_bredr_tx_power_get(&min,&max);
    // ESP_LOGI(TAG, "BT Power(new): %d/%d",min,max);


    if ((ret = esp_spp_init(esp_spp_mode)) != ESP_OK) {
        ESP_LOGE(SPP_TAG, "%s spp init failed: %s\n", __func__, esp_err_to_name(ret));
        return;
    }else
    {
        ESP_LOGI(SPP_TAG, "esp_spp_init() ok");
    }

	ESP_LOGI(TAG, "BT Started.");
	//xTaskCreate(SPPC_Send_task, "SPPC_Send_task", 10000, NULL, 5, NULL);
	//ESP_LOGI(TAG, "xTaskCreate(SPPC_Send_task)");

//}}}}}BT-SPP
/


 printf("System Started\n");

while(1)
{
   DebugBT("Hello world!",12);
   vTaskDelay(1000 / portTICK_RATE_MS);
}

}
2.4 蓝牙基础初始化及其他
函数:
void InitHardware()
为初始化。
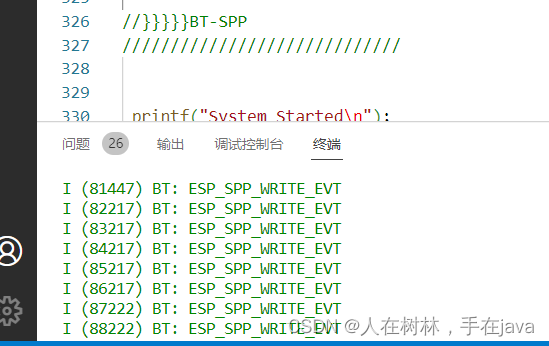
下面代码为显示日志,即在VC code终端上显示,不为蓝牙所需主体。
esp_read_mac(derived_mac_addr, ESP_MAC_BT);

	for (int i = 0; i < SPP_DATA_LEN; ++i) {
        spp_data[i] = 0x30+i;
    }
    esp_bt_controller_config_t bt_cfg = BT_CONTROLLER_INIT_CONFIG_DEFAULT();
    if ((ret = esp_bt_controller_init(&bt_cfg)) != ESP_OK) {
        ESP_LOGE(SPP_TAG, "%s initialize controller failed: %s\n", __func__, esp_err_to_name(ret));
        return;
    }else
    {
        ESP_LOGI(SPP_TAG, "esp_bt_controller_init() ok");
    }
    if ((ret = esp_bt_controller_enable(ESP_BT_MODE_CLASSIC_BT)) != ESP_OK) {
        ESP_LOGE(SPP_TAG, "%s enable controller failed: %s\n", __func__, esp_err_to_name(ret));
        return;
    }else
    {
        ESP_LOGI(SPP_TAG, "esp_bt_controller_enable() ok");
    }

    if ((ret = esp_bluedroid_init()) != ESP_OK) {
        ESP_LOGE(SPP_TAG, "%s initialize bluedroid failed: %s\n", __func__, esp_err_to_name(ret));
        return;
    }else
    {
        ESP_LOGI(SPP_TAG, "esp_bluedroid_init() ok");
    }

    if ((ret = esp_bluedroid_enable()) != ESP_OK) {
        ESP_LOGE(SPP_TAG, "%s enable bluedroid failed: %s\n", __func__, esp_err_to_name(ret));
        return;
    }else
    {
        ESP_LOGI(SPP_TAG, "esp_bluedroid_enable() ok");
    }

    if ((ret = esp_spp_register_callback(esp_spp_cb)) != ESP_OK) {
        ESP_LOGE(SPP_TAG, "%s spp register failed: %s\n", __func__, esp_err_to_name(ret));
        return;
    }else
    {
        ESP_LOGI(SPP_TAG, "esp_spp_register_callback() ok");
    }

    // esp_power_level_t min,max;
    // esp_bredr_tx_power_get(&min,&max);
    // ESP_LOGI(TAG, "BT Power(init): %d/%d",min,max);
    // min=ESP_PWR_LVL_N12;
    // max=ESP_PWR_LVL_N9;
    // esp_bredr_tx_power_set(min,max);
    // esp_bredr_tx_power_get(&min,&max);
    // ESP_LOGI(TAG, "BT Power(new): %d/%d",min,max);


    if ((ret = esp_spp_init(esp_spp_mode)) != ESP_OK) {
        ESP_LOGE(SPP_TAG, "%s spp init failed: %s\n", __func__, esp_err_to_name(ret));
        return;
    }else
    {
        ESP_LOGI(SPP_TAG, "esp_spp_init() ok");
    }

	ESP_LOGI(TAG, "BT Started.");
其他关于蓝牙的程序
case ESP_SPP_DATA_IND_EVT:  收到数据
case ESP_SPP_SRV_OPEN_EVT:手机连接
case ESP_SPP_CLOSE_EVT:手机断开
2.5 蓝牙在串口APP上显示数据
我们可以创建一个函数DebugBT
void DebugBT(char *buf, int len)
{
    if(BTHandle>=0)
    {
        esp_spp_write(BTHandle,len,(unsigned char *) buf);
    }
}
其中write为显示函数,BTHandle会因为操作发生值的变化
int BTHandle=-1;
esp_spp_write(BTHandle,param->data_ind.len,param->data_ind.data);
直接调用函数DebugBT( DebugBT(“写你想显示的字符串”,字符串的长度) ),就可以在SPP蓝牙串口上显示出字符串。
2.6 蓝牙接收回发数据
蓝牙主要处理在static void esp_spp_cb(esp_spp_cb_event_t event, esp_spp_cb_param_t -param )函数中。
函数case ESP_SPP_DATA_IND_EVT:包含了蓝牙回写程序
    case ESP_SPP_DATA_IND_EVT:
		BTHandle=param->data_ind.handle;
        ESP_LOGI(SPP_TAG, "ESP_SPP_DATA_IND_EVT len=%d handle=%d",
                param->data_ind.len, param->data_ind.handle);
        esp_log_buffer_hex("",param->data_ind.data,param->data_ind.len);
         esp_spp_write(BTHandle,param->data_ind.len,param->data_ind.data);
        break;
我们可以更改其中程序看看与之前程序有什么不同,我们会发现ESP_LOGI和esp_log_buffer_hex这个程序段只是增加或减少了VS code终端上的程序
并未对SPP串口app上显示的数据做出改变,而当我们在APP上输入所需显示的字符串时,程序就会进行
**case ESP_SPP_DATA_IND_EVT:**程序 esp_spp_write就会将你输入的字符串在app上显示出来,完成程序的回发。
结束
完成以上操作就基本完成了蓝牙最简单的一点功能了。


 1036
1036

 被折叠的 条评论
为什么被折叠?
被折叠的 条评论
为什么被折叠?
 到【灌水乐园】发言


