


★★★ 本文源自AI Studio社区精品项目,【点击此处】查看更多精品内容 >>>
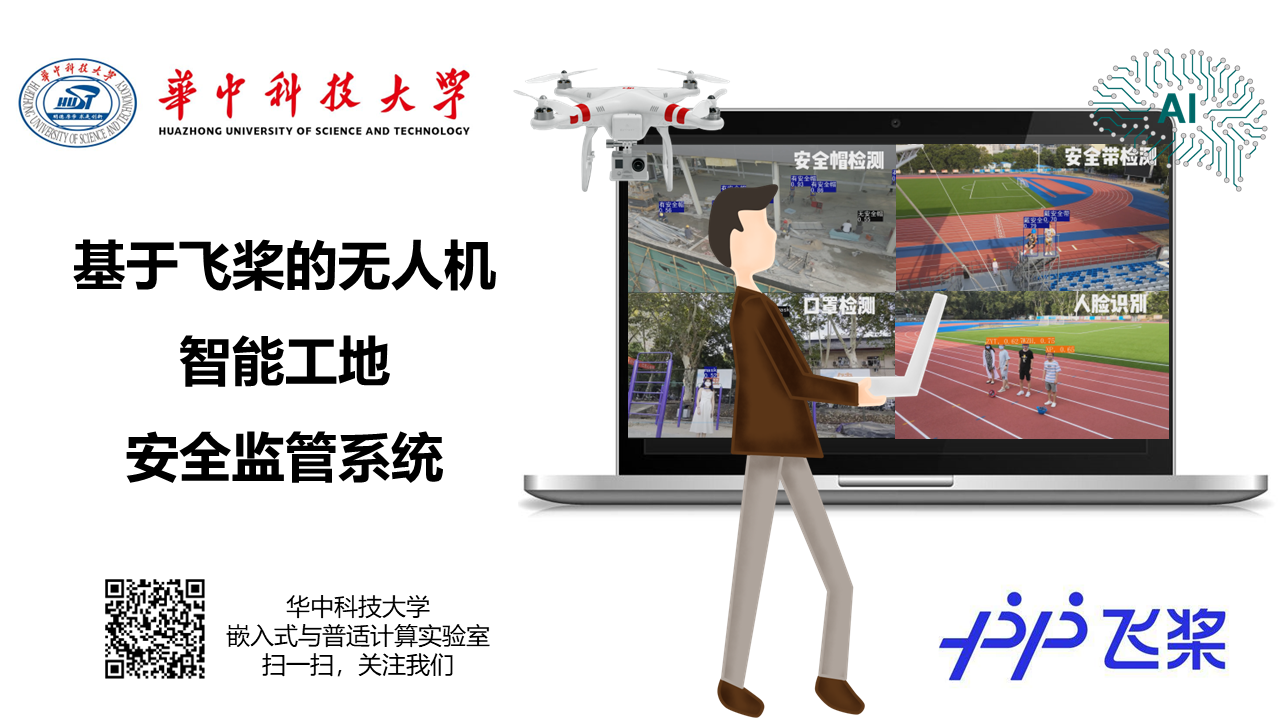
基于飞桨的无人机智能工地安全监管系统
项目展示
项目背景
近年来,我国建筑工地数量和规模虽然保持高速增长,但是工地安全事故频发、建筑质量问题频出,安全生产的需求日益凸显。然而,考虑到工地劳动人员多样、流动频繁、安全意识薄弱,单纯依靠人工进行巡检和监管难度大、成本高。

2017-2020年我国智慧工地市场规模走势(数据来源:中研普华产业研究院)
随着加强“两新一重”建设,《建筑业发展“十二五”规划》提出全面提高行业信息化水平。在政策和技术的驱动下,智慧工地市场规模持续增加。2017-2018年,智慧工地市场规模保持20%以上增速,2019年市场规模达120.9亿元,2020年底行业市场规模达138.6亿元,同比上年增长14.6%。
市场现状
目前,市场上较为成熟的智慧工地解决方案是在地面架设的监控摄像头平台上构建AI智能视频监控系统。利用工地上现有的或专门安装的监控摄像头获取视频流数据,通过部署在智能计算主机或云服务器上的各种AI视觉识别算法进行监测。然而,在这种解决方案中,地面安装的监控摄像头视角固定、密度有限、安装位置受工地环境限制,并且必须使用有线供电和数据传输。
智慧工地的另一类解决方案是借助无人机系统的灵活性,在工地上空快速高效地飞行安全巡检。得益于近年来无人机技术的快速发展,一批科技公司能够提供无人机的自动化巡检服务,该项服务包括无人机的自动起降、充电、飞行航线规划等。但无人机机载的嵌入式设备算力低下,市面上大多数智慧工地无人机自动巡检产品只能实现视频流的回传,视频内容分析和安全问题检测需要安全员在地面端监控系统中手动完成。
项目目的
本项目着眼于工地安全作业的切实需求,着力于解决工地安全监管的现实痛点,旨在打破地面AI监控系统视角受限、摄像头安装成本高的局限性,提高现有无人机巡检系统的智能化程度。本项目将强大的AI视觉识别算法和灵活的无人机飞行平台有机结合,创新性地提出了基于无人机与人工智能技术的一体化智慧工地安全生产监管解决方案。
项目创新点
在需求分析和系统设计层面,本项目开创性地将AI视觉算法搭载在开源的无人机飞行平台上。通过将AI算法高度融合于无人机巡检系统,在保持无人机巡检系统机动灵活、部署便捷、不干涉工地设施等优势的同时,大大提升了系统的智能化、自动化程度。而相比于地面AI监控系统,本项目将人工智能的视野从地面扩展到天空,进一步解放了视觉识别算法的强大功能,更好地服务于工地安全监管需求。本项目无人机飞行平台的实现、AI算法的研发以及二者的有机结合体现了设计理念和技术上的创新性。
在功能实现层面,本项目创新性地采用边缘卸载技术实现系统功能。针对边缘端测设备算力低的问题,本项目将面向端侧的视觉识别算法部署在无人机的机载计算机上,避免视频流往返传输造成的延迟,更快识别违规行为,带来高实时、高稳定性的优势。语音警告语音库也被置入无人机机载计算机,针对检测到的违规行为无人机可以直接喊话警告。将这些计算任务卸载到边缘设备后,对违规行为进行监测和警告的实时性得到了提高。
项目功能
本项目主要提供基于飞桨平台的AI算法和无人机飞行平台的工地安全监管服务,系统提供以下功能:
- 拥有可视化管理网页,便于工地安全管理人员获取工地信息和无人机状态,并下达飞行任务。
- 支持检测安全帽和口罩的佩戴情况。
- 支持针对高空作业人员,判断是否佩戴高空作业安全带。
- 支持通过人脸识别算法获取违规人员信息。该算法即便在戴有口罩和安全帽情况下也支持识别。
- 支持通过机载扩音器,喊话警告违规人员。
- 支持对历史视频、检测输出结果、安全巡检日志数据持久化保存。
项目架构
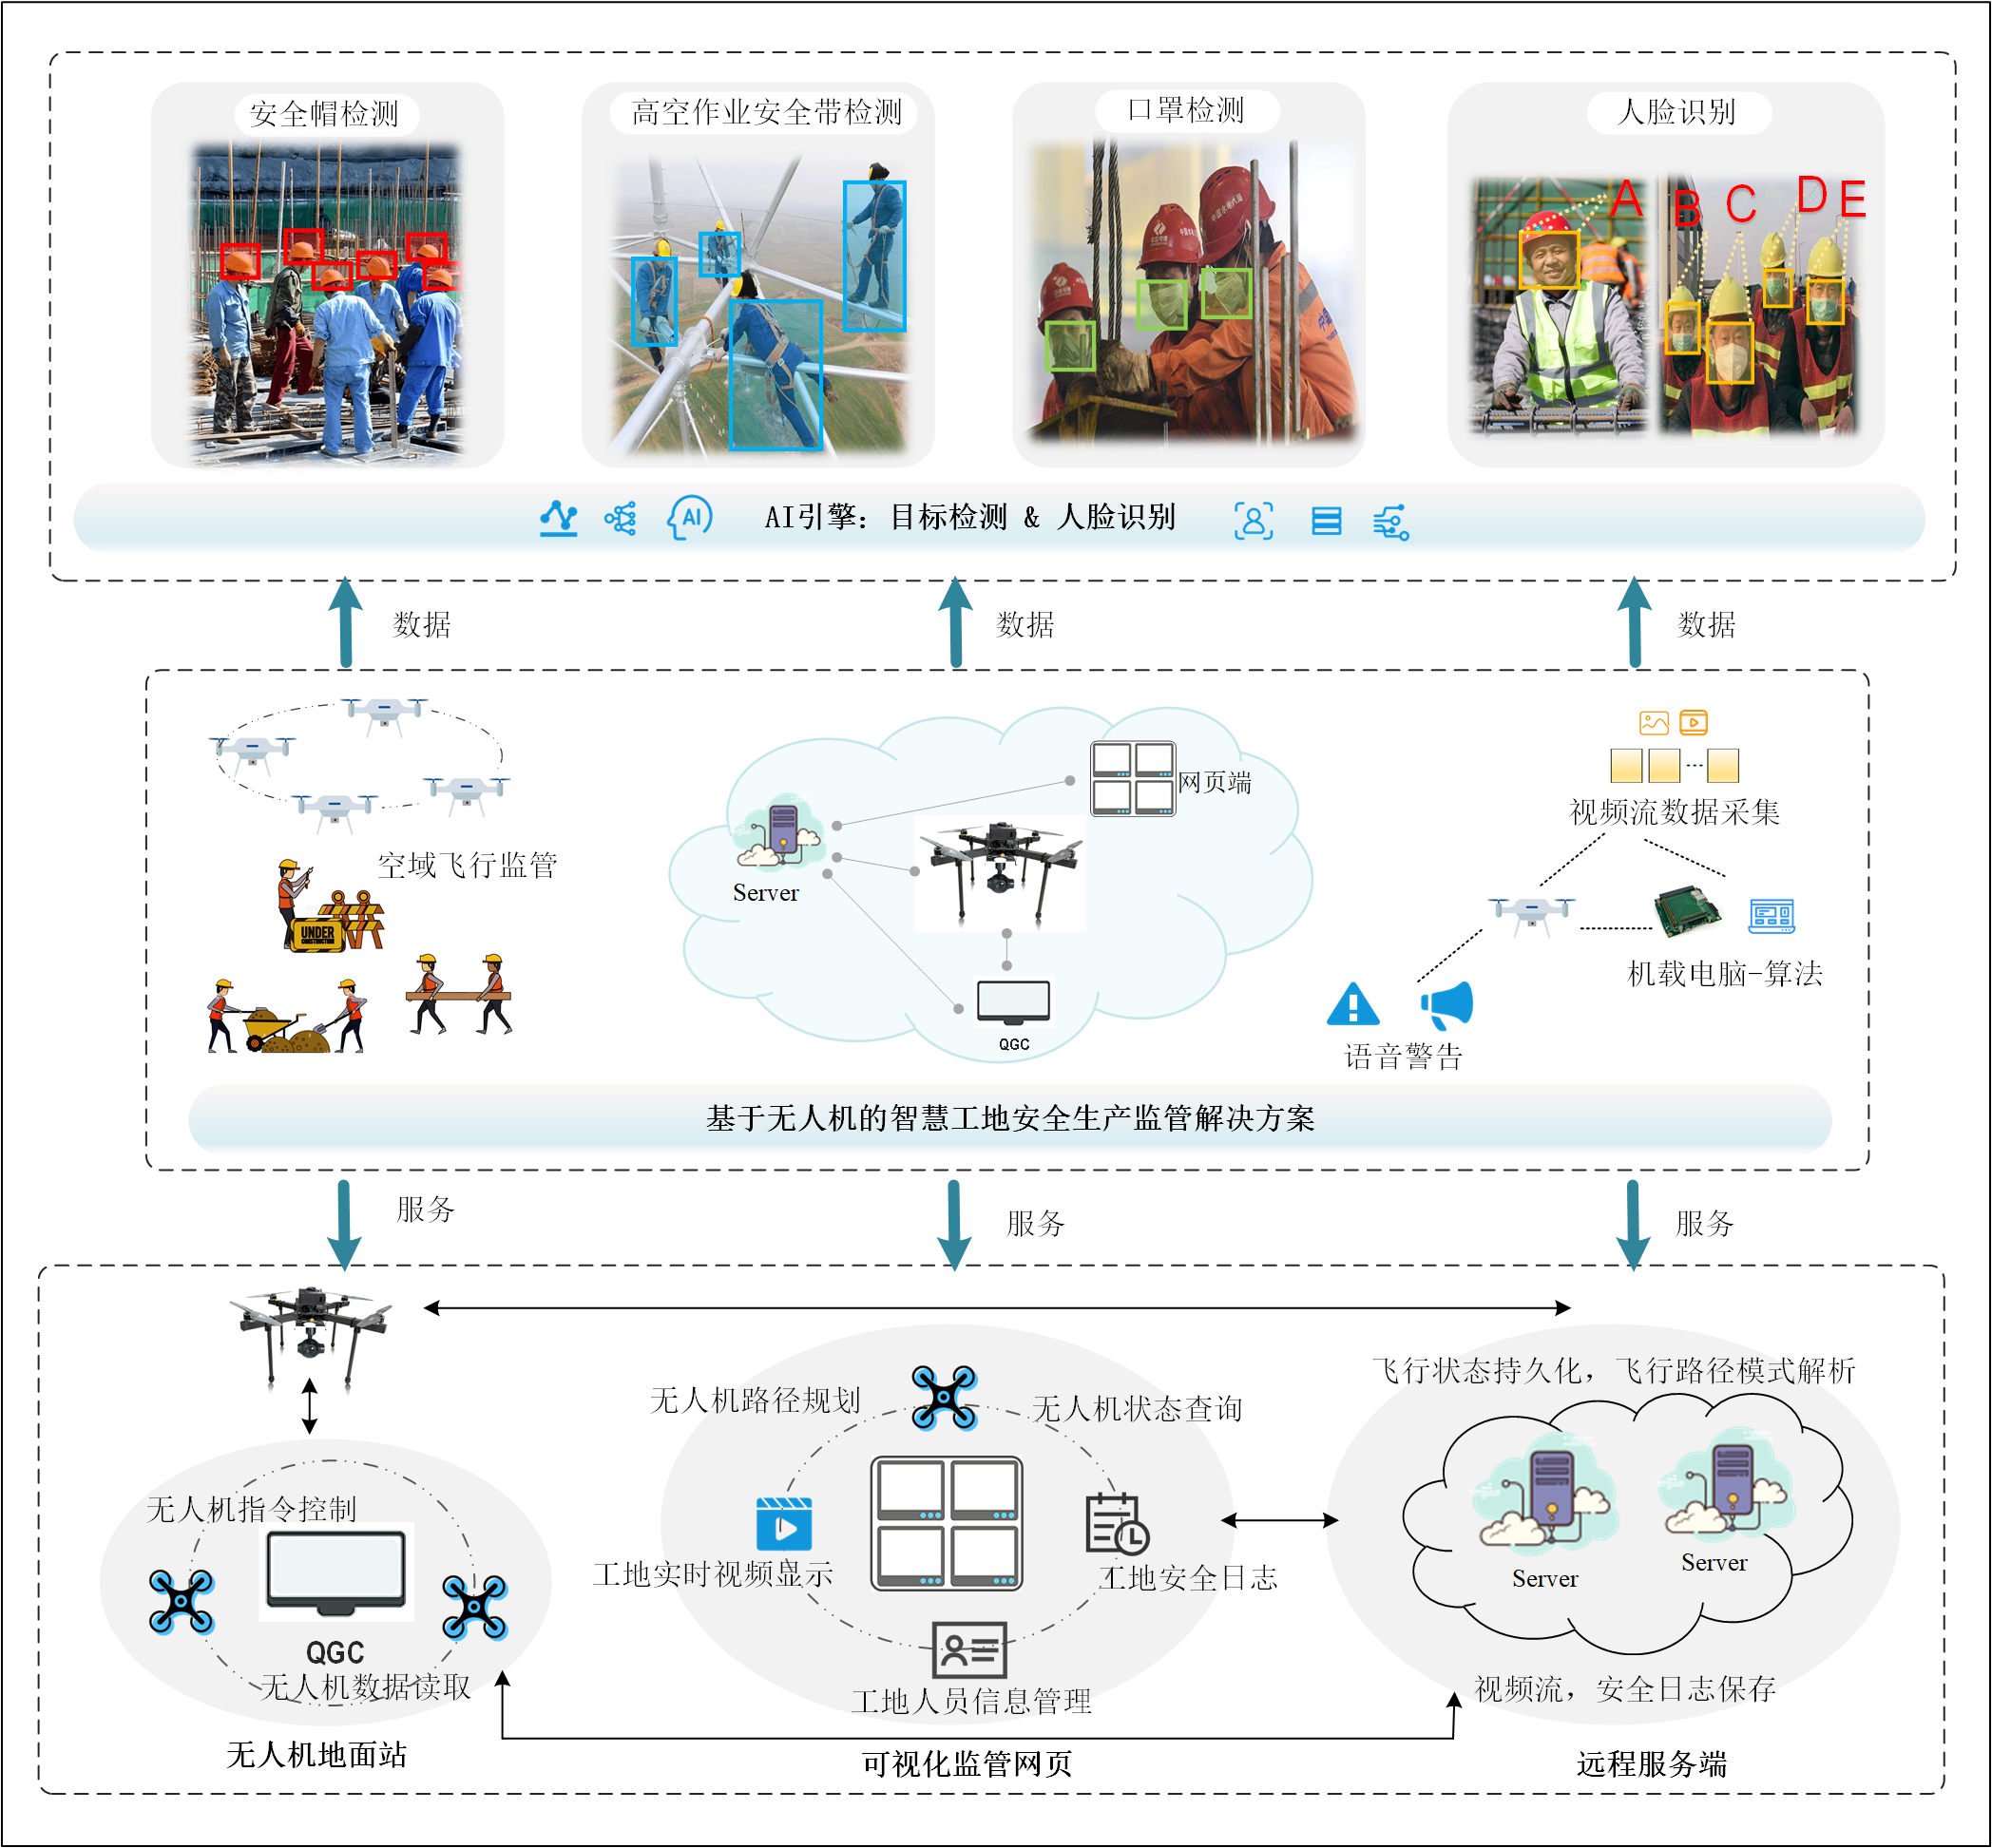
系统总体框架与功能模块
系统的整体架构由可视化监管网页、远程服务器、无人机地面站和无人机飞行平台四个部分组成,并按照以上顺序依次连接,各组件作用如下:
- 无人机负责飞行巡检、视频流实时采集、现场语音提醒;
- 无人机地面站负责飞控指令解析下达、无人机状态信息读取上传;
- 远程服务端作为枢纽连通地面站和可视化监管网页,负责飞行状态持久化、飞行路径模式解析以及视频流和安全日志的保存;
- 可视化监管网页作为和安全管理员的直接交互界面,为用户提供无人机路径规划、无人机状态查询、工地实施视频显示、工地安全日志查询和工地人员信息管理等服务。
项目开发设计
地面站二次开发架构

QGC二次开发架构
QGC二次开发架构如上图所示,使用QtWebsocket与前端通信,接收对无人机下达的指令,同时返回无人机的各项状态信息与指令下达结果。通过指令下达线程和状态读取线程,发送MavLink消息与无人机通信,下达指令,并读取无人机信息。
视频流服务架构

视频流服务节点分布
本项目web端通过webserver实现视频拉取与吊舱控制,节点分布设计如图上所示。Rosbridge通过订阅来自摄像头发布的图像节点,获取图像信息,并通过/connected_clients将图像信息传输到web端。Rosbridge发布节点话题/cloud_platform_ctrl,无人机中的节点/moni则订阅该节点消息,并转发到话题/write中最终由/serial_node节点进行统一各方控制信息,并执行控制指令。
无人机网络连接设计
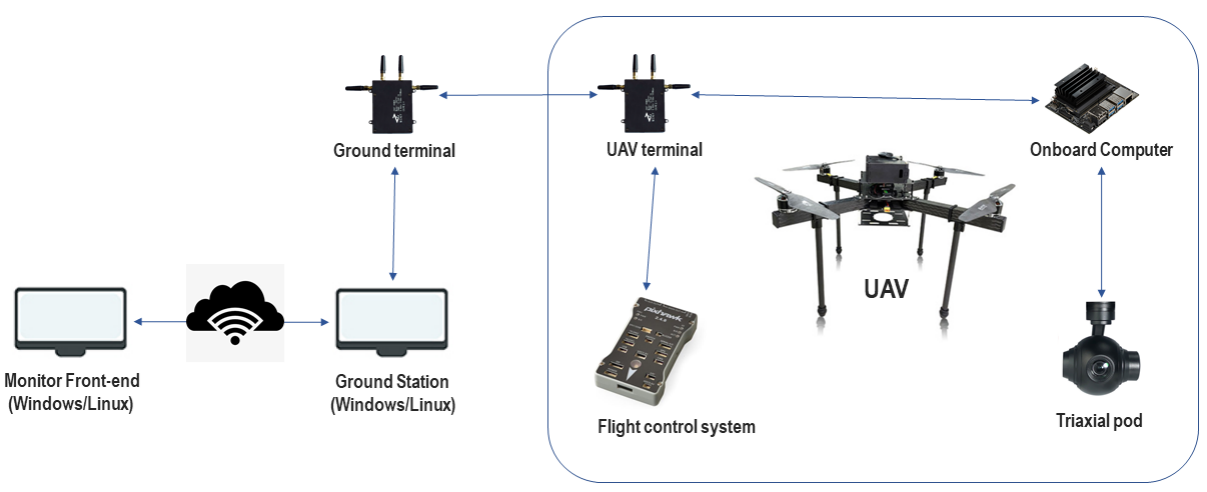
无人机系统网络连接无人机系统网络连接
无人机内部各设备组成一个局域网,如上所示,以天空端为对外通信接口,飞行控制系统与天空端连接,接收控制信号并反馈飞行状态,机载电脑连接天空端及摄像头吊舱,负责视频流的获取和回传。天空端和地面端配对,通过无线网络通信。地面端连接在地面站通用计算机上,收发无人机需要的一切控制信号、状态信息。
算法实现
下面详细介绍算法模型训练及推理。
目标检测
由于当前工业界和学术界还没有一个公开的目标检测数据集包含本项目所需的所有目标对象,因此我们利用多个数据集分别训练对应的目标检测网络模型。具体地,我们基于飞桨 (PaddlePaddle)深度学习平台,研发了面向本项目的目标检测和人脸识别AI技术。其中,我们先利用多个检测模型获取图像中人体、安全帽、高空作业安全带、口罩等元素候选区域;然后以检测到的个体区域为范围,搜寻安全要素(安全帽、口罩等);接着对缺少安全要素的个体判定为安全装备佩戴不合规对象;最后结合人脸识别算法获取到的目标个体ID信息。
数据集准备
安全帽数据集
数据集下载
这是数据集地址,从百度网盘或谷歌网盘下载。
解压
加载数据集到本项目后
cd /home/aistudio/work/C4AI/detect/C4AI_data
unzip /home/aistudio/data/data166806/SHDD.zip -d ./
mv VOC2028/ SH
数据处理
生成该数据集对应VOC格式的的划分文件
# 生成valid.txt
orign_file = '/home/aistudio/work/C4AI/detect/C4AI_data/SH/ImageSets/Main/val.txt'
target_file = '/home/aistudio/work/C4AI/detect/C4AI_data/SH/new_valid.txt'

orign_f = open(orign_file, "r")
# 新建label文件
target_f = open(target_file, "a+")

for line in orign_f.readlines():
    line = line.strip('\n')  #去掉列表中每一个元素的换行符

    name_1 = './JPEGImages/'
    name_2 = './Annotations/'
    # 生成一条对应Label
    str_co = name_1+line+".jpg "+name_2+line+".xml\n"
    target_f.write(str_co)

orign_f.close()
target_f.close()

# 生成train.txt
orign_file = '/home/aistudio/work/C4AI/detect/C4AI_data/SH/ImageSets/Main/train.txt'
target_file = '/home/aistudio/work/C4AI/detect/C4AI_data/SH/new_train.txt'

orign_f = open(orign_file, "r")

# 新建label文件
target_f = open(target_file, "a+")

for line in orign_f.readlines():
    line = line.strip('\n')  #去掉列表中每一个元素的换行符

    name_1 = './JPEGImages/'
    name_2 = './Annotations/'
    # 生成一条对应Label
    str_co = name_1+line+".jpg "+name_2+line+".xml\n"
    target_f.write(str_co)

orign_f.close()
target_f.close()
高空作业安全带数据集
数据集下载
数据集使用广东电网智慧现场作业挑战赛赛道三中高空作业及高空作业安全带佩戴数据集。
加载数据集到本项目
cd  /home/aistudio/work/C4AI/detect/C4AI_data
mkdir SB
cd SB
tar -xzvf /home/aistudio/data/data93034/3_test_imagesa.tar.gz
tar -xzvf /home/aistudio/data/data93034/3_images.tar.gz
cp /home/aistudio/data/data93034/3train_rname.csv ./
cp /home/aistudio/data/data93034/3_testa_user.csv ./
数据处理
将该数据集转为coco格式,参考
cd /home/aistudio/work/C4AI/detect/data_process
python SB_preprocess_data.py
pyhton SB_2_coco.py
口罩数据集
数据集下载
这是数据集地址
加载数据集到本项目后
cd /home/aistudio/work/C4AI/detect/C4AI_data
unzip  /home/aistudio/data/data166805/maskdataset.zip  -d ./Mask
cd Mask
rm -rf __MACOSX/
mv label/ Annotations
mv data/  JPEGImages
数据集处理
划分voc格式的数据集,生成 ImageSets 文件夹下面的xml文件
# 划分voc 格式的数据集,生成 ImageSets 文件夹下面的文件
import os
import  numpy as np

anno_dir ='/home/aistudio/work/C4AI/detect/C4AI_data/Mask/Annotations'
sets_dir ='/home/aistudio/work/C4AI/detect/C4AI_data/Mask/ImageSets'

def creat_sets(set_list, sets_name, sets_dir=sets_dir):
    if not os.path.exists(sets_dir):
        os.makedirs(sets_dir)
        print("creat sets_dir")

    target_file = sets_dir+"/"+sets_name+".txt"
    target_f = open(target_file, "a+")

    for file in set_list:
        file_name = file.split('.')[0]
        # 拼接label条目
        target_str = "JPEGImages/"+file_name+".jpg"+" "+"Annotations/"+file_name+".xml\n"
        target_f.write(target_str)

    target_f.close()


train_ratio = 0.7
val_rato = 0.2
test_ratio = 0.1

# 获取文件List
for root, dirs, anno_list in os.walk(anno_dir):
    anno_list= np.array(anno_list)
    break
dataset_size = len(anno_list)

np.random.shuffle(anno_list)

# 划分数据集
train_data_list = anno_list[0:int(dataset_size*train_ratio)]
val_data_list = anno_list[int(dataset_size*train_ratio) : int(dataset_size*(1-test_ratio))]
test_data_list = anno_list[int(dataset_size*(1-test_ratio)):]

creat_sets(train_data_list, 'train')
creat_sets(val_data_list, 'val')
creat_sets(test_data_list, 'test')
creat sets_dir
网络模型选择
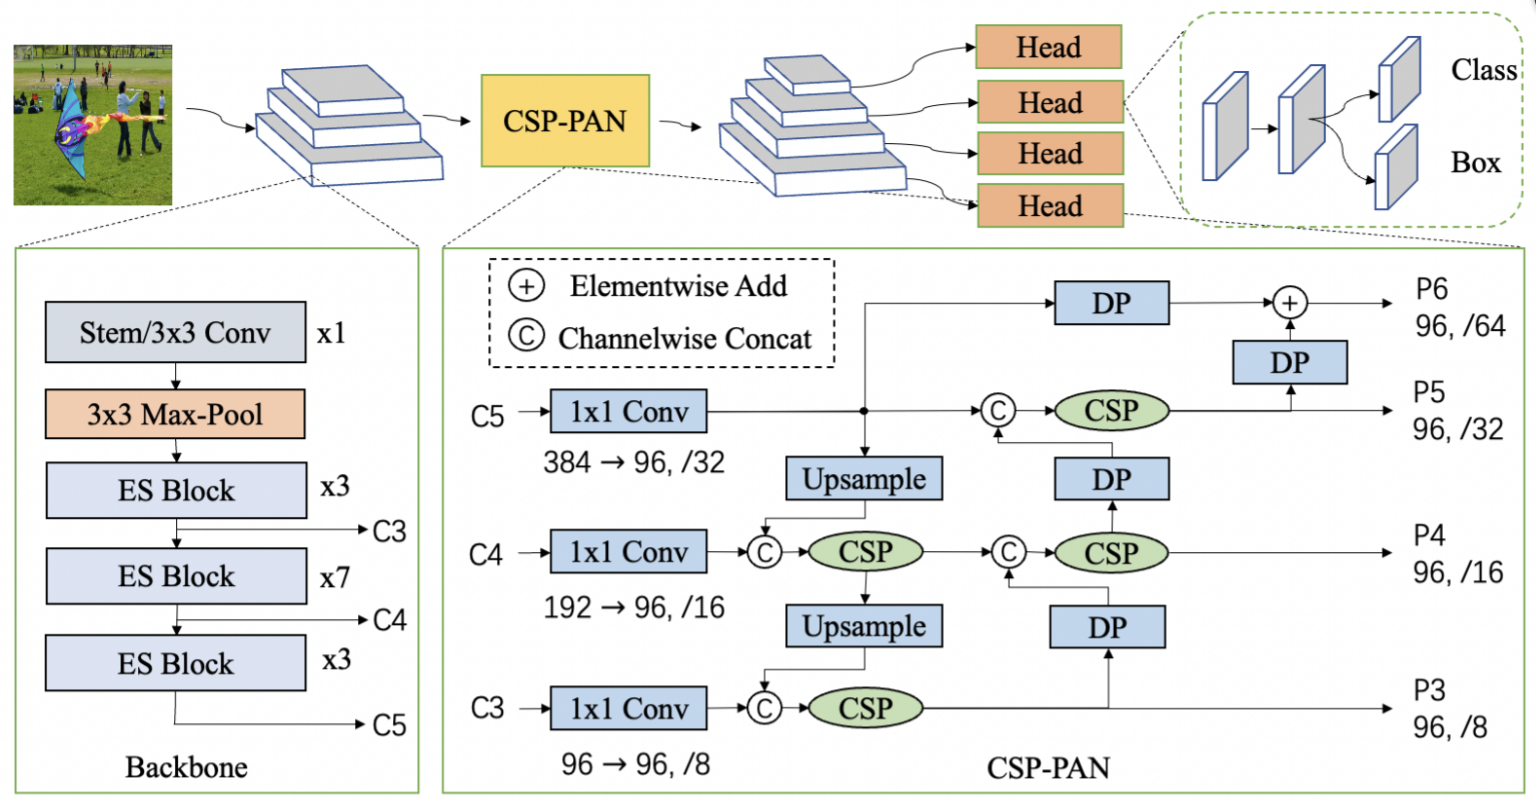
PP-PicoDet结构 [PP-PicoDet: A Better Real-Time Object Detector on Mobile Devices]
在本项目中,我们以无人机为边缘监管平台,充分利用无人机的移动性和便捷性优势。考虑到无人机机载计算机的性能较低和能耗限制,我们选取PaddleDetection 2.4中的PP-PicoDet作为本项目的目标检测网络模型。PP-PicoDet是边缘端和CPU端超轻量SOTA目标检测模型,具备更快的预测速度,PP-PicoDet架构如上图所示。同时,PaddlePaddle提供了从模型训练到边缘设备端部署的完整流程套件,极大地方便了本项目的研发和部署。
下载PaddleDetection及依赖
cd /home/aistudio/work/C4AI/detect
git clone https://github.com/PaddlePaddle/PaddleDetection.git
mv C4AI_data/ ./PaddleDetection/
配置参数
配置数据集设置
cd /home/aistudio/work/C4AI/detect/PaddleDetection/configs/datasets
vim C4AI_mask_data.yml
配置如下
metric: VOC
map_type: integral
num_classes: 2

TrainDataset:
  !VOCDataSet
    dataset_dir: C4AI_data/Mask
    anno_path: ImageSets/train.txt
    label_list: label_list.txt
    data_fields: ['image', 'gt_bbox', 'gt_class', 'difficult']

EvalDataset:
  !VOCDataSet
    dataset_dir: C4AI_data/Mask
    anno_path: ImageSets/val.txt
    label_list: label_list.txt
    data_fields: ['image', 'gt_bbox', 'gt_class', 'difficult']

TestDataset:
  !ImageFolder
    anno_path: C4AI_data/Mask/label_list.txt
vim C4AI_SB_data.yml
配置如下
metric: COCO
num_classes: 4

TrainDataset:
  !COCODataSet
    image_dir: train
    anno_path: annotations/instances_train.json
    dataset_dir: C4AI_data/SB/coco
    data_fields: ['image', 'gt_bbox', 'gt_class', 'is_crowd']

EvalDataset:
  !COCODataSet
    image_dir: val
    anno_path: annotations/instances_val.json
    dataset_dir: C4AI_data/SB/coco

TestDataset:
  !ImageFolder
    anno_path: annotations/instances_val.json
    dataset_dir: C4AI_data/SB/coco
vim C4AI_SH_data.yml
配置如下
metric: VOC
map_type: integral
num_classes: 2

TrainDataset:
  !VOCDataSet
    dataset_dir: C4AI_data/SH/VOC2028
    anno_path: new_train.txt
    label_list: label_list.txt
    data_fields: ['image', 'gt_bbox', 'gt_class', 'difficult']

EvalDataset:
  !VOCDataSet
    dataset_dir: C4AI_data/SH/VOC2028
    anno_path: new_valid.txt
    label_list: label_list.txt
    data_fields: ['image', 'gt_bbox', 'gt_class', 'difficult']

TestDataset:
  !ImageFolder
    anno_path: C4AI_data/SH/VOC2028/label_list.txt
配置模型运行设置
cd /home/aistudio/work/C4AI/detect/PaddleDetection/configs/picodet
vim picodet_SB.yml
修改配置为如下
_BASE_: [
  '../datasets/C4AI_SB_data.yml',
  '../runtime.yml',
  '_base_/picodet_v2.yml',
  '_base_/optimizer_300e.yml',
  '_base_/picodet_640_reader.yml',
]

pretrain_weights: https://paddle-imagenet-models-name.bj.bcebos.com/dygraph/legendary_models/PPLCNet_x2_0_pretrained.pdparams
weights: output/picodet_l_320_coco/best_model
find_unused_parameters: True
use_ema: true
epoch: 300
snapshot_epoch: 10

LCNet:
  scale: 2.0
  feature_maps: [3, 4, 5]

LCPAN:
  out_channels: 160

PicoHeadV2:
  conv_feat:
    name: PicoFeat
    feat_in: 160
    feat_out: 160
    num_convs: 4
    num_fpn_stride: 4
    norm_type: bn
    share_cls_reg: True
    use_se: True
  feat_in_chan: 160

LearningRate:
  base_lr: 0.024
  schedulers:
  - !CosineDecay
    max_epochs: 300
  - !LinearWarmup
    start_factor: 0.1
    steps: 300

TrainReader:
  batch_size: 12
vim picodet_SH.yml
配置如下
_BASE_: [
  '../datasets/C4AI_SH_data.yml',
  '../runtime.yml',
  '_base_/picodet_v2.yml',
  '_base_/optimizer_300e.yml',
  '_base_/picodet_416_reader.yml',
]

weights: output/picodet_m_416_coco/best_model
find_unused_parameters: True
use_ema: true
epoch: 250
snapshot_epoch: 10

TrainReader:
  batch_size: 48

LearningRate:
  base_lr: 0.06
  schedulers:
  - !CosineDecay
    max_epochs: 300
  - !LinearWarmup
    start_factor: 0.1
    steps: 300
vim picodet_Mask.yml
配置如下
_BASE_: [
  '../datasets/C4AI_mask_data.yml',
  '../runtime.yml',
  '_base_/picodet_v2.yml',
  '_base_/optimizer_300e.yml',
  '_base_/picodet_640_reader.yml',
]

pretrain_weights: https://paddle-imagenet-models-name.bj.bcebos.com/dygraph/legendary_models/PPLCNet_x2_0_pretrained.pdparams
weights: output/picodet_l_320_coco/best_model
find_unused_parameters: True
use_ema: true
epoch: 300
snapshot_epoch: 10

LCNet:
  scale: 2.0
  feature_maps: [3, 4, 5]

LCPAN:
  out_channels: 160

PicoHeadV2:
  conv_feat:
    name: PicoFeat
    feat_in: 160
    feat_out: 160
    num_convs: 4
    num_fpn_stride: 4
    norm_type: bn
    share_cls_reg: True
    use_se: True
  feat_in_chan: 160

LearningRate:
  base_lr: 0.025
  schedulers:
  - !CosineDecay
    max_epochs: 300
  - !LinearWarmup
    start_factor: 0.1
    steps: 300

TrainReader:
  batch_size: 12
训练
3个模型的训练中,我们在PP-PicoDet公开的预训练模型权重上重新训练以微调模型,得到符合工地场景的目标检测模型。
训练安全帽的目标检测模型
CUDA_VISIBLE_DEVICES=1,2,3 python -m paddle.distributed.launch --gpus 1,2,3 tools/train.py -c configs/picodet/picodet_SH.yml -o pretrain_weights=/home/aistudio/work/C4AI/detect/PaddleDetection/output/pre_train_picodet_M_416_coco_lcnet.pdparams
训练高空作业安全带的目标检测模型
CUDA_VISIBLE_DEVICES=1,2,3 python -m paddle.distributed.launch --gpus 1,2,3 tools/train.py -c configs/picodet/picodet_SB.yml -o pretrain_weights=/home/aistudio/work/C4AI/detect/PaddleDetection/output/pre_train_picodet_l_640_coco_lcnet.pdparams
训练口罩的目标检测模型
CUDA_VISIBLE_DEVICES=1,2,3 python -m paddle.distributed.launch --gpus 1,2,3 tools/train.py -c configs/picodet/picodet_Mask.yml -o pretrain_weights=/home/aistudio/work/C4AI/detect/PaddleDetection/output/pre_train_picodet_l_640_coco_lcnet.pdparams
导出模型
训练安全帽的目标检测模型
python tools/export_model.py -c configs/picodet/picodet_SH.yml --output_dir=./inference_model -o weights=output/picodet_SH/model_final.pdparams
训练高空作业安全带的目标检测模型
python tools/export_model.py -c configs/picodet/picodet_SB.yml --output_dir=./inference_model -o weights=output/picodet_SB/model_final.pdparams
训练口罩的目标检测模型
python tools/export_model.py -c configs/picodet/picodet_Mask.yml --output_dir=./inference_model -o weights=output/picodet_Mask/model_final.pdparams
算法推理
下面以安全帽为算法推理例子
python deploy/python/infer.py --model_dir=./inference_model/picodet_SH --video_file=/home/aistudio/work/C4AI/test_data/school/school_0691.MP4 --device=GPU --output_dir=./output/picodet_SH
效果展示
安全帽目标检测

口罩目标检测

高空作业安全带目标检测


人脸识别

PP-ShiTu架构 [PP-ShiTu: A Practical Lightweight Image Recognition System]
本项目人脸识别算法使用飞桨图像识别套件PaddleClas中的PP-ShiTu作为网络模型,模型架构如上图所示。PP-ShiTu是轻量级图像识别系统,集成了目标检测、特征学习、图像检索等模块,广泛适用于各类图像识别任务。
构建paddleclas 环境
cd /home/aistudio/work/C4AI
git clone https://github.com/PaddlePaddle/PaddleClas.git -b release/2.4
pip install paddleclas
模型下载
本着功能优先原则,本项目使用BlazeFace作为人脸目标检测模型。由于paddleClass库暂无人脸特征提取模型,本项目将拥有强大特征泛化能力的轻量级通用识别模型作为特征提取模块。
cd /home/aistudio/work/C4AI/PaddleClas/deploy
mkdir models
cd models
检测模型下载
wget https://paddle-model-ecology.bj.bcebos.com/model/insight-face/blazeface_fpn_ssh_1000e_v1.0_infer.tar && tar -xf blazeface_fpn_ssh_1000e_v1.0_infer.tar
识别模型下载
wget https://paddle-imagenet-models-name.bj.bcebos.com/dygraph/rec/models/inference/general_PPLCNet_x2_5_lite_v1.0_infer.tar && tar -xf general_PPLCNet_x2_5_lite_v1.0_infer.tar
配置模型参数
cd /home/aistudio/work/C4AI/PaddleClas/deploy/configs
vim inference_C4AI_face.yaml
编辑内容如下
Global:
  # 图片路径
  infer_imgs: "-1"
  # 视频路径
  infer_video: -1
  # camera 设置编号
  infer_camera: -1
  # 输出路径
  output_dir: 'output'
  # 检测模型路径
  det_inference_model_dir: "./models/blazeface_fpn_ssh_1000e_v1.0_infer/"
  # 识别模型路径
  rec_inference_model_dir: "./models/general_PPLCNet_x2_5_lite_v1.0_infer/"
  rec_nms_thresold: 0.05

  batch_size: 1
  image_shape: [3, 640, 640]
  threshold: 0.2
  max_det_results: 5
  label_list:
  - foreground

  use_gpu: True
  enable_mkldnn: True
  cpu_num_threads: 10
  enable_benchmark: True
  use_fp16: False
  ir_optim: True
  use_tensorrt: False
  gpu_mem: 8000
  enable_profile: False

DetPreProcess:
  transform_ops:
    - DetResize:
        interp: 2
        keep_ratio: false
        target_size: [720, 720]
    - DetNormalizeImage:
        is_scale: true
        mean: [0.485, 0.456, 0.406]
        std: [0.229, 0.224, 0.225]
    - DetPermute: {}

DetPostProcess: {}

RecPreProcess:
  transform_ops:
    - ResizeImage:
        resize_short: 256
    - CropImage:
        size: 224
    - NormalizeImage:
        scale: 0.00392157
        mean: [0.485, 0.456, 0.406]
        std: [0.229, 0.224, 0.225]
        order: ''
    - ToCHWImage:

RecPostProcess: null

# indexing engine config
IndexProcess:
  index_method: "HNSW32" # supported: HNSW32, IVF, Flat
  # 模型模型库路径
  index_dir: "./pic_dataset/our_face/index_all/"
  image_root: "./pic_dataset/our_face/"
  # 对象Label文件
  data_file:  "./pic_dataset/our_face/data_list.txt"
  index_operation: "new" # suported: "append", "remove", "new"
  delimiter: "\t"
  dist_type: "IP"
  embedding_size: 512
  batch_size: 32
  return_k: 5
  score_thres: 0.6
目标图片准备
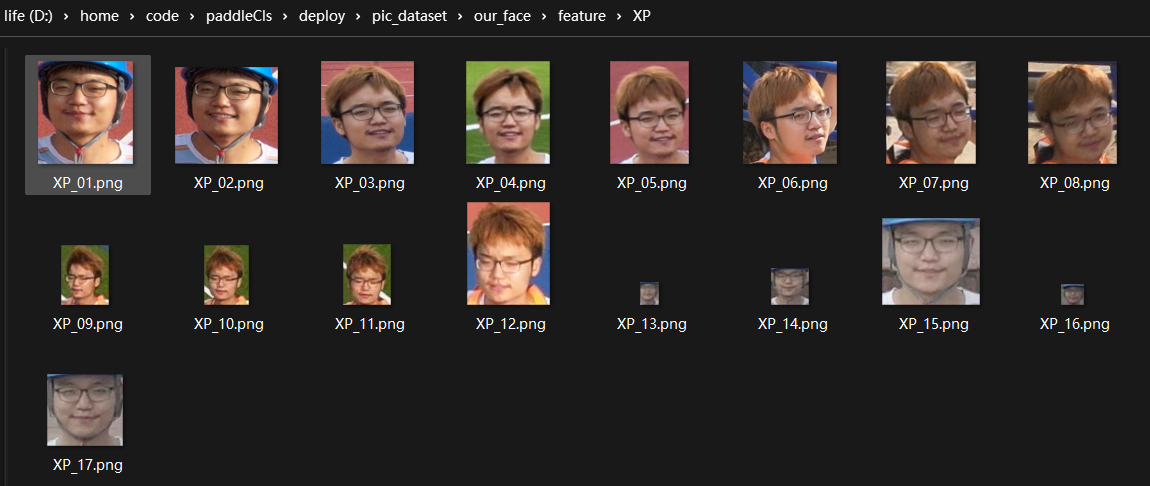
收集待识别人员的图像
识别对象头像例子1

识别对象头像例子2
生成对象标签文件
import os
import  numpy as np

# gallary层目录
img_dir = '/home/aistudio/work/C4AI/PaddleClas/deploy/pic_dataset/our_face/gallery'
target_f = open(img_dir+"/../data_list_test.txt", "a+")

# 假设 gallary 目录下有
#   dog/dog_1.png
#   dog/dog_2.png
#   cat/cat_1.png

for root, dirs, _ in os.walk(img_dir):
     # dirs: {dog,cat}

    # dirs: 各种类别目标
    for class_name in dirs:

        child_tree = os.path.join(root, class_name)

        # 遍历  某个 类别目录的文件
        # child_tree: gallary/dog
        for child_root, child_dirs, child_files in os.walk(child_tree):

            # child_files: {dog_1.png, dog_2.png}
            for img_name in child_files:
                label_str = "gallery/" + class_name + "/"  + img_name  +"\t"+class_name +"\n"
                target_f.write(label_str)
target_f.close()

人脸标签例子
文件内容如上图
生成特征库
生成特征检索库以供特征匹配流程调用
cd /home/aistudio/work/C4AI/PaddleClas/deploy
python3.7 python/build_gallery.py -c configs/inference_C4AI_face.yaml -o Global.rec_inference_model_dir=./models/general_PPLCNet_x2_5_lite_v1.0_infer
修改推理文件
官方提供的PaddleClas架构仅支持对图片的推理,为了应用到本项目的实时视频流推理任务中,我们将PaddleDetection的推理文件移植到了PaddleClas库中。优化过的PaddleClas全面支持对视频和camera设备的推理,同时兼容官方所有原始推理指令。
优化过的 /home/aistudio/work/C4AI/PaddleClas/deploypython/predict_system.py 内容如下
import os
import copy
import numpy as np
import cv2
import faiss
import pickle
import argparse
import os
import numpy as np
import cv2
from PIL import Image, ImageDraw, ImageFont

from paddleclas.deploy.utils import logger, config
from paddleclas.deploy.utils.get_image_list import get_image_list
# from utils.draw_bbox import draw_bbox_results
from paddleclas.deploy.python.predict_rec import RecPredictor
from paddleclas.deploy.python.predict_det import DetPredictor

# from deploy.utils.draw_bbox import draw_bbox_results


# 标注结果框
def draw_bbox_results(image,
                      results,
                      infer_image_Flag,
                      input_path=None,
                      save_dir=None,
                      font_path="./utils/simfang.ttf"):


    if isinstance(image, np.ndarray):
        image = Image.fromarray(image)
    draw = ImageDraw.Draw(image)
    font_size = 100
    font = ImageFont.truetype(font_path, font_size, encoding="utf-8")

    color = (0, 102, 255)

    for result in results:
        # empty results
        if result["rec_docs"] is None:
            continue

        xmin, ymin, xmax, ymax = result["bbox"]
        text = "{}, {:.2f}".format(result["rec_docs"], result["rec_scores"])
        th = font_size
        tw = font.getsize(text)[0]
        # tw = int(len(result["rec_docs"]) * font_size) + 60
        start_y = max(0, ymin - th)

        draw.rectangle(
            [(xmin + 1, start_y), (xmin + tw + 1, start_y + th)], fill=color)

        draw.text((xmin + 1, start_y), text, fill=(255, 255, 255), font=font)

        draw.rectangle(
            [(xmin, ymin), (xmax, ymax)], outline=(255, 0, 0), width=2)

    # infer video or camera
    if infer_image_Flag != 1:
        return np.array(image)

    # infer image
    else:
        image_name = os.path.basename(input_path)
        if save_dir is None:
            save_dir = "output"
        os.makedirs(save_dir, exist_ok=True)
        output_path = os.path.join(save_dir, image_name)

        image.save(output_path, quality=95)
        return np.array(image)

class SystemPredictor(object):
    def __init__(self, config):

        self.config = config
        self.rec_predictor = RecPredictor(config)
        self.det_predictor = DetPredictor(config)

        assert 'IndexProcess' in config.keys(), "Index config not found ... "
        self.return_k = self.config['IndexProcess']['return_k']

        index_dir = self.config["IndexProcess"]["index_dir"]
        assert os.path.exists(os.path.join(
            index_dir, "vector.index")), "vector.index not found ..."
        assert os.path.exists(os.path.join(
            index_dir, "id_map.pkl")), "id_map.pkl not found ... "

        if config['IndexProcess'].get("dist_type") == "hamming":
            self.Searcher = faiss.read_index_binary(
                os.path.join(index_dir, "vector.index"))
        else:
            self.Searcher = faiss.read_index(
                os.path.join(index_dir, "vector.index"))

        with open(os.path.join(index_dir, "id_map.pkl"), "rb") as fd:
            self.id_map = pickle.load(fd)

    def append_self(self, results, shape):
        results.append({
            "class_id": 0,
            "score": 1.0,
            "bbox":
                np.array([0, 0, shape[1], shape[0]]),  # xmin, ymin, xmax, ymax
            "label_name": "foreground",
        })
        return results

    def nms_to_rec_results(self, results, thresh=0.1):
        filtered_results = []
        x1 = np.array([r["bbox"][0] for r in results]).astype("float32")
        y1 = np.array([r["bbox"][1] for r in results]).astype("float32")
        x2 = np.array([r["bbox"][2] for r in results]).astype("float32")
        y2 = np.array([r["bbox"][3] for r in results]).astype("float32")
        scores = np.array([r["rec_scores"] for r in results])

        areas = (x2 - x1 + 1) * (y2 - y1 + 1)
        order = scores.argsort()[::-1]
        while order.size > 0:
            i = order[0]
            xx1 = np.maximum(x1[i], x1[order[1:]])
            yy1 = np.maximum(y1[i], y1[order[1:]])
            xx2 = np.minimum(x2[i], x2[order[1:]])
            yy2 = np.minimum(y2[i], y2[order[1:]])

            w = np.maximum(0.0, xx2 - xx1 + 1)
            h = np.maximum(0.0, yy2 - yy1 + 1)
            inter = w * h
            ovr = inter / (areas[i] + areas[order[1:]] - inter)
            inds = np.where(ovr <= thresh)[0]
            order = order[inds + 1]
            filtered_results.append(results[i])

        return filtered_results

    def predict(self, img):
        output = []
        # st1: get all detection results
        results = self.det_predictor.predict(img)

        # st2: add the whole image for recognition to improve recall
        results = self.append_self(results, img.shape)

        # st3: recognition process, use score_thres to ensure accuracy
        for result in results:
            preds = {}
            xmin, ymin, xmax, ymax = result["bbox"].astype("int")
            crop_img = img[ymin:ymax, xmin:xmax, :].copy()
            rec_results = self.rec_predictor.predict(crop_img)
            preds["bbox"] = [xmin, ymin, xmax, ymax]
            scores, docs = self.Searcher.search(rec_results, self.return_k)

            # just top-1 result will be returned for the final
            if self.config["IndexProcess"]["dist_type"] == "hamming":
                if scores[0][0] <= self.config["IndexProcess"][
                    "hamming_radius"]:
                    preds["rec_docs"] = self.id_map[docs[0][0]].split()[1]
                    preds["rec_scores"] = scores[0][0]
                    output.append(preds)
            else:
                if scores[0][0] >= self.config["IndexProcess"]["score_thres"]:
                    preds["rec_docs"] = self.id_map[docs[0][0]].split()[1]
                    preds["rec_scores"] = scores[0][0]
                    output.append(preds)

        # st5: nms to the final results to avoid fetching duplicate results
        output = self.nms_to_rec_results(
            output, self.config["Global"]["rec_nms_thresold"])

        return output


def main(config):
    system_predictor = SystemPredictor(config)
    output_dir = config["Global"]["output_dir"]

    # 判断推理参数是否正确
    if config["Global"]["infer_imgs"] == '-1' \
            and config["Global"]["infer_video"] == -1 \
            and config["Global"]["infer_camera"] == -1:
        print("no infer goal!!!")
        exit()

    # input video or  camera
    if config["Global"]["infer_video"] != -1 \
            or config["Global"]["infer_camera"] != -1:

        # print(type(config["Global"]["infer_video"]))
        # print(config["Global"]["infer_video"] is not "-1")
        # print(config["Global"]["infer_camera"] != -1)

        video_file = config["Global"]["infer_video"]
        camera_id = config["Global"]["infer_camera"]

        video_out_name = 'output.mp4'

        # camera 设备推理
        if camera_id != -1:
            capture = cv2.VideoCapture(camera_id)
        else:
        # 视频文件推理
            capture = cv2.VideoCapture(video_file)
            video_out_name = os.path.split(video_file)[-1]
        # 获取视频信息 : resolution, fps, frame count
        width = int(capture.get(cv2.CAP_PROP_FRAME_WIDTH))
        height = int(capture.get(cv2.CAP_PROP_FRAME_HEIGHT))
        fps = int(capture.get(cv2.CAP_PROP_FPS))
        frame_count = int(capture.get(cv2.CAP_PROP_FRAME_COUNT))
        print("fps: %d, frame_count: %d" % (fps, frame_count))

        if not os.path.exists(output_dir):
            os.makedirs(output_dir)
        out_path = os.path.join(output_dir, video_out_name)
        fourcc = cv2.VideoWriter_fourcc(*'mp4v')
        writer = cv2.VideoWriter(out_path, fourcc, fps, (width, height))
        index = 1
        while (1):
            # 读取一帧
            ret, frame = capture.read()
            if not ret:
                break
            print('detect frame: ',index,"/",frame_count)
            index += 1

            img = frame[:, :, ::-1]
            # img = frame[:, :, ::-1]

            # 预测一帧的结果
            output = system_predictor.predict(img)

            im = draw_bbox_results(frame, output, infer_image_Flag=0)

            # 写入附加标签帧到视频
            writer.write(im)
            if camera_id != -1:
                cv2.imshow('Mask Detection', im)
                if cv2.waitKey(1) & 0xFF == ord('q'):
                    break
        writer.release()

        return

    else:
        # 输入图片
        image_list = get_image_list(config["Global"]["infer_imgs"])

        assert config["Global"]["batch_size"] == 1
        for idx, image_file in enumerate(image_list):
            img = cv2.imread(image_file)[:, :, ::-1]
            # 推理一张图
            output = system_predictor.predict(img)
            # 标准结果
            draw_bbox_results(img, output, infer_image_Flag=1, input_path=image_file, save_dir=output_dir)
            print(output)
        return


if __name__ == "__main__":
    args = config.parse_args()
    config = config.get_config(args.config, overrides=args.override, show=True)
    main(config)
推理
图片推理
python3.7 python/predict_system.py -c configs/inference_general.yaml -o Global.infer_imgs="/home/aistudio/work/C4AI/test_data/pic.png"
推理视频源
python3.7 python/predict_system.py -c configs/inference_C4AI_face.yaml -o Global.infer_video='/home/aistudio/work/C4AI/test_data/school/school_0679.MP4' -o IndexProcess.index_dir="./pic_dataset/our_face/index_all"
推理camera 源
python3.7 python/predict_system.py -c configs/inference_C4AI_face.yaml -o Global.infer_camera=camera_id -o IndexProcess.index_dir="./pic_dataset/our_face/index_all"
效果展示
正常角度情况

正常角度人脸识别
在正常无遮挡的情况下,我们的模型对戴有安全帽和口罩的个体都能实现不错的人脸识别效果。
存在遮挡情况

存在遮挡情况人脸识别
在有遮挡的情况下,我们的人脸识别模型不会误识别。
管理前端、后台、QGC二次开发项目代码 github 链接陆续更新


 9922
9922


 被折叠的 条评论
为什么被折叠?
被折叠的 条评论
为什么被折叠?
 到【灌水乐园】发言


