


注意:本文代码是直接将一串文字信息嵌入图片中,并非将数字水印(图片)隐写在图片中
本源码可直接使用,请记得修改成你自己的文件路径 ovo
一、隐写部分
使用LSB(Least Significant Bit)隐写术方法实现了图像隐写术。
在编码信息时,它将要隐藏的二进制信息逐位地写入到图像的像素的最低有效位中,从而实现了信息的隐藏。
from skimage import io
import matplotlib.pyplot as plt
def encode(s): #写码
value = ''
for c in s:
o = ord(c)
t = bin(o)
t = t.replace('0b', '')
t = ''.join([i for i in ['0'] * (16 - len(t))]) + t
value = value + t
return value
def hide():#隐藏信息
#path = input('请输入图片路径(如D:/1.jpg):')
#path = path.replace("\\", "/")
img = io.imread("./test/P.jpg")
width, height, c = img.shape
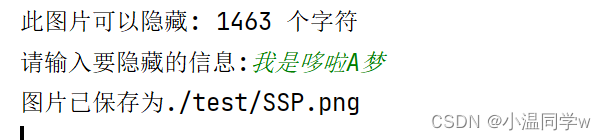
print("此图片可以隐藏:", width * height // 16, "个字符")
message = input("请输入要隐藏的信息:")
length = len(message)
binLength = bin(length).replace('0b', '')
binLength = ''.join(['0'] * (16 - len(binLength))) + binLength
binMsg = encode(message)
binMsg = binLength + binMsg
total = len(binMsg)
index = 0
for i in range(width):
for j in range(height):
img[i, j, 0] = img[i, j, 0] & 254
img[i, j, 0] = img[i, j, 0] + int(binMsg[index])
index += 1
if index >= total:
break
if index >= total:
break
#可修改下述fname改变保存的文件名
fname = "./test/SSP.png"# 这里用jpg数据会出错,其他格式没试过
io.imsave(fname, img)
print("图片已保存为"+fname)
mod_img = io.imread(fname)
# 构造对比图
plt.rcParams['font.sans-serif'] = ['SimHei'] # 设置中文字体
plt.rcParams['axes.unicode_minus'] = False
plt.subplot(121)
plt.title("原始图像")
plt.imshow(img)
plt.subplot(122)
plt.title("嵌有秘密信息的图像")
plt.imshow(mod_img)
plt.show()
if __name__ == '__main__':
hide()
运行结果

二、解码部分
在解码信息时,再次从图像的像素的最低有效位中逐位地读取出信息,然后进行解码。
from skimage import io
import re
import matplotlib.pyplot as plt
def decode(s):
l = re.findall(r'.{16}', s)
s = ''
for i in l:
s = s + chr(int(i, 2))
return s
def display():
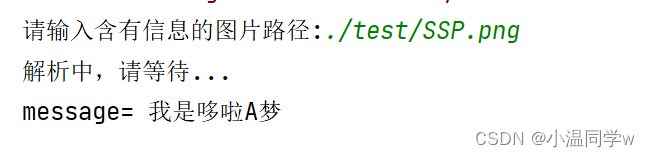
path = input('请输入含有信息的图片路径:')
path = path.replace("\\", "/")
img = io.imread(path)
width, height, c = img.shape
num = ''
index = 0
for i in range(width):
for j in range(height):
num = num + str(img[i, j, 0] & 1)
index += 1
if index == 16:
break
if index == 16:
break
num = int(num, 2) + 1 # 数据空间 +长度空间
total = num * 16
binMsg = ''
index = 0
print("解析中,请等待...")
for i in range(width):
for j in range(height):
binMsg = binMsg + str(img[i, j, 0] & 1)
index += 1
if index > total:
break
if index > total:
break
message = decode(binMsg[16:])
print("message=", message)
# 构造对比图
plt.rcParams['font.sans-serif'] = ['SimHei'] # 中文字体设置
plt.rcParams['axes.unicode_minus'] = False
# plt.subplot(121)
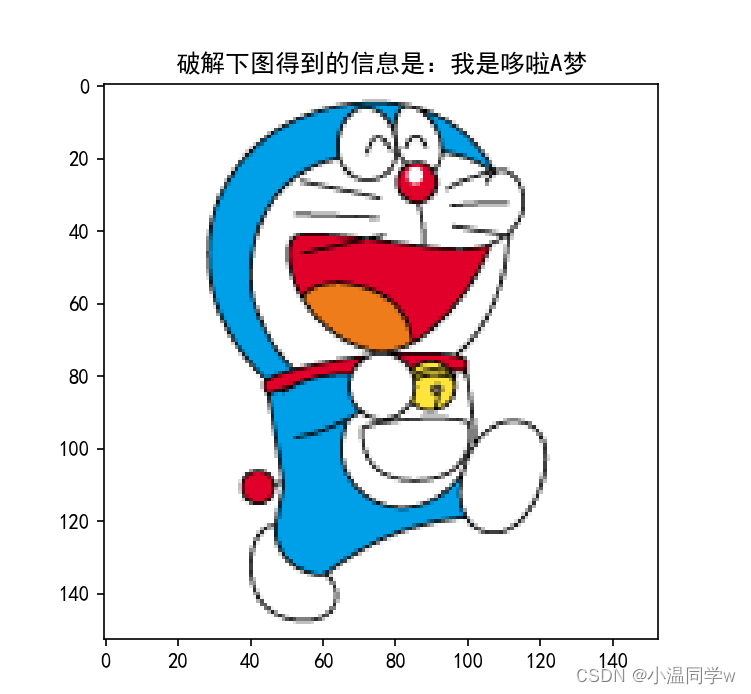
plt.title("破解下图得到的信息是:"+message)
plt.imshow(img)
plt.show()
if __name__ == '__main__':
display()
运行结果
三、扩展:如何写入一整个txt文件
很简单的改写,不赘述
from skimage import io
import matplotlib.pyplot as plt
import chardet

input_secret_text_path = "./test/input.txt"
def encode(s): #写码
    value = ''
    for c in s:
        o = ord(c)
        t = bin(o)
        t = t.replace('0b', '')
        t = ''.join([i for i in ['0'] * (16 - len(t))]) + t
        value = value + t
    return value

def get_text_from_file(): #读取中文的txt
    file = open(input_secret_text_path, mode='r',encoding='utf-8')
    text = file.read()
    file.close()
    return text

def hide():#隐藏信息
    #path = input('请输入图片路径(如D:/1.jpg):')
    #path = path.replace("\\", "/")
    img = io.imread("./test/P.jpg")
    width, height, c = img.shape
    print("此图片可以隐藏:", width * height // 16, "个字符")
    #message = input("请输入要隐藏的信息:")
    message = get_text_from_file()
    length = len(message)
    binLength = bin(length).replace('0b', '')
    binLength = ''.join(['0'] * (16 - len(binLength))) + binLength
    binMsg = encode(message)
    binMsg = binLength + binMsg
    total = len(binMsg)
    index = 0
    for i in range(width):
        for j in range(height):
            img[i, j, 0] = img[i, j, 0] & 254
            img[i, j, 0] = img[i, j, 0] + int(binMsg[index])
            index += 1
            if index >= total:
                break
        if index >= total:
            break
    #可修改下述fname改变保存的文件名
    fname = "./test/SSP.png"# 这里用jpg数据会出错,其他格式没试过
    io.imsave(fname, img)
    print("图片已保存为"+fname)
    mod_img = io.imread(fname)
    # 构造对比图
    plt.rcParams['font.sans-serif'] = ['SimHei']  # 设置中文字体
    plt.rcParams['axes.unicode_minus'] = False
    plt.subplot(121)
    plt.title("原始图像")
    plt.imshow(img)
    plt.subplot(122)
    plt.title("嵌有秘密信息的图像")
    plt.imshow(mod_img)
    plt.show()

if __name__ == '__main__':
    hide()
    # test = get_text_from_file()
    # print(test)
四、分析PSNR和MSE并画出DCT直方图
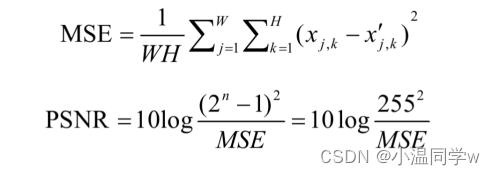
1、 PSNR(峰值信噪比):用于测量图像或信号的质量,通常用于比较原始信号与经过压缩或处理后的信号之间的相似性。在隐写术中,一些研究可能会使用PSNR来评估隐写后的图像与原始图像之间的差异。较高的PSNR值表示两者之间的差异较小,但并不一定意味着隐写术的性能更好,因为PSNR主要关注图像的结构和像素值的差异,而不是隐写术的隐蔽性。
2、MSE(均方误差):计算原始信号与处理后信号之间差异的数学度量。它也用于评估图像或信号处理的质量。在隐写术中,较低的MSE值表示两个图像之间的差异较小,但与PSNR一样,它并不直接反映隐写术的性能,因为它没有考虑到隐写术的隐蔽性和安全性等方面的因素。
计算公式如下:
代码如下:
import cv2
import numpy as np
import matplotlib.pyplot as plt

# 读取原始图片P和加密后的图片SP
original_image = cv2.imread('P.jpg', cv2.IMREAD_GRAYSCALE)# 原图
encrypted_image = cv2.imread('SP.png', cv2.IMREAD_GRAYSCALE)# 加密图

# 计算MSE
mse = np.mean((original_image - encrypted_image) ** 2)

# 计算PSNR
max_pixel_value = 255  # 图像像素值的最大值
psnr = 10 * np.log10((max_pixel_value ** 2) / mse)

# 计算DCT
dct_original = cv2.dct(np.float32(original_image))
dct_encrypted = cv2.dct(np.float32(encrypted_image))
# 构造对比图
plt.rcParams['font.sans-serif'] = ['SimHei']  # 中文字体设置
plt.rcParams['axes.unicode_minus'] = False
# 绘制DCT的直方图
plt.figure(figsize=(6, 4))

# 原始图像的DCT直方图
plt.subplot(121)
plt.hist(dct_original.ravel(), bins=256, range=[-255, 255], color='blue', alpha=0.5)
plt.title('DCT直方图(原始图片)')

# 加密后的图像的DCT直方图
plt.subplot(122)
plt.hist(dct_encrypted.ravel(), bins=256, range=[-255, 255], color='red', alpha=0.5)
plt.title('DCT直方图(加密图片)')

'''# PSNR和MSE
plt.subplot(133)
plt.text(0.5, 0.5, f'PSNR: {psnr:.2f}\nMSE: {mse:.2f}', fontsize=12, ha='center')
plt.axis('off')
plt.title('PSNR 和 MSE')
'''

plt.show()

# 打印PSNR和MSE的值
print(f'PSNR: {psnr:.2f}')
print(f'MSE: {mse:.2f}')
运行结果
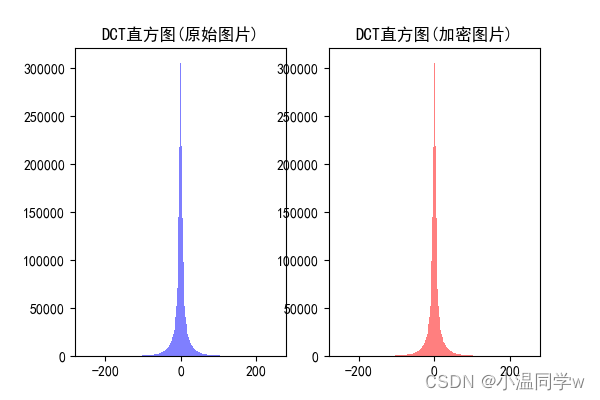
ps:PSNR和MSE的值控制台输出了,没放图片


 4895
4895


 被折叠的 条评论
为什么被折叠?
被折叠的 条评论
为什么被折叠?
 到【灌水乐园】发言


