


目录
前言
今天清理电脑发现了上学期做的八路抢答器仿真设计文件,删了可惜,分享出来大家一起学习。
设计目标
1、主持人按下抢答开始按键,抢答者才可以开始抢答,数码管抢答倒计时30s。
2、抢答成功后显示抢答选手编号。
3、可以通过按键修改倒计时时间。
4、抢答成功后绿色指示灯闪烁。
仿真设计
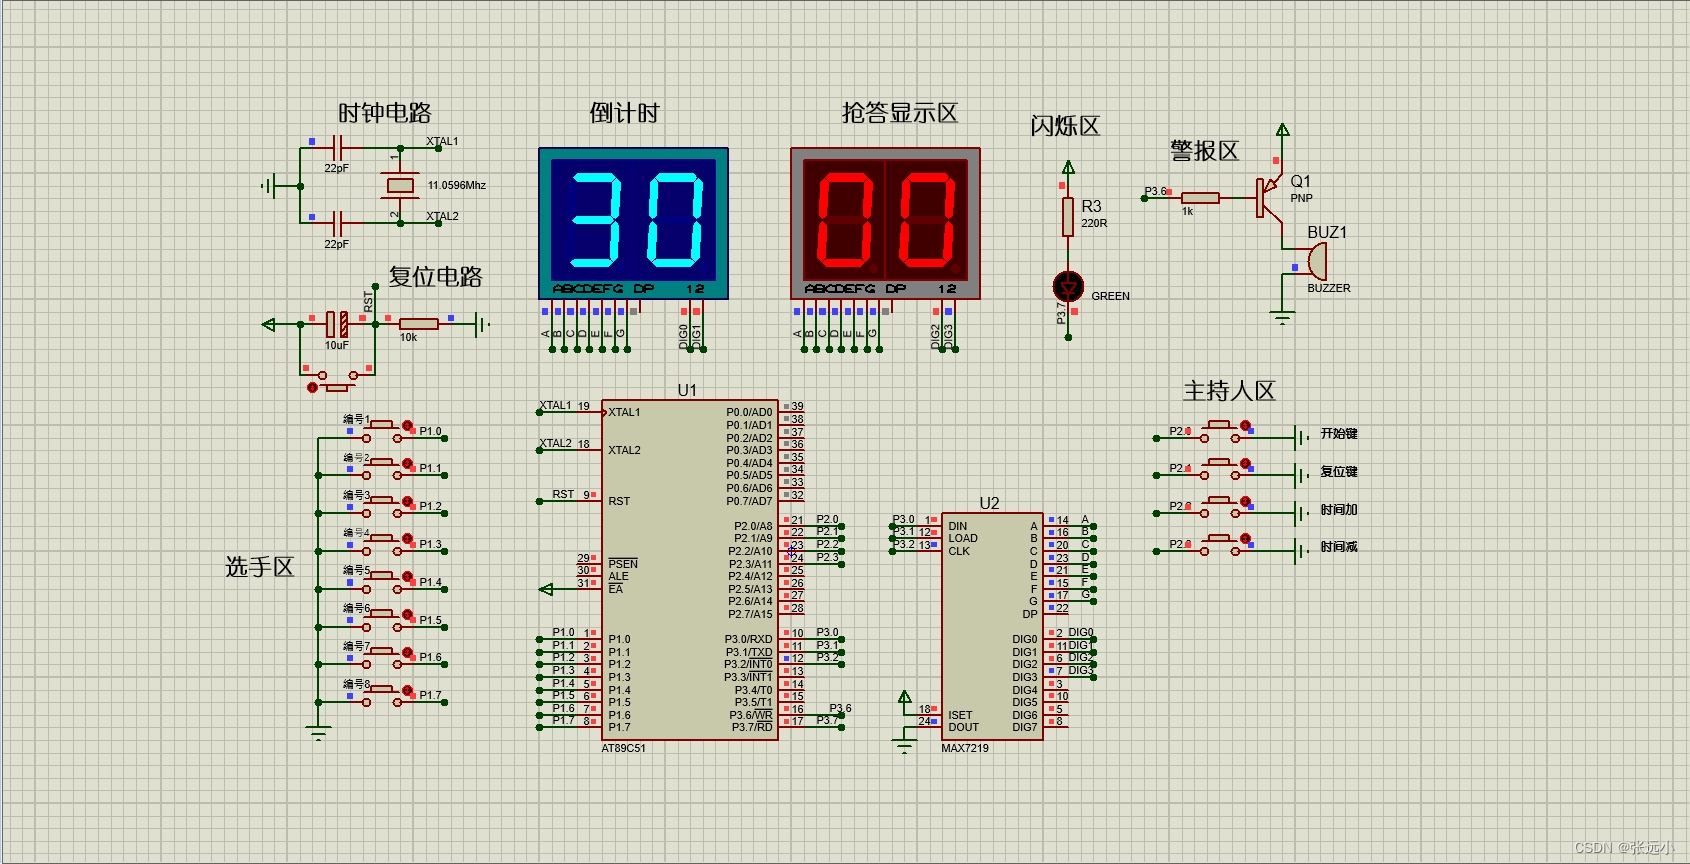
Proteus版本为8.9。整体仿真图如下所示:

蜂鸣器记得设置一下,要不然不会响

分析:
点击仿真开始后,倒计时和抢答显示区不会显示数字(本来就是不显示的,别担心是你哪里弄错了)。如下图所示:

点击主持人区的开始键后,倒计时从30s开始倒计时,抢答显示区显示00.如下图所示:
当1-8号中有选手抢答时,倒计时会停止,抢答显示区会显示抢答选手编号,绿色指示灯会不停闪烁,蜂鸣器也会响一下。如下如所示:
然后复位键的作用是在抢答结束后,将倒计时复位到30s,具体操作步骤是:在抢答完成后,就是有选手抢答后,点击一下,倒计时会回到30,同时显示区显示00.如下图所示:

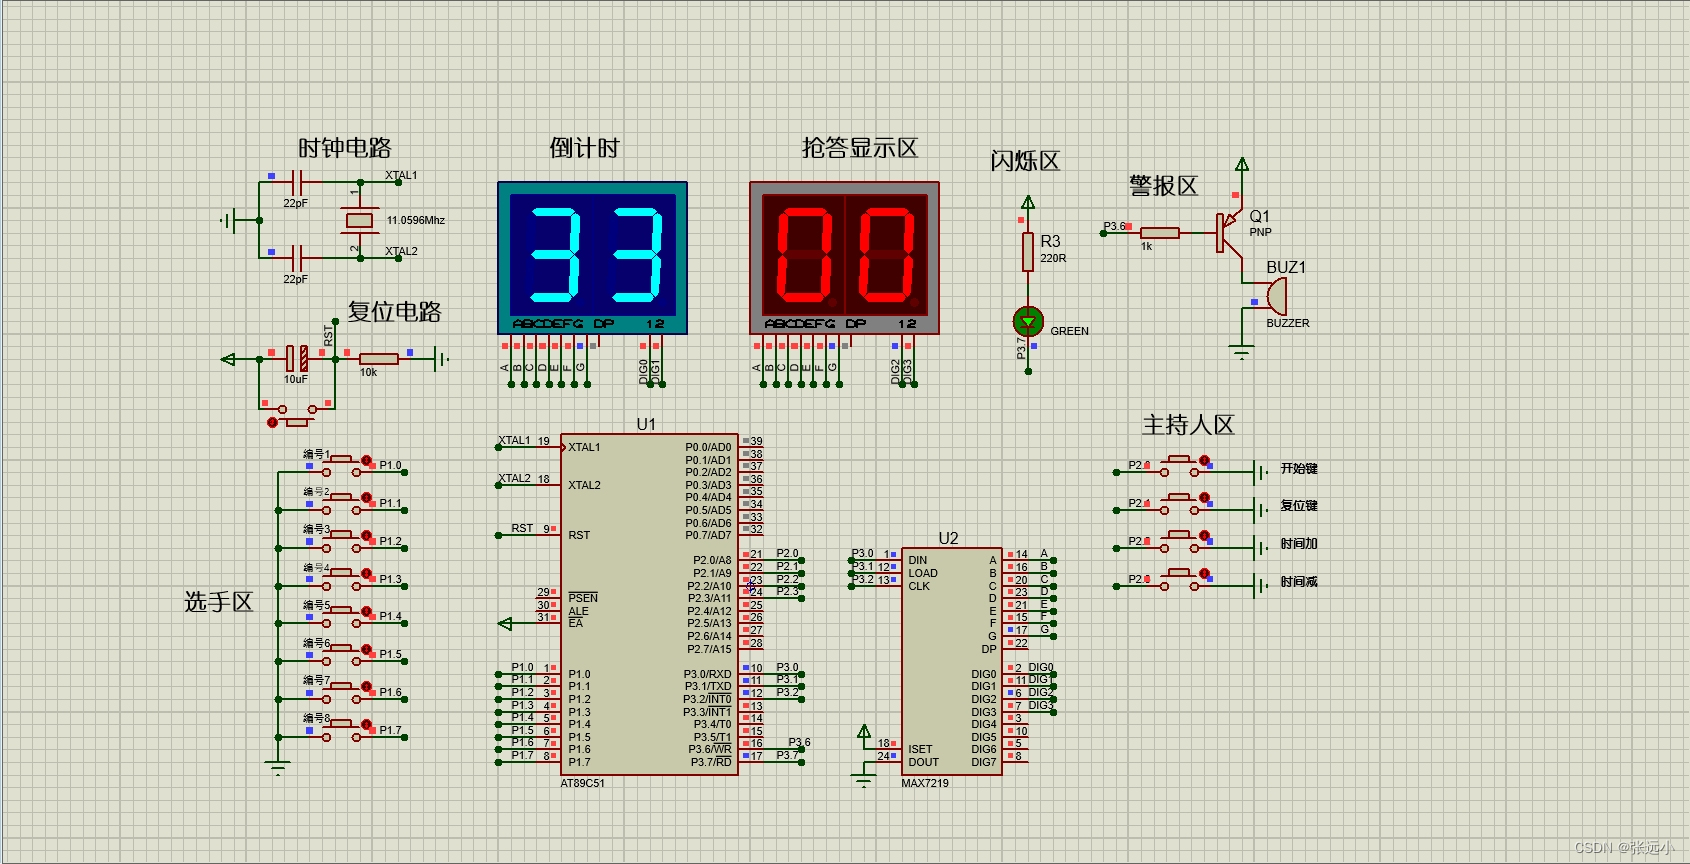
然后时间加和时间减的作用是改变倒计时。记住,刚开始第一次不能立马就改变倒计时,第一次必须是30s倒计时,因为刚开始啥也不显示,点加减也没用。当第一次30s倒计时内有人抢答后,你可以直接就点击时间加或减;又或者点一下复位键,让倒计时变为30后,再加减,其实都一样。改变时间后,点一下开始就开始倒计时了。如下图所示:
如果没有人抢答,倒计时结束,蜂鸣器会响一下。
程序代码
程序编写使用keil平台,编译0错误,0警告
#include<reg51.h>
#define uint	unsigned	int
#define uchar	unsigned	char

sbit DIN=P3^0;	//与max7219接口定义
sbit LOAD=P3^1;
sbit CLK=P3^2;

sbit key0=P1^0;	//8路抢答器按键
sbit key1=P1^1;
sbit key2=P1^2;
sbit key3=P1^3;
sbit key4=P1^4;
sbit key5=P1^5;
sbit key6=P1^6;
sbit key7=P1^7;

sbit buzzer=P3^6;//蜂鸣器
sbit LED1=P3^7;

sbit begin=P2^0;	//主持人开始按键
sbit key_clear=P2^1;	//主持人复位
sbit key_add=P2^2;	//时间加
sbit key_sub=P2^3;	//时间减

uchar second=30;	//秒表计数值
uchar counter=0;	//counter每100,minite加1
uchar people=0;	//抢答结果

uchar num_add[]={0x01,0x02,0x03,0x04,0x05,0x06,0x07,0x08};	//max7219读写地址、内容
uchar num_dat[]={0x80,0x81,0x82,0x83,0x84,0x85,0x86,0x87,0x88,0x89};

void delay(uint xms)
{
	uchar i, j;
	while(xms--)
	{
		i = 2;
		j = 239;
		do
		{
			while (--j);
		} while (--i);
	}
}

uchar keyscan()//键盘扫描函数
{
  uchar key_value,temp;
  key_value=0;
  P1=0xFF;
  temp=P1;
  if(~(P1&temp))
		{
			switch(temp)
			{
				case 0xfe:
					key_value=1;
					break;
				case 0xfd:
					key_value=2;
					break;
				case 0xfb:
					key_value=3;
					break;
				case 0xf7:
					key_value=4;
					break;
				case 0xef:
					key_value=5;
					break;
				case 0xdf:
					key_value=6;
					break;
				case 0xbf:
					key_value=7;
					break;
					case 0x7f:
					key_value=8;
					break;
				default:
					key_value=0;
					break;
			}
		}
  return key_value;
}

void max7219_send(uchar	add,uchar	dat)//向max7219写指令函数
{
  uchar	ADS,i,j;
  LOAD=0;
  i=0;
  while(i<16)
		{
			if(i<8)
				{
					ADS=add;
				}
			else
				{
					ADS=dat;
				}
			for(j=8;j>=1;j--)
				{
					DIN=ADS&0x80;
					ADS=ADS<<1;
					CLK=1;
					CLK=0;
				}
			i=i+8;
		}
	LOAD=1;
}

void max7219_init()//max7219初始化函数
{
  max7219_send(0x0c,0x01);
  max7219_send(0x0b,0x07);
  max7219_send(0x0a,0xf5);
  max7219_send(0x09,0xff);
}

void time_display(uchar x)//时间显示
{
  uchar i,j;
  i=x/10;
  j=x%10;
  max7219_send(num_add[1],num_dat[j]);
  max7219_send(num_add[0],num_dat[i]);
}

void scare_display(uchar x)//抢答结果显示
{
  uchar i,j;
  i=x/10;
  j=x%10;
  max7219_send(num_add[3],num_dat[j]);
  max7219_send(num_add[2],num_dat[i]);

	if(x >= 1 && x <= 8)
		{
			LED1=~LED1;
			delay(100);
		}
}

void holderscan()//抢答时间设置,0-60s
{
  time_display(second);
  scare_display(people);
  if(~key_clear)//如果有键按下,改变抢答时间
		{
			while(~key_clear);
			if(people)//如果抢答结果没有清空,抢答器重置
				{
					second=30;
					people=0;
				}
			else
				{}
		}
	if(~key_add)
		{
			while(~key_add);
			if(second<60)
				{
					second++;
				}
			else
				{
					second=0;
				}
		}
	if(~key_sub)
		{
			while(~key_sub);
			if(second>0)
				{
					second--;
				}
			else
				{
					second=60;
				}
		}
}

void timer_init()
{
  EA=1;
  ET0=1;
  TMOD=0x01;
  TH0=0xd8;//设定10ms中断一次
  TL0=0xef;
}

void main()
{
  while(1)
	{
		do
		{
			holderscan();
		}while(begin);//开始前进行设置,未按下开始键

		while(~begin);//防抖
		max7219_init(); //芯片初始化
		timer_init();	  //中断初始化
		TR0=1;		  //开始中断

		do
		{
			time_display(second);
			scare_display(people);
			people=keyscan();
		}while((!people)&&(second));//运行直到抢答结束或者时间结束
		TR0=0;
		buzzer = 0;
		delay(100);
		buzzer = 1;
	}
}

void timer0() interrupt 1
{
	TH0=0xd8;//重新装载
  TL0=0xef;
  TR0=1;
  if(counter<100)
		{
			counter++;
		}
  else
		{
			counter=0;
			second=second-1;
		}
}
总结
以上就是今天要讲的内容。


 1718
1718

 被折叠的 条评论
为什么被折叠?
被折叠的 条评论
为什么被折叠?
 到【灌水乐园】发言


