


1、运行环境:
| 主机 | 主机名 | 系统 | 服务 |
| 192.168.50.128 | Server-Web | Linux | Web |
| 192.168.50.131 | Server-NFS-DNS | Linux | NFS/DNS |
2、基础配置
- 配置主机名,静态IP地址
- 开启防火墙并配置
- 部分开启SELinux并配置
- 服务器之间使用同ntp.aliyun.com进行时间同步
- 服务器之间实现SSH免密登录
3、业务需求
- Server-NFS-DNS主机配置NFS服务器,将博客网站资源共享文件分享给Server-Web主机,Server-NFS-DNS主机配置DNS
- Server-Web主机配置web服务,通过域名www.fanxingyizhan.com可以访问到自建的博客网站
4、准备工作
4.1、恢复快照
本实验在两台安装CentOS-9-Stream系统的虚拟机下实现
4.2、配置静态IP
Server-Web端:
[root@server ~]# nmcli connection show
NAME             UUID                                  TYPE      DEVICE
ethernet-ens160  22b01b60-c356-4a2a-8689-bb0bb40eb1f7  ethernet  ens160
[root@server ~]# nmcli connection modify ethernet-ens160 ipv4.method manual ipv4.addresses '192.168.50.128/24' ipv4.gateway '192.168.50.2' ipv4.dns "114.114.114.114"
[root@server ~]# nmcli connection reload
[root@server ~]# nmcli connection up ethernet-ens160
连接已成功激活(D-Bus 活动路径:/org/freedesktop/NetworkManager/ActiveConnection/2)


Server-NFS-DNS端:
[root@server ~]# nmcli connection show
NAME    UUID                                  TYPE      DEVICE
ens160  f86c82ca-1588-32e1-9ab8-074c274c18a6  ethernet  ens160
[root@server ~]# nmcli connection modify ens160 ipv4.method manual ipv4.addresses '192.168.50.131/24' ipv4.gateway '192.168.50.2' ipv4.dns '114.114.114.114'
[root@server ~]# nmcli connection reload
[root@server ~]# nmcli connection up ens160
连接已成功激活(D-Bus 活动路径:/org/freedesktop/NetworkManager/ActiveConnection/2)
nmcli connection show ##查询正在运行的网卡,为后面修改静态IP做准备(ps:要修改总要知道修改谁)
nmcli connection modify ethernet-ens160 ipv4.method manual ipv4.addresses '192.168.50.128/24' ipv4.gateway '192.168.50.2' ipv4.dns "114.114.114.114"
##修改ethernet-ens160这个网卡的ipv4地址为‘192.168.50.128/24’ 网关地址为‘192.168.50.2’dns服务地址为‘114.114.114.114’
[root@server ~]# nmcli connection reload ##重启服务
[root@server ~]# nmcli connection up ethernet-ens160 ##重启网卡
下面的同上
4.3、修改主机名及hosts映射
在192.168.50.128中配置
[root@server ~]# hostnamectl set-hostname Server-Web
[root@server ~]# vim /etc/hosts
127.0.0.1       Server-Web
192.168.50.128  Server-Web
192.168.50.131  Server-NFS-DNS
[root@server ~]# reboot

在192.168.50.131中配置
[root@server ~]# hostnamectl set-hostname Server-NFS-DNS
[root@server ~]# vim /etc/hosts
127.0.0.1       Server-NFS-DNS
192.168.50.128  Server-Web
192.168.50.131  Server-NFS-DNS
[root@server ~]# reboot
[root@server ~]# hostnamectl set-hostname Server-Web
##修改主机名为
Server-Web
[
root@server ~]# vim /etc/hosts
##进入并修改housts文件,删除原有内容,写入新的映射关系
IP 主机名
[root@server ~]# reboot
重启虚拟机
下面的同上
4.4、开启防火墙
[root@Server-Web ~]# systemctl start firewalld
[root@Server-Web ~]# systemctl enable firewalld
此操作两台虚拟机都要进行
4.5、SELinux设置
[root@Server-Web ~]# setenforce 0 # Server-Web端关闭
[root@Server-NFS-DNS ~]# setenforce 1 # Server-NFS-DNS端开启
4.6、时间同步
[root@Server-Web ~]# yum -y install cherony    ##安装cherony软件
[root@Server-Web ~]vim /etc/chrony.conf    ##编辑主配置文件
##方法1:
server ntp.aliyun.com iburst # 在第三行更改,将时间服务器地址更换为开源的阿里时间服务器地址
##方法2:
# 点击Esc键,进入命令模式,点击d键一直按下,删除所有内容,复制粘贴推荐配置:
server ntp.aliyun.com iburst
stratumweight 0
driftfile /var/lib/chrony/drift
rtcsync
makestep 10 3
bindcmdaddress 127.0.0.1
bindcmdaddress ::1
keyfile /etc/chrony.keys
commandkey 1
generatecommandkey
logchange 0.5
logdir /var/log/chrony
[root@Server-Web ~]systemctl restart chronyd   ##重启服务
[root@Server-Web ~]chronyc sources -v    ##同步时间
[root@Server-Web ~]timedatectl status    ##查看是否时间已同步
                   Local time: 六 2023-03-18 10:59:15 CST
                Universal time: 六 2023-03-18 02:59:15 UTC
                      RTC time: 六 2023-03-18 02:59:16
                    Time zone: Asia/Shanghai (CST, +0800)
System clock synchronized: yes    ## 注意:yes,表示时间已同步完成
                   NTP service: active
                RTC in local TZ: no
此操作服务端和客户端都要进行
4.7、配置免密ssh登录
# 在192.168.48.130(Server-Web)中配置
[root@Server-Web ~]# ssh-keygen -t rsa # 生成公钥私钥,一路回车
[root@Server-Web ~]# ssh-copy-id 192.168.48.131
[root@Server-Web ~]# ssh 192.168.48.131
[root@Server-NFS-DNS ~]# exit   #退出远程登陆


# 在192.168.48.131(Server-NFS-DNS)中配置
[root@Server-NFS-DNS ~]# ssh-keygen -t rsa # 生成公钥私钥,一路回车
[root@Server-NFS-DNS ~]# ssh-copy-id 192.168.50.128
/usr/bin/ssh-copy-id: INFO: Source of key(s) to be installed: "/root/.ssh/id_rsa.pub"
The authenticity of host '192.168.50.128 (192.168.50.128)' can't be established.
ED25519 key fingerprint is SHA256:sdnqfElRvhiL7R6vDpFxwmDoGmQjJ28FJlk4154Q5+A.
This key is not known by any other names
Are you sure you want to continue connecting (yes/no/[fingerprint])? yes   ##输入yes
/usr/bin/ssh-copy-id: INFO: attempting to log in with the new key(s), to filter out any that are already installed
/usr/bin/ssh-copy-id: INFO: 1 key(s) remain to be installed -- if you are prompted now it is to install the new keys
root@192.168.50.128's password:      ###输入root账户密码

Number of key(s) added: 1

Now try logging into the machine, with:   "ssh '192.168.50.128'"
and check to make sure that only the key(s) you wanted were added.

[root@Server-NFS-DNS ~]# ssh 192.168.50.128
Activate the web console with: systemctl enable --now cockpit.socket

Register this system with Red Hat Insights: insights-client --register
Create an account or view all your systems at https://red.ht/insights-dashboard
Last login: Tue Apr 25 10:42:01 2023 from 192.168.50.1

[root@Server-NFS-DNS ~]# ssh 192.168.48.130
[root@Server-Web ~]# exit
5、环境搭建
5.1、Server-web端安装LAMP环境软件
[root@Server-Web ~]# yum install httpd mariadb-server php* -y
5.2、Server-NFS-DNS端上传博客软件
- 网址:https://cn.wordpress.org/ ,下载后为zip压缩文件
- 将wordpress上传到192.168.48.131(Server-NFS-DNS)端的/目录下
- 解压缩:

[root@Server-NFS-DNS ~]# cd /
[root@Server-NFS-DNS /]# unzip wordpress-6.1-zh_CN.zip   ##解压缩
[root@Server-NFS-DNS /]# cd wordpress   ##进入wordpress目录
[root@Server-NFS-DNS wordpress]# ls     ##查看

5.3、Server-NFS-DNS端设置NFS共享
- 目的:将Server-NFS-DNS端的/wordpress目录共享给192.168.50.128 (Server-Web)
[root@Server-NFS-DNS ~]# yum install rpcbind -y
[root@Server-NFS-DNS ~]# yum install nfs-utils -y
[root@Server-NFS-DNS /]# cd ~
[root@Server-NFS-DNS ~]# vim /etc/exports # 编辑配置文件
/wordpress 192.168.48.130(rw,sync,all_squash) # 添加
# 设置权限
[root@Server-NFS-DNS ~]# chmod -Rf 777 /wordpress
# 防火墙添加服务放行
[root@Server-NFS-DNS ~]# firewall-cmd --permanent --zone public --addservice=mountd
[root@Server-NFS-DNS ~]# firewall-cmd --permanent --zone public --add-service=rpcbind
[root@Server-NFS-DNS ~]# firewall-cmd --permanent --zone public --add-service=nfs
[root@Server-NFS-DNS ~]# firewall-cmd --reload
# 启动服务
[root@Server-NFS-DNS ~]# systemctl start rpcbind
[root@Server-NFS-DNS ~]# systemctl start nfs-server
# 设置SELinux上下文策略
[root@Server-NFS-DNS ~]# chcon -t httpd_sys_content_t /wordpress -Rv
5.4、Server-Web设置
5.4.1、挂载远程共享目录
[root@Server-Web ~]# yum install rpcbind -y
[root@Server-Web ~]# yum install nfs-utils -y
[root@Server-Web ~]# showmount -e 192.168.48.131 # 查看
[root@Server-Web ~]# mkdir /wp # 新建本地挂载目录
[root@Server-Web ~]# mount -t nfs 192.168.48.131:/wordpress /wp # 挂载
[root@Server-Web ~]# cd /wp
[root@Server-Web wp]# ls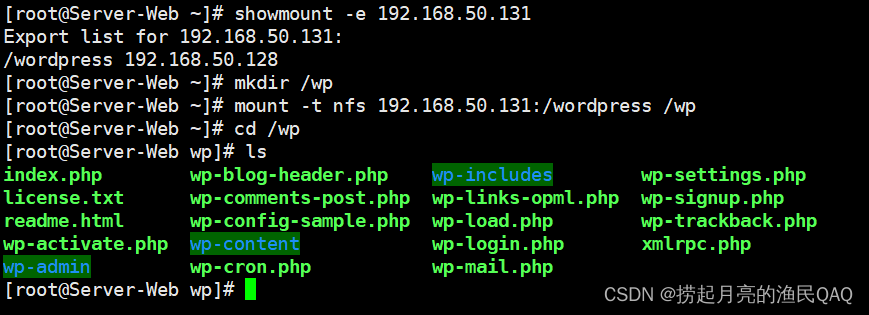
5.4.2、httpd设置
[root@Server-Web wp]# cd ~
[root@Server-Web ~]# firewall-cmd --permanent --zone public --add-service=http #
放行
[root@Server-Web ~]# firewall-cmd --reload
[root@Server-Web ~]# vim /etc/httpd/conf/httpd.conf # 编辑http配置文件
124 DocumentRoot "/wp"
129 <Directory "/wp">
5.4.3、修改wordpress配置文件
[root@Server-Web ~]# cd /wp
[root@Server-Web wp]# cp wp-config-sample.php wp-config.php # 根据模板拷贝配置文件
# 编辑wp-config.php配置文件
[root@Server-Web wp]# vim wp-config.php
# 定位23行修改后半部分
define('DB_NAME', 'wordpress'); # WordPress数据库的名称
define( 'DB_USER', 'shuai_xiao_huo' ); # MySQL数据库用户名   一键三连的的都是帅小伙
define('DB_PASSWORD', '123456'); # MySQL数据库密码
5.4.4、启动数据库
[root@Server-Web wp]# cd ~
[root@Server-Web ~]# systemctl start mariadb
5.4.5、在数据库中创建数据库和用户
[root@Server-Web ~]# mysql
MariaDB [(none)]> create database wordpress; # 创建数据库,尾部有分号
MariaDB [(none)]> create user 'shuai_xiao_huo'@'localhost' identified by '123456'; # 第一
个''为数据库账号,@后面的''内容为数据库可以登录的地址,localhost意为只能本机登录。用户和密码与
wordpress配置文件一样,
MariaDB [(none)]> grant all on wordpress.* to 'shuai_xiao_huo'@'localhost'; # 给用户授权
MariaDB [(none)]> exit # 退出
5.4.6、重启数据库和http
[root@Server-Web ~]# systemctl restart mariadb
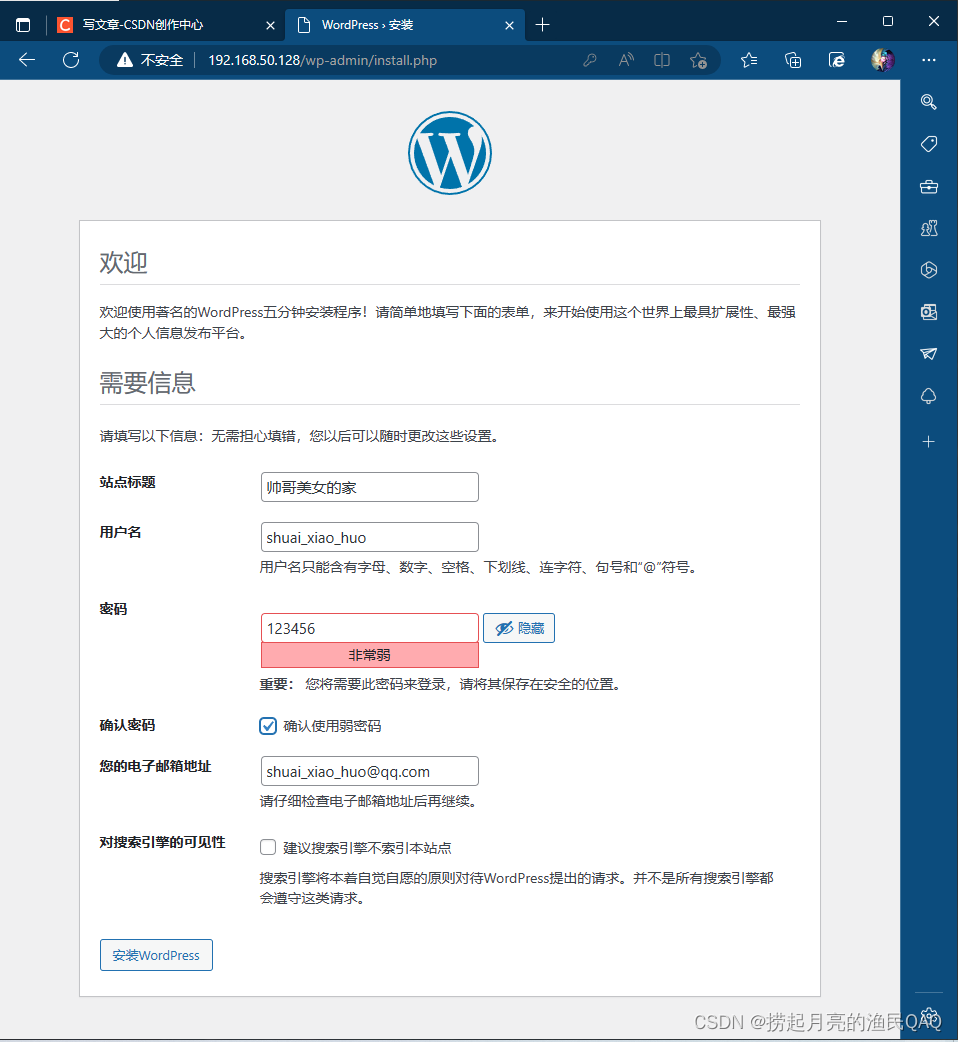
[root@Server-Web ~]# systemctl start httpd5.5、测试
- 在windows端输入192.168.50.128继续完成wordpress配置(邮箱必须设置)
5.6、在Server-NFS-DNS端配置DNS
- 原则:www.yutang.com正向解析为192.168.50.128
5.6.1、安装
[root@Server-NFS-DNS ~]# cd ~
[root@Server-NFS-DNS ~]# yum install bind -y
[root@Server-NFS-DNS ~]# firewall-cmd --permanent --zone public --add-service=dns
# 防火墙放行
[root@Server-NFS-DNS ~]# firewall-cmd --reload
[root@Server-NFS-DNS ~]# systemctl start named
5.6.2、编辑配置文件
[root@Server-NFS-DNS ~]# vim /etc/named.conf
# 第11 19行修改为any任意主机
11 listen-on port 53 { any; };
19 allow-query { any; };
5.6.3、修改区域配置文件,清空添加:
[root@Server-NFS-DNS ~]# vim /etc/named.rfc1912.zones
zone "openlab.com" IN {
        type master;
        file "yutang.com.zone";
        allow-update { none; };
};
5.6.4、新建区域数据文件并配置解析
[root@Server-NFS-DNS ~]# cd /var/named
[root@Server-NFS-DNS named]# cp -a named.localhost openlab.com.zone
[root@Server-NFS-DNS named]# vim openlab.com.zone
# 添加正向解析,注意:解析为192.168.48.130web服务器
$TTL 1D
@       IN SOA  yutang.com. admin.yutang.com. (
                                        0       ; serial
                                        1D      ; refresh
                                        1H      ; retry
                                        1W      ; expire
                                        3H )    ; minimum
        NS      ns.yutang.com.
ns      IN      A       192.168.50.128
www     IN      A       192.168.50.128
bbs     IN      A       192.168.50.128

5.6.5、启动服务:
[root@Server-NFS-DNS named]# systemctl restart named5.6.6、测试:将Server-Web端的DNS改为192.168.50.131后输入www.yutang.com域名访问
[root@Server-Web ~]# vim /etc/NetworkManager/system-connections/ethernet-ens160.nmconnection
   # 编辑网卡配置文件,将DNS修改为server端的IP
[connection]
id=ens160
uuid=0f83fcfd-bc6d-3866-b82b-fc4b09df2068
type=ethernet
autoconnect-priority=-999
interface-name=ens160
timestamp=1679456213

[ethernet]

[ipv4]
address1=192.168.48.131/24,192.168.48.2
dns=192.168.50.128;   # 修改这里
method=manual

[ipv6]
addr-gen-mode=eui64
method=auto

[proxy]

[root@node1 ~]# nmcli connection reload
[root@node1 ~]# nmcli connection up ens160   # 激活


 1344
1344


 被折叠的 条评论
为什么被折叠?
被折叠的 条评论
为什么被折叠?
 到【灌水乐园】发言


