


一、进程和进程调度
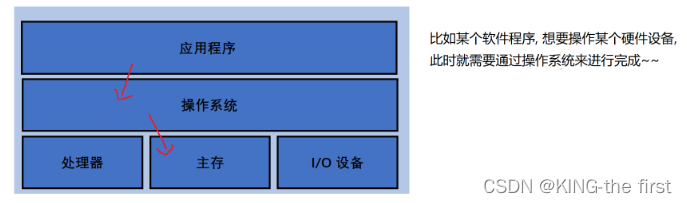
在介绍线程之前,先讲一下操作系统,操作系统是一个非常复杂的软件,对下要管理好各种硬件设施,对上要给软件提供稳定的运行环境。
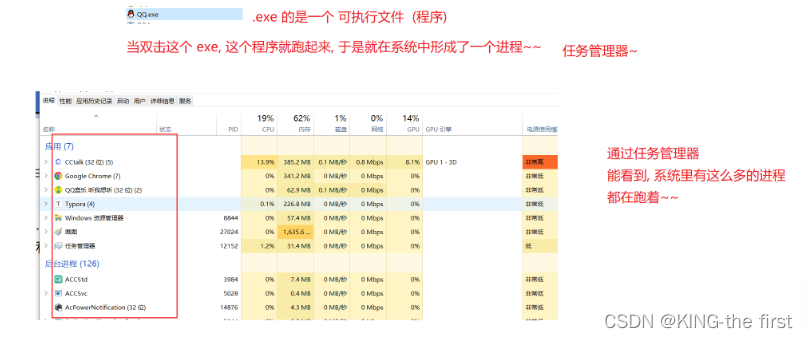
1、进程:一个运行起来的程序就是进程。进程是操作系统进行资源分配的基本单位。
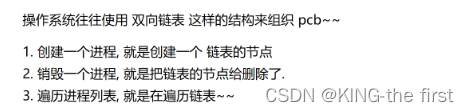
2、进程管理:描述一个进程:使用结构体/类,把一个进程有那些信息表示出来。
组织这些进程:是hi用一定的数据结构,把这些结构体/对象放到一起3、进程的结构体(PCB)有哪些属性(讲几个核心的)
pid:每个进程都需要有一个唯一的身份标识
内存指针:当前这个进程使用的内存是哪一部分(进程要跑起来,就需要消耗一定的硬件资源,比如内存,内存指针也就是说进程运行起来的时候,使用了哪些内存上的资源)
文件描述符表(进程运行的时候使用了哪些硬盘上的资源):文件:比如硬盘上存储的数据,往往就是以文件为单位进行整理的,进程每次打开一个文件,就会产生一个“文件描述符”(标识这个被打开的文件)一个进程可能会打开很多文件,对应了一组文件描述符表,把这些文件描述符表放到一个顺序表这样的结构里面,就构成了文件描述符表。
进程状态:就绪态:该进程已经准备好,随时可以上CPU上执行
阻塞态:该进程暂时无法上CPU上执行
进程的优先级:进程之间的调度不一定是“公平的”,有的需要优先调度
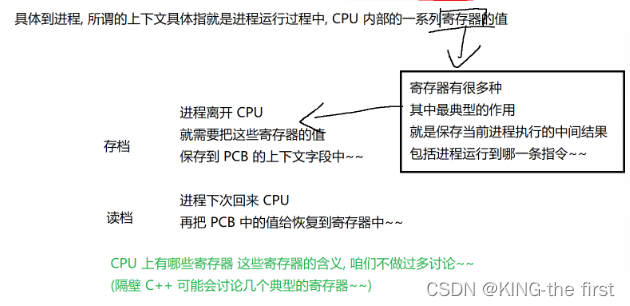
进程的上下文:上下文就是描述了当前进程执行到哪里这样的“存档记录”,进程在离开CPU的时候就要把当前运行的中间结果“存档”,等到下次进程回来CPU上,在恢复之前的“存档”,从上次的结果继续往后执行。
进程的记账信息:统计了每个进程在CPU上执行了多久了,可以作为调度的参考依据。
4、并行:同一时刻两个核心,同时执行两个进程,此时这两个进程就是并行的
并发:一个核心,先执行进程一,再去执行进程二…此时只要这里的切换速度足够快,看起来就是在同时执行。
5、进程内存分配----内存管理:操作系统对内存的分配,采用的是空间模式,互相之间不会干扰,操作系统给进程分配的内存,是以“虚拟地址空间”的方式进行分配的,每个进程访问的内存空间,都不是真实的物理内存地址;
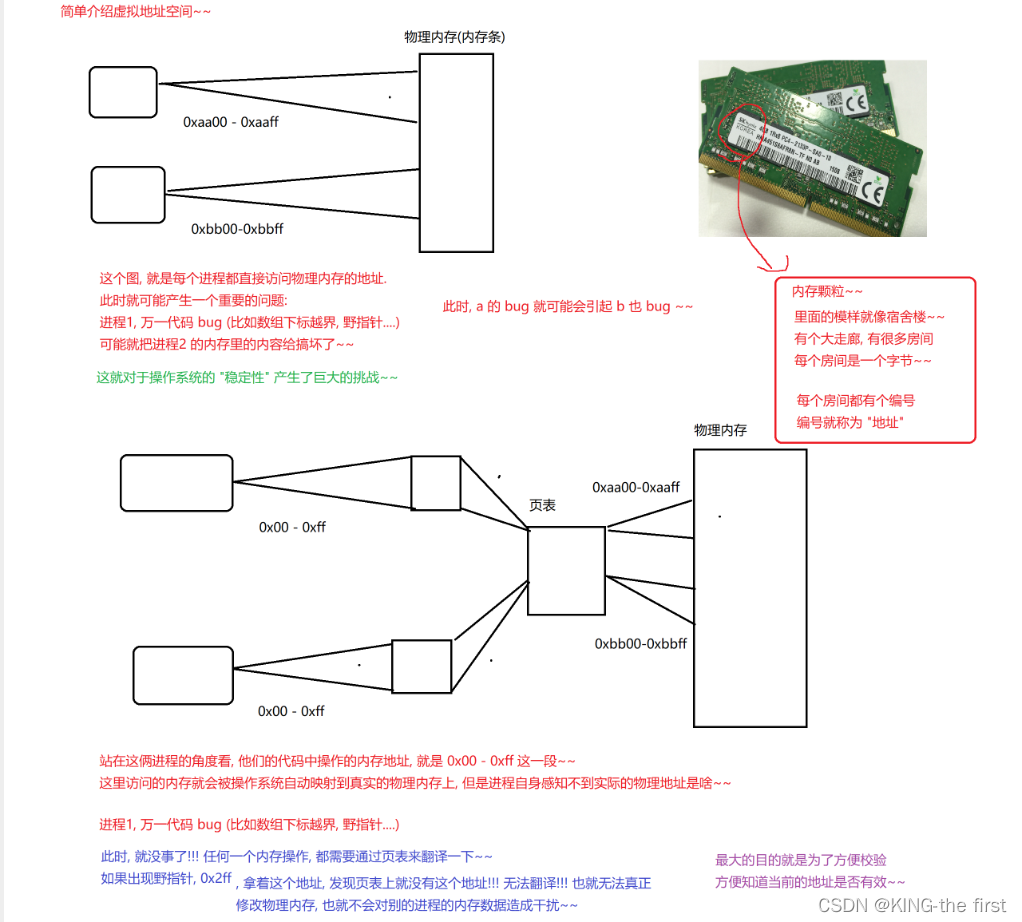
结论:“进程的独立性”每个进程有自己独立的地址空间(隔离性)
6、进程间通信:有些时候,需要进程之间进行交互,相互配合,如果每个进程可以直接访问物理内存,其实是没有隔离性,也就不需要进程间通信,如:进程一直接把算好的结果存入进程二的内存中即可,但是进程具有隔离性,所以所谓的进程间通信就是在隔离性的前提下,找一个公共区域,让两个进程借助这个区域来完成数据交换。
二、认识线程
线程是更轻量的进程,一个进程中可以包含多个线程,此时这些线程中每个线程都是一个独立可以调度执行的“执行流”,多个线程之间是并发执行的并且共用一份进程的系统资源(内存空间,文件描述符表)。
A、进程和线程的区别:
1、进程包含线程
2、进程有自己独立的内存空间和文件描述符表,同一个进程的多个线程之间共用一份地址空间和文件描述符表;
3、进程是操作系统资源分配的基本单位,线程是操作系统调度执行的基本单位;
4、进程之间具有独立性,互相不影响,但是同一个进程的多个线程之间,一个线程挂了,可能会把整个进程都带走,影响到其他线程的。
B、创建线程
1、使用继承Thread重写run的方式来创建线程
class MyThread extends Thread {
    @Override
    public void run() {
        while (true) {
            System.out.println("hello t");
            try {
                Thread.sleep(1000);
            } catch (InterruptedException e) {
                e.printStackTrace();
            }
        }
    }
}

public class ThreadDemo1 {
    public static void main(String[] args) {
        Thread t = new MyThread();
        // start 会创建新的线程
        t.start();
        // run 不会创建新的线程. run 是在 main 线程中执行的~~
        // t.run();

        while (true) {
            System.out.println("hello main");
            try {
                Thread.sleep(1000);
            } catch (InterruptedException e) {
                e.printStackTrace();
            }
        }
    }
}
2、使用实现Runnable接口,重写run
class MyRunnable implements Runnable {
    @Override
    public void run() {
        while (true) {
            System.out.println("hello t");
            try {
                Thread.sleep(1000);
            } catch (InterruptedException e) {
                e.printStackTrace();
            }
        }
    }
}

public class ThreadDemo2 {
    public static void main(String[] args) {
        MyRunnable runnable = new MyRunnable();
        Thread t = new Thread(runnable);
        t.start();

        while (true) {
            System.out.println("hello main");
            try {
                Thread.sleep(1000);
            } catch (InterruptedException e) {
                e.printStackTrace();
            }
        }
    }
}
3、继承Thread,使用匿名内部类
public class ThreadDemo3 {
    public static void main(String[] args) {
        Thread t = new Thread() {
            @Override
            public void run() {
                while (true) {
                    System.out.println("hello t");
                    try {
                        Thread.sleep(1000);
                    } catch (InterruptedException e) {
                        e.printStackTrace();
                    }
                }
            }
        };

        t.start();

        while (true) {
            System.out.println("hello main");
            try {
                Thread.sleep(1000);
            } catch (InterruptedException e) {
                e.printStackTrace();
            }
        }
    }
}
4、实现Runnable,使用匿名内部类
public class ThreadDemo4 {
    public static void main(String[] args) {
        Thread t = new Thread(new Runnable() {
            @Override
            public void run() {
                while (true) {
                    System.out.println("hello t");
                    try {
                        Thread.sleep(1000);
                    } catch (InterruptedException e) {
                        e.printStackTrace();
                    }
                }
            }
        });
        t.start();

        while (true) {
            System.out.println("hello main");
            try {
                Thread.sleep(1000);
            } catch (InterruptedException e) {
                e.printStackTrace();
            }
        }
    }
}
5、lambda表达式(最常用的方式)
public class ThreadDemo5 {
    public static void main(String[] args) {
        Thread t = new Thread( () -> {
            while (true) {
                System.out.println("hello t");
                try {
                    Thread.sleep(1000);
                } catch (InterruptedException e) {
                    e.printStackTrace();
                }
            }
        } );

        t.start();

        while (true) {
            System.out.println("hello main");
            try {
                Thread.sleep(1000);
            } catch (InterruptedException e) {
                e.printStackTrace();
            }
        }
    }
}
Thread类中其他常见方法

C、run方法,start方法
start方法,真正从系统创建一个线程,新的线程会执行run方法
run方法,表示线程的入口方法是啥(线程启动起来,要执行哪些逻辑)
D、中断一个线程,join请看另一篇文章 http://t.csdn.cn/ZmI3c
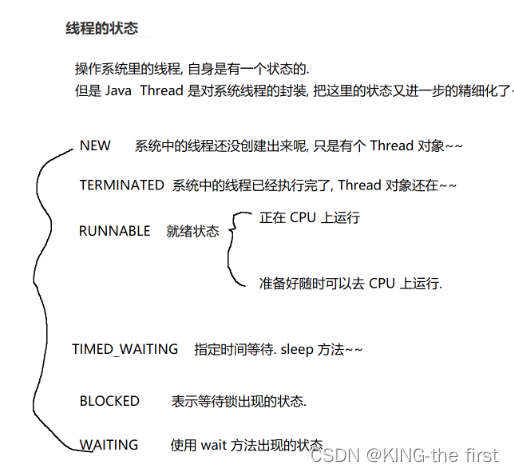
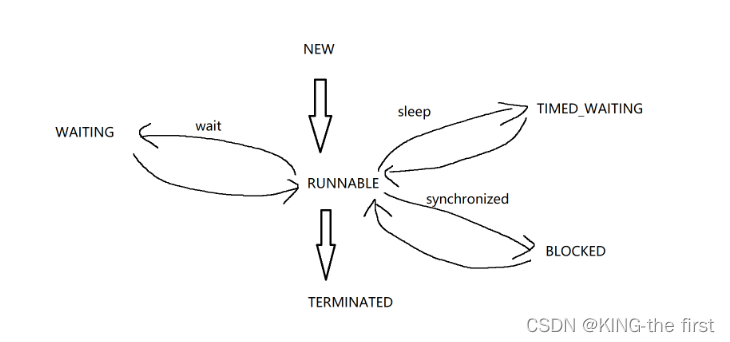
E、线程的状态
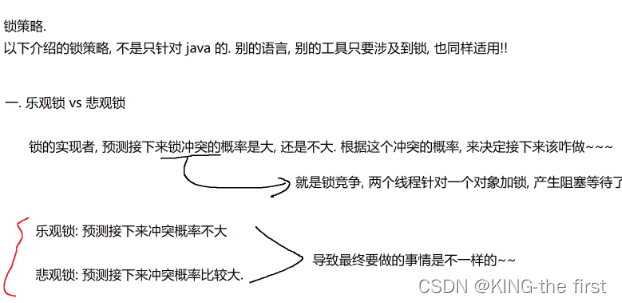
三、线程安全
线程安全问题本质上是因为线程的无序调度
A、线程不安全原因:
1、抢占式执行
2、多个线程修改同一个变量
3、修改操作,不是原子的
4、内存可见性
5、指令重排序
B、Volatile关键字保证内存可见性和防止指令重排序
C、单例模式:http://t.csdn.cn/R9zra
D、wait和notify
wait是让某个线程暂停下来等一等(发现条件不满足时)
notify是把该线程唤醒,能够继续执行(其他线程构成了一个成熟的条件)
public class ThreadDemo {
    public static void main(String[] args) throws InterruptedException {
        Object locker = new Object();
        Thread t1 = new Thread(() -> {
            try {
                System.out.println("wait 开始");
                synchronized (locker) {
                    locker.wait();
                }
                System.out.println("wait 结束");
            } catch (InterruptedException e) {
                e.printStackTrace();
            }
        });
        t1.start();

        Thread.sleep(1000);

        Thread t2 = new Thread(() -> {
            synchronized (locker) {
                System.out.println("notify 开始");
                locker.notify();
                System.out.println("notify 结束");
            }
        });
        t2.start();
    }
}
wait:释放锁,阻塞等待,当收到通知就唤醒,同时尝试重新获取锁
notify:要放到synchronized 中执行
notifyAll:可以有多个线程等待同一个对象,全部唤醒
wait和sleep:
wait解决的是线程之间的顺序控制
sleep单纯让当前线程休眠一会儿
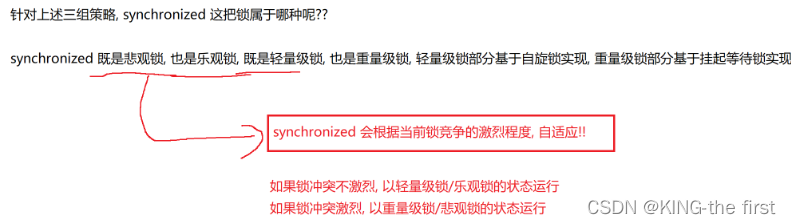
E、synchronized关键字
起到互斥效果,当线程执行到某个对象的synchronized中时,其他线程如果也执行到同一个对象的synchronized就会阻塞等待
四、基于阻塞队列实现生产者消费者模型
阻塞队列 :1、如果队列空,尝试出队列,就会阻塞等待,等到队列不空为止
2、如果队列满,尝试入队列,也会阻塞等待,等到队列不满为止
生产者消费者模型:**1、可以让上下游模块之间进行更好的“解耦合”;**这里就必须说一下什么是耦合:高内聚低耦合(主要是关联性强不强)
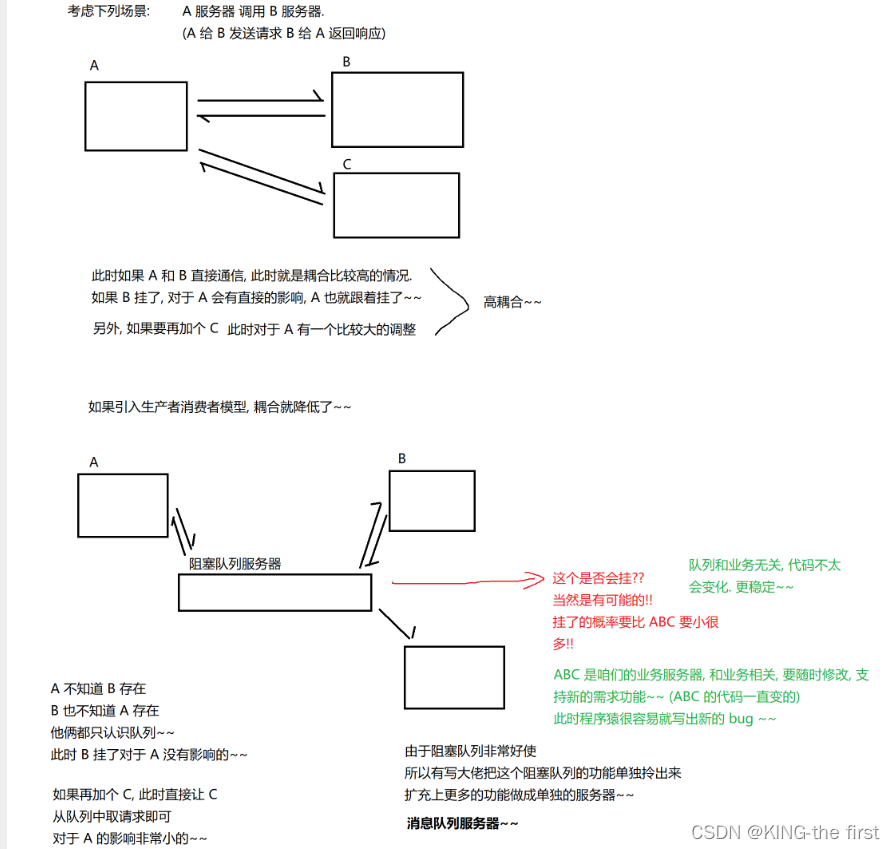
2、削峰填谷

实现阻塞队列,分三步
1、实现一个普通队列
2、加上线程安全
3、加上阻塞功能
代码如下
// 基于数组来实现队列.
class MyBlockingQueue {
    private int[] items = new int[1000];
    // 约定 [head, tail) 队列 的有效元素
    volatile private int head = 0;
    volatile private int tail = 0;
    volatile private int size = 0;

    // 入队列
    synchronized public void put(int elem) throws InterruptedException {
        while (size == items.length) {
            // 队列满了, 插入失败.
            // return;
            this.wait();
        }
        // 把新元素放到 tail 所在位置上
        items[tail] = elem;
        tail++;
        // 万一 tail 达到末尾, 就需要让 tail 从头再来.
        if (tail == items.length) {
            tail = 0;
        }
        // tail = tail % items.length;
        size++;
        this.notify();
    }

    // 出队列
    synchronized public Integer take() throws InterruptedException {
        while (size == 0) {
            // return null;
            this.wait();
        }
        int value = items[head];
        head++;
        if (head == items.length) {
            head = 0;
        }
        size--;
        this.notify();
        return value;
    }
}

public class ThreadDemo {
    public static void main(String[] args) {
        MyBlockingQueue queue = new MyBlockingQueue();
        // 消费者
        Thread t1 = new Thread(() -> {
            while (true) {
                try {
                    int value = queue.take();
                    System.out.println("消费: " + value);
                    Thread.sleep(1000);
                } catch (InterruptedException e) {
                    e.printStackTrace();
                }
            }
        });

        // 生产者
        Thread t2 = new Thread(() -> {
            int value = 0;
            while (true) {
                try {
                    System.out.println("生产: " + value);
                    queue.put(value);
                    value++;
                } catch (InterruptedException e) {
                    e.printStackTrace();
                }
            }
        });

        t1.start();
        t2.start();


        System.out.println("hello");
    }
}
五、实现定时器
定时器在软件开发中的一个重要组件,类似于一个闹钟,达到设定的时间之后就执行某个指定的代码
定时器的构成
1、一个带优先级的阻塞队列
2、队列中每个元素是一个task对象
3、task中带有一个时间属性,队首元素就是即将
4、同时有一个woker线程一直扫描队首元素,看队首元素是否需要执行
// 表示一个任务.
class MyTask implements Comparable<MyTask> {
    public Runnable runnable;
    // 为了方便后续判定, 使用绝对的时间戳.
    public long time;


    public MyTask(Runnable runnable, long delay) {
        this.runnable = runnable;
        // 取当前时刻的时间戳 + delay, 作为该任务实际执行的时间戳
        this.time = System.currentTimeMillis() + delay;
    }

    @Override
    public int compareTo(MyTask o) {
        // 这样的写法意味着每次取出的是时间最小的元素.
        // 到底是谁减谁?? 俺也记不住!!! 随便写一个, 执行下, 看看效果~~
        return (int)(this.time - o.time);
    }
}

class MyTimer {
    // 这个结构, 带有优先级的阻塞队列. 核心数据结构
    private PriorityQueue<MyTask> queue = new PriorityQueue<>();

    // 创建一个锁对象
    private Object locker = new Object();

    // 此处的 delay 是一个形如 3000 这样的数字 (多长时间之后, 执行该任务)
    public void schedule(Runnable runnable, long delay) {
        // 根据参数, 构造 MyTask, 插入队列即可.
        synchronized (locker) {
            MyTask myTask = new MyTask(runnable, delay);
            queue.offer(myTask);
            locker.notify();
        }
    }


    // 在这里构造线程, 负责执行具体任务了.
    public MyTimer() {
        Thread t = new Thread(() -> {
            while (true) {
                try {
                    synchronized (locker) {
                        // 阻塞队列, 只有阻塞的入队列和阻塞的出队列, 没有阻塞的查看队首元素.
                        while (queue.isEmpty()) {
                            locker.wait();
                        }
                        MyTask myTask = queue.peek();
                        long curTime = System.currentTimeMillis();
                        if (curTime >= myTask.time) {
                            // 时间到了, 可以执行任务了
                            queue.poll();
                            myTask.runnable.run();
                        } else {
                            // 时间还没到
                            locker.wait(myTask.time - curTime);
                        }
                    }
                } catch (InterruptedException e) {
                    e.printStackTrace();
                }
            }
        });
        // 少了个启动操作.
        t.start();
    }
}

public class ThreadDemo23 {
    public static void main(String[] args) {
        // System.out.println(System.currentTimeMillis());
        MyTimer myTimer = new MyTimer();
        myTimer.schedule(new Runnable() {
            @Override
            public void run() {
                System.out.println("hello4");
            }
        }, 4000);
        myTimer.schedule(new Runnable() {
            @Override
            public void run() {
                System.out.println("hello3");
            }
        }, 3000);
        myTimer.schedule(new Runnable() {
            @Override
            public void run() {
                System.out.println("hello2");
            }
        }, 2000);
        myTimer.schedule(new Runnable() {
            @Override
            public void run() {
                System.out.println("hello1");
            }
        }, 1000);

        System.out.println("hello0");
    }
}
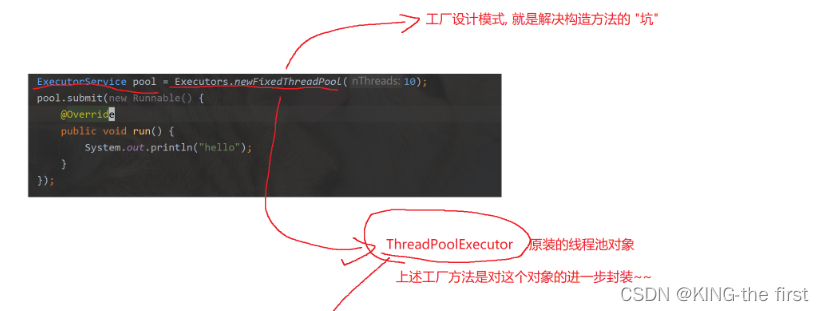
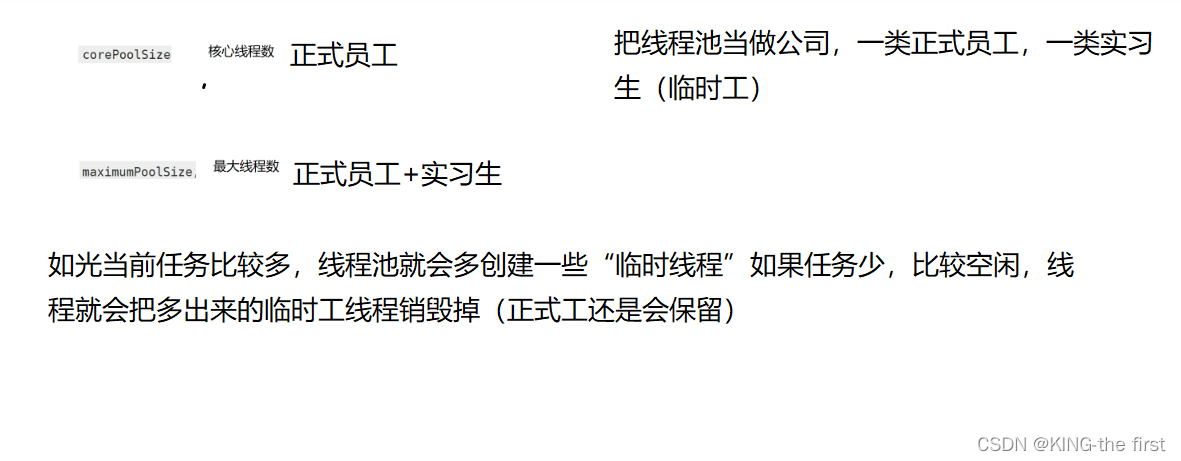
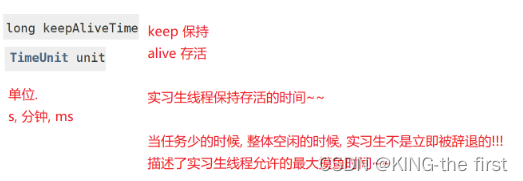
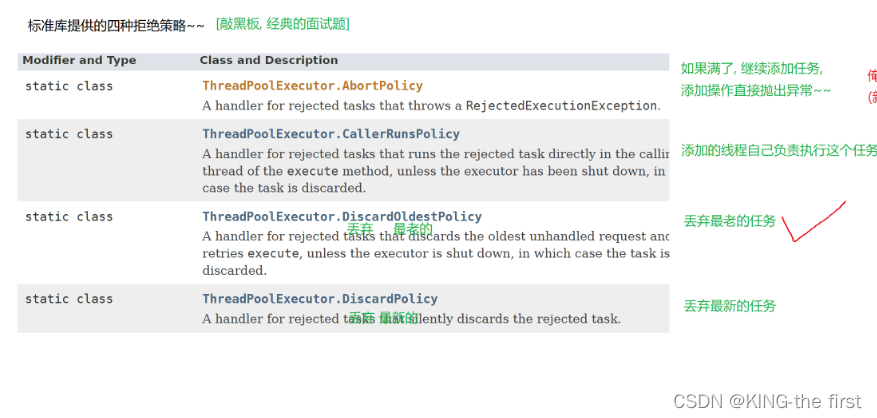
六、线程池
线程池:提前把线程准备好,创建线程不是直接从系统申请而是直接从池子里面拿,线程不用了,也是还给线程池(一定程度上提高了效率)
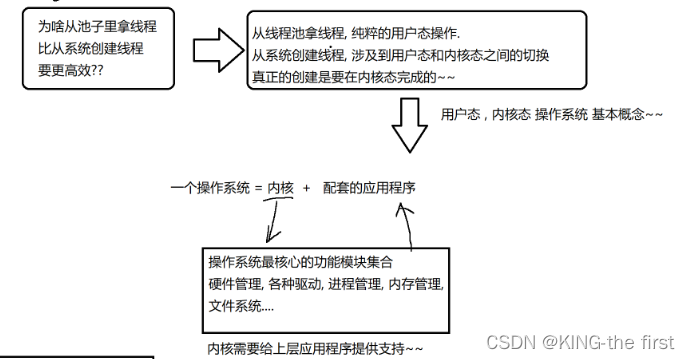
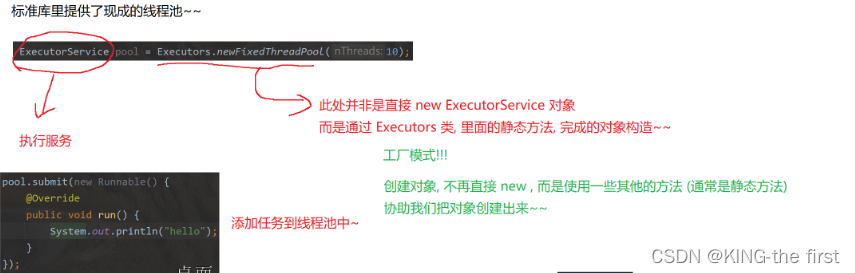
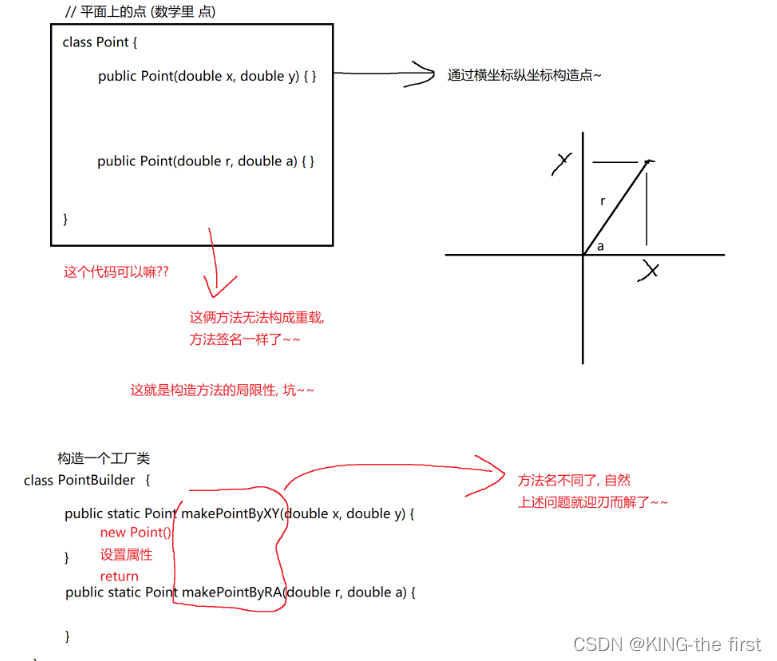
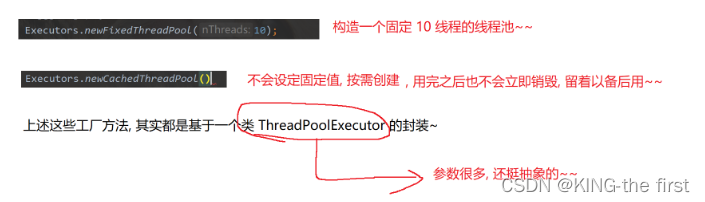
从线程池取线程,是属于纯用户态操作,不涉及和内核的交互,标准库也提供了线程池

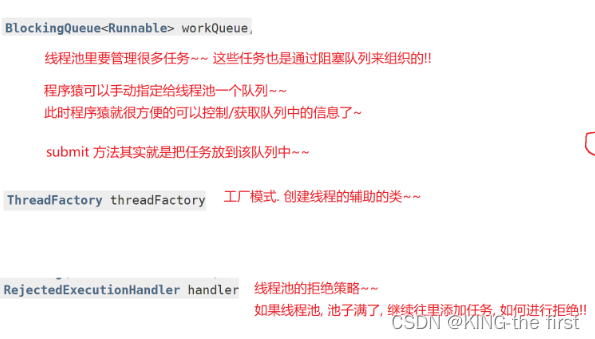
class MyThreadPool {
    // 阻塞队列用来存放任务.
    private BlockingQueue<Runnable> queue = new LinkedBlockingQueue<>();

    public void submit(Runnable runnable) throws InterruptedException {
        queue.put(runnable);
    }

    // 此处实现一个固定线程数的线程池.
    public MyThreadPool(int n) {
        for (int i = 0; i < n; i++) {
            Thread t = new Thread(() -> {
                try {
                    while (true) {
                        // 此处需要让线程内部有个 while 循环, 不停的取任务.
                        Runnable runnable = queue.take();
                        runnable.run();
                    }
                } catch (InterruptedException e) {
                    e.printStackTrace();
                }
            });
            // 不要忘记, 启动线程.
            t.start();
        }
    }
}

public class ThreadDemo25 {
    public static void main(String[] args) throws InterruptedException {
        MyThreadPool pool = new MyThreadPool(10);
        for (int i = 0; i < 1000; i++) {
            int number = i;
            pool.submit(new Runnable() {
                @Override
                public void run() {
                    System.out.println("hello " + number);
                }
            });
        }

        Thread.sleep(3000);
    }
}


锁消除:非必要不加锁,编辑器有优化手段,检测当前代码是否是多线程执行、是否有必要加锁,如果没有必要,但是又加了锁,就会在编译过程中自动把锁去掉;
锁粗化:锁的粒度(synchronized代码块,包含代码的多少,代码越多,粒度越粗,代码越少,粒度越细)多数情况下,希望锁的粒度小一点,(串行执行的代码越少,并发执行的代码就越多)

JUC(java.util.concurrent)
Callable的用法,非常类似于Runnable,也可以创建一个线程,接下来我们用代码来实现,创建一个线程,用这个线程计算1+2+…+1000 500500
public class ThreadDemo27 {
    public static void main(String[] args) throws ExecutionException, InterruptedException {
        // 这只是创建个任务
        Callable<Integer> callable = new Callable<Integer>() {
            @Override
            public Integer call() throws Exception {
                int sum = 0;
                for (int i = 1; i <= 1000; i++) {
                    sum += i;
                }
                return sum;
            }
        };

        // 还需要找个人, 来完成这个任务. (线程)
        // Thread 不能直接传 callable, 需要再包装一层
        FutureTask<Integer> futureTask = new FutureTask<>(callable);
        Thread t = new Thread(futureTask);
        t.start();

        System.out.println(futureTask.get());
    }
}
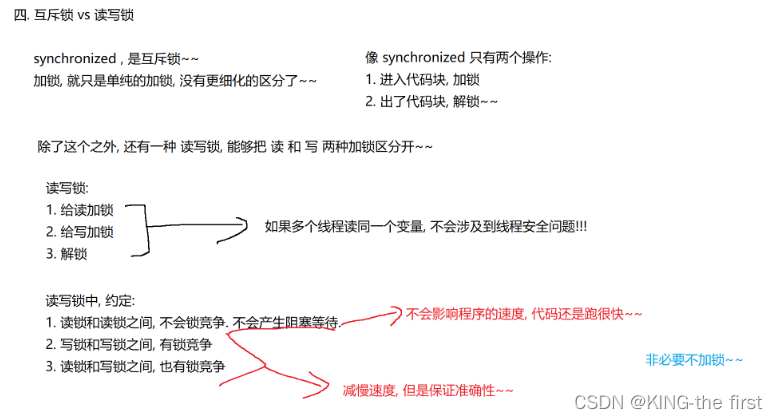
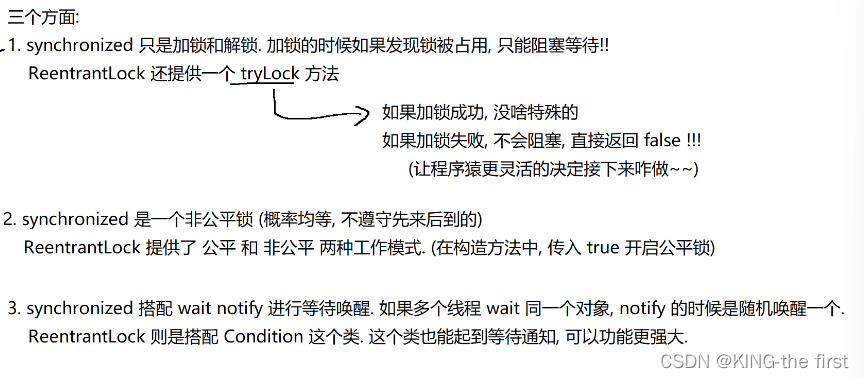
ReentrantLock 可重入锁
synchronized关键字,是基于代码块来控制加锁解锁的
ReentrantLock则是提供了lock和unlock独立的方法来进行加锁
信号量Semaphore,本质上是一个计数器,描述了当前“可用资源的个数”。


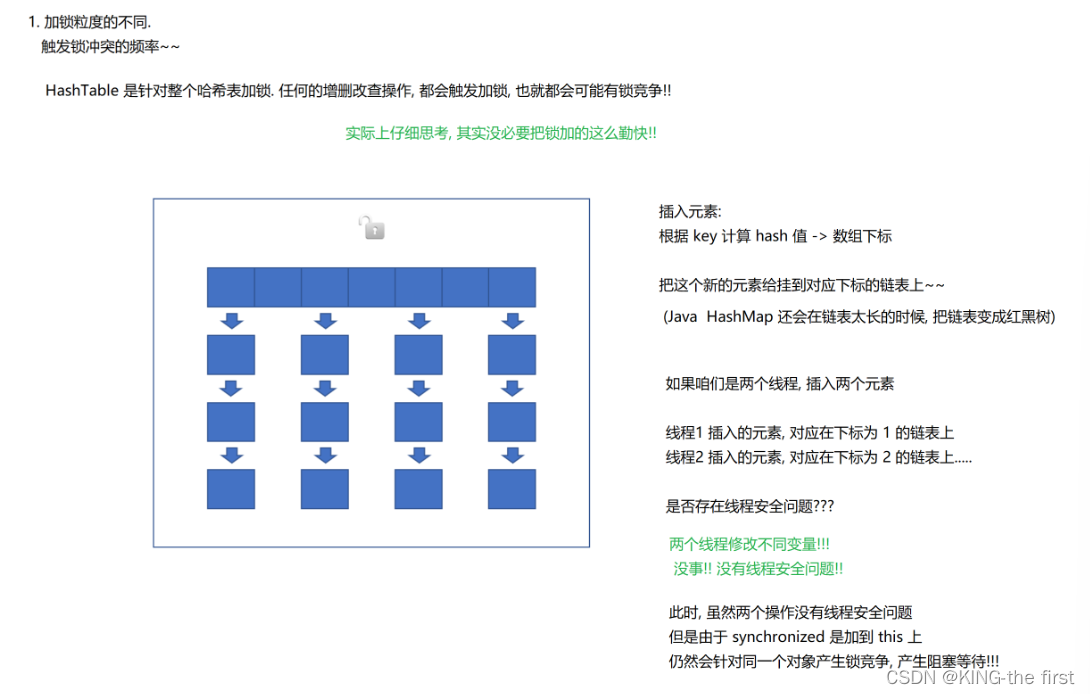
HashTable和ConcurrentHashMap的区别

总结
以上就是对多线程部分所学内容进行的整理


 4341
4341


 被折叠的 条评论
为什么被折叠?
被折叠的 条评论
为什么被折叠?
 到【灌水乐园】发言


