


目录
前言
本文章主要使用pyqt5搭建YOLOV5检测平台,使用opencv里面的DNN进行检测
参考:https://github.com/Transformer-man/yolov5_onnx_dnn.git
一、准备工作
1、代码下载
百度网盘: https://pan.baidu.com/s/1tYc3qviXKCENLyKc_R0pUg?pwd=yyds 提取码: yyds
2、环境安装
2.1、pyqt5安装
pip install PyQt5或
pip install PyQt5 -i https://pypi.tuna.tsinghua.edu.cn/simple 2.2、opencv安装
pip install opencv-python
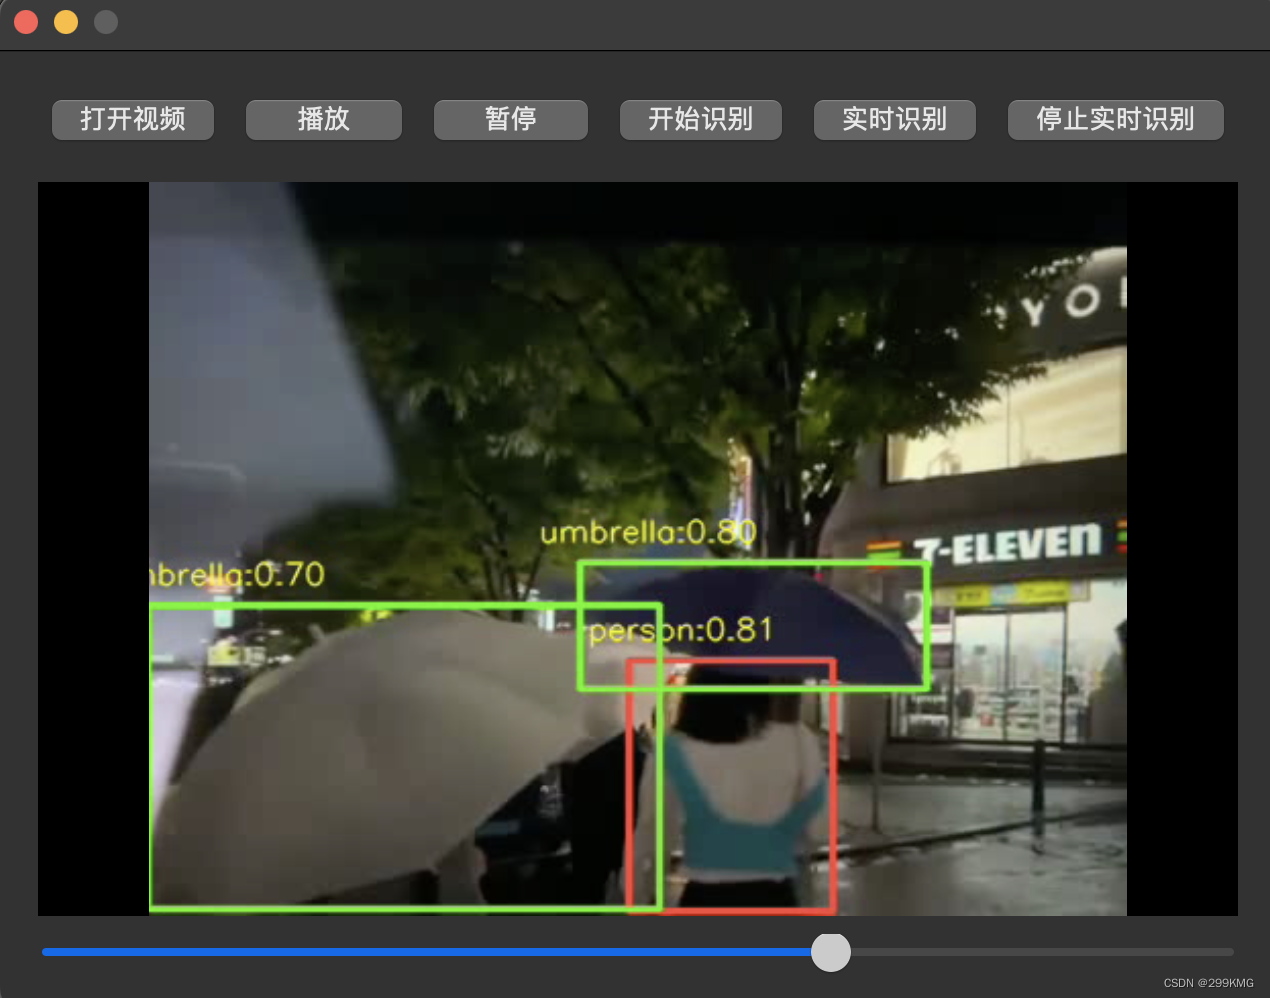
二、效果展示
可进行实时识别和mp4识别
qt界面
三、整体代码:
点击打开视频会将视频保存在input_image/text.mp4 后点击运行会将识别后的视频存放在output_image/text.mp4 并进行播放
qt代码:
import sys
import os
import shutil

from PyQt5.QtGui import QImage, QPixmap
from yolov5_dnn import yolov5
from yolov5_dnn import mult_test
import subprocess
from PyQt5.QtWidgets import QApplication, QWidget, QFileDialog, QPushButton, QVBoxLayout, QHBoxLayout, QLabel, QSlider
from PyQt5.QtMultimedia import QMediaPlayer, QMediaContent
from PyQt5.QtMultimediaWidgets import QVideoWidget
from PyQt5.QtCore import Qt, QUrl, QTimer
import cv2


class RealtimeDetection(QWidget):
    def __init__(self):
        super().__init__()


        # 创建媒体播放器和视频显示部件
        self.player = QMediaPlayer(self)
        self.video_widget = QVideoWidget(self)
        self.player.setVideoOutput(self.video_widget)

        self.label = QLabel(self)
        self.label.hide()
        # self.label.setAlignment(Qt.AlignCenter)
        # self.label.setAlignment(Qt.AlignVCenter)
        self.label.setGeometry(100,1,400,500)

        # self.label.setFixedSize(400,300)


        self.setFixedSize(640, 480)

        # 创建控制按钮和进度条
        self.open_button = QPushButton("打开视频", self)
        self.play_button = QPushButton("播放", self)
        self.pause_button = QPushButton("暂停", self)
        self.progress_bar = QSlider(Qt.Horizontal, self)
        self.progress_bar.setRange(0, 0)
        self.progress_bar.sliderMoved.connect(self.set_position)
        self.detect_button = QPushButton("开始识别", self)
        self.realtime_detect_button = QPushButton("实时识别", self)
        self.stop_realtime_detection=QPushButton("停止实时识别",self)

        # 设置布局
        button_layout = QHBoxLayout()
        button_layout.addWidget(self.open_button)
        button_layout.addWidget(self.play_button)
        button_layout.addWidget(self.pause_button)
        button_layout.addWidget(self.detect_button)
        button_layout.addWidget(self.realtime_detect_button)
        button_layout.addWidget(self.stop_realtime_detection)
        # button_layout.addWidget(self.label, stretch=1)  # 将self.label添加到布局中,并设置stretch参数

        layout = QVBoxLayout()
        layout.addLayout(button_layout)
        layout.addWidget(self.video_widget)
        layout.addWidget(self.progress_bar)

        self.setLayout(layout)

        # 信号与槽连接
        self.open_button.clicked.connect(self.open_video)
        self.play_button.clicked.connect(self.play_video)
        self.pause_button.clicked.connect(self.player.pause)
        self.player.durationChanged.connect(self.progress_bar.setMaximum)
        self.player.positionChanged.connect(self.progress_bar.setValue)
        self.realtime_detect_button.clicked.connect(self.start_realtime_detection)
        self.detect_button.clicked.connect(self.start_detection)
        self.stop_realtime_detection.clicked.connect(self.stop_recognition)

        # 存储视频文件的路径
        self.video_path = ""

        # 打开摄像头
        # self.cap = cv2.VideoCapture(0)  # 0表示默认摄像头


    def open_video(self):
        # 打开视频文件
        file_path = QFileDialog.getOpenFileName(self, "选择视频文件")[0]

        if file_path:
            media = QMediaContent(QUrl.fromLocalFile(file_path))
            self.player.setMedia(media)
            self.player.play()
            # 将视频文件路径存储在self.video_path中
            self.video_path = file_path

    def set_position(self, position):
        self.player.setPosition(position)

    def play_video(self):
        # 如果当前是停止状态,设置新的视频路径并播放
        if self.player.state() == QMediaPlayer.StoppedState:
            video_path = "/Volumes/Hard_disk/yolov5_onnx_dnn-master-3/output_image/text.mp4"
            self.player.setMedia(QMediaContent(QUrl.fromLocalFile(video_path)))
        self.player.play()

    def start_detection(self):
        # 创建input_image文件夹用于存放输入视频
        input_folder = "input_image"
        os.makedirs(input_folder, exist_ok=True)

        # 将选定的视频复制到input_image文件夹中,保存为text.mp4
        input_video_path = os.path.join(input_folder, 'text.mp4')
        shutil.copyfile(self.video_path, input_video_path)

        onnx_path = r'./yolov5s.onnx'
        input_path = r'./input_image'
        save_path = r'./output_image'

        mult_test(onnx_path, input_path, save_path, video=False)
        video_path = "/Volumes/Hard_disk/yolov5_onnx_dnn-master-3/output_image/text.mp4"
        self.player.setMedia(QMediaContent(QUrl.fromLocalFile(video_path)))
        self.player.play()

    def realtime_detection(self):
        self.cap = cv2.VideoCapture(0)  # 0表示默认摄像头
        onnx_path = r'./yolov5s.onnx'
        model = yolov5(onnx_path)

        frame_height = int(self.cap.get(cv2.CAP_PROP_FRAME_HEIGHT))
        frame_width = int(self.cap.get(cv2.CAP_PROP_FRAME_WIDTH))
        fps = self.cap.get(cv2.CAP_PROP_FPS)  # 视频平均帧率
        size = (frame_height, frame_width)  # 尺寸和帧率和原视频相同
        fourcc = cv2.VideoWriter_fourcc(*'XVID')
        out = cv2.VideoWriter('zi.mp4', fourcc, fps, size)

        ret, frame = self.cap.read()
        if not ret:
            print("无法读取")
        else:
            frame = model.detect(frame)
            frame = cv2.cvtColor(frame, cv2.COLOR_BGR2RGB)

            image = QImage(frame.data, frame_width, frame_height, QImage.Format_RGB888)
            scaled_image = image.scaled(self.label.size(), Qt.KeepAspectRatio)

            self.label.setPixmap(QPixmap.fromImage(scaled_image))
            self.label.show()  # 显示self.label

    def start_realtime_detection(self):
        self.timer = QTimer(self)
        self.timer.timeout.connect(self.realtime_detection)
        self.timer.start(30)

    def stop_recognition(self):
        self.label.clear()
        self.label.hide()
        self.timer.stop()
        self.cap.release()


if __name__ == '__main__':
    app = QApplication(sys.argv)
    player = RealtimeDetection()
    player.show()
    sys.exit(app.exec_())
图像处理代码:
参考:https://github.com/Transformer-man/yolov5_onnx_dnn.git
import cv2
import numpy as np
import time
import os
from numpy import array


class Colors:
    # Ultralytics color palette https://ultralytics.com/
    def __init__(self):
        # hex = matplotlib.colors.TABLEAU_COLORS.values()
        hex = ('FF3838', 'FF9D97', 'FF701F', 'FFB21D', 'CFD231', '48F90A', '92CC17', '3DDB86', '1A9334', '00D4BB',
               '2C99A8', '00C2FF', '344593', '6473FF', '0018EC', '8438FF', '520085', 'CB38FF', 'FF95C8', 'FF37C7')
        self.palette = [self.hex2rgb('#' + c) for c in hex]
        self.n = len(self.palette)

    def __call__(self, i, bgr=False):
        c = self.palette[int(i) % self.n]
        return (c[2], c[1], c[0]) if bgr else c

    @staticmethod
    def hex2rgb(h):  # rgb order (PIL)
        return tuple(int(h[1 + i:1 + i + 2], 16) for i in (0, 2, 4))

colors = Colors()


class yolov5():
    def __init__(self, onnx_path, confThreshold=0.25, nmsThreshold=0.45):
        self.classes = ['person', 'bicycle', 'car', 'motorcycle', 'airplane', 'bus', 'train', 'truck', 'boat',
                        'traffic light',
                        'fire hydrant', 'stop sign', 'parking meter', 'bench', 'bird', 'cat', 'dog', 'horse', 'sheep',
                        'cow',
                        'elephant', 'bear', 'zebra', 'giraffe', 'backpack', 'umbrella', 'handbag', 'tie', 'suitcase',
                        'frisbee',
                        'skis', 'snowboard', 'sports ball', 'kite', 'baseball bat', 'baseball glove', 'skateboard',
                        'surfboard',
                        'tennis racket', 'bottle', 'wine glass', 'cup', 'fork', 'knife', 'spoon', 'bowl', 'banana',
                        'apple',
                        'sandwich', 'orange', 'broccoli', 'carrot', 'hot dog', 'pizza', 'donut', 'cake', 'chair',
                        'couch',
                        'potted plant', 'bed', 'dining table', 'toilet', 'tv', 'laptop', 'mouse', 'remote', 'keyboard',
                        'cell phone',
                        'microwave', 'oven', 'toaster', 'sink', 'refrigerator', 'book', 'clock', 'vase', 'scissors',
                        'teddy bear',
                        'hair drier', 'toothbrush']
        self.colors = [np.random.randint(0, 255, size=3).tolist() for _ in range(len(self.classes))]
        num_classes = len(self.classes)
        self.anchors = [[10, 13, 16, 30, 33, 23], [30, 61, 62, 45, 59, 119], [116, 90, 156, 198, 373, 326]]
        self.nl = len(self.anchors)
        self.na = len(self.anchors[0]) // 2
        self.no = num_classes + 5
        self.stride = np.array([8., 16., 32.])
        self.inpWidth = 640
        self.inpHeight = 640
        self.net = cv2.dnn.readNetFromONNX(onnx_path)

        self.confThreshold = confThreshold
        self.nmsThreshold = nmsThreshold

    def _make_grid(self, nx=20, ny=20):
        xv, yv = np.meshgrid(np.arange(ny), np.arange(nx))
        return np.stack((xv, yv), 2).reshape((-1, 2)).astype(np.float32)

    def letterbox(self, im, new_shape=(640, 640), color=(114, 114, 114), auto=True, scaleFill=False, scaleup=True, stride=32):
     # Resize and pad image while meeting stride-multiple constraints
        shape = im.shape[:2]  # current shape [height, width]
        if isinstance(new_shape, int):
            new_shape = (new_shape, new_shape)

        # Scale ratio (new / old)
        r = min(new_shape[0] / shape[0], new_shape[1] / shape[1])
        if not scaleup:  # only scale down, do not scale up (for better val mAP)
            r = min(r, 1.0)

        # Compute padding
        ratio = r, r  # width, height ratios
        new_unpad = int(round(shape[1] * r)), int(round(shape[0] * r))
        dw, dh = new_shape[1] - new_unpad[0], new_shape[0] - new_unpad[1]  # wh padding
        if auto:  # minimum rectangle
            dw, dh = np.mod(dw, stride), np.mod(dh, stride)  # wh padding
        elif scaleFill:  # stretch
            dw, dh = 0.0, 0.0
            new_unpad = (new_shape[1], new_shape[0])
            ratio = new_shape[1] / shape[1], new_shape[0] / shape[0]  # width, height ratios

        dw /= 2  # divide padding into 2 sides
        dh /= 2

        if shape[::-1] != new_unpad:  # resize
            im = cv2.resize(im, new_unpad, interpolation=cv2.INTER_LINEAR)
        top, bottom = int(round(dh - 0.1)), int(round(dh + 0.1))
        left, right = int(round(dw - 0.1)), int(round(dw + 0.1))
        im = cv2.copyMakeBorder(im, top, bottom, left, right, cv2.BORDER_CONSTANT, value=color)  # add border
        return im, ratio, (dw, dh)


    def box_area(self,boxes :array):
        return (boxes[:, 2] - boxes[:, 0]) * (boxes[:, 3] - boxes[:, 1])

    def box_iou(self,box1 :array, box2: array):
        """
        :param box1: [N, 4]
        :param box2: [M, 4]
        :return: [N, M]
        """
        area1 = self.box_area(box1)  # N
        area2 = self.box_area(box2)  # M
        # broadcasting, 两个数组各维度大小 从后往前对比一致, 或者 有一维度值为1;
        lt = np.maximum(box1[:, np.newaxis, :2], box2[:, :2])
        rb = np.minimum(box1[:, np.newaxis, 2:], box2[:, 2:])
        wh = rb - lt
        wh = np.maximum(0, wh) # [N, M, 2]
        inter = wh[:, :, 0] * wh[:, :, 1]
        iou = inter / (area1[:, np.newaxis] + area2 - inter)
        return iou  # NxM

    def numpy_nms(self, boxes :array, scores :array, iou_threshold :float):

        idxs = scores.argsort()  # 按分数 降序排列的索引 [N]
        keep = []
        while idxs.size > 0:  # 统计数组中元素的个数
            max_score_index = idxs[-1]
            max_score_box = boxes[max_score_index][None, :]
            keep.append(max_score_index)

            if idxs.size == 1:
                break
            idxs = idxs[:-1]  # 将得分最大框 从索引中删除; 剩余索引对应的框 和 得分最大框 计算IoU;
            other_boxes = boxes[idxs]  # [?, 4]
            ious = self.box_iou(max_score_box, other_boxes)  # 一个框和其余框比较 1XM
            idxs = idxs[ious[0] <= iou_threshold]

        keep = np.array(keep)
        return keep

    def xywh2xyxy(self,x):
        # Convert nx4 boxes from [x, y, w, h] to [x1, y1, x2, y2] where xy1=top-left, xy2=bottom-right
       # y = x.clone() if isinstance(x, torch.Tensor) else np.copy(x)
        y = np.copy(x)
        y[:, 0] = x[:, 0] - x[:, 2] / 2  # top left x
        y[:, 1] = x[:, 1] - x[:, 3] / 2  # top left y
        y[:, 2] = x[:, 0] + x[:, 2] / 2  # bottom right x
        y[:, 3] = x[:, 1] + x[:, 3] / 2  # bottom right y
        return y

    def non_max_suppression(self,prediction, conf_thres=0.25,agnostic=False):                                                 #25200 = 20*20*3 + 40*40*3 + 80*80*3
        xc = prediction[..., 4] > conf_thres  # candidates,获取置信度,prediction为所有的预测结果.shape(1, 25200, 21),batch为1,25200个预测结果,21 = x,y,w,h,c + class个数
        # Settings
        min_wh, max_wh = 2, 4096  # (pixels) minimum and maximum box width and height
        max_nms = 30000  # maximum number of boxes into torchvision.ops.nms()
        output = [np.zeros((0, 6))] * prediction.shape[0]
        # for p in prediction:
        #     for i in p:
        #         with open('./result.txt','a') as f:
        #             f.write(str(i) + '\n')
        for xi, x in enumerate(prediction):  # image index, image inference
            # Apply constraints
            x = x[xc[xi]]  # confidence,获取confidence大于conf_thres的结果
            if not x.shape[0]:
                continue
            # Compute conf
            x[:, 5:] *= x[:, 4:5]  # conf = obj_conf * cls_conf
            # Box (center x, center y, width, height) to (x1, y1, x2, y2)
            box = self.xywh2xyxy(x[:, :4])
            # Detections matrix nx6 (xyxy, conf, cls)
            conf = np.max(x[:, 5:], axis=1)    #获取类别最高的置信度
            j = np.argmax(x[:, 5:],axis=1)     #获取下标
            #转为array:  x = torch.cat((box, conf, j.float()), 1)[conf.view(-1) > conf_thres]
            re = np.array(conf.reshape(-1)> conf_thres)
            #转为维度
            conf =conf.reshape(-1,1)
            j = j.reshape(-1,1)
            #numpy的拼接
            x = np.concatenate((box,conf,j),axis=1)[re]
            # Check shape
            n = x.shape[0]  # number of boxes
            if not n:  # no boxes
                continue
            elif n > max_nms:  # excess boxes
                x = x[x[:, 4].argsort(descending=True)[:max_nms]]  # sort by confidence
            # Batched NMS
            c = x[:, 5:6] * (0 if agnostic else max_wh)  # classes
            boxes, scores = x[:, :4] + c, x[:, 4]  # boxes (offset by class), scores
            i = self.numpy_nms(boxes, scores, self.nmsThreshold)
            output[xi] = x[i]
        return output

    def detect(self, srcimg):
        im = srcimg.copy()
        im, ratio, wh = self.letterbox(srcimg, self.inpWidth, stride=self.stride, auto=False)
        # Sets the input to the network
        blob = cv2.dnn.blobFromImage(im, 1 / 255.0,swapRB=True, crop=False)
        self.net.setInput(blob)
        outs = self.net.forward(self.net.getUnconnectedOutLayersNames())[0]
        #NMS
        pred = self.non_max_suppression(outs, self.confThreshold,agnostic=False)
        #draw box
        for i in pred[0]:
            left = int((i[0] - wh[0])/ratio[0])
            top = int((i[1]-wh[1])/ratio[1])
            width = int((i[2] - wh[0])/ratio[0])
            height = int((i[3]-wh[1])/ratio[1])
            conf = i[4]
            classId = i[5]
            cv2.rectangle(srcimg, (int(left), int(top)), (int(width),int(height)), colors(classId, True), 2, lineType=cv2.LINE_AA)
            label = '%.2f' % conf
            label = '%s:%s' % (self.classes[int(classId)], label)
            # Display the label at the top of the bounding box
            labelSize, baseLine = cv2.getTextSize(label, cv2.FONT_HERSHEY_SIMPLEX, 0.5, 1)
            top = max(top, labelSize[1])
            cv2.putText(srcimg, label, (int(left-20),int(top - 10)), cv2.FONT_HERSHEY_SIMPLEX, 0.5, (0,255,255), thickness=1, lineType=cv2.LINE_AA)
        return srcimg

def mult_test(onnx_path, img_dir, save_root_path, video=False):
    model = yolov5(onnx_path)
    if video:
        cap = cv2.VideoCapture(0)
        frame_height = int(cap.get(cv2.CAP_PROP_FRAME_HEIGHT))
        frame_width = int(cap.get(cv2.CAP_PROP_FRAME_WIDTH))
        fps = cap.get(cv2.CAP_PROP_FPS)       #视频平均帧率
        size = (frame_height,frame_width)     #尺寸和帧率和原视频相同
        fourcc = cv2.VideoWriter_fourcc(*'XVID')
        out = cv2.VideoWriter('zi.mp4',fourcc,fps,size)

        while cap.isOpened():
            ok, frame = cap.read()
            if not ok:
                break
            frame = model.detect(frame)
            out.write(frame)
            cv2.imshow('result', frame)
            c = cv2.waitKey(1) & 0xFF
            if c==27 or c==ord('q'):
                break
        cap.release()
        out.release()
        cv2.destroyAllWindows()
    else:
        if not os.path.exists(save_root_path):
            os.mkdir(save_root_path)
        for root, dir, files in os.walk(img_dir):
            for file in files:
                image_path = os.path.join(root, file)
                save_path = os.path.join(save_root_path, file)
                if "mp4" in file or 'avi' in file:
                    cap = cv2.VideoCapture(image_path)
                    frame_height = int(cap.get(cv2.CAP_PROP_FRAME_HEIGHT))
                    frame_width = int(cap.get(cv2.CAP_PROP_FRAME_WIDTH))
                    fps = cap.get(cv2.CAP_PROP_FPS)
                    size = (frame_width, frame_height)
                    fourcc = cv2.VideoWriter_fourcc(*'XVID')
                    out = cv2.VideoWriter(save_path,fourcc,fps,size)
                    while cap.isOpened():
                        ok, frame = cap.read()
                        if not ok:
                            break
                        frame = model.detect(frame)
                        out.write(frame)
                    cap.release()
                    out.release()
                    print("  finish:   ", file)
                elif 'jpg' or 'png' in file:
                    srcimg = cv2.imread(image_path)
                    srcimg = model.detect(srcimg)
                    print("  finish:   ", file)
                    cv2.imwrite(save_path, srcimg)
使用自己的模型:
将训练好的pt模型转换为onnx 后将模型存放在本项目目录下:
python export.py --weights yolov5s.pt --include onnx更改yolov5_dnn.py 第30行代码 更改为自己训练的模型类别名:
self.classes = ['person', 'bicycle', 'car', 'motorcycle', 'airplane', 'bus', 'train', 'truck', 'boat',
                        'traffic light',
                        'fire hydrant', 'stop sign', 'parking meter', 'bench', 'bird', 'cat', 'dog', 'horse', 'sheep',
                        'cow',
                        'elephant', 'bear', 'zebra', 'giraffe', 'backpack', 'umbrella', 'handbag', 'tie', 'suitcase',
                        'frisbee',
                        'skis', 'snowboard', 'sports ball', 'kite', 'baseball bat', 'baseball glove', 'skateboard',
                        'surfboard',
                        'tennis racket', 'bottle', 'wine glass', 'cup', 'fork', 'knife', 'spoon', 'bowl', 'banana',
                        'apple',
                        'sandwich', 'orange', 'broccoli', 'carrot', 'hot dog', 'pizza', 'donut', 'cake', 'chair',
                        'couch',
                        'potted plant', 'bed', 'dining table', 'toilet', 'tv', 'laptop', 'mouse', 'remote', 'keyboard',
                        'cell phone',
                        'microwave', 'oven', 'toaster', 'sink', 'refrigerator', 'book', 'clock', 'vase', 'scissors',
                        'teddy bear',
                        'hair drier', 'toothbrush']
后将tt.py里面的路径更换为本机路径:
video_path:是识别后的视频存放路径
第100行
    def play_video(self):
        # 如果当前是停止状态,设置新的视频路径并播放
        if self.player.state() == QMediaPlayer.StoppedState:
            video_path = "/Volumes/Hard_disk/yolov5_onnx_dnn-master-3/output_image/text.mp4"
            self.player.setMedia(QMediaContent(QUrl.fromLocalFile(video_path)))
        self.player.play()
onnx_path:是模型路径
第104行
    def start_detection(self):
        # 创建input_image文件夹用于存放输入视频
        input_folder = "input_image"
        os.makedirs(input_folder, exist_ok=True)

        # 将选定的视频复制到input_image文件夹中,保存为text.mp4
        input_video_path = os.path.join(input_folder, 'text.mp4')
        shutil.copyfile(self.video_path, input_video_path)

        onnx_path = r'./yolov5s.onnx'
        input_path = r'./input_image'
        save_path = r'./output_image'

        mult_test(onnx_path, input_path, save_path, video=False)
        video_path = "/Volumes/Hard_disk/yolov5_onnx_dnn-master-3/output_image/text.mp4"
        self.player.setMedia(QMediaContent(QUrl.fromLocalFile(video_path)))
        self.player.play()
第122行
    def realtime_detection(self):
        self.cap = cv2.VideoCapture(0)  # 0表示默认摄像头
        onnx_path = r'./yolov5s.onnx'
        model = yolov5(onnx_path)

        frame_height = int(self.cap.get(cv2.CAP_PROP_FRAME_HEIGHT))
        frame_width = int(self.cap.get(cv2.CAP_PROP_FRAME_WIDTH))
        fps = self.cap.get(cv2.CAP_PROP_FPS)  # 视频平均帧率
        size = (frame_height, frame_width)  # 尺寸和帧率和原视频相同
        fourcc = cv2.VideoWriter_fourcc(*'XVID')
        out = cv2.VideoWriter('zi.mp4', fourcc, fps, size)

        ret, frame = self.cap.read()
        if not ret:
            print("无法读取")
        else:
            frame = model.detect(frame)
            frame = cv2.cvtColor(frame, cv2.COLOR_BGR2RGB)

            image = QImage(frame.data, frame_width, frame_height, QImage.Format_RGB888)
            scaled_image = image.scaled(self.label.size(), Qt.KeepAspectRatio)

            self.label.setPixmap(QPixmap.fromImage(scaled_image))
            self.label.show()  # 显示self.label
修改以上地方就可正常使用


 510
510

 被折叠的 条评论
为什么被折叠?
被折叠的 条评论
为什么被折叠?
 到【灌水乐园】发言


