


文章目录
一、用户访问author服务获取token
1、author服务中令牌创建和解析的测试
1.1、创建CreateJwtTest类来创建token令牌
- 代码实现
public class CreateJwtTest {

    /***
     * 创建令牌测试
     */
    @Test
    public void testCreateToken(){
        //证书文件路径
        String key_location="changgou.jks";
        //秘钥库密码
        String key_password="changgou";
        //秘钥密码
        String keypwd = "changgou";
        //秘钥别名
        String alias = "changgou";

        //访问证书路径
        ClassPathResource resource = new ClassPathResource(key_location);

        //创建秘钥工厂
        KeyStoreKeyFactory keyStoreKeyFactory = new KeyStoreKeyFactory(resource,key_password.toCharArray());

        //读取秘钥对(公钥、私钥)
        KeyPair keyPair = keyStoreKeyFactory.getKeyPair(alias,keypwd.toCharArray());

        //获取私钥
        RSAPrivateKey rsaPrivate = (RSAPrivateKey) keyPair.getPrivate();

        //定义Payload
        Map<String, Object> tokenMap = new HashMap<>();
        tokenMap.put("id", "1");
        tokenMap.put("name", "itheima");
        tokenMap.put("roles", "ROLE_VIP,ROLE_USER");

        //生成Jwt令牌
        Jwt jwt = JwtHelper.encode(JSON.toJSONString(tokenMap), new RsaSigner(rsaPrivate));

        //取出令牌
        String encoded = jwt.getEncoded();
        System.out.println(encoded);
    }
}
1.2、创建ParseJwtTest类实现解析token令牌
- 代码实现
public class ParseJwtTest {

    /***
     * 校验令牌
     */
    @Test
    public void testParseToken(){
        //令牌
        String token = "eyJhbGciOiJSUzI1NiIsInR5cCI6IkpXVCJ9.eyJyb2xlcyI6IlJPTEVfVklQLFJPTEVfVVNFUiIsIm5hbWUiOiJpdGhlaW1hIiwiaWQiOiIxIn0.IR9Qu9ZqYZ2gU2qgAziyT38UhEeL4Oi69ko-dzC_P9-Vjz40hwZDqxl8wZ-W2WAw1eWGIHV1EYDjg0-eilogJZ5UikyWw1bewXCpvlM-ZRtYQQqHFTlfDiVcFetyTayaskwa-x_BVS4pTWAskiaIKbKR4KcME2E5o1rEek-3YPkqAiZ6WP1UOmpaCJDaaFSdninqG0gzSCuGvLuG40x0Ngpfk7mPOecsIi5cbJElpdYUsCr9oXc53ROyfvYpHjzV7c2D5eIZu3leUPXRvvVAPJFEcSBiisxUSEeiGpmuQhaFZd1g-yJ1WQrixFvehMeLX2XU6W1nlL5ARTpQf_Jjiw";

        //公钥
        String publickey = "-----BEGIN PUBLIC KEY-----MIIBIjANBgkqhkiG9w0BAQEFAAOCAQ8AMIIBCgKCAQEAvFsEiaLvij9C1Mz+oyAmt47whAaRkRu/8kePM+X8760UGU0RMwGti6Z9y3LQ0RvK6I0brXmbGB/RsN38PVnhcP8ZfxGUH26kX0RK+tlrxcrG+HkPYOH4XPAL8Q1lu1n9x3tLcIPxq8ZZtuIyKYEmoLKyMsvTviG5flTpDprT25unWgE4md1kthRWXOnfWHATVY7Y/r4obiOL1mS5bEa/iNKotQNnvIAKtjBM4RlIDWMa6dmz+lHtLtqDD2LF1qwoiSIHI75LQZ/CNYaHCfZSxtOydpNKq8eb1/PGiLNolD4La2zf0/1dlcr5mkesV570NxRmU1tFm8Zd3MZlZmyv9QIDAQAB-----END PUBLIC KEY-----";

        //校验Jwt
        Jwt jwt = JwtHelper.decodeAndVerify(token, new RsaVerifier(publickey));

        //获取Jwt原始内容
        String claims = jwt.getClaims();
        System.out.println(claims);
        //jwt令牌
        String encoded = jwt.getEncoded();
        System.out.println(encoded);
    }
}
2、author服务所需配置
1.1、所需工具类
1.1.1、Author实体类
用于存储token,reshtoken(刷新token),jwt短令牌
代码实现:
@Data//导入Lombok依赖,该注解为自动生成set和get方法
public class AuthToken implements Serializable{

    //令牌信息
    String accessToken;
    //刷新token(refresh_token)
    String refreshToken;
    //jwt短令牌
    String jti;
}
1.1.2、Cookie实体类
将cookie数据封装化——便于在其他地方调用该工具来添加和获取cookie值
实现代码:
public class CookieUtil {

    /**
     * 设置cookie
     *
     * @param response
     * @param name     cookie名字
     * @param value    cookie值
     * @param maxAge   cookie生命周期 以秒为单位
     */
    public static void addCookie(HttpServletResponse response, String domain, String path, String name,
                                 String value, int maxAge, boolean httpOnly) {
        Cookie cookie = new Cookie(name, value);
        cookie.setDomain(domain);
        cookie.setPath(path);
        cookie.setMaxAge(maxAge);
        cookie.setHttpOnly(httpOnly);
        response.addCookie(cookie);
    }

    /**
     * 根据cookie名称读取cookie
     * @param request
     * @return map<cookieName,cookieValue>
     */

    public static Map<String,String> readCookie(HttpServletRequest request, String ... cookieNames) {
        Map<String,String> cookieMap = new HashMap<String,String>();
            Cookie[] cookies = request.getCookies();
            if (cookies != null) {
                for (Cookie cookie : cookies) {
                    String cookieName = cookie.getName();
                    String cookieValue = cookie.getValue();
                    for(int i=0;i<cookieNames.length;i++){
                        if(cookieNames[i].equals(cookieName)){
                            cookieMap.put(cookieName,cookieValue);
                        }
                    }
                }
            }
        return cookieMap;

    }
}
1.1.3、UserJwt实体类
UserJwt类,封装SpringSecurity中User信息以及用户自身基本信息
代码实现:
@Data
public class UserJwt extends User {
    private String id;    //用户ID
    private String name;  //用户名字

    public UserJwt(String username, String password, Collection<? extends GrantedAuthority> authorities) {
        super(username, password, authorities);
    }
}
1.2、业务逻辑
- Serverlmp类
@Service
public class AuthServiceImpl implements AuthService {

    @Autowired
    private LoadBalancerClient loadBalancerClient;

    @Autowired
    private RestTemplate restTemplate;

    /***
     * 授权认证方法
     * @param username
     * @param password
     * @param clientId
     * @param clientSecret
     * @return
     */
    @Override
    public AuthToken login(String username, String password, String clientId, String clientSecret) {
        //申请令牌
        AuthToken authToken = applyToken(username,password,clientId, clientSecret);
        if(authToken == null){
            throw new RuntimeException("申请令牌失败");
        }
        return authToken;
    }


    /****
     * 认证方法
     * @param username:用户登录名字
     * @param password:用户密码
     * @param clientId:配置文件中的客户端ID
     * @param clientSecret:配置文件中的秘钥
     * @return
     */
    private AuthToken applyToken(String username, String password, String clientId, String clientSecret) {
        //选中认证服务的地址
        ServiceInstance serviceInstance = loadBalancerClient.choose("user-auth");
        if (serviceInstance == null) {
            throw new RuntimeException("找不到对应的服务");
        }
        //获取令牌的url
        String path = serviceInstance.getUri().toString() + "/oauth/token";
        //定义body
        MultiValueMap<String, String> formData = new LinkedMultiValueMap<>();
        //授权方式
        formData.add("grant_type", "password");
        //账号
        formData.add("username", username);
        //密码
        formData.add("password", password);
        //定义头
        MultiValueMap<String, String> header = new LinkedMultiValueMap<>();
        header.add("Authorization", httpbasic(clientId, clientSecret));
        //指定 restTemplate当遇到400或401响应时候也不要抛出异常,也要正常返回值
        restTemplate.setErrorHandler(new DefaultResponseErrorHandler() {
            @Override
            public void handleError(ClientHttpResponse response) throws IOException {
                //当响应的值为400或401时候也要正常响应,不要抛出异常
                if (response.getRawStatusCode() != 400 && response.getRawStatusCode() != 401) {
                    super.handleError(response);
                }
            }
        });
        Map map = null;
        try {
            //http请求spring security的申请令牌接口
            ResponseEntity<Map> mapResponseEntity = restTemplate.exchange(path, HttpMethod.POST,new HttpEntity<MultiValueMap<String, String>>(formData, header), Map.class);
            //获取响应数据
            map = mapResponseEntity.getBody();
        } catch (RestClientException e) {
            throw new RuntimeException(e);
        }
        if(map == null || map.get("access_token") == null || map.get("refresh_token") == null || map.get("jti") == null) {
            //jti是jwt令牌的唯一标识作为用户身份令牌
            throw new RuntimeException("创建令牌失败!");
        }

        //将响应数据封装成AuthToken对象
        AuthToken authToken = new AuthToken();
        //访问令牌(jwt)
        String accessToken = (String) map.get("access_token");
        //刷新令牌(jwt)
        String refreshToken = (String) map.get("refresh_token");
        //jti,作为用户的身份标识
        String jwtToken= (String) map.get("jti");
        authToken.setJti(jwtToken);
        authToken.setAccessToken(accessToken);
        authToken.setRefreshToken(refreshToken);
        return authToken;
    }


    /***
     * base64编码
     * @param clientId
     * @param clientSecret
     * @return
     */
    private String httpbasic(String clientId,String clientSecret){
        //将客户端id和客户端密码拼接,按“客户端id:客户端密码”
        String string = clientId+":"+clientSecret;
        //进行base64编码
        byte[] encode = Base64Utils.encode(string.getBytes());
        return "Basic "+new String(encode);
    }
}
1.3、controller控制类
- 判断输入密码和账号是否为空
- 申请token令牌
- 将获取到的令牌添加到cookie中
- 返回登录成功
@RestController
@RequestMapping(value = "/user")
public class AuthController {

    //客户端ID
    @Value("${auth.clientId}")
    private String clientId;

    //秘钥
    @Value("${auth.clientSecret}")
    private String clientSecret;

    //Cookie存储的域名
    @Value("${auth.cookieDomain}")
    private String cookieDomain;

    //Cookie生命周期
    @Value("${auth.cookieMaxAge}")
    private int cookieMaxAge;

    @Autowired
    AuthService authService;

    @PostMapping("/login")
    public Result login(String username, String password) {
        if(StringUtils.isEmpty(username)){
            throw new RuntimeException("用户名不允许为空");
        }
        if(StringUtils.isEmpty(password)){
            throw new RuntimeException("密码不允许为空");
        }
        //申请令牌
        AuthToken authToken =  authService.login(username,password,clientId,clientSecret);

        //用户身份令牌
        String access_token = authToken.getAccessToken();
        //将令牌存储到cookie
        saveCookie(access_token);

        return new Result(true, StatusCode.OK,"登录成功!");
    }

    /***
     * 将令牌存储到cookie
     * @param token
     */
    private void saveCookie(String token){
        HttpServletResponse response = ((ServletRequestAttributes) RequestContextHolder.getRequestAttributes()).getResponse();
        CookieUtil.addCookie(response,cookieDomain,"/","Authorization",token,cookieMaxAge,false);
    }
}
二、用户获取token传到gateway网关服务
gateway网关服务分别从请求头、cookie、redis中寻找token,然后将token封装好存入请求头传给指定服务如user服务

三、用户服务获取token进行校验
1、引入依赖
<!--oauth依赖-->
<dependency>
    <groupId>org.springframework.cloud</groupId>
    <artifactId>spring-cloud-starter-oauth2</artifactId>
</dependency>
2、资源授权配置
- 创建JwtAccessTokenConverter类型的Bean
- 在该方法中创建JwtAccessTokenConverter对象
- 调用setVerifierKey方法,参数为公钥
- 创建一个获取公钥的方法getPubKey()
- 创建TokenStore类型的Bean
- 继承ResourceServerConfigurerAdapter
- 重写configure方法——Http安全配置,对每个到达系统的http请求链接进行校验
代码实现:
@Configuration
@EnableResourceServer
@EnableGlobalMethodSecurity(prePostEnabled = true, securedEnabled = true)//激活方法上的PreAuthorize注解
public class ResourceServerConfig extends ResourceServerConfigurerAdapter {
//公钥
private static final String PUBLIC_KEY = "public.key";
/***
* 定义JwtTokenStore
* @param jwtAccessTokenConverter
* @return
*/
@Bean
public TokenStore tokenStore(JwtAccessTokenConverter jwtAccessTokenConverter) {
return new JwtTokenStore(jwtAccessTokenConverter);
}
/***
* 定义JJwtAccessTokenConverter
* @return
*/
@Bean
public JwtAccessTokenConverter jwtAccessTokenConverter() {
JwtAccessTokenConverter converter = new JwtAccessTokenConverter();
converter.setVerifierKey(getPubKey());
return converter;
}
/**
* 获取非对称加密公钥 Key
* @return 公钥 Key
*/
private String getPubKey() {
Resource resource = new ClassPathResource(PUBLIC_KEY);
try {
InputStreamReader inputStreamReader = new InputStreamReader(resource.getInputStream());
BufferedReader br = new BufferedReader(inputStreamReader);
return br.lines().collect(Collectors.joining("\n"));
} catch (IOException ioe) {
return null;
}
}
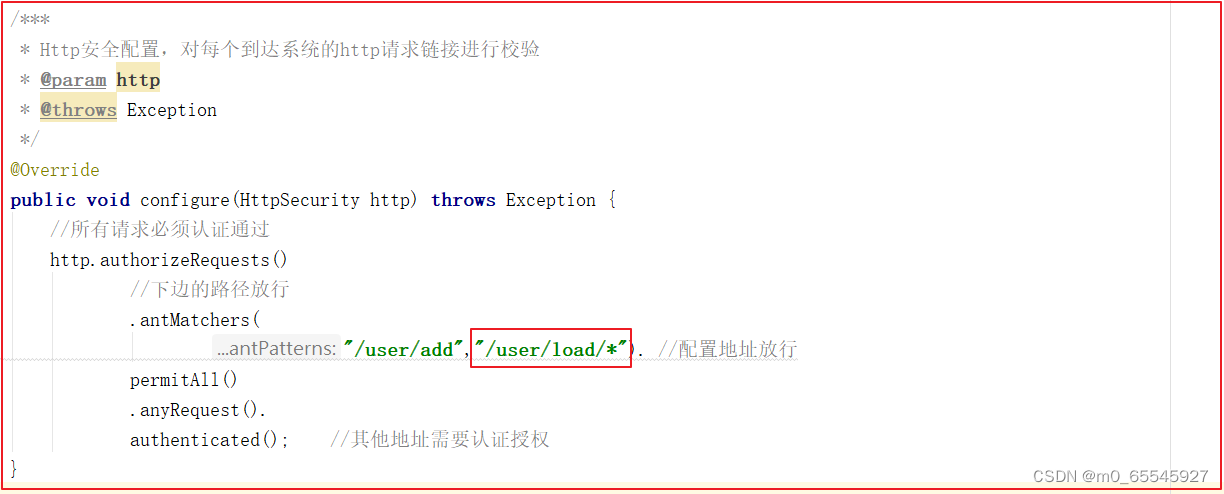
/***
* Http安全配置,对每个到达系统的http请求链接进行校验
* @param http
* @throws Exception
*/
@Override
public void configure(HttpSecurity http) throws Exception {
//所有请求必须认证通过
http.authorizeRequests()
//下边的路径放行
.antMatchers(
"/user/add"). //配置地址放行
permitAll()
.anyRequest().
authenticated(); //其他地址需要认证授权
}
}
上面是检验是否登录,下面是在成功登录后实现角色不同拥有的权限也不同
四、在author服务实现权限控制
1、巧用注解
- Spring Security中定义了四个支持权限控制的表达式注解,分别是
@PreAuthorize、@PostAuthorize、@PreFilter和@PostFilter。其中前两者可以用来在方法调用前或者调用后进行权限检查,后两者可以用来对集合类型的参数或者返回值进行过滤。在需要控制权限的方法上,我们可以添加@PreAuthorize注解,用于方法执行前进行权限检查,校验用户当前角色是否能访问该方法。 - 开启
@PreAuthorize注解- 在user服务中
ResourceServerConfig类上添加@EnableGlobalMethodSecurity注解,用于开启@PreAuthorize的支持,代码如下:

- 方法权限控制

- 在user服务中
知识点说明:
如果希望一个方法能被多个角色访问,配置:@PreAuthorize("hasAnyAuthority('admin','user')")
如果希望一个类都能被多个角色访问,在类上配置:@PreAuthorize("hasAnyAuthority('admin','user')")
五、author服务实现动态加载数据
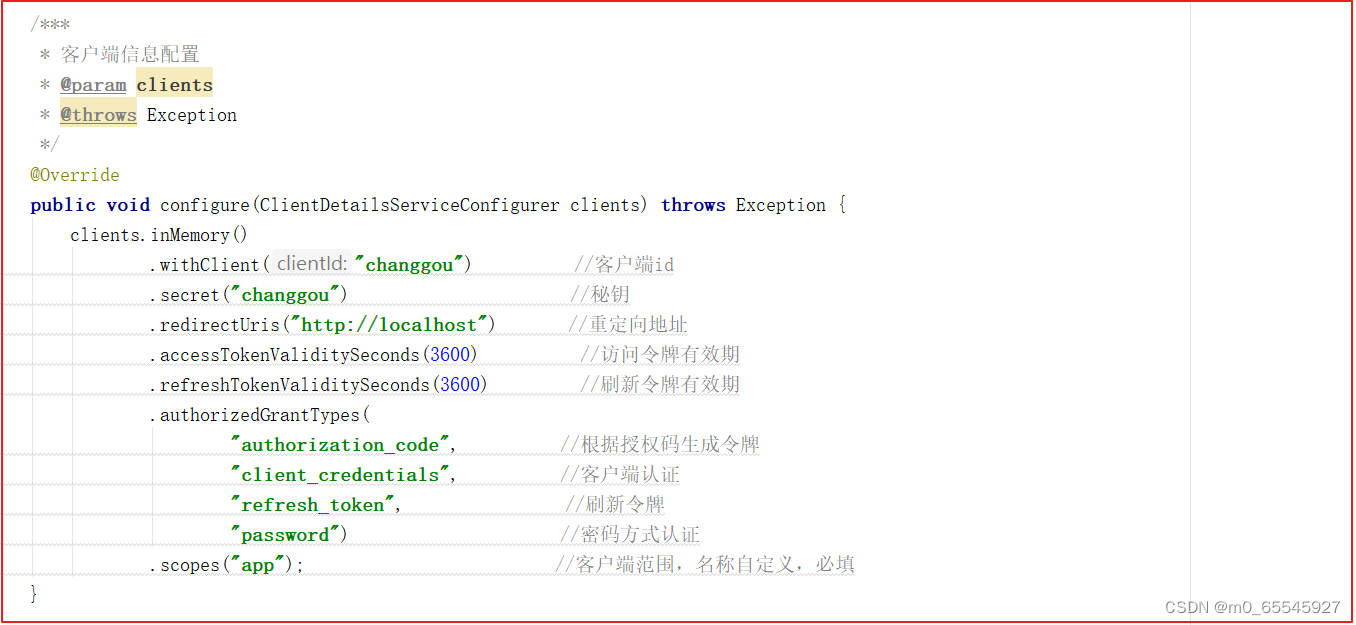
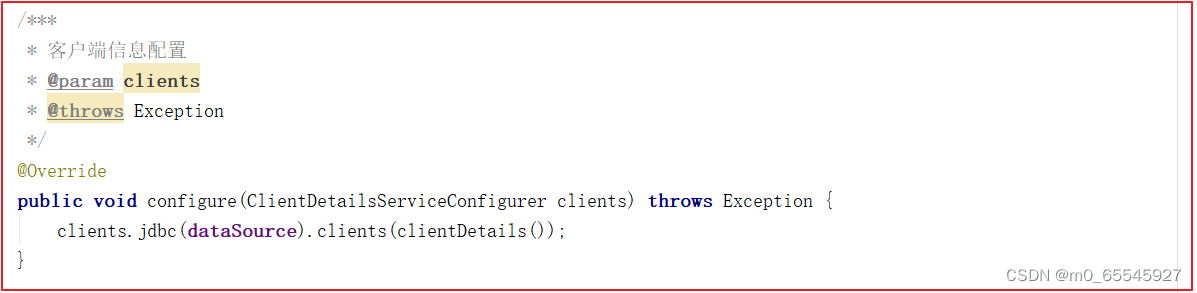
1、优化AuthorizationServerConfig类的配置
1.1、重写的configure方法
将configure方法所需的数据进行整理构建一个关系表,之后只需从数据库中查询即可,降低了耦合
- 表结构
CREATE TABLE `oauth_client_details` (
  `client_id` varchar(48) NOT NULL COMMENT '客户端ID,主要用于标识对应的应用',
  `resource_ids` varchar(256) DEFAULT NULL,
  `client_secret` varchar(256) DEFAULT NULL COMMENT '客户端秘钥,BCryptPasswordEncoder加密算法加密',
  `scope` varchar(256) DEFAULT NULL COMMENT '对应的范围',
  `authorized_grant_types` varchar(256) DEFAULT NULL COMMENT '认证模式',
  `web_server_redirect_uri` varchar(256) DEFAULT NULL COMMENT '认证后重定向地址',
  `authorities` varchar(256) DEFAULT NULL,
  `access_token_validity` int(11) DEFAULT NULL COMMENT '令牌有效期',
  `refresh_token_validity` int(11) DEFAULT NULL COMMENT '令牌刷新周期',
  `additional_information` varchar(4096) DEFAULT NULL,
  `autoapprove` varchar(256) DEFAULT NULL,
  PRIMARY KEY (`client_id`)
) ENGINE=InnoDB DEFAULT CHARSET=utf8;
字段说明:
client_id:客户端id
resource_ids:资源id(暂时不用)
client_secret:客户端秘钥
scope:范围
access_token_validity:访问token的有效期(秒)
refresh_token_validity:刷新token的有效期(秒)
authorized_grant_type:授权类型:authorization_code,password,refresh_token,client_credentials
上述表结构属于SpringSecurity Oauth2.0所需的一个认证表结构,不能随意更改。相关操作在其他类中有所体现,如:`org.springframework.security.oauth2.provider.client.JdbcClientDetailsService
未创建该表之前的配置
修改后
注意:由于需要从数据库获取数据,所以要导入依赖,添加jdbc配置
  datasource:
    driver-class-name: com.mysql.jdbc.Driver
    url: jdbc:mysql://192.168.211.132:3306/changgou_oauth?useUnicode=true&characterEncoding=utf-8&useSSL=false&allowMultiQueries=true&serverTimezone=UTC
    username: root
    password: 123456
2、author服务通过feign调用user服务中的方法
1.1、引入feign依赖坐标
1.2、在专门管理api服务中设置调用接口
- feign
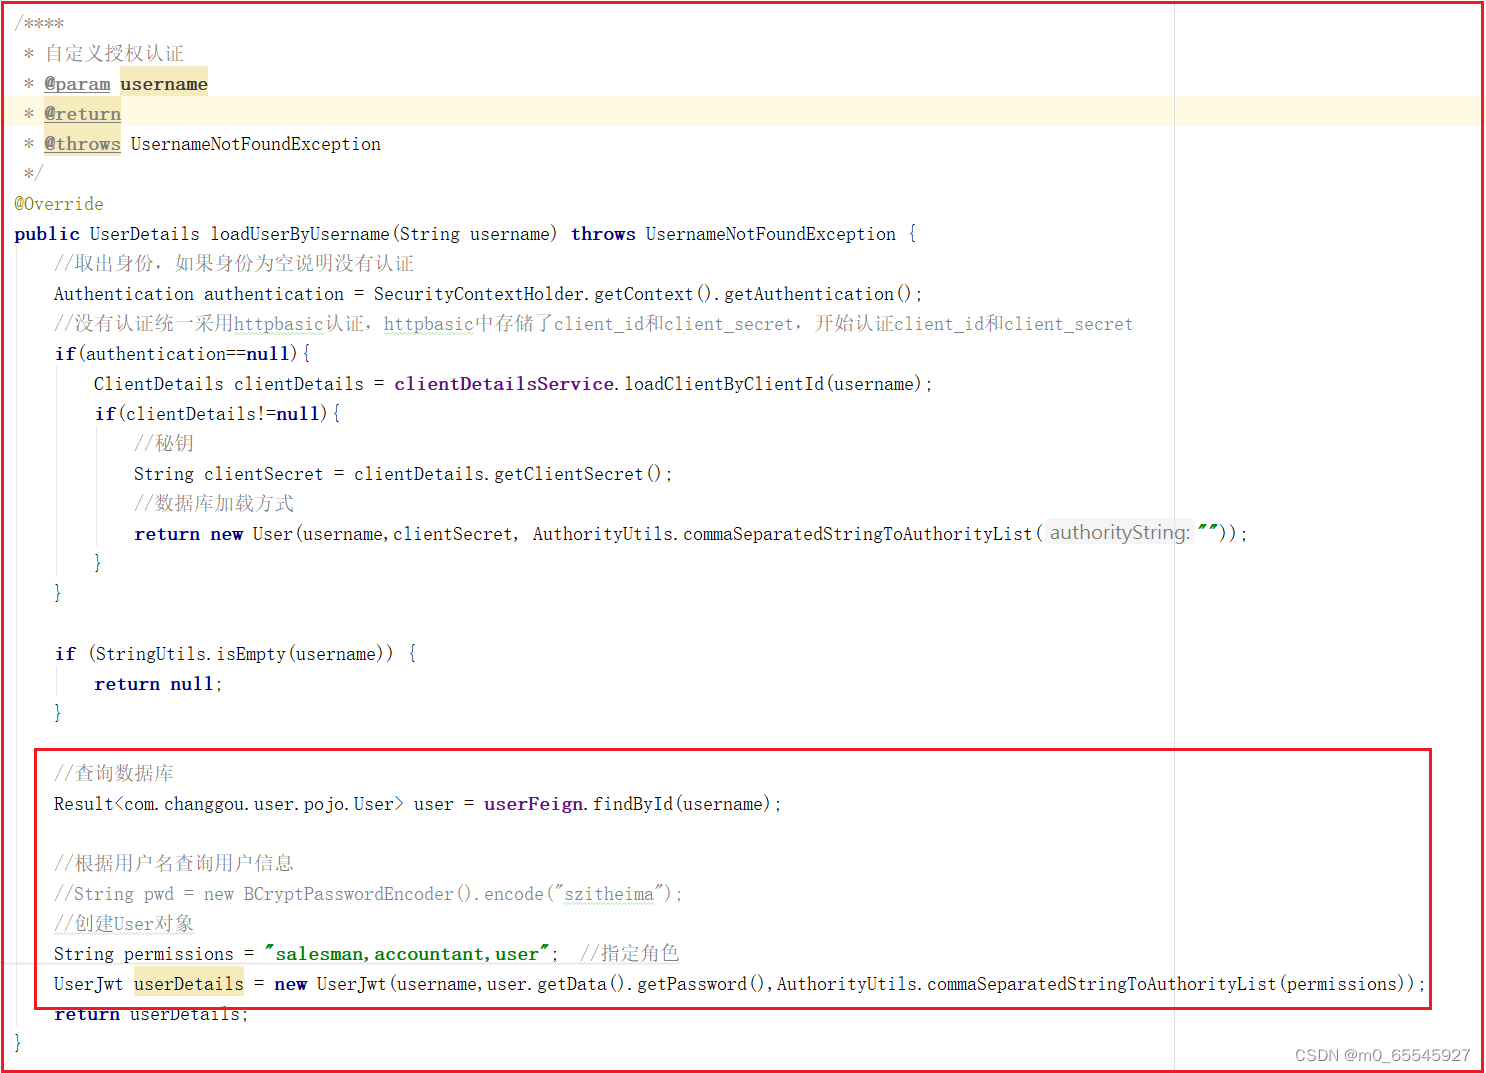
如:author服务需要掉用user服务查询用户信息(findById)的接口,代码如下:
@FeignClient(name="user")
@RequestMapping("/user")
public interface UserFeign {

    /***
     * 根据ID查询用户信息
     * @param id
     * @return
     */
    @GetMapping("/load/{id}")
    Result<User> findById(@PathVariable String id);
}
- user服务对应的接口

- 放行查询用户方法
因为oauth需要调用查询用户信息,需要在user服务中放行/user/load/{id}方法,修改ResourceServerConfig,添加对/user/load/{id}的放行操作,代码如下:
- oauth调用查询用户信息
oauth引入对user-api的依赖
<!--依赖用户api-->
<dependency>
    <groupId>com.changgou</groupId>
    <artifactId>changgou-service-user-api</artifactId>
    <version>1.0-SNAPSHOT</version>
</dependency>
修改oauth的com.changgou.oauth.config.UserDetailsServiceImpl的loadUserByUsername方法,调用UserFeign查询用户信息,代码如下:
- feign开启
修改com.changgou.OAuthApplication开启Feign客户端功能
@SpringBootApplication
@EnableDiscoveryClient
@EnableFeignClients(basePackages = {"com.changgou.user.feign"})
@MapperScan(basePackages = "com.changgou.auth.dao")
public class OAuthApplication {

    public static void main(String[] args) {
        SpringApplication.run(OAuthApplication.class,args);
    }


    @Bean(name = "restTemplate")
    public RestTemplate restTemplate() {
        return new RestTemplate();
    }

}
问题
-
tk.mybatis.mapper.provider.base.BaseSelectProvider.()——
mapperscan的包导错了 -
spring clound 项目 @FeignClient 上加 @RequestMapping 注解远程调用报错解决——@FeignClient和@RequestMapping 同时使用会报错


 1万+
1万+


 被折叠的 条评论
为什么被折叠?
被折叠的 条评论
为什么被折叠?
 到【灌水乐园】发言


