


文章目录
参考博客0
一、webSocket的作用
1)通知功能:
2)数据收集:
3)加密 && 认证:
4)反向控制钩子:
二、webSocket的优缺点
1、优点
1、websocket则允许我们在一条ws连接上同时并发多个请求,即在A请求发出后A响应还未到达,就可以继续发出B请求。由于TCP的慢启动特性(新连接速度上来是需要时间的),以及连接本身的握手损耗,都使得websocket协议的这一特性有很大的效率提升。
2、webSocket的复用性可以利用上一条请求内容
3、websocket支持服务器推送消息,这带来了及时消息通知的更好体验,也是ajax请求无法达到的。
2、缺点
1、服务器长期维护长连接需要一定的成本
2、各个浏览器支持程度不一
3、websocket 是长连接,受网络限制比较大,需要处理好重连,比如用户进电梯或电信用户打个电话网断了,这时候就需要重连
3、webSocket与Http协议的异同
三、webSocket重要步骤
步骤:
	1.后端
		a.搭建服务器和处理器
	2.前端
		a.判断是否支持webSocket
		b.创建webSocket对象设置参数uri
		c.设计发送(send)、接收和显示(show)消息方法
		d.心跳机制:确保客户端或服务器活着
		e.重连机制:当客户端或服务器恢复后能够重新连上
1、后端
1.1、webSocket服务器搭建
- 导入依赖
		<dependency>
            <groupId>io.netty</groupId>
            <artifactId>netty-all</artifactId>
            <version>4.1.77.Final</version>
        </dependency>
- 服务类代码实现
package com.wxl.websocket;

import io.netty.bootstrap.ServerBootstrap;
import io.netty.channel.*;
import io.netty.channel.nio.NioEventLoopGroup;
import io.netty.channel.socket.nio.NioServerSocketChannel;
import io.netty.handler.codec.http.HttpObjectAggregator;
import io.netty.handler.codec.http.HttpServerCodec;
import io.netty.handler.codec.http.websocketx.WebSocketServerProtocolHandler;

public class WebSocketServer {
    public static void main(String[] args) {
        try {
            EventLoopGroup master = new NioEventLoopGroup();
            EventLoopGroup salve=new NioEventLoopGroup();

            ServerBootstrap bootstrap = new ServerBootstrap();
            bootstrap.group(master,salve);
            bootstrap.channel(NioServerSocketChannel.class);
            bootstrap.childHandler(new ChannelInitializer() {
                @Override
                protected void initChannel(Channel channel) throws Exception {
                    ChannelPipeline pipeline = channel.pipeline();
                    //http编码器
                    pipeline.addLast(new HttpServerCodec());
                    pipeline.addLast(new HttpObjectAggregator(1024*10));

                    pipeline.addLast(new WebSocketServerProtocolHandler("/"));//此处设置映射路径
                    //自定义客户端处理器
                    pipeline.addLast(new WebSocketServerHandler());
                }
            });
            ChannelFuture channelFuture = bootstrap.bind(8081);
            channelFuture.sync();
            System.out.println("服务端启动成功。。。。");
        } catch (InterruptedException e) {
            e.printStackTrace();
        }
    }
}
注意:在添加处理器的位置添加客户端超过多久未发送信息便自动断开连接的处理器——//客户端10s不发送信息自动断开
pipeline.addLast(new ReadTimeoutHandler(10, TimeUnit.SECONDS));
- 自定义处理类代码实现
package com.wxl.websocket;

import io.netty.channel.ChannelHandler;
import io.netty.channel.ChannelHandlerContext;
import io.netty.channel.SimpleChannelInboundHandler;
import io.netty.handler.codec.http.websocketx.TextWebSocketFrame;
import io.netty.util.concurrent.EventExecutorGroup;

public class WebSocketServerHandler extends SimpleChannelInboundHandler<TextWebSocketFrame> {
    @Override
    protected void channelRead0(ChannelHandlerContext channelHandlerContext, TextWebSocketFrame textWebSocketFrame) throws Exception {
        System.out.println("读取客户端的内容:"+textWebSocketFrame.text());
        String text=textWebSocketFrame.text();
        if (text.equals("heard")){//处理心跳
            //响应heard到客户端
            TextWebSocketFrame heard = new TextWebSocketFrame("heard");
            channelHandlerContext.writeAndFlush(heard);
            return;
        }
        TextWebSocketFrame textWebSocketFrame1 = new TextWebSocketFrame("嗯");
        channelHandlerContext.writeAndFlush(textWebSocketFrame1);
    }

    @Override
    public void channelRegistered(ChannelHandlerContext ctx) throws Exception {
        System.out.println("新客户端建立连接。。。。");
    }

    @Override
    public void channelUnregistered(ChannelHandlerContext ctx) throws Exception {
        System.out.println("客户端断开连接。。。。");
    }
}
2、前端
1.1、心跳机制
- 心跳代码
			//心跳机制
			sendHeard(){
				//每5秒发送一次
				this.sendHeardTime=setInterval(function() {
					//向服务端发送消息
					ws.send("heard");
				}, 5000);
			},
注意:在data方法中定义sendHeardTime:undefined==》用于后序clearInterval(sendHeardTime)清除该定时事件
- 超时关闭连接的方法
- 当客户端发送心跳后多久后未收到服务端回的心跳,便断开连接。
- 实现代码
			//关闭连接
			closeConn(){
				this.closeConnTime=setTimeout(function(){
					ws.close();
				},10000);
			},
- 在onopen方法中调用——两方法
- 在onmessage方法中收到服务端回的心跳后,调用clearTimeout,并再次调closeConn方法
- 在onclose和destroyed方法中clearInterval
1.2、重连机制
- 重连的代码
			//重连机制
			reConn(){
				console.info("重连");
				setTimeout(()=>{
					this.initWebSocket();
				},5000);
			}
- 在onclose方法中调用
四、通讯项目思想
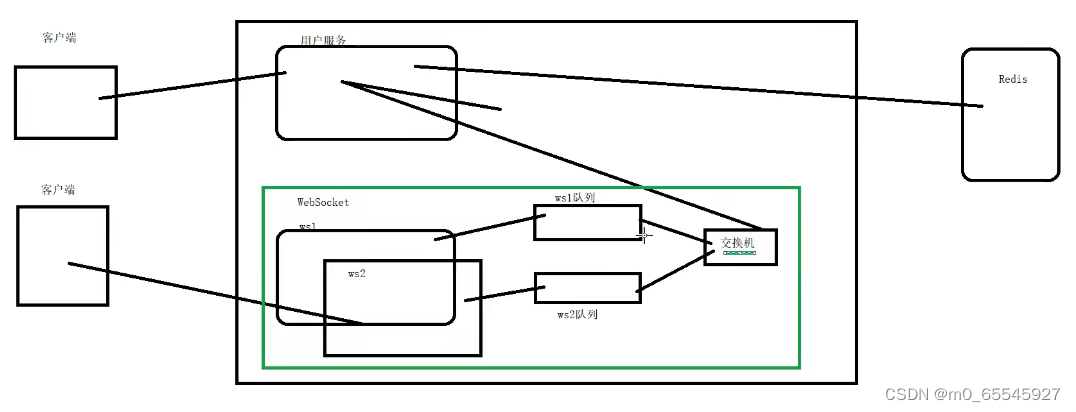
1、服务搭建
服务划分:
	1、搭建eureka注册中心
	2、config服务,将所有配置集中放到该服务
	3、用户服务——处理各种业务逻辑
	4、网关服务
	5、netty服务——通讯
2、创建多个实体类处理不同业务
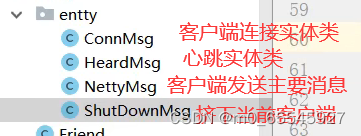
同时创建各自的处理类,将处理类添加到websocket服务类
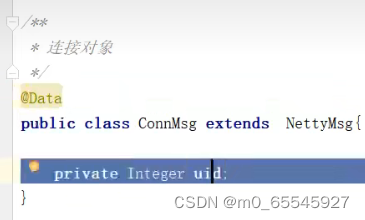
实体类:
-
ConnMsg实体类
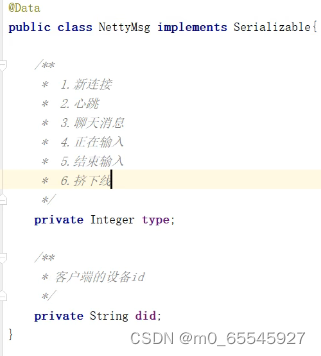
-
NettyMsg
-
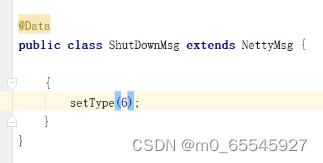
ShutDownMsg
-
ChannelGroup实体类
package com.wxl;

import io.netty.channel.Channel;

import java.util.HashMap;
import java.util.Map;
import java.util.Set;

/**
 * 保存所有的客户端的连接  设备id,channel
 */
public class ChannelGroup {
    /**
     * key:设备id
     * channel:设备id的连接对象
     */
    public static Map<String, Channel> channelMap=new HashMap<>();

    /**
     * 添加channel到容器中
     * @param did
     * @param channel
     */
    public static void addChannel(String did,Channel channel){
        channelMap.put(did,channel);
    }

    /**
     * 获取channel对象
     * @param did
     * @return
     */
    public static Channel getChannel(String did){
        return channelMap.get(did);
    }

    /**
     * 删除channel对象
     * @param did
     */
    public static void removeChannel(String did){
        channelMap.remove(did);
    }

    public static void removeChannel(Channel channel){
        if (channelMap.containsKey(channel)){
            Set<Map.Entry<String, Channel>> entries = channelMap.entrySet();
            for (Map.Entry<String, Channel> entry : entries) {
                if (entry.getValue()==channel){
                    channelMap.remove(entry.getKey());
                    break;
                }
            }
        }
    }

}
- websocket的主处理类webSocketHandler,先执行该处理类再处理其他处理类

3、实现用户挤下线的功能
主要步骤
	1、引入redis存储用户id和设备id
	2、引入rabbitmq,通过交换机和队列,来实现用户服务查询websocket服务中注册的channel
	3、创建ChannelGroup实体类,并定义一个map属性来存储设备id和channel
1、redis
- 引入依赖和添加配置
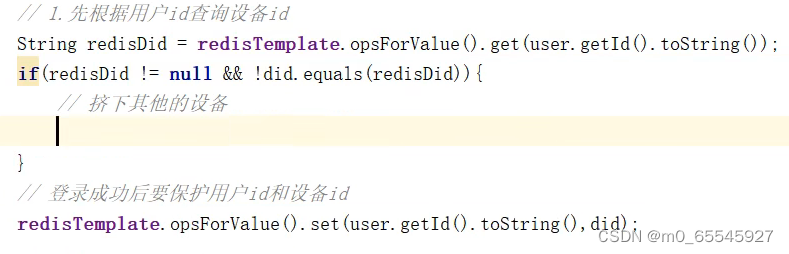
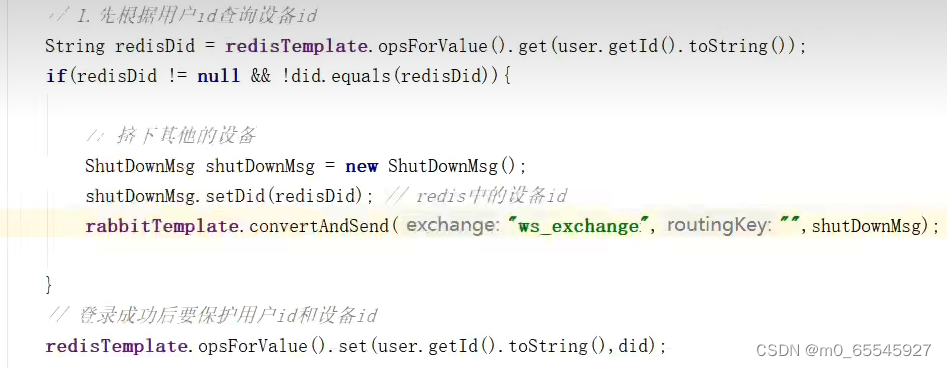
- 在用户服务注入StringRedisTemplate——存入redis的数据对为(用户id:设备id)
- 在login业务中——根据用户id查询设备id
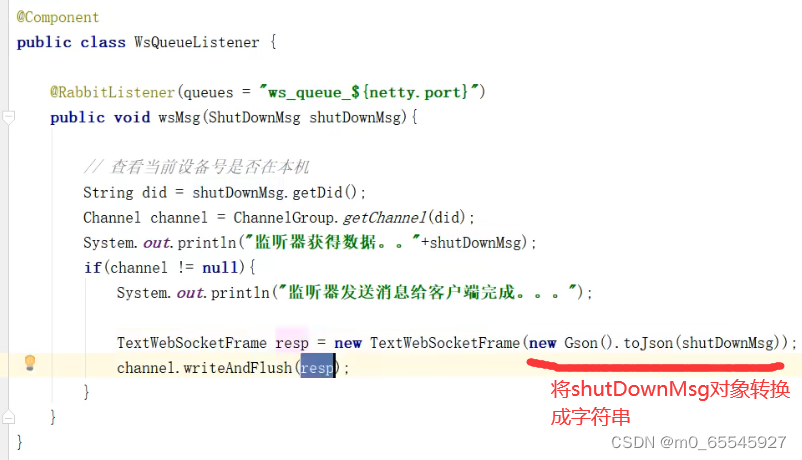
- 判断设备id与前端传来的是否相等,不等创建shutDownMsg对象,rabbitmq发送消息
- 挤下操作
1、目的:根据设备id获取对应的channel
2、rabbitmq
-
用户端和netty服务端引入依赖,添加配置
-
用户端注入Rabbitmq,主要负责给交换机发送数据
-
创建队列和交换机,同时绑定队列和交换机
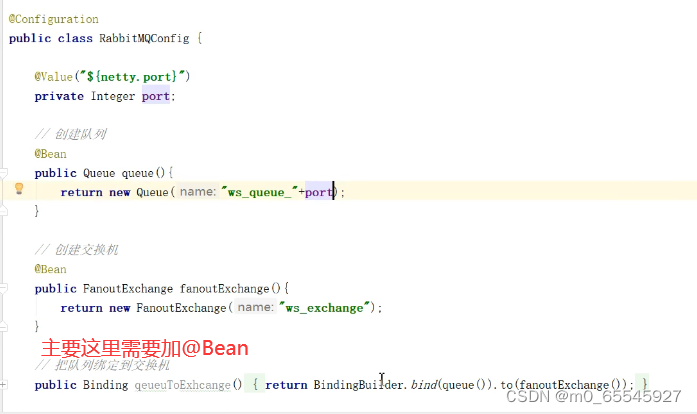
-
创建监听类——监听是否向交换机发送了消息
-
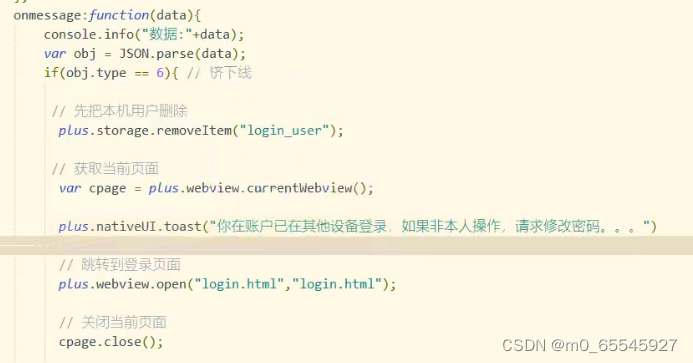
前端获取服务端消息onmassege()——方法查询html5plus官网
-
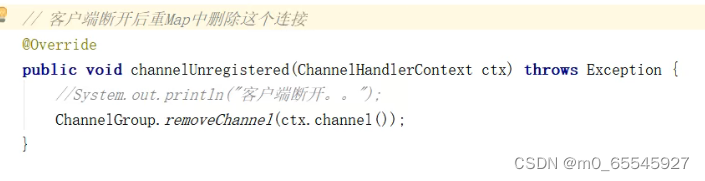
在客户端断开连接后需在主webSocketHandler处理器的unregistered方法中将当前channel从ChannelGroup中删除
-
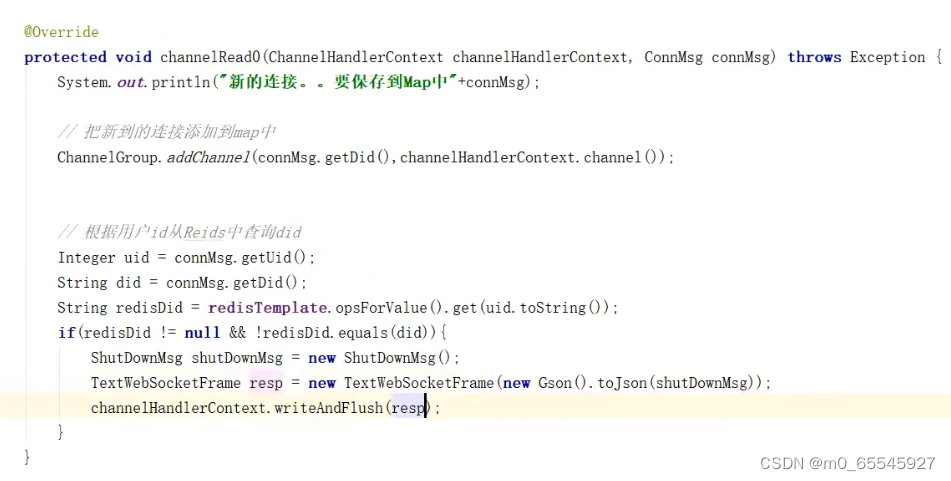
在ConnMsgHandler类(客户端连接处理器)中使用构造器的方法将websocket主服务类中注入的redisTemplate通过参数传入该类
五、整体代码
1.vue
<template>
	<view>
		<view style="width: 400px;height: 300px;border: 1px solid red;" id="showMgs">
			<!-- <view v-for="(item,index) in msgs" :key="index" v-html="item.cnt"></view> -->
		</view>
		<view style="border: 1px solid red;width: 400px;">
			<input style="float: left;border: 1px solid green; width: 200px;height: 40px;" type="text" v-model="cnt"/>
			<button style="width: 100px;height: 40px;line-height: 40px;" @click="sendMsg">发送</button>
		</view>


	</view>
</template>

<script>
	import $ from 'jquery';
	var ws;
	export default {
		data() {
			return {
				cnt:'',
				flage:true,
				closeConnTime:undefined,	//超过多少时间关闭连接的事件
				sendHeardTime:undefined,	//定时发送心跳机制
			}
		},

		created() {
			this.initWebSocket();
		},
		destroyed() {
			clearInterval(this.sendHeardTime);
			ws.close();
			//this.reConn();//重连
		},
		methods: {
			initWebSocket(){
				console.log("1");
				//是否支持websocket属性
				if(window.WebSocket){
					console.log("2");
					//连接服务器
					ws=new WebSocket("ws://localhost:8081/");
					ws.onmessage = this.websocketonmessage;
					ws.onopen = this.websocketonopen;
					ws.onerror = this.websocketonerror;
					ws.onclose = this.websocketclose;
				}else{
					alert("不支持websocket服务器");
				}
			},
			//客户端接收服务端数据时触发
			websocketonmessage(data){
				if(data.data!="heard"){
					console.info("客户端响应数据"+data.data);
					$("#showMgs").append("<span>我:"+data.data+"</span><br>");
				}else{
					clearTimeout(this.closeConnTime);//清除定时关闭的连接
					this.closeConn();
					console.info("心跳:"+data.data);
				}
				//this.msgs.push("<span>我:"+data.data+"</span><br>");
			},
			websocketonopen(){//连接建立时触发
				console.info("客户端连接成功。。。。");
				$("#showMgs").append("<span style='color:green;'>客户端连接成功</span><br>");
				//this.msgs.push({cnt:"<span style='color:green;'>客户端连接成功</span><br>"});
				//成功连接之后调用心跳
				this.sendHeard();
				this.closeConn();
			},
			//通信发生错误时触发
			websocketonerror(){
				console.info("通信发生错误。。。");
			},
			websocketclose(){//连接关闭时触发
				clearInterval(this.sendHeardTime);//清除定时发送心跳事件
				this.reConn();//重连
				console.info("客户端断开连接。。。");
				$("#showMgs").append("<span style='color:red;'>客户端断开连接</span><br>");
				//this.msgs.push("<span style='color:red;'>客户端断开连接</span><br>");
			},
			sendMsg(){
				//var msg=$("#cnt").val();
				var msg=this.cnt;
				console.info(msg);
				//发送消息
				ws.send(msg);//将数据发送到webSocket服务端
				//将数据显示到页面
				$("#showMgs").append("<span>我:"+msg+"</span><br>");
				//this.msgs.push("<span>我:"+msg+"</span><br>");
			},

			//心跳机制
			sendHeard(){
				//每5秒发送一次
				this.sendHeardTime=setInterval(function() {
					//向服务端发送消息
					ws.send("heard");
				}, 5000);
			},
			//关闭连接
			closeConn(){
				this.closeConnTime=setTimeout(function(){
					ws.close();
				},10000);
			},
			//重连机制
			reConn(){
				console.info("重连");
				setTimeout(()=>{
					this.initWebSocket();
				},5000);
			}

		}
	}
</script>

<style>

</style>


 5251
5251


 被折叠的 条评论
为什么被折叠?
被折叠的 条评论
为什么被折叠?
 到【灌水乐园】发言


