


Elasticsearch从入门到项目部署 安装 分词器 索引库操作-CSDN博客
3.文档操作
有了索引库,接下来就可以向索引库中添加数据了。
Elasticsearch中的数据其实就是JSON风格的文档。操作文档自然保护增、删、改、查等几种常见操作,我们分别来学习。
3.1.新增文档
语法:
POST /索引库名/_doc/文档id
{
    "字段1": "值1",
    "字段2": "值2",
    "字段3": {
        "子属性1": "值3",
        "子属性2": "值4"
    },
}
示例:
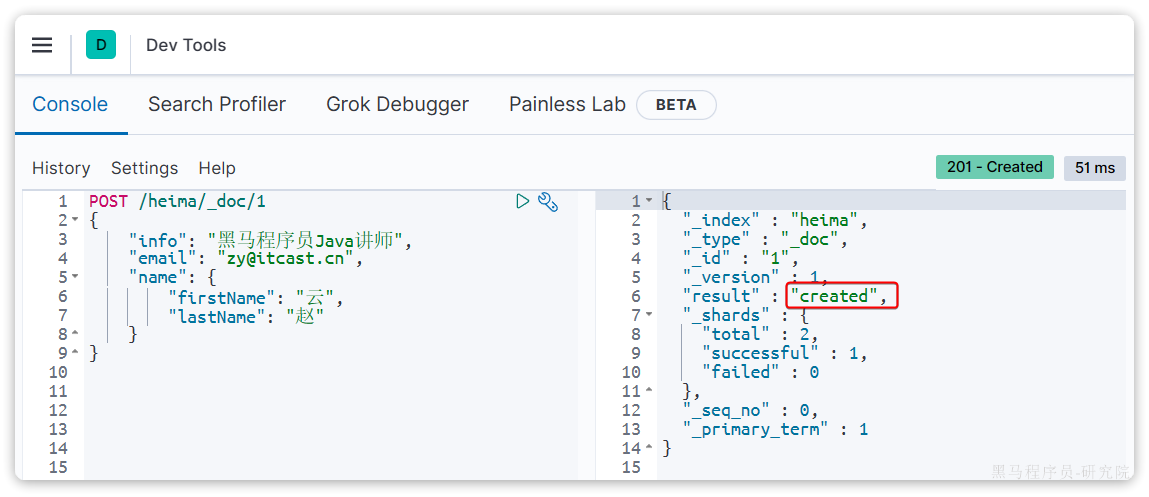
POST /heima/_doc/1
{
    "info": "黑马程序员Java讲师",
    "email": "zy@itcast.cn",
    "name": {
        "firstName": "云",
        "lastName": "赵"
    }
}
响应:
3.2.查询文档
根据rest风格,新增是post,查询应该是get,不过查询一般都需要条件,这里我们把文档id带上。
语法:
GET /{索引库名称}/_doc/{id}示例:
GET /heima/_doc/1查看结果:

3.3.删除文档
删除使用DELETE请求,同样,需要根据id进行删除:
语法:
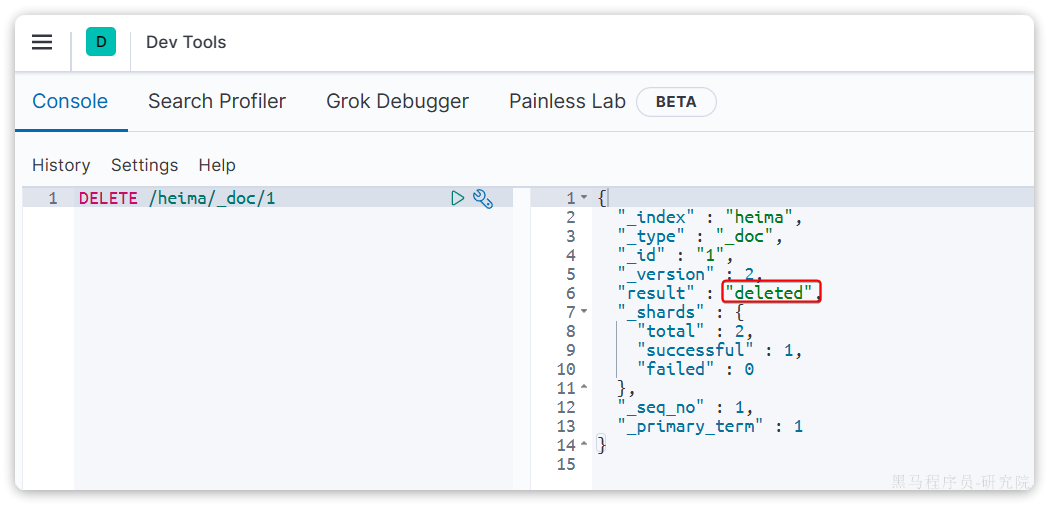
DELETE /{索引库名}/_doc/id值示例:
DELETE /heima/_doc/1结果:
3.4.修改文档
修改有两种方式:
- 全量修改:直接覆盖原来的文档
- 局部修改:修改文档中的部分字段
3.4.1.全量修改
全量修改是覆盖原来的文档,其本质是两步操作:
- 根据指定的id删除文档
- 新增一个相同id的文档
注意:如果根据id删除时,id不存在,第二步的新增也会执行,也就从修改变成了新增操作了。
语法:
PUT /{索引库名}/_doc/文档id
{
    "字段1": "值1",
    "字段2": "值2",
    // ... 略
}
示例:
PUT /heima/_doc/1
{
    "info": "黑马程序员高级Java讲师",
    "email": "zy@itcast.cn",
    "name": {
        "firstName": "云",
        "lastName": "赵"
    }
}由于id为1的文档已经被删除,所以第一次执行时,得到的反馈是created:

所以如果执行第2次时,得到的反馈则是updated:

3.4.2.局部修改
局部修改是只修改指定id匹配的文档中的部分字段。
语法:
POST /{索引库名}/_update/文档id
{
"doc": {
"字段名": "新的值",
}
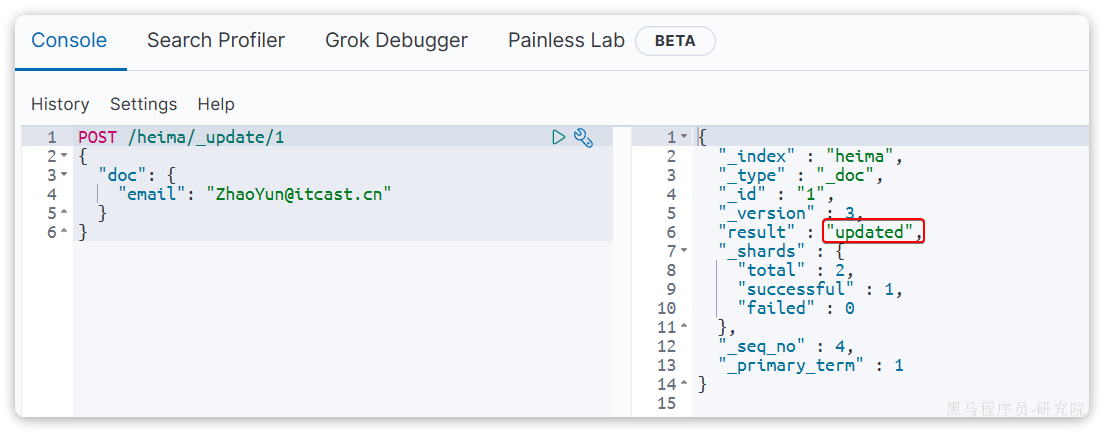
}示例:
POST /heima/_update/1
{
  "doc": {
    "email": "ZhaoYun@itcast.cn"
  }
}执行结果:
3.5.批处理
批处理采用POST请求,基本语法如下:
POST _bulk
{ "index" : { "_index" : "test", "_id" : "1" } }
{ "field1" : "value1" }
{ "delete" : { "_index" : "test", "_id" : "2" } }
{ "create" : { "_index" : "test", "_id" : "3" } }
{ "field1" : "value3" }
{ "update" : {"_id" : "1", "_index" : "test"} }
{ "doc" : {"field2" : "value2"} }
其中:
index代表新增操作_index:指定索引库名_id指定要操作的文档id{ "field1" : "value1" }:则是要新增的文档内容
delete代表删除操作_index:指定索引库名_id指定要操作的文档id
update代表更新操作_index:指定索引库名_id指定要操作的文档id{ "doc" : {"field2" : "value2"} }:要更新的文档字段
示例,批量新增:
POST /_bulk
{"index": {"_index":"hmall", "_id": "3"}}
{"info": "黑马程序员C++讲师", "email": "ww@itcast.cn", "name":{"firstName": "五", "lastName":"赵"}}
{"index": {"_index":"hmall", "_id": "4"}}
{"info": "黑马程序员前端讲师", "email": "zhangsan@itcast.cn", "name":{"firstName": "三", "lastName":"张"}}
批量删除:
POST /_bulk
{"delete":{"_index":"hmall", "_id": "3"}}
{"delete":{"_index":"hmall", "_id": "4"}}
3.6.总结
文档操作有哪些?
- 创建文档:
POST /{索引库名}/_doc/文档id { json文档 } - 查询文档:
GET /{索引库名}/_doc/文档id - 删除文档:
DELETE /{索引库名}/_doc/文档id - 修改文档:
- 全量修改:
PUT /{索引库名}/_doc/文档id { json文档 } - 局部修改:
POST /{索引库名}/_update/文档id { "doc": {字段}}
- 全量修改:
4.RestAPI
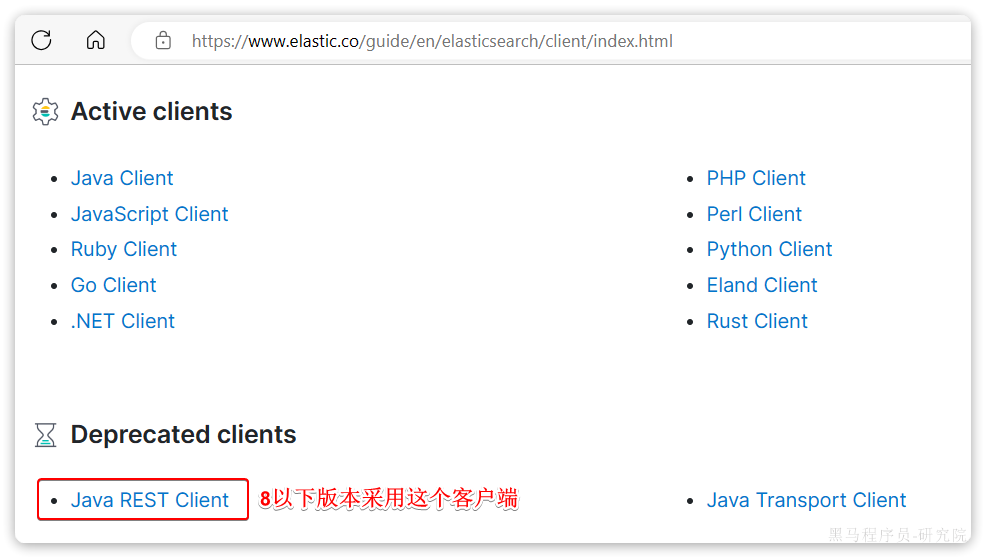
ES官方提供了各种不同语言的客户端,用来操作ES。这些客户端的本质就是组装DSL语句,通过http请求发送给ES。
官方文档地址:
Elasticsearch Clients | Elastic
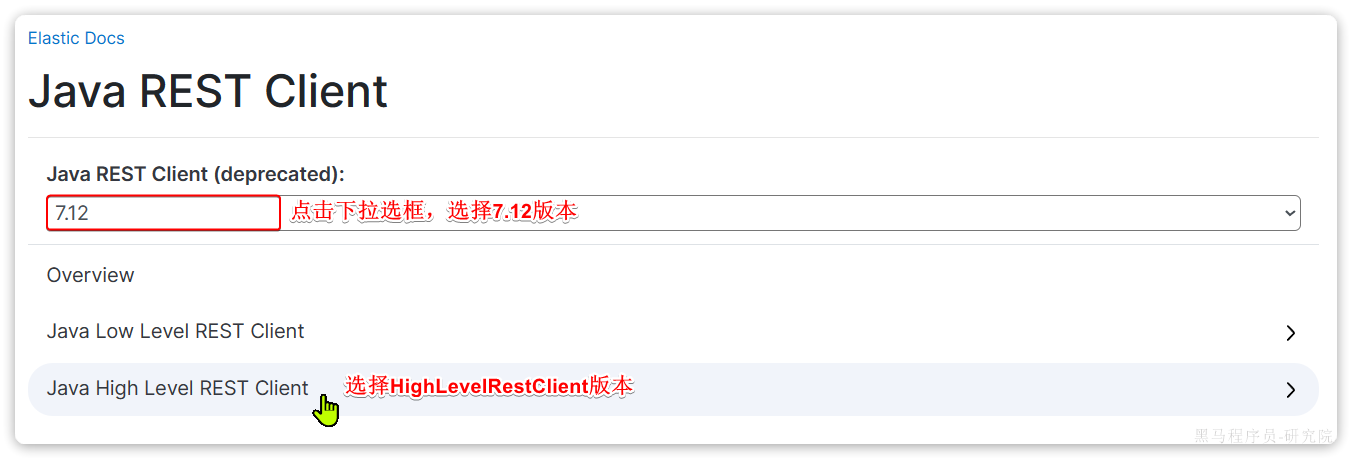
由于ES目前最新版本是8.8,提供了全新版本的客户端,老版本的客户端已经被标记为过时。而我们采用的是7.12版本,因此只能使用老版本客户端:
然后选择7.12版本,HighLevelRestClient版本:
4.1.初始化RestClient
在elasticsearch提供的API中,与elasticsearch一切交互都封装在一个名为RestHighLevelClient的类中,必须先完成这个对象的初始化,建立与elasticsearch的连接。
分为三步:
1)在item-service模块中引入es的RestHighLevelClient依赖:
<dependency>
    <groupId>org.elasticsearch.client</groupId>
    <artifactId>elasticsearch-rest-high-level-client</artifactId>
</dependency>2)因为SpringBoot默认的ES版本是7.17.10,所以我们需要覆盖默认的ES版本:
  <properties>
      <maven.compiler.source>11</maven.compiler.source>
      <maven.compiler.target>11</maven.compiler.target>
      <elasticsearch.version>7.12.1</elasticsearch.version>
  </properties>
3)初始化RestHighLevelClient:
初始化的代码如下:
RestHighLevelClient client = new RestHighLevelClient(RestClient.builder(
        HttpHost.create("http://192.168.150.101:9200")
));这里为了单元测试方便,我们创建一个测试类IndexTest,然后将初始化的代码编写在@BeforeEach方法中:
package com.hmall.item.es;

import org.apache.http.HttpHost;
import org.elasticsearch.client.RestClient;
import org.elasticsearch.client.RestHighLevelClient;
import org.junit.jupiter.api.AfterEach;
import org.junit.jupiter.api.BeforeEach;
import org.junit.jupiter.api.Test;

import java.io.IOException;

public class IndexTest {

    private RestHighLevelClient client;

    @BeforeEach
    void setUp() {
        this.client = new RestHighLevelClient(RestClient.builder(
                HttpHost.create("http://192.168.150.101:9200")
        ));
    }

    @Test
    void testConnect() {
        System.out.println(client);
    }

    @AfterEach
    void tearDown() throws IOException {
        this.client.close();
    }
}
4.1.创建索引库
由于要实现对商品搜索,所以我们需要将商品添加到Elasticsearch中,不过需要根据搜索业务的需求来设定索引库结构,而不是一股脑的把MySQL数据写入Elasticsearch.
4.1.1.Mapping映射
搜索页面的效果如图所示:

实现搜索功能需要的字段包括三大部分:
- 搜索过滤字段
- 分类
- 品牌
- 价格
- 排序字段
- 默认:按照更新时间降序排序
- 销量
- 价格
- 展示字段
- 商品id:用于点击后跳转
- 图片地址
- 是否是广告推广商品
- 名称
- 价格
- 评价数量
- 销量
对应的商品表结构如下,索引库无关字段已经划掉:
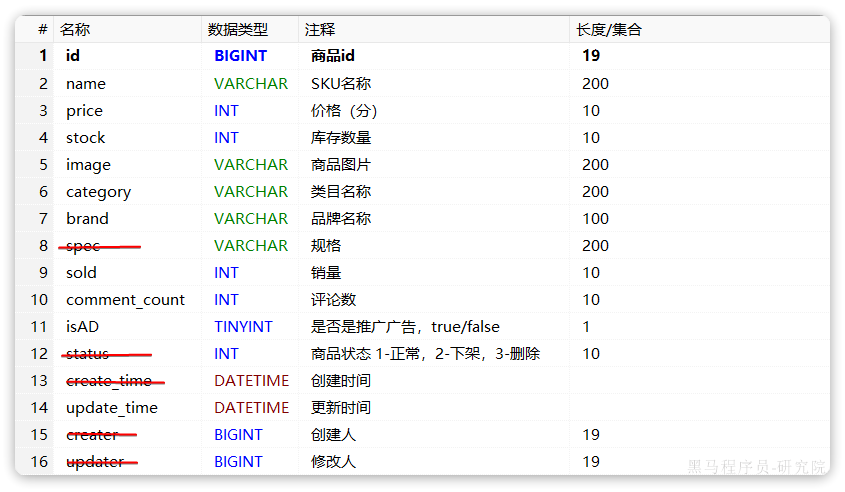
结合数据库表结构,以上字段对应的mapping映射属性如下:
| 字段名 | 字段类型 | 类型说明 | 是否 参与搜索 | 是否 参与分词 | 分词器 | |
| id |
| 长整数 |
|
| —— | |
| name |
| 字符串,参与分词搜索 |
|
| IK | |
| price |
| 以分为单位,所以是整数 |
|
| —— | |
| stock |
| 字符串,但需要分词 |
|
| —— | |
| image |
| 字符串,但是不分词 |
|
| —— | |
| category |
| 字符串,但是不分词 |
|
| —— | |
| brand |
| 字符串,但是不分词 |
|
| —— | |
| sold |
| 销量,整数 |
|
| —— | |
| commentCount |
| 销量,整数 |
|
| —— | |
| isAD |
| 布尔类型 |
|
| —— | |
| updateTime |
| 更新时间 |
|
| —— | |
因此,最终我们的索引库文档结构应该是这样:
PUT /items
{
  "mappings": {
    "properties": {
      "id": {
        "type": "keyword"
      },
      "name":{
        "type": "text",
        "analyzer": "ik_max_word"
      },
      "price":{
        "type": "integer"
      },
      "stock":{
        "type": "integer"
      },
      "image":{
        "type": "keyword",
        "index": false
      },
      "category":{
        "type": "keyword"
      },
      "brand":{
        "type": "keyword"
      },
      "sold":{
        "type": "integer"
      },
      "commentCount":{
        "type": "integer"
      },
      "isAD":{
        "type": "boolean"
      },
      "updateTime":{
        "type": "date"
      }
    }
  }
}
4.1.2.创建索引
创建索引库的API如下:

代码分为三步:
- 1)创建Request对象。
- 因为是创建索引库的操作,因此Request是
CreateIndexRequest。
- 因为是创建索引库的操作,因此Request是
- 2)添加请求参数
- 其实就是Json格式的Mapping映射参数。因为json字符串很长,这里是定义了静态字符串常量
MAPPING_TEMPLATE,让代码看起来更加优雅。
- 其实就是Json格式的Mapping映射参数。因为json字符串很长,这里是定义了静态字符串常量
- 3)发送请求
client.indices()方法的返回值是IndicesClient类型,封装了所有与索引库操作有关的方法。例如创建索引、删除索引、判断索引是否存在等
在item-service中的IndexTest测试类中,具体代码如下:
@Test
void testCreateIndex() throws IOException {
    // 1.创建Request对象
    CreateIndexRequest request = new CreateIndexRequest("items");
    // 2.准备请求参数
    request.source(MAPPING_TEMPLATE, XContentType.JSON);
    // 3.发送请求
    client.indices().create(request, RequestOptions.DEFAULT);
}

static final String MAPPING_TEMPLATE = "{\n" +
            "  \"mappings\": {\n" +
            "    \"properties\": {\n" +
            "      \"id\": {\n" +
            "        \"type\": \"keyword\"\n" +
            "      },\n" +
            "      \"name\":{\n" +
            "        \"type\": \"text\",\n" +
            "        \"analyzer\": \"ik_max_word\"\n" +
            "      },\n" +
            "      \"price\":{\n" +
            "        \"type\": \"integer\"\n" +
            "      },\n" +
            "      \"stock\":{\n" +
            "        \"type\": \"integer\"\n" +
            "      },\n" +
            "      \"image\":{\n" +
            "        \"type\": \"keyword\",\n" +
            "        \"index\": false\n" +
            "      },\n" +
            "      \"category\":{\n" +
            "        \"type\": \"keyword\"\n" +
            "      },\n" +
            "      \"brand\":{\n" +
            "        \"type\": \"keyword\"\n" +
            "      },\n" +
            "      \"sold\":{\n" +
            "        \"type\": \"integer\"\n" +
            "      },\n" +
            "      \"commentCount\":{\n" +
            "        \"type\": \"integer\"\n" +
            "      },\n" +
            "      \"isAD\":{\n" +
            "        \"type\": \"boolean\"\n" +
            "      },\n" +
            "      \"updateTime\":{\n" +
            "        \"type\": \"date\"\n" +
            "      }\n" +
            "    }\n" +
            "  }\n" +
            "}";
4.2.删除索引库
删除索引库的请求非常简单:
DELETE /hotel与创建索引库相比:
- 请求方式从PUT变为DELTE
- 请求路径不变
- 无请求参数
所以代码的差异,注意体现在Request对象上。流程如下:
- 1)创建Request对象。这次是DeleteIndexRequest对象
- 2)准备参数。这里是无参,因此省略
- 3)发送请求。改用delete方法
在item-service中的IndexTest测试类中,编写单元测试,实现删除索引:
@Test
void testDeleteIndex() throws IOException {
    // 1.创建Request对象
    DeleteIndexRequest request = new DeleteIndexRequest("items");
    // 2.发送请求
    client.indices().delete(request, RequestOptions.DEFAULT);
}
4.3.判断索引库是否存在
判断索引库是否存在,本质就是查询,对应的请求语句是:
GET /hotel因此与删除的Java代码流程是类似的,流程如下:
- 1)创建Request对象。这次是GetIndexRequest对象
- 2)准备参数。这里是无参,直接省略
- 3)发送请求。改用exists方法
@Test
void testExistsIndex() throws IOException {
    // 1.创建Request对象
    GetIndexRequest request = new GetIndexRequest("items");
    // 2.发送请求
    boolean exists = client.indices().exists(request, RequestOptions.DEFAULT);
    // 3.输出
    System.err.println(exists ? "索引库已经存在!" : "索引库不存在!");
}
4.4.总结
JavaRestClient操作elasticsearch的流程基本类似。核心是client.indices()方法来获取索引库的操作对象。
索引库操作的基本步骤:
- 初始化
RestHighLevelClient - 创建XxxIndexRequest。XXX是
Create、Get、Delete - 准备请求参数(
Create时需要,其它是无参,可以省略) - 发送请求。调用
RestHighLevelClient#indices().xxx()方法,xxx是create、exists、delete
非常感谢您阅读到这里,创作不易!如果这篇文章对您有帮助,希望能留下您的点赞👍 关注💖 收藏 💕评论💬感谢支持!!!
听说 三连能够给人 带来好运!更有可能年入百w,进入大厂,上岸

[ 本文作者 ]   软工菜鸡
[ 博客链接 ]   https://blog.csdn.net/m0_67184231
[ 版权声明 ]   如果您在非 CSDN 网站内看到这一行,
说明该死的侵权网络爬虫可能在本人还没有完整发布的时候就抓走了我的文章,
可能导致内容不完整,请去上述的原文链接查看原文。


 2584
2584


 被折叠的 条评论
为什么被折叠?
被折叠的 条评论
为什么被折叠?
 到【灌水乐园】发言


