目录
1.驱动模块
入口(安装):资源的申请
出口(卸载):资源的释放
许可证:GPL
hello.c
//声明函数

static int  __init hello_init(void) //入口,static :只能在当前程序使用,防止其他驱动重名

{
   return 0;
}

static void __exit hello_exit(void)//出口
{

}
module_init(hello_init);//告诉内核驱动的入口

module_exit(hello_exit);//告诉内核驱动的出口

MODULE_LICENSE("GPL");
Makefile
==/lib/modules/4.15.0-142-generic/build
KERNELDIR:= /lib/modules/$(shell uname -r)/build/ Ubuntu内核目录
#KERNELDIR:= /home/hq/fs6818_uboot/kernel-3.4.39/ 开发板内核目录
PWD:=$(shell pwd)
all:
make -C $(KERNELDIR) M=$(PWD) modules
clean:
make -C $(KERNELDIR) M=$(PWD) clean
obj-m:=hello.o
编写完后执行make编译,sudo insmod hello.ko安装
$make
$sudo insmod hello.ko

$sudo rmmod hello //卸载

2.内核中的打印函数(编写第一个驱动程序)
Source Insight 使用:
1)打开Source Insight,新建项目 Project-->New Project

2)添加自己的工程名与存放路径 ,点击OK


3)选择解压后的内核代码,点击Add All全部添加


3.打印函数编写
分析
--------------------------------------------------------打印级别-----------------------------------------------------
#define KERN_EMERG "<0>" /* system is unusable */
#define KERN_ALERT "<1>" /* action must be taken immediately */
#define KERN_CRIT "<2>" /* critical conditions */
#define KERN_ERR "<3>" /* error conditions */
#define KERN_WARNING "<4>" /* warning conditions */
#define KERN_NOTICE "<5>" /* normal but significant condition */
#define KERN_INFO "<6>" /* informational */
#define KERN_DEBUG "<7>" /* debug-level messages */

4 4 1 7
终端的级别 消息的默认级别 终端的最大级别 终端的最小级别
#define console_loglevel (console_printk[0])
#define default_message_loglevel (console_printk[1])
#define minimum_console_loglevel (console_printk[2])
#define default_console_loglevel (console_printk[3])
------------------------------------------------------打印函数-------------------------------------------------------
printk(KERN_ERR "BFS-fs: %s(): " format, __func__, ## args)
功能:消息打印
参数:
第一个参数:打印的级别
第二个参数:打印的内容
第三个参数:和printf一样,需要打印的参数
#include <linux/init.h>
#include <linux/module.h>
#include <linux/printk.h>
static int __init hello_init(void)//入口
{
  printk(KERN_ERR "hello word\n");
  return 0;
}
static void __exit hello_exit(void)//出口
{
  printk(KERN_ERR "baibai\n");
}
module_init(hello_init);//告诉内核驱动的入口
module_exit(hello_exit);//告诉内核驱动的出口
MODULE_LICENSE("GPL");
没有打印信息,解决方法如下:

PM:
方法一:虚拟控制台
ctrl+alt+F5 或者ctrl+Fn+alt+F5(F1-F5)(进入虚拟控制台)
ctrl+alt+F7或者ctrl+Fn+alt+F7(退出虚拟控制台)-》有的退出是F2
sudo insmod hello.ko(安装驱动)sudo rmmod hello(卸载驱动)
方法二:在终端输入
dmesg (查看消息的回显) dmesg -c (查看回显并清空)dmesg -C (清空回显)

cat /proc/sys/kernel/printk(查看ubuntu终端显示级别 消息默认级别 消息最大级别 消息最小级别)
su root echo 4 3 1 7 > /proc/sys/kernel/printk(修改ubuntu终端显示级别 消息默认级别 消息最大级别 消息最小级别)
echo 4 3 1 7 > /proc/sys/kernel/printk (修改开发板)
= 赋值 需要等待其他文件全部执行完,才执行调用的
:= 立即赋值
+= 附加赋值
?= 询问变量之前是否被赋值过,如果赋值过本次赋值不成立,否则成立
4、驱动的多文件编译
hello . c add . cMakefile
obj-m:=demo.o
demo-y+=hello.o add.o
最终生成demo.ko文件

5、模块传递参数
module_param(name, type, perm)
功能:接收命令行传递的参数
参数:
name: 变量的名字 type:变量的类型 perm:权限 0664 0775
name: 变量的名字 type:变量的类型 perm:权限 0664 0775
#include <linux/init.h>
#include <linux/module.h>
int a=10;
module_param(a,int,0664);
static int __init hello_init(void)
{
 printk("sum= %d\n",a);
 return 0;
}
static void __exit hello_exit(void)
{
 printk(KERN_ERR"bai");
}
module_init(hello_init);
module_exit(hello_exit);
MODULE_LICENSE("GPL");


传递两个参数程序
int a = 10 ;module_param(a,int,0664);
int b=10;
module_param(b,int,0664);
问:安装时怎么区分a和b的作用,自己写的知道那如果移植其他厂商的呢比如LCD屏
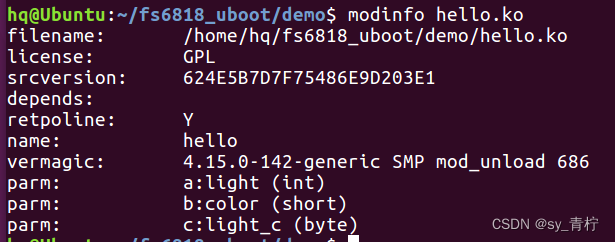
使用modinfo hello.ko查看

且需要程序里使用如下函数进行配置:
MODULE_PARM_DESC(_parm, desc)
功能:对变量的功能进行描述
参数:@_parm:变量
@desc :描述字段
int a=10;
module_param(a,int,0664);
MODULE_PARM_DESC(a,"light");//描述信息
short b=123;
module_param(b,short,0664);
MODULE_PARM_DESC(b,"color");
char c='c';
module_param(c,byte,0664);
MODULE_PARM_DESC(c,"light_c");
 static int __init hello_init(void)
{
    printk("sum= %d\n",a);
    printk("sum= %d\n",b);
    printk("sum= %c\n",c);
return 0;
}
static void __exit hello_exit(void)
 {
  printk(KERN_ERR"bai");
}
 module_init(hello_init);
 module_exit(hello_exit);
 MODULE_LICENSE("GPL");

练习:其他类型
数组传参:
module_param_array(name,type,nump,perm)
功能:接收命令行传递的数组
参数:name:数组名
type :数组类型
nump:参数的个数,变量的地址
perm 权限
int ww[10]={0};
int num;
module_param_array(ww,int,&num,0664)
static int __init hello_init(void)
{
    int i;
    for(i=0;i<num;i++)
    {
     printk("ww[%d]=%d\n",i,ww[i]);
    }
}
sudo insmod hello.ko ww=1,2,3,4,5


6、安装好驱动之后如何传参?
- lsmod查看驱动名字

2、找路径 /sys/module/驱动模块的名字/parameters
3、修改-》su root-》echo 需要改为多少> 需要修改的参数名
4、cat 需要修改的参数名 (查看是否修改成功)多驱动之间调用(导出符号表)

假如有两个驱动模块,demo和demo2 ,假设demo调用demo2中的函数
cp -r demo/ demo2/ 先拷贝demo到demo2
mv hello.c add.c 将demo2中hello.c重命名为add.c

在被调用者add.c中添加代码:
EXPORT_SYMBOL_GPL(add);//导出符号表
#include <linux/intt.h>
#include <linux/module.h>
int add(int a,int b)
{
 return (a+b);
}
EXPORT_SYMBOL_GPL(add);//导出符号表
static int __init hello_init(void)
{
 return 0;
}
staic int __exit hello_exit(void)
{
}
module_init(hello_init);
module_exit(hello_exit);
MODULE_LICENSE("GPL");
执行 $make 生成Module.symvers,将其cp到demo调用者中
$vi hello.c打开调用者,添加外部引用。
extern int add ( int a , int b );static int __init hello_init(void)
{
printk("sum = %d\n",add(2,3));
}
编译: make 发现报错,提示add没有定义
所以在执行之前把add.c里面M开头文件复制到demo下
cp Module.symvers ../demo 然后再make
安装: 先安装提供者 sudo insmod add.ko
再安装调用者 sudo insmod hello.ko
查看信息:dmesg
卸载:先卸载 调用者hello.ko 再卸载提供者add.ko
7、字符设备驱动

8、字符设备驱动的注册
int register_chrdev(unsigned int major, const char *name,const struct file_operations *fops)
功能:注册一个字符设备驱动
参数: @major:主设备号
:如果你填写的值大于0,它认为这个就是主设备号
:如果你填写的值为0,操作系统给你分配一个主设备号
@name :名字 cat /proc/devices 查看设备名和主设备号
@fops :操作方法结构体
返回值:major>0 ,成功返回0,失败返回错误码(负数) (vi -t EIO 可以查看错误码)
major=0,成功主设备号,失败返回错误码(负数)
void unregister_chrdev(unsigned int major, const char *name)
功能:注销一个字符设备驱动
参数:@major:主设备号
@name:名字
返回值:无
#include <linux/init.h>
#include <linux/module.h>
#include <linux/printk.h>
#include <linux/fs.h>
int major=0;
#define CNAME "hello"
ssize_t mycdev_read (struct file *file, char __user *user, size_t size, loff_t * loff)
{
   printk("this is read");
   return 0;
}
ssize_t mycdev_write (struct file *file, const char __user *user, size_t, loff_t *loff)
{
   printk("this is write");
   return 0;
}
int mycdev_open (struct inode *inode, struct file *file)
{
   printk("this is open");
   return 0;
}
int mycdev_release (struct inode *inode, struct file *file)
{
   printk("this is close");
   return 0;
}

const struct file_operations fops={
   .open=mycdev_open,
   .read=mycdev_read,
   .write=mycdev_write,
   .release=mycdev_release,
};

static int __init hello_init(void)//入口
{
  major=register_chrdev(major,CNAME,&fops);
  if(major<0)
  {
   printk("register chrdev error");
  }
  return 0;
}
static void __exit hello_exit(void)//出口
{
  unregister_chrdev(major,CNAME);
}
module_init(hello_init);//告诉内核驱动的入口
module_exit(hello_exit);//告诉内核驱动的出口
MODULE_LICENSE("GPL");
9、总结归纳:
字符设备驱动:
1、注册驱动register_chrdev(unsigned int major, const char *name,const struct file_operations *fops)
major=0 自动分配设备号 name:驱动的名字 fops:结构体
2、声明结构体-》注册驱动时第三个参数
3、open、read、write、release-》按照内核的格式自己写的
4、把自己写的这些函数->给到结构体里-》.open .read .write .release
5、注销设备驱动


 本文介绍了Linux驱动的基本概念和开发流程,包括驱动模块的安装与卸载,内核中的打印函数使用,以及如何编写和编译多文件驱动。同时讲解了如何传递模块参数,以及字符设备驱动的注册和注销。此外,还提到了SourceInsight在驱动开发中的应用。


 2395
2395

 被折叠的 条评论
为什么被折叠?


