Git–版本控制器学习(一)
文章目录
前言
git:版本控制器,记录每次的修改及版本迭代的一个管理系统,可以控制电脑上所有格式的文档,对于开发人员来说,可控制项目中的源代码文档。
环境:Linux-centos7.6
Git引入
我们在编写各种文档时,为了防止文档丢失,更改失误,失误后能恢复到原来的版本,不得不复制出⼀个副本,如:
“报告-v1”
“报告-v2”
“报告-v3”
“报告-确定版”
“报告-最终版”
“报告-究极进化版”…
每个版本有各自的内容,但最终会只有⼀份报告需要被我们使用。
但在此之前的工作都需要这些不同版本的报告,于是每次都是复制粘贴副本,产出的文件就越来越多,文件多不是问题,问题是:随着版本数量的不断增多,如何记得这些版本各自都是修改了什么吗?
文档如此,我们写的项目代码,也是同样如此!
为了能够更方便我们管理这些不同版本的文件,便有了版本控制器。所谓的版本控制器,就是能让你了解到⼀个文件的历史,以及它的发展过程的系统。通俗的讲就是一个可以记录工程的每⼀次改动和版本迭代的一个管理系统,同时也⽅便多⼈协同作业。目前最主流的版本控制器就是Git。
Git可以控制电脑上所有格式的文件,例如doc、excel、dwg、dgn、rvt等等。对于我们开发⼈员来说,Git最重要的就是可以帮助我们管理软件开发项目中的源代码文件。
需要明确一下,所有版本控制系统,Git也不例外,其实只能跟踪文本文件的改动,比如TXT文件,网页,所有的程序代码等等。版本控制系统可以告诉你每次的改动,比如在第五行加了一个单词“Linux”,在第八行删除了一个单词“windows”。而图片,视频这些二进制文件,虽然也能由版本控制系统进行管理,但没法跟踪文件的变化,只能把二进制文件每次改动串动起来,也就是只知道图片从10KB变成了120KB,但到底改了啥,版本控制系统并不知道,也没法知道。
一、Git安装
★ 安装git
sudo yum install git -y
★ 查看git版本
git --version
二、Git基本操作
git若要对文件进行管理,则被管理的文件必须在git仓库中,只有在git仓库下的文件才能被git追踪管理。
1 创建仓库
创建目录gitcode,在此目录下创建本地仓库。
[dev@localhost ~]$ mkdir gitcode
[dev@localhost ~]$ cd ./gitcode
[dev@localhost gitcode]$ git init
初始化空的 Git 版本库于 /home/dev/gitcode/.git/
[dev@localhost gitcode]$ ll -a
总用量 4
drwxrwxr-x.  3 dev dev   18 8月  19 21:40 .
drwx------. 27 dev dev 4096 8月  19 21:39 ..
drwxrwxr-x.  7 dev dev  119 8月  19 21:40 .git
[dev@localhost gitcode]$ tree .git
.git
├── branches
├── config
├── description
├── HEAD
├── hooks
│   ├── applypatch-msg.sample
│   ├── commit-msg.sample
│   ├── post-update.sample
│   ├── pre-applypatch.sample
│   ├── pre-commit.sample
│   ├── prepare-commit-msg.sample
│   ├── pre-push.sample
│   ├── pre-rebase.sample
│   └── update.sample
├── info
│   └── exclude
├── objects
│   ├── info
│   └── pack
└── refs
    ├── heads
    └── tags

9 directories, 13 files
[dev@localhost gitcode]$
可以看到,当初始化完成后,在目录下会有个.git 的隐藏文件,.git 目录是Git来跟踪管理仓库的,我们不能手动修改目录里面的文件,会将git仓库给破坏掉。
2 配置git
在仓库中,设置用户名称和Email地址。
★ 设置用户名称和Email地址。
git config [--global] user.name "Name"
git config [--global] user.email "email"
--global 是⼀个可选项,如果使用了该选项,表示该台机器上所有的Git仓库都会使用该配置,若希望在不同仓库中使用不同的name和Email,就不使用该选项。
★ 查看用户配置。
git config -l
★ 删除用户配置。
git config [--global] --unset user.name
git config [--global] --unset user.email
例子:
设置用户名为 link ,邮箱为 qkzx345qq.com 的配置,然后再删除该配置。
[dev@localhost gitcode]$ git config user.name "link"
[dev@localhost gitcode]$ git config user.email "qkzx345qq.com"
[dev@localhost gitcode]$ git config -l
core.repositoryformatversion=0
core.filemode=true
core.bare=false
core.logallrefupdates=true
user.name=link
user.email=qkzx345qq.com
[dev@localhost gitcode]$ git config --unset user.name
[dev@localhost gitcode]$ git config --unset user.email
[dev@localhost gitcode]$ git config -l
core.repositoryformatversion=0
core.filemode=true
core.bare=false
core.logallrefupdates=true
[dev@localhost gitcode]$
3 仓库认识(工作区、暂存区、版本库)
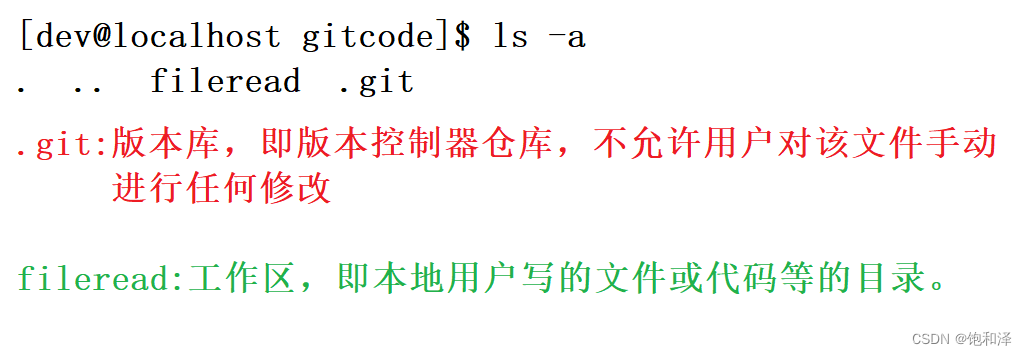
工作区:在电脑上要写的代码或文件的目录。
暂存区:英文叫stage或index,一般存放在
.git目录下的index文件(.git/index)中,将暂存区有时也叫称索引(index)。
版本库:工作区有⼀个隐藏目录
.git,它不算工作区,而是Git的版本库。这个版本库里面的所有文件都可以被Git管理起来,每个文件的修改、删除,Git都能跟踪,以便任何时刻都可以追踪历史,或者在将来某个时刻可以“还原”。
[dev@localhost gitcode]$ ls -a
.  ..  .git
[dev@localhost gitcode]$ mkdir fileread
[dev@localhost gitcode]$ ls
fileread
[dev@localhost gitcode]$ ls -a
.  ..  fileread  .git
[dev@localhost gitcode]$
在gitcode目录下创建fileread文件,此种情况下git可以管理fileread文件吗?
不可以,只有当文件在仓库中时才能对文件进行管理。
三者关系:
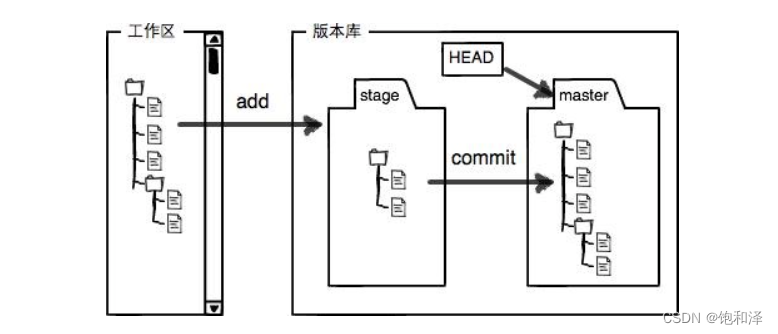
- 创建版本库时,git会自动创建一个master分支和一个指向master的一个指针HEAD。
- 当对工作区进行修改或新增的文件执行
git add命令时,暂存区目录树的文件索引会被更新。 - 当执行提交操作
git commit时,master分支会做出相应的更新,即将暂存区中的目录树真正写到版本库中。
3.1 添加文件
★ 将工作区文件添加到暂存区。
git add

//添加一个或多个文件到暂存区
git add [file1] [file2] ...

//添加指定目录到暂存区,包括子目录
git add [dir]

//添加当前目录下的所有文件改动到暂存区
git add .
★ 将暂存区中的内容添加到本地仓库中。
git commit

//提交暂存区全部内容到本地仓库中
git commit -m "message"

//提交暂存区的指定文件到仓库区
git commit [file1] [file2] ... -m "message"
其中, git commit 后面的 -m 选项,要跟上描述本次提交的message,由用户自己完成,即说明此次提交的变动及其细节。
实例:
[dev@localhost gitcode]$ vim hello
[dev@localhost gitcode]$ cat hello
hello world
hello
[dev@localhost gitcode]$ git add hello
[dev@localhost gitcode]$ git commit -m "commit my first file"
[master 9d63950] commit my first file
 1 file changed, 1 insertion(+), 1 deletion(-)
git commit命令执行成功后,1个文件被改动。
当然,还可以多次添加不同的文件,而一次commit就可以提交所有的文件,需要提交的文件被add到暂存区中,然后一次性commit暂存区中所有的修改。
[dev@localhost gitcode]$ touch file1 file2 file3
[dev@localhost gitcode]$ git add file1 file2 file3
\[dev@localhost gitcode]$ git commit -m "add 3 files"
[master afd1866] add 3 files
 3 files changed, 0 insertions(+), 0 deletions(-)
 create mode 100644 file1
 create mode 100644 file2
 create mode 100644 file3
至此,我们已将文件添加到暂存区,且提交到仓库中了。
★ 查看用户提交的历史记录。
git log
查看实例中提交的历史记录。
[dev@localhost gitcode]$ git log
commit afd18662e5eb6518becf4e9cd7b7277921861a78
Author: confused-cat <2155598746@qq.com>
Date:   Sun Aug 20 13:58:02 2023 +0800

    add 3 files

commit 9d639503b108ab0351f88ede22891c3ac57f4a56
Author: confused-cat <2155598746@qq.com>
Date:   Sun Aug 20 13:50:30 2023 +0800

    commit my first file

commit d6d6d54748442f5e1f58c22ffdaeb9ab7016df7d
Author: dev <dev@localhost.localdomain>
Date:   Sun Aug 20 13:38:57 2023 +0800

    commit my first file
[dev@localhost gitcode]$ git log --pretty=oneline
afd18662e5eb6518becf4e9cd7b7277921861a78 add 3 files
9d639503b108ab0351f88ede22891c3ac57f4a56 commit my first file
d6d6d54748442f5e1f58c22ffdaeb9ab7016df7d commit my first file
说明:
我们看到的一大串类似afd18662e5eb6518becf4e9cd7b7277921861a78的是每次提交的commit id (版本号),git的 commit id 并不是1,2,3……递增的数字,而是⼀个SHA1计算出来的⼀个非常大的数字,用十六进制表示。
3.2 查看.git文件
.git目录结构:
[dev@localhost gitcode]$ tree .git
.git
├── branches
├── COMMIT_EDITMSG
├── config
├── description
├── HEAD
├── hooks
│   ├── applypatch-msg.sample
│   ├── commit-msg.sample
│   ├── post-update.sample
│   ├── pre-applypatch.sample
│   ├── pre-commit.sample
│   ├── prepare-commit-msg.sample
│   ├── pre-push.sample
│   ├── pre-rebase.sample
│   └── update.sample
├── index
├── info
│   └── exclude
├── logs
│   ├── HEAD
│   └── refs
│       └── heads
│           └── master
├── objects
│   ├── 34
│   │   └── f021eea1594bb532cf544de0a338259349a18e
│   ├── 45
│   │   └── 58c8cd2236ac0bb5047e8f3aded8eb9ee19708
│   ├── 77
│   │   └── 9fc58b96ac6d140df7ea99813dfd79a1590d0e
│   ├── 9d
│   │   └── 639503b108ab0351f88ede22891c3ac57f4a56
│   ├── af
│   │   └── d18662e5eb6518becf4e9cd7b7277921861a78
│   ├── d6
│   │   └── d6d54748442f5e1f58c22ffdaeb9ab7016df7d
│   ├── de
│   │   └── d0e2a485affd4c5bffa9361d7e22fb18d01245
│   ├── e6
│   │   └── 9de29bb2d1d6434b8b29ae775ad8c2e48c5391
│   ├── e9
│   │   └── caba42dfbc29ffc41ff7739f82553e195ba370
│   ├── info
│   └── pack
└── refs
    ├── heads
    │   └── master
    └── tags

21 directories, 27 files
1 HEAD默认指向master分支的指针
[dev@localhost gitcode]$ cat .git/HEAD
ref: refs/heads/master
[dev@localhost gitcode]$ cat .git/refs/heads/master
afd18662e5eb6518becf4e9cd7b7277921861a78

//保存当前最新的commit id
2 objects为git的对象库,包含了创建的各种版本库对象及内容。
执行git add时,暂存区的目录树被更新,同时工作区修改或新增的文件内容被写入到对象库中的一个新的对象中,即位于.git/objects目录下。
[dev@localhost gitcode]$ ls .git/objects/
34  45  77  9d  af  d6  de  e6  e9  info  pack
那这些对象有啥用呢?

该类文件是经过安全哈希算法(sha)加密过的文件,可以使用git cat-file命令来查看版本库对象内容:
[dev@localhost gitcode]$ git cat-file -p afd18662e5eb6518becf4e9cd7b7277921861a78
tree 4558c8cd2236ac0bb5047e8f3aded8eb9ee19708
parent 9d639503b108ab0351f88ede22891c3ac57f4a56
author confused-cat <2155598746@qq.com> 1692511082 +0800
committer confused-cat <2155598746@qq.com> 1692511082 +0800

add 3 files
查看tree 4558c8cd2236ac0bb5047e8f3aded8eb9ee19708。
[dev@localhost gitcode]$ git cat-file -p 4558c8cd2236ac0bb5047e8f3aded8eb9ee19708
100644 blob e69de29bb2d1d6434b8b29ae775ad8c2e48c5391	file1
100644 blob e69de29bb2d1d6434b8b29ae775ad8c2e48c5391	file2
100644 blob e69de29bb2d1d6434b8b29ae775ad8c2e48c5391	file3
100644 blob 34f021eea1594bb532cf544de0a338259349a18e	hello
查看hello 34f021eea1594bb532cf544de0a338259349a18e。
[dev@localhost gitcode]$ git cat-file -p 34f021eea1594bb532cf544de0a338259349a18
hello world
hello
即最近一次提交。
总结:
index:暂存区,git add 后会更新内容。
HEAD:指向master分支的一个指针。
refs/heads/master:文件里保存当前master分支最新的commit id。
objects:包含了创建的各种版本库对象及内容。
4 修改文件
git版本控制系统跟踪并管理的是修改,并非文件。
对文件hello进行增加语句的修改操作。
[dev@localhost gitcode]$ cat hello
hello world
hello
[dev@localhost gitcode]$ vim hello
[dev@localhost gitcode]$ cat hello
hello world
hello
hello teachers and students
我们知道,此时工作区中的hello文件和仓库中hello文件并不一样,如何知晓?
★ 查看在提交了文件之后工作区是否对该文件进行了修改
git status
[dev@localhost gitcode]$ git status
# 位于分支 master
# 尚未暂存以备提交的变更:
#   (使用 "git add <file>..." 更新要提交的内容)
#   (使用 "git checkout -- <file>..." 丢弃工作区的改动)
#
#	修改:      hello
#
修改尚未加入提交(使用 "git add" 和/或 "git commit -a")
git status命令可以知道:hello文件被修改,但是还没完成添加和提交。
git status命令只能知道哪些文件被改动了,但是并没有详细改动的信息。
★ 显示暂存区文件与工作区文件的不同
git diff [file]
★ 显示版本库和工作区文件的区别
git diff HEAD -- [file]
[dev@localhost gitcode]$ git diff hello
diff --git a/hello b/hello
index 34f021e..52f2309 100644
--- a/hello
+++ b/hello
@@ -1,2 +1,3 @@
 hello world
-hello
+hello
+hello teachers and students
git diff hello命令可以显示:hello文件具体做出的修改,显示格式是Unix通用的diff格式。
之后正常地添加与提交即可。
[dev@localhost gitcode]$ git add hello
[dev@localhost gitcode]$ git commit -m "add modify hello file"
[master 7c55a31] add modify hello file
 1 file changed, 2 insertions(+), 1 deletion(-)
[dev@localhost gitcode]$ git status
# 位于分支 master
无文件要提交,干净的工作区
5 版本回退
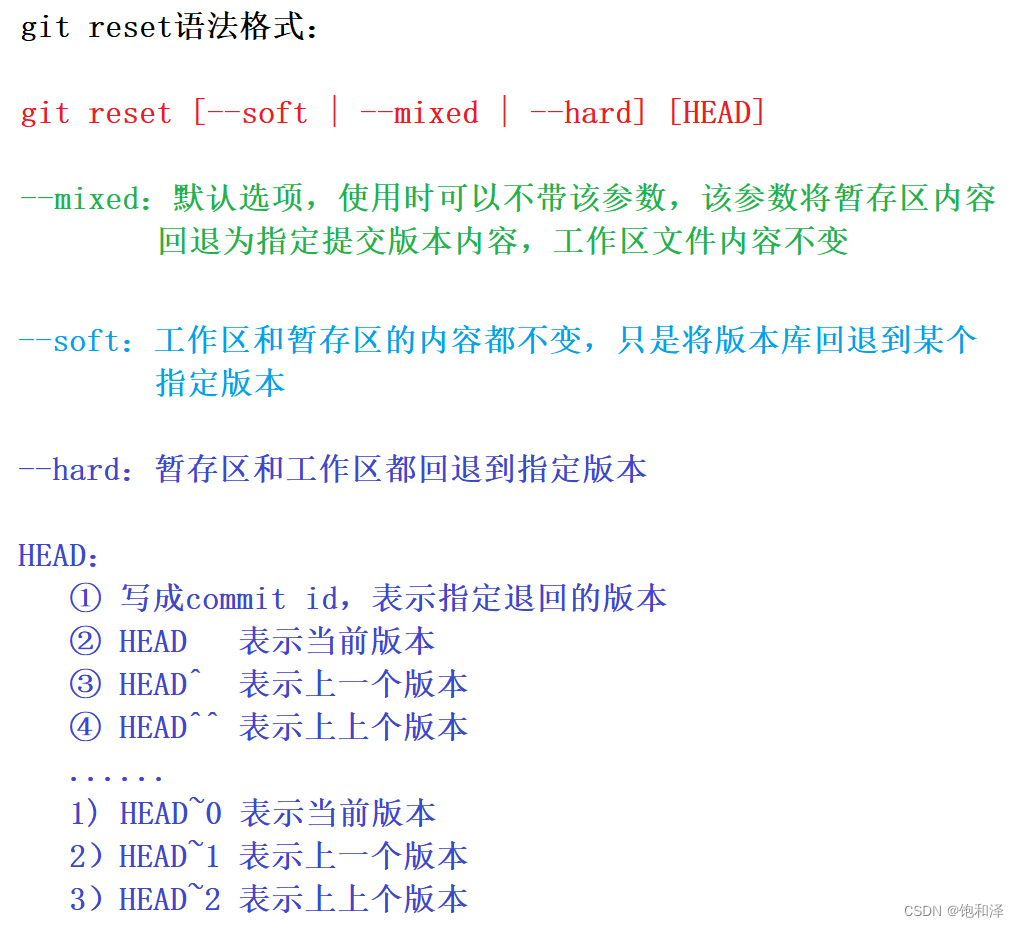
当需要回到某一个历史版本时,及版本回退。回退的本质是将版本库中的内容进行回退,工作区或暂存区是否回退由命令参数决定。
★ 版本回退命令(可以回退到指定的版本)
git reset
实例:对hello文件进行三次的修改,更新三个版本并进行三次的提交。
//第一次修改
[dev@localhost gitcode]$ cat hello
hello world
hello
hello teachers and students

hello version1
[dev@localhost gitcode]$ git add hello
[dev@localhost gitcode]$ git commit -m "add version1"
[master d75c971] add version1
 1 file changed, 2 insertions(+)

//第二次修改
[dev@localhost gitcode]$ cat hello
hello world
hello
hello teachers and students

hello version1
hello version2
[dev@localhost gitcode]$ git add hello
[dev@localhost gitcode]$ git commit -m "add version2"
[master 84f5150] add version2
 1 file changed, 1 insertion(+)

//第三次修改
[dev@localhost gitcode]$ cat hello
hello world
hello
hello teachers and students

hello version1
hello version2
hello version3
[dev@localhost gitcode]$ git add hello
[dev@localhost gitcode]$ git commit -m "add version3"
[master 6a82c8c] add version3
 1 file changed, 1 insertion(+)

//查看历史提交记录
[dev@localhost gitcode]$ git log --pretty=oneline
6a82c8c9dc388e96104f1a581e866af41a69d070 add version3
84f51509c784fb8087719fcba115ab53c2b38c01 add version2
d75c971d2aac0dd5b01fcf1c251887ce0cdd5ecc add version1
7c55a31df9ef6d4ad37fd080abd7cd189113015e add modify hello file
1a00ec8ddc752921154ee65f710caf29f94881f7 add file
afd18662e5eb6518becf4e9cd7b7277921861a78 add 3 files
9d639503b108ab0351f88ede22891c3ac57f4a56 commit my first file
d6d6d54748442f5e1f58c22ffdaeb9ab7016df7d commit my first file
现在是version3的状态,我们想回退到version2,重新基于version2进行编写,希望工作区也回退到version2,则使用--hard参数。
[dev@localhost gitcode]$ git reset --hard 84f51509c784fb8087719fcba115ab53c2b38c01
HEAD 现在位于 84f5150 add version2
[dev@localhost gitcode]$ cat hello
hello world
hello
hello teachers and students

hello version1
hello version2
[dev@localhost gitcode]$ git log --pretty=oneline
84f51509c784fb8087719fcba115ab53c2b38c01 add version2
d75c971d2aac0dd5b01fcf1c251887ce0cdd5ecc add version1
7c55a31df9ef6d4ad37fd080abd7cd189113015e add modify hello file
1a00ec8ddc752921154ee65f710caf29f94881f7 add file
afd18662e5eb6518becf4e9cd7b7277921861a78 add 3 files
9d639503b108ab0351f88ede22891c3ac57f4a56 commit my first file
d6d6d54748442f5e1f58c22ffdaeb9ab7016df7d commit my first file
可以看到,版本已经回退到version2了,然后历史提交记录里面也回退到了version2,那此时若还想回到version3该如何?
//记录本地的每一次命令
git reflog
利用git reflog来找到version3的commit id来恢复version3。
[dev@localhost gitcode]$ git reflog
84f5150 HEAD@{0}: reset: moving to 84f51509c784fb8087719fcba115ab53c2b38c01
6a82c8c HEAD@{1}: commit: add version3
84f5150 HEAD@{2}: commit: add version2
d75c971 HEAD@{3}: commit: add version1
7c55a31 HEAD@{4}: commit: add modify hello file
1a00ec8 HEAD@{5}: commit: add file
afd1866 HEAD@{6}: commit: add 3 files
9d63950 HEAD@{7}: commit: commit my first file
d6d6d54 HEAD@{8}: commit (initial): commit my first file
6a82c8c是version3的部分,git版本回退的时候,可使用部分commit id来代表目标版本。
//回退到version3
[dev@localhost gitcode]$ git reset --hard 6a82c8c
HEAD 现在位于 6a82c8c add version3

//查看工作区
[dev@localhost gitcode]$ cat hello
hello world
hello
hello teachers and students

hello version1
hello version2
hello version3

//查看log
[dev@localhost gitcode]$ git log --pretty=oneline
6a82c8c9dc388e96104f1a581e866af41a69d070 add version3
84f51509c784fb8087719fcba115ab53c2b38c01 add version2
d75c971d2aac0dd5b01fcf1c251887ce0cdd5ecc add version1
7c55a31df9ef6d4ad37fd080abd7cd189113015e add modify hello file
1a00ec8ddc752921154ee65f710caf29f94881f7 add file
afd18662e5eb6518becf4e9cd7b7277921861a78 add 3 files
9d639503b108ab0351f88ede22891c3ac57f4a56 commit my first file
d6d6d54748442f5e1f58c22ffdaeb9ab7016df7d commit my first file
在此处我们可以找到commit id,但是在实际开发中,由于长时间开发,会导致commit id早就找不到,那想回退到原来的版本似乎不太可能。
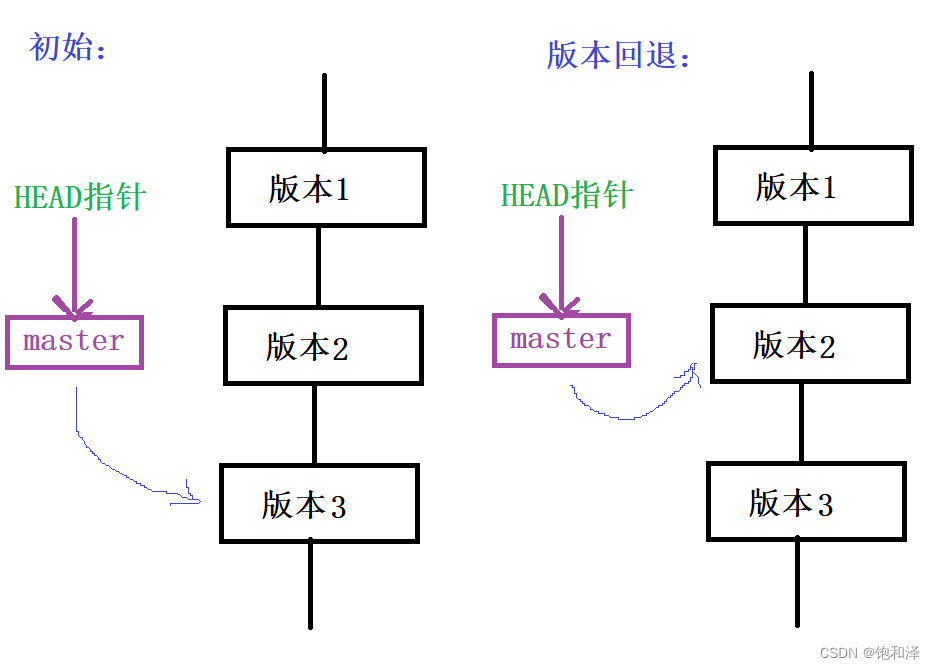
实际上,git版本的回退速度是非常快的,因为在git内部有个指向当前分支的HEAD指针,refs/heads/master文件里面保存当前master分支的最新commit id,当在回退版本的时候,仅仅只是在refs/heads/master文件中存储一个特定的version。
6 撤销修改
想将工作区中的文件恢复到上一个版本。
6.1 文件还未add
1 直接删除目前工作区中新增的内容。
★ 将工作区文件回到最近一次add或commit时的状态。
git checkout -- [file]
//在hello文件中新增“this is easy”
[dev@localhost gitcode]$ cat hello
hello world
hello
hello teachers and students
hello version1
hello version2
hello version3
this is easy

//将hello文件恢复到上一次add或commit
[dev@localhost gitcode]$ git checkout -- hello
[dev@localhost gitcode]$ cat hello
hello world
hello
hello teachers and students

hello version1
hello version2
hello version3
6.2 文件已add,但未commit
add后存入了暂存区。
git reset回退命令中默认选项--mixed参数,可将暂存区中内容回退为指定的版本内容,但工作区文件保持不变。如此,就可以利用该命令来回退暂存区中的内容。
//--mixed为默认参数
git reset --mixed HEAD [file]
实例:将hello文件新增“this is fun”,只进行add而不commit。
//向hello文件中新增“this is fun”
[dev@localhost gitcode]$ cat hello
hello world
hello
hello teachers and students

hello version1
hello version2
hello version3
this is fun

//将hello添加到缓存区
[dev@localhost gitcode]$ git add hello
[dev@localhost gitcode]$ git status
# 位于分支 master
# 要提交的变更:
#   (使用 "git reset HEAD <file>..." 撤出暂存区)
#
#	修改:      hello

//将添加的hello文件缓存区回退到原来的版本
[dev@localhost gitcode]$ git reset --mixed HEAD hello
warning: --mixed 带路径已弃用,而是用 'git reset -- <paths>'。
重置后撤出暂存区的变更:
M	hello
git status查看一下,然后暂存区是干净的,工作区有修改
[dev@localhost gitcode]$ git status
# 位于分支 master
# 尚未暂存以备提交的变更:
#   (使用 "git add <file>..." 更新要提交的内容)
#   (使用 "git checkout -- <file>..." 丢弃工作区的改动)
#
#	修改:      hello
#
修改尚未加入提交(使用 "git add" 和/或 "git commit -a")
状态返回到文件还未add的状态。git checkout -- [file]再将工作区的版本回退到初始版本。
[dev@localhost gitcode]$ git checkout -- hello
[dev@localhost gitcode]$ git status
# 位于分支 master
无文件要提交,干净的工作区
6.3 文件已add,且commit
使用命令git reset --hard HEAD^可以回退到上一个版本,不过是在还未将自己的本地版本库推送到远程的条件上。
实例:将hello文件新增“this is cool”,add也commit。
//向hello文件中新增“this is cool”
[dev@localhost gitcode]$ cat hello
hello world
hello
hello teachers and students

hello version1
hello version2
hello version3
this is cool

//再add和commit
[dev@localhost gitcode]$ git add hello
[dev@localhost gitcode]$ git commit -m "test file"
[master ae55039] test file
 1 file changed, 1 insertion(+)

//命令git reset --hard HEAD^进行版本回退
[dev@localhost gitcode]$ git reset --hard HEAD^
HEAD 现在位于 6a82c8c add version3
[dev@localhost gitcode]$ cat hello
hello world
hello
hello teachers and students

hello version1
hello version2
hello version3
7 删除文件
我们使用rm命令来删除文件,这样只能把工作区的文件进行删除,这样一来,版本库和工作区就不一样了。
故,要删除文件,工作区和版本库中文件都得删除掉。
★ 将文件从暂存区和版本库中删除掉。
git rm [file]
实例:删除文件file4,并commit。
[dev@localhost gitcode]$ ls
file1  file2  file3  file4  hello

[dev@localhost gitcode]$ git rm file4
rm 'file4'
[dev@localhost gitcode]$ git status
# 位于分支 master
# 要提交的变更:
#   (使用 "git reset HEAD <file>..." 撤出暂存区)
#
#	删除:      file4
#

[dev@localhost gitcode]$ git commit -m "delete file4"
[master 0dc0284] delete file4
 1 file changed, 0 insertions(+), 0 deletions(-)
 delete mode 100644 file4
[dev@localhost gitcode]$ git status
# 位于分支 master
无文件要提交,干净的工作区
三、Git分支管理
1 何为分支
分支,类比于科幻电影里的平行时空,当小明在学习C++的时候,另一个平行时空的小明在学习Java,若两个时空互不干扰,那对每个时空的小明并没有影响,但当某个时间点两时空合并,这时小明既学会了C++又学会了Java。
在版本回退中的每次提交,git都将它们串成一条时间线,此时间线即为一个分支,在git中只有一条时间线,此分支为主分支,即master分支。
HEAD指针,严格意义上,HEAD指向master,master指向提交,即HEAD指向当前分支。
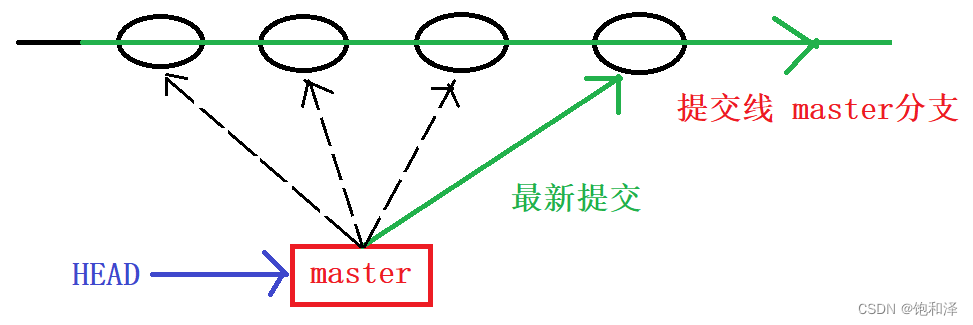
每次提交,master分支都会往前移动一步,随着不断提交,master分支线也会越来越长,HEAD一直指向master分支即指向当前分支。
2 创建分支
★ 创建分支
git branch branch-name
★ 查看当前本地所有的分支
git branch
实例:创建分支dev
[dev@localhost gitcode]$ git branch
* master
[dev@localhost gitcode]$ git branch dev
[dev@localhost gitcode]$ git branch
  dev
* master
创建分支dev后,git会新建一个指针叫dev,*表示当前HEAD指向的分支是master分支。
[dev@localhost gitcode]$ ls .git/refs/heads/
dev  master
[dev@localhost gitcode]$ cat .git/refs/heads/*
0dc02840d3dacf16fd38a13db9ab2a47edbf33e8
0dc02840d3dacf16fd38a13db9ab2a47edbf33e8
发现两个指针master和dev都指向同一个修改。而此时HEAD指针是指向master的。
[dev@localhost gitcode]$ cat .git/HEAD
ref: refs/heads/master
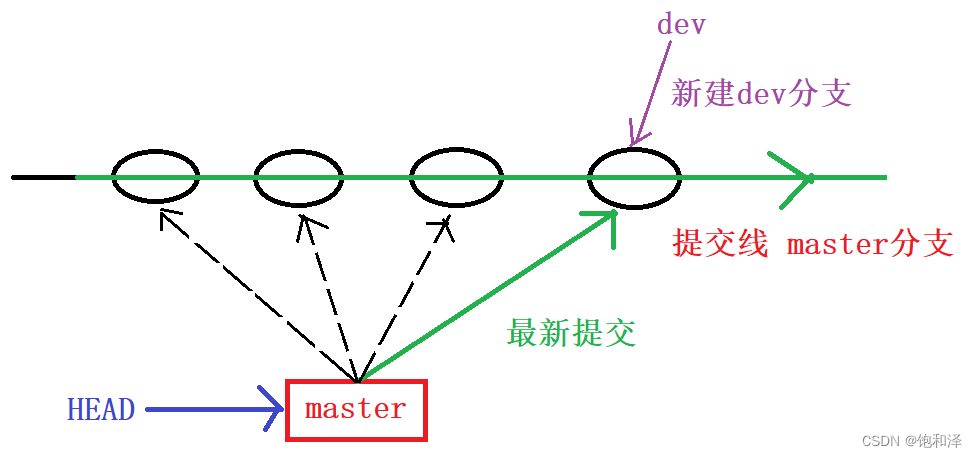
3 切换分支
★ 切换分支
git checkout branch-name
实例:从master分支切换到dev分支
[dev@localhost gitcode]$ git branch
  dev
* master
[dev@localhost gitcode]$ git checkout dev
切换到分支 'dev'
[dev@localhost gitcode]$ git branch
* dev
  master
[dev@localhost gitcode]$ cat .git/HEAD
ref: refs/heads/dev
切换成dev分支后,HEAD指针就指向了dev。
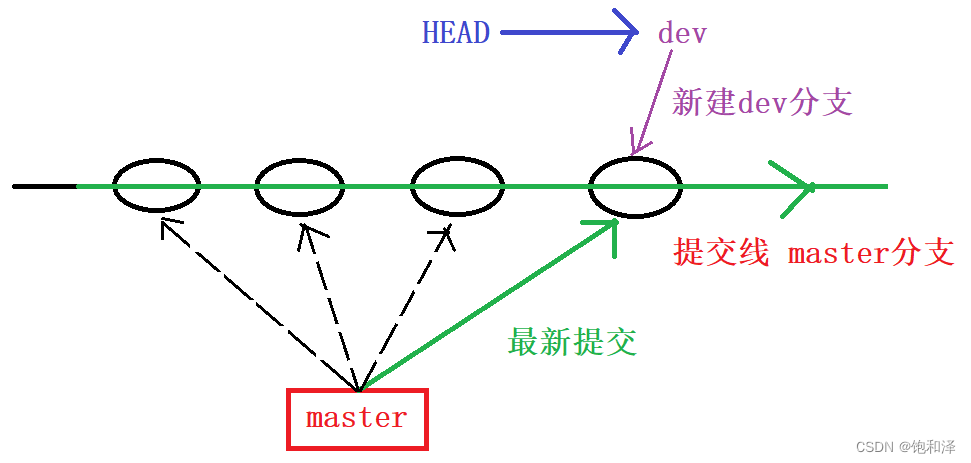
切换为dev分支后,对hello文件新增内容“write a for new branch”并进行提交操作。
[dev@localhost gitcode]$ cat hello
hello world
hello
hello teachers and students

hello version1
hello version2
hello version3
write a for new branch
[dev@localhost gitcode]$ git add hello
[dev@localhost gitcode]$ git commit -m "modify hello"
[dev eafb85e] modify hello
 1 file changed, 1 insertion(+)
又切换master分支,查看hello文件。
[dev@localhost gitcode]$ git checkout master
切换到分支 'master'
[dev@localhost gitcode]$ git branch
  dev
* master
[dev@localhost gitcode]$ cat hello
hello world
hello
hello teachers and students

hello version1
hello version2
hello version3
可以看到,hello文件并没有新增的内容。而dev分支上hello文件是有新增的。
实际上,hello文件的新增操作是在dev分支上提交的,而master分支上此刻的提交点并没有改变。
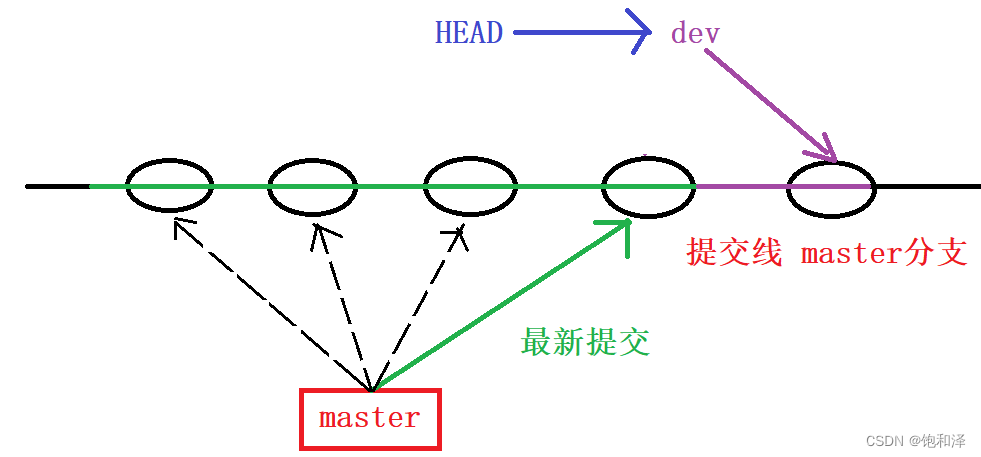
所有,当在dev分支上做的修改提交,切换回master分支后HEAD就指向了master,也就看不到hello文件的修改了。
4 合并分支
为了让master主分支上也能看到新的提交,就需要将dev分支合并到master分支上。
★ 合并指定分支到当前分支
git merge branch-name
实例:将dev分支合并到master分支上。
[dev@localhost gitcode]$ git branch
* dev
  master
[dev@localhost gitcode]$ git checkout master
切换到分支 'master'
[dev@localhost gitcode]$ git merge dev
更新 0dc0284..eafb85e
Fast-forward
 hello | 1 +
 1 file changed, 1 insertion(+)
[dev@localhost gitcode]$ cat hello
hello world
hello
hello teachers and students

hello version1
hello version2
hello version3
write a for new branch
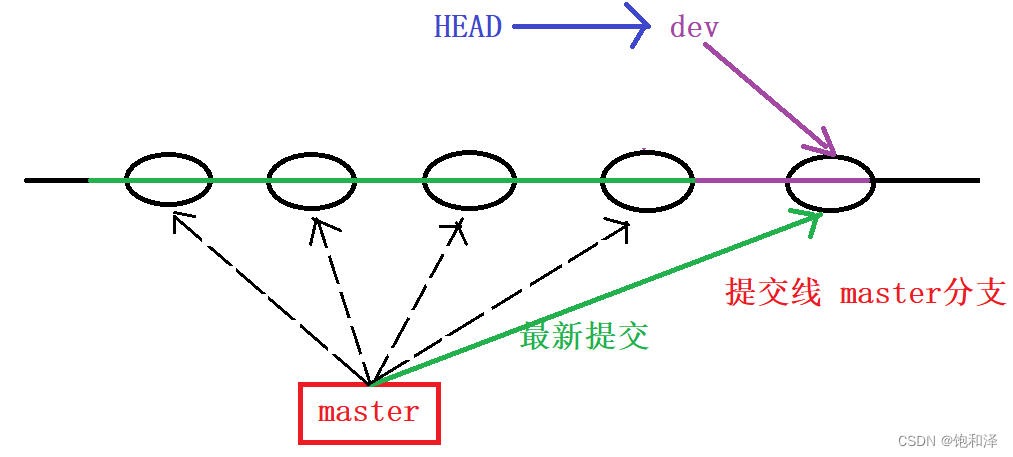
Fast-forward表示“快进模式”,即直接把master指向dev的当前提交,其合并速度是很快的,但并非每次的合并都能Fast-forward。
5 删除分支
★ 删除分支
git branch -d branch-name
实例:删除dev分支。
[dev@localhost gitcode]$ git branch
  dev
* master
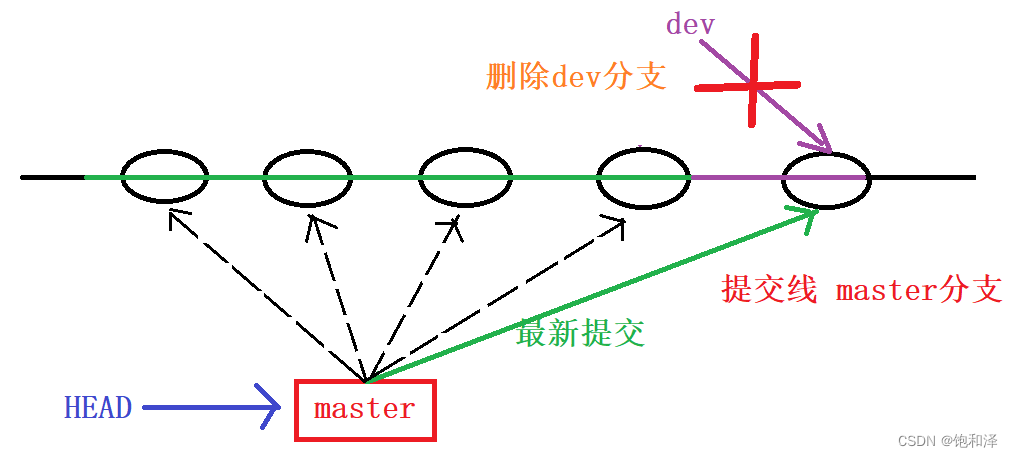
[dev@localhost gitcode]$ git branch -d dev
已删除分支 dev(曾为 eafb85e)。
[dev@localhost gitcode]$ git branch
* master
当然,也可以在当前分支下删除当前该分支。
6 合并冲突
在实际合并分支时,并不是如此容易的,有时候会遇到代码冲突的问题。
实例:
创建分支dev1,切换到dev1分支,将hello文件中“write a for new branch”修改为“write aaa for new branch”并进行提交;切换为master分支,将hello文件中“write a for new branch”修改为“write bbb for new branch”并进行提交,之后再将两分支进行合并。
[dev@localhost gitcode]$ git branch dev1
[dev@localhost gitcode]$ git branch
  dev1
* master
[dev@localhost gitcode]$ git checkout dev1
切换到分支 'dev1'
[dev@localhost gitcode]$ git branch
* dev1
  master
[dev@localhost gitcode]$ vim hello
[dev@localhost gitcode]$ cat hello
hello world
hello
hello teachers and students

hello version1
hello version2
hello version3
write aaa for new branch
[dev@localhost gitcode]$ git add hello
[dev@localhost gitcode]$ git commit -m "modify hello"
[dev1 59a38f7] modify hello
 1 file changed, 1 insertion(+), 1 deletion(-)
[dev@localhost gitcode]$ git checkout master
切换到分支 'master'
[dev@localhost gitcode]$ cat hello
hello world
hello
hello teachers and students

hello version1
hello version2
hello version3
write a for new branch
[dev@localhost gitcode]$ vim hello
[dev@localhost gitcode]$ cat hello
hello world
hello
hello teachers and students

hello version1
hello version2
hello version3
write bbb for new branch
[dev@localhost gitcode]$ git add hello
[dev@localhost gitcode]$ git commit -m "modify hello"
[master 0fe251a] modify hello
 1 file changed, 1 insertion(+), 1 deletion(-)
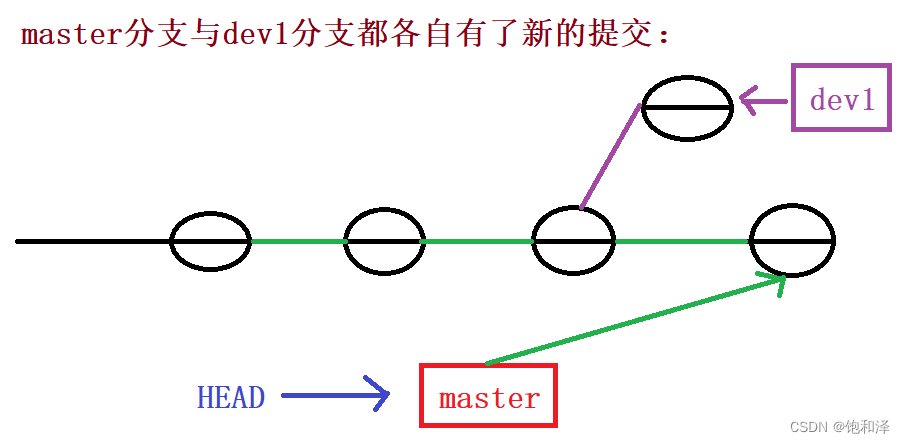
这时将master分支与dev1分支合并。
[dev@localhost gitcode]$ git merge dev1
自动合并 hello
冲突(内容):合并冲突于 hello
自动合并失败,修正冲突然后提交修正的结果。
[dev@localhost gitcode]$ git status
# 位于分支 master
# 您有尚未合并的路径。
#   (解决冲突并运行 "git commit")
#
# 未合并的路径:
#   (使用 "git add <file>..." 标记解决方案)
#
#	双方修改:     hello
#
修改尚未加入提交(使用 "git add" 和/或 "git commit -a")
[dev@localhost gitcode]$ cat hello
hello world
hello
hello teachers and students

hello version1
hello version2
hello version3
<<<<<<< HEAD
write bbb for new branch
=======
write aaa for new branch
>>>>>>> dev1
可以看到,提示合并出现冲突。发现hello文件有冲突,git会用<<<<<<< ,=======,>>>>>>>来标记不同分支的冲突内容。
这时就需要用户自己手动调整冲突代码,并提交修正后的结果,并git log查看分支合并的情况。
[dev@localhost gitcode]$ vim hello
[dev@localhost gitcode]$ cat hello
hello world
hello
hello teachers and students

hello version1
hello version2
hello version3
write aaa for new branch
[dev@localhost gitcode]$ git add hello
[dev@localhost gitcode]$ git commit -m "merge hello"
[master 4f37cf6] merge hello
[dev@localhost gitcode]$ git log --graph --pretty=oneline --abbrev-commit
*   4f37cf6 merge hello
|\
| * 59a38f7 modify hello
* | 0fe251a modify hello
|/
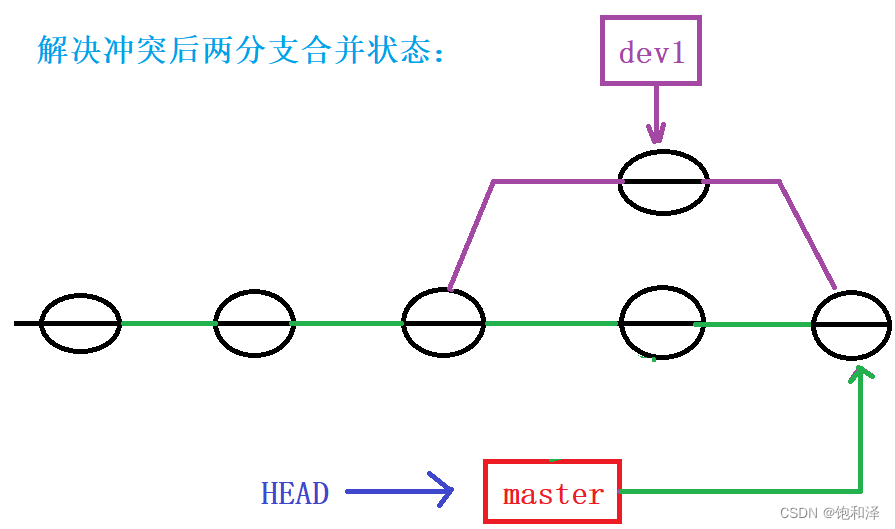
合并之后,dev1分支也没啥用了,就可以把dev1分支删除。
7 分支管理
7.1 --no-ff参数
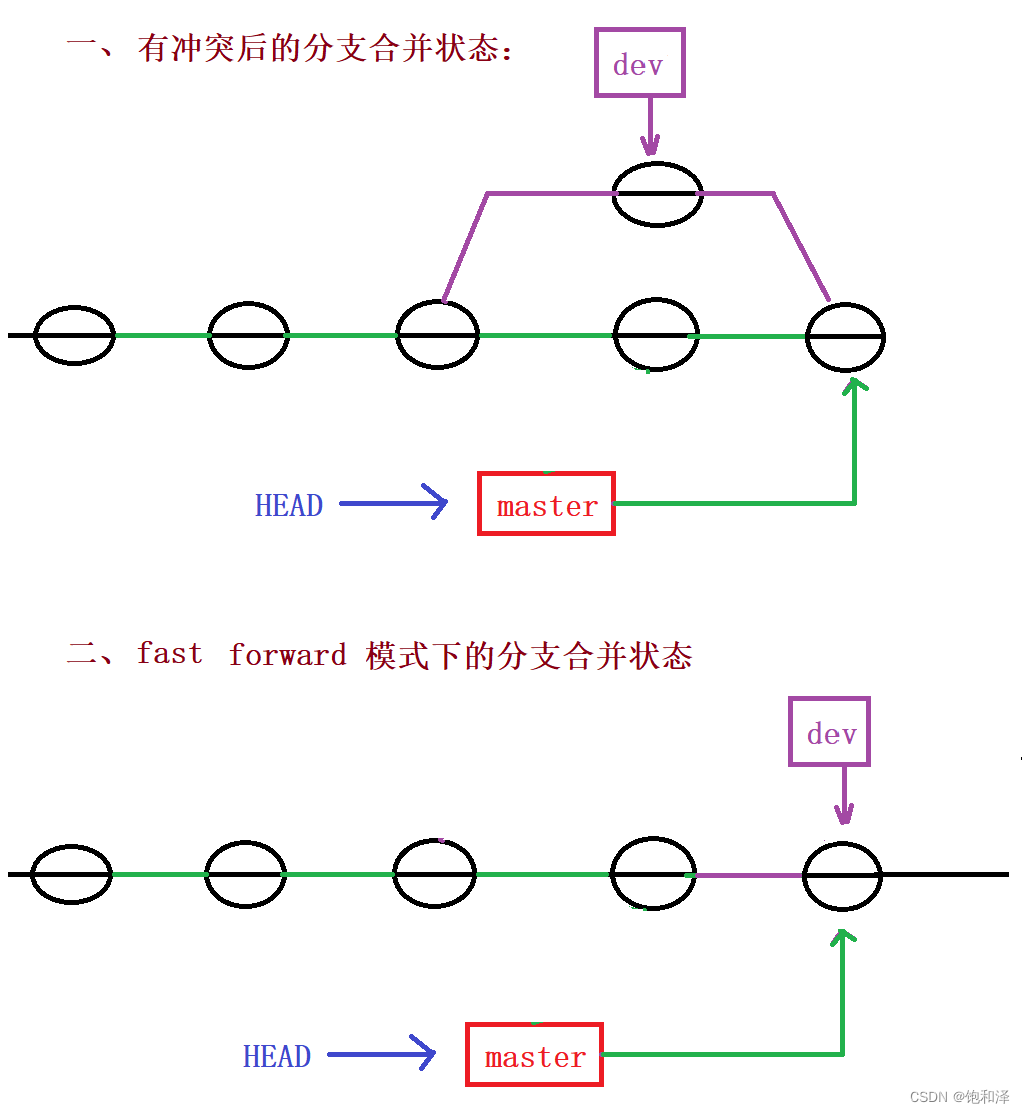
fast forward模式下,删除分支后,查看分支历史时分支信息会丢弃,并不知道最新提交是合并进来的还是正常提交的。
发生合并冲突之后合并的,会解决合并冲突后再进行一次新的提交,那么从分支历史上就可以看出分支信息。
--no-ff方式进行分支的合并。
实例:创建分支dev2,切换至dev2分支,修改hello文件并提交;再切换会master分支进行合并。
[dev@localhost gitcode]$ git checkout -b dev2
切换到一个新分支 'dev2'
[dev@localhost gitcode]$ vim hello
[dev@localhost gitcode]$ cat hello
hello world
hello
hello teachers and students

hello version1
hello version2
hello version3
write aaa for new branch
aaaaaaaaaaaaaaaaaaaaaaaa
[dev@localhost gitcode]$ git add .
[dev@localhost gitcode]$ git commit -m "modify hello"
[dev2 36498cc] modify hello
 1 file changed, 1 insertion(+)
[dev@localhost gitcode]$ git checkout master
切换到分支 'master'
[dev@localhost gitcode]$ git merge --no-ff -m "merge with no-ff" dev2
Merge made by the 'recursive' strategy.
 hello | 1 +
 1 file changed, 1 insertion(+)
[dev@localhost gitcode]$ cat hello
hello world
hello
hello teachers and students

hello version1
hello version2
hello version3
write aaa for new branch
aaaaaaaaaaaaaaaaaaaaaaaa

查看--no-ff方式进行分支合并历史。
[dev@localhost gitcode]$ git log --graph --pretty=oneline --abbrev-commit
*   03b6bf3 merge with no-ff
|\
| * 36498cc modify hello
|/
*   4f37cf6 merge hello
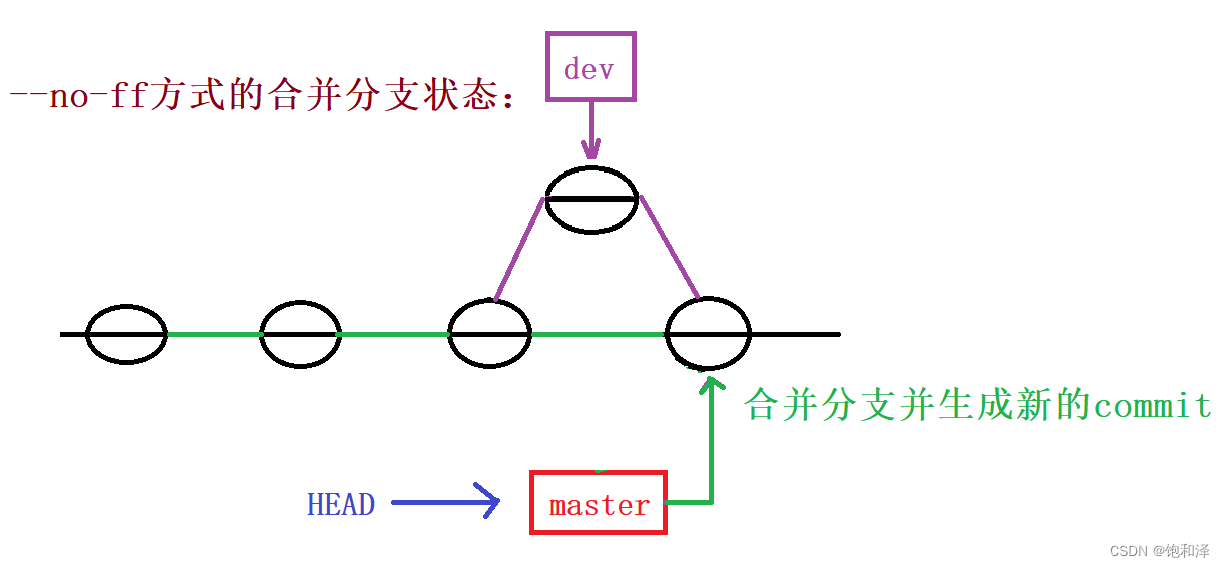
--no-ff参数可以用普通模式进行合并,合并后的历史有分支,但是fast forward合并就看不出来。
7.2 分支策略
在实际的开发中,应该按照几个原则进行分支管理。
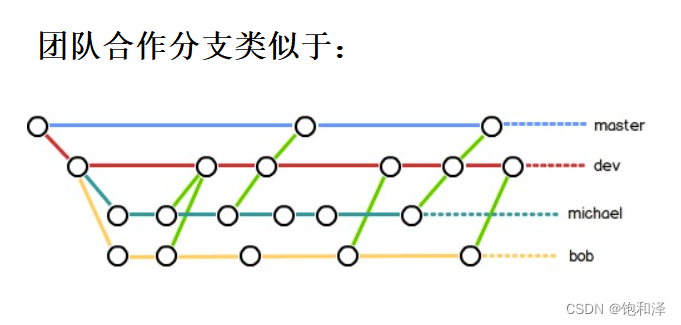
master分支是非常稳定的,此分支仅用来发布新版本;dev分支是不稳定的,在dev分支上进行开发工作,即在dev上进行干活,如当1.0版本要发布时,将dev分支合并到master分支上,在master分支上发布1.0版本。
而我们和自己所在团队成员都在dev分支上干活,每个人都有自己的分支,每个人将自己的内容时不时合并到dev分支上就可。
8 bug分支
若现在我们正在dev2分支上进行开发工作,开发到一半时发现master分支上面有bug,如何解决?
git中每个bug都可以通过一个新的临时分支来修复,然后合并分支和将临时分支删除。
//将当前工作区内容进行储藏,然后在将来要用的时候再将其恢复出来
git stash

//查看git stash储藏的内容放在哪里
git stash list

//恢复git stash储藏的内容,恢复同时把stash也删除
git stash pop

//恢复git stash储藏的内容,恢复不删除stash
git stash qpply
git stash drop //删除stash
实例:在分支dev2上进行开发,开发一半发现master分支有错误,用git stash命令将dev2分支新开发的内容先保存,切换回master分支通过新建临时分支来修复错误。
[dev@localhost gitcode]$ git branch
* dev2
  master
[dev@localhost gitcode]$ cat hello
hello world
hello
hello teachers and students

hello version1
hello version2
hello version3
write aaa for new branch
aaaaaaaaaaaaaaaaaaaaaaaa

[dev@localhost gitcode]$ git status
# 位于分支 dev2
# 尚未暂存以备提交的变更:
#   (使用 "git add <file>..." 更新要提交的内容)
#   (使用 "git checkout -- <file>..." 丢弃工作区的改动)
#
#	修改:      hello
#
修改尚未加入提交(使用 "git add" 和/或 "git commit -a")
git stash将当前工作区信息储藏,被储藏的内容可在将来某个时刻恢复。
[dev@localhost gitcode]$ git stash
Saved working directory and index state WIP on dev2: 36498cc modify hello
HEAD 现在位于 36498cc modify hello
[dev@localhost gitcode]$ git status
# 位于分支 dev2
无文件要提交,干净的工作区
切换回master分支,创建临时分支fix_bug来修正错误,在临时分支上对文件进行错误修正后再add和commit。
[dev@localhost gitcode]$ clear
[dev@localhost gitcode]$ git checkout master
切换到分支 'master'
[dev@localhost gitcode]$ git checkout -b fix_bug
切换到一个新分支 'fix_bug'
[dev@localhost gitcode]$ vim hello

//错误修正:将“write aaa for new branch”中aaa修改为abc

[dev@localhost gitcode]$ cat hello
hello world
hello
hello teachers and students

hello version1
hello version2
hello version3
write abc for new branch
aaaaaaaaaaaaaaaaaaaaaaaa
[dev@localhost gitcode]$ git add hello
[dev@localhost gitcode]$ git commit -m "fix bug"
[fix_bug 45c0620] fix bug
 1 file changed, 1 insertion(+), 1 deletion(-)
错误修正后,切换回master分支,合并fix_bug分支,然后删除fix_bug分支。
在这里插入代码片[dev@localhost gitcode]$ git checkout master
切换到分支 'master'
[dev@localhost gitcode]$ git merge --no-ff -m "merge fix_bug branch" fix_bug
Merge made by the 'recursive' strategy.
 hello | 2 +-
 1 file changed, 1 insertion(+), 1 deletion(-)
[dev@localhost gitcode]$ cat hello
hello world
hello
hello teachers and students

hello version1
hello version2
hello version3
write abc for new branch
aaaaaaaaaaaaaaaaaaaaaaaa
master分支上出现的错误已经修订了,返回dev2分支进行开发,查询内容存储地方,将内容进行还原,然后继续初始的开发工作。
[dev@localhost gitcode]$ git checkout dev2
切换到分支 'dev2'
[dev@localhost gitcode]$ git stash list
stash@{0}: WIP on dev2: 36498cc modify hello
[dev@localhost gitcode]$ git stash pop
# 位于分支 dev2
# 尚未暂存以备提交的变更:
#   (使用 "git add <file>..." 更新要提交的内容)
#   (使用 "git checkout -- <file>..." 丢弃工作区的改动)
#
#	修改:      hello
#
修改尚未加入提交(使用 "git add" 和/或 "git commit -a")
丢弃了 refs/stash@{0} (6d467dd2c1e902e5e12aeab35dd52d572aa4e90d)
[dev@localhost gitcode]$ git stash list
[dev@localhost gitcode]$
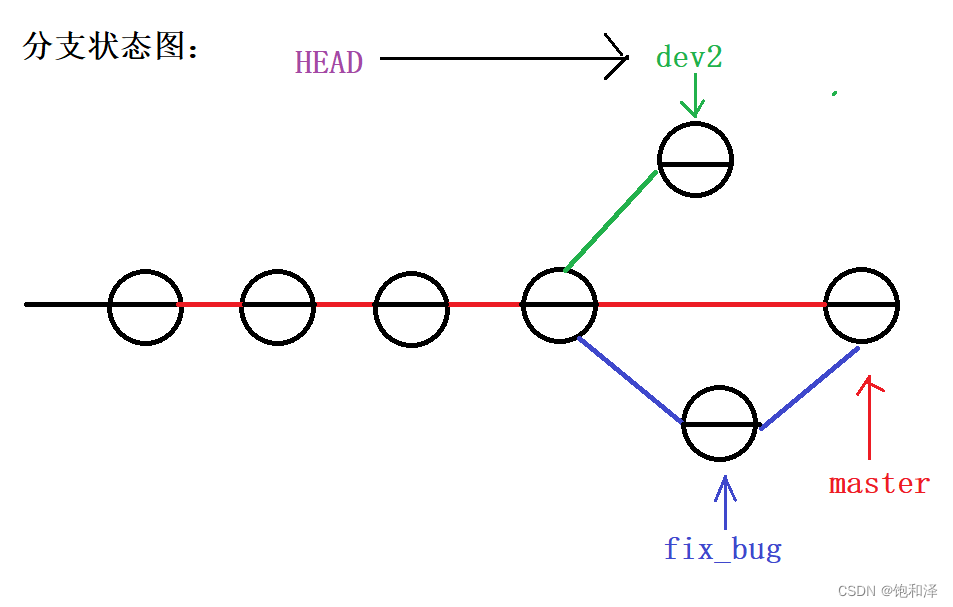
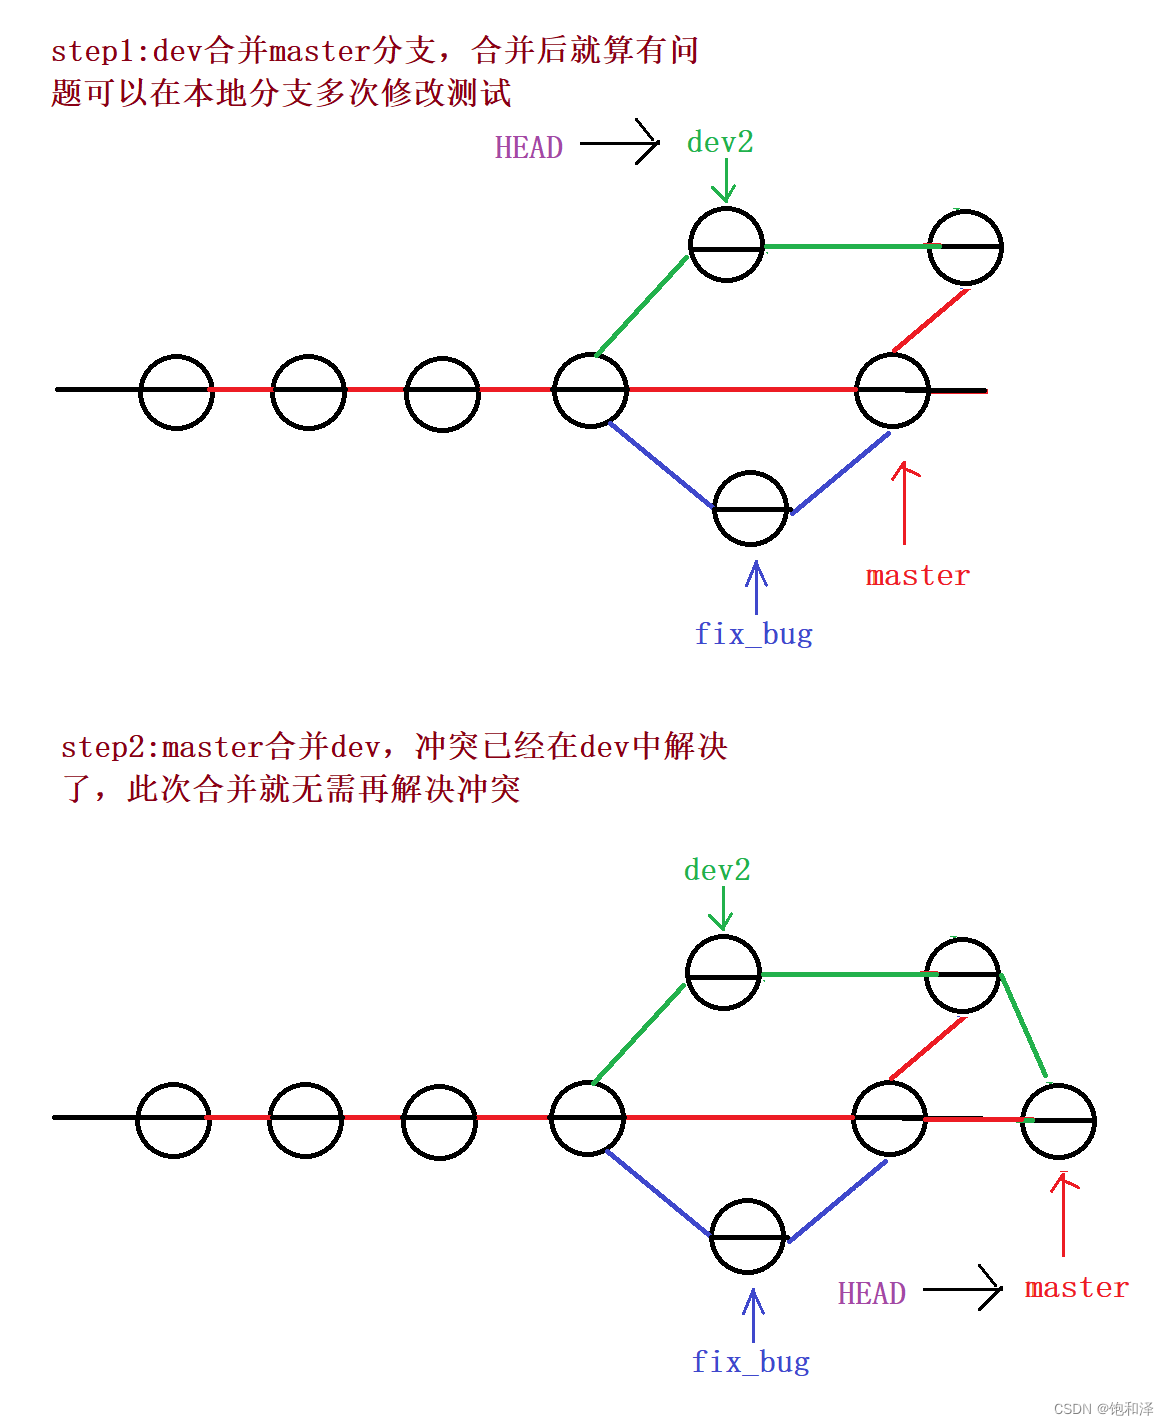
实际上,最终是要让master合并dev2的,但实际在合并的时候可能会产生冲突,代码冲突需要用户手动解决,而实际开发中,并不能保证冲突问题可以一次性解决,解决冲突过程难免失误导致错误内容被合并到master分支上。
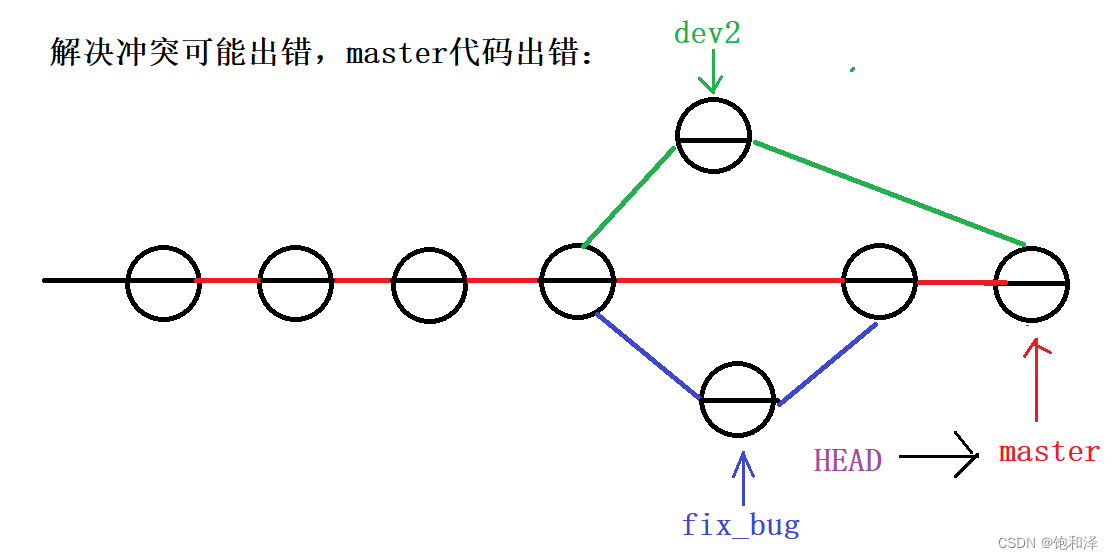
对于此问题解决为:在自己的分支上合并master分支,再让master分支去合并dev分支,这样若有冲突的话可以在本地分支解决并进行测试,从而不影响master分支。
9 删除临时分支
实际开发中,不断的有新功能增加,每添加一个功能时最好新建一个分支,称之为feature 分支,进行功能添加完成后合并然后删除。
实例:
//新建分支dev3并切换到新分支
[dev@localhost gitcode]$ git checkout -b dev3
切换到一个新分支 'dev3'

//dev3分支下开发新功能并add和commit
[dev@localhost gitcode]$ vim hello
[dev@localhost gitcode]$ cat hello
hello world
hello
hello teachers and students

hello version1
hello version2
hello version3
write abc for new branch
aaaaaaaaaaaaaaaaaaaaaaaa

dev3 insert
[dev@localhost gitcode]$ git add hello
[dev@localhost gitcode]$ git commit -m "modify hello for new feature"
[dev3 d58c12f] modify hello for new feature
 1 file changed, 1 insertion(+)
[dev@localhost gitcode]$ git checkout master
切换到分支 'master'

//现在我们并不需要dev3下开发的内容,即并不需要dev3分支了,将dev3分支删除掉
[dev@localhost gitcode]$ git branch -d dev3
error: 分支 'dev3' 没有完全合并。
如果您确认要删除它,执行 'git branch -D dev3'。
[dev@localhost gitcode]$ git branch -D dev3
已删除分支 dev3(曾为 d58c12f)。
本节结束!!!
下节内容:Git–版本控制器学习(二)


 2393
2393


 被折叠的 条评论
为什么被折叠?


