


1.安装IDEA2023版本
官网下载,破解授权码可以私信我找我要
2.快速入门示例一
首先创建一个空项目,选择maven、Java(jdk版本不能太低,大概要17以上)
遇到的问题一:没有安装这样的版本,下载jdk 17
1.定义一个Java类mianapplication是作为启动spring boot项目的主入口程序
-
2.针对spring boot application加一个注解表示这是一个spring boot应用是一个固定写法
/**

*@Description启动Springboot项目的主入口程序

*/

@SpringBootApplication//这是一个Springboot应用

publicclassMainApplication{

publicstaticvoidmain(String[]args){

SpringApplication.run(MainApplication.class,args);

}

//固定写法

}
3.其实最重要的是在那个pom.XML需要配置一些依赖
官网:Spring Boot
<!--创建pom,所有springboot项目都必须继承自spring-jxzy-starter-->

<parent>

<groupId>org.springframework.boot</groupId>

<artifactId>spring-boot-starter-parent</artifactId>

<version>3.0.9</version>

</parent>
然后配置web开发场景启动器
<!--web开发场景启动器-->

<dependencies>

<dependency>

<groupId>org.springframework.boot</groupId>

<artifactId>spring-boot-starter-web</artifactId>

</dependency>

</dependencies>
然后还可以配置一个spring boot应用打包插件
<!--SpringBoot应用打包插件-->

<build>

<plugins>

<plugin>

<groupId>org.springframework.boot</groupId>

<artifactId>spring-boot-maven-plugin</artifactId>

</plugin>

</plugins>

</build>
为了就是即使你在线上改掉这个接口你也可以改一下
这些都可以根据Spring Boot官网区域直接复制过来
controller层
//@ResponseBody

//@Controller

@RestController

publicclassHelloController{

@GetMapping("/hello")

publicStringhello(){

return"Hello,SpringBoot3,你已经成功迈出一步了";

}

}

//加GetMapping处理浏览器的hello请求

//因为返回的是纯文本所以加注解ResponseBody

//放在外面表示这个controller层的所有都是用来返回Jason字符串和纯文本数据的

//这两个@ResponseBody,@Controller有一个合成注解@RestController
可以对项目进行打包,在安装了spring boot应用打包插件后
点maven=>生命周期=>clean=>package
就会生成一个target文件=>找到一个jar包打开它的文件位置
你单独把它拿出来给放到一个文件里再新建一个application.properties文件里面加一行
server.port=要更改的端口号=>就可以实现请求的端口号不一样了
运行这个jar包需要一行命令Java -jar 文件jar包名
运行项目了前端请求到数据如果报错:大概是因为你的jdk版本不够高
3.快速入门示例二:
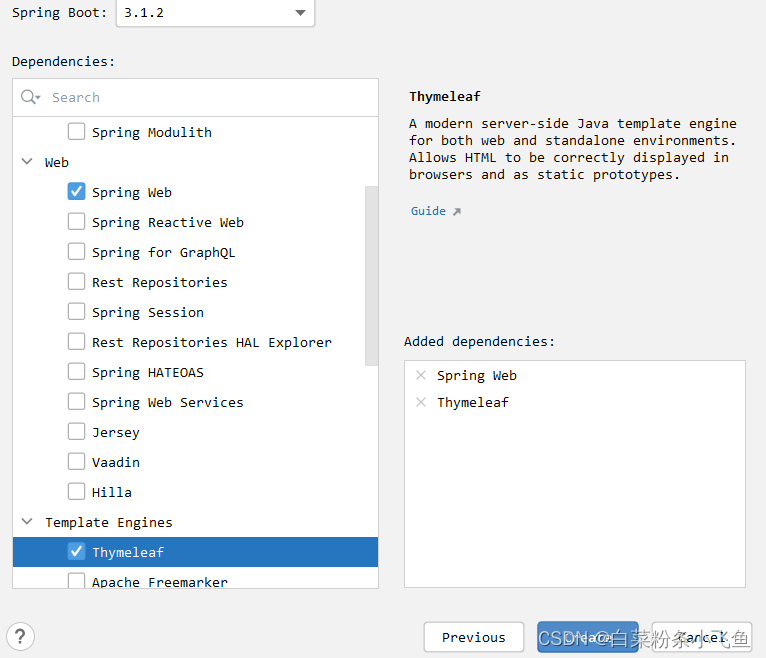
通过Spring Boot Initializr一键实现上述效果
首先:选择Spring Boot Initializr;
如果没有去插件那下一下,下完记得重启;然后根据你的配置选咯

然后next,选择你需要的配置
(我是选择web前端,和页面跳转所以才选择了这两个),选择完后就可以创建了
要连数据库的话这个配置,两个数据库一个sql server.mysql

结构

4.依赖管理机制
1.为什么导入starter-web所有的依赖都会被导入进去
- 开发什么场景,导入什么场景启动器
- maven依赖传递原则(有了A,等于也拥有了B,C;A包含B,C)
- 导入场景启动器,自动把场景所需的核心依赖导入进来
2.为什么版本号都不用写
- 每个boot项目都有一个父项目Spring- boot-starter-parent
- parent的父项目是springboot-dependencies
- 父项目版本仲裁中心,已经把常见的jar的依赖版本都声明好了
3.自定义版本
利用maven的就近原则
直接利用项目标签propertices声明父项目使用的版本对应的key
直接在导入依赖的时候声明版本号
第三方导jar包:boot父项目没有管理该一路来,要自行加版本号(例如下面这是druid)
<!-- https://mvnrepository.com/artifact/com.alibaba/druid -->
<dependency>
    <groupId>com.alibaba</groupId>
    <artifactId>druid</artifactId>
    <version>1.2.18</version>
</dependency>
5.自动配置机制
6.SQL server数据库连接
在连接SQL Server时,可以使用以下两种配置方式来连接数据库。
第一种方式: 在application.yml文件中添加以下配置:
spring:
  datasource:
    driver-class-name: com.microsoft.sqlserver.jdbc.SQLServerDriver
    url: jdbc:sqlserver://ip地址:端口号;database=数据库名字;encrypt=false
    username: 账号
    password: 密码
其中,ip地址为SQL Server的IP地址,端口号为SQL Server的端口号,数据库名字为要连接的数据库的名称,账号和密码为连接数据库的账号和密码。
第二种方式: 在application.yml文件中添加以下配置:
spring:
  datasource:
    driverClassName: net.sourceforge.jtds.jdbc.Driver
    url: jdbc:jtds:sqlserver://ip地址:端口号;database=数据库名字
    username: 账号
    password: 密码
同样,ip地址为SQL Server的IP地址,端口号为SQL Server的端口号,数据库名字为要连接的数据库的名称,账号和密码为连接数据库的账号和密码。
示例:
spring:
  datasource:
    driver-class-name: com.microsoft.sqlserver.jdbc.SQLServerDriver
    url: jdbc:sqlserver://localhost:1433;database=recipeDataBase;encrypt=false
    username: tyl
    password: tyl123456
6.2如何查询IP地址:端口号
可以按照以下步骤操作:
- 打开SQL Server管理器并连接到SQL Server实例。
- 在左侧的“对象资源管理器”窗格中,展开“SQL Server Network Configuration”节点。
- 选择“Protocols for [SQL Server Instance Name]”节点。
- 在右侧窗格中,找到“TCP/IP”协议,并确保它的状态为“已启用”。
- 右键单击“TCP/IP”协议,并选择“属性”。
- 在“IP地址”选项卡中,找到“IPAll”节。
- 在“TCP端口”框中,您将看到SQL Server的端口号。
- 如果您想查找SQL Server的IP地址,请查看“IPAll”节中的“TCP动态端口”或“TCP端口”字段。
6.3数据库碰到的问题一:无法访问数据库object
这是你的用户权限不够导致的

解决方法
 (右键属性,服务器角色,勾选public,sysadmin)

当你遇到这个错误的时候:(好~,你权限不够,断开连接,以windows身份验证登录进去同上操作在赋予用户权限)

7.导入前端项目并且运行
1.直接把vue文件拖进SpringBoot文件里
2.运行前端项目
方法一:添加一个npm编辑器
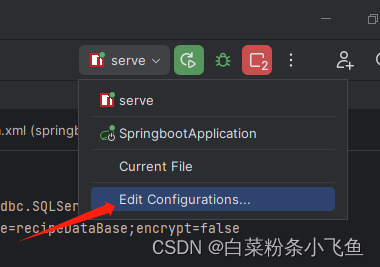
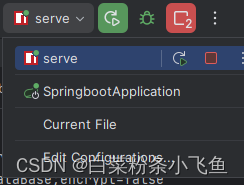 (绿点代表正在使用)
(忘记说了,这里还要加一个serve,别漏了步骤)
 方法二:在终端输入npm run serve

8.MyBatis实现增删改的步骤
1.可以用Navicatl连接各种数据库
2.IDEA中连接数据库


在实现增删改的过程中
Caused by: java.lang.IllegalArgumentException: Property 'sqlSessionFactory' or 'sqlSessionTemplate' are required假如你遇到这样的问题,(最坏的办法是重开,你懂吧,这有时候是最快最高效的方式),造成这个问题的原因是因为它没有办法读取到你的mapper层在加了注解@Mapper后没用的话在试试在Springbootapplication中加个注解(为了让它去扫描该位置下所有的mapper文件)
@MapperScan("com.example.springboot.mapper")实现步骤:
1.检查pom.xml是否引入mybatis-spring-boot-starter依赖
可以加一个依赖导包快
<!-- https://mvnrepository.com/artifact/com.alibaba/druid -->
            <!--		数据库连接池-->
		<dependency>
			<groupId>com.alibaba</groupId>
			<artifactId>druid-spring-boot-starter</artifactId>
			<version>1.1.9</version>
		</dependency>
2.写一个实体类
(实体类中加这个插件能省很多代码,那些函数不用写了,自动可以调用)
lombok 插件
@Data 各种函数
@NoArgsConstructor 无参构造
@AllArgsConstructor 有参构造
3.写一个接口mapper,要加注解@Mapper,
4.在controler中接口需要调用数据库接口,用@GetMapping("/"),用这个注解需要先加@RestContronller注解(它是组合注解:@Controller,@ResponseBody),成对出现。
application.yml中文件配置
spring:
datasource:
driver-class-name: com.microsoft.sqlserver.jdbc.SQLServerDriver
url: jdbc:sqlserver://localhost:1433;database=recipeDataBase;encrypt=false
username: tyl
password: tyl123456
server:
port: 9090
#mybatis:
# #在yml文件中做了以下配置就无需做mybatis-config.xml配置,如果使用了mybatis-config.xml配置,就把下面两行注掉,将第三行配置打开
## mapper-locations: classpath:mybatis/mappers/*.xml
## type-aliases-package: com.example.mybatis.entity
# config-location: classpath:mybatis-config.xml
mybatis:
mapper-locations: classpath:mapper/*.xml
#目的是为了省略resultType里的代码量
type-aliases-package: com.itheima.pojo
configuration:
map-underscore-to-camel-case: true
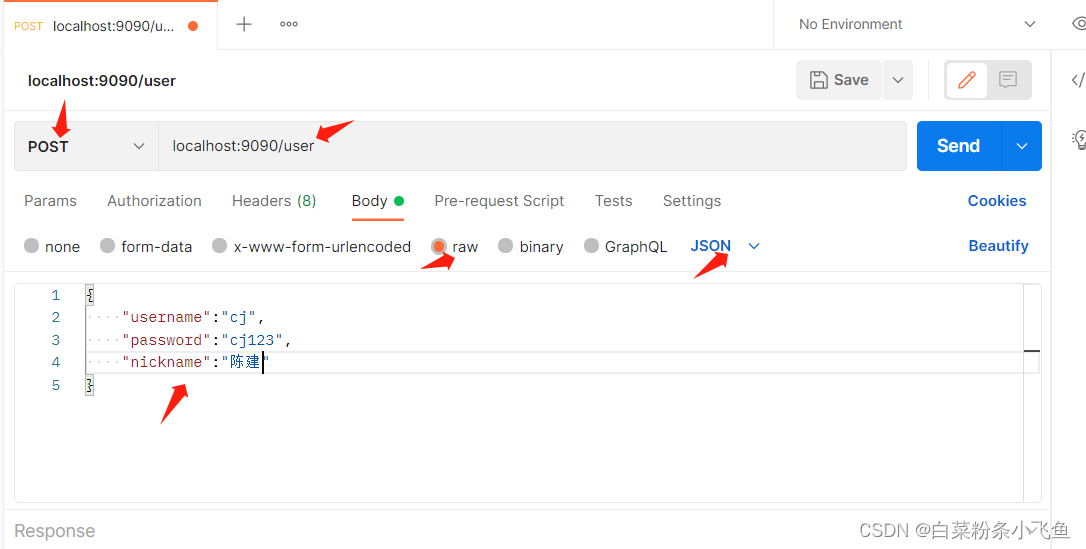
log-impl: org.apache.ibatis.logging.stdout.StdOutImpl增操作
如果没有前端,可以借助postman工具去向后端传输数据,send后返回值为1表示成功
有两种方式实现更新操作,一种是在mapper中加入注解的方式实现,一种是通过写mapper.xml的方式实现
第一种”
//mapper层,缺点是更新操作容易一次性全部字段更新,或实现起来繁琐
package com.example.newwork.mapper;

import com.example.newwork.entity.User;
import org.apache.ibatis.annotations.*;

import java.util.List;
@Mapper
public interface UserMapper {
    @Select("SELECT * FROM users")
    List<User> findselect();


    @Insert("INSERT INTO users(username,password,nickname) VALUES (#{username},#{password},#{nickname})")
    int insert(User user);

    int upadte(User user);

    @Delete("DELETE FROM users WHERE userId=#{userId}")
    Integer deleteById( @Param("userId") Integer userId);
    //@Parm("userId)这里面的参数必须和@Delete里的#{userId}保持一致
}


//service层
package com.example.newwork.service;

import com.example.newwork.entity.User;
import com.example.newwork.mapper.UserMapper;
import org.springframework.beans.factory.annotation.Autowired;
import org.springframework.stereotype.Service;

@Service
public class UserService {
    @Autowired
    private UserMapper userMapper;
    public  int save(User user) {
        if (user.getUserId() == null) {
            //新增
          return   userMapper.insert(user);

        }else {
            //更新
         return    userMapper.upadte(user);
        }

    }

}
//Controller
package com.example.newwork.controller;

import com.example.newwork.entity.User;
import com.example.newwork.mapper.UserMapper;
import com.example.newwork.service.UserService;
import org.springframework.beans.factory.annotation.Autowired;
import org.springframework.web.bind.annotation.*;

import java.util.List;

@RestController
@RequestMapping("/user")
public class UserController {
    @Autowired
    private UserMapper userMapper;

    @Autowired
    private UserService userService;

    //新增和修改
    @PostMapping
    public Integer save(@RequestBody User user){
        //包含新增和更新
      return   userService.save(user);
    }
    //删,花括号里的参数userId一定要与方法里面的参数保持一致
    @DeleteMapping("/{userId}")
    public  Integer delete(@PathVariable Integer userId){
       return userMapper.deleteById(userId);
    }
    //查询所有的数据
    @GetMapping
    public List<User> index (){
        return  userMapper.findselect();
    }


}
第二种:
推荐插件MyBatis X,方便mapper层与他的xml之间跳转
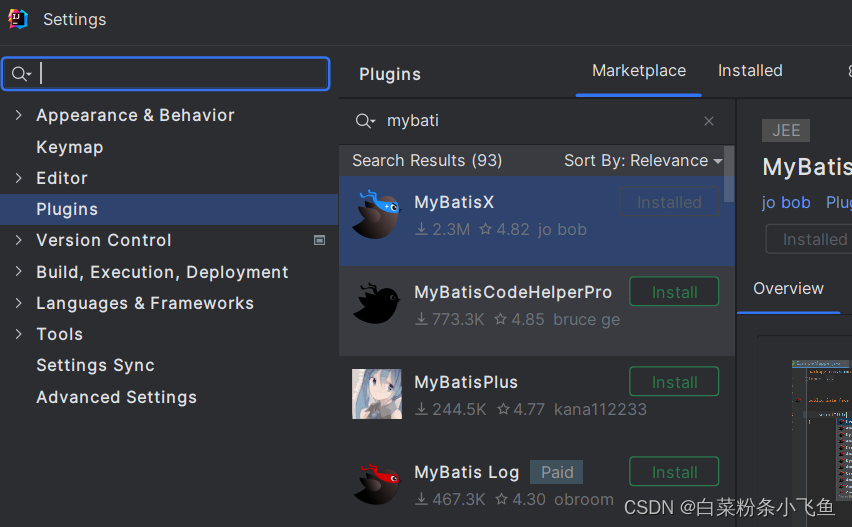
在resoures下创建一个mapper.xml文件 ,使它动态起来了
<?xml version="1.0" encoding="UTF-8" ?>
<!DOCTYPE mapper
        PUBLIC "-//mybatis.org//DTD Mapper 3.0//EN"
        "http://mybatis.org/dtd/mybatis-3-mapper.dtd">
<mapper namespace="com.example.newwork.mapper.UserMapper">
    <!--    id的名字与方法名字保持一致-->
    <update id="upadte">
        update  users
        <set>
            <if test="username!=null">
                username=#{username},
            </if>
            <!--        <if test=" password!=null">-->
            <!--            password=#{password}-->
            <!--        </if>-->
            <if test="nickname!=null">
                nickname=#{nickname},
            </if>
        </set>

        <where>
            userId=#{userId}
        </where>
    </update>

</mapper>
运到这样的错误的话,是由于它自己是无法知道你创建xml的作用的,所以要在yml文件中加上mybatis配置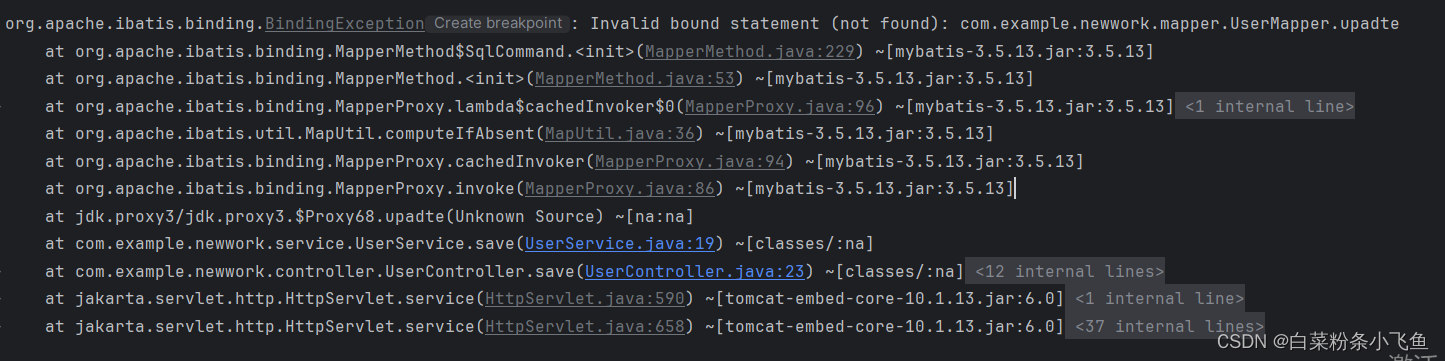
application.yml
mybatis:
  mapper-locations: classpath:mapper/*.xml #扫描所有的mybatis的xml文件
  configuration:
    log-impl: org.apache.ibatis.logging.stdout.StdOutImpl #打印配置文件
9.前端遇到跨域请求问题,后端Springboot解决
在Springboot项目里加上这个配置文件CorsConfig.java(创建一个config文件放里面),重启之后即可实现跨域访问,前端无需再配置跨域(把包删了,换成你自己的)
package com.example.newwork.config;


import org.springframework.context.annotation.Bean;
import org.springframework.context.annotation.Configuration;
import org.springframework.web.cors.CorsConfiguration;
import org.springframework.web.cors.UrlBasedCorsConfigurationSource;
import org.springframework.web.filter.CorsFilter;

@Configuration
public class CorsConfig {

    // 当前跨域请求最大有效时长。这里默认1天
    private static final long MAX_AGE = 24 * 60 * 60;

    @Bean
    public CorsFilter corsFilter() {
        UrlBasedCorsConfigurationSource source = new UrlBasedCorsConfigurationSource();
        CorsConfiguration corsConfiguration = new CorsConfiguration();
        corsConfiguration.addAllowedOrigin("*"); // 1 设置访问源地址
        corsConfiguration.addAllowedHeader("*"); // 2 设置访问源请求头
        corsConfiguration.addAllowedMethod("*"); // 3 设置访问源请求方法
        corsConfiguration.setMaxAge(MAX_AGE);
        source.registerCorsConfiguration("/**", corsConfiguration); // 4 对接口配置跨域设置
        return new CorsFilter(source);
    }
}
在展示过程中,想要忽略某个字段不展示前端,可以在实体类那个字段前加注解@JsonIngnore
10.前端axios与vue结合如何配置
先在store目录下创建一个axios.js文件
import axios from 'axios'
import {
    ElLoading
} from 'element-plus'


//export将service传出去
export const service = axios.create({
    baseURL: 'http://localhost:9090'
    //baseURL: import.meta.env.VITE_BASE_URL, //这里也可以使用变量
    //timeout: 30000,//超时设置
    //withCredentials: true, //异步请求携带cookie
    //headers: {
    // 		//设置后端需要的传参类型
    // 		'Content-Type': 'application/json;charset=UTF-8;',
    // 		//'token': 'your token',
    // 		'X-Requested-With': 'XMLHttpRequest'
    // 	}
})


//下面有2种写法,一种是声明函数的写法,一种是箭头函数的写法,都可以

//request interceptor  请求拦截器
service.interceptors.request.use(
    function(config) {
        // 在发送请求之前做些什么
        console.log(config)
        console.log('这里是请求前')
        //这里是使用了element-plus,进行模态化窗体,也就是等待查询的意思,本案例在api中,设置了等待时间
        ElLoading.service({
            lock: true,
            text: 'Loading...',
            background: 'rgba(0, 0, 0, 0.7)', //灰色,删除就是白色的
        })

        return config
    },
    function(error) {
        // 对请求错误做些什么
        console.log(error)
        console.log('这里是请求错误')

        return Promise.reject(error)
    }
)


//响应拦截器
service.interceptors.response.use(
    res => {
        // 在请求成功后的数据处理
        if (res.status === 200) {
            console.log(res.status)
            console.log('这里是请求成功后')
            //查询成功,关闭模态化窗体
            ElLoading.service().close()

            return res;
        } else {
            console.log(res.status)
            console.log('这里是请求失败后')
            ElLoading.service().close()

            return res;
        }

    },
    err => {
        // 在响应错误的时候的逻辑处理
        console.log('这里是响应错误')

        return Promise.reject(err)
    });
前端可测试
    const Login = async ()=>{
      await service.get(`/user/recipe`).then(
        res => {
          console.log(res);
        })
    }
     Login();
//get里的地址是后端你调用接口名称
请求成功后


 608
608


 被折叠的 条评论
为什么被折叠?
被折叠的 条评论
为什么被折叠?
 到【灌水乐园】发言


