


目录
一.前期的目录准备:
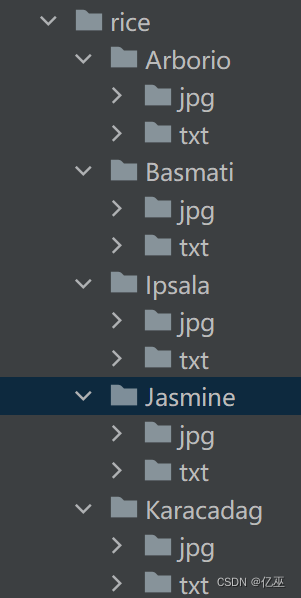
创建一个名为rice的目录,在此下创建arborio,basmati等五类米的子目录,并且分别在每个子目录下创建jpg目录和txt目录,jpg目录用以存放cv绘制最小矩形框后的图片,txt目录用以存放以jpg文件数据生成的可以用于yolo模型训练的文本文件。
二.代码部分需要用到的cv函数:
使用cv2.pyrDown()函数缩小图片。
使用cv2.threshold()函数进行二值化处理。
使用cv2.findContours()函数检测轮廓。
使用cv2.boundingRect()函数获得边界框。
使用cv2.rectangle()函数绘制边界框。
使用cv2.minAreaRect()函数获得最小矩形区域。
使用cv2.drawContours()函数绘制最小矩形区域。
使用cv2.minEnclosingCircle()函数获得最小闭圆。
使用cv2.circle()函数绘制最小闭圆。
三.cv部分函数参数详情:
使用cv2.threshold()函数进行二值化处理。
threshold(InputArray src,
OutputArray dst,
double thresh,
double maxval,
int type
)
src:源图像,可以为8位的灰度图,也可以为32位的彩色图像。(两者由区别)
dst:输出图像
thresh:阈值
maxval:dst图像中最大值
type:阈值类型
使用cv2.findContours()函数检测轮廓。
findContours( InputOutputArray image,
OutputArrayOfArrays contours,
OutputArray hierarchy,
int mode,
int method,
Point offset=Point());
第一个参数:image,单通道图像矩阵,可以是灰度图,但更常用的是二值图像,一般是经过Canny、拉普拉斯等边缘检测算子处理过的二值图像;
第二个参数:contours,定义为“vector<vector<Point>> contours”,是一个向量,并且是一个双重向量,向量内每个元素保存了一组由连续的Point点构成的点的集合的向量,每一组Point点集就是一个轮廓。
有多少轮廓,向量contours就有多少元素。
第三个参数:hierarchy,定义为“vector<Vec4i> hierarchy”,先来看一下Vec4i的定义:
typedef Vec<int, 4> Vec4i;
Vec4i是Vec<int,4>的别名,定义了一个“向量内每一个元素包含了4个int型变量”的向量。
所以从定义上看,hierarchy也是一个向量,向量内每个元素保存了一个包含4个int整型的数组。
向量hiararchy内的元素和轮廓向量contours内的元素是一一对应的,向量的容量相同。
hierarchy向量内每一个元素的4个int型变量——hierarchy[i][0] ~hierarchy[i][3],分别表示第
i个轮廓的后一个轮廓、前一个轮廓、父轮廓、内嵌轮廓的索引编号。如果当前轮廓没有对应的后一个
轮廓、前一个轮廓、父轮廓或内嵌轮廓的话,则hierarchy[i][0] ~hierarchy[i][3]的相应位被设置为
默认值-1。第四个参数:mode,CV_RETR_EXTERNAL只检测最外围轮廓,包含在外围轮廓内的内围轮廓被忽略
第五个参数:int型的method,定义轮廓的近似方法:
取值一:CV_CHAIN_APPROX_NONE 保存物体边界上所有连续的轮廓点到contours向量内
取值二:CV_CHAIN_APPROX_SIMPLE 仅保存轮廓的拐点信息,把所有轮廓拐点处的点保存入contours
向量内,拐点与拐点之间直线段上的信息点不予保留
取值三和四:CV_CHAIN_APPROX_TC89_L1,CV_CHAIN_APPROX_TC89_KCOS使用teh-Chinl chain 近
似算法
四.旋转方式:
基于旋转矩形的中心和角度计算得到一个变换矩阵。这里我想要得到的车牌是一个横着的正矩形,因此需要判断一下angle, width和height,保证旋转后的矩形是横着的矩形。
以旋转矩形的中心为基准点,对整张图进行旋转,这里旋转的实现是基于仿射变换实现的。
五:代码部分:
- import类库
import cv2
import numpy as np
import os
import math
2.根路径设置,使用r转义不会报错,可以自己修改成原图片所在路径。
root_path=r'C:\Users\prx17\Desktop\study\urp\rice\label'3.通过cv函数获得最小矩形框
k=0#记录大米的类个数
for i in os.listdir(root_path):
    class_path=os.path.join(root_path,i)
    #C:\Users\prx17\Desktop\study\urp\rice\label\Arborio
    n=1
    #用于后面保存文件,记录文件个数
    for m in os.listdir(class_path):
        img_path=os.path.join(root_path,i,m)

        print(img_path)
        #C:\Users\prx17\Desktop\study\urp\rice\label\Arborio\Arborio (1).jpg,图片绝对路径
        img = cv2.imread(img_path)
        ret, thresh = cv2.threshold(cv2.cvtColor(img.copy(), cv2.COLOR_BGR2GRAY),127,255, cv2.THRESH_BINARY)
        contours, hierarchy = cv2.findContours(thresh, cv2.RETR_EXTERNAL, cv2.CHAIN_APPROX_SIMPLE)
        for c in contours:

            x, y, w, h = cv2.boundingRect(c)#获得边界框
              #cv2.rectangle(img, (x, y),(x + w, y + h),(0,255,0),2)

            rect = cv2.minAreaRect(c)#最小矩形区域

            box = cv2.boxPoints(rect)#获取矩形的四个顶点

            box = np.int0(box)#取整
            #绘制矩形边框
            cv2.drawContours(img,[box], 0, (0,0,255),1)


            (x, y), radius = cv2.minEnclosingCircle(c)


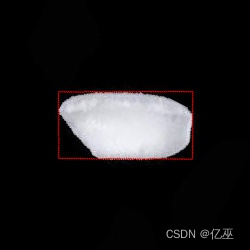
由左图变化为右图,绘制了一个最小矩形框。
右图是一开始设置的粗细为2的图,后来调节成了线条粗细为1的图。
4.根据绘制的最小矩形框的倾斜角度,旋转到矩形框水平。
        horizon = True
        center, size, angle = rect[0], rect[1], rect[2]
        x1,y1=center[0],center[1]
        center, size = tuple(map(int, center)), tuple(map(int, size))
        print(angle)
        if horizon:
            if size[0] < size[1]:
                angle -= 270
                w = size[1]
                h = size[0]
            else:
                w = size[0]
                h = size[1]
            size = (w, h)
        print(w,h)
        height, width = img.shape[0], img.shape[1]
        print(width,height)
M = cv2.getRotationMatrix2D(center, angle, 1)#做旋转 
将会由左图通过旋转angle角度到右图。
5.通过生成的jpg文件进行txt数据准备与处理
#标签
        label = 0
#中心横坐标与图像宽度的比值
        x_ = abs(float(x1/width))
        y_ = abs(float(y1/height))
        w_ = abs(float(w/width))
        h_ = abs(float(h/height))
        print(x_,y_,w_,h_)
        a1='%.6f'%x_
        a2='%.6f'%y_
        b1='%.6f'%w_
        b2='%.6f'%h_
        img_rot = cv2.warpAffine(img, M, (width, height))
        img_crop = cv2.getRectSubPix(img_rot, size, center)

第一个数据是种类标签,
第二个数据是矩形框中心的横坐标与图像宽度的比值,
第三个数据是矩形框中心的纵坐标与图像长度的比值,
第四个数据是矩形框宽度与图像宽度的比值,
第五个数据是矩形框高度与图像高度的比值。
6.保存文件:
        save_dir1 = "rice/%s/jpg/%s(%d).jpg" % (i, i, n)
#jpg文件的保存路径
        save_dir2 = "rice/%s/txt/%s(%d).txt" % (i, i, n)
#txt文件的保存路径
        cv2.imwrite(save_dir1, img_rot)
#将生成的旋转后水平的图片存入save_dir1
        cv2.destroyAllWindows()
        with open(save_dir2, 'w') as f:
#打开test.txt   如果文件不存在,创建该文件。
            f.write(str(k)+' ')
            f.write(a1+' ')
#把变量var写入test.txt。这里var必须是str格式,如果不是,则可以转一下。
            f.write(a2+' ')
            f.write(b1+' ')
            f.write(b2+' ')

        n=n+1
        continue
    k=k+1
六:代码完整版:
"""
使用cv2.pyrDown()函数缩小图片。
使用cv2.threshold()函数进行二值化处理。
使用cv2.findContours()函数检测轮廓。
使用cv2.boundingRect()函数获得边界框。
使用cv2.rectangle()函数绘制边界框。
使用cv2.minAreaRect()函数获得最小矩形区域。
使用cv2.drawContours()函数绘制最小矩形区域。
使用cv2.minEnclosingCircle()函数获得最小闭圆。
使用cv2.circle()函数绘制最小闭圆。
计算旋转矩形。
基于旋转矩形的中心和角度计算得到一个变换矩阵。这里我想要得到的车牌是一个横着的正矩形,因此需要判断一下angle, width和height,保证旋转后的矩形是横着的矩形。
以旋转矩形的中心为基准点,对整张图进行旋转,这里旋转的实现是基于仿射变换实现的。
由于旋转之后矩形的中点坐标是不变的,以中心为基础,通过width和height抠出正矩形。

"""
import cv2
import numpy as np
import os
import math
root_path=r'C:\Users\prx17\Desktop\study\urp\rice\label'
k=0
for i in os.listdir(root_path):
    class_path=os.path.join(root_path,i)
    n=1
    for m in os.listdir(class_path):
        img_path=os.path.join(root_path,i,m)
        print(img_path)
        img = cv2.imread(img_path)
        ret, thresh = cv2.threshold(cv2.cvtColor(img.copy(), cv2.COLOR_BGR2GRAY), 127, 255, cv2.THRESH_BINARY)
        contours, hierarchy = cv2.findContours(thresh, cv2.RETR_EXTERNAL, cv2.CHAIN_APPROX_SIMPLE)
        for c in contours:
             # find bounding box coordinates
            x, y, w, h = cv2.boundingRect(c)#获得边界框
              #cv2.rectangle(img, (x, y), (x + w, y + h), (0, 255, 0), 2)
             # find minimum area
            rect = cv2.minAreaRect(c)#最小矩形区域
             # calculate coordinates of the minimum area rectangle
            box = cv2.boxPoints(rect)#获取矩形的四个顶点
    # normalize coordinates to integers
            box = np.int0(box)#取整
    # draw contours
            cv2.drawContours(img, [box], 0, (0, 0,255), 1)

    # calculate center and radius of minimum enclosing circle
            (x, y), radius = cv2.minEnclosingCircle(c)
    # cast to integers
        horizon = True
        center, size, angle = rect[0], rect[1], rect[2]
        x1,y1=center[0],center[1]
        center, size = tuple(map(int, center)), tuple(map(int, size))
        print(angle)
        if horizon:
            if size[0] < size[1]:
                angle -= 270
                w = size[1]
                h = size[0]
            else:
                w = size[0]
                h = size[1]
            size = (w, h)
        print(w,h)
        height, width = img.shape[0], img.shape[1]
        print(width,height)
        M = cv2.getRotationMatrix2D(center, angle, 1)#做旋转
#旋转后的中心坐标
#x1 = math.cos(angle)*x-math.sin(angle)*y;
#y1 = math.cos(angle)*y+math.sin(angle)*x;
        print(x1,y1)
#标签
        label = 0
#中心横坐标与图像宽度的比值
        x_ = abs(float(x1/width))
        y_ = abs(float(y1/height))
        w_ = abs(float(w/width))
        h_ = abs(float(h/height))
        print(x_,y_,w_,h_)
        a1='%.6f'%x_
        a2='%.6f'%y_
        b1='%.6f'%w_
        b2='%.6f'%h_
        img_rot = cv2.warpAffine(img, M, (width, height))
        img_crop = cv2.getRectSubPix(img_rot, size, center)


        save_dir1 = "rice/%s/jpg/%s(%d).jpg" % (i, i, n)
        save_dir2 = "rice/%s/txt/%s(%d).txt" % (i, i, n)

        cv2.imwrite(save_dir1, img_rot)
        cv2.destroyAllWindows()
        with open(save_dir2, 'w') as f:  # 打开test.txt   如果文件不存在,创建该文件。
            f.write(str(k)+' ')
            f.write(a1+' ')  # 把变量var写入test.txt。这里var必须是str格式,如果不是,则可以转一下。
            f.write(a2+' ')
            f.write(b1+' ')
            f.write(b2+' ')
               #cv2.waitKey()
        n=n+1
        continue
    k=k+1


 7799
7799


 被折叠的 条评论
为什么被折叠?
被折叠的 条评论
为什么被折叠?
 到【灌水乐园】发言


