


一、前言
Linux上安装软件常见的几种方式:
- 源码编译
- 压缩包解压(一般为tar.gz)
- 编译好的安装包(RPM、DPKG等)
- 在线安装(YUM、APT等)
以上几种方式便捷性依次增加,但通用性依次下降
删除老版本MySQL的开发头文件和库
rm -rf /etc/my.cnfrm -rf /var/lib/mysql
二、安装mysql
mysql的安装可以用yum安装更方便
[root@yoyo ~]# cd /usr/local/
[root@yoyo ~]# mkdir mysql-community-release
[root@yoyo ~]# cd mysql-community-release
[root@yoyo ~]# wget http://dev.mysql.com/get/mysql-community-release-el7-5.noarch.rpm
[root@yoyo ~]# rpm -ivh mysql-community-release-el7-5.noarch.rpm
[root@yoyo ~]# yum -y install mysql-community-server
安装完成后查看版本号:mysql -V
[root@yoyo local]# mysql -V
mysql  Ver 14.14 Distrib 5.6.42, for Linux (x86_64) using  EditLine wrapper
安装完成后重启mysql服务,查看状态是 Active: active (running) ,说明启动成功
启动服务:service mysqld restart
[root@yoyo local]# service mysqld restart
查看mysql运行状态:systemctl status mysql.service
[root@yoyo local]# systemctl status mysql.service
[root@yoyo local]# service mysqld restart
Redirecting to /bin/systemctl restart mysqld.service
Job for mysqld.service failed because the control process exited with error code. See "systemctl status mysqld.service" and "journalctl -xe" for details.

[root@yoyo ~]# systemctl status mysql.service
● mysqld.service - MySQL Community Server
   Loaded: loaded (/usr/lib/systemd/system/mysqld.service; enabled; vendor preset: disabled)
   Active: active (running) since Tue 2019-01-15 09:53:42 CST; 47s ago
 Main PID: 946 (mysqld_safe)
   CGroup: /system.slice/mysqld.service
           ├─ 946 /bin/sh /usr/bin/mysqld_safe --basedir=/usr
           └─1282 /usr/sbin/mysqld --basedir=/usr --datadir=/var/lib/mysql --plugin-dir=/usr/lib64/mysql/plugin --log-error=/v...

Jan 15 09:53:39 yoyo systemd[1]: Starting MySQL Community Server...
Jan 15 09:53:40 yoyo mysqld_safe[946]: 190115 09:53:40 mysqld_safe Logging to '/var/log/mysqld.log'.
Jan 15 09:53:40 yoyo mysqld_safe[946]: 190115 09:53:40 mysqld_safe Starting mysqld daemon with databases from /var/lib/mysql
Jan 15 09:53:42 yoyo systemd[1]: Started MySQL Community Server.
三、mysql重置密码
方法一:
初次安装使用mysql,root账户默认是没设置密码的,系统会给个临时密码,在/var/log/mysqld.log可以查看
[root@yoyo local]# grep ‘temporary password’ /var/log/mysqld.log
如下图所示,出现的就是临时密码,复制出来就可以登录mysql了
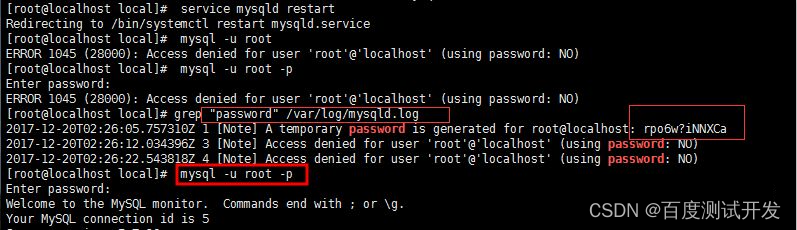
[root@yoyo local]# mysql -u root -p
看到Enter password: 输入密码,重置密码后exit退出mysql
[root@yoyo local]# mysql -u root -p
Enter password:
Welcome to the MySQL monitor.  Commands end with ; or \g.
Your MySQL connection id is 26
Server version: 5.6.42 MySQL Community Server (GPL)

Copyright (c) 2000, 2018, Oracle and/or its affiliates. All rights reserved.

Oracle is a registered trademark of Oracle Corporation and/or its
affiliates. Other names may be trademarks of their respective
owners.

Type 'help;' or '\h' for help. Type '\c' to clear the current input statement.
# 重置密码
mysql> update user set password = Password('root') where User = 'root';
# 回车后执行(刷新MySQL系统权限相关的表
mysql> flush privileges;
# 再执行exit退出:
mysql> exit
Bye
[root@yoyo local]#
方法二:
要是上一步找不到临时密码,那就用此方法,先停掉mysql,以安全方式启动
[root@yoyo local]# systemctl stop mysql.service
以安全方式启动mysql:
[root@yoyo local]# /usr/bin/mysqld_safe —skip-grant-tables >/dev/null 2>&1 &
然后执行
[root@yoyo local]# /usr/bin/mysql -u root mysql
出现“mysql>”提示符后输入:
mysql> update user set password = Password('root') where User = 'root';
回车后执行(刷新MySQL系统权限相关的表):
mysql> flush privileges;
再执行exit退出:
mysql> exit;
退出后,使用以下命令登陆mysql,试试是否成功:
[root@yoyo local]#mysql -u root -p
按提示输入密码:root
[root@yoyo local]# mysql -u root -p
Enter password:
Welcome to the MySQL monitor.  Commands end with ; or \g.
Your MySQL connection id is 27
Server version: 5.6.42 MySQL Community Server (GPL)

Copyright (c) 2000, 2018, Oracle and/or its affiliates. All rights reserved.

Oracle is a registered trademark of Oracle Corporation and/or its
affiliates. Other names may be trademarks of their respective
owners.

Type 'help;' or '\h' for help. Type '\c' to clear the current input statement.

mysql>
出现Welcome to the MySQL那就是登录成功了
四、查看mysql端口号
mysql默认端口是3306,如何查看msyql端口号呢?可以用root账号登录后,执行show variables like ‘port’
[root@yoyo local]# mysql -u root -p
Enter password:
Welcome to the MySQL monitor.  Commands end with ; or \g.
Your MySQL connection id is 33
Server version: 5.6.42 MySQL Community Server (GPL)

Copyright (c) 2000, 2018, Oracle and/or its affiliates. All rights reserved.

Oracle is a registered trademark of Oracle Corporation and/or its
affiliates. Other names may be trademarks of their respective
owners.

Type 'help;' or '\h' for help. Type '\c' to clear the current input statement.

mysql> show variables like 'port';
+---------------+-------+
| Variable_name | Value |
+---------------+-------+
| port          | 3306  |
+---------------+-------+
1 row in set (0.00 sec)

mysql>
五、授权mysql远程连接
mysql在linux上安装完成后,为了方便的查看,可以在本地电脑上安装一个远程连接数据库的客户端,远程连上mysql
方法一:
先创建一个root新用户,登录密码为password,可以自己随便命名
mysql> create user ‘root’@’%’ identified by ‘password’;
[root@yoyo sysconfig]# mysql -u root -p
Enter password:
Welcome to the MySQL monitor.  Commands end with ; or \g.
mysql> create user 'root'@'%' identified by 'password';
ERROR 1396 (HY000): Operation CREATE USER failed for 'root'@'%'
mysql> exit
方法二:
查看user表,把host为localhost,user为root的记录更新host为%就是允许远程访问了
操作mysql时候,先执行use mysql
[root@yoyo sysconfig]# mysql -u root -p
Enter password:
mysql> use mysql
Reading table information for completion of table and column names
You can turn off this feature to get a quicker startup with -A
\Database changed
mysql> select user,host,password from user;
+-------+-----------+-------------------------------------------+
| user  | host      | password                                  |
+-------+-----------+-------------------------------------------+
| root  | yoyo      | *81F5E21E35407D884A6CD4A731AEBFB6AF209E1B |
| root  | 127.0.0.1 | *81F5E21E35407D884A6CD4A731AEBFB6AF209E1B |
| root  | ::1       | *81F5E21E35407D884A6CD4A731AEBFB6AF209E1B |
|       | yoyo      |                                           |
| root1 | %         | *668425423DB5193AF921380129F465A6425216D0 |
| root  | localhost | *2470C0C06DEE42FD1618BB99005ADCA2EC9D1E19 |
+-------+-----------+-------------------------------------------+
6 rows in set (0.00 sec)
如果看到root后面的host对应的是%说明有远程访问权限,显示localhost就 update更新它,如何flush privileges刷新系统权限
mysql> use mysql
mysql> update user set host = '%' where user = 'root';
ERROR 1062 (23000): Duplicate entry '%-root' for key 'PRIMARY'
mysql> flush privileges;
Query OK, 0 rows affected (0.00 sec)

mysql> select user,host,password from user;
+-------+-----------+-------------------------------------------+
| user  | host      | password                                  |
+-------+-----------+-------------------------------------------+
| root  | yoyo      | *81F5E21E35407D884A6CD4A731AEBFB6AF209E1B |
| root  | 127.0.0.1 | *81F5E21E35407D884A6CD4A731AEBFB6AF209E1B |
| root  | ::1       | *81F5E21E35407D884A6CD4A731AEBFB6AF209E1B |
|       | yoyo      |                                           |
| root1 | %         | *668425423DB5193AF921380129F465A6425216D0 |
| root  | %         | *2470C0C06DEE42FD1618BB99005ADCA2EC9D1E19 |
+-------+-----------+-------------------------------------------+
6 rows in set (0.00 sec)
mysql> exit
方法三:
授权法,给root用户远程登录的权限
# 想root使用123456从任何主机连接到mysql服务器的话
mysql> GRANT ALL PRIVILEGES ON *.* TO 'root'@'%' IDENTIFIED BY '123546' WITH GRANT OPTION;
# 如果你想允许用户root从ip为192.168.1.3的主机连接到mysql服务器,并使用123456作为密码

mysql> GRANT ALL PRIVILEGES ON *.* TO 'root'@'192.168.1.3' IDENTIFIED BY '123456' WITH GRANT OPTION;
接下来去阿里云ECS服务后台安全组-添加规则,新增3306端口访问权限,使用Navicat远程工具就可以连上了
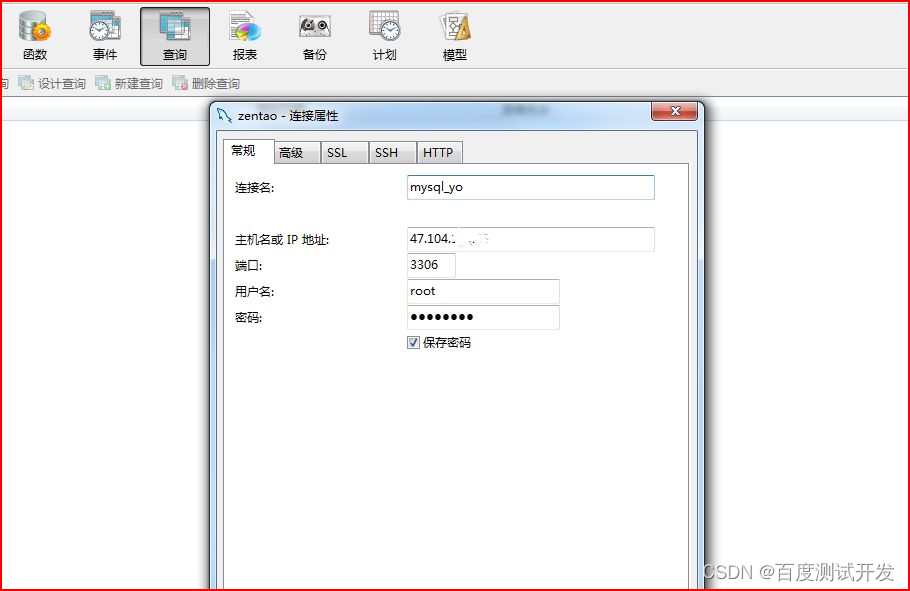
这里的账号密码就是前面方法一里面设置的“root” 和“password”
开启与关闭服务
1、启动mysql
service mysqld start
2、查看mysql运行状态
service mysqld status # 或者 systemctl status mysql.service
3停掉mysql服务
service mysqld stop # 或者 systemctl stop mysql.service
4重启mysql
systemctl restart mysql.service
5查看运行进程
ps -ef | grep mysqld
[root@yoyo sysconfig]# ps -ef | grep mysql
mysql     2506     1  0 12:51 ?        00:00:00 /bin/sh /usr/bin/mysqld_safe --basedir=/usr
mysql     2674  2506  0 12:51 ?        00:00:00 /usr/sbin/mysqld --basedir=/usr --datadir=/var/lib/mysql --plugin-dir=/usr/lib64mysql/plugin --log-error=/var/log/mysqld.log --pid-file=/var/run/mysqld/mysqld.pid --socket=/var/lib/mysql/mysql.sock
root      2748  1668  0 12:55 pts/0    00:00:00 grep --color=auto mysql
6查看mysql端口
netstat -tulpn |grep mysql
[root@yoyo sysconfig]# netstat -tulpn |grep mysql
tcp6       0      0 :::3306                 :::*                    LISTEN      2674/mysql
六、遇到问题
启动mysql的时候,出现Failed to start MySQL Community Server.具体报错如下
[root@yoyo ~]# systemctl status mysql.service
● mysqld.service - MySQL Community Server
   Loaded: loaded (/usr/lib/systemd/system/mysqld.service; enabled; vendor preset: disabled)
   Active: failed (Result: start-limit) since Mon 2019-01-14 20:31:27 CST; 13h ago
  Process: 26800 ExecStartPost=/usr/bin/mysql-systemd-start post (code=exited, status=0/SUCCESS)
  Process: 26799 ExecStart=/usr/bin/mysqld_safe --basedir=/usr (code=exited, status=1/FAILURE)
  Process: 26786 ExecStartPre=/usr/bin/mysql-systemd-start pre (code=exited, status=0/SUCCESS)
 Main PID: 26799 (code=exited, status=1/FAILURE)

Jan 14 20:31:27 yoyo systemd[1]: Failed to start MySQL Community Server.
Jan 14 20:31:27 yoyo systemd[1]: Unit mysqld.service entered failed state.
Jan 14 20:31:27 yoyo systemd[1]: mysqld.service failed.
Jan 14 20:31:27 yoyo systemd[1]: mysqld.service holdoff time over, scheduling restart.
Jan 14 20:31:27 yoyo systemd[1]: start request repeated too quickly for mysqld.service
Jan 14 20:31:27 yoyo systemd[1]: Failed to start MySQL Community Server.
Jan 14 20:31:27 yoyo systemd[1]: Unit mysqld.service entered failed state.
Jan 14 20:31:27 yoyo systemd[1]: mysqld.service failed.
刚开始以为是哪里配置有问题,后来百度搜了下,reboot重启linux服务器就解决了


 717
717


 被折叠的 条评论
为什么被折叠?
被折叠的 条评论
为什么被折叠?
 到【灌水乐园】发言


