


华为视频接入播控中心和投播能力概述**
华为视频在进入影片详情页播放时,支持在控制中心查看当前播放的视频信息,并进行快进、快退、拖动进度、播放暂停、下一集、调节音量等操作,方便用户通过控制中心来操作当前播放的视频。
当用户希望通过大屏播放当前华为视频的影片时,可以在华为视频或播控中心内进行投播,将影片投播到同一网络下的华为智慧屏等大屏设备进行播放,且通过播控中心来方便地进行播放暂停、快进快退、下一集等操作。
华为视频投播功能需要使用播控中心的能力完成,所以在接入投屏之前,华为视频需要先接入播控中心。
华为视频接入播控中心
华为视频接入播控中心介绍
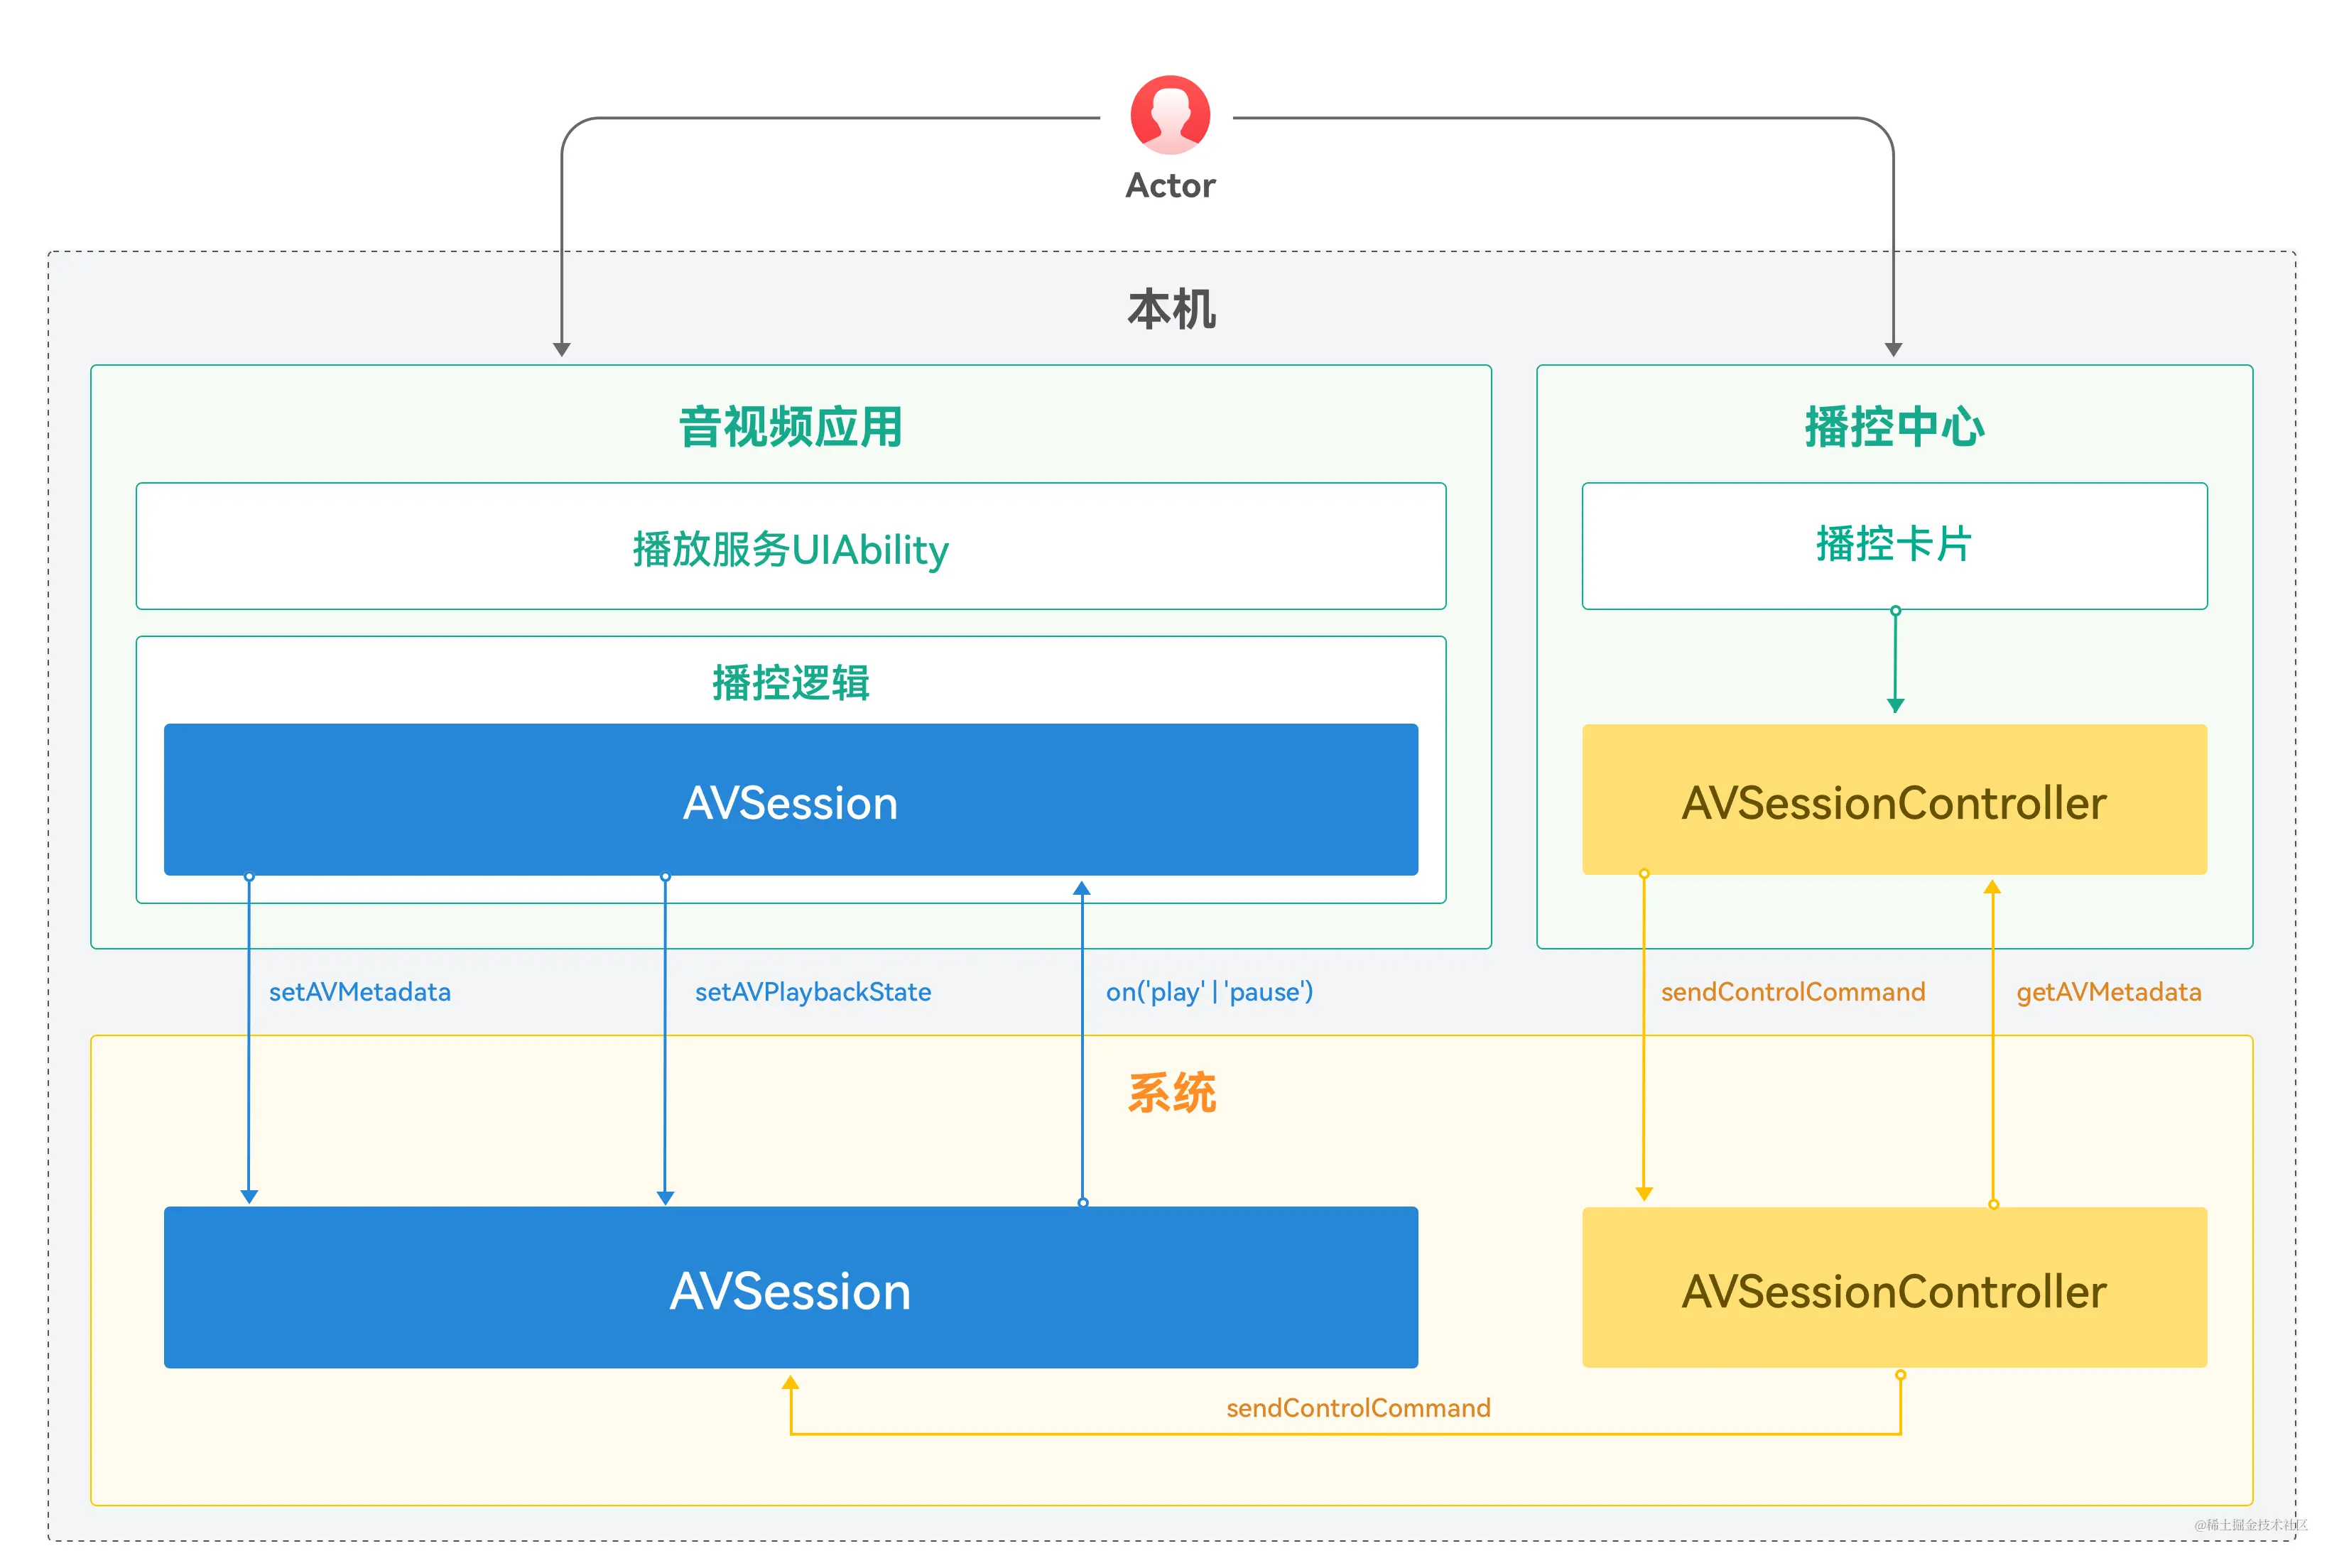
- 媒体会话(AVSession):本地播放时用于更新媒体资源的信息和响应系统播控中心,接入参考[媒体会话提供方]。在投播时,AVSession作为在本地播放和投播之间切换的“枢纽”接口,把二者联系起来。通过AVSession可以设置和查询应用投播能力,并创建投播控制器。
- 媒体会话控制器(AVSessionController):一般由播控中心提供。如果是应用内的控制器,可用于控制应用的后台播放。
华为视频接入播控中心的交互流程如图所示。
华为视频同步播控中心
-
播放内容信息上报播控中心
这部分功能负责实现在应用播放的时候,通知播控中心当前播放的影片信息。
- 应用冷启动之后,需要调用[createAVSession]创建会话。应用生命周期结束后会话自动销毁,不需要调用destroy。
说明
下文中代码示例,可能包含重复的函数和导包引入,因此后续代码示例不再重复展示。
- 导入相关模块
// MainAbility.ets
import { AbilityConstant, UIAbility, Want } from '@kit.AbilityKit';
import { hilog } from '@kit.PerformanceAnalysisKit';
import { AvSessionManager } from '../avsession/AvSessionManager';
import router from '@system.router';
// AvSessionManager.ts
import avSession from '@ohos.multimedia.avsession';
import hilog from '@ohos.hilog';
import type { BusinessError } from '@ohos.base';
import type common from '@ohos.app.ability.common';
import WantAgent from '@ohos.app.ability.wantAgent';
// 业务Index.ets
import avSession from '@ohos.multimedia.avsession';
import { AvSessionManager } from '../avsession/AvSessionManager';
- 调用[createAVSession]创建会话相关示例代码如下:
// MainAbility.ets
export default class MainAbility extends UIAbility {
  onCreate(want: Want, launchParam: AbilityConstant.LaunchParam): void {
    AvSessionManager.getInstance().init(this.context);
  }
}
// AvSessionManager.ts
const TAG = 'AvSessionManager';

/**
 * 对接播控中心管理器
 */
export class AvSessionManager {

  private static readonly instance: AvSessionManager = new AvSessionManager();
  private session: avSession.AVSession = null;

  static getInstance(): AvSessionManager {
    return this.instance;
  }

  init(abilityContext: common.Context): void {
    avSession.createAVSession(abilityContext, 'himovie', 'video').then(session => {
      this.session = session;
      // 创建完成之后,激活会话。
      this.session.activate();
      hilog.info(0x06666, TAG, 'createAVSession success');
    }).catch((error: BusinessError) => {
      hilog.error(0x06666, TAG, `createAVSession or activate failed, code: ${error?.code}`);
    });
  }
}
- 根据当前播放的Volume信息,拼接填写[setAVMetadata]。
// 业务Index.ets
@Entry
@Component
struct Index {
  private avsessionMetaData: avSession.AVMetadata | null = null;

  aboutToAppear(): void {
    this.setAVSessionMetaData();
  }

  setAVSessionMetaData() {
    this.avsessionMetaData = {
      // 影片的id
      assetId: 'test vod id',
      subtitle: 'vod subtitle',
      artist: 'artist name',
      title: 'vod title',
      mediaImage: 'media image url',
      // 仅支持投屏到Cast+ Stream的设备
      filter: avSession.ProtocolType.TYPE_CAST_PLUS_STREAM,
      // 快进快退时间
      skipIntervals: avSession?.SkipIntervals?.SECONDS_30
    };
    AvSessionManager.getInstance().setMetaData(this.avsessionMetaData);
  }
  build() {
    // ...
  }
}
// AvSessionManager.ts
export class AvSessionManager {
  private static readonly instance: AvSessionManager = new AvSessionManager();
  private session: avSession.AVSession = null;

  static getInstance(): AvSessionManager {
    return this.instance;
  }

  /**
   * 设置metaData并初始化状态
   *
   * @param metadata 影片元数据
   */
  setMetaData(metadata: avSession.AVMetadata): void {
    if (this.session) {

      hilog.info(0x06666, TAG, `setMetaData avMetadata: ${JSON.stringify(metadata)}`);

      this.session?.setAVMetadata(metadata)
        .then(() => {
          hilog.info(0x06666, TAG, `setMetaData success.`);
        })
        .catch((error: BusinessError) => {
          hilog.error(0x06666, TAG, `setMetaData failed, code: ${error.code}`);
        });
    }
  }
}
- 播放状态上报播控中心
参考以下示例代码,向播控中心上报应用当前的播放状态。即应用中进行播放、暂停、进度调整等行为,通知播控中心进行不同的状态显示。
// AvSessionManager.ts
export class AvSessionManager {

  private static readonly instance: AvSessionManager = new AvSessionManager();
  private session: avSession.AVSession = null;
  /** 播放状态 */
  playState?: avSession.AVPlaybackState = {
    state: avSession.PlaybackState.PLAYBACK_STATE_INITIAL,
    position: {
      elapsedTime: 0,
      updateTime: (new Date()).getTime()
    }
  };

  static getInstance(): AvSessionManager {
    return this.instance;
  }

  /**
   * 播放
   *
   * @returns
   */
  play(currentTime?: number): void {
    hilog.info(0x0666, TAG, `AVSession play, currentTime:${currentTime}, state: ${this.playState?.state}`);
    this.setPlayOrPauseToAvSession('play', currentTime);
  }

  /**
   * 暂停
   *
   * @returns
   */
  pause(currentTime?: number): void {
    hilog.info(0x0666, TAG, `AVSession pause, currentTime: ${currentTime}, state: ${this.playState?.state}`);
    this.setPlayOrPauseToAvSession('pause', currentTime);
  }


  /**
   * 设置播控中心的状态为播放或暂停
   *
   * @param state 状态
   * @param elapsedTime 当前进度
   */
  private setPlayOrPauseToAvSession(state: 'play' | 'pause', elapsedTime: number): void {
    if (elapsedTime === undefined || elapsedTime < 0) {
      hilog.warn(0x0666, TAG, `param error, elapsedTime: ${elapsedTime}, do not play or pause.`);
      return;
    }
    if (this.playState === undefined || this.playState.state === avSession.PlaybackState.PLAYBACK_STATE_STOP) {
      hilog.warn(0x0666, TAG, `playState error, state is PLAYBACK_STATE_STOP or undefined, do not play or pause.`);
      return;
    }

    this.playState.state = state === 'play' ? avSession.PlaybackState.PLAYBACK_STATE_PLAY : avSession.PlaybackState.PLAYBACK_STATE_PAUSE;
    this.playState.position = {
      elapsedTime: elapsedTime,
      updateTime: (new Date()).getTime()
    };
    this.setAVPlaybackState();
  }

  /**
   * 向播控中心设置播放状态
   */
  private setAVPlaybackState(): void {
    hilog.info(0x0666, TAG, `setAVPlaybackState state: ${this.playState.state}, updateTime: ${this.playState?.position?.updateTime}, speed: ${this.playState?.speed}`);
    this.session?.setAVPlaybackState(this.playState);
  }
}
- 详情页退出的特殊逻辑
当用户从详情页退出到应用首页时,需要通知AVSession清除播放信息。
// AvSessionManager.ts
export class AvSessionManager {

  private static readonly instance: AvSessionManager = new AvSessionManager();
  private session: avSession.AVSession = null;
  /** 播放状态 */
  playState?: avSession.AVPlaybackState = {
    state: avSession.PlaybackState.PLAYBACK_STATE_INITIAL,
    position: {
      elapsedTime: 0,
      updateTime: (new Date()).getTime()
    }
  };

  /**
   * 向播控中心设置播放状态
   */
  private setAVPlaybackState(): void {
    hilog.info(0x0666, TAG, `setAVPlaybackState state: ${this.playState.state}, updateTime: ${this.playState?.position?.updateTime}, speed: ${this.playState?.speed}`);
    this.session?.setAVPlaybackState(this.playState);
  }

  /**
   * 释放播放器
   */
  releasePlayer(): void  {
    this.playState.state = avSession.PlaybackState.PLAYBACK_STATE_STOP;
    this.setAVPlaybackState();
  }
}
华为视频响应播控中心
当应用处于正常播放的状态时,播放信息和状态同步到播控中心,用户可以在播控中心控制媒体,如暂停、进度调整等。用户在播控中心操作后,需要应用配合响应各种事件,通过AVSession的各种回调完成播放控制。
应用如果已切换到后台,用户点击播控中心,将由播控中心负责[拉起华为视频]。应用需要配置拉起参数。
同时,应用需要[设置监听回调],包括播放、暂停、下一首、进度调整等。只有设置了回调,播控中心侧的按钮才会亮起来,否则按钮将会置灰。
- 拉起华为视频
// AvSessionManager.ts
export class AvSessionManager {
  private static readonly instance: AvSessionManager = new AvSessionManager();
  private session: avSession.AVSession = null;
  /** 播放状态 */
  playState?: avSession.AVPlaybackState = {
    state: avSession.PlaybackState.PLAYBACK_STATE_INITIAL,
    position: {
      elapsedTime: 0,
      updateTime: (new Date()).getTime()
    }
  };

  static getInstance(): AvSessionManager {
    return this.instance;
  }

  /**
   * 设置metaData并初始化状态
   *
   * @param metadata 影片元数据
   */
  setMetaData(metadata: avSession.AVMetadata): void {
    if (this.session) {
      hilog.info(0x06666, TAG, `setMetaData avMetadata: ${JSON.stringify(metadata)}`);

      this.session?.setAVMetadata(metadata)
        .then(() => {
          hilog.info(0x06666, TAG, `setMetaData success.`);
          this.setLaunchAbility(metadata.assetId);
        })
        .catch((error: BusinessError) => {
          hilog.error(0x06666, TAG, `setMetaData failed, code: ${error.code}`);
        });
    }
  }

  /**
   * 设置一个WantAgent用于拉起会话的Ability
   * @param vodId 影片Id
   */
  setLaunchAbility(vodId: string): void {
    const ability: WantAgent.WantAgentInfo = {
      wants: [
        {
          bundleName: 'com.huawei.hmsapp.himovie',
          abilityName: 'MainAbility',
          parameters: {
            type: 'avsession',
            routeParams: {
              vodId,
            }
          }
        }
      ],
      requestCode: 0,
      actionType: WantAgent.OperationType.START_ABILITY,
      actionFlags: [WantAgent.WantAgentFlags.UPDATE_PRESENT_FLAG]
    }
    this.session.setLaunchAbility(ability).then(() => {
      hilog.info(0x0666, TAG, `SetLaunchAbility successfully`);
    }).catch((err: BusinessError) => {
      hilog.info(0x0666, TAG, `SetLaunchAbility failed, code: ${err.code}`);
    });
  }
}
- 设置监听回调
// AvSessionManager.ts
export class AvSessionManager {
  private session: avSession.AVSession = null;

  /**
   * 监听播控中心回调事件,播放
   *
   * @param action 回调方法
   */
  onPlay(action: () => void): void {
    if (this.session) {
      this.session.on('play', action);
    }
  }

  /**
   * 监听播控中心回调事件,暂停
   *
   * @param action 回调方法
   */
  onPause(action: () => void): void {
    if (this.session) {
      this.session.on('pause', action);
    }
  }
}
华为视频支持投播
华为视频应用内发起投播
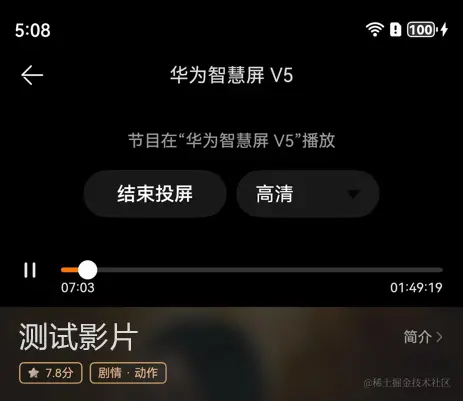
用户使用华为视频播放影片时,通过点击右上角投播组件
,选择需要投播的大屏设备,连接成功后即可完成投播的流程。效果如下图所示。
图1 从华为视频内播放到投播成功

实现投播效果需要完成以下步骤。
- 使用隔空投放组件连接远端设备
用户在播放影片时,右上角会展示一个
图标,它提供了[投播]能力。用户点击该图标后,播控中心将拉起设备选择的模态窗口,设备的搜索发现、用户选择设备后的连接均由播控中心完成,此过程华为视频不感知。完成连接后,播控中心通过播放设备变化的监听事件outputDeviceChange通知华为视频,华为视频再进行下一步处理。
图2 点击投播组件触发设备选择弹框

应用使用[AVSession.on(‘outputDeviceChange’)]设置播放设备变化的监听事件,示例代码如下。
远端设备能够投播,需要满足以下条件:
-
设备连接成功,即outputDeviceChange事件监听回调返回connectState为1。
-
OutputDeviceInfo中设备列表的第一个设备,必须为远端设备,即castCategory为CATEGORY_REMOTE。
-
投播协议类型必须支持Cast+ Stream。
- 导入相关模块
// CastType.ts
import media from '@ohos.multimedia.media';
// 业务Index.ets
import avSession from '@ohos.multimedia.avsession';
import { AvSessionManager } from '../avsession/AvSessionManager';
import { CastManager } from '../avsession/CastManager';
import hilog from '@ohos.hilog';
import type { BusinessError } from '@ohos.base';
// CastManager.ets
import avSession from '@ohos.multimedia.avsession';
import hilog from '@ohos.hilog';
import type { BusinessError } from '@ohos.base';
import { CastMediaInfo, M3U8Info, CastMediaInfoType, CastErrorType } from './CastType';
import wantAgent from '@ohos.app.ability.wantAgent';
import backgroundTaskManager from '@ohos.resourceschedule.backgroundTaskManager';
import promptAction from '@ohos.promptAction';
- 设置播放设备变化的监听事件示例代码:
// CastManager.ets
const TAG = 'CastManager';

/**
 * 投播管理器
 */
export class CastManager {
  /** 单例 */
  private static readonly INSTANCE: CastManager = new CastManager();
  /** 播控中心avSession */
  private avSession?: avSession.AVSession;
  /** 投播控制器 */
  private avCastController?: avSession.AVCastController;

  public afterCreateSession(session: avSession.AVSession) {
    this.avSession = session;
    // 监听设备连接状态的变化
    this.setOutputDeviceChangeListener();
  }

  /**
   * 设置输出设备变化监听器
   */
  private setOutputDeviceChangeListener(): void {
    this.avSession?.on('outputDeviceChange', (connectState: avSession.ConnectionState,
      device: avSession.OutputDeviceInfo) => {
      const castCategory = device?.devices?.[0].castCategory;
      // 成功连接远程设备
      if (castCategory === avSession.AVCastCategory.CATEGORY_REMOTE && connectState === avSession.ConnectionState.STATE_CONNECTED) {
        // 获取cast控制器
        this.avSession?.getAVCastController().then(async (controller: avSession.AVCastController) => {
          hilog.info(0x0666, TAG, 'success to get avController');
          this.avCastController = controller;
          this.startCast();
        })
      }

      // 远端断开 或 本地连上 都算断开投播
      const isDisConnect = (castCategory === avSession.AVCastCategory.CATEGORY_REMOTE && connectState === avSession.ConnectionState.STATE_DISCONNECTED)
        || (castCategory === avSession.AVCastCategory.CATEGORY_LOCAL && connectState === avSession.ConnectionState.STATE_CONNECTED);
      if (isDisConnect) {
        this.stopCast();
      }
    });
  }

  /**
   * 开始投播
   */
  private startCast(): void {
    // ...
  }

  /**
   * 结束投播
   */
  public stopCast(): void {
    // 通知avSession结束投播
    this.avSession?.stopCasting();
  }
}
- 获取投播的视频信息
华为视频目前获取投播的URL,是通过单独查询playVod播放鉴权接口,此接口返回一个HLS的多码率播放地址。
为了支持在华为视频内部切换清晰度的需求,需要对这个HLS的多码率播放地址进行解析,获取到多个清晰度的二级索引地址。
图3 应用播放框内投播选择清晰度

// CastType.ts
// CastType文件用于存放一些公共的类型定义

/**
 * 媒体信息的类型:在线视频、本地视频
 */
export type CastMediaInfoType = 'online' | 'local';

/**
 * 媒体信息
 */
export class CastMediaInfo {
  /**
   * 媒体信息的类型
   * online:在线视频投播
   * local:本地视频投播
   */
  type: CastMediaInfoType;
  /**
   * vodId
   */
  vodId?: string;
  /**
   * 剧集id
   */
  volumeId?: string;
  /**
   * url
   */
  url: string;
  /**
   * 清晰度
   */
  clarity?: string;
  /**
   * 文件句柄
   */
  fdSrc?: media.AVFileDescriptor;
  /**
   * 展示错误类型
   */
  playErrType?: number;
  /**
   * 展示错误码
   */
  playErrCode?: number;
}

/**
 * 解析m3u8的信息
 */
export class M3U8Info {
  /**
   * 播放地址
   */
  playUrl?: string;
  /**
   * 带宽
   */
  bandwidth: number = Number.NaN;
  /**
   * 分辨率:0x0
   */
  resolution?: string;
  /**
   * 媒体分辨率:例如720、1080等,取高度
   */
  mediaResolution: number = Number.NaN;
  /**
   * 清晰度
   */
  clarity: string = '';
}

/**
 * 给页面返回的错误类型
 */
export type CastErrorType = 'avSessionError' | 'playVodError';
// CastManager.ets
export class CastManager {
  /** 获取媒体uri */
  private getMediaInfoFunction: () => CastMediaInfo = () => new CastMediaInfo();
  /** 媒体资源详情:内部定制,初始化非空 */
  private avMediaDescription: avSession.AVMediaDescription = { assetId: '', startPosition: 0 };
  /** 缓存分辨率信息列表 */
  private m3u8InfoList: M3U8Info[] = [];

  /**
   * 解析清晰度码流
   */
  private parseUri(uri: string): M3U8Info[] {
    // 具体实现不在此详述
    return [];
  }

  /**
   * 业务注册获取媒体uri的函数:【使用投播必须获取媒体uri】
   *
   * @param callback 获取媒体uri的函数
   */
  registerGetMediaInfo(callback: () => CastMediaInfo): void {
    this.getMediaInfoFunction = callback;
  }

  /**
   * 开始投播
   */
  private startCast(): void {
    let mediaInfo: CastMediaInfo = this.getMediaInfoFunction();

    // 同步获取不同分辨率的二级索引url(获取到的url按清晰度从高到低排序)
    this.m3u8InfoList = this.parseUri(mediaInfo.url);

    // 设置默认推送的url(优先取720p,其次取清晰度最高的url,如4K或2K)
    let targetClarity = 'HD';
    // 根据默认的720p剧集的分辨率来获取
    for (const m3u8Info of this.m3u8InfoList) {
      if (m3u8Info.clarity === targetClarity) {
        // 推送的url
        this.avMediaDescription.mediaUri = m3u8Info.playUrl;
        break;
      }
    }
  }
}
- 投送视频信息
获取到影片的URL后,通过[prepare]方法投送给播控中心,触发远端设备播放器进行投播。
prepare方法会投送一个播放列表AVQueueItem,AVQueueItem内容请参考[播放列表中单项的相关属性]。
调用prepare方法之后,APP播放框内就会展示成播放中的UI状态。
图4 APP播放框内投播UI状态
以下是具体的实现样例代码:
export class CastManager {
  /** 播控中心avSession */
  private avSession?: avSession.AVSession;
  /** 投播控制器 */
  private avCastController?: avSession.AVCastController;
  /** 获取媒体uri */
  private getMediaInfoFunction: () => CastMediaInfo = () => new CastMediaInfo();
  /** 媒体资源详情:内部定制,初始化非空 */
  private avMediaDescription: avSession.AVMediaDescription = { assetId: '', startPosition: 0 };
  /** 当前投播的媒体类型 */
  private currentCastMediaInfoType?: CastMediaInfoType;
  /** 开始投播的回调:用于刷新播窗ui,展示投播控制器ui */
  private callbackOnStart: (deviceName: string) => void;


  /**
   * 解析清晰度码流
   */
  private parseUri(uri: string): M3U8Info[] {
    // 具体实现不在此详述
    return [];
  }

  /**
   * 业务注册获取媒体uri的函数:【使用投播必须获取媒体uri】
   *
   * @param callback 获取媒体uri的函数
   */
  registerGetMediaInfo(callback: () => CastMediaInfo): void {
    this.getMediaInfoFunction = callback;
  }


  /**
   * 业务注册投播开始时回调
   *
   * @param callback 回调
   */
  onStart(callback: (deviceName: string) => void): void {
    this.callbackOnStart = callback;
  }

  /**
   * 开始投播
   */
  private async startCast(): Promise<void> {
    let mediaInfo: CastMediaInfo = this.getMediaInfoFunction();

    // 同步获取不同分辨率的二级索引url(获取到的url按清晰度从高到低排序)
    const m3u8InfoList = this.parseUri(mediaInfo.url);

    // 设置默认推送的url(优先取720p,其次取清晰度最高的url,如4K或2K)
    let targetClarity = 'HD';
    // 根据默认的720p剧集的分辨率来获取
    for (const m3u8Info of m3u8InfoList) {
      if (m3u8Info.clarity === targetClarity) {
        // 推送的url
        this.avMediaDescription.mediaUri = m3u8Info.playUrl;
        break;
      }
    }

    // 通知业务开始投播
    const deviceName: string = '客厅的智慧屏';
    this.callbackOnStart?.(deviceName);

    // 构建播放影片队列数据,开始prepare
    const queueItem = this.buildAVQueueItem();
    try {
      await this.avCastController?.prepare(queueItem);
    } catch (err) {
      this.handlerCastError(err, 'avSessionError', 'prepare');
    }

  }

  /**
   * 构建投播视频队列子项
   *
   * @returns 投播视频队列子项
   */
  private buildAVQueueItem(): avSession.AVQueueItem {
    hilog.info(0x0666, TAG, `buildAVQueueItem, description:${JSON.stringify(this.avMediaDescription)}`);
    // 构建媒体item
    let item: avSession.AVQueueItem = {
      itemId: 0,
      description: this.avMediaDescription
    };
    hilog.debug(0x0666, TAG, `buildAVQueueItem, queue: ${JSON.stringify(item)}`);
    return item;
  }

  /**
   * 将投播过程中的报错通知给投播组件展示,并打印日志
   * @param err 错误信息
   * @param type 错误类型
   * @param funcName 投播调用的函数名
   */
  private handlerCastError(err: BusinessError, type: CastErrorType, funcName: string): void {
    if (type === 'playVodError') {
      this.stopCast();
    }
    hilog.error(0x0666, TAG, `Failed to ${funcName}; errCode: ${err.code}, errType: ${type}`);
  }

  /**
   * 结束投播
   */
  private stopCast(): void {
    // 通知avSession结束投播
    this.avSession?.stopCasting();
  }
}
- 视频在远端播放
在prepare回调成功之后,应用需要继续串行调用[start]接口通知远端进行启播。
start接口调用成功后,远端设备播放器就可以播放出流了。
图5 远端设备播放器

样例代码如下:
// CastManager.ets
export class CastManager {
  /** 投播控制器 */
  private avCastController?: avSession.AVCastController;
  /** 获取媒体uri */
  private getMediaInfoFunction: () => CastMediaInfo = () => new CastMediaInfo();
  /** 媒体资源详情:内部定制,初始化非空 */
  private avMediaDescription: avSession.AVMediaDescription = { assetId: '', startPosition: 0 };
  /** 当前投播的媒体类型 */
  private currentCastMediaInfoType?: CastMediaInfoType;
  /** 开始投播的回调:用于刷新播窗ui,展示投播控制器ui */
  private callbackOnStart: (deviceName: string) => void = () => {};
  /**
   * 开始投播
   */
  private async startCast(): Promise<void> {
    let mediaInfo: CastMediaInfo = this.getMediaInfoFunction();

    // 同步获取不同分辨率的二级索引url(获取到的url按清晰度从高到低排序)
    const m3u8InfoList = this.parseUri(mediaInfo.url);

    // 设置默认推送的url(优先取720p,其次取清晰度最高的url,如4K或2K)
    let targetClarity = 'HD';
    // 根据默认的720p剧集的分辨率来获取
    for (const m3u8Info of m3u8InfoList) {
      if (m3u8Info.clarity === targetClarity) {
        // 推送的url
        this.avMediaDescription.mediaUri = m3u8Info.playUrl;
        break;
      }
    }

    // 通知业务开始投播
    const deviceName: string = '客厅的智慧屏';
    this.callbackOnStart?.(deviceName);

    // 构建播放影片队列数据,开始prepare
    const queueItem = this.buildAVQueueItem();
    try {
      await this.avCastController.prepare(queueItem);
    } catch (err) {
      this.handlerCastError(err, 'avSessionError', 'prepare');
    }

    // 启动投播
    this.startPlay(mediaInfo.type);
  }

  /**
   * 构建投播视频队列子项
   *
   * @returns 投播视频队列子项
   */
  private buildAVQueueItem(): avSession.AVQueueItem {
    hilog.info(0x0666, TAG, `buildAVQueueItem, description:${JSON.stringify(this.avMediaDescription)}`);
    // 构建媒体item
    let item: avSession.AVQueueItem = {
      itemId: 0,
      description: this.avMediaDescription
    };
    hilog.debug(0x0666, TAG, `buildAVQueueItem, queue: ${JSON.stringify(item)}`);
    return item;
  }

  /**
   * 投播后设置监听器
   */
  private setListenerOnCast(type: 'online' | 'local'): void {
    // 稍后实现
  }

  /**
   * 通知远端开始播放
   *
   * @param type:起播类型:在线、本地
   */
  private startPlay(type: CastMediaInfoType): void {
    hilog.info(0x0666, TAG, `startPlay, type: ${type}`);
    if (!this.avCastController) {
      hilog.error(0x0666, TAG, 'startPlay, avCastController is undefined, can not startPlay');
      return;
    }

    // 构建播放影片队列数据
    const queueItem = this.buildAVQueueItem();
    this.avCastController?.start(queueItem)
      .then(() => {
        hilog.info(0x0666, TAG, 'success to avCastController.start');

        // 设置投播后的事件监听
        this.setListenerOnCast(this.avMediaDescription.mediaUri ? 'online' : 'local');

        // 更新当前投播的剧集信息
        this.currentCastMediaInfoType = type;
      })
      .catch((err: BusinessError) => {
        this.handlerCastError(err, 'avSessionError', 'start');
      });
  }
}
- 告知播控中心华为视频支持的能力
投播时外部支持进行哪些操作,和之前对接AVSession控制一样,通过是否注册回调来控制。
对于不支持的操作,不需要注册回调,播控中心将不显示对应的操作按钮或将操作按钮置灰不可点击。
华为视频支持的操作:
- 支持“下一首”,注册on(‘playNext’)事件。
- 支持监听播放状态变化,注册on(‘playbackStateChange’)事件。
- 支持SEEK进度,注册on(‘seekDone’)事件。
- 支持展示AVSession的错误,注册on(‘error’)事件。
- 支持获取影片时长,注册on(‘mediaItemChange’)事件。
华为视频不支持以下操作,将不注册对应回调:
-
不支持收藏和循环模式,不注册on(‘toggleFavorite’)和on(‘setLoopMode’)事件。
-
不支持上一集,不注册on(type: ‘playPrevious’, callback: Callback)事件。
-
不支持video尺寸更改,不注册on(type: ‘videoSizeChange’)事件。
-
拉起长时任务
投播在开始start之后,需要对接[申请长时任务],避免应用切后台之后被系统冻结,可以进行长期监控,完成连续播放。
需要注意如下几点:
-
需要申请ohos.permission.KEEP_BACKGROUND_RUNNING权限。只需要申请本机权限即可。
-
任务类型为:MULTI_DEVICE_CONNECTION。所有任务请查看[BackgroundMode]。
-
wantAgent参数用于点击长时任务后打开对应投播的详情页。
下面是开始和停止长时任务的示例代码:
// CastManager.ets
export class CastManager {
  /** 投播控制器 */
  private avCastController?: avSession.AVCastController;
  /** 媒体资源详情:内部定制,初始化非空 */
  private avMediaDescription: avSession.AVMediaDescription = { assetId: '', startPosition: 0 };
  /** 当前投播的媒体类型 */
  private currentCastMediaInfoType?: CastMediaInfoType;
  /** context,申请长时任务需要 */
  private context?: Context;

  /**
   * 通知远端开始播放
   *
   * @param type:起播类型:在线、本地
   */
  private startPlay(type: CastMediaInfoType): void {
    hilog.info(0x0666, TAG, `startPlay, type: ${type}`);
    if (!this.avCastController) {
      hilog.error(0x0666, TAG, 'startPlay, avCastController is undefined, can not startPlay');
      return;
    }

    // 构建播放影片队列数据
    const queueItem = this.buildAVQueueItem();
    this.avCastController?.start(queueItem)
      .then(() => {
        hilog.info(0x0666, TAG, 'success to avCastController.start');

        // 设置投播后的事件监听
        this.setListenerOnCast(this.avMediaDescription.mediaUri ? 'online' : 'local');

        // 更新当前投播的剧集信息
        this.currentCastMediaInfoType = type;

        // 申请长时任务
        this.startLongTimeTask();
      })
      .catch((err: BusinessError) => {
        this.handlerCastError(err, 'avSessionError', 'start');
      });
  }

  /**
   * 注册Context
   */
  registerContext(context: Context): void {
    this.context = context;
  }

  /**
   * 开始长时任务
   */
  private startLongTimeTask(): void {

    const wantAgentInfo: wantAgent.WantAgentInfo = {
      // 点击通知后,将要执行的动作列表
      wants: [
        {
          bundleName: 'com.huawei.hmsapp.himovie',
          abilityName: 'MainAbility',
          parameters: {
            type: 'avsession',
            category: this.currentCastMediaInfoType ?? '',
            routeParams: {
              vodId: this.avMediaDescription.assetId
            }
          }
        }
      ],
      // 点击通知后,动作类型
      operationType: wantAgent.OperationType.START_ABILITY,
      // 使用者自定义的一个私有值
      requestCode: 0,
      // 点击通知后,动作执行属性
      wantAgentFlags: [wantAgent.WantAgentFlags.UPDATE_PRESENT_FLAG]
    };

    this.startContinuousTask(this.context as Context,
      backgroundTaskManager.BackgroundMode.MULTI_DEVICE_CONNECTION,
      wantAgentInfo,() => {
        hilog.info(0x0666, TAG, 'success to startLongTimeTask.callback');
      });
  }

  /**
   * 开始长时任务
   *
   * @param context context
   * @param bgMode 后台模式
   * @param wantAgentInfo want信息
   * @param callbackOnStart 成功的回调
   */
  private startContinuousTask(context: Context, bgMode: backgroundTaskManager.BackgroundMode, wantAgentInfo: wantAgent.WantAgentInfo, callbackOnStart: () => void): void {
    // 通过wantAgent模块下getWantAgent方法获取WantAgent对象
    wantAgent.getWantAgent(wantAgentInfo).then((wantAgentObj) => {
      backgroundTaskManager.startBackgroundRunning(context, bgMode, wantAgentObj)
        .then(callbackOnStart)
        .catch((err: BusinessError) => {
          hilog.error(0x0666, TAG, `Failed to operation startBackgroundRunning, code is ${err.code}`);
        });
    }).catch((err: BusinessError) => {
      hilog.error(0x0666, TAG, `Failed to start background running`);
    })
  }
}
下面是点击手机通知栏的长时任务时拉起影片详情页的相关代码:
// MainAbility.ets
export default class MainAbility extends UIAbility {
  onNewWant(want: Want, launchParam: AbilityConstant.LaunchParam): void {
    // 投播中,由长时任务拉起的事件
    if (want?.parameters?.type === 'avsession' && want?.parameters?.routeParams) {
      hilog.info(0x0666, TAG, `received a want, type is avsession, want.parameters.category: ${want.parameters?.category}`);
      router.pushUrl({
        url: '@bundle:com.huawei.hmsapp.himovie/local_video/ets/player/Player',
      }, router.RouterMode.Standard);
  }}
}
播控中心发起投播
点击控制中心的右上角的投播图标,会进入投音控制界面,在此界面中选择其他投播设备,可以进行设备连接投播。这个时候,播控中心会给业务应用回调通知,让应用接续完成投播能力。
图6 播控中心发起投播的流程

具体的实现原理如下:
-
用户选择设备且连接成功之后,播控中心触发on(‘outputDeviceChange’)回调通知应用,应用可感知到有投播设备正在试图连接。
-
后续流程与应用发起投播流程一致。可参考[华为视频应用内发起投播],大致分为:
- 根据ConnectionState判断是否连接成功。
- 根据DeviceInfo.castCategory判断是否远程设备。
- 根据DeviceInfo.supportedProtocols判断投播协议类型必须支持Cast+ Stream。
- 上述步骤均判断成功后,让应用请求投播播放URL,解析地址,投送URL。
连续播放影片的投播流程
对于连续播放,当前的方案如图所示。
图7 切换不同影片时播控中心显示
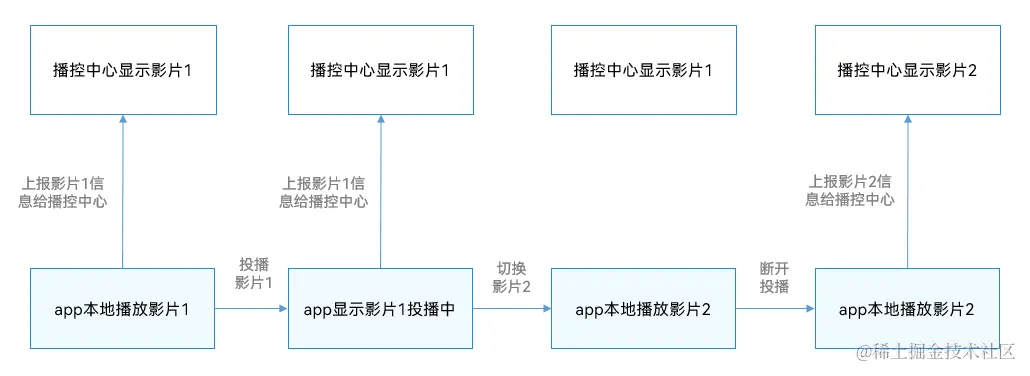
- 如果应用仅在本地播放,播放状态上报给播控中心。(应用本地播放影片1)
- 如果应用进行投播播放,则将投播状态上报到播控中心。(应用投播影片1)
- 投播过程中,应用如果进行其他影片的本地播放,不会通知播控中心。(应用本地播放影片2,此时播控中心仍然显示影片1)
- 当在投播过程中,本地播放的内容如果想触发投播时,需要通过播控中心提供的投播按钮实现。播控中心提供投播按钮的图片资源,应用内置做成按钮。播放框内点击这个按钮,直接将新内容的MetaData和投播URL都替换当前投播内容的方式实现。即对于播控中心,仅认为是投播中的内容变化了。
- 投播和本地播放并存时,投播如果突然断开,当前播放的本地内容将立刻上报到播控中心。
播控状态显示和操作指令
-
华为视频应用
- 状态显示
图8 华为视频app内状态显示

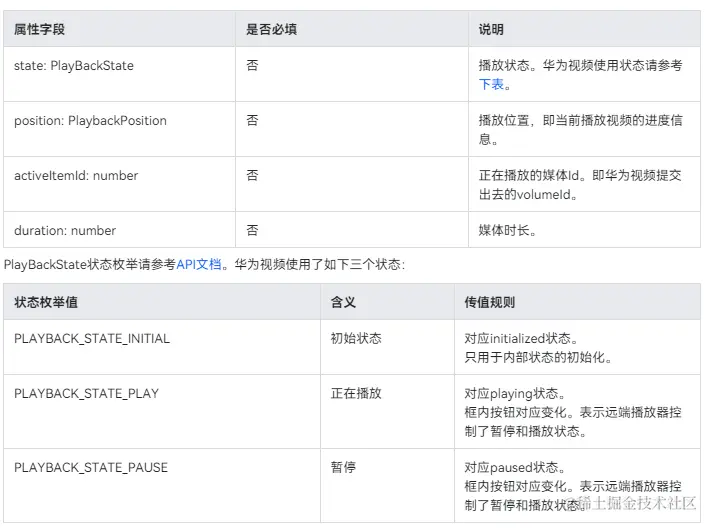
通过监听on(type: ‘playbackStateChange’)事件,获取播放状态。
AVPlaybackState属性定义请参考[API文档]。
// CastManager.ets
import avSession from '@ohos.multimedia.avsession';
import hilog from '@ohos.hilog';
import type { BusinessError } from '@ohos.base';
import { CastMediaInfo, M3U8Info, CastMediaInfoType, CastErrorType } from './CastType';

const TAG = 'CastManager';
/**
 * 投播管理器
 */
export class CastManager {
  /** 单例 */
  private static readonly INSTANCE: CastManager = new CastManager();
  /** 投播控制器 */
  private avCastController?: avSession.AVCastController;
  /** 投播状态变化的回调 */
  private callbackOnPlaybackStateChange: (state: avSession.AVPlaybackState) => void = () => {};

  /**
   * 获取实例
   *
   * @returns 实例
   */
  public static getInstance(): CastManager {
    return CastManager.INSTANCE;
  }

  /**
   * 业务注册投播播放状态变化时回调
   *
   * @param callback 回调
   * @returns 实例
   */
  onPlaybackStateChange(callback: (state: avSession.AVPlaybackState) => void): void {
    this.callbackOnPlaybackStateChange = callback;
  }


  /**
   * 投播后设置监听器
   */
  private setListenerOnCast(type: 'online' | 'local'): void {
    // 播放状态变化
    this.setPlaybackStateChangeListener();
  }

  /**
   * 监听播控中心或者大屏的播放状态变化事件
   */
  private setPlaybackStateChangeListener(): void {
    this.avCastController?.on('playbackStateChange', 'all', playbackState => {
      // 通知业务播放状态变化
      this.callbackOnPlaybackStateChange(playbackState);
    });
  }
}
-
操作指令
-
播放和暂停
在进度条左边绘制播放/暂停按钮。
实际上华为视频应用无法直接控制远端影片播放的状态,必须通过播控中心来进行,状态的变化也依赖于播控中心的回调。
点击播放/暂停按钮后,调用[sendCommonCommand接口]通知播控中心进行状态变更。
为了尽快让用户看到状态的变化,在点击按钮后,立刻将状态设置成修改后的状态,之后播控中心再返回什么状态,就渲染成什么状态。
样例代码如下:
// CastManager.ets
export class CastManager {
  /** 单例 */
  private static readonly INSTANCE: CastManager = new CastManager();
  /** 投播控制器 */
  private avCastController?: avSession.AVCastController;

  /**
   * 获取实例
   *
   * @returns 实例
   */
  public static getInstance(): CastManager {
    return CastManager.INSTANCE;
  }

  /**
   * 发送控制指令
   *
   * @param controlParam 控制参数:控制类型、进度
   */
  sendControlCommand(command: avSession.AVCastControlCommand): Promise<void> {
    if (!this.avCastController) {
      return Promise.resolve();
    }
    hilog.info(0x0666, TAG, `sendControlCommand, command:${JSON.stringify(command)}`);
    return this.avCastController.sendControlCommand(command);
  }
}
// 业务Index.ets
@Entry
@Component
struct Index {
  private TAG = 'Index';
  /** 视频的总时长 */
  @State duration: number = 0;
  /** 是否在投播中 */
  @State isCasting: boolean = false;
  /** 当前播放进度 */
  @State currentTime: number = 0;
  /** 视频是否正在播放的用户状态,非实际状态 */
  @State isPlaying: boolean = false;

  /**
   * 播放/暂停按钮点击监听
   */
  private handlePlayPauseButtonClick(): void {
    if (this.isPlaying) {
      this.sendControlCommand('pause', this.currentTime, () => {
        this.isPlaying = false;
      });
    } else {
      this.sendControlCommand('play', this.currentTime, () => {
        this.isPlaying = true;
      });
    }
  }

  /**
   * 发送控制命令给播控中心
   * @param command 播控中心支持的控制命令
   * @param parameter 控制命令附带的参数
   * @param callback 执行成功后的回调
   */
  private sendControlCommand(command: avSession.AVCastControlCommandType, parameter: number, callback?: () => void): void {
    const controlParam: avSession.AVCastControlCommand = {
      command,
      parameter,
    };
    CastManager.getInstance().sendControlCommand(controlParam).then(() => {
      hilog.info(0x0666, this.TAG, `sendControlCommand set ${command} ok`);
      if (callback) {
        callback();
      }
    }).catch((err: BusinessError) => {
      hilog.error(0x0666, this.TAG, `sendControlCommand set ${command} fail, code: ${err.code}`);
    });
  }
}
-
进度SEEK
-
播放UI中需要根据上文的duration和position属性绘制播放进度条。每次回调时候进行刷新。没有触发回调时不显示进度。
-
用户也可以自己点击拖动进度进行SEEK操作。当SEEK松手的时候,发送上述的命令提交SEEK进度。
-
SEEK命令发送之后,UI播控的进度和状态,等待SINK端的下次回调之后刷新。
-
由于拖动进度条过程中,播控中心也会持续地返回进度给app,因此此时要禁用进度更新,防止进度条左右横跳。
样例代码如下:
// 业务Index.ets
/** 滑动条进度最大值 */
const MAX_SLIDER_VALUE = 100;

@Entry
@Component
struct Index {;
  private TAG = 'Index';
  /** 视频的总时长 */
  @State duration: number = 0;
  /** 是否在投播中 */
  @State isCasting: boolean = false;
  /** 当前播放进度 */
  @State currentTime: number = 0;
  /** 视频是否正在播放的用户状态,非实际状态 */
  @State isPlaying: boolean = false;

  /**
   * 进度条变化监听
   * @param value 新的值
   * @param mode 修改模式(Begin、End、Moving、Click)
   */
  private onSliderChange(value: number, mode: SliderChangeMode): void {
    if (this.duration) {
      this.currentTime = this.duration * value / MAX_SLIDER_VALUE;

      if (mode === SliderChangeMode.End) {
        this.sendControlCommand('seek', this.currentTime);
      }
    }
  }

  /**
   * 发送控制命令给播控中心
   * @param command 播控中心支持的控制命令
   * @param parameter 控制命令附带的参数
   * @param callback 执行成功后的回调
   */
  private sendControlCommand(command: avSession.AVCastControlCommandType, parameter: number, callback?: () => void): void {
    const controlParam: avSession.AVCastControlCommand = {
      command,
      parameter,
    };
    CastManager.getInstance().sendControlCommand(controlParam).then(() => {
      hilog.info(0x0666, this.TAG, `sendControlCommand set ${command} ok`);
      if (callback) {
        callback();
      }
    }).catch((err: BusinessError) => {
      hilog.error(0x0666, this.TAG, `sendControlCommand set ${command} fail, code: ${err.code}`);
    });
  }

  build() {
    // ...
  }
}
- 自动下一集
图9 切换影片不同剧集时播控中心显示

影片播放结束以后,一般来说,电影是没有下一集,而电视剧是有下一集的,处理不同场景的处理方法如下:
对于切换不同电影、电视剧的场景
此时应该结束投播,华为视频应用内从刚刚播放的影片继续播放,远端播放器结束播放。
对于切换剧集(同一电视剧不同集或预告、花絮等)的场景
为了方便用户,此时不应该结束投播,应获取到下一集的播放URL,继续自动投播下一集。具体的实现如下:
- 判断是否可以投播下一集:当前影片有下一集且华为视频应用感知到当前影片即将播放完毕,满足上述条件,即可投播下一集。
说明
华为视频app投播时判断影片即将播放完毕有两种方式:
- 收到avCastController的endOfStream回调时。
- 判断播放进度是否到了最后5秒以内。
-
华为视频app播放详情页,状态切换到下一集。
-
通知AvSession的Matedata信息,切换成下一个影片的信息。
-
走华为视频app发起投播的流程,重新请求playVod,重新parepare和start启动投播。
样例代码如下:
// CastManager.ets
export class CastManager {
  /** 单例 */
  private static readonly INSTANCE: CastManager = new CastManager();
  /** 投播控制器 */
  private avCastController?: avSession.AVCastController;
  private context?: Context;

  /**
   * 投播后设置监听器
   */
  private setListenerOnCast(type: 'online' | 'local'): void {
    // 播放流结束
    this.setEndOfStreamListener();
  }

  /**
   * 监听播控中心或者大屏的endOfStream事件
   */
  private setEndOfStreamListener(): void {
    this.avCastController?.on('endOfStream', () => {
      // 通知页面播放下一集(页面处理逻辑不在此详述)
      this.context?.eventHub.emit('PLAY_COMPLETE');
    });
  }
}
- 清晰度切换
- 开始投播的时候,多个清晰度的二级URL都已经解析好了。
用户选择清晰度后,就找到对应清晰度的二级URL然后调用prepare和start接口进行投播。
- 播放进度:按照当前触发切换时候的进度点开始继续播放。
样例代码:
// 业务Index.ets
@Entry
@Component
struct Index {
  private TAG = 'Index';
  /** 视频的总时长 */
  @State duration: number = 0;
  /** 是否在投播中 */
  @State isCasting: boolean = false;
  /** 当前播放进度 */
  @State currentTime: number = 0;
  /** 视频是否正在播放的用户状态,非实际状态 */
  @State isPlaying: boolean = false;
  /** 清晰度列表 */
  @State clarityInfoList: ClarityInfo[] = [];
  /** 选择的清晰度在列表中的下标 */
  @State selectedClarityIndex: number | undefined = undefined;
  /** 选择的清晰度的资源值:如:高清 */
  @State selectedClarityValue: string = '';

  /**
   * 清晰度选择Selector
   */
  @Builder
  ClaritySelector() {
    if (this.clarityInfoList && this.clarityInfoList.length > 0) {
      Select(this.clarityInfoList)
        .fontColor('#FFFFFF')
        .font({ size: 16 })
        .backgroundColor('#19FFFFFF')
        .borderRadius(20)
        .width(120)
        .height(40)
        .selected(this.selectedClarityIndex)
        .value(this.selectedClarityValue)
        .onSelect((index: number, text: string) => {
          hilog.info(0x0666, this.TAG, `select clarity, index:${index}, text:${text}`);
          if (this.selectedClarityIndex !== index) {
            this.selectedClarityIndex = index;
            this.selectedClarityValue = this.clarityInfoList[index].value;
            CastManager.getInstance().reStartCast(this.clarityInfoList[index].name);
          }
        })
        .id('id/cast_clarity_selector')
    }}
}

/**
 * 清晰度信息
 */
interface ClarityInfo {
  /**
   * 'HD' | 'SD' | 'BluRay'
   */
  name: string;

  /**
   * 展示名称,如中文:高清、标清、蓝光
   */
  value: string;
}
// CastManager.ets
export class CastManager {
  /** 投播控制器 */
  private avCastController?: avSession.AVCastController;
  /** 媒体资源详情:内部定制,初始化非空 */
  private avMediaDescription: avSession.AVMediaDescription = { assetId: '', startPosition: 0 };
  /** 缓存分辨率信息列表 */
  private m3u8InfoList: M3U8Info[] = [];

  /**
   * 重新投播:当前只有切换清晰度的场景会用
   *
   * @param clarity 清晰度
   */
  async reStartCast(clarity: string): Promise<void> {
    // 构建播放影片队列数据,开始prepare
    const queueItem = this.buildAVQueueItem();
    try {
      await this.avCastController?.prepare(queueItem);
    } catch (err) {
      this.handlerCastError(err, 'avSessionError', 'prepare');
    }

    let m3u8Info: M3U8Info | undefined = this.m3u8InfoList.find(item => item.clarity === clarity);
    if (!m3u8Info || !m3u8Info.playUrl) {
      hilog.error(0x0666, TAG, `Failed to find m3u8Info, when clarity is ${clarity}`);
      return;
    }
    // 更新播放url
    this.avMediaDescription.mediaUri = m3u8Info.playUrl;
    // 启动投播
    this.startPlay('online');
  }
}
-
结束投播
-
点击结束投播按钮,调用[AVSession.stopCasting接口]来结束投播;
-
此时拉起APP内播放器进行播放,起播进度使用投播结束时的播放进度。
示例代码:
// 业务Index.ets
@Entry
@Component
struct Index {
  @Builder
  StopCastButton() {
    Button('结束投播')
      .fontColor('#FFFFFF')
      .fontSize(16)
      .backgroundColor('#19FFFFFF')
      .borderRadius(20)
      .width(120)
      .height(40)
      .onClick(() => {
        CastManager.getInstance().stopCast();
      })
      .id('id/cast_stop_button')
  }
}
-
错误提示
-
如果选择设备之后,在playVod播放鉴权的时候报错,根据错误码给对应提示。产生提示时,没有开始投播流程,也没有进入prepare状态,无法在投播界面展示,因此使用toast方式提示。
图10 播放鉴权报错时的错误提示

样例代码:
// CastManager.ets
export class CastManager {
  private getUIErrMessage(code: number): string {
    // 此处不详细写转换的逻辑
    return '';
  }

  /**
   * 将投播过程中的报错通知给投播组件展示,并打印日志
   * @param err 错误信息
   * @param type 错误类型
   * @param funcName 投播调用的函数名
   */
  private handlerCastError(err: BusinessError, type: CastErrorType, funcName: string): void {
    if (type === 'playVodError') {
      const message = this.getUIErrMessage(err.code);
      const toastString = `${message}(${err.code})`;
      hilog.warn(0x0666, TAG, `[handleCastError]playVodErrCode = ${err.code}, toastString = ${toastString}`);
      promptAction.showToast({
        message: toastString,
        duration: 3000,
      });
    }

    hilog.error(0x0666, TAG, `Failed to ${funcName}; errCode: ${err.code}, errType: ${type}`);
  }
}
- 播控中心
控制中心的状态显示和操作指令,UI界面展示如下:
图11 播控中心状态显示

- 操作路径
从系统顶部下拉进入控制中心 -> 点击影片海报进入播控中心页面 -> 点击右上角投播按钮进入投音控制页面;
从系统顶部下拉进入控制中心 -> 点击右上角投播按钮进入投音控制页面。
- 状态显示
支持展示影片的标题、副标题、海报、播放状态、当前进度、总时长等信息。
- 操作指令
支持播放暂停、进度SEEK、下一集、快进快退、调节SINK端音量、退出投播、切换设备等操作。
对以下场景,华为视频进行了监听处理:
-
播放暂停、进度SEEK、快进快退等状态监听,即监听playbackStateChange事件,详细代码可参考[华为视频应用-状态显示]。
-
下一集。
监听到下一集事件时,通知详情页组件播放下一集。此时会触发自动投播的流程,具体可参考[操作指令-自动下一集]。
- 播放结束。
播放结束后,和下一集的操作类似,可以选择结束投播,具体可以参考[操作指令-结束投播]。
- 退出投播、切换设备。
退出投播,其实就是切换到本机播放;切换设备,也是先切换到本机,再投播到其他设备,流程是类似的,都是监听outputDeviceChange事件,处理代码可以参考[使用隔空投放组件连接远端设备]。
- 远端设备播放器
远端设备播放器应用状态显示和操作指令,其UI界面如下:
图12 大屏播放器播放状态显示

- 状态显示
支持展示影片的标题、副标题、播放状态、当前进度、总时长等信息。
- 操作指令
支持播放暂停、进度SEEK、下一集、快进快退、退出投播(关闭播放器)、设置播放速度等操作。
对播放暂停、进度SEEK、下一集、快进快退、退出投播场景,华为视频进行了监听处理,具体实现可以参考[华为视频应用-操作指令]。
本地视频支持投播
图13 本地视频投播

本地视频投播的逻辑和在线视频基本一致,具体差异点如下所示:
- 不支持下一集、自动下一集。
- 不支持清晰度切换。
- 调用prepare接口时,不传mediaUri,传fdSrc(本地文件句柄media.AVFileDescriptor类型)。
完整示例代码
注意
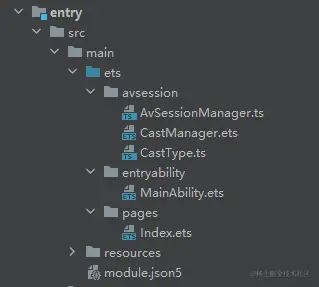
代码目录结构如下所示,请开发者参考代码时注意文件的路径。
// MainAbility.ets
import { AbilityConstant, UIAbility, Want } from '@kit.AbilityKit';
import { hilog } from '@kit.PerformanceAnalysisKit';
import { AvSessionManager } from '../avsession/AvSessionManager';
import router from '@ohos.router';

const TAG = 'MainAbility';
export default class MainAbility extends UIAbility {
  onCreate(want: Want, launchParam: AbilityConstant.LaunchParam): void {
    AvSessionManager.getInstance().init(this.context);
  }

  onNewWant(want: Want, launchParam: AbilityConstant.LaunchParam): void {
    // 投播中,由长时任务拉起的事件
    if (want?.parameters?.type === 'avsession' && want?.parameters?.routeParams) {
      hilog.info(0x0666, TAG, `received a want, type is avsession, want.parameters.category: ${want.parameters?.category}`);
      router.pushUrl({
        url: '@bundle:com.huawei.hmsapp.himovie/local_video/ets/player/Player',
      }, router.RouterMode.Standard);
  }}
}
// CastType.ts
import media from '@ohos.multimedia.media';

/**
 * 媒体信息的类型:在线视频、本地视频
 */
export type CastMediaInfoType = 'online' | 'local';

/**
 * 媒体信息
 */
export class CastMediaInfo {
  /**
   * 媒体信息的类型
   * online:在线视频投播
   * local:本地视频投播
   */
  type: CastMediaInfoType;
  /**
   * vodId
   */
  vodId?: string;
  /**
   * 剧集id
   */
  volumeId?: string;
  /**
   * url
   */
  url: string;
  /**
   * 清晰度
   */
  clarity?: string;
  /**
   * 文件句柄
   */
  fdSrc?: media.AVFileDescriptor;
  /**
   * 展示错误类型
   */
  playErrType?: number;
  /**
   * 展示错误码
   */
  playErrCode?: number;
}

/**
 * 解析m3u8的信息
 */
export class M3U8Info {
  /**
   * 播放地址
   */
  playUrl?: string;
  /**
   * 带宽
   */
  bandwidth: number = Number.NaN;
  /**
   * 分辨率:0x0
   */
  resolution?: string;
  /**
   * 媒体分辨率:例如720、1080等,取高度
   */
  mediaResolution: number = Number.NaN;
  /**
   * 清晰度
   */
  clarity: string = '';
}

/**
 * 给页面返回的错误类型
 */
export type CastErrorType = 'avSessionError' | 'playVodError';
// 业务Index.ets
import avSession from '@ohos.multimedia.avsession';
import { AvSessionManager } from '../avsession/AvSessionManager';
import { CastManager } from '../avsession/CastManager';
import hilog from '@ohos.hilog';
import type { BusinessError } from '@ohos.base';

/** 滑动条进度最大值 */
const MAX_SLIDER_VALUE = 100;

@Entry
@Component
struct Index {
  private avsessionMetaData: avSession.AVMetadata | null = null;
  private TAG = 'Index';
  /** 视频的总时长 */
  @State duration: number = 0;
  /** 是否在投播中 */
  @State isCasting: boolean = false;
  /** 当前播放进度 */
  @State currentTime: number = 0;
  /** 视频是否正在播放的用户状态,非实际状态 */
  @State isPlaying: boolean = false;
  /** 投播的播放状态 */
  private playState: avSession.PlaybackState = avSession.PlaybackState.PLAYBACK_STATE_INITIAL;
  /** 清晰度列表 */
  @State clarityInfoList: ClarityInfo[] = [];
  /** 选择的清晰度在列表中的下标 */
  @State selectedClarityIndex: number | undefined = undefined;
  /** 选择的清晰度的资源值:如:高清 */
  @State selectedClarityValue: string = '';

  aboutToAppear(): void {
    CastManager.getInstance().registerContext(getContext());
    CastManager.getInstance().onPlaybackStateChange((avPlaybackState: avSession.AVPlaybackState) => {
      this.handlePlaybackStateChange(avPlaybackState);
    })
    this.setAVSessionMetaData();
  }

  /**
   * 投播播放状态变化监听
   * @param avPlaybackState 媒体播放状态相关属性
   */
  private handlePlaybackStateChange(avPlaybackState: avSession.AVPlaybackState): void {
    // 必须投播中才更新状态
    if (this.isCasting) {
      if (avPlaybackState?.state != null) {
        this.playState = avPlaybackState.state;
      }
      // 更新进度
      this.currentTime = avPlaybackState.position?.elapsedTime || 0;
      // 更新总时长
      if (avPlaybackState.extras?.duration && avPlaybackState.extras?.duration !== this.duration) {
        hilog.info(0x0666, this.TAG, `[handlePlaybackStateChange]duration set to ${this.duration}`);
        this.duration = avPlaybackState.extras?.duration as number;
      }
      // 更新播放状态
      this.isPlaying = this.playState === avSession.PlaybackState.PLAYBACK_STATE_PLAY;

      hilog.debug(0x0666, this.TAG, `avPlaybackState: ${JSON.stringify(avPlaybackState)}`);
    }
  }

  setAVSessionMetaData() {
    this.avsessionMetaData = {
      // 影片的id
      assetId: 'test vod id',
      subtitle: 'vod subtitle',
      artist: 'artist name',
      title: 'vod title',
      mediaImage: 'media image url',
      // 仅支持投屏到Cast+ Stream的设备
      filter: avSession.ProtocolType.TYPE_CAST_PLUS_STREAM,
      // 快进快退时间
      skipIntervals: avSession?.SkipIntervals?.SECONDS_30
    };
    AvSessionManager.getInstance().setMetaData(this.avsessionMetaData);
  }

  /**
   * 播放/暂停按钮点击监听
   */
  private handlePlayPauseButtonClick(): void {
    if (this.isPlaying) {
      this.sendControlCommand('pause', this.currentTime, () => {
        this.isPlaying = false;
      });
    } else {
      this.sendControlCommand('play', this.currentTime, () => {
        this.isPlaying = true;
      });
    }
  }

  /**
   * 进度条变化监听
   * @param value 新的值
   * @param mode 修改模式(Begin、End、Moving、Click)
   */
  private onSliderChange(value: number, mode: SliderChangeMode): void {
    if (this.duration) {
      this.currentTime = this.duration * value / MAX_SLIDER_VALUE;

      if (mode === SliderChangeMode.End) {
        this.sendControlCommand('seek', this.currentTime);
      }
    }
  }

  /**
   * 发送控制命令给播控中心
   * @param command 播控中心支持的控制命令
   * @param parameter 控制命令附带的参数
   * @param callback 执行成功后的回调
   */
  private sendControlCommand(command: avSession.AVCastControlCommandType, parameter: number, callback?: () => void): void {
    const controlParam: avSession.AVCastControlCommand = {
      command,
      parameter,
    };
    CastManager.getInstance().sendControlCommand(controlParam).then(() => {
      hilog.info(0x0666, this.TAG, `sendControlCommand set ${command} ok`);
      if (callback) {
        callback();
      }
    }).catch((err: BusinessError) => {
      hilog.error(0x0666, this.TAG, `sendControlCommand set ${command} fail, code: ${err.code}`);
    });
  }

  /**
   * 清晰度选择Selector
   */
  @Builder
  ClaritySelector() {
    if (this.clarityInfoList && this.clarityInfoList.length > 0) {
      Select(this.clarityInfoList)
        .fontColor('#FFFFFF')
        .font({ size: 16 })
        .backgroundColor('#19FFFFFF')
        .borderRadius(20)
        .width(120)
        .height(40)
        .selected(this.selectedClarityIndex)
        .value(this.selectedClarityValue)
        .onSelect((index: number, text: string) => {
          hilog.info(0x0666, this.TAG, `select clarity, index:${index}, text:${text}`);
          if (this.selectedClarityIndex !== index) {
            this.selectedClarityIndex = index;
            this.selectedClarityValue = this.clarityInfoList[index].value;
            CastManager.getInstance().reStartCast(this.clarityInfoList[index].name);
          }
        })
        .id('id/cast_clarity_selector')
    }
  }

  @Builder
  StopCastButton() {
    Button('结束投播')
      .fontColor('#FFFFFF')
      .fontSize(16)
      .backgroundColor('#19FFFFFF')
      .borderRadius(20)
      .width(120)
      .height(40)
      .onClick(() => {
        CastManager.getInstance().stopCast();
      })
      .id('id/cast_stop_button')
  }

  build() {
    // ...
  }
}


/**
 * 清晰度信息
 */
interface ClarityInfo {
  /**
   * 'HD' | 'SD' | 'BluRay'
   */
  name: string;

  /**
   * 展示名称,如中文:高清、标清、蓝光
   */
  value: string;
}
// CastManager.ets
import { avSession } from '@kit.AVSessionKit';
import { hilog } from '@kit.PerformanceAnalysisKit';
import { BusinessError } from '@kit.BasicServicesKit';
import { promptAction } from '@kit.ArkUI';
import { wantAgent } from '@kit.AbilityKit';
import { backgroundTaskManager } from '@kit.BackgroundTasksKit';
import { CastMediaInfo, M3U8Info, CastMediaInfoType, CastErrorType } from './CastType';

const TAG = 'CastManager';

/**
 * 投播管理器
 */
export class CastManager {
  /** 单例 */
  private static readonly INSTANCE: CastManager = new CastManager();
  /** 播控中心avSession */
  private avSession?: avSession.AVSession;
  /** 投播控制器 */
  private avCastController?: avSession.AVCastController;
  /** 获取媒体uri */
  private getMediaInfoFunction: () => CastMediaInfo = () => new CastMediaInfo();
  /** 媒体资源详情:内部定制,初始化非空 */
  private avMediaDescription: avSession.AVMediaDescription = { assetId: '', startPosition: 0 };
  /** 当前投播的媒体类型 */
  private currentCastMediaInfoType?: CastMediaInfoType;
  /** 开始投播的回调:用于刷新播窗ui,展示投播控制器ui */
  private callbackOnStart: (deviceName: string) => void = () => {};
  /** 投播状态变化的回调 */
  private callbackOnPlaybackStateChange: (state: avSession.AVPlaybackState) => void = () => {};
  /** 播放结束的回调 */
  private callbackOnEndOfStream: () => void = () => {};
  private context?: Context;
  /** 缓存分辨率信息列表 */
  private m3u8InfoList: M3U8Info[] = [];

  /**
   * 获取实例
   *
   * @returns 实例
   */
  public static getInstance(): CastManager {
    return CastManager.INSTANCE;
  }

  public afterCreateSession(session: avSession.AVSession) {
    this.avSession = session;
    // 监听设备连接状态的变化
    this.setOutputDeviceChangeListener();
  }

  /**
   * 设置输出设备变化监听器
   */
  private setOutputDeviceChangeListener(): void {
    this.avSession?.on('outputDeviceChange', (connectState: avSession.ConnectionState,
      device: avSession.OutputDeviceInfo) => {
      const castCategory = device?.devices?.[0].castCategory;
      // 成功连接远程设备
      if (castCategory === avSession.AVCastCategory.CATEGORY_REMOTE && connectState === avSession.ConnectionState.STATE_CONNECTED) {
        // 获取cast控制器
        this.avSession?.getAVCastController().then(async (controller: avSession.AVCastController) => {
          hilog.info(0x0666, TAG, 'success to get avController');
          this.avCastController = controller;
          this.startCast();
        })
      }

      // 远端断开 或 本地连上 都算断开投播
      const isDisConnect = (castCategory === avSession.AVCastCategory.CATEGORY_REMOTE && connectState === avSession.ConnectionState.STATE_DISCONNECTED)
        || (castCategory === avSession.AVCastCategory.CATEGORY_LOCAL && connectState === avSession.ConnectionState.STATE_CONNECTED);
      if (isDisConnect) {
        this.stopCast();
      }
    });
  }

  /**
   * 解析清晰度码流
   */
  private parseUri(uri: string): M3U8Info[] {
    // 具体实现不在此详述
    return [];
  }

  /**
   * 业务注册获取媒体uri的函数:【使用投播必须获取媒体uri】
   *
   * @param callback 获取媒体uri的函数
   */
  registerGetMediaInfo(callback: () => CastMediaInfo): void {
    this.getMediaInfoFunction = callback;
  }


  /**
   * 业务注册投播开始时回调
   *
   * @param callback 回调
   */
  onStart(callback: (deviceName: string) => void): void {
    this.callbackOnStart = callback;
  }

  /**
   * 业务注册投播播放状态变化时回调
   *
   * @param callback 回调
   * @returns 实例
   */
  onPlaybackStateChange(callback: (state: avSession.AVPlaybackState) => void): void {
    this.callbackOnPlaybackStateChange = callback;
  }

  /**
   * 播放结束
   *
   * @param callback 回调
   * @returns this
   */
  onEndOfStream(callback: () => void): CastManager {
    this.callbackOnEndOfStream = callback;
    return this;
  }

  /**
   * 开始投播
   */
  private async startCast(): Promise<void> {
    let mediaInfo: CastMediaInfo = this.getMediaInfoFunction();

    // 同步获取不同分辨率的二级索引url(获取到的url按清晰度从高到低排序)
    this.m3u8InfoList = this.parseUri(mediaInfo.url);

    // 设置默认推送的url(优先取720p,其次取清晰度最高的url,如4K或2K)
    let targetClarity = 'HD';
    // 根据默认的720p剧集的分辨率来获取
    for (const m3u8Info of this.m3u8InfoList) {
      if (m3u8Info.clarity === targetClarity) {
        // 推送的url
        this.avMediaDescription.mediaUri = m3u8Info.playUrl;
        break;
      }
    }

    // 通知业务开始投播
    const deviceName: string = '客厅的智慧屏';
    this.callbackOnStart?.(deviceName);

    // 构建播放影片队列数据,开始prepare
    const queueItem = this.buildAVQueueItem();
    try {
      await this.avCastController?.prepare(queueItem);
    } catch (err) {
      this.handlerCastError(err, 'avSessionError', 'prepare');
    }

    // 启动投播
    this.startPlay(mediaInfo.type);
  }

  /**
   * 构建投播视频队列子项
   *
   * @returns 投播视频队列子项
   */
  private buildAVQueueItem(): avSession.AVQueueItem {
    hilog.info(0x0666, TAG, `buildAVQueueItem, description:${JSON.stringify(this.avMediaDescription)}`);
    // 构建媒体item
    let item: avSession.AVQueueItem = {
      itemId: 0,
      description: this.avMediaDescription
    };
    hilog.debug(0x0666, TAG, `buildAVQueueItem, queue: ${JSON.stringify(item)}`);
    return item;
  }

  /**
   * 投播后设置监听器
   */
  private setListenerOnCast(type: 'online' | 'local'): void {
    // 播放状态变化
    this.setPlaybackStateChangeListener();
    // 播放流结束
    this.setEndOfStreamListener();
  }


  /**
   * 监听播控中心或者大屏的endOfStream事件
   */
  private setEndOfStreamListener(): void {
    this.avCastController?.on('endOfStream', () => {
      // 通知页面播放下一集
      this.context?.eventHub.emit('PLAY_COMPLETE');
    });
  }

  /**
   * 监听播控中心或者大屏的播放状态变化事件
   */
  private setPlaybackStateChangeListener(): void {
    this.avCastController?.on('playbackStateChange', 'all', playbackState => {
      // 通知业务播放状态变化
      this.callbackOnPlaybackStateChange(playbackState);
    });
  }

  private getUIErrMessage(code: number): string {
    // 此处不详细写转换的逻辑
    return '';
  }

  /**
   * 将投播过程中的报错通知给投播组件展示,并打印日志
   * @param err 错误信息
   * @param type 错误类型
   * @param funcName 投播调用的函数名
   */
  private handlerCastError(err: BusinessError, type: CastErrorType, funcName: string): void {
    if (type === 'playVodError') {
      const message = this.getUIErrMessage(err.code);
      const toastString = `${message}(${err.code})`;
      hilog.warn(0x0666, TAG, `[handleCastError]playVodErrCode = ${err.code}, toastString = ${toastString}`);
      promptAction.showToast({
        message: toastString,
        duration: 3000,
      });
    }

    hilog.error(0x0666, TAG, `Failed to ${funcName}; errCode: ${err.code}, errType: ${type}`);
  }

  /**
   * 结束投播
   */
  public stopCast(): void {
    // 通知avSession结束投播
    this.avSession?.stopCasting();
  }

  /**
   * 通知远端开始播放
   *
   * @param type:起播类型:在线、本地
   */
  private startPlay(type: CastMediaInfoType): void {
    hilog.info(0x0666, TAG, `startPlay, type: ${type}`);
    if (!this.avCastController) {
      hilog.error(0x0666, TAG, 'startPlay, avCastController is undefined, can not startPlay');
      return;
    }

    // 构建播放影片队列数据
    const queueItem = this.buildAVQueueItem();
    this.avCastController?.start(queueItem)
      .then(() => {
        hilog.info(0x0666, TAG, 'success to avCastController.start');

        // 设置投播后的事件监听
        this.setListenerOnCast(this.avMediaDescription.mediaUri ? 'online' : 'local');

        // 更新当前投播的剧集信息
        this.currentCastMediaInfoType = type;

        // 申请长时任务
        this.startLongTimeTask();
      })
      .catch((err: BusinessError) => {
        this.handlerCastError(err, 'avSessionError', 'start');
      });
  }

  /**
   * 发送控制指令
   *
   * @param controlParam 控制参数:控制类型、进度
   */
  sendControlCommand(command: avSession.AVCastControlCommand): Promise<void> {
    if (!this.avCastController) {
      return Promise.resolve();
    }
    hilog.info(0x0666, TAG, `sendControlCommand, command:${JSON.stringify(command)}`);
    return this.avCastController.sendControlCommand(command);
  }

  /**
   * 重新投播:当前只有切换清晰度的场景会用
   *
   * @param clarity 清晰度
   */
  async reStartCast(clarity: string): Promise<void> {
    // 构建播放影片队列数据,开始prepare
    const queueItem = this.buildAVQueueItem();
    try {
      await this.avCastController?.prepare(queueItem);
    } catch (err) {
      this.handlerCastError(err, 'avSessionError', 'prepare');
    }

    let m3u8Info: M3U8Info | undefined = this.m3u8InfoList.find(item => item.clarity === clarity);
    if (!m3u8Info || !m3u8Info.playUrl) {
      hilog.error(0x0666, TAG, `Failed to find m3u8Info, when clarity is ${clarity}`);
      return;
    }
    // 更新播放url
    this.avMediaDescription.mediaUri = m3u8Info.playUrl;
    // 启动投播
    this.startPlay('online');
  }

  /**
   * 注册Context
   */
  registerContext(context: Context): void {
    this.context = context;
  }

  /**
   * 开始长时任务
   */
  private startLongTimeTask(): void {

    const wantAgentInfo: wantAgent.WantAgentInfo = {
      // 点击通知后,将要执行的动作列表
      wants: [
        {
          bundleName: 'com.huawei.hmsapp.himovie',
          abilityName: 'MainAbility',
          parameters: {
            type: 'avsession',
            category: this.currentCastMediaInfoType ?? '',
            routeParams: {
              vodId: this.avMediaDescription.assetId
            }
          }
        }
      ],
      // 点击通知后,动作类型
      operationType: wantAgent.OperationType.START_ABILITY,
      // 使用者自定义的一个私有值
      requestCode: 0,
      // 点击通知后,动作执行属性
      wantAgentFlags: [wantAgent.WantAgentFlags.UPDATE_PRESENT_FLAG]
    };

    this.startContinuousTask(this.context as Context,
      backgroundTaskManager.BackgroundMode.MULTI_DEVICE_CONNECTION,
      wantAgentInfo,() => {
        hilog.info(0x0666, TAG, 'success to startLongTimeTask.callback');
      });
  }

  /**
   * 开始长时任务
   *
   * @param context context
   * @param bgMode 后台模式
   * @param wantAgentInfo want信息
   * @param callbackOnStart 成功的回调
   */
  private startContinuousTask(context: Context, bgMode: backgroundTaskManager.BackgroundMode, wantAgentInfo: wantAgent.WantAgentInfo, callbackOnStart: () => void): void {
    // 通过wantAgent模块下getWantAgent方法获取WantAgent对象
    wantAgent.getWantAgent(wantAgentInfo).then((wantAgentObj) => {
      backgroundTaskManager.startBackgroundRunning(context, bgMode, wantAgentObj)
        .then(callbackOnStart)
        .catch((err: BusinessError) => {
          hilog.error(0x0666, TAG, `Failed to operation startBackgroundRunning, code is ${err.code}`);
        });
    }).catch((err: BusinessError) => {
      hilog.error(0x0666, TAG, `Failed to start background running`);
    })
  }
}
// AvSessionManager.ts
import avSession from '@ohos.multimedia.avsession';
import hilog from '@ohos.hilog';
import type { BusinessError } from '@ohos.base';
import type common from '@ohos.app.ability.common';
import WantAgent from '@ohos.app.ability.wantAgent';

const TAG = 'AvSessionManager';

/**
 * 对接播控中心管理器
 */
export class AvSessionManager {

  private static readonly instance: AvSessionManager = new AvSessionManager();
  private session: avSession.AVSession = null;
  /** 播放状态 */
  playState?: avSession.AVPlaybackState = {
    state: avSession.PlaybackState.PLAYBACK_STATE_INITIAL,
    position: {
      elapsedTime: 0,
      updateTime: (new Date()).getTime()
    }
  };

  static getInstance(): AvSessionManager {
    return this.instance;
  }

  init(abilityContext: common.Context): void {
    avSession.createAVSession(abilityContext, 'himovie', 'video').then(session => {
      this.session = session;
      // 创建完成之后,激活会话。
      this.session.activate();
      hilog.info(0x06666, TAG, 'createAVSession success');
    }).catch((error: BusinessError) => {
      hilog.error(0x06666, TAG, `createAVSession or activate failed, code: ${error?.code}`);
    });
  }

  /**
   * 设置metaData并初始化状态
   *
   * @param metadata 影片元数据
   */
  setMetaData(metadata: avSession.AVMetadata): void {
    if (this.session) {
      hilog.info(0x06666, TAG, `setMetaData avMetadata: ${JSON.stringify(metadata)}`);

      this.session?.setAVMetadata(metadata)
        .then(() => {
          hilog.info(0x06666, TAG, `setMetaData success.`);
          this.setLaunchAbility(metadata.assetId);
        })
        .catch((error: BusinessError) => {
          hilog.error(0x06666, TAG, `setMetaData failed, code: ${error.code}`);
        });
    }
  }

  /**
   * 设置一个WantAgent用于拉起会话的Ability
   * @param vodId 影片Id
   */
  setLaunchAbility(vodId: string): void {
    const ability: WantAgent.WantAgentInfo = {
      wants: [
        {
          bundleName: 'com.huawei.hmsapp.himovie',
          abilityName: 'MainAbility',
          parameters: {
            type: 'avsession',
            routeParams: {
              vodId,
            }
          }
        }
      ],
      requestCode: 0,
      actionType: WantAgent.OperationType.START_ABILITY,
      actionFlags: [WantAgent.WantAgentFlags.UPDATE_PRESENT_FLAG]
    }
    this.session.setLaunchAbility(ability).then(() => {
      hilog.info(0x0666, TAG, `SetLaunchAbility successfully`);
    }).catch((err: BusinessError) => {
      hilog.info(0x0666, TAG, `SetLaunchAbility failed, code: ${err.code}`);
    });
  }

  /**
   * 播放
   *
   * @returns
   */
  play(currentTime?: number): void {
    hilog.info(0x0666, TAG, `AVSession play, currentTime:${currentTime}, state: ${this.playState?.state}`);
    this.setPlayOrPauseToAvSession('play', currentTime);
  }

  /**
   * 暂停
   *
   * @returns
   */
  pause(currentTime?: number): void {
    hilog.info(0x0666, TAG, `AVSession pause, currentTime: ${currentTime}, state: ${this.playState?.state}`);
    this.setPlayOrPauseToAvSession('pause', currentTime);
  }


  /**
   * 设置播控中心的状态为播放或暂停
   *
   * @param state 状态
   * @param elapsedTime 当前进度
   */
  private setPlayOrPauseToAvSession(state: 'play' | 'pause', elapsedTime: number): void {
    if (elapsedTime === undefined || elapsedTime < 0) {
      hilog.warn(0x0666, TAG, `param error, elapsedTime: ${elapsedTime}, do not play or pause.`);
      return;
    }
    if (this.playState === undefined || this.playState.state === avSession.PlaybackState.PLAYBACK_STATE_STOP) {
      hilog.warn(0x0666, TAG, `playState error, state is PLAYBACK_STATE_STOP or undefined, do not play or pause.`);
      return;
    }

    this.playState.state = state === 'play' ? avSession.PlaybackState.PLAYBACK_STATE_PLAY : avSession.PlaybackState.PLAYBACK_STATE_PAUSE;
    this.playState.position = {
      elapsedTime: elapsedTime,
      updateTime: (new Date()).getTime()
    };

    this.setAVPlaybackState();
  }

  /**
   * 向播控中心设置播放状态
   */
  private setAVPlaybackState(): void {
    hilog.info(0x0666, TAG, `setAVPlaybackState state: ${this.playState.state}, updateTime: ${this.playState?.position?.updateTime}, speed: ${this.playState?.speed}`);
    this.session?.setAVPlaybackState(this.playState);
  }

  /**
   * 释放播放器
   */
  releasePlayer(): void {
    this.playState.state = avSession.PlaybackState.PLAYBACK_STATE_STOP;
    this.setAVPlaybackState();
  }


  /**
   * 监听播控中心回调事件,播放
   *
   * @param action 回调方法
   * @returns
   */
  onPlay(action: () => void): void {
    if (this.session) {
      this.session.on('play', action);
    }
  }

  /**
   * 监听播控中心回调事件,暂停
   *
   * @param action 回调方法
   */
  onPause(action: () => void): void {
    if (this.session) {
      this.session.on('pause', action);
    }
  }
}
最后呢
很多开发朋友不知道需要学习那些鸿蒙技术?鸿蒙开发岗位需要掌握那些核心技术点?为此鸿蒙的开发学习必须要系统性的进行。
而网上有关鸿蒙的开发资料非常的少,假如你想学好鸿蒙的应用开发与系统底层开发。你可以参考这份资料,少走很多弯路,节省没必要的麻烦。由两位前阿里高级研发工程师联合打造的《鸿蒙NEXT星河版OpenHarmony开发文档》里面内容包含了(ArkTS、ArkUI开发组件、Stage模型、多端部署、分布式应用开发、音频、视频、WebGL、OpenHarmony多媒体技术、Napi组件、OpenHarmony内核、Harmony南向开发、鸿蒙项目实战等等)鸿蒙(Harmony NEXT)技术知识点
如果你是一名Android、Java、前端等等开发人员,想要转入鸿蒙方向发展。可以直接领取这份资料辅助你的学习。下面是鸿蒙开发的学习路线图。

针对鸿蒙成长路线打造的鸿蒙学习文档。话不多说,我们直接看详细鸿蒙(OpenHarmony )手册(共计1236页)与鸿蒙(OpenHarmony )开发入门视频,帮助大家在技术的道路上更进一步。
- 《鸿蒙 (OpenHarmony)开发学习视频》
- 《鸿蒙生态应用开发V2.0白皮书》
- 《鸿蒙 (OpenHarmony)开发基础到实战手册》
- OpenHarmony北向、南向开发环境搭建
- 《鸿蒙开发基础》
- 《鸿蒙开发进阶》
- 《鸿蒙开发实战》

总结
鸿蒙—作为国家主力推送的国产操作系统。部分的高校已经取消了安卓课程,从而开设鸿蒙课程;企业纷纷跟进启动了鸿蒙研发。
并且鸿蒙是完全具备无与伦比的机遇和潜力的;预计到年底将有 5,000 款的应用完成原生鸿蒙开发,未来将会支持 50 万款的应用。那么这么多的应用需要开发,也就意味着需要有更多的鸿蒙人才。鸿蒙开发工程师也将会迎来爆发式的增长,学习鸿蒙势在必行! 自↓↓↓拿


 915
915

 被折叠的 条评论
为什么被折叠?
被折叠的 条评论
为什么被折叠?
 到【灌水乐园】发言


