


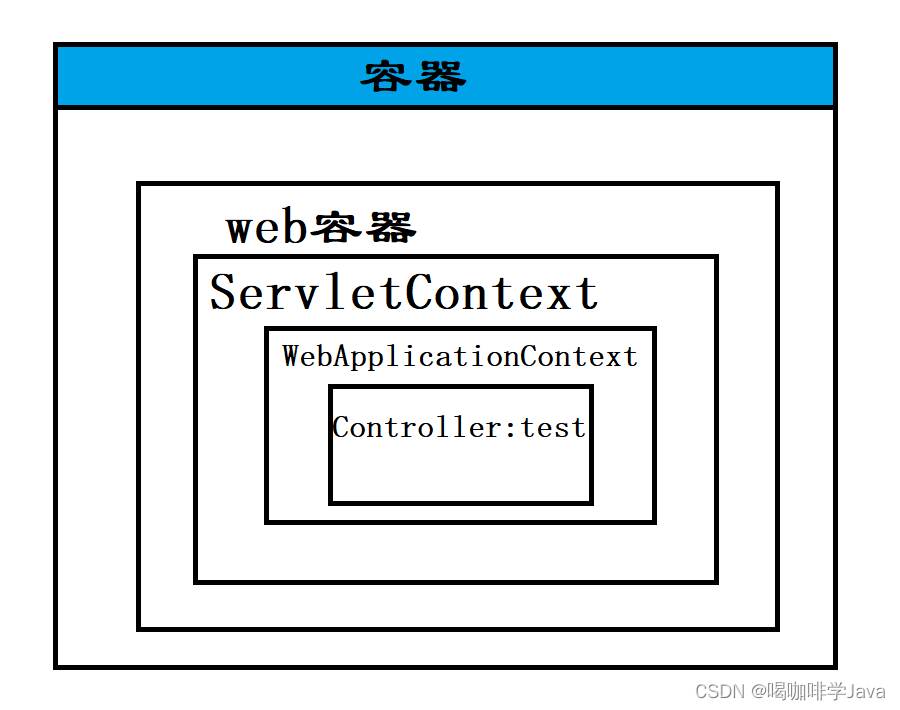
一、回顾SpringMVC访问接口流程
1.容器加载分析
- 容器分析
- 手动注册WebApplicationContext
public class ServletConfig extends AbstractDispatcherServletInitializer {

    @Override
    protected WebApplicationContext createServletApplicationContext() {
        //获取SpringMVC容器
        AnnotationConfigWebApplicationContext context = new AnnotationConfigWebApplicationContext();
        context.register(SpringMvcConfig.class);
        return context;
    }

    @Override
    protected String[] getServletMappings() {
        return new String[]{"/"};
    }

    @Override
    protected WebApplicationContext createRootApplicationContext() {
        return null;
    }
}
2.容器加载过程分析
-
tomcat 服务器启动的时候,加载ServletConfig类之后,做初始化web容器操作,相当于 web.xml
- 执行注册容器的方法,获取 SpringMVC容器 WebApplicationContext
@Nullable
    protected WebApplicationContext createRootApplicationContext() {
        Class<?>[] configClasses = this.getRootConfigClasses();
        if (!ObjectUtils.isEmpty(configClasses)) {
            AnnotationConfigWebApplicationContext context = new AnnotationConfigWebApplicationContext();
            context.register(configClasses);
            return context;
        } else {
            return null;
        }
    }

    protected WebApplicationContext createServletApplicationContext() {
        AnnotationConfigWebApplicationContext context = new AnnotationConfigWebApplicationContext();
        Class<?>[] configClasses = this.getServletConfigClasses();
        if (!ObjectUtils.isEmpty(configClasses)) {
            context.register(configClasses);
        }

        return context;
}- 通过@ComponentScan("cn.sycoder.controller") 加载 Controller 下面的bean 进 WebApplicationContext
@RestController
public class TestController {

    @GetMapping("/test/{id}")
    public String test(@PathVariable Long id) {
        return "ok:" + id;
    }
}-
把使用了 RequestMapping 注解的方法的 value --- 对应一个方法,建立起了一对一映射关系(可以想象为hashmap)
-
/test/{id} ---- test 方法
-
3.请求接口过程
-
匹配 springmvc 的 / servletMapping 规则,交给 springmvc 处理
-
解析 /test/1路径找到对应的 test 方法
-
执行方法
-
因为使用 RestController ,所以返回方法的返回值作为响应体返回给浏览器
4.SSM整合会出现bean界定不清楚问题
-
SpringMVC 需要加载哪些bean?
-
controller 层(表现层即可)
-
-
Spring 加载哪些bean?
-
service
-
dao
-
4.1如何处理
- 将spring配置注入到 web 容器中
@Configuration
@ComponentScan(value={"cn.sycoder.service","cn.sycoder.dao"})
public class SpringConfig {
}
public class ServletConfig  extends AbstractAnnotationConfigDispatcherServletInitializer {
    @Override
    protected Class<?>[] getRootConfigClasses() {
        return new Class[]{SpringConfig.class};
    }

    @Override
    protected Class<?>[] getServletConfigClasses() {
        return new Class[]{SpringMvcConfig.class};
    }

    @Override
    protected String[] getServletMappings() {
        return new String[]{"/"};
    }
}
4.2验证两个容器的bean相互不干扰
@Test
public void test(){
    AnnotationConfigApplicationContext applicationContext =
            new AnnotationConfigApplicationContext(SpringConfig.class);
    ITestService bean = applicationContext.getBean(ITestService.class);
    bean.get(1L);

    TestController bean1 = applicationContext.getBean(TestController.class);
    System.out.println(bean1.test(1L));
}
二、SSM整合
1.SSM整合流程分析
1.1创建项目
- 导入依赖
- 配置 web 项目入口配置替换 web.x(AbstractAnnotationConfigDispatcherServletInitializer)
配置 Spring 配置类交给 web 容器管理
@Override
    protected Class<?>[] getRootConfigClasses() {
        return new Class[]{SpringConfig.class};
    }
配置 SpringMVC 配置类交给 web 容器管理
@Override
    protected Class<?>[] getServletConfigClasses() {
        return new Class[]{SpringMvcConfig.class};
    }
配置请求拦截规则,交给 springmvc 处理
@Override
    protected String[] getServletMappings() {
        return new String[]{"/"};
    }
1.2配置 Spring
-
SpringConfig
-
@Configuration 标记Spring配置类,替换Spring-config-xml
-
@ComponetScan 扫描需要被Spring 管理的bean
-
@EnableTransactionManagment 启动管理事务支持
-
@PropertySource 引入db.properties 配置文件
-
-
配置 JdbcConfig 配置类
-
使用德鲁伊 DataSource 数据源
-
构建平台事务管理器 DataSourceTransactionManager
-
-
配置 MyBatis 配置类
-
构建 SqlSessionFactoryBean
-
指定 MapperScanner 设置 mapper 包扫描寻找 mapper.xml 文件
-
1.3配置 SpringMVC
-
配置SpringMvcConfig
-
@Configuration
-
@ComponentScan 只扫描 Controller
-
开启SpringMVC 注解支持 @EnableWebMvc
-
1.4开发业务
-
使用注解
-
注入bean 注解
-
@Autowired
-
-
@RestController
-
@GetMapping
-
@RequestParam
-
-
@PostMapping
-
@RequestBody
-
-
@DeleteMapping
-
@PathVariable
-
-
@PutMapping
-
-
@Service
-
@Transactional
-
-
junit
-
@RunWith
-
@ContextConfiguration
-
@Test
-
-
2.SSM整合
2.1导入依赖
<dependencies>
    <dependency>
      <groupId>org.springframework</groupId>
      <artifactId>spring-webmvc</artifactId>
      <version>5.2.17.RELEASE</version>
    </dependency>

    <dependency>
      <groupId>org.springframework</groupId>
      <artifactId>spring-jdbc</artifactId>
      <version>5.2.17.RELEASE</version>
    </dependency>

    <dependency>
      <groupId>org.springframework</groupId>
      <artifactId>spring-test</artifactId>
      <version>5.2.17.RELEASE</version>
    </dependency>

    <dependency>
      <groupId>org.mybatis</groupId>
      <artifactId>mybatis</artifactId>
      <version>3.5.6</version>
    </dependency>

    <dependency>
      <groupId>org.mybatis</groupId>
      <artifactId>mybatis-spring</artifactId>
      <version>1.3.0</version>
    </dependency>

    <dependency>
      <groupId>mysql</groupId>
      <artifactId>mysql-connector-java</artifactId>
      <version>8.0.29</version>
    </dependency>

    <dependency>
      <groupId>com.alibaba</groupId>
      <artifactId>druid</artifactId>
      <version>1.1.16</version>
    </dependency>

    <dependency>
      <groupId>junit</groupId>
      <artifactId>junit</artifactId>
      <version>4.12</version>
      <scope>test</scope>
    </dependency>

    <dependency>
      <groupId>javax.servlet</groupId>
      <artifactId>javax.servlet-api</artifactId>
      <version>3.1.0</version>
      <scope>provided</scope>
    </dependency>

    <dependency>
      <groupId>com.fasterxml.jackson.core</groupId>
      <artifactId>jackson-databind</artifactId>
      <version>2.9.0</version>
    </dependency>
  </dependencies>
2.2创建各目录结构
-
目录如下
2.3创建SpringConfig
-
SpringConfig
@Configuration
@ComponentScan(value = {"cn.sycoder.service","cn.sycoder.dao"})
@EnableTransactionManagement
@PropertySource("classpath:db.properties")
@Import({DbConfig.class,MybatisConfig.class})
public class SpringConfig {
}
2.4创建DbConfig配置类
-
创建数据库配置文件
jdbc.url=jdbc:mysql://localhost:3306/ssm
jdbc.driver=com.mysql.cj.jdbc.Driver
jdbc.username=root
jdbc.password=123456- 创建DbConfig
public class DbConfig {

    @Value("${jdbc.url}")
    private String url;
    @Value("${jdbc.driver}")
    private String driver;
    @Value("${jdbc.username}")
    private String username;
    @Value("${jdbc.password}")
    private String password;

    /**
     * 配置德鲁伊连接池
     * @return
     */
    @Bean
    public DataSource dataSource(){
        DruidDataSource source = new DruidDataSource();
        source.setUrl(url);
        source.setDriverClassName(driver);
        source.setPassword(password);
        source.setUsername(username);
        return source;
    }

    @Bean
    public PlatformTransactionManager transactionManager(DataSource dataSource){
        DataSourceTransactionManager manager = new DataSourceTransactionManager();
        manager.setDataSource(dataSource);
        return manager;
    }

}
2.5创建MybatisConfig配置类
-
MyBatisConfig
public class MybatisConfig {

    @Bean
    public SqlSessionFactoryBean sessionFactoryBean(DataSource dataSource){
        SqlSessionFactoryBean bean = new SqlSessionFactoryBean();
        bean.setDataSource(dataSource);
        bean.setTypeAliasesPackage("cn.sycoder.domain");
        return bean;
    }

    @Bean
    public MapperScannerConfigurer mapperScannerConfigurer(){
        MapperScannerConfigurer configurer = new MapperScannerConfigurer();
        configurer.setBasePackage("cn.sycoder.dao");
        return configurer;
    }
}
2.6创建SpringMVC配置类
-
SpringMvcConfig
@Configuration
@ComponentScan("cn.sycoder.controller")
@EnableWebMvc
public class SpringMvcConfig {
}
2.7创建Web项目入口配置类
-
ServletConfig
public class ServletConfig extends AbstractAnnotationConfigDispatcherServletInitializer {
    @Override
    protected Class<?>[] getRootConfigClasses() {
        return new Class[]{SpringConfig.class};//配置Spring交给Web 管理
    }

    @Override
    protected Class<?>[] getServletConfigClasses() {
        return new Class[]{SpringMvcConfig.class};
    }

    @Override
    protected String[] getServletMappings() {
        return new String[]{"/"};
    }
}
3.功能开发
3.1创建数据库及表
-
创建 ssm 数据库
-
创建 item 表
create table item
(
	id bigint auto_increment,
	type varchar(64) null,
	name varchar(64) null,
	remark text null,
	constraint item_pk
		primary key (id)
);
3.2编写模型类
-
添加 lombok 依赖
<dependency>
  <groupId>org.projectlombok</groupId>
  <artifactId>lombok</artifactId>
  <version>1.18.22</version>
</dependency>- 模型类
@Data
public class Item {
    private Long id;
    private String name;
    private String type;
    private String remark;
}
3.3编写Mapper接口
-
Mapper 接口
@Repository
public interface ItemMapper {
    @Insert("insert into item(name,type,remark) value(#{name},#{type},#{remark})")
    public int save(Item item);
    @Delete("delete from item where id = #{id}")
    public int delete(Long id);
    @Update("update item set name = #{name},type = #{type},remark=#{remark} where id=#{id}")
    public int update(Item item);
    @Select("select * from item where id = #{id}")
    public Item getById(Long id);
    @Select("select * from item")
    public List<Item> list();

}
3.4编写Service接口和实现类
-
Service 接口
public interface IItemService {
    /**
     * 添加闲置物品方法
     * @param item
     * @return
     */
    public boolean save(Item item);

    /**
     * 删除闲置物品
     * @param id
     * @return
     */
    public boolean delete(Long id);

    /**
     * 更新闲置物品
     * @param item
     * @return
     */
    public boolean update(Item item);

    /**
     * 查询闲置物品通过id
     * @param id
     * @return
     */
    public Item getById(Long id);

    /**
     * 查询所有闲置商品
     * @return
     */
    public List<Item> lists();
}- 定义接口实现类
@Service
public class ItemServiceImpl implements IItemService {

    @Autowired
    ItemMapper mapper;

    @Override
    @Transactional
    public boolean save(Item item) {
        return mapper.save(item) > 0;
    }

    @Override
    @Transactional
    public boolean delete(Long id) {
        return mapper.delete(id) >0;
    }

    @Override
    @Transactional
    public boolean update(Item item) {
        return mapper.update(item) >0;
    }

    @Override
    public Item getById(Long id) {
        return mapper.getById(id);
    }

    @Override
    public List<Item> lists() {
        return mapper.list();
    }
}
3.5编写Contorller类
-
Controller
@RestController
@RequestMapping("/item")
public class ItemController {

    @Autowired
    IItemService service;

    @PostMapping
    public boolean save(@RequestBody Item item){
        return service.save(item);
    }

    @PutMapping
    public boolean update(@RequestBody Item item){
        return service.update(item);
    }

    @DeleteMapping("/{id}")
    public boolean delete(@PathVariable Long id){
        return service.delete(id);
    }

    @GetMapping("/{id}")
    public Item getById(@PathVariable Long id){
        return service.getById(id);
    }

    @GetMapping
    public List<Item> list(){
        return service.lists();
    }
}
4.验证 ssm 整合结果
-
启动项目并且解决问题

- 修改Spring配置类
@Configuration
@ComponentScan(value = {"cn.sycoder.service","cn.sycoder.dao"})
@EnableTransactionManagement
@PropertySource("classpath:db.properties")
@Import({DbConfig.class,MybatisConfig.class})
public class SpringConfig {
}
4.1添加item 数据
-
准备 item 数据
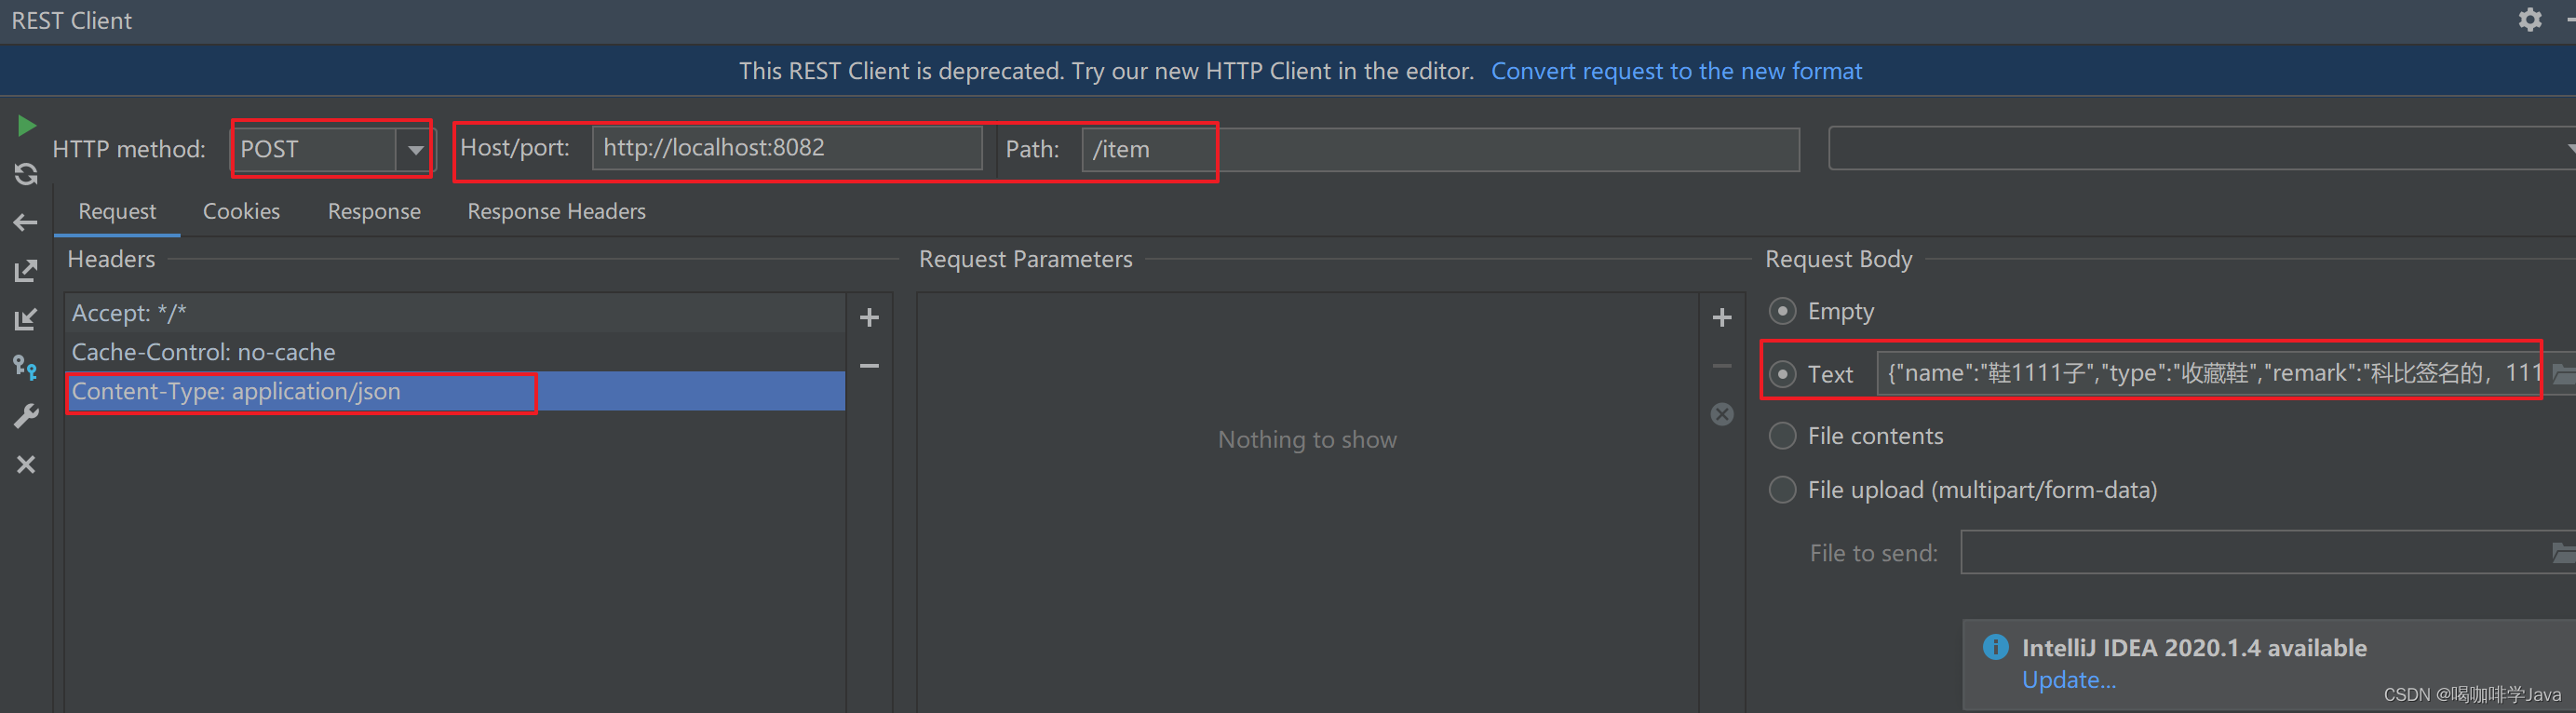
{"name":"键盘","type":"电脑外设","remark":"9成新,半价卖"}
{"name":"笔记本","type":"电脑","remark":"9成新,8折出售"}
{"name":"鞋子","type":"收藏鞋","remark":"科比签名的,独一无二"}
- 添加数据
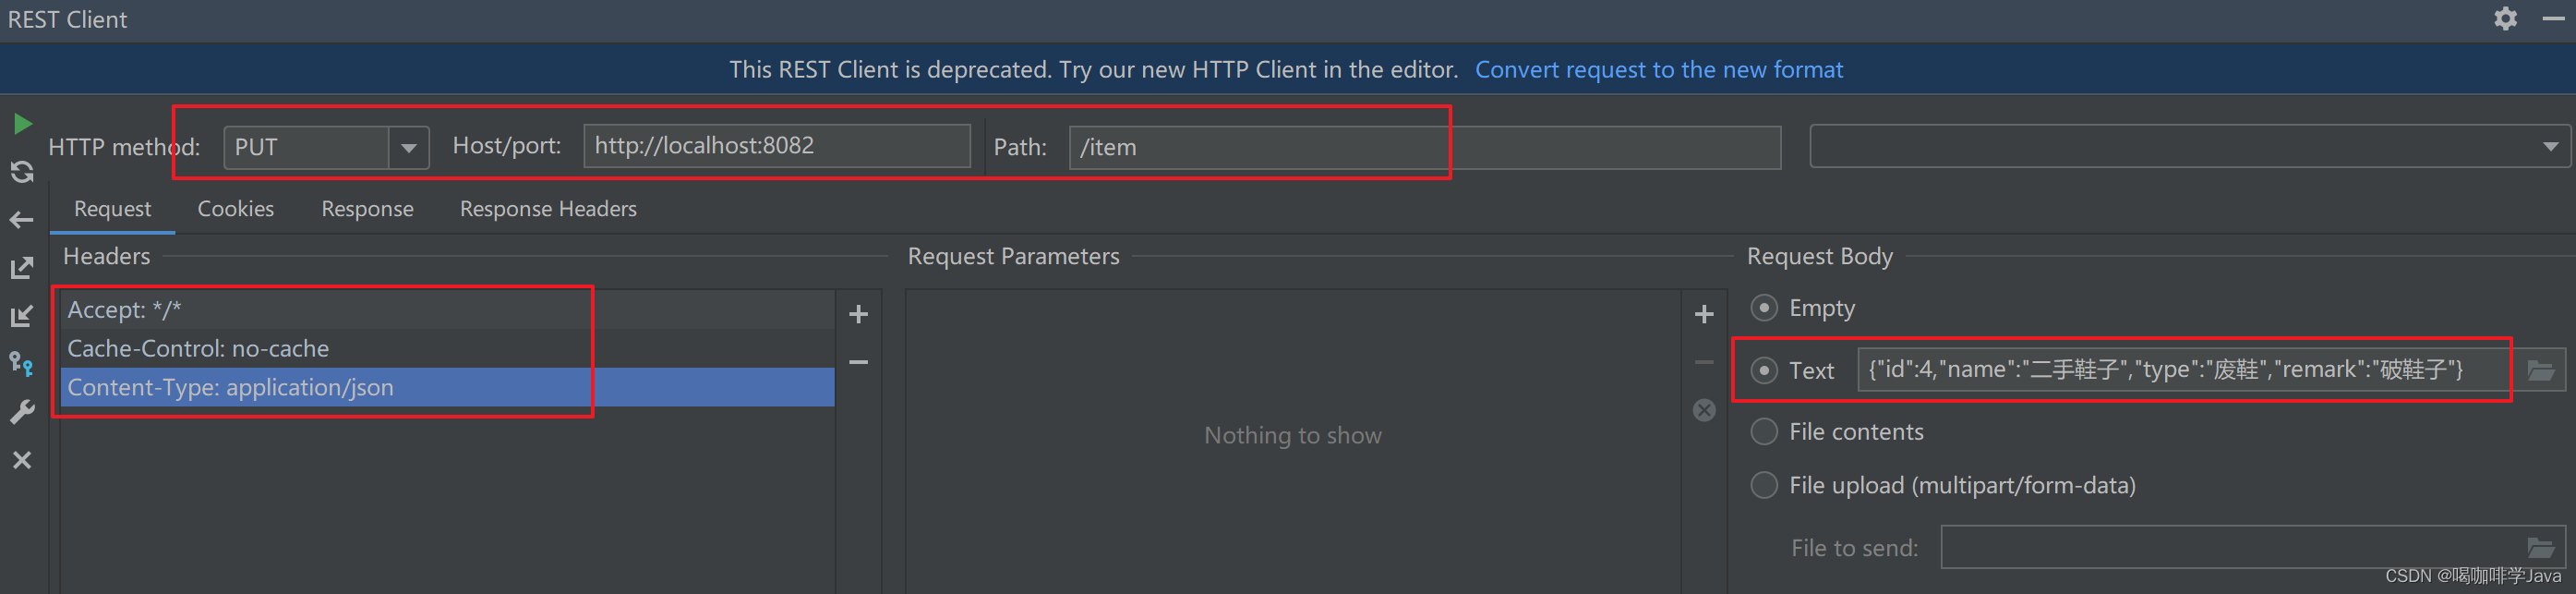
4.2修改数据
-
准备数据
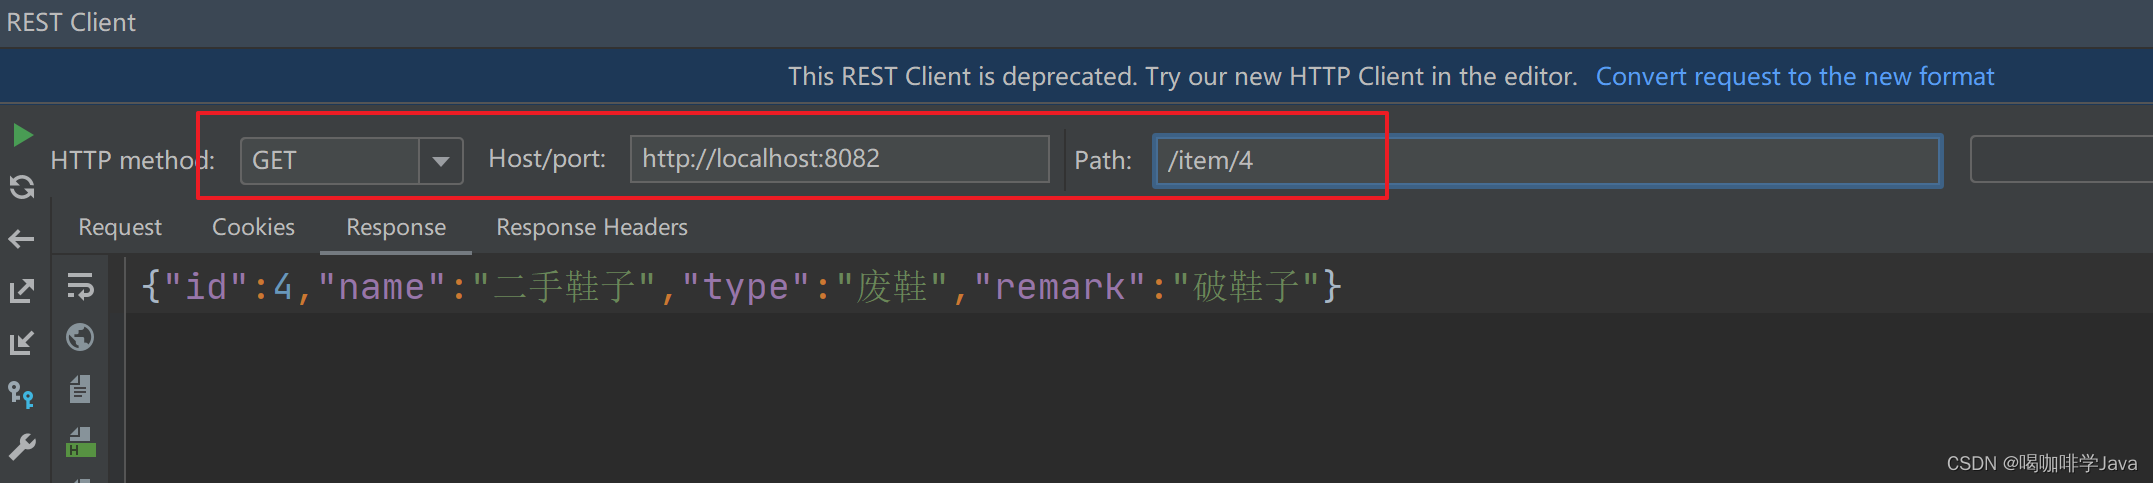
{"id":4,"name":"二手鞋子","type":"废鞋","remark":"破鞋子"}
4.3查询单个数据
-
查询id=4的物品
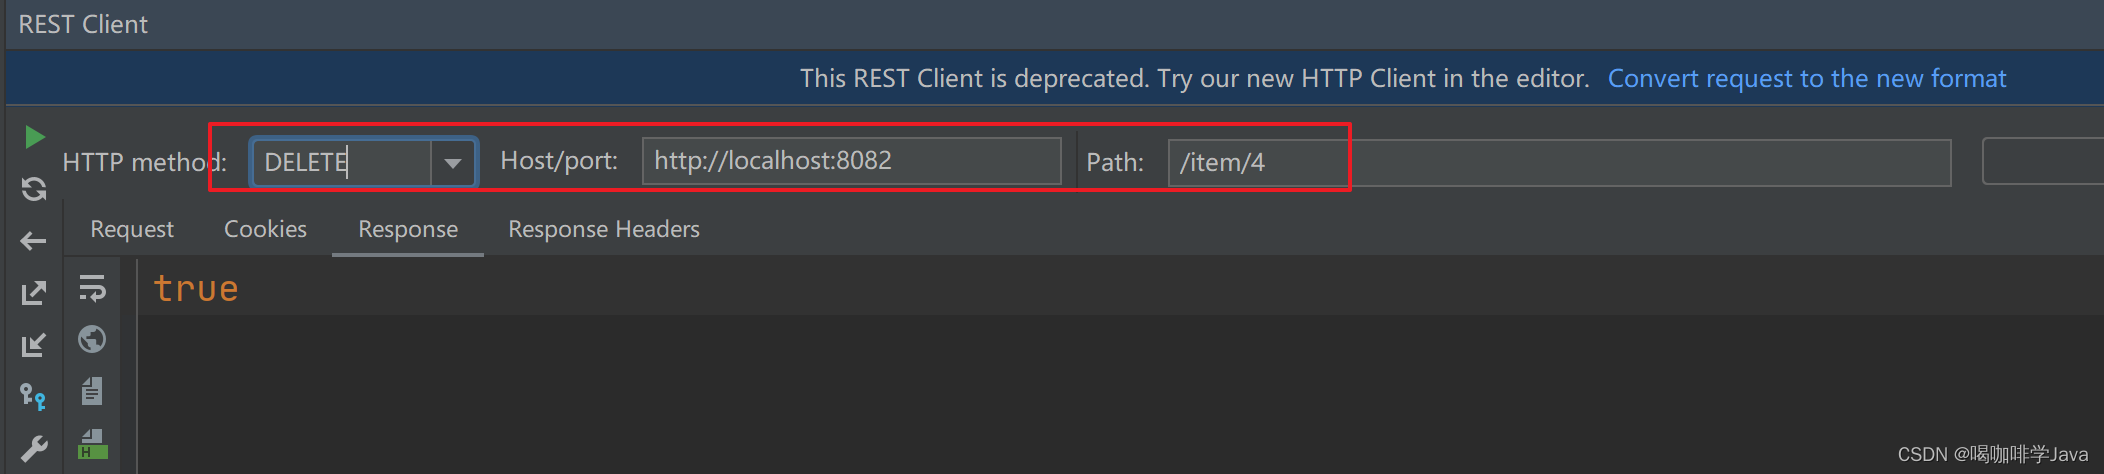
4.4删除单个数据
-
删除id=4的物品
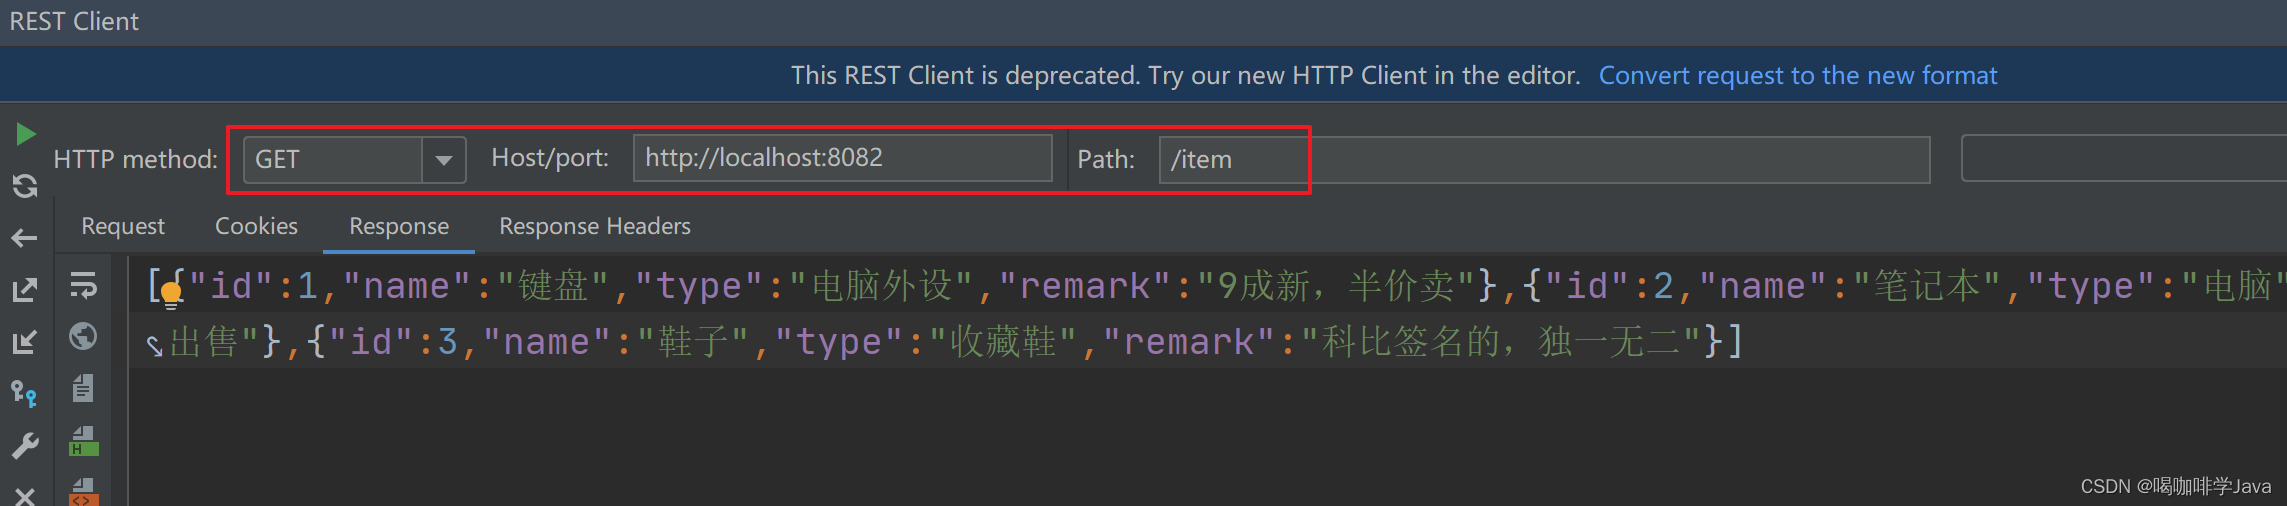
4.5查询全部数据操作
-
查询全部
5.整合单元测试
-
目录结构
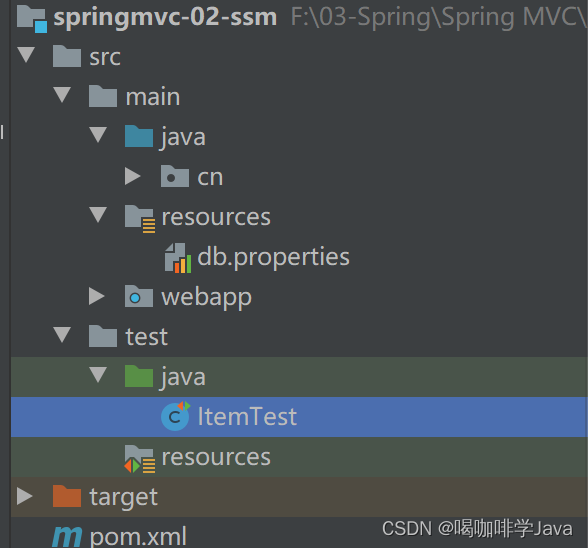
- 新建测试类
@RunWith(SpringJUnit4ClassRunner.class)
@ContextConfiguration(classes = SpringConfig.class)
public class ItemTest {

    @Autowired
    IItemService service;


    @Test
    public void save(){
        Item item = new Item();
        item.setName("单元测试");
        item.setRemark("单元测试");
        item.setType("单元测试");
        boolean save = service.save(item);
        System.out.println(save);
    }

    @Test
    public void update(){
        Item item = new Item();
        item.setId(5L);
        item.setName("单元测试");
        item.setRemark("单元测试");
        item.setType("单元测试");
        boolean save = service.update(item);
        System.out.println(save);
    }

    @Test
    public void getById(){
        Item byId = service.getById(5L);
        System.out.println(byId);
    }

    @Test
    public void list(){
        List<Item> lists = service.lists();
        System.out.println(lists);
    }
}
三、项目实战中细节问题
1.导入前端资源
1.1静态资源拦截处理
-
设置访问 index 访问主页
@Controller
public class IndexController {
    @RequestMapping("/index")
    public String index(){
        System.out.println("----------------");
        return "/pages/items.html";
    }

}- 出现静态资源被拦截问题
@Configuration
public class StaticSupport extends WebMvcConfigurationSupport {

    @Override
    protected void addResourceHandlers(ResourceHandlerRegistry registry) {
        registry.addResourceHandler("/pages/**").addResourceLocations("/pages/");
        registry.addResourceHandler("/js/**").addResourceLocations("/js/");
        registry.addResourceHandler("/css/**").addResourceLocations("/css/");
        registry.addResourceHandler("/plugins/**").addResourceLocations("/plugins/");

    }
}- 将 staticSupport 交给 SpringMvc 管理
@Configuration
@ComponentScan(value = {"cn.sycoder.controller","cn.sycoder.config"})
@EnableWebMvc
public class SpringMvcConfig {
}
1.2项目实现
-
保存方法
handleAdd () {
    console.log("========")
    axios.post("/item",this.formData).then((res)=>{
        //todo
    })
},- 列表查询
getAll() {
    axios.get("/item",).then((res)=>{
        this.dataList = res.data;
    })
},- 删除操作
handleDelete(row) {
    axios.delete("/item/"+row.id).then((res)=>{
        //todo
    })
}- 编辑操作
handleEdit() {
      axios.put("/item", this.formData).then((res) => {


},
2.全局统一结果集处理
2.1分析目前写代码存在的问题
-
查询单个物品时返回单条数据
{"id":2,"name":"笔记本","type":"电脑","remark":"9成新,8折出售"}
- 查询列表返回列表数据
[{"id":1,"name":"键盘","type":"电脑外设","remark":"9成新,半价卖"},{"id":2,"name":"笔记本","type":"电脑","remark":"9成新,8折出售"},{"id":3,"name":"鞋子","type":"收藏鞋","remark":"科比签名的,独一无二"},{"id":5,"name":"单元测试","type":"单元测试","remark":"单元测试"}]
-
删除数据返回单个结果
true
-
目前对于系统而言参数了三种数据类型
-
不能做到前后端同时开发
-
前后端的交互很乱
-
-
最后处理
{"data":true}
{"data":{"id":2,"name":"笔记本","type":"电脑","remark":"9成新,8折出售"}}


{
    "code":2000,
    "data":true,
    "msg":"详情"
}
2.2处理方式
-
通过定义一个统一结果集处理
{
    "code":2000,
    "data":true,
    "msg":"详情"
}- 后端实体
@Data
public class ResultResp {
    private Integer code;
    private Object data;
    private String msg;
}- 后端返回实体最终结果
@Data
public class ResultResp {
    private Integer code;
    private Object data;
    private String msg;

    public ResultResp(){
    }

    public ResultResp(Integer code,Object data){
        this.code = code;
        this.data=data;
    }

    public ResultResp(Integer code,Object data,String msg){
        this.code=code;
        this.data=data;
        this.msg=msg;
    }

    public static ResultResp success(Integer code,Object data){
        return new ResultResp(code,data);
    }
}- 状态码类
public class Code {
    /**
     * 定义好协议之后,前端和后端统一按照协议执行
     */
    public static final Integer SAVE_OK = 20000;
    public static final Integer SAVE_FAIL = 20001;


    public static final Integer UPDATE_OK = 20010;
    public static final Integer UPDATE_FAIL = 20011;

    public static final Integer DELETE_OK = 20020;
    public static final Integer DELETE_FAIL = 20021;

    public static final Integer GET_OK = 20030;
    public static final Integer GET_FAIL = 20031;

    public static final Integer PAGE_OK = 20040;
    public static final Integer PAGE_FAIL = 20041;
}
修改控制层返回代码
-
save 方法
@PostMapping
public ResultResp save(@RequestBody Item item){
    boolean ret = service.save(item);
    return new ResultResp(ret? Code.SAVE_OK:Code.SAVE_FAIL,ret);
}- update 方法
@PutMapping
public ResultResp update(@RequestBody Item item){
    boolean ret = service.update(item);
    return new ResultResp(ret? Code.UPDATE_OK:Code.UPDATE_FAIL,ret);
}- delete 方法
@DeleteMapping("/{id}")
public ResultResp delete(@PathVariable Long id){
    boolean ret = service.delete(id);
    return new ResultResp(ret? Code.DELETE_OK:Code.DELETE_FAIL,ret);
}- 单个结果集处理
@GetMapping("/{id}")
public ResultResp getById(@PathVariable Long id){
    Item ret = service.getById(id);
    return ResultResp.success(ret==null?Code.GET_FAIL:Code.GET_OK,ret);
}- 集合结果集
@GetMapping
public ResultResp list(){
    List<Item> ret = service.lists();
    return ResultResp.success(ret==null?Code.PAGE_FAIL:Code.PAGE_OK,ret);
}
2.3前后端联调
-
保存操作
handleAdd() {
    console.log("========")
    axios.post("/item", this.formData).then((res) => {
        if (res.data.code == 20000) {
            //关闭新增弹框
            this.dialogFormVisible = false;
            this.$message.success("添加物品成功")
        } else {
            this.$message.error("添加失败")
        }
    }).finally(() => {
        this.getAll();
    })
},- 列表查询
getAll() {
    axios.get("/item",{
            params:{
                name:this.pagination.queryString
            }
    }).then((res)=>{
        // this.dataList = res.data;
        if(res.data.code == 20040){
            this.dataList = res.data.data;
        }else{
            this.$message.error("加载失败")
        }
    })
},- 删除操作
 handleDelete(row) {
    axios.delete("/item/" + row.id).then((res) => {
        if (res.data.code == 20020) {
            this.$message.success("删除物品成功")
        } else {
            this.$message.error("删除失败")
        }
    }).finally(() => {
        this.getAll();
    })
}- 编辑操作
handleEdit() {
    axios.put("/item", this.formData).then((res) => {
        if (res.data.code == 20010) {
            this.dialogFormVisible4Edit = false;
            this.$message.success("编辑物品成功")
        } else {
            this.$message.error("编辑失败")
        }
    }).finally(() => {
        this.getAll();
    })
},
高级查询修改
-
controller
@GetMapping
    public ResultResp list(@RequestParam(required = false) String name){
        List<Item> ret = service.lists(name);
        return ResultResp.success(ret==null?Code.PAGE_FAIL:Code.PAGE_OK,ret);
}- 业务层
@Override
    public List<Item> lists(String name) {
        if (name != null && !"".equals(name.trim())) {

            return mapper.list(name);
        }

        return mapper.listNull();
}- mapper 接口
@Select("select * from item where name like concat('%',#{name},'%')")
public List<Item> list(String name);

@Select("select * from item ")
public List<Item> listNull();
3.全局统一异常处理
3.1目前存在问题
-
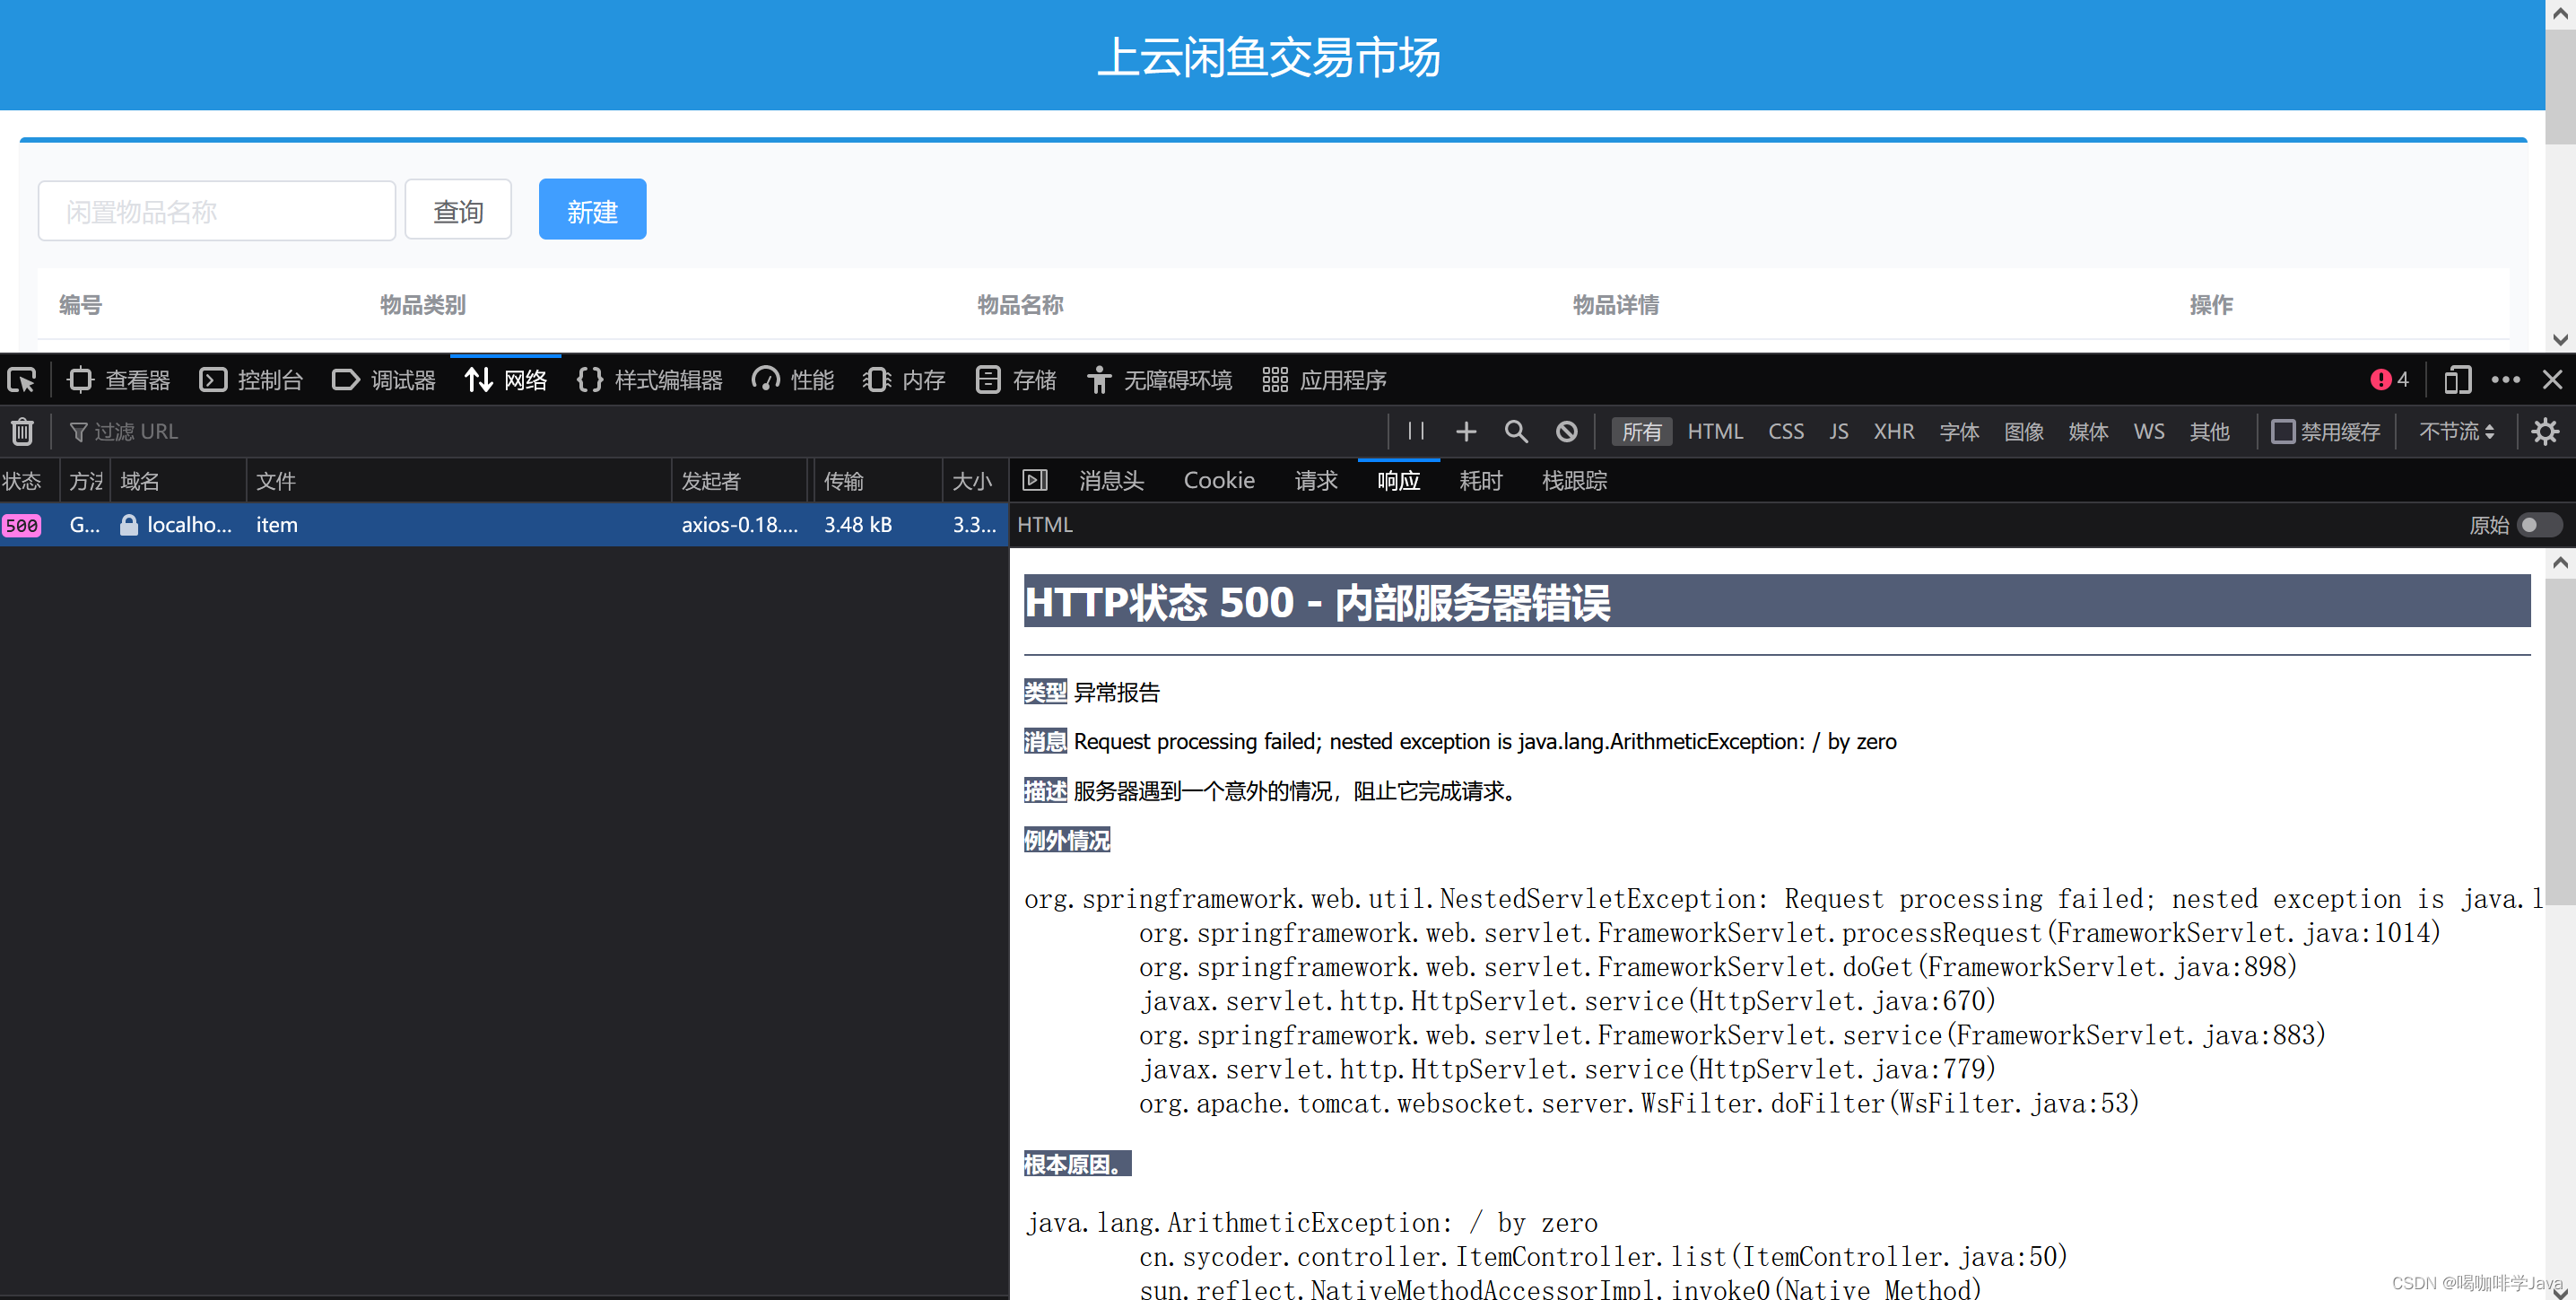
模拟后台出现服务器异常
@GetMapping
public ResultResp list(@RequestParam(required = false) String name){
    System.out.println(1/0);
    List<Item> ret = service.lists(name);
    return ResultResp.success(ret==null?Code.PAGE_FAIL:Code.PAGE_OK,ret);
}
出现如下错误
3.2后端服务可能会出现的异常
-
框架可能报错
-
持久层代码报错
-
业务层业务代码报错
-
控制层业务代码报错
-
注意:这些异常不能避免的,此时应该把所有的异常在表现层进行统一的处理(aop)
-
解决方案
@RestControllerAdvice
public class ExceptionHandlerController {

    @ExceptionHandler(ArithmeticException.class)
    public ResultResp handlerException(){
        System.out.println("出现异常了");
        return new ResultResp(500,null,"服务繁忙,请稍后再试");
    }
}
3.3@RestControllerAdvice
- 使用来做控制器增强操作
| 名称 | @RestControllerAdvice |
|---|---|
| 位置 | Rest 风格增强类上 |
| 作用 | 给控制器做增强操作 |
| 使用 | 类上面 |
-
包含了如下注解
-
@ResponseBody
-
@ControllerAdvice
-
@Component
-
3.4@ExceptionHandler
-
异常处理器
| 名称 | @ExceptionHandler |
|---|---|
| 位置 | 方法上 |
| 属性 | 具体的异常类型 |
| 作用 | 处理具体异常的,设定具体异常类型,出现异常后,终止controller中方法的执行,转入当前方法执行 |
3.5项目中具体处理
-
业务异常
@Data
public class BusinessException extends RuntimeException{
    private Integer code;
}- 持久层异常
@Data
public class DaoException extends RuntimeException{
    private Integer code;
}- 系统异常
@Data
public class SystemException extends RuntimeException{
    private Integer code;
}- 其它异常
@Data
public class OtherException extends RuntimeException{
    private Integer code;
}
- 定义code
public class Code {
    /**
     * 定义好协议之后,前端和后端统一按照协议执行
     */
    public static final Integer SAVE_OK = 20000;
    public static final Integer SAVE_FAIL = 20001;


    public static final Integer UPDATE_OK = 20010;
    public static final Integer UPDATE_FAIL = 20011;

    public static final Integer DELETE_OK = 20020;
    public static final Integer DELETE_FAIL = 20021;

    public static final Integer GET_OK = 20030;
    public static final Integer GET_FAIL = 20031;

    public static final Integer PAGE_OK = 20040;
    public static final Integer PAGE_FAIL = 20041;


    public static final Integer BUSINESS_ERR = 50001;
    public static final Integer SYSTEM_ERR = 50002;
    public static final Integer DAO_ERR = 50003;
    public static final Integer OTHER_ERR = 50005;


}- 统一异常处理
@RestControllerAdvice
public class ExceptionHandlerController {
    //业务异常的例子:账户名和密码错误
    @ExceptionHandler(BusinessException.class)
    public ResultResp handlerBusinessException(BusinessException e){
        return new ResultResp(e.getCode(),null,e.getMessage());
    }

    //需要发送短信提醒运维人员
    @ExceptionHandler(SystemException.class)
    public ResultResp handlerSystemException(SystemException e){
        //发送短信提醒业务人员的操作
        //日志打印
        return new ResultResp(e.getCode(),null,e.getMessage());
    }

    @ExceptionHandler(OtherException.class)
    public ResultResp handlerException(OtherException e){
        return new ResultResp(e.getCode(),null,e.getMessage());
    }
}- 控制层方法
 @GetMapping
public ResultResp list(@RequestParam(required = false) String name) {
    if (name == null || name.equals(""))
        throw new BusinessException(Code.BUSINESS_ERR,"传参不正常请重试");
    List<Item> ret = null;
    try {
        ret = service.lists(name);
    } catch (Exception e) {
        throw new SystemException(Code.SYSTEM_ERR,"系统繁忙,请稍后再试");
    }
    return ResultResp.success(ret == null ? Code.PAGE_FAIL : Code.PAGE_OK, ret);
}
4.拦截器
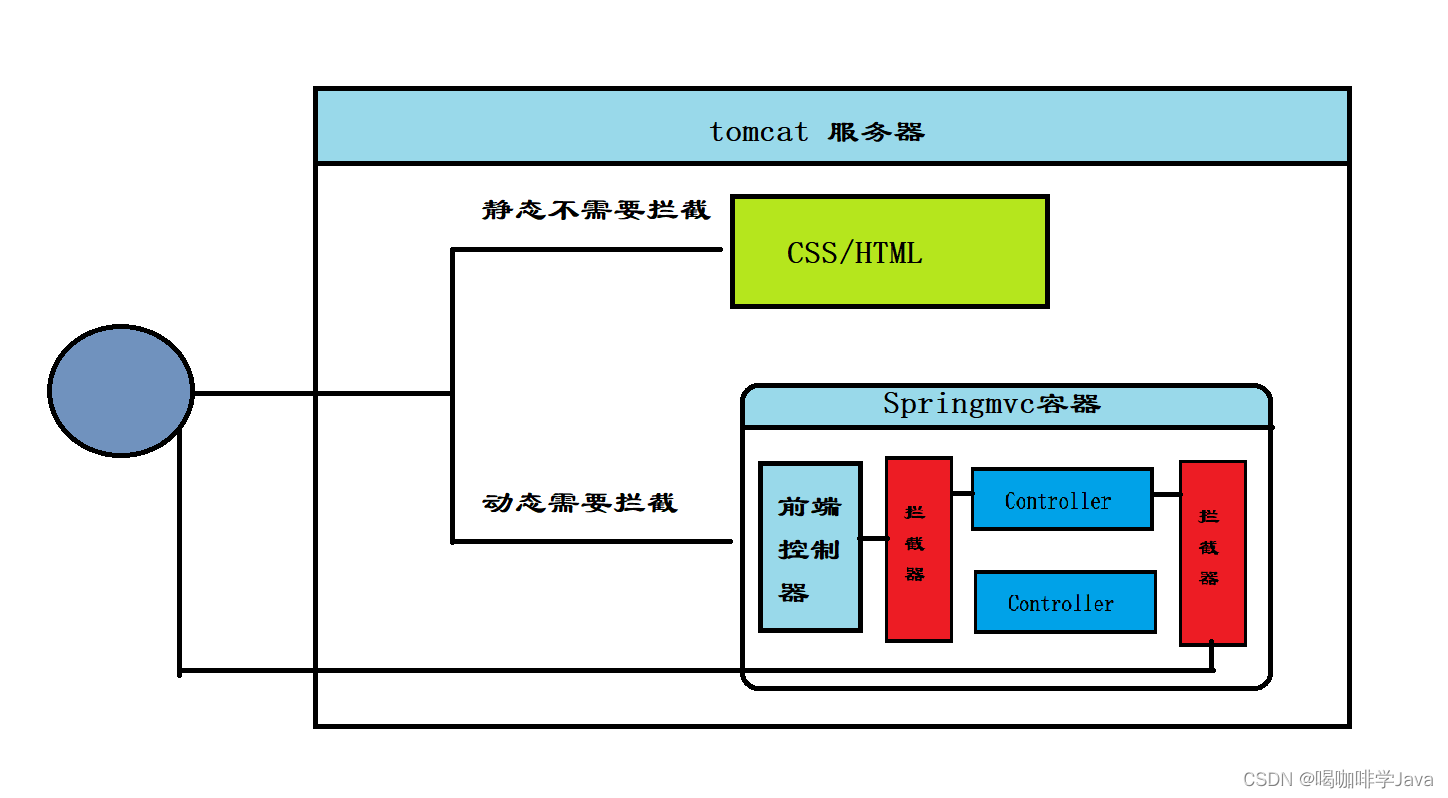
4.1拦截器概述
-
概述:一种动态拦截方法调用的机制,在SpringMVC中动态拦截控制器方法的执行
-
实际开发中,静态资源(HTML/CSS)不需要交给框架处理,需要拦截的是动态资源
4.2图示
-
图示
4.3案例实现
-
模拟没有登录拦截操作
-
新定义拦截器
@Component
public class LoginInterceptor implements HandlerInterceptor {
    @Override
    public boolean preHandle(HttpServletRequest request, HttpServletResponse response, Object handler) throws Exception {
        System.out.println("登录拦截操作");
        String username = request.getParameter("username");
        if("sy".equals(username)){
            return true;
        }
        System.out.println("preHandle");
        return false;
    }

    @Override
    public void postHandle(HttpServletRequest request, HttpServletResponse response, Object handler, ModelAndView modelAndView) throws Exception {
        System.out.println("postHandle");
    }

    @Override
    public void afterCompletion(HttpServletRequest request, HttpServletResponse response, Object handler, Exception ex) throws Exception {
        System.out.println("afterCompletion");
    }
}- 修改SpringMvc 配置
@Configuration
@ComponentScan({"cn.sycoder.controller","cn.sycoder.interceptor"})
@EnableWebMvc
public class SpringMvcConfig implements WebMvcConfigurer {

    @Autowired
    LoginInterceptor loginInterceptor;

    @Override
    public void addInterceptors(InterceptorRegistry registry) {
        registry.addInterceptor(loginInterceptor).addPathPatterns("/item","/item/*");
    }
}- controller 确实被拦截
@RestController
@RequestMapping("/item")
public class ItemController {

    @GetMapping("/{id}")
    public String getById(@PathVariable Long id){
        return "query"+id;
    }

    @GetMapping
    public String list(){
        return "list";
    }
}
4.4拦截器参数讲解
-
HttpServletRequest request
-
HttpServletResponse response
-
Object handler 相当于是对访问接口的一种包装
4.5拦截器链
-
新增拦截器
@Component
public class AuthInterceptor implements HandlerInterceptor {
    @Override
    public boolean preHandle(HttpServletRequest request, HttpServletResponse response, Object handler) throws Exception {
        System.out.println("权限拦截的方法");
        return true;
    }

    @Override
    public void postHandle(HttpServletRequest request, HttpServletResponse response, Object handler, ModelAndView modelAndView) throws Exception {
        System.out.println("权限拦截的postHandle方法");
    }

    @Override
    public void afterCompletion(HttpServletRequest request, HttpServletResponse response, Object handler, Exception ex) throws Exception {
        System.out.println("权限拦截的afterCompletion方法");
    }
}- 添加到拦截器链中
@Configuration
@ComponentScan({"cn.sycoder.controller","cn.sycoder.interceptor"})
@EnableWebMvc
public class SpringMvcConfig implements WebMvcConfigurer {

    @Autowired
    LoginInterceptor loginInterceptor;

    @Autowired
    AuthInterceptor authInterceptor;

    @Override
    public void addInterceptors(InterceptorRegistry registry) {
        registry.addInterceptor(loginInterceptor).addPathPatterns("/item","/item/*");
        registry.addInterceptor(authInterceptor).addPathPatterns("/item","/item/*");
    }
}-
拦截器链注意点
-
拦截器有着先进后出的原则
-
preHandle : 与配置顺序保持一致的执行顺序
-
postHandle:与配置顺序相反,可能不运行
-
afterCompletion:与配置顺序相反,可能不运行
-
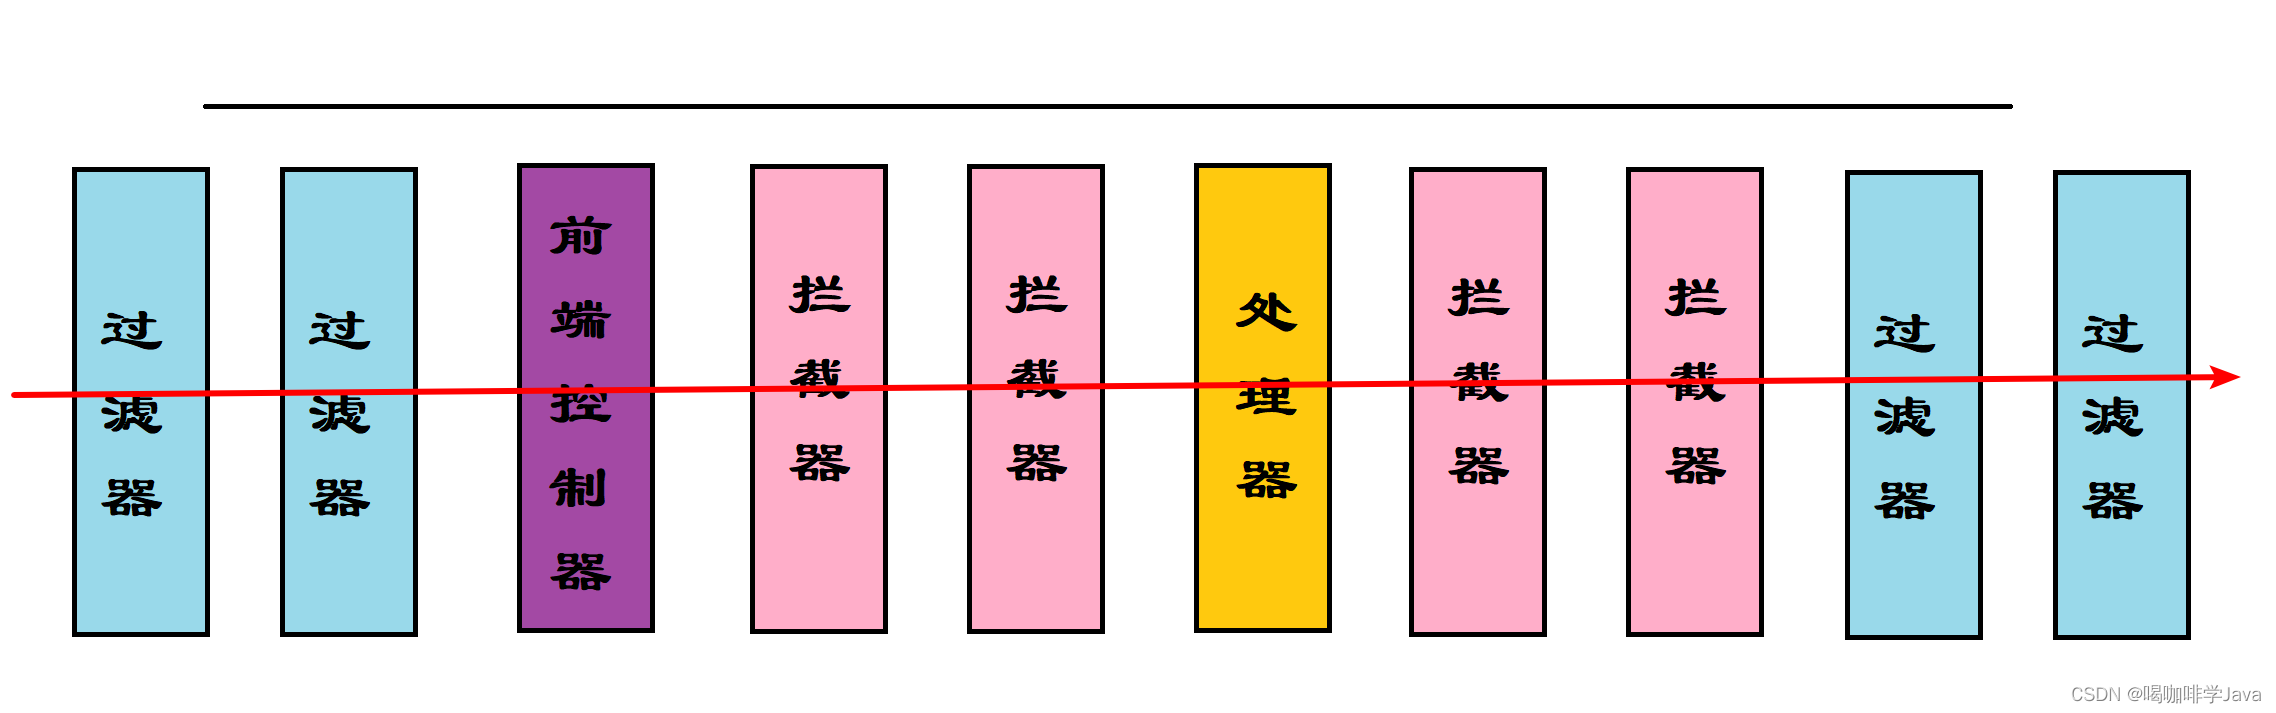
4.6面试题拦截器与过滤器的区别
-
区别
-
技术所属不同
-
过滤器:Servlet 技术
-
拦截器:SpringMVC技术
-
-
拦截内容不同
-
Filter : 是对所有访问进行过滤
-
Interceptor:仅仅针对访问SpringMVC
-
-
-
访问流程
四、SpringMVC执行流程
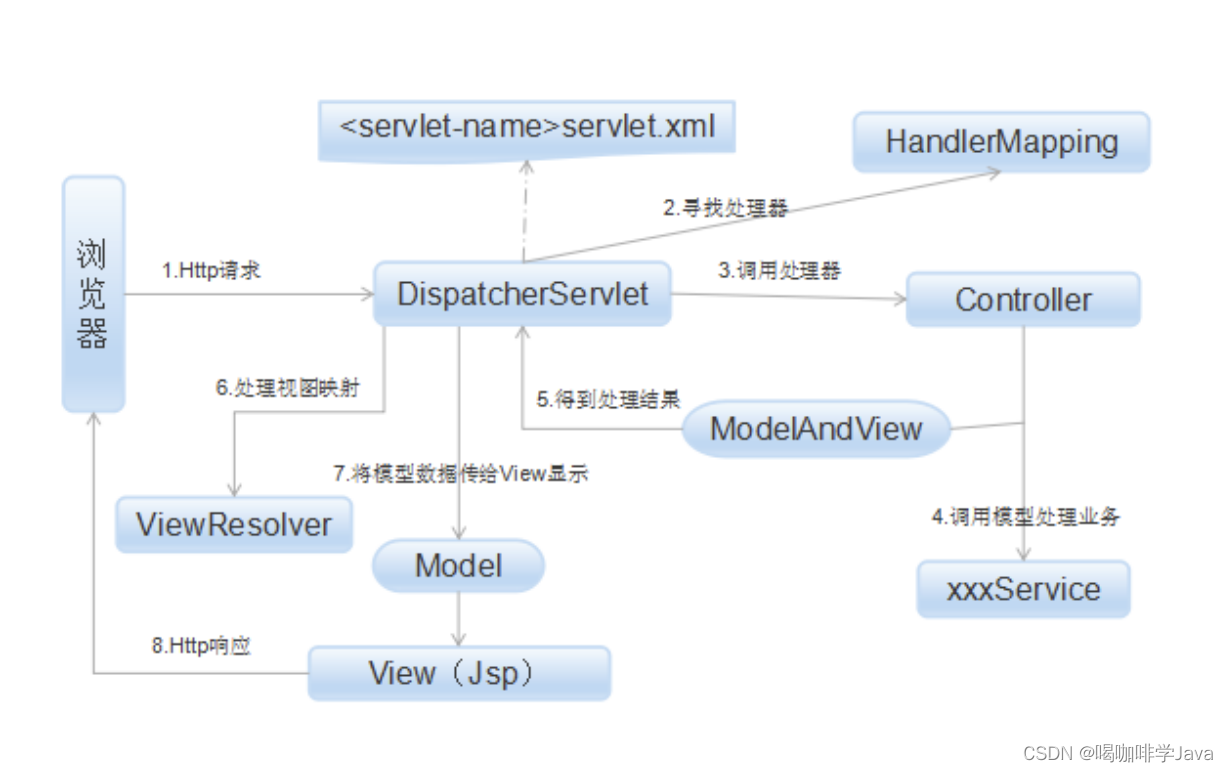
1.SpringMVC 常用组件
-
DispatcherServlet:前端控制器,用于对请求和响应进行统一处理
-
HandlerMapping:处理器映射器,根据 url/method可以去找到具体的 Handler(Controller)
-
Handler:具体处理器(程序员,以后开发这一部分需要)
-
HandlerAdapter:处理器适配器,进行处理器方法的执行
-
ViewResolver:处理视图相关的
2.处理流程图
3.执行流程原理分析
3.1DispatcherServlet
-
初始化操作
protected void initStrategies(ApplicationContext context) {
        this.initMultipartResolver(context);
        this.initLocaleResolver(context);
        this.initThemeResolver(context);
        this.initHandlerMappings(context);
        this.initHandlerAdapters(context);
        this.initHandlerExceptionResolvers(context);
        this.initRequestToViewNameTranslator(context);
        this.initViewResolvers(context);
        this.initFlashMapManager(context);
}- 具体处理请求的方法
protected final void processRequest(HttpServletRequest request, HttpServletResponse response) throws ServletException, IOException {
        //删掉了一系列没用方法

        try {
            //具体执行方法
            this.doService(request, response);
        } catch (IOException | ServletException var16) {
            failureCause = var16;
            throw var16;
        } catch (Throwable var17) {
            failureCause = var17;
            throw new NestedServletException("Request processing failed", var17);
        } finally {
            this.resetContextHolders(request, previousLocaleContext, previousAttributes);
            if (requestAttributes != null) {
                requestAttributes.requestCompleted();
            }

            this.logResult(request, response, (Throwable)failureCause, asyncManager);
            this.publishRequestHandledEvent(request, response, startTime, (Throwable)failureCause);
        }

    }
protected void doService(HttpServletRequest request, HttpServletResponse response) throws Exception {
//删掉一系列干扰代码
try {
//具体执行
this.doDispatch(request, response);
} finally {
if (!WebAsyncUtils.getAsyncManager(request).isConcurrentHandlingStarted() && attributesSnapshot != null) {
this.restoreAttributesAfterInclude(request, attributesSnapshot);
}
}
}protected void doDispatch(HttpServletRequest request, HttpServletResponse response) throws Exception {
HttpServletRequest processedRequest = request;
HandlerExecutionChain mappedHandler = null;
boolean multipartRequestParsed = false;
WebAsyncManager asyncManager = WebAsyncUtils.getAsyncManager(request);
try {
try {
ModelAndView mv = null;
Object dispatchException = null;
try {
processedRequest = this.checkMultipart(request);
multipartRequestParsed = processedRequest != request;
//获取处理器就是具体的需要执行的 Tontroller
mappedHandler = this.getHandler(processedRequest);
if (mappedHandler == null) {
this.noHandlerFound(processedRequest, response);
return;
}
//获取处理器适配器
HandlerAdapter ha = this.getHandlerAdapter(mappedHandler.getHandler());
String method = request.getMethod();
boolean isGet = "GET".equals(method);
if (isGet || "HEAD".equals(method)) {
long lastModified = ha.getLastModified(request, mappedHandler.getHandler());
if ((new ServletWebRequest(request, response)).checkNotModified(lastModified) && isGet) {
return;
}
}
if (!mappedHandler.applyPreHandle(processedRequest, response)) {
return;
}
//具体调用 Controller 中的方法
mv = ha.handle(processedRequest, response, mappedHandler.getHandler());
if (asyncManager.isConcurrentHandlingStarted()) {
return;
}
this.applyDefaultViewName(processedRequest, mv);
mappedHandler.applyPostHandle(processedRequest, response, mv);
} catch (Exception var20) {
dispatchException = var20;
} catch (Throwable var21) {
dispatchException = new NestedServletException("Handler dispatch failed", var21);
}
this.processDispatchResult(processedRequest, response, mappedHandler, mv, (Exception)dispatchException);
} catch (Exception var22) {
this.triggerAfterCompletion(processedRequest, response, mappedHandler, var22);
} catch (Throwable var23) {
this.triggerAfterCompletion(processedRequest, response, mappedHandler, new NestedServletException("Handler processing failed", var23));
}
} finally {
if (asyncManager.isConcurrentHandlingStarted()) {
if (mappedHandler != null) {
mappedHandler.applyAfterConcurrentHandlingStarted(processedRequest, response);
}
} else if (multipartRequestParsed) {
this.cleanupMultipart(processedRequest);
}
}
}//获取具体执行的
protected HandlerExecutionChain getHandler(HttpServletRequest request) throws Exception {
if (this.handlerMappings != null) {
Iterator var2 = this.handlerMappings.iterator();
while(var2.hasNext()) {
HandlerMapping mapping = (HandlerMapping)var2.next();
HandlerExecutionChain handler = mapping.getHandler(request);
if (handler != null) {
return handler;
}
}
}
return null;
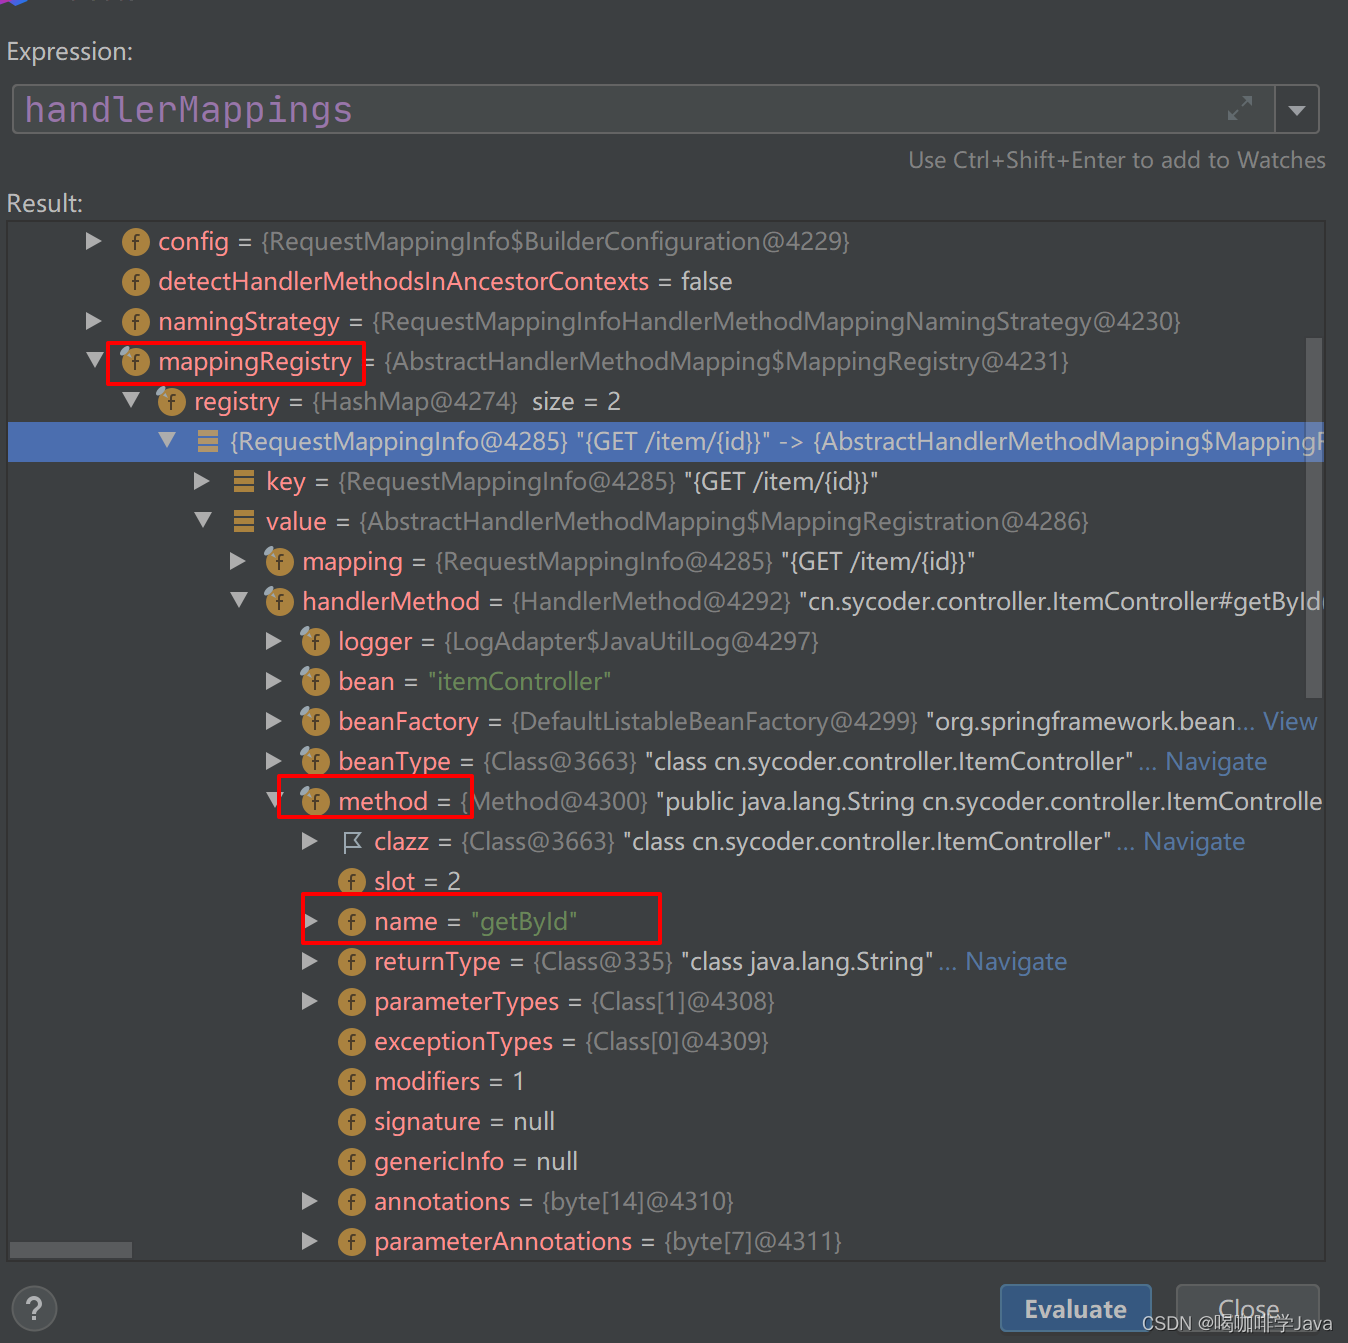
}3.2HandlerMapping
-
dbug 的图示


 766
766


 被折叠的 条评论
为什么被折叠?
被折叠的 条评论
为什么被折叠?
 到【灌水乐园】发言


