


目录
前言
在 Ansible 中,Playbooks(剧本)是用来定义一系列任务的文件,可以实现自动化部署、配置和管理服务器等操作
本文主要介绍 playbooks 剧本的组成以及编写
一、playbooks 剧本概述
1、playbooks 剧本概念
playbook 是 一个不同于使用 Ansible 命令行执行方式的模式,其功能更强大灵活。简单来说,playbook 是一个非常简单的配置管理和多主机部署系统,不同于任何已经存在的模式,可作为一个适合部署复杂应用程序的基础
Playbook 可以定制配置,可以按照指定的操作步骤有序执行,支持同步和异步方式。我们完成一个任务,例如安装部署一个httpd服务,我们需要多个模块(一个模块也可以称之为 task)提供功能来完成
而 playbook 就是组织多个 task 的容器,他的实质就是一个文件,有着特定的组织格式,它采用的语法格式是 YAML(Yet Another Markup Language)
2、playbooks 剧本组成部分
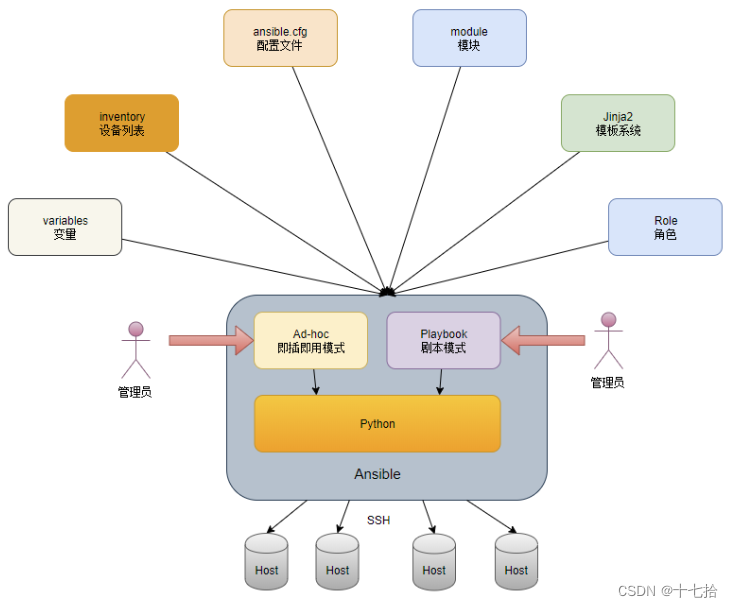
- Tasks:任务,即通过 task 调用 ansible 的模板将多个操作组织在一个 playbook 中运行
- Variables:变量,变量用来存储数据,可以在playbook中被引用。这些变量可以是全局的,也可以是针对特定主机或主机组的。使用变量可以使playbook更加灵活和可重用
- Templates:模板,一种用来生成配置文件或者其他文本文件的机制。在Ansible中,你可以使用Jinja2模板引擎来创建模板文件。这些模板文件中可以包含变量、条件语句、循环等,使得你可以根据不同的情况生成不同的文本内容
- Handlers:处理器,是一种特殊类型的任务,它们仅在特定条件下触发。通常用于在一组任务执行完成后执行诸如重启服务之类的操作。当changes状态条件满足时,(notify)触发执行的操作
- Roles:角色,一种用来组织playbooks中任务的结构化方式。一个role包含了一组相关的任务、变量、handlers、文件等内容,可以使得playbooks更加模块化、可重用和易于维护
3、playbooks 剧本特点与优势
- 声明式:用户只需描述期望的系统状态,而非具体的操作步骤,Ansible 负责确定如何达到这一状态
- 幂等性:Playbook 设计为可重复执行,即使在系统已处于预期状态时,再次运行也不会产生副作用
- 可读性强:YAML 格式和简洁的结构使得Playbook易于编写和维护
- 模块丰富:Ansible 提供了大量的模块,覆盖了从系统配置到云资源管理的广泛需求
- 跨平台:支持多种操作系统和环境,适配不同的自动化需求
二、ansible-playbook 命令
ansible-playbook [options] playbook.yml
#playbook.yml 是要运行的剧本文件名,options 是可选参数
| 参数 | 说明 |
|---|---|
-i |
指定 inventory 文件的路径,用于指定要管理的主机列表 |
| -k(–ask-pass) | 用来交互输入ssh密码 |
| -K(-ask-become-pass) | 用来交互输入sudo(普通用户)密码 |
| -u | 指定用户 |
-l |
指定要运行剧本的主机或主机组 |
-e |
指定额外的变量,可以在剧本中使用 |
-t |
指定要运行的标签,只运行带有指定标签的任务 |
| --C | 会执行完整的 Playbook,但是所有 task 中的行为都不会在远程被管理节点服务器上执行,所有的操作都是模拟 |
--diff |
在执行任务之前,显示将要更改的文件的差异 |
--syntax-check |
检查yaml文件的语法是否正确 |
| --step | 执行 tasks 中的任务,需要手动确认是否往下执行 |
--list-tasks |
列出剧本中的所有任务 |
| --list-hosts | 检查生效的主机 |
| --start-at-task | 指定从某个task开始运行,如--start-at-task='install httpd' |
除了这些常用的参数之外,还有很多其他的参数可以使用,可以通过运行 ansible-playbook --help 命令来查看所有可用的参数
三、playbooks 剧本简单实例
playbook 中运用的模块就是 ansible 中的模块,就像 docker-compose 一样将 docker 操作容器的指令归纳为一个 yaml 文件,开启运行 yaml 中的指令模块就能按照预设计的方向去完成
前提:在主机清单文件里定义被控端ip
vim /etc/ansible/hosts

[webs]
172.16.12.12

[dbs]
172.16.12.13
1、编写 apache 的 yum 安装部署脚本
(1)创建工作目录
mkdir -p /mnt/httpd
cd /mnt/httpd
(2)准备 httpd.html 文件,上传至控制端的/mnt/httpd/目录下
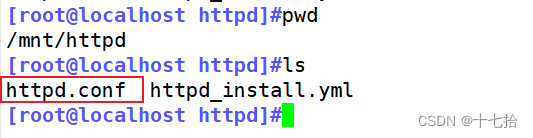
(3)编写 playbook 剧本
vim httpd_install.yml

---
- name: first play
  gather_facts: false
  hosts: dbs
  remote_user: root
  tasks:
    - name: test connection
      ping:
    - name: disable firewalld
      service: name=firewalld state=stopped
    - name: install httpd
      yum: name=httpd state=latest
    - name: Create a web file
      shell: 'echo hello httpd service > /var/www/html/index.html'
    - name: install configuration file for httpd
      copy: src=/mnt/httpd/httpd.conf dest=/etc/httpd/conf/httpd.conf
      notify: "restart httpd"
    - name: start httpd service
      service: enabled=true name=httpd state=started
  handlers:
    - name: restart httpd
      service: name=httpd state=restarted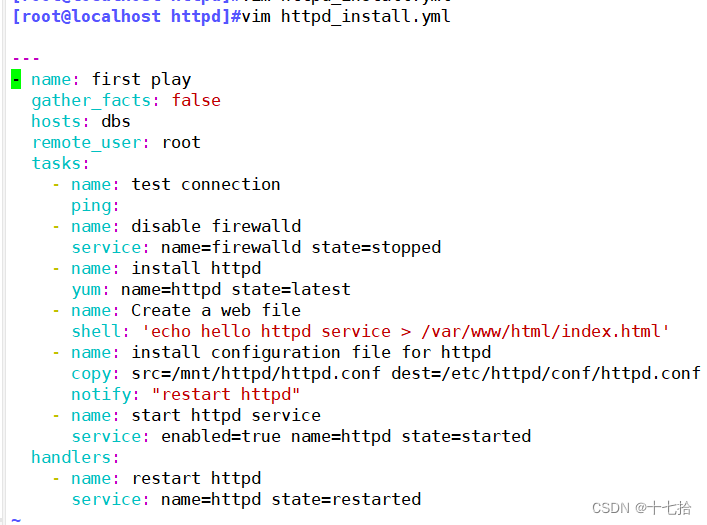
#详细解释
---     #yaml文件以---开头,以表明这是一个yaml文件,可省略
- name: first play     #定义一个play的名称,可省略
  gather_facts: false  #设置不进行facts信息收集,这可以加快执行速度,可省略
  hosts: dbs           #指定要执行任务的被管理主机组,如多个主机组用冒号分隔
  remote_user: root    #指定被管理主机上执行任务的用户
  tasks:               #定义任务列表,任务列表中的各任务按次序逐个在hosts中指定的主机上执行
   - name: test connection    #自定义任务名称
     ping:             #使用 module: [options] 格式来定义一个任务
   - name: disable selinux
     command: '/sbin/setenforce 0'  #command模块和shell模块无需使用key=value格式
     ignore_errors: True
#如执行命令的返回值不为0,就会报错,tasks停止,可使用ignore_errors忽略失败的任务
   - name: disable firewalld
     service: name=firewalld state=stopped
#使用 module: options 格式来定义任务,option使用key=value格式
   - name: install httpd
     yum: name=httpd state=latest
   - name: Create a web file
     shell: 'echo hello httpd service > /var/www/html/index.html'
   - name: install configuration file for httpd
     copy: src=/mnt/httpd/httpd.conf dest=/etc/httpd/conf/httpd.conf
#这里需要一个事先准备好的/mnt/httpd/httpd.conf文件
     notify: "restart httpd"
#如以上操作后为changed的状态时,会通过notify指定的名称触发对应名称的handlers操作
   - name: start httpd service
     service: enabled=true name=httpd state=started
  handlers:     #handlers中定义的就是任务,此处handlers中的任务使用的是service模块
   - name: restart httpd    #notify和handlers中任务的名称必须一致
     service: name=httpd state=restarted
#Ansible在执行完某个任务之后并不会立即去执行对应的handler,而是在当前play中所有普通任务都执行完后再去执行handler,这样的好处是可以多次触发notify,但最后只执行一次对应的handler,从而避免多次重启。
(4)检测 playbook 剧本
ansible-playbook httpd_install.yml --syntax-check  #检查yml文件的语法是否正确
ansible-playbook httpd_install.yml --list-task     #列出task任务
ansible-playbook httpd_install.yml --list-hosts    #检测生效的主机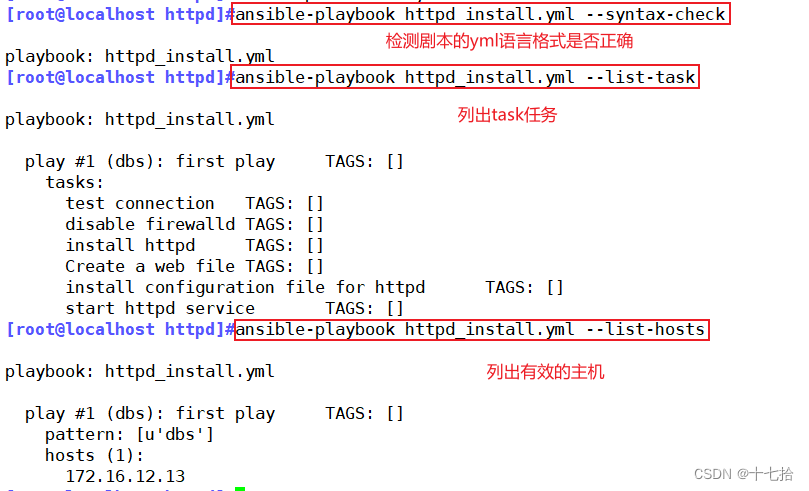
(5)执行 playbook 剧本
ansible-playbook httpd_install.yml
(6) 浏览器测试访问被控端网页,判断apache服务是否安装成功

2、编写 nginx 的 yum 安装部署剧本
剧本编写实现的需求:对 Ansible 管理的所有的 webs 组的成员,yum 安装最新版本的 nginx 服务软件,并进行相应环境的调整,确保 webs 的 nginx 服务能够正常运行并设置开机自启
(1)创建工作目录
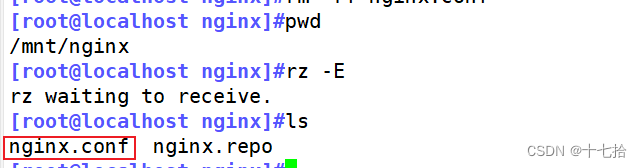
mkdir -p /mnt/nginx
cd /mnt/nginx
(2)准备nginx主配置文件,上传至控制端的/mnt/nginx/目录下
(3)编写 playbook 剧本
vim nginx_install.yml

---
- name: second play
  gather_facts: false
  hosts: webs
  remote_user: root
  tasks:
   - name: test connection
     ping:
   - name: disable selinux
     command: '/sbin/setenforce 0'
     ignore_errors: True
   - name: disable firewalld
     service: name=firewalld state=stopped
   - name: install repo
     yum: name=epel-release.noarch state=latest
   - name: install nginx
     yum: name=nginx state=latest
   - name: Create a web file
     shell: 'echo hello nginx service > /usr/share/nginx/html/index.html'
   - name: install configuration file for nginx
     copy: src=/mnt/nginx/nginx.conf dest=/etc/nginx/nginx.conf
     notify: "restart nginx"
   - name: start nginx service
     service: enabled=true name=nginx state=started
  handlers:
   - name: restart nginx
     service: name=nginx state=restarted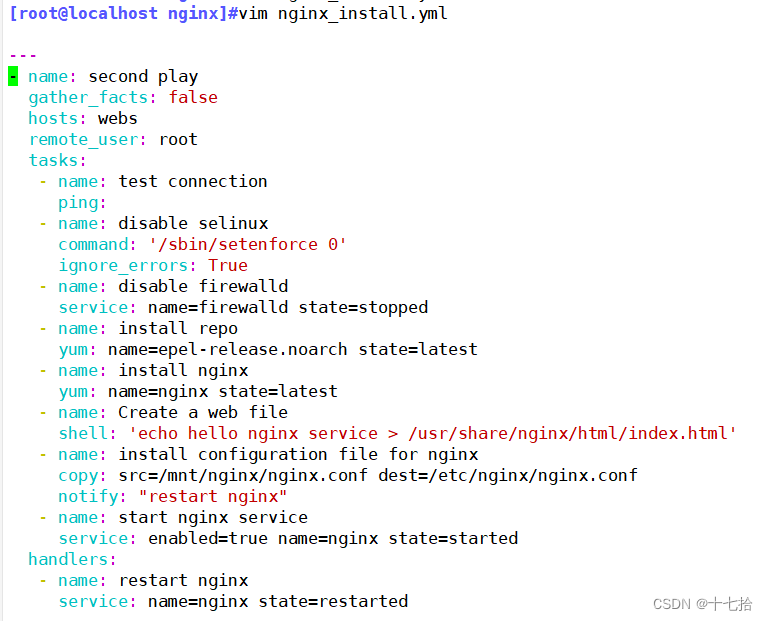
(4)检测 playbook 剧本
ansible-playbook nginx_install.yml --syntax-check  #检查yaml文件的语法是否正确
ansible-playbook nginx_install.yml --list-task     #列出task任务
ansible-playbook nginx_install.yml --list-hosts    #检测生效的主机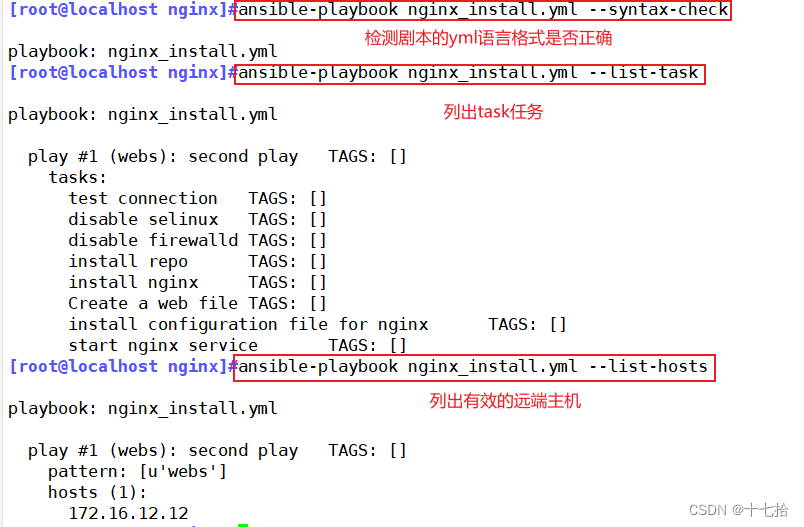
(6)执行 playbook 剧本
ansible-playbook nginx_install.yml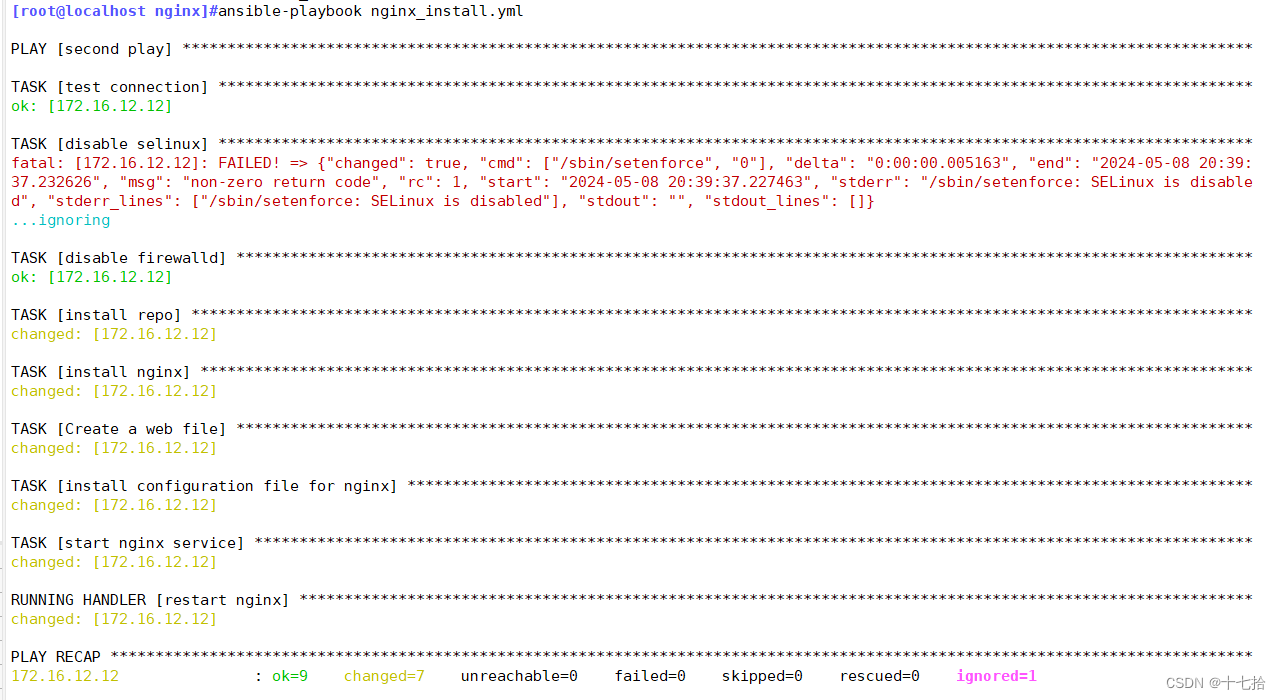
(7) 浏览器测试访问被控端网页,判断nginx服务是否安装成功

四、playbooks 定义、引用变量
引用变量是在playbook中使用变量的概念。变量可以用来存储数据,如主机列表、文件路径、配置参数等。在playbook中,可以定义变量并在需要的地方引用它们,以便在不同的任务中重复使用相同的值或根据需要动态地更改值
1、使用vars关键字定义变量并直接使用
在yaml文件中,我们可以在初始配置的模块中用var去定义变量的存在,变量的格式为 key:value ,以此来确定该变量在剧本中的存在
案例一:
#编写 playbook 脚本,并在其中定义和引用变量
vim test1.yml
---
- name: first play
hosts: dbs
remote_user: root
vars:
foldername: data #定义变量
filename: 123.txt #格式为 key: value
tasks:
- name: mkdir a data folder
file: path=/{
{foldername}} state=directory #使用 {
{key}} 引用变量的值
- name: touch a test file
file: path=/{
{foldername}}/{
{filename}} state=touch
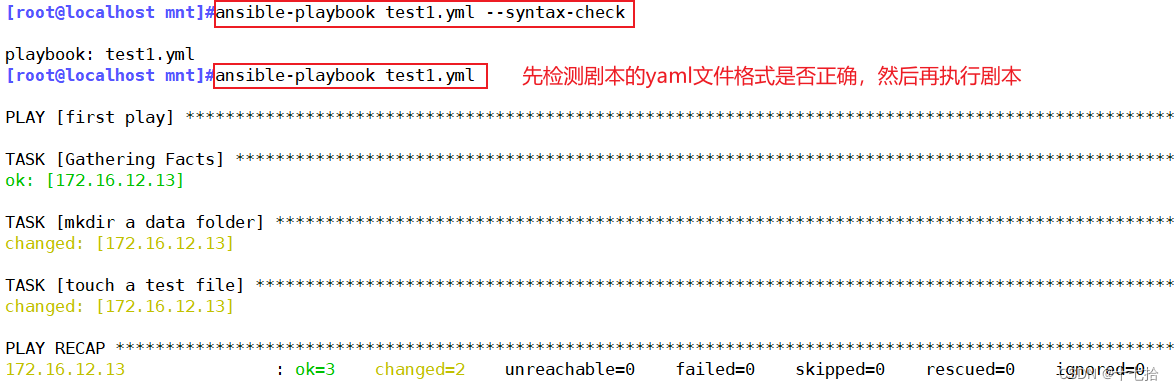
#检测剧本yaml格式是否正确
ansible-playbook test1.yml --syntax-check
#执行剧本
ansible-playbook test1.yml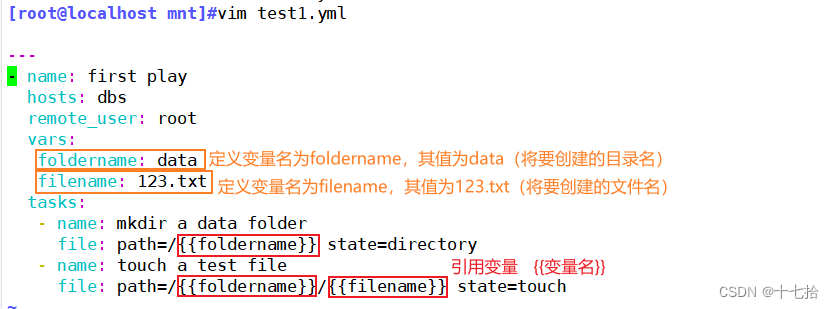
测试:查看被控端是否成功建立了/data目录并在其下创建了123.txt文件

案例二:
#编写 playbook 脚本,并在其中定义和引用变量
vim test2.yml
---
- name: second p
最低0.47元/天 解锁文章


 被折叠的 条评论
为什么被折叠?
被折叠的 条评论
为什么被折叠?
 到【灌水乐园】发言


