


核心概念
IoC控制反转
使用对象时,由主动new产生对象转换为由外部提供对象,此工程中对象创建控制权由程序转移到外部,此思想称为控制反转。
Spring
对其思想进行了实现
IoC容器
由Spring提供,充当“外部”,负责对象的创建,初始化等一系列工作
Bean
被创建或被管理的对象
DI依赖注入
在容器中建立bean与bean之间的依赖关系的整个过程
IoC入门案例分析
思路
- 管理什么?(Service与Dao)
- 如何将被管理的对象告知IoC容器?(配置)
- 被管理的对象交给IoC容器,如何获取到IoC容器?(接口)
- IoC容器得到后,如何从容器中获取bean?(接口方法)
- 使用Spring导入哪些坐标(pom.xml)
实现步骤
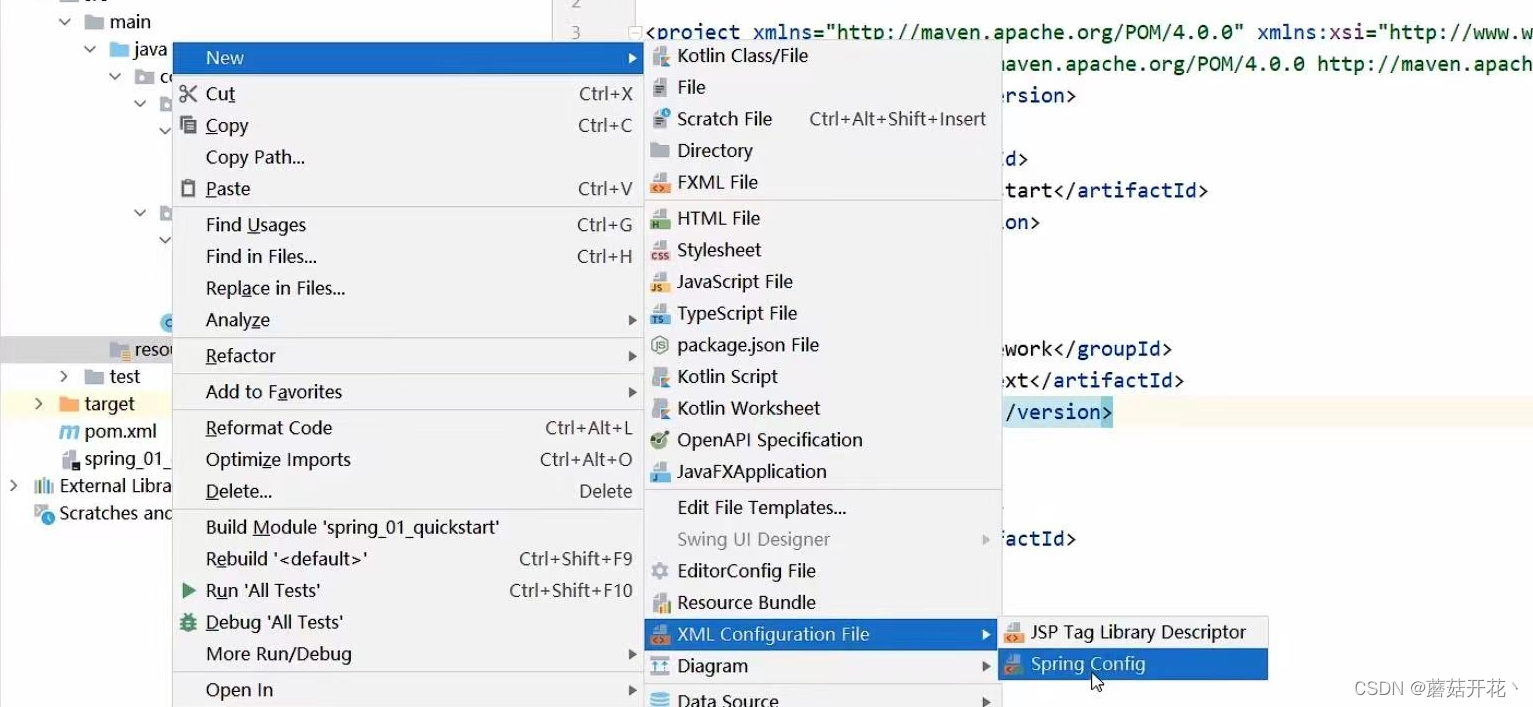
- 在pom.xml导入spring的坐标spring-context,对应版本号5.2.10.RELEASE,在创建applicationContext.xml文件
//数据层实现类
public class BookDaoImpl implements BookDao{
    public void save(){
        System.out.println("book dao save");
    }
}
//业务层实现类 public class BookServiceImpl implements BookService{ private BookDao = new BookDaoImpl(); public void save(){ System.out.println("book service save"); bookDao.save(); } }//bookdao接口 public interface BookDao{ public void save(); } - 数据层实现类,数据层接口;业务层接口,业务层实现类

- 在.xml中的beans里配置bean
<!--bean标签配置bean,id属性给bean起名字,class属性给bean定义类型-->
<bean id="bookdao" class="com.mogu.dao.impl.BookDaoImpl"/>

<bean id="bookService" class="com.mogu.service.impl.BookServiceImpl"/>- 获取IoC容器,创建一个App.java
public class App{
    public static void main(String[] args){
        //获取IoC容器
        ApplicationContext ctx = new ClassPathXmlApplicationContext("applicationContext.xml");
        //获取bean
        BookDao bookdao = (BookDao)ctx.getBean("bookDao");
        bookDao.save();

        //BookService bookService = (BookService)ctx.getBean("bookService");
        //bookService.save();
}
DI入门案例分析
思路
- 基于IoC管理bean
- Service中使用new形式创建的Dao对象是否保留?(否)
- Service中需要的Dao对象如何进入到Service中(提供方法)
- Service与Dao之间的关系如何描述?(配置)
实现步骤
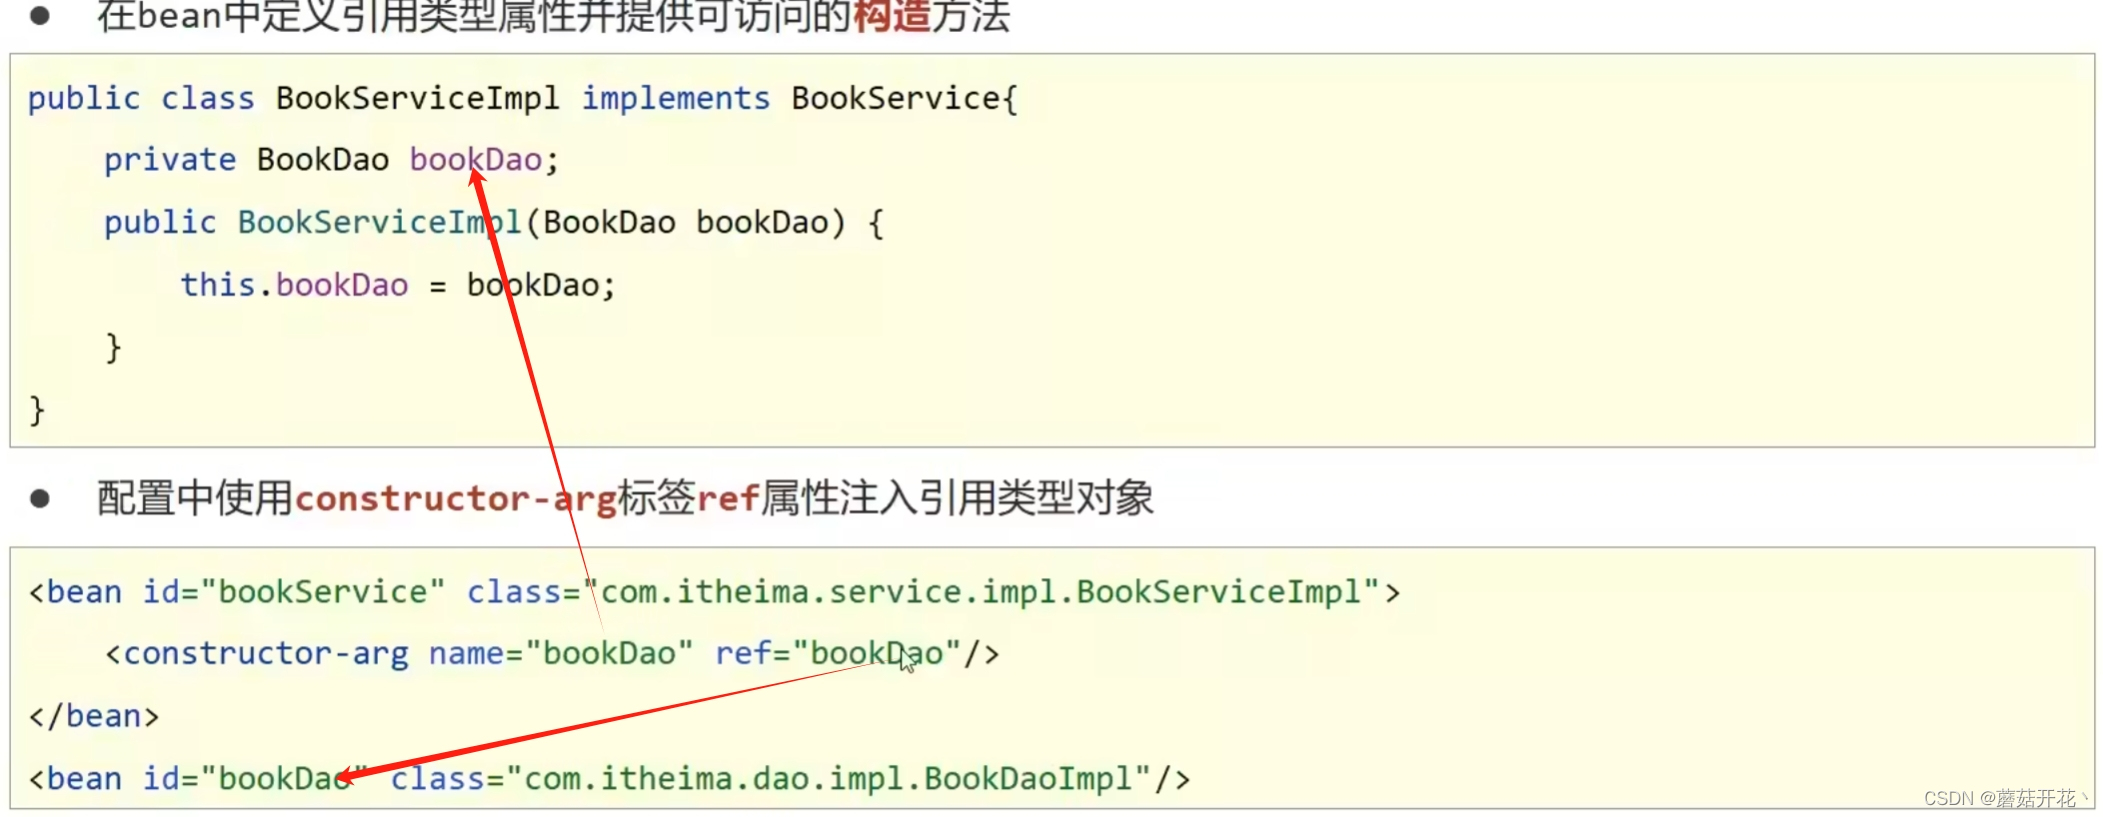
- 删除业务层实现类中使用new的方式创建的dao对象,并提供对应的set方法
//业务层实现类
public class BookServiceImpl implements BookService{
    private BookDao;
    public void save(){
        System.out.println("book service save");
        bookDao.save();
        }

    //提供对应set方法
    punlic void setBookDao(BookDao bookDao){
        this.bookDao = bookDao;
    }
} - 在applicationContext.xml中配置server与dao的关系
<!--bean标签配置bean,id属性给bean起名字,class属性给bean定义类型-->
<bean id="bookdao" class="com.mogu.dao.impl.BookDaoImpl"/>

<bean id="bookService" class="com.mogu.service.impl.BookServiceImpl">
    <!--配置server与dao的关系
        name里是实现类里定义的,ref是.xml中的id
        property标签表示配置当前bean属性
        name属性表示配置哪一个具体的属性
        ref属性表示参照哪一个bean-->
    <property name="bookDao" ref="bookDao"/>
</bean>
bean配置
bean别名配置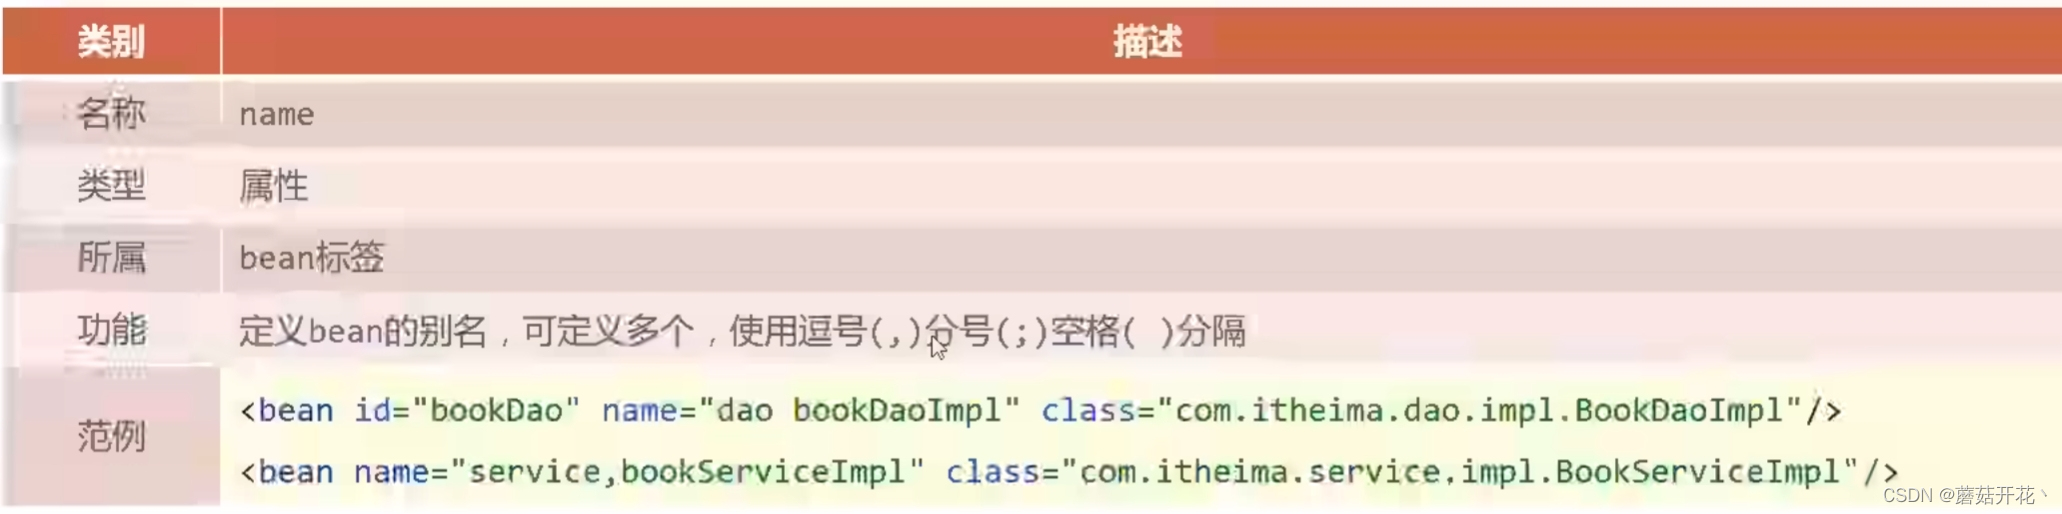
bean作用范围配置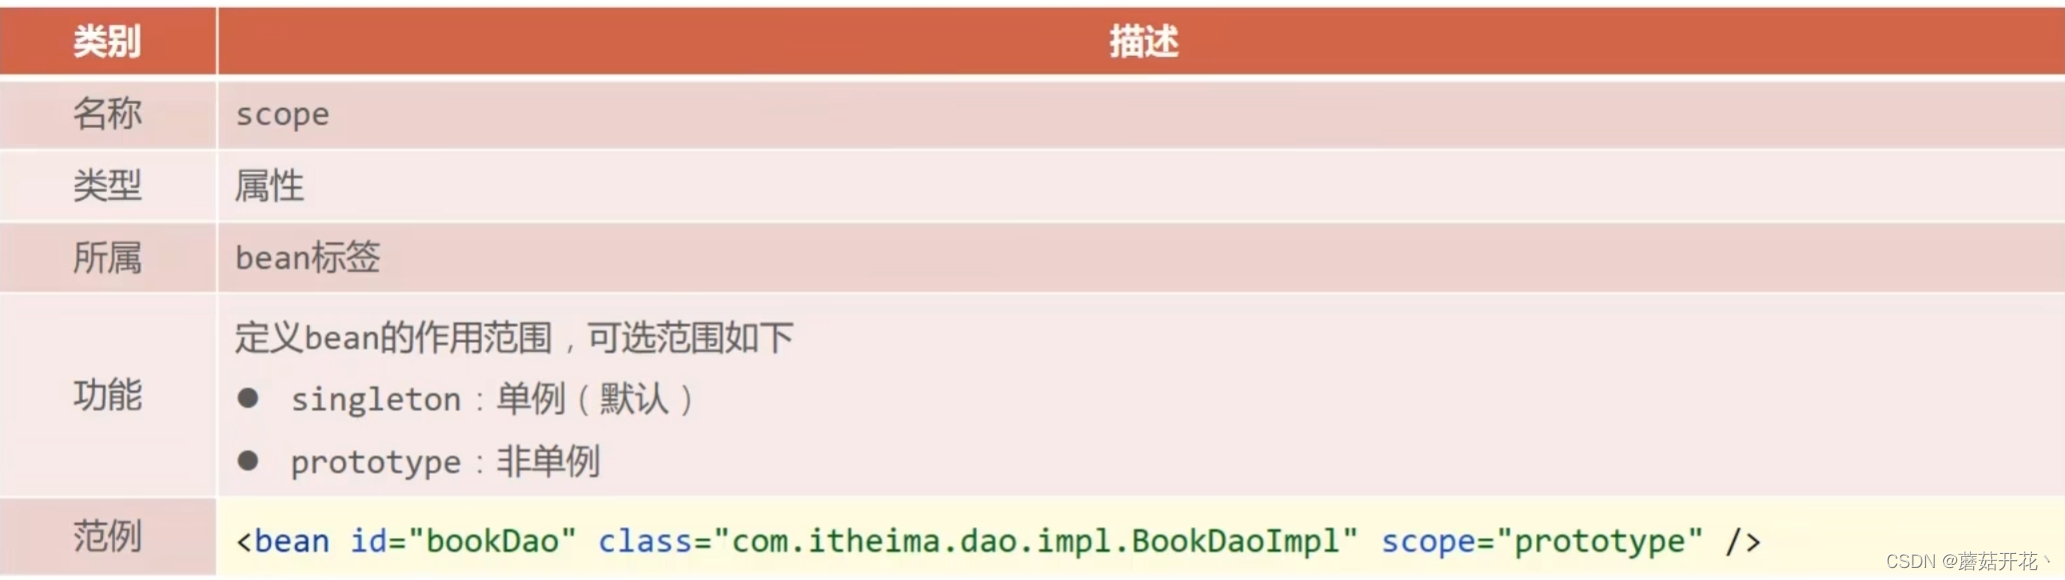
bean实例化
构造方法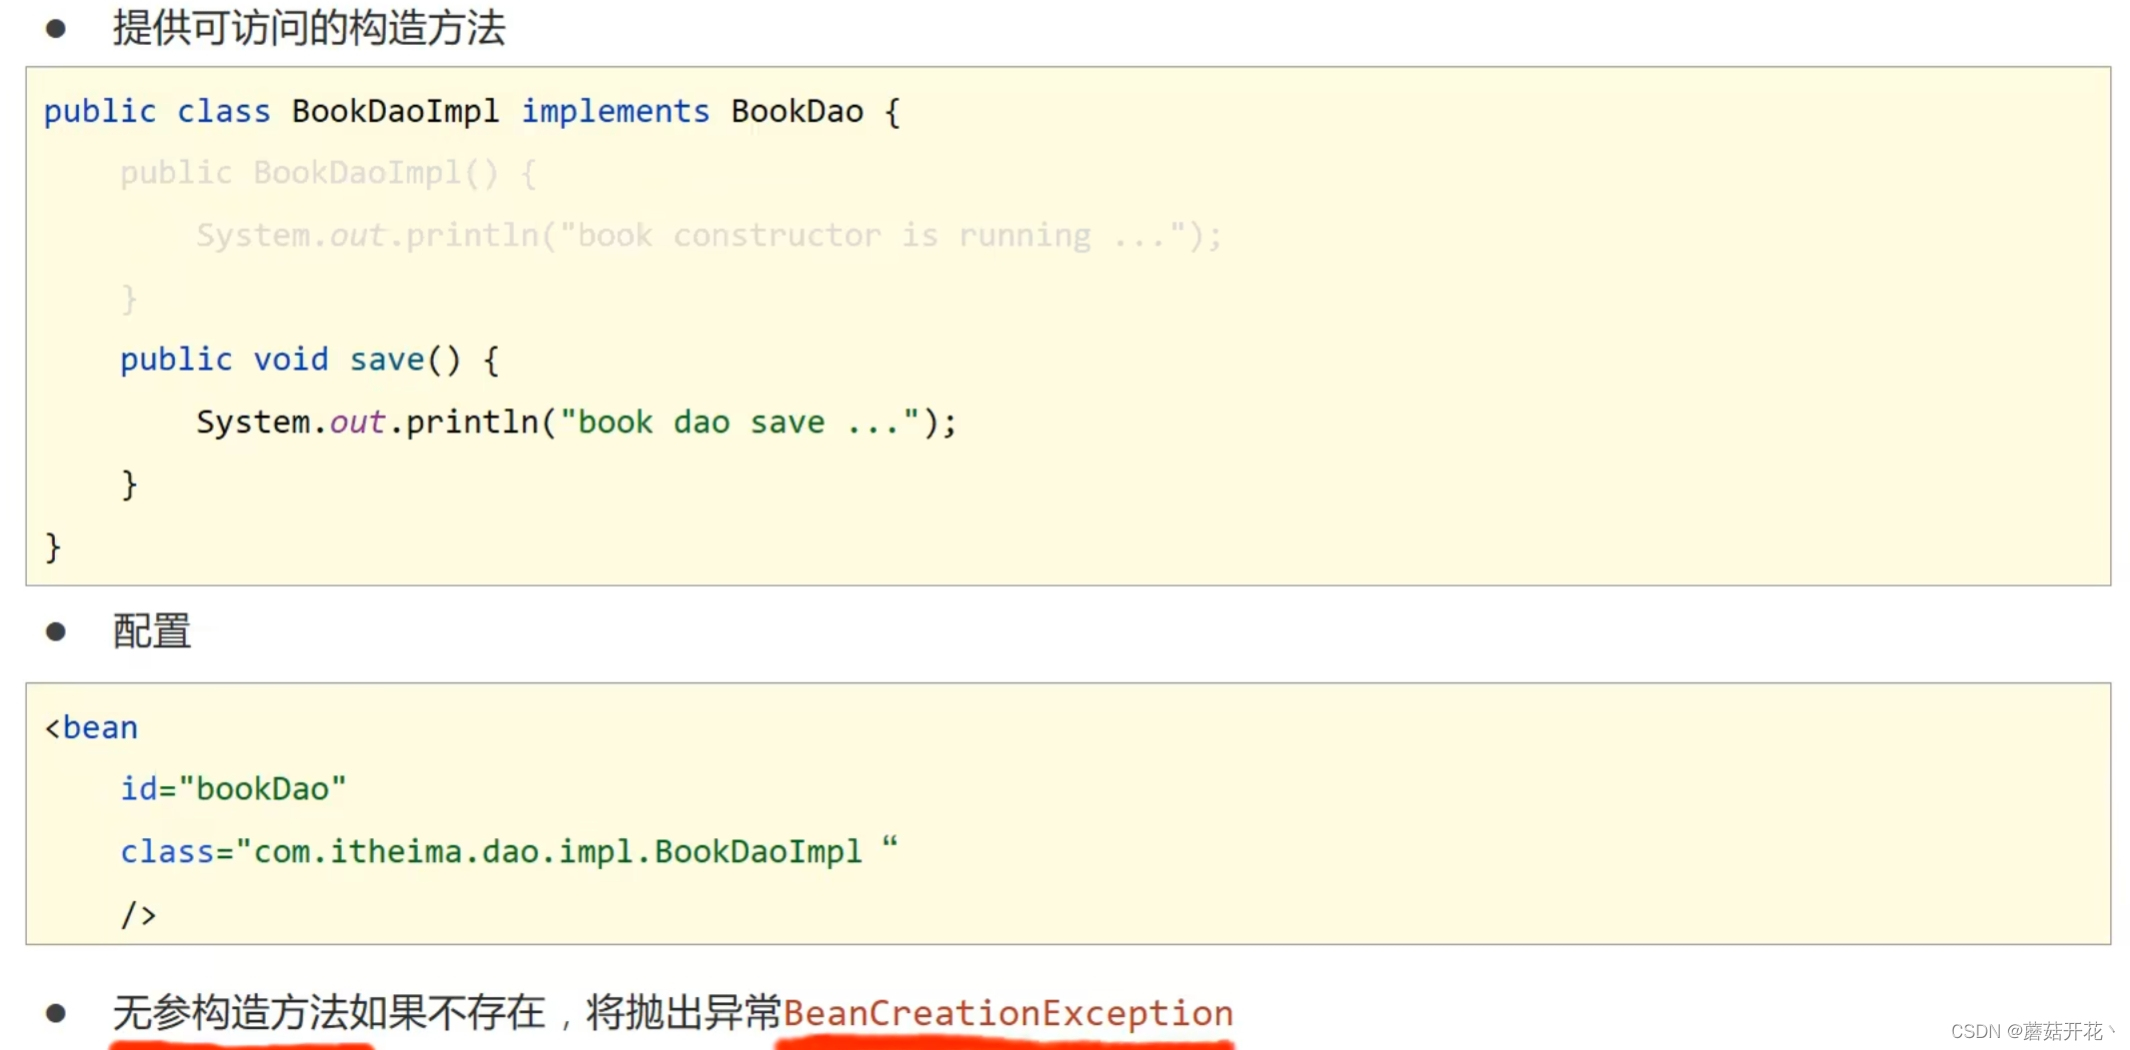
静态工厂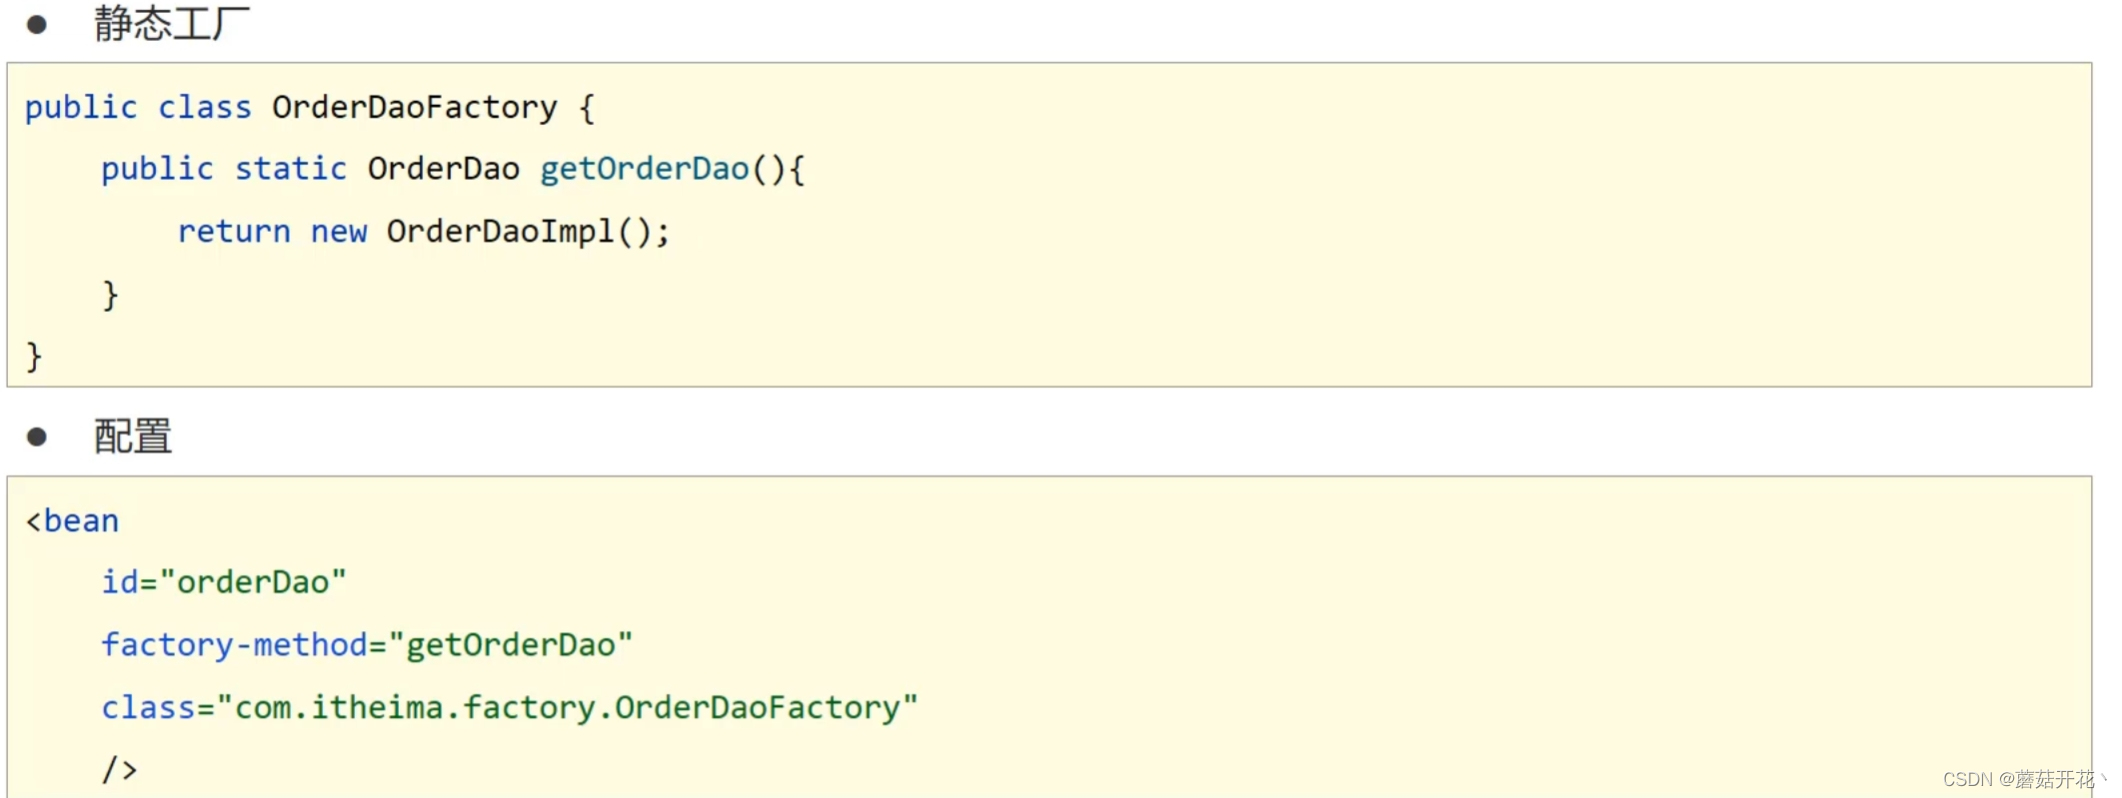
实例工厂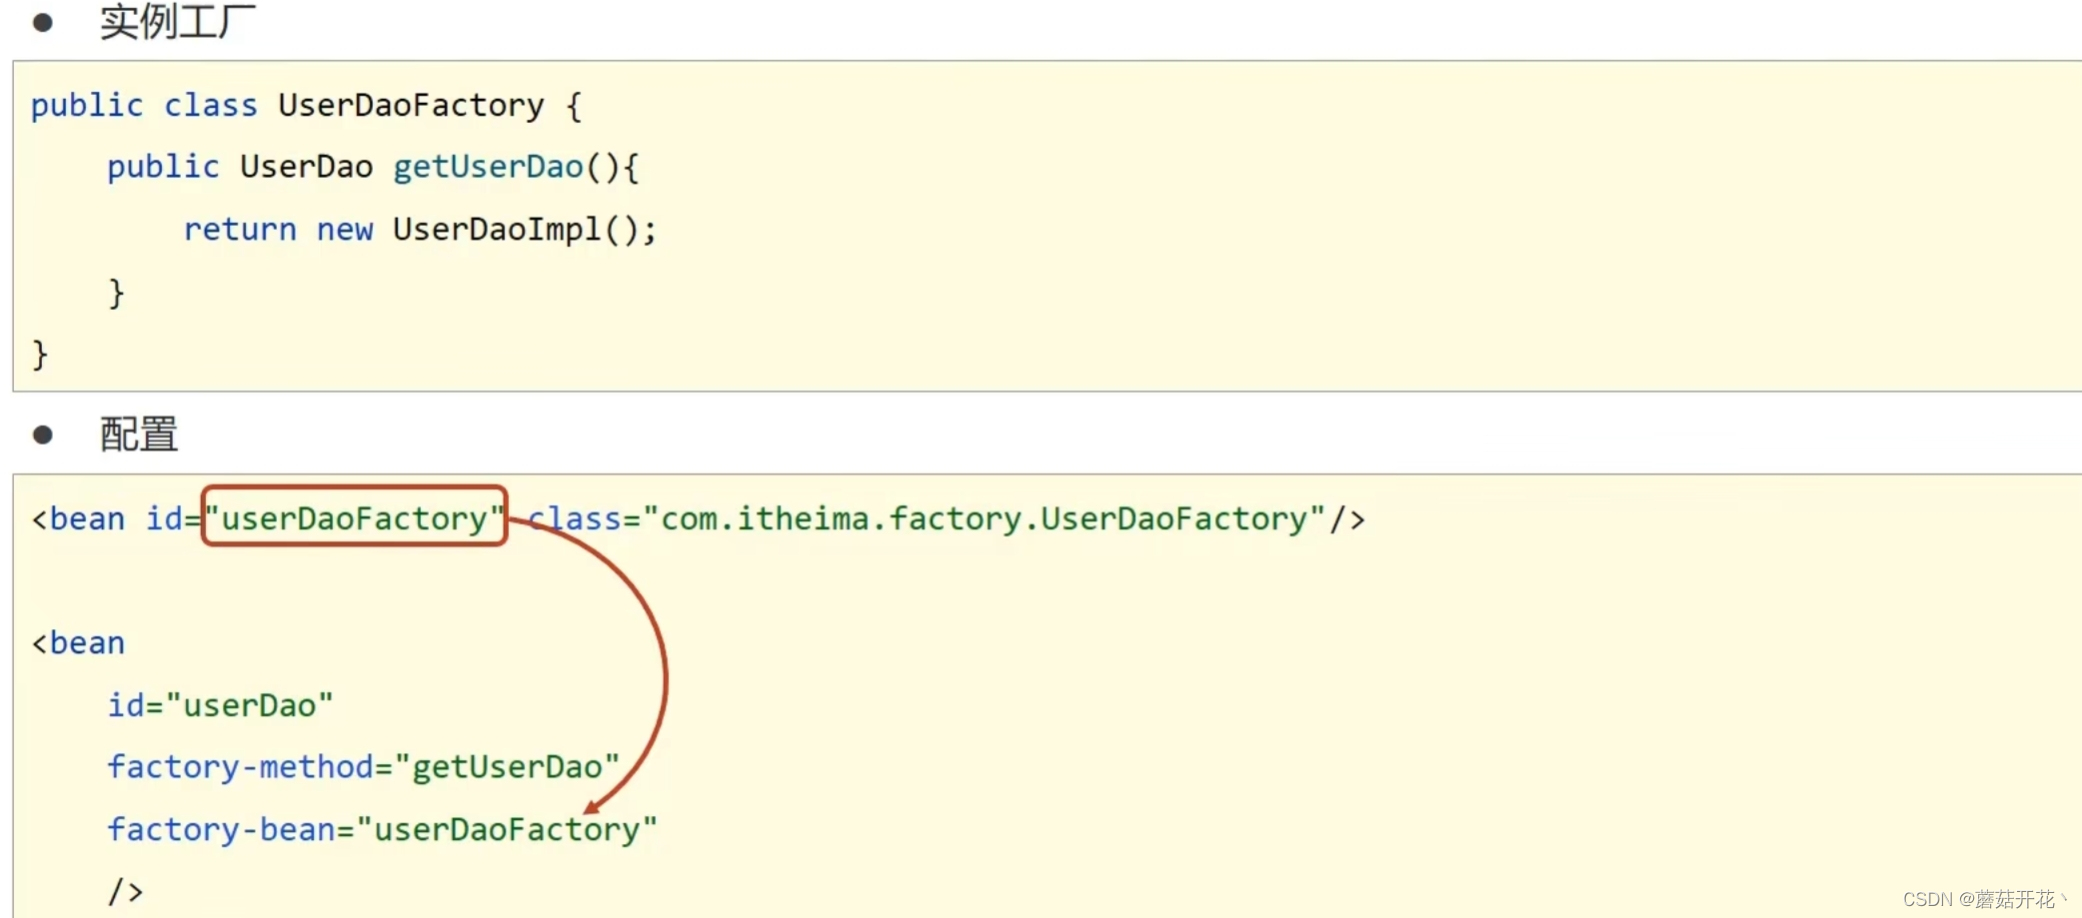
FactoryBean
bean生命周期
阶段
- 初始化容器
- 创建对象(内存分配)
- 执行构造方法
- 执行属性注入(set操作)
- 执行bean初始化方法
- 使用bean
- 执行业务操作
- 关闭/销毁容器
- 执行bean销毁方法
bean生命周期控制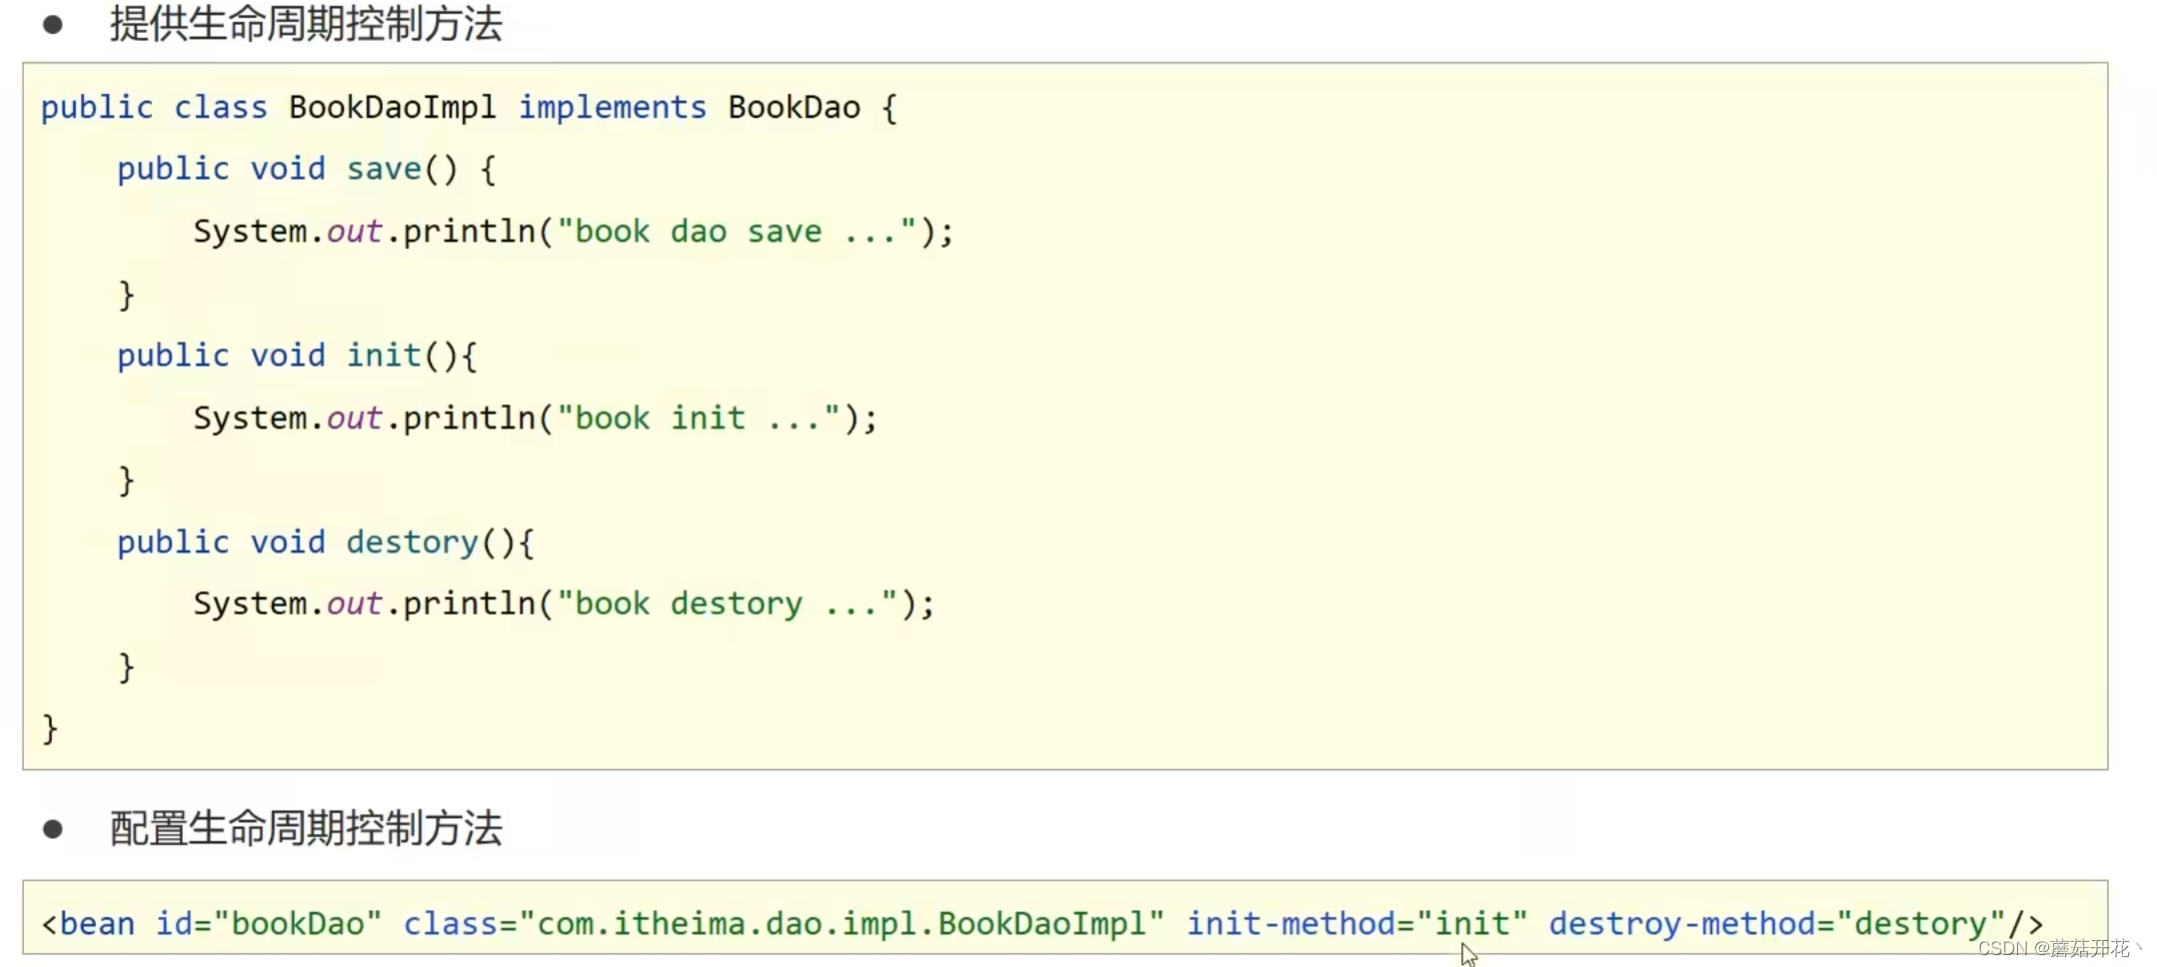
接口控制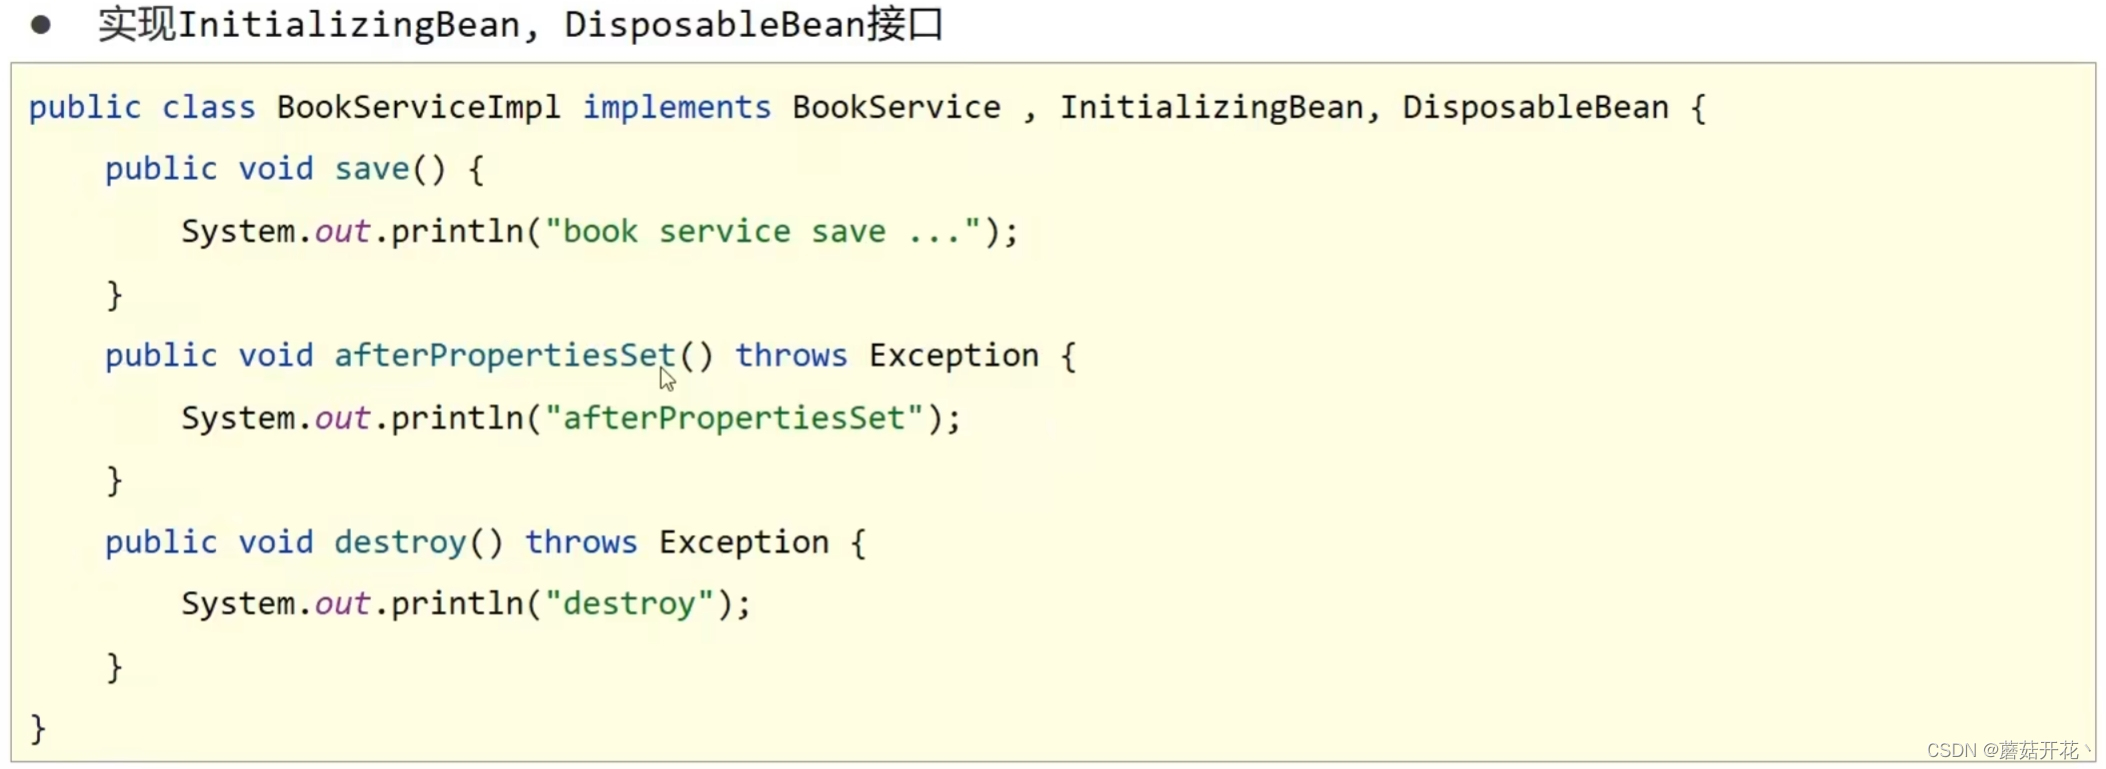
bean销毁时机
关闭前触发bean的销毁
关闭方式
手工关闭容器
- ConfigurableApplicationContext接口close()操作
注册关闭钩子,在虚拟机退出前再退出虚拟机
- ConfigurableApplicationContext接口registerShutdownHook()操作
依赖注入方式
set方法
简单类型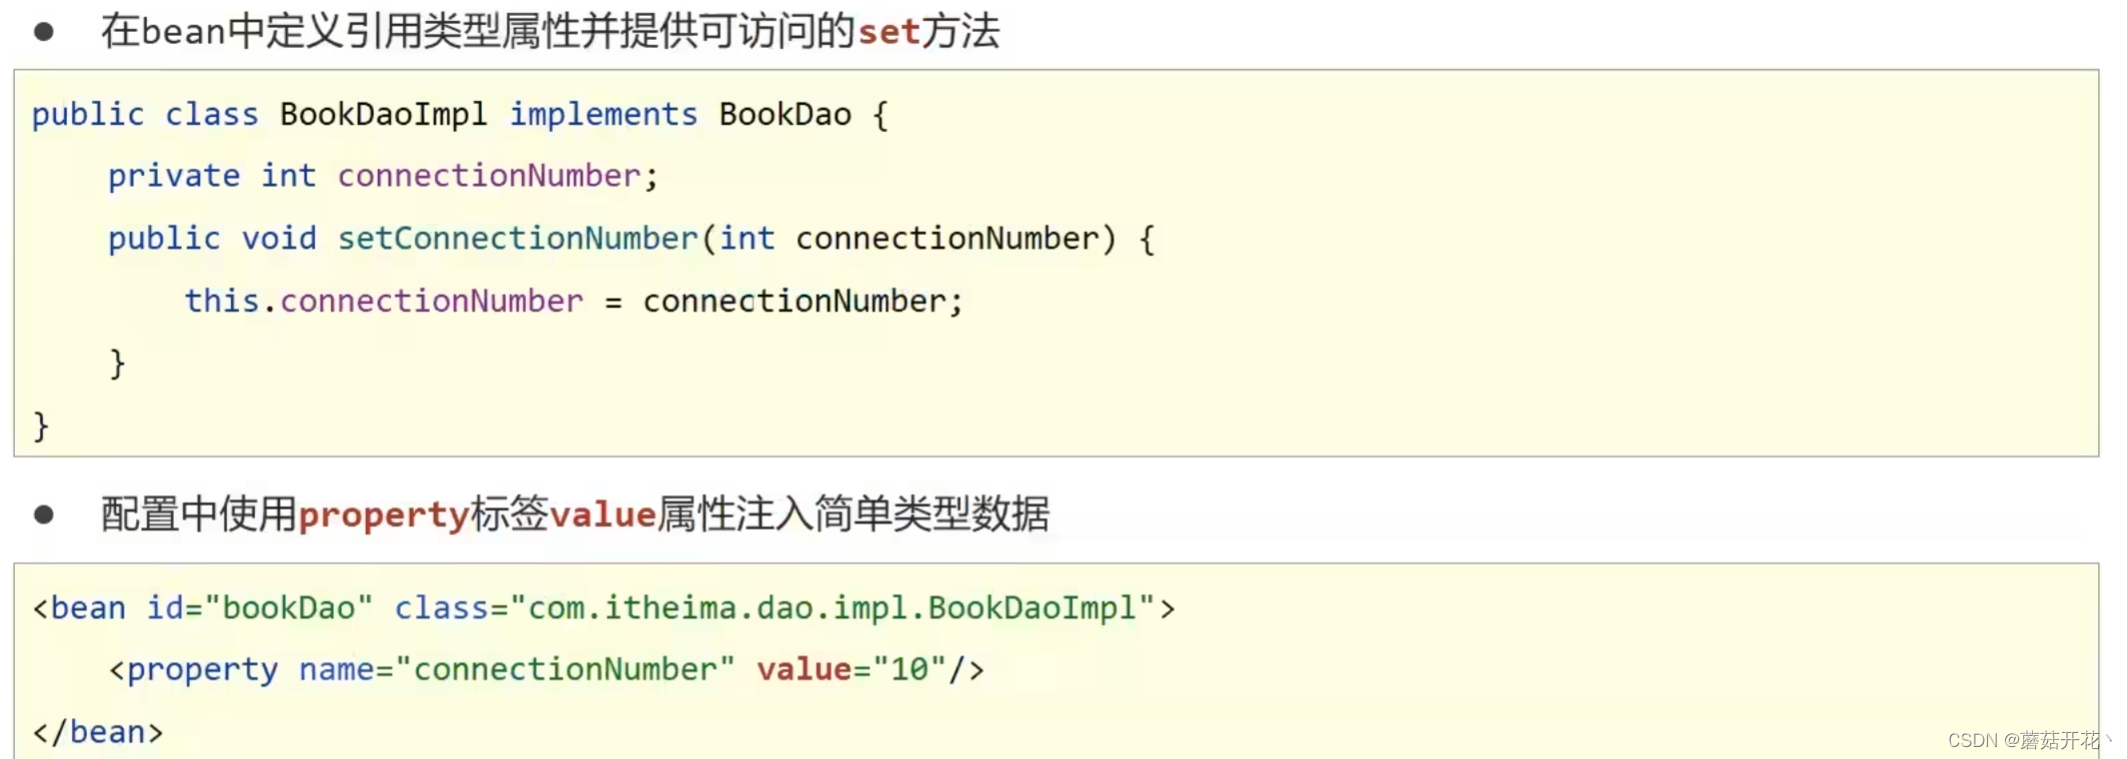
引用类型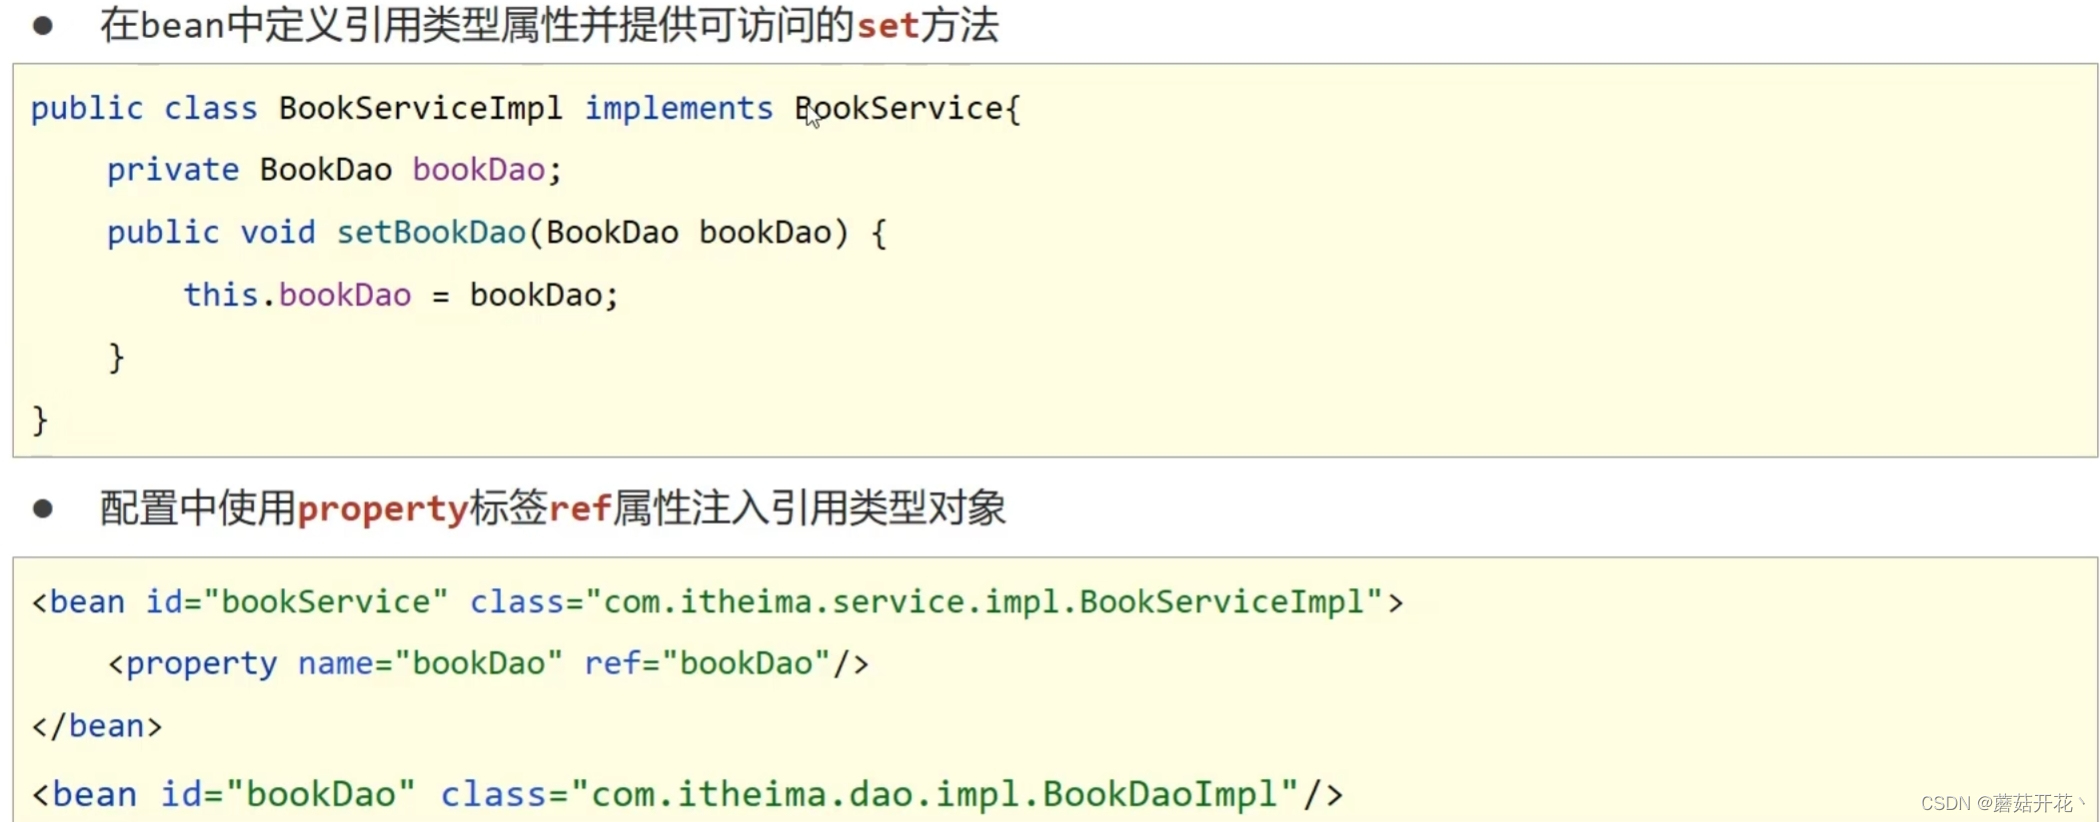
构造方法
简单类型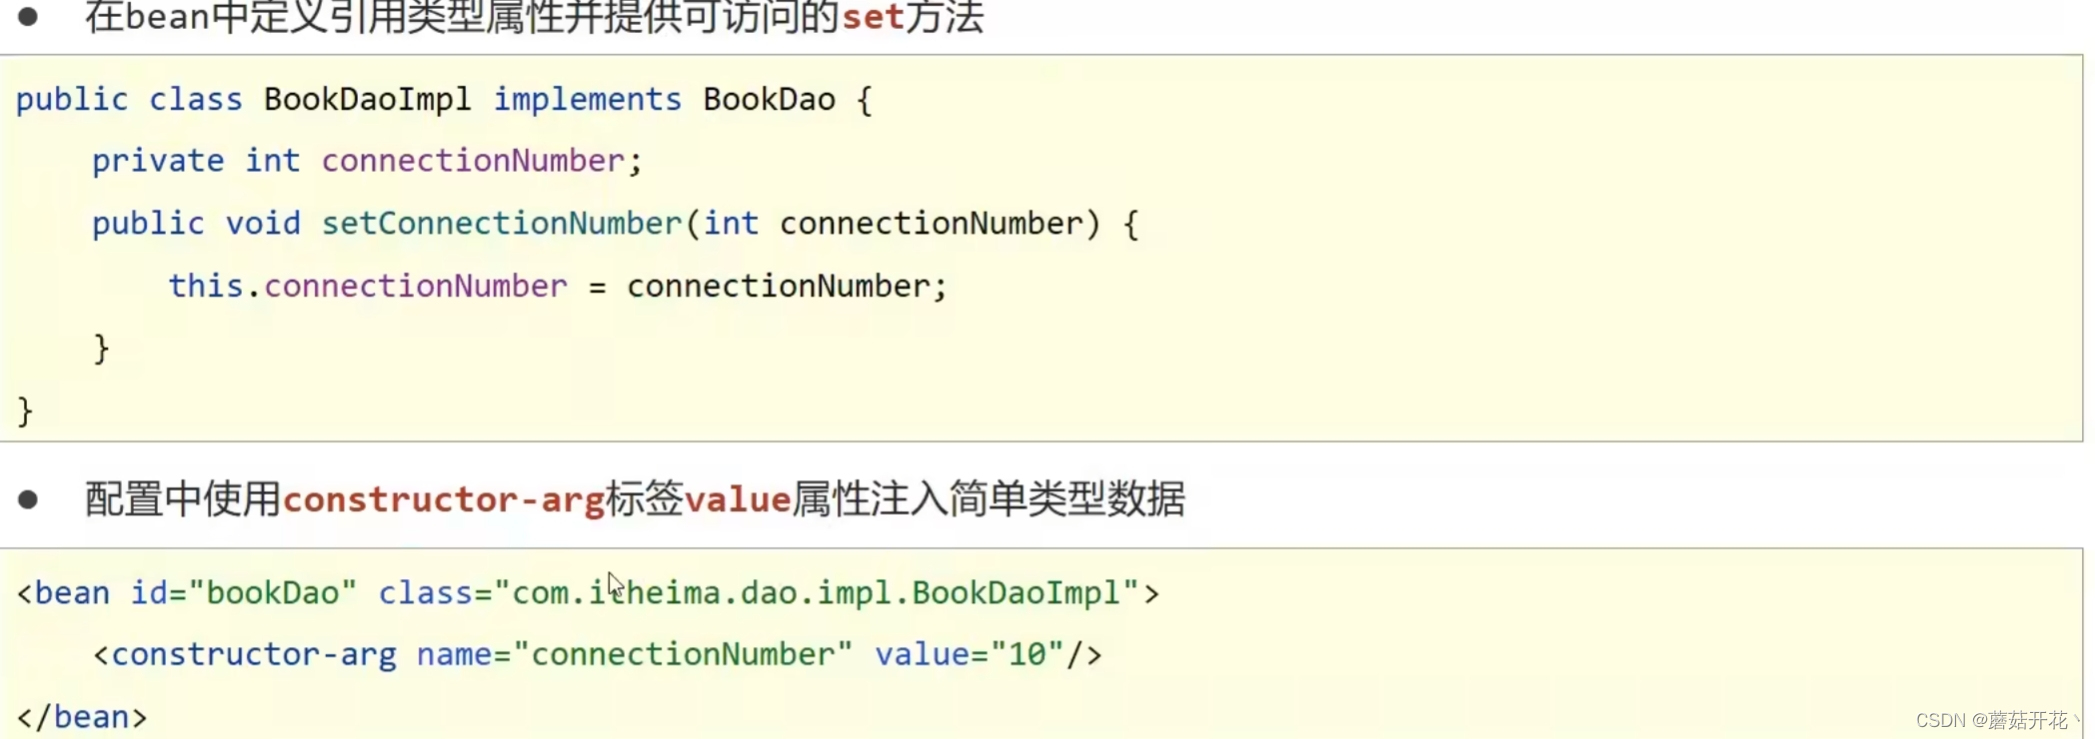
引用类型
参数适配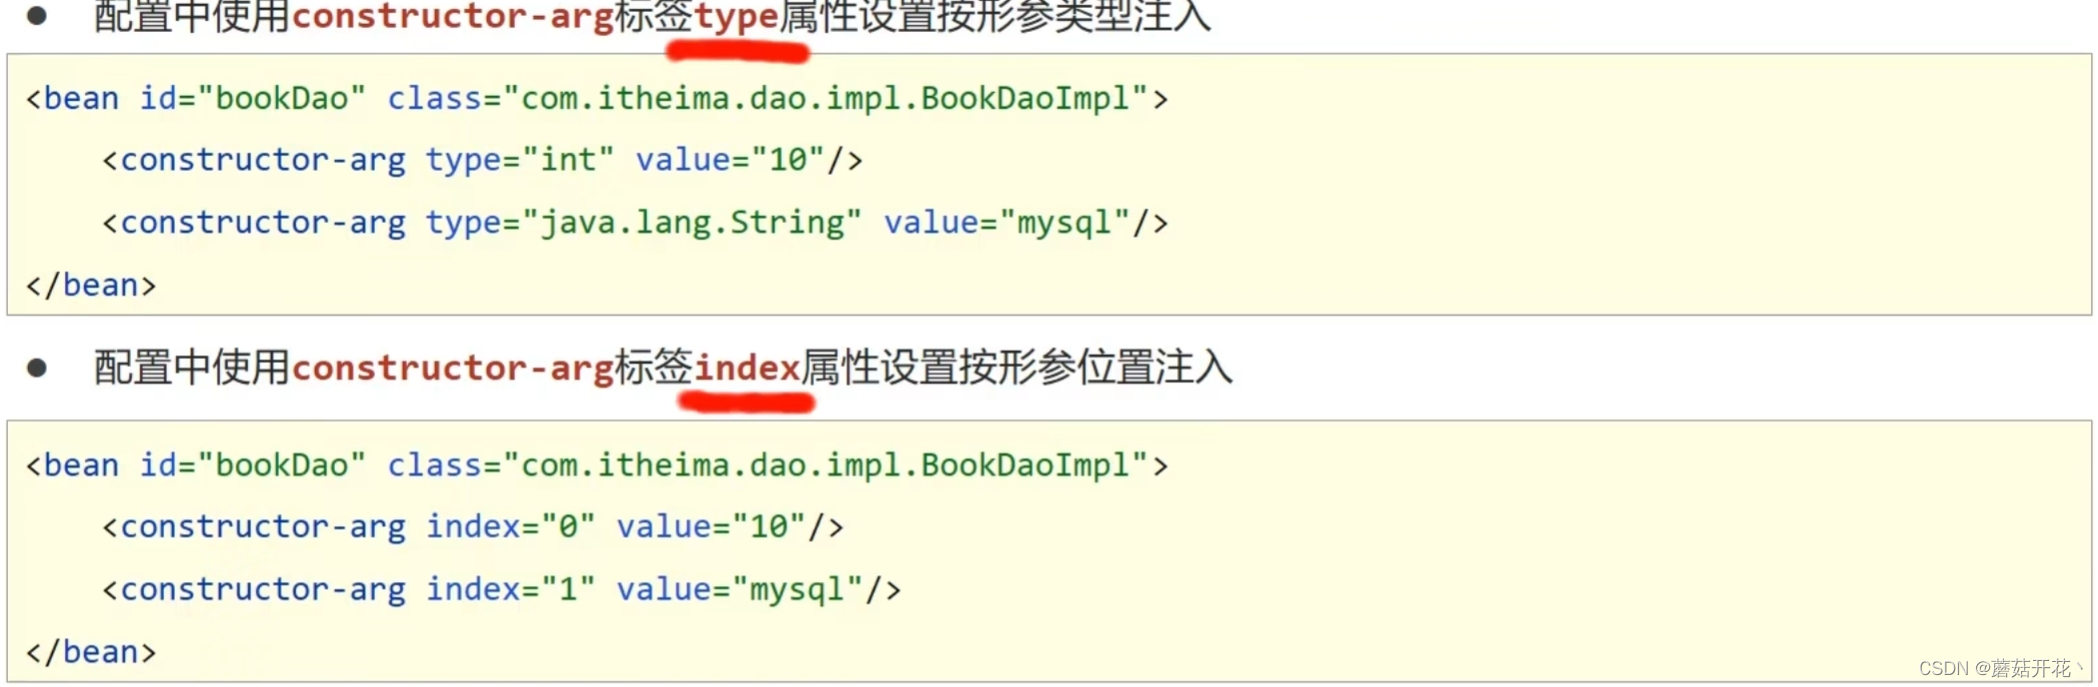
自动装配
- 用于引用类依赖注入型
- byType必须保障容器中相同类型的bean唯一,推荐使用
- byName必须保障容器中具有指定名称的bean,因变量名与配置耦合,不推荐使用

集合注入
- 在实体类中
 public class BookDaoImpl implements BookDao{
    private int[] array;
    private List<String> list;
    private Set<String> set;
    private Map<String,String> map;
    private Properties properties;

    public void setArray(int[] array) {this.array = array;}
    public void setList(List<String> list) {this.list = list;}
    public void setSet(Set<String> set) {this.set= set;}
    public void setMap(Map<String,String> map) {this.map= map;}
    public void setProperties (Properties properties) {this.properties = properties;}

    public void save(){
        System.out.println("save");
    }
}- 在applicationContext.xml中
<bean id="bookDao" class="com.mogu.dao.impl.BookDaoImpl">
    <property name="array">
        <array>
            <value>100</value>
            <value>200</value>
        </array>
    </property>
    <property name="list">
        <list>
            <value>100</value>
            <value>200</value>
        </list>
    </property>
    <property name="set">
        <set>
            <!--重复会过滤-->
            <value>100</value>
            <value>200</value>
            <value>200</value>
        </set>
    </property>
    <property name="map">
        <map>
            <entry key="country" value="china"/>
            <entry key="age" value="18"/>
        </map>
    </property>
    <property name="properties">
        <props>
            <prop key="country">china</prop>
        </props>
    </property>
</bean>
加载properties文件
步骤
- properties文件内容
jdbc.driver=com.mysql.jdbc.Driver jdbc.url=jdbc:mysql://127.0.0.1:3306/spring_db jdbc.username=root jdbc.password=root - 在applicationContect.xml中开启context命名空间
<?xml version="1.0" encoding="UTF-8"?>
<beans xmlns="http://www.springframework.org/schema/beans"
       xmlns:xsi="http://www.w3.org/2001/XMLSchema-instance"

      <!-- 新增,beans改为context -->
       xmlns:context="http://www.springframework.org/schema/context"

       xsi:schemaLocation="
            http://www.springframework.org/schema/beans
            http://www.springframework.org/schema/beans/spring-beans.xsd

            <!--新增,beans改为context-->
            http://www.springframework.org/schema/context
            http://www.springframework.org/schema/context/spring-context.xsd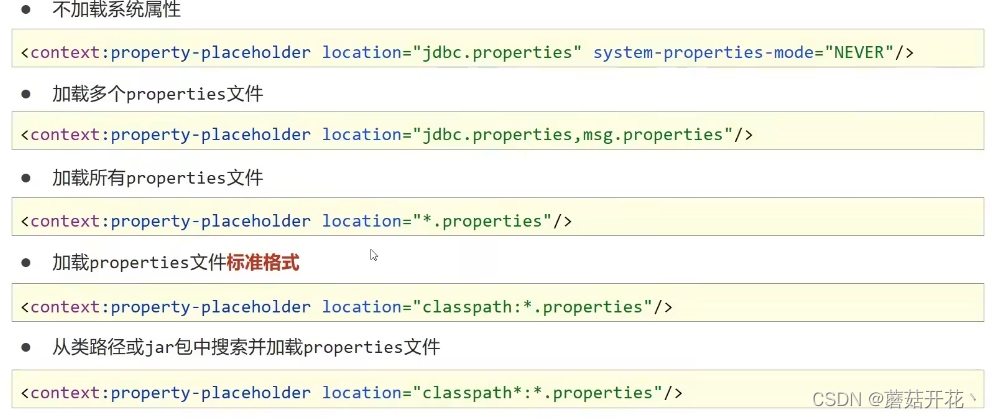
">- 使用context空间加载properties文件
<!--前提:与applicationContext.xml都在resources中且命名为jdbc.properties-->
<context:property-placeholder location="jdbc.properties"/>

<!--使用属性占位符${}读取properties文件中的属性-->
<bean class="com.alibaba.druid.pool.DruiddDataSource">
    <property name="driverClassName" value="${jdbc.driver}"/>
    <property name="driverClassName" value="${jdbc.url}"/>
    <property name="driverClassName" value="${jdbc.username}"/>
    <property name="driverClassName" value="${jdbc.password}"/>
</bean>
补充
容器
创建容器
获取bean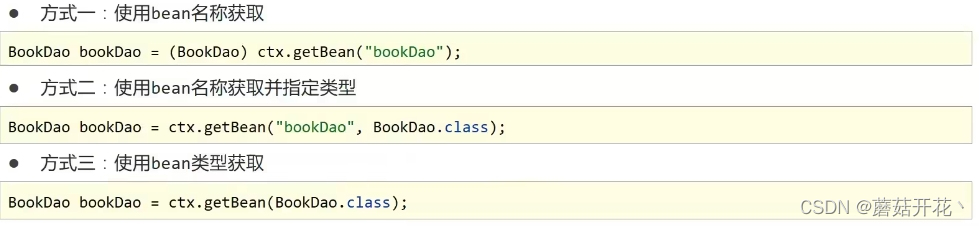
BeanFactory初始化 
注解开发
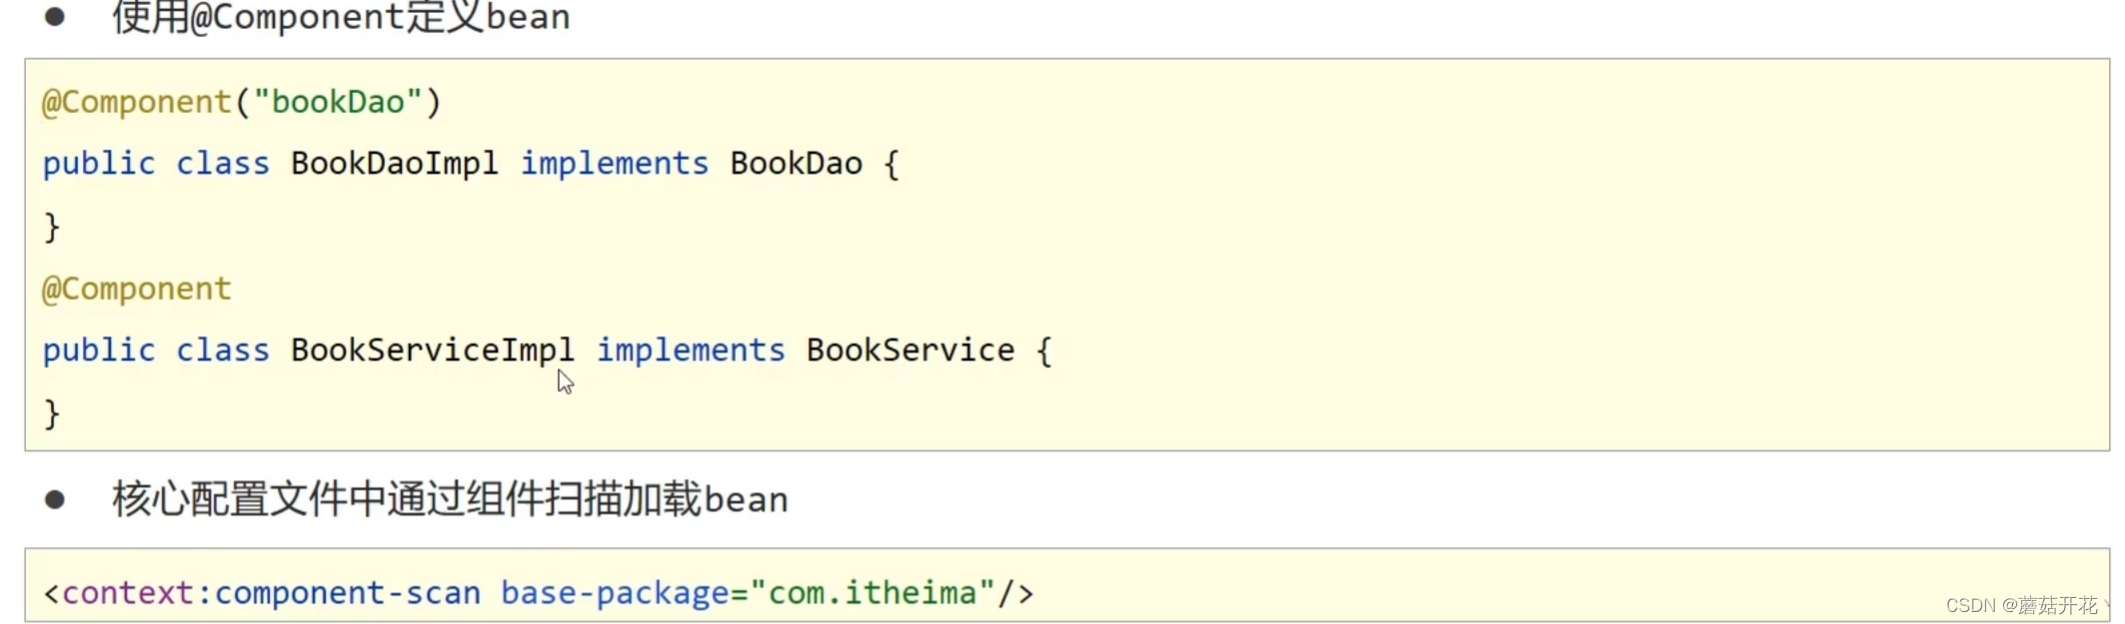
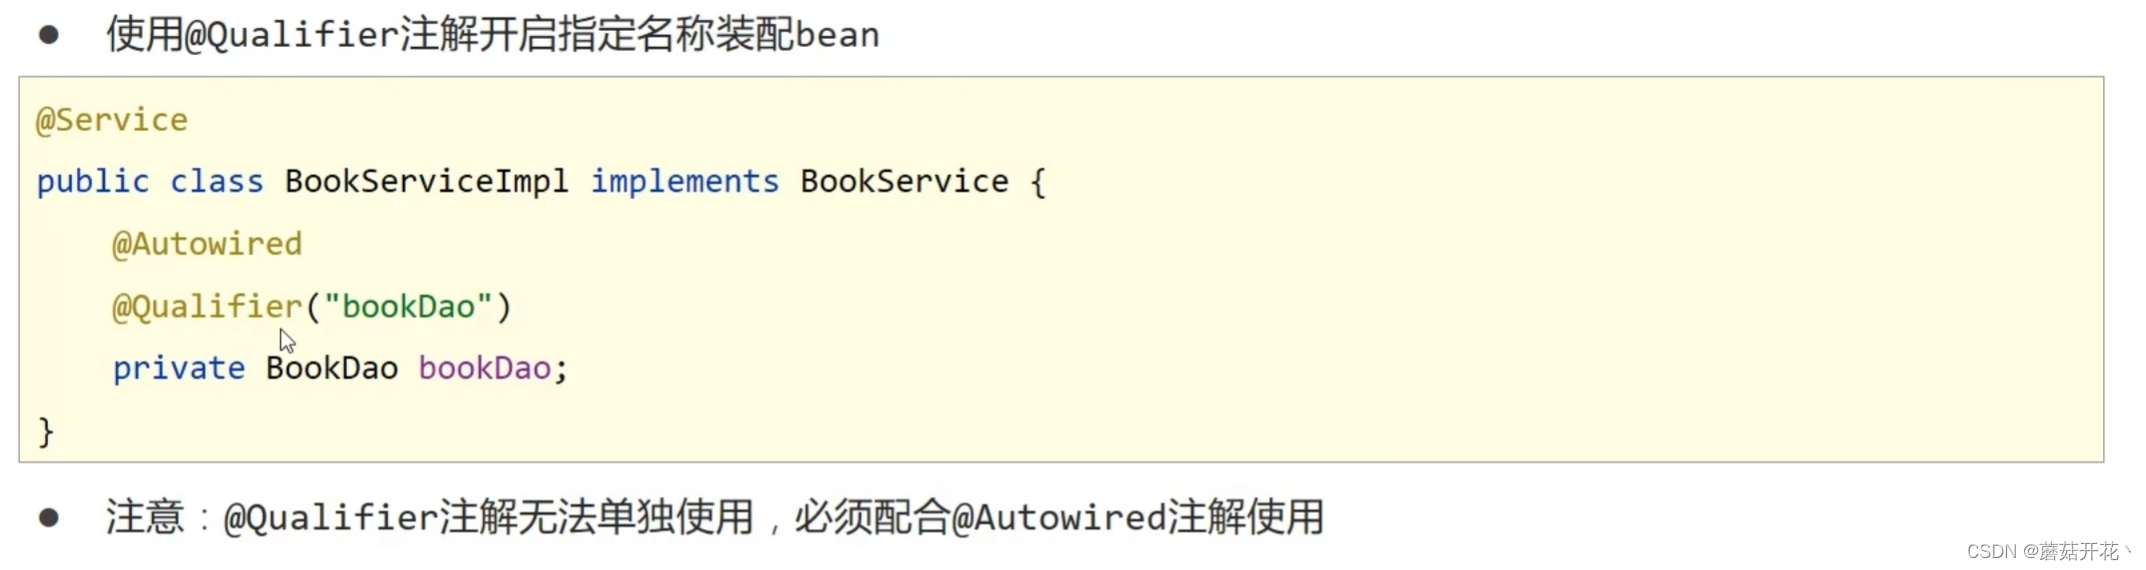
注解开发定义bean
@Component
衍生注解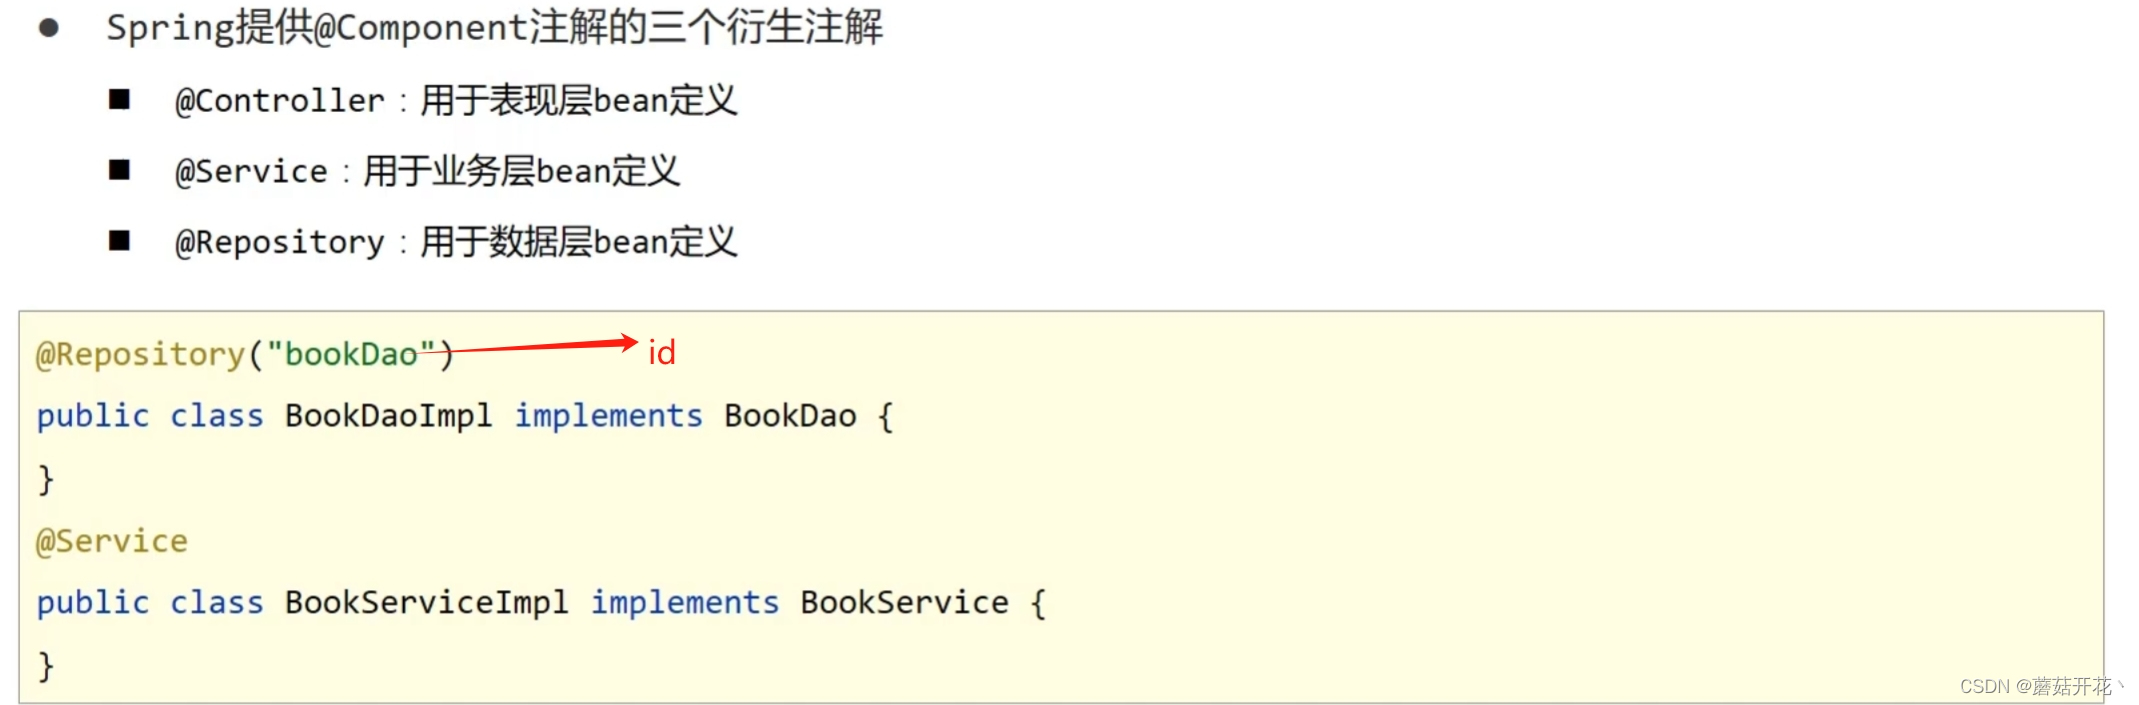
纯注解开发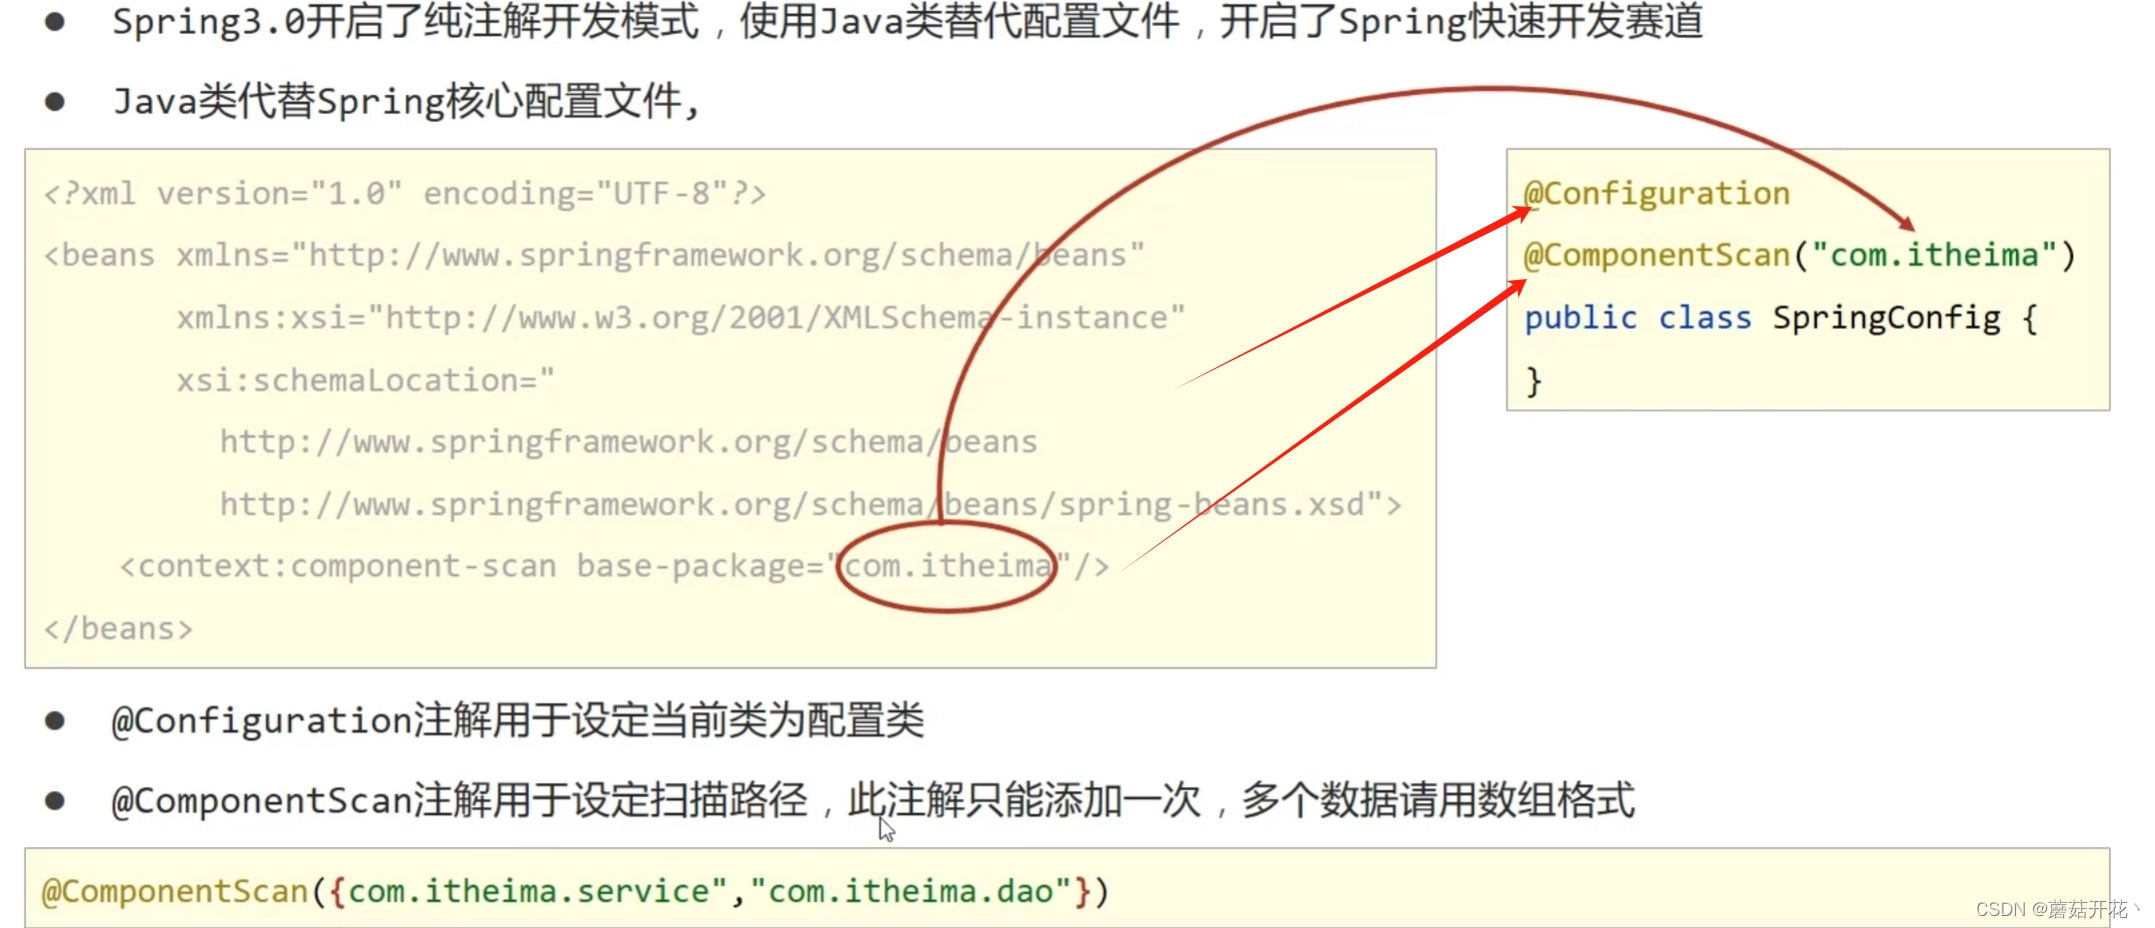

bean管理
bean作用范围
bean生命周期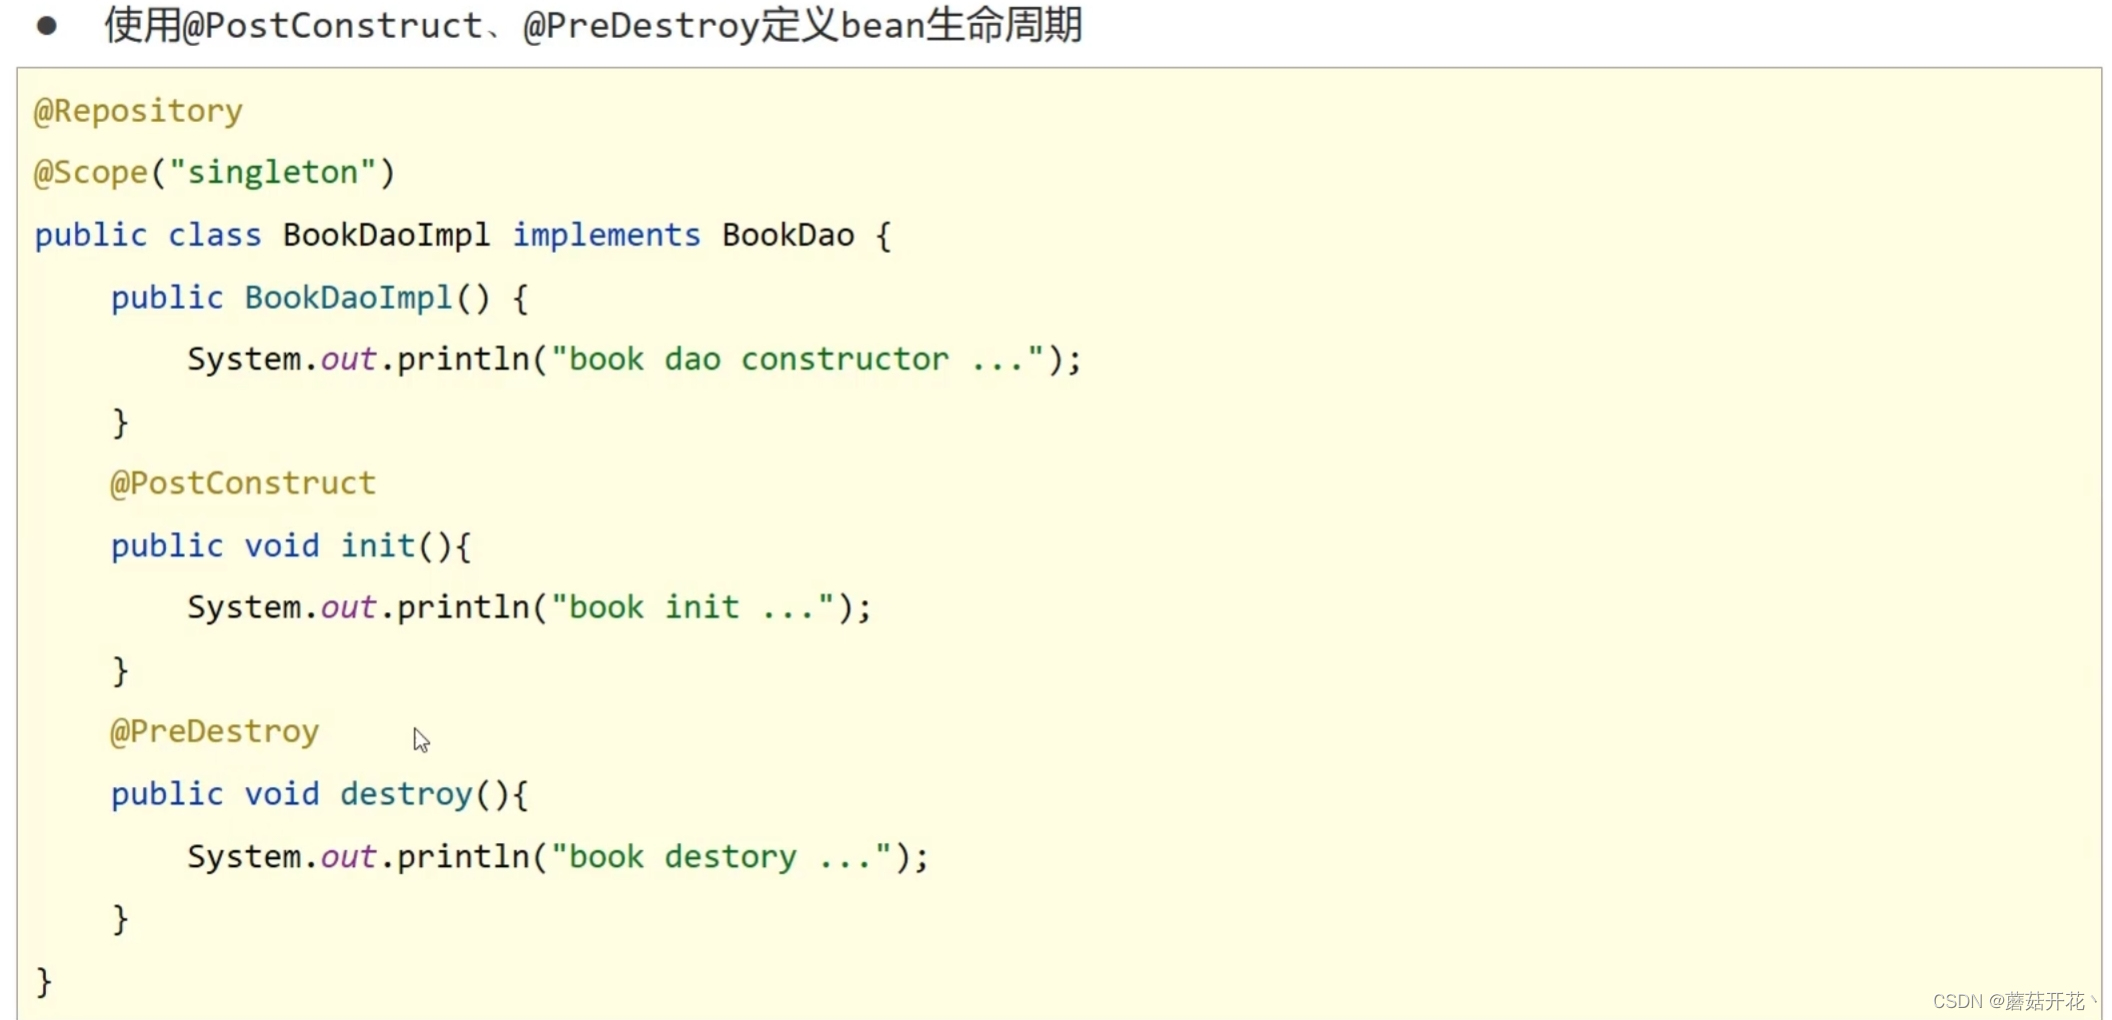
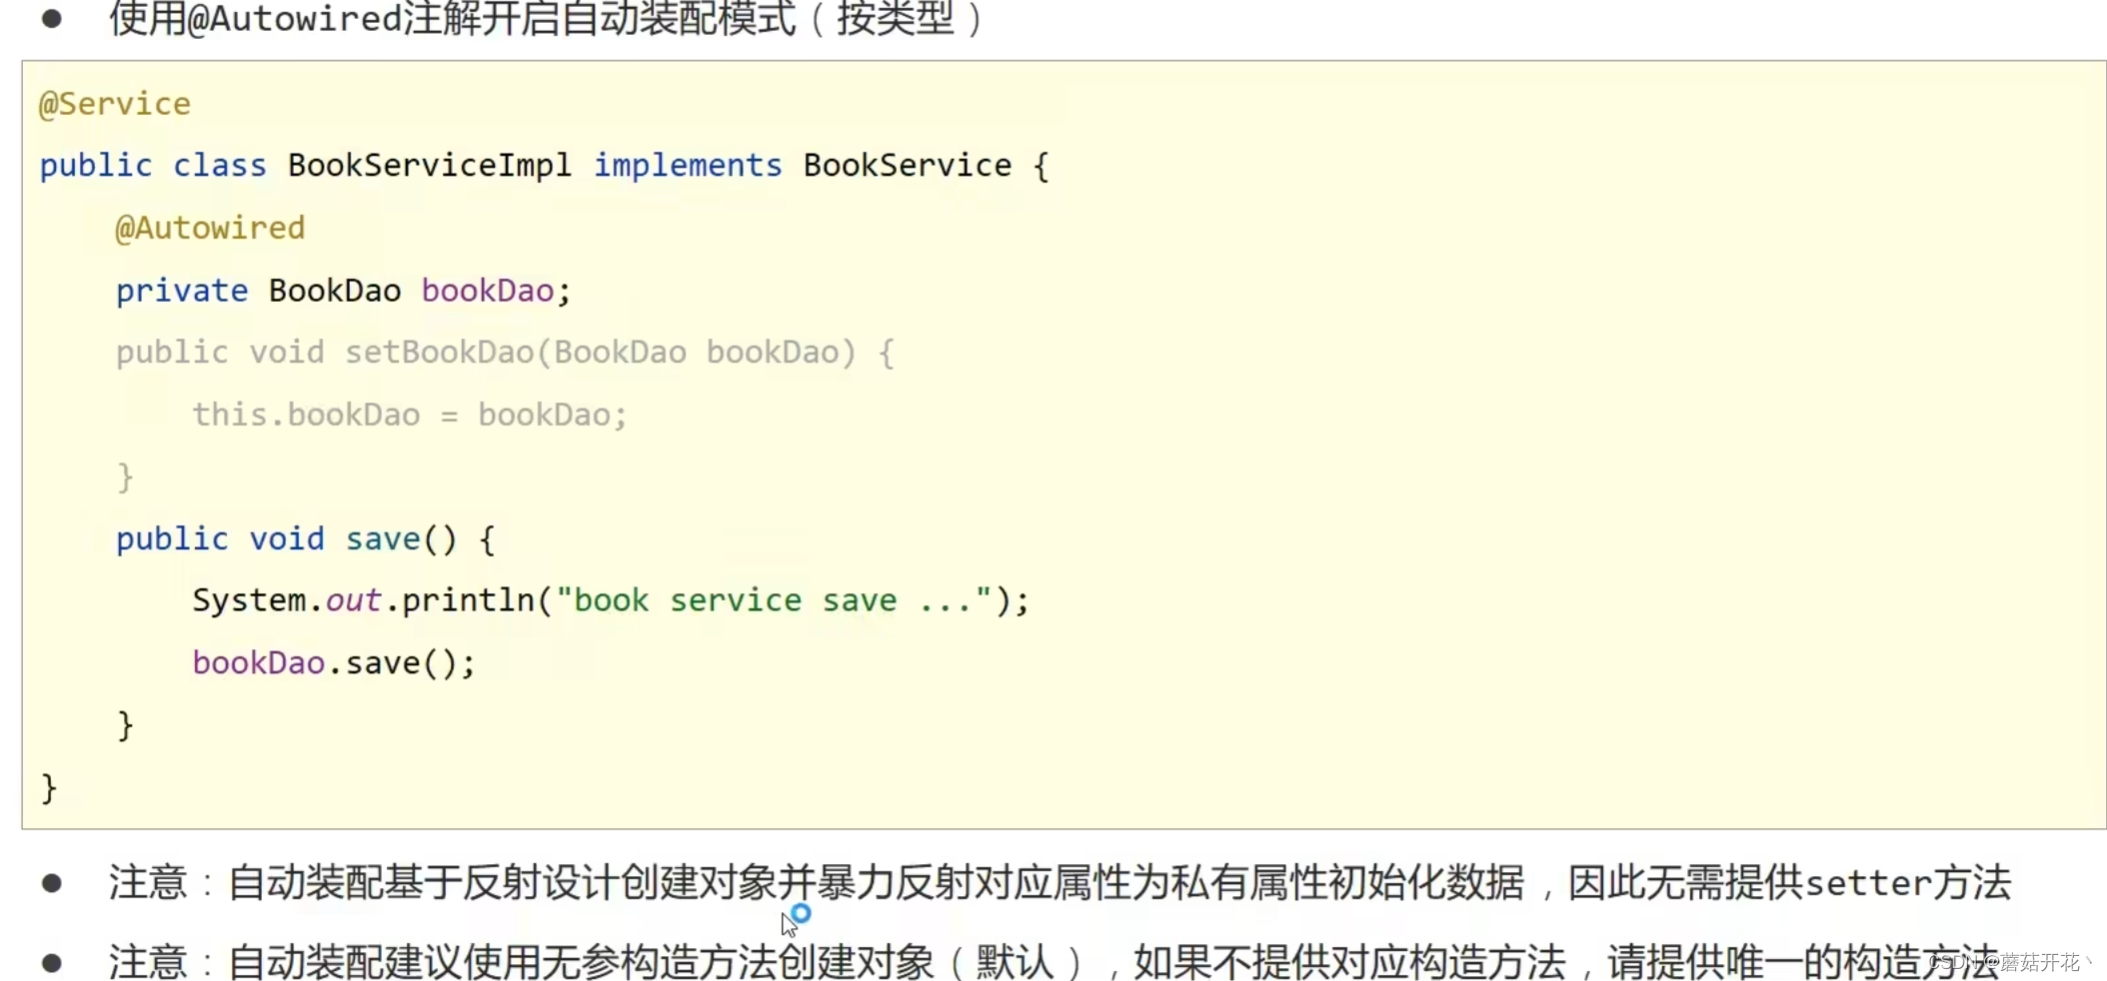
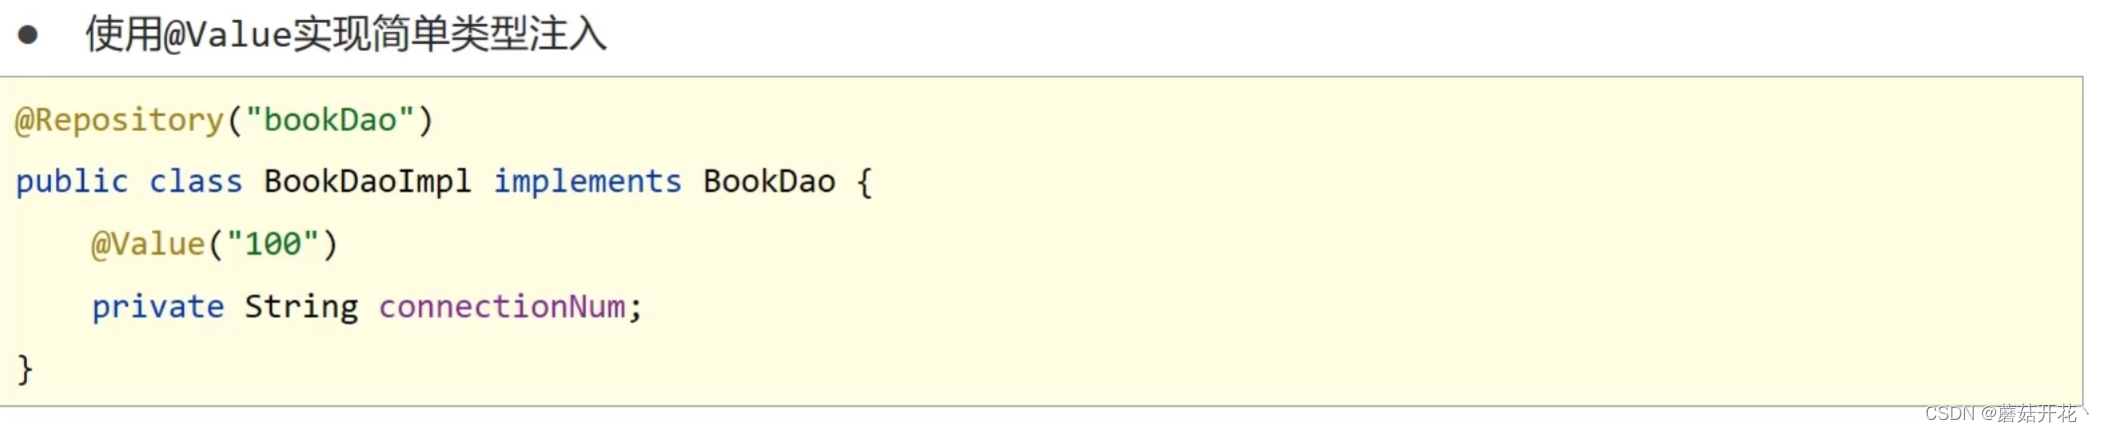
依赖注入
引用类型
简单类型
加载properties文件 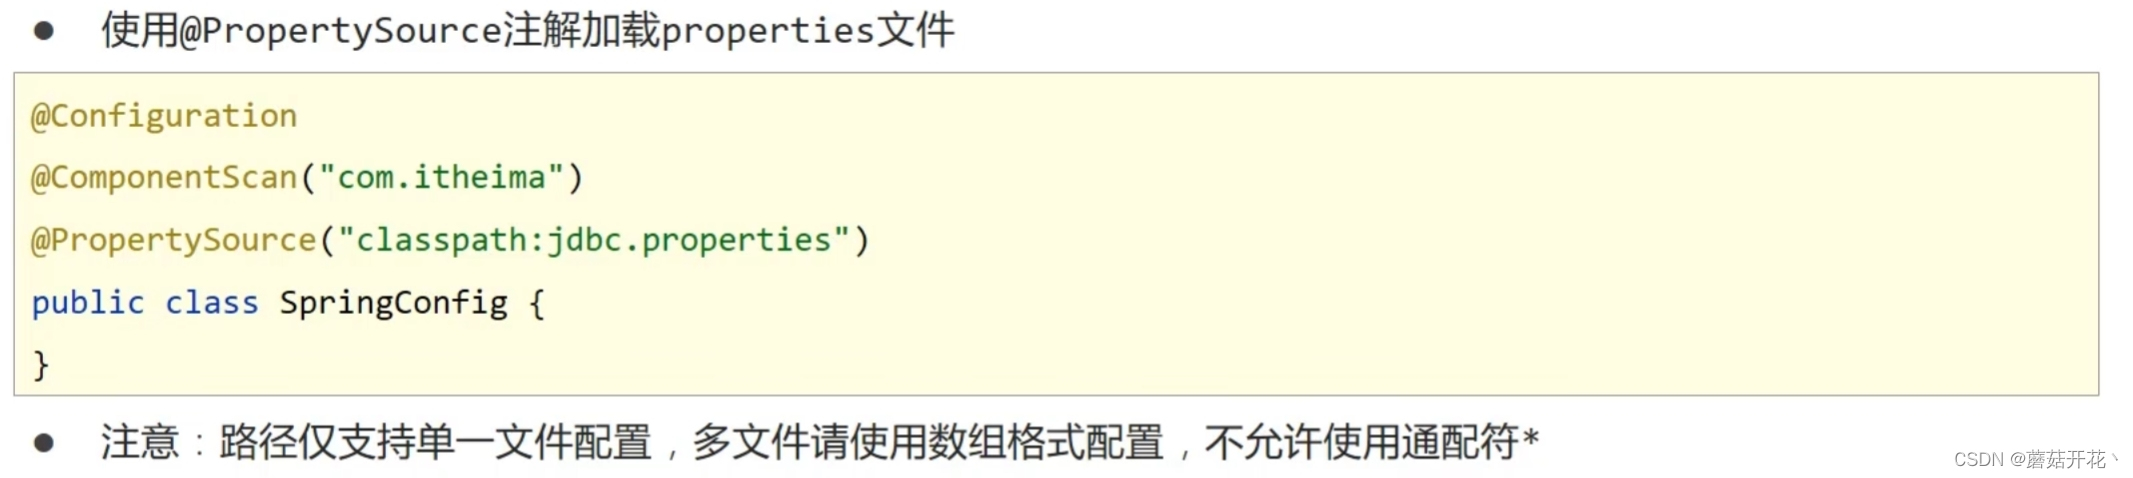
第三方bean管理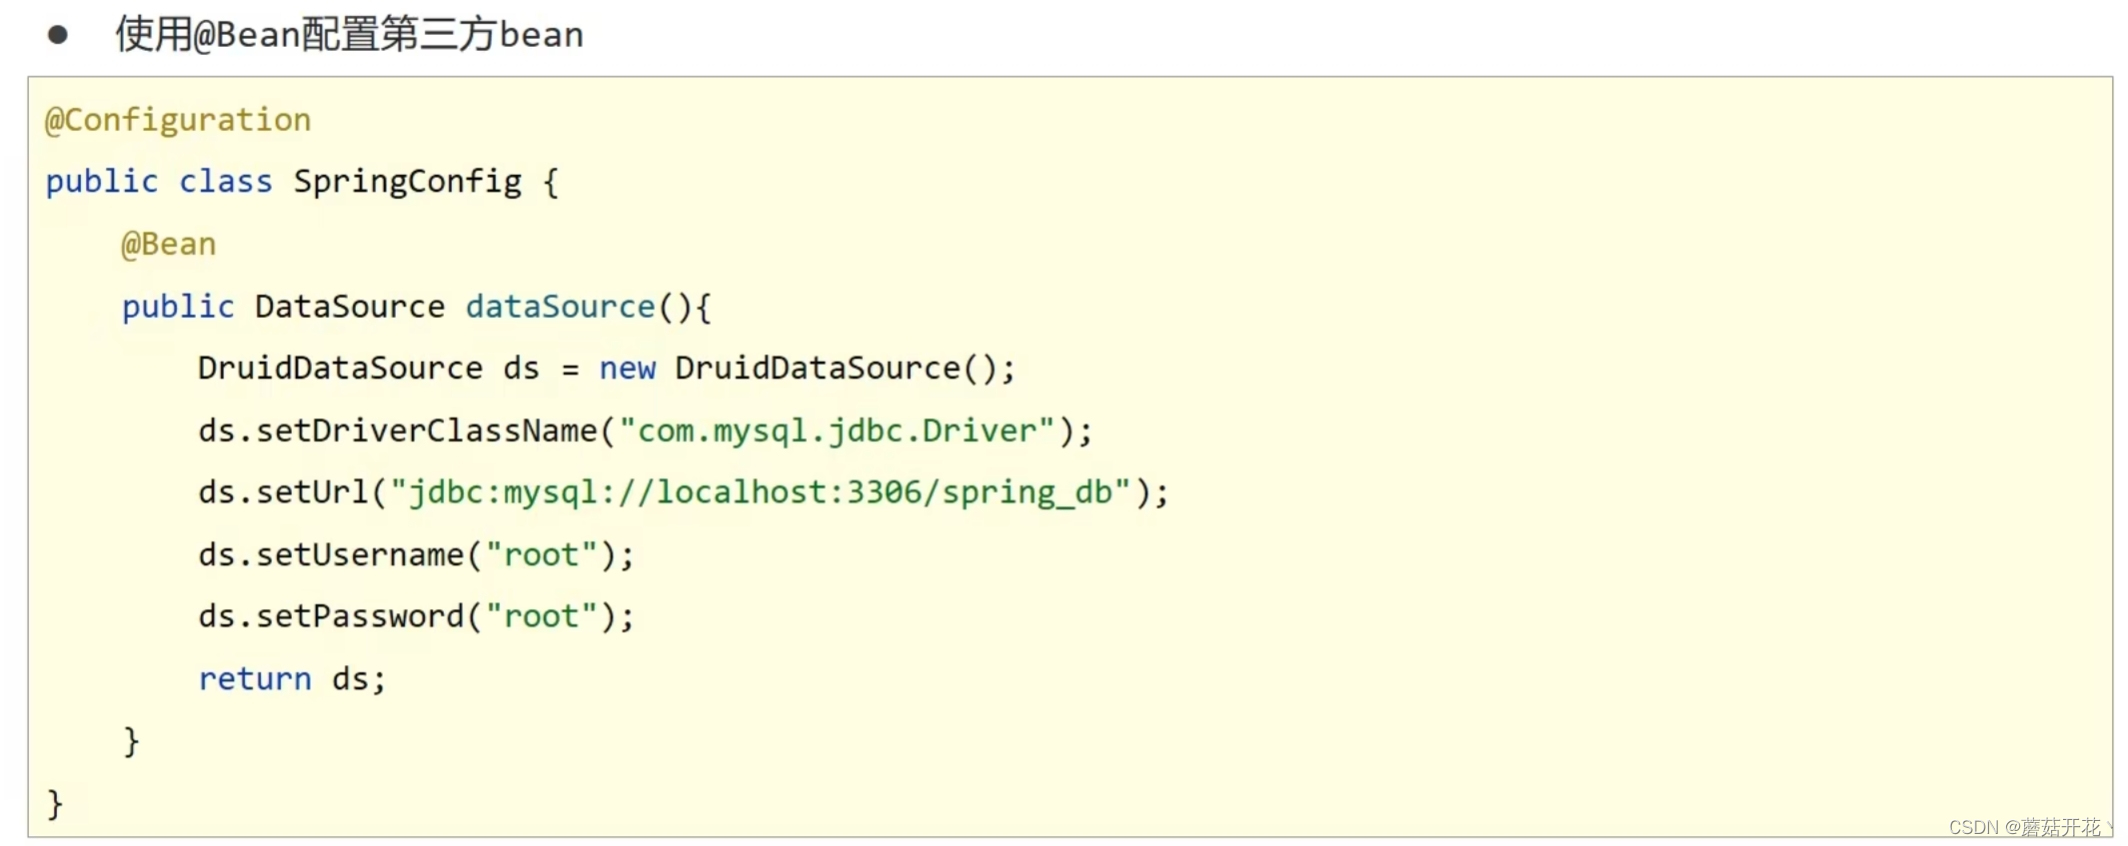
建议下面的方式
方式一 
方式二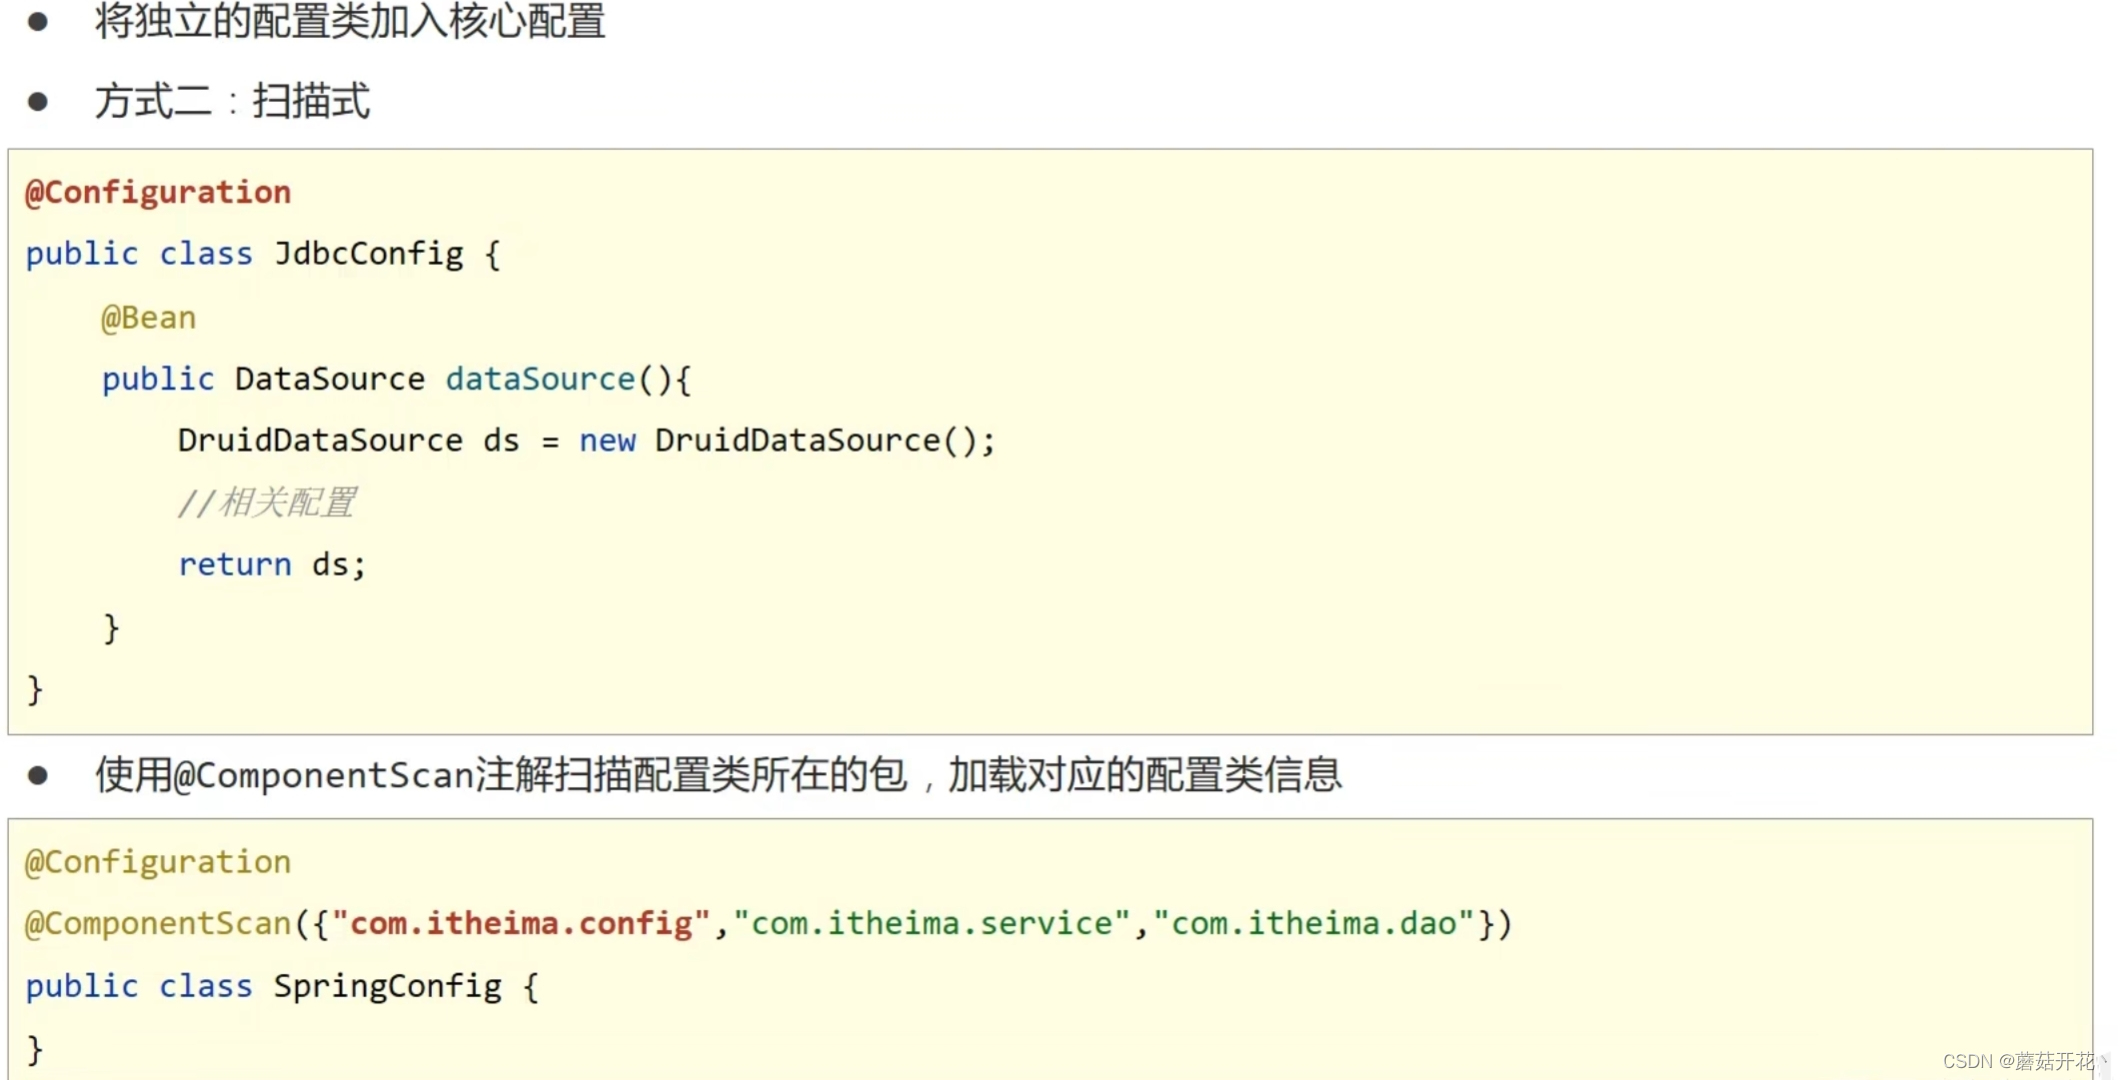
第三方bean依赖注入
简单类型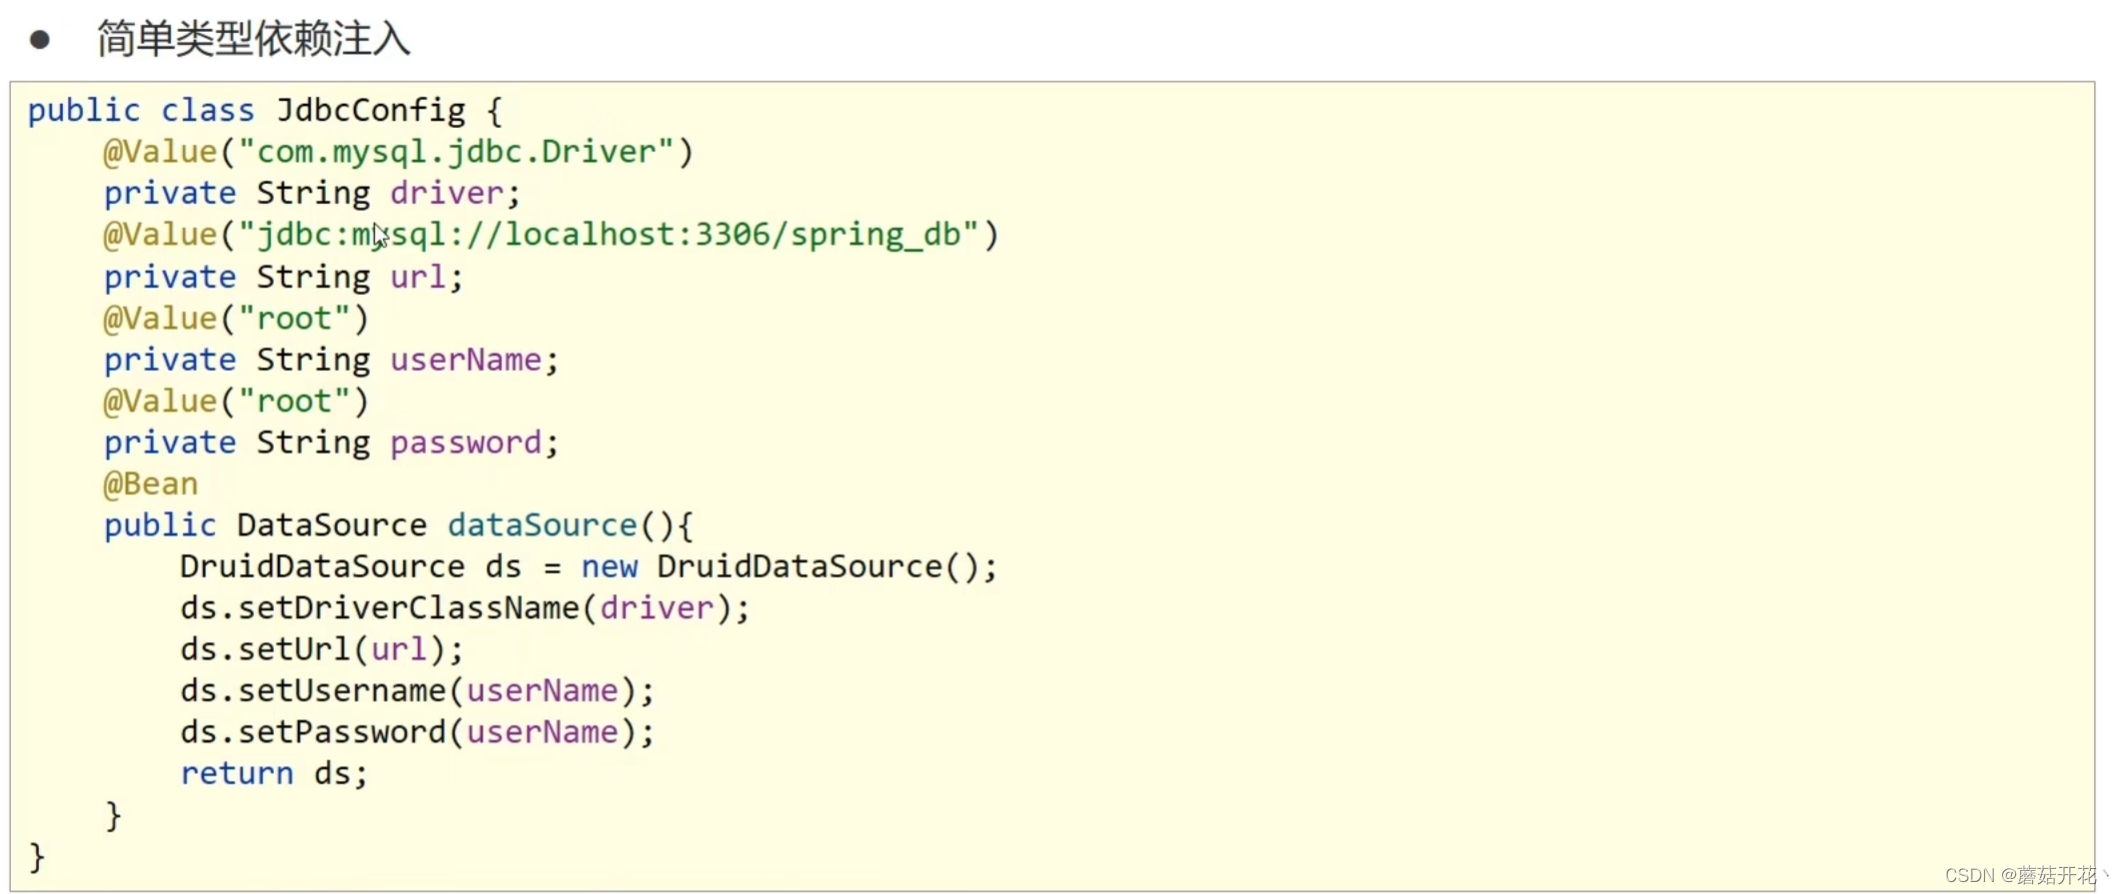
引用类型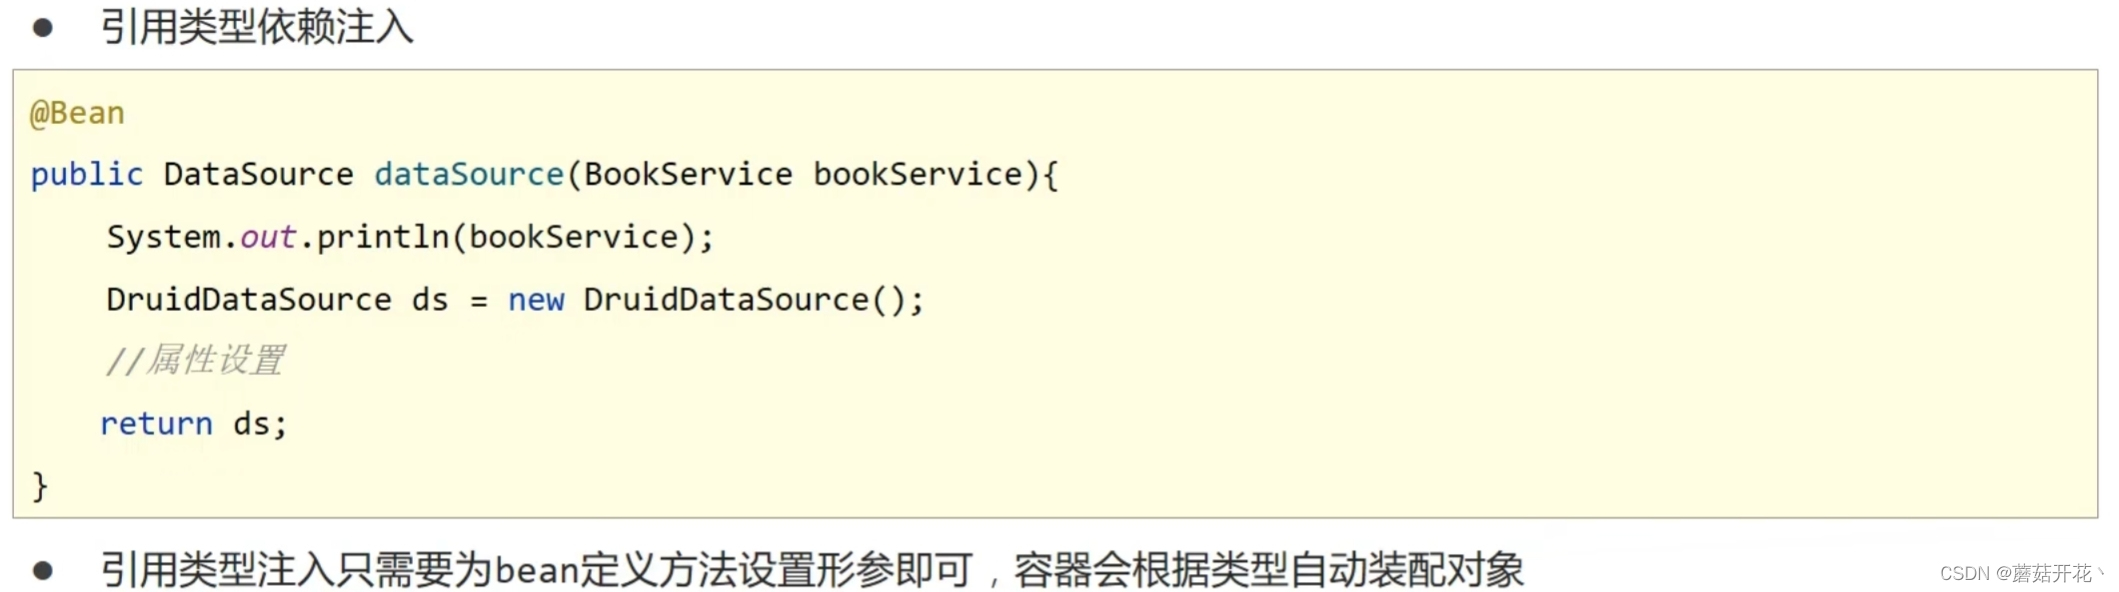
XML配置比对注解配置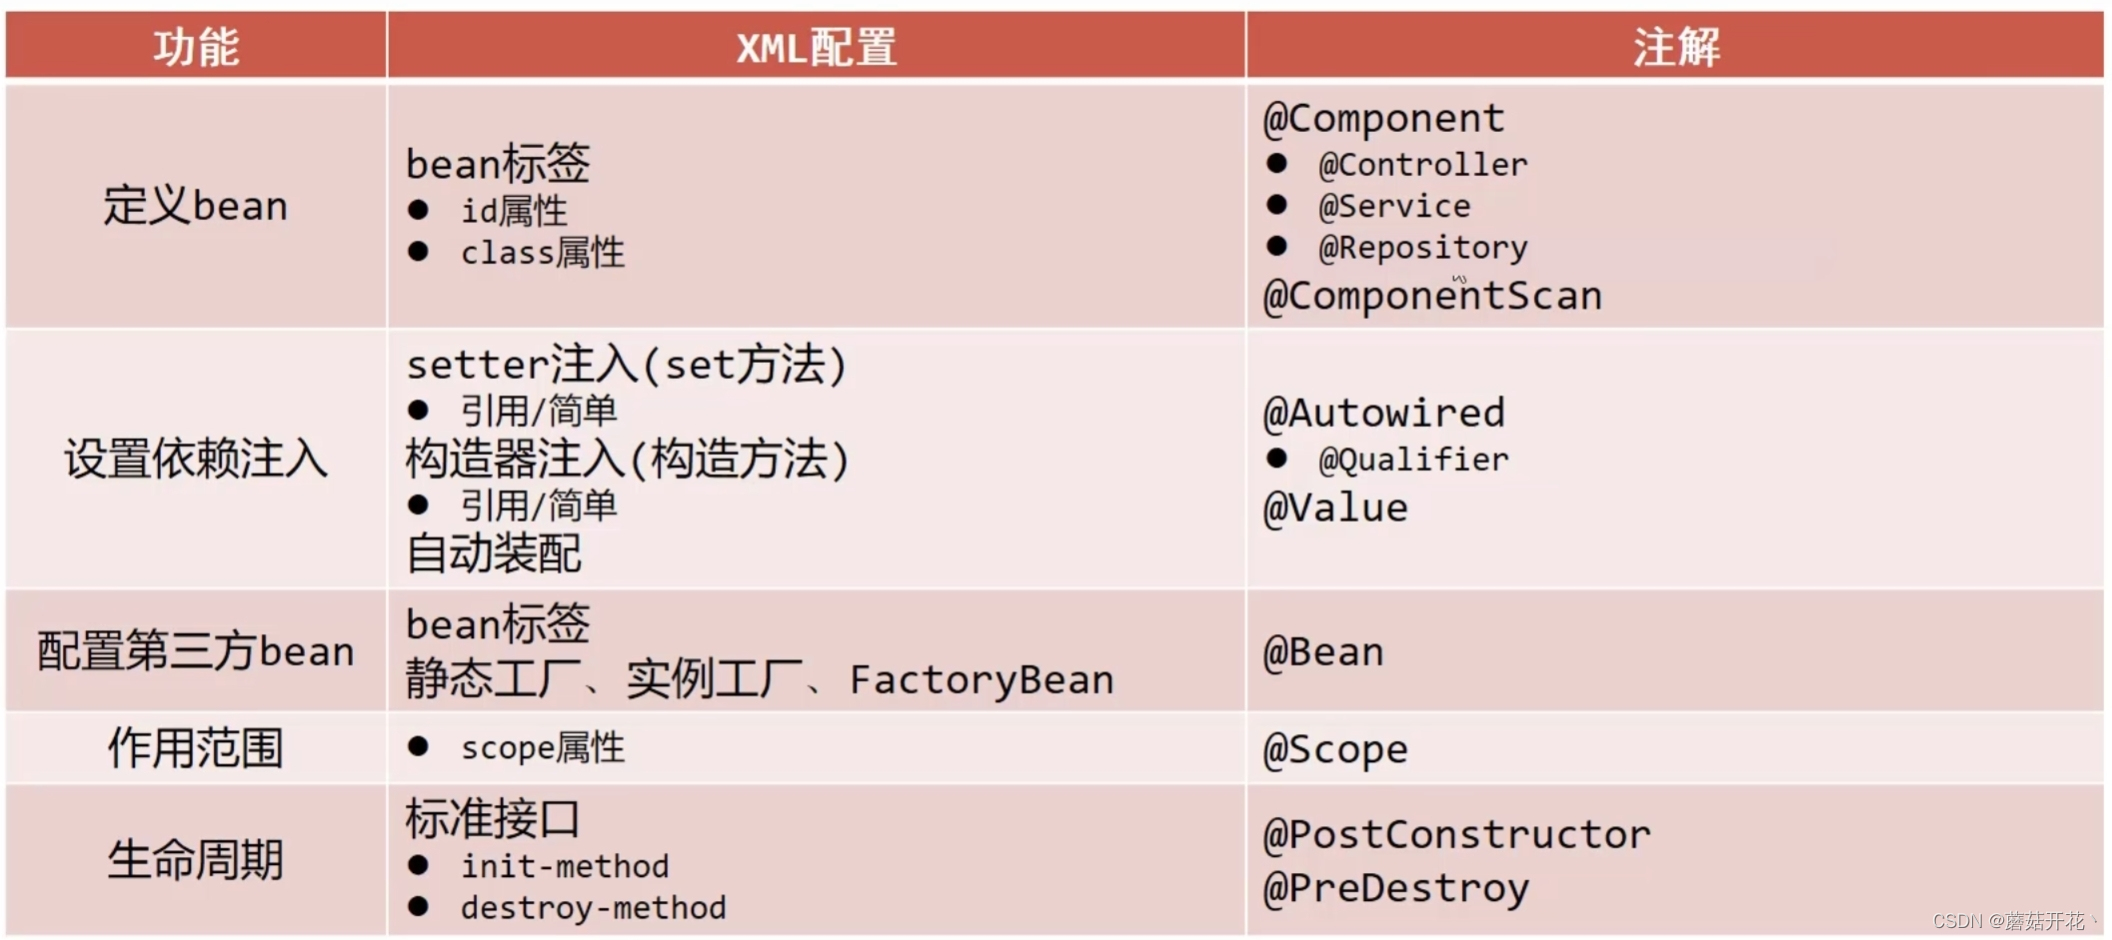
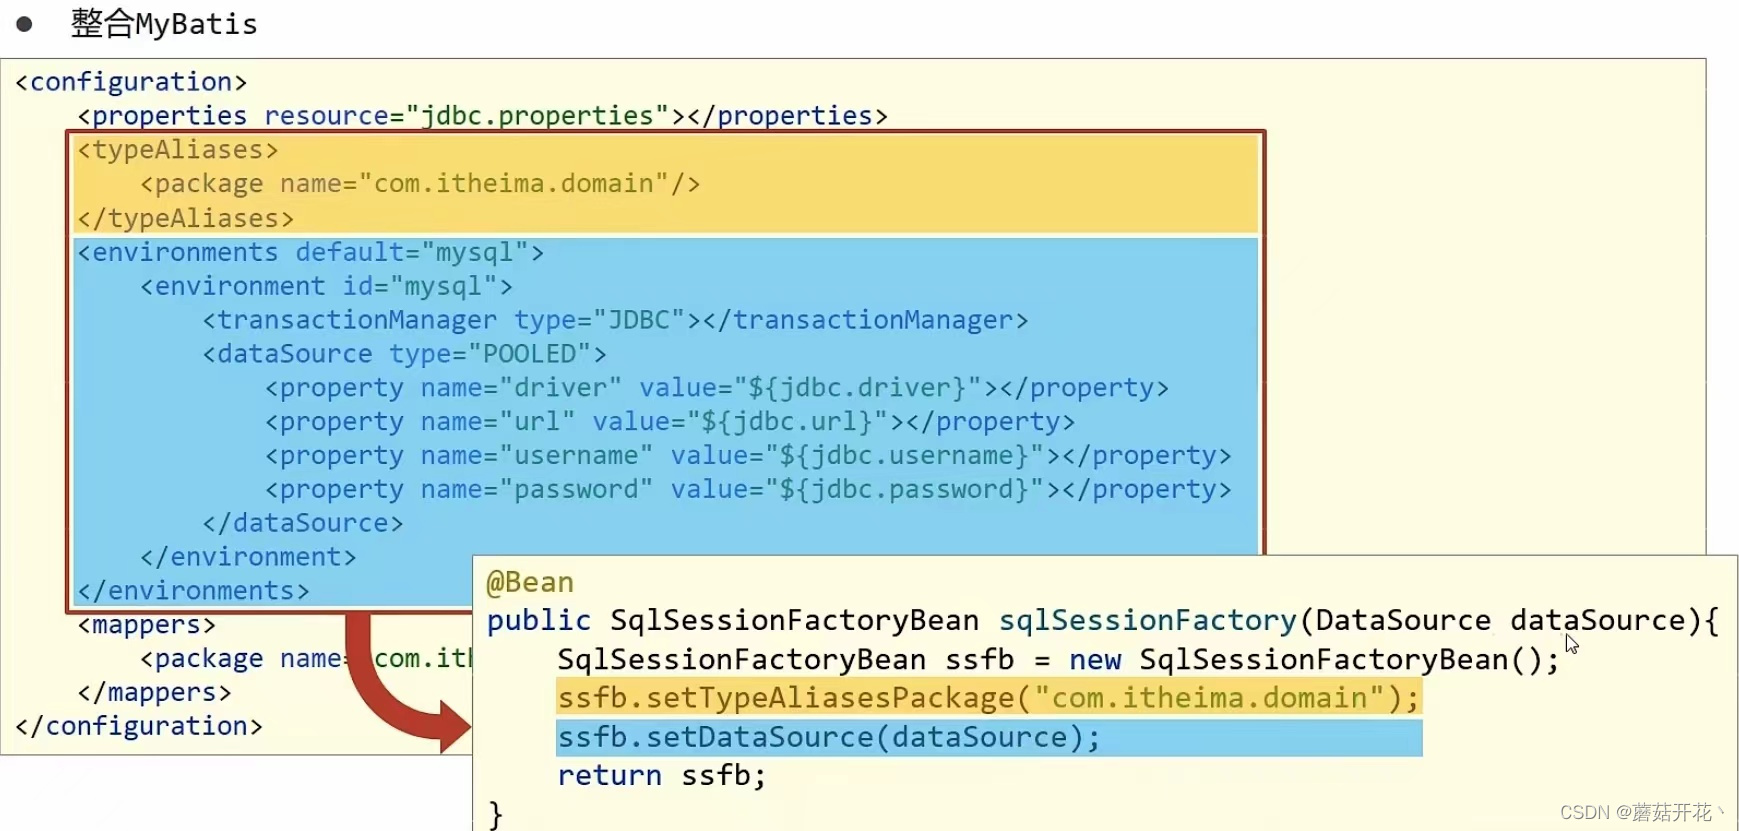
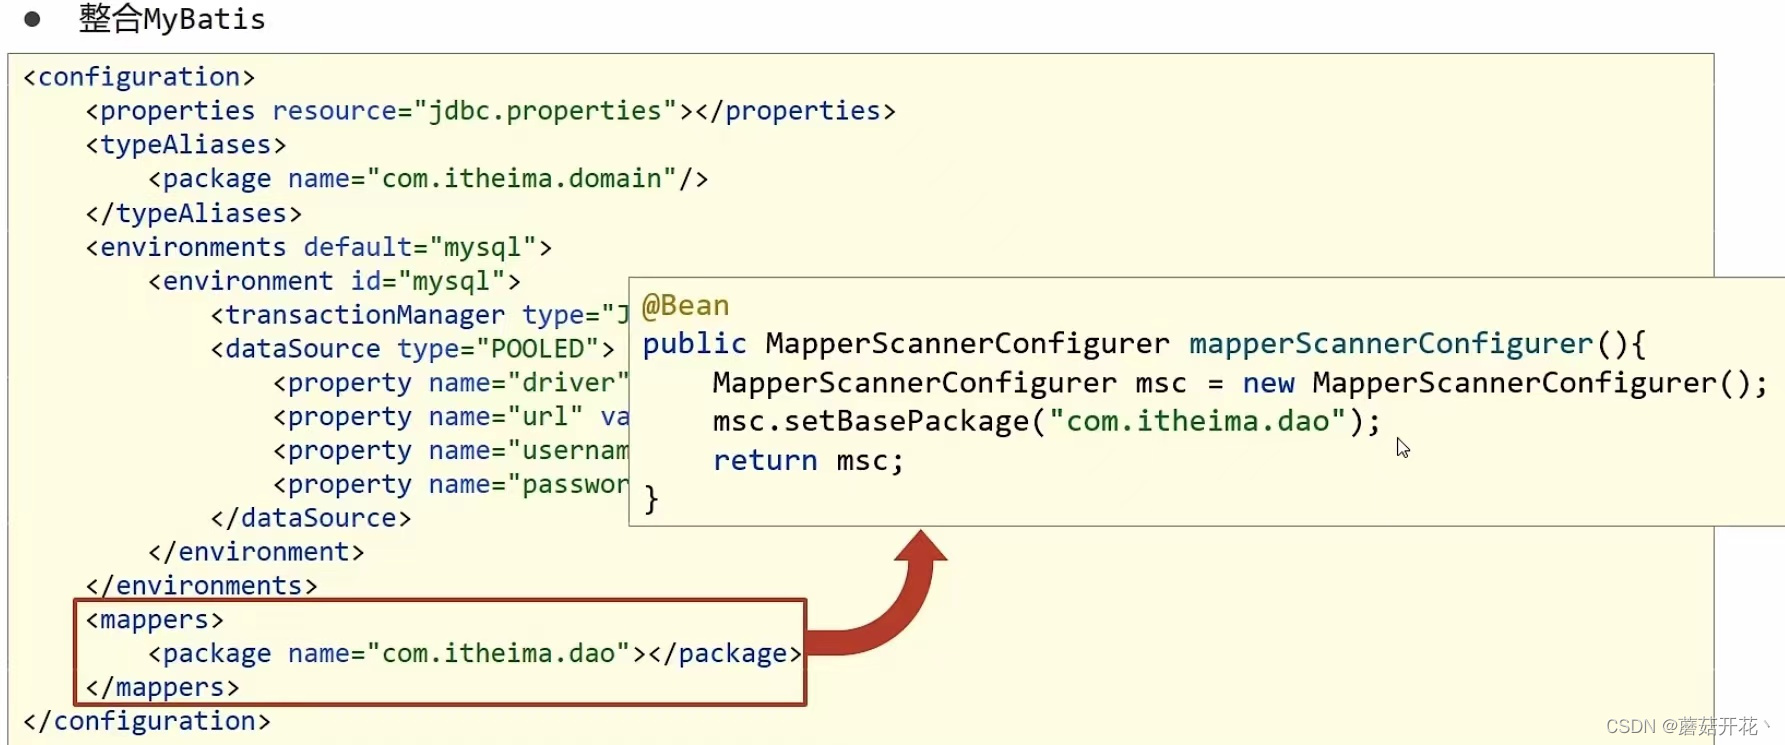
整合Mybatis
- 在pom.xml中(maven导包)
<dependency> <grouId>org.springframework</groupId> <artifactId>spring-jdbc</artifactId> <version>/!--根据上面版本决定--/</version> </dependency> <dependency> <grouId>org.mybatis</groupId> <artifactId>mybatis-spring</artifactId> <version>/!--根据上面版本决定--/</version> </dependency> -
整合
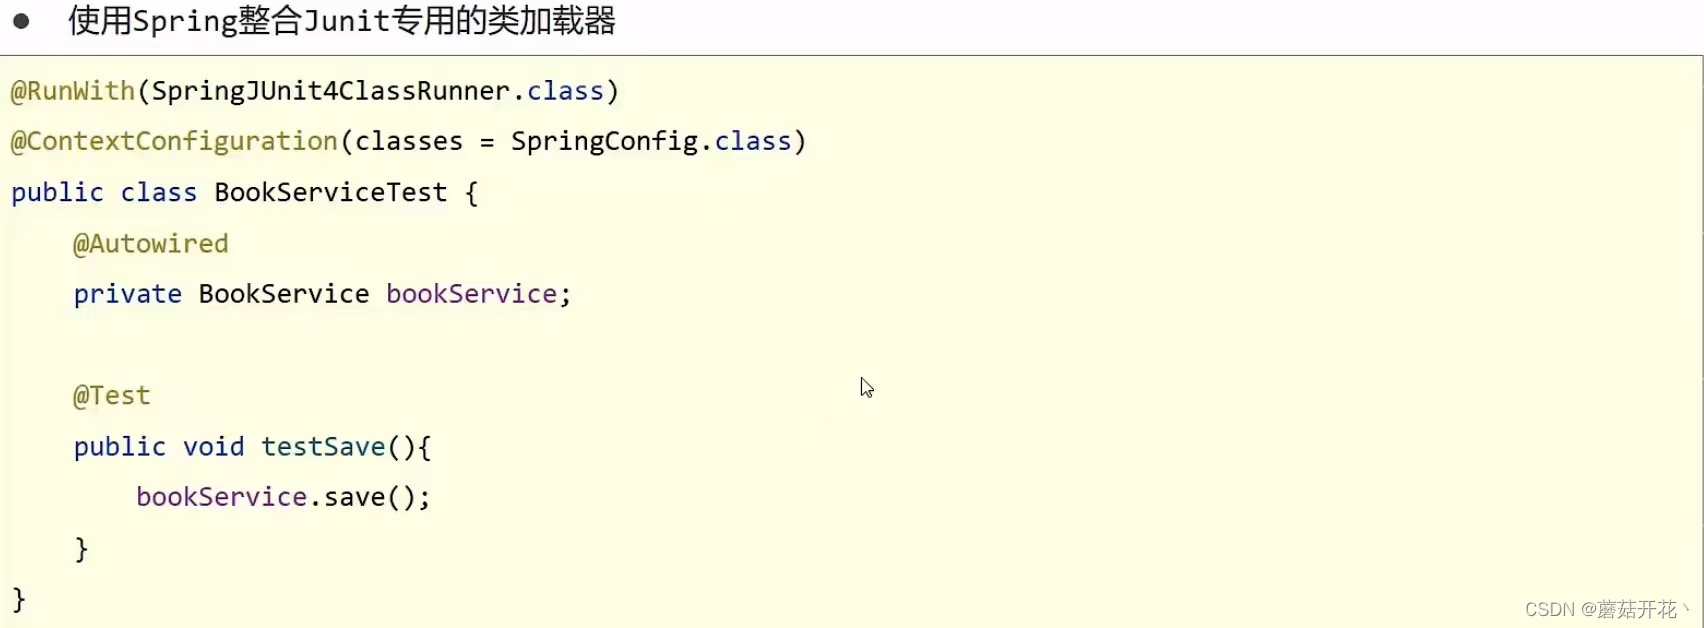
整合junit
- 在pom.xml中(maven导包)
<dependency> <grouId>junit</groupId> <artifactId>junit</artifactId> <version>/!--根据上面版本决定--/</version> <scope>test</scope> </dependency> <dependency> <grouId>org.springframework</groupId> <artifactId>spring-test</artifactId> <version>/!--根据上面版本决定--/</version> </dependency> - 整合
AOP
面向切面编程
在不惊动原始设计的基础上为其进行功能增强
入门案例
- 导入坐标(pom.xml)
<!--旧--> <dependency> <grouId>org.springframework</groupId> <artifactId>spring-context</artifactId> <version>/!--根据上面版本决定--/</version> </dependency> <!--新--> <dependency> <grouId>org.aspectj</groupId> <artifactId>aspectjweaver</artifactId> <version>/!--根据上面版本决定--/</version> </dependency> - 制作连接点方法(原始操作,Dao接口与实现类)
@Repository public class BookDaoImpl implements BookDao{ public void save(){ System.out.println(System.currentTimeMillis());//下一步要抽出 System.out.println("save"); } public void update(){ System.out.println("update"); } } - 制作共性功能(通知类与通知)
public class MyAdvice{ //第三步 public void method(){ System.out.println(System.currentMillis()); } } - 定义切入点
public class MyAdvice{ //第四步 @pointcut("execution(void com.mogu.dao.BookDao.update())")//切入点,当执行到这个方法时 private void pt(){} //第三步 public void method(){ System.out.println(System.currentMillis()); } } - 绑定切入点与通知关系(切面)
@component
@Aspect   //告诉spring这是AOP
public class MyAdvice{
//第四步
    @pointcut("execution(void com.mogu.dao.BookDao.update())")//切入点,当执行到这个方法时

    private void pt(){}

//第五步
    @Before("pt()")
//第三步
    public void method(){
        System.out.println(System.currentMillis());
    }
}
在配置类中加@EnableAspectAutoProxy表使用注解开发AOP
工作流程
- spring容器启动
- 读取所有切面配置中的切入点
- 初始化bean,判定bean对应的类中的方法是否匹配到任意切点(匹配失败创建对象;匹配成功,创建原始对象{目标对象}的代理对象)
- 获取bean执行方法(获取bean,调用方法并执行,完成操作;获取的bean是代理对象时,根据代理对象的运作模式运行原始方法与增强的内容,完成操作)
核心概念
- 目标对象(Target):原始功能去掉共性功能对应的类产生的对象,这种对象是无法直接完成最终工作的
- 代理(Proxy):目标对象无法直接完成工作,需要对其进行功能回填,通过原始对象的代理对象实现
AOP切入点表达式


AOP通知类型 
前置通知
后置通知
环绕通知

返回后通知
抛出异常后通知
AOC通知获取数据
参数获取

返回值获取
获取异常数据
事务
Spring事务简介
在数据层或者业务层保证一系列的数据库操作同成功同失败
比如在减钱和加钱之间有错误,这俩个操作都失败
步骤


事务配置


 8万+
8万+


 被折叠的 条评论
为什么被折叠?
被折叠的 条评论
为什么被折叠?
 到【灌水乐园】发言


