


文章目录
SSM(Vue3+ElementPlus+Axios+SSM前后端分离)–基础环境搭建【四】
项目介绍
项目功能/界面
● SSM 整合项目界面

创建表,使用逆向工程生成Bean、XxxMapper 和XxxMapper.xml
1. 创建furns_ssm 数据库和furns 表
-- 创建furns_ssm
DROP DATABASE IF EXISTS furns_ssm;
CREATE DATABASE furns_ssm;
USE furns_ssm;
-- 创建家居表
CREATE TABLE furn(
`id` INT(11) PRIMARY KEY AUTO_INCREMENT, ## id
`name` VARCHAR(64) NOT NULL, ## 家居名
`maker` VARCHAR(64) NOT NULL, ## 厂商
`price` DECIMAL(11,2) NOT NULL, ## 价格
`sales` INT(11) NOT NULL, ## 销量
`stock` INT(11) NOT NULL, ## 库存
`img_path` VARCHAR(256) NOT NULL ## 照片路径
);
使用MyBatis Generator 逆向工程生成bean mapper 接口和mapper.xml
当然也可以自己写,如果在开发中, 逆向工程生成的代码, 不能满足需要,再自己编写.
<!-- 修改mybatis-config.xml , 增加typeAliases 配置.-->
<configuration>
<!--
1. 如果一个包下有很多的类,我们可以直接引入包
2. 这样该包下面的所有类名,可以直接使用
-->
<typeAliases>
    <package name="com.nlc.furns.bean"/>
</typeAliases>
</configuration>
引入MyBatis Generator 包, 在pom.xml 配置
<dependency>
    <groupId>junit</groupId>
    <artifactId>junit</artifactId>
    <version>4.11</version>
    <scope>test</scope>
</dependency>

<!-- 引入mybatis 逆向工程依赖包-->
<dependency>
    <groupId>org.mybatis.generator</groupId>
    <artifactId>mybatis-generator-core</artifactId>
    <version>1.4.0</version>
</dependency>
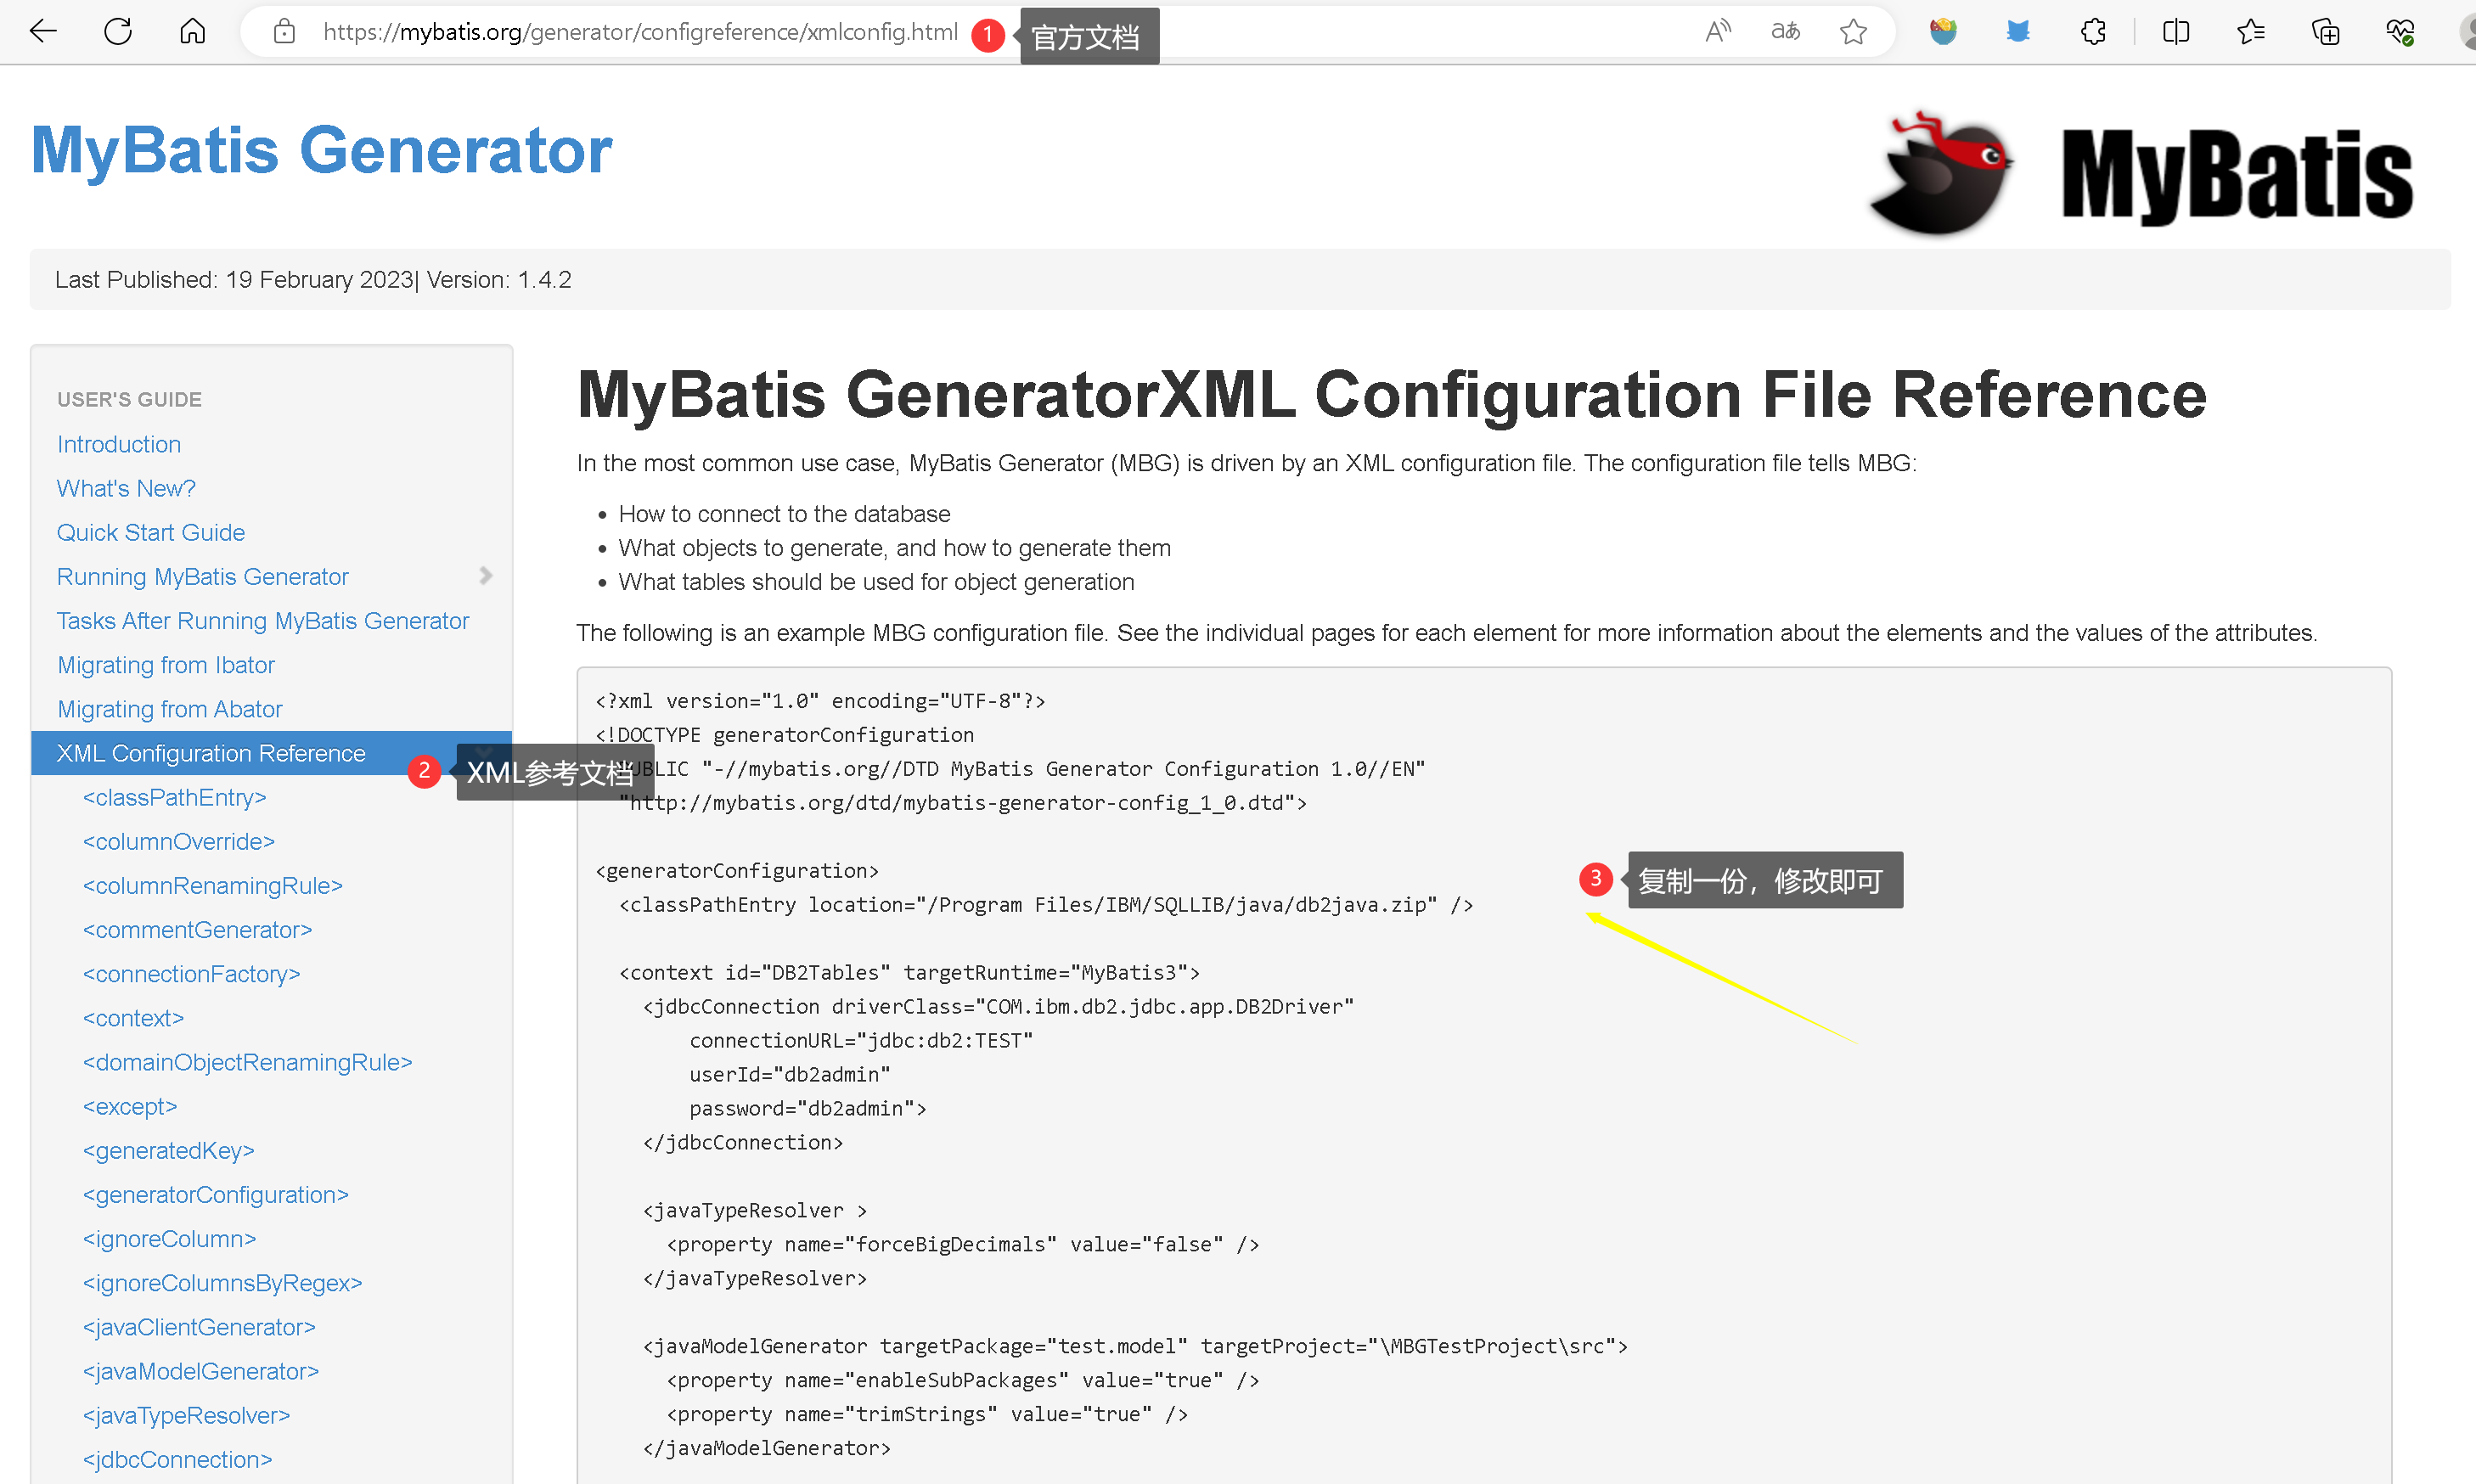
创建furns_ssm\mbg.xml
参考文档https://mybatis.org/generator/ 进行配置, 这里给出了一个模板xml ,在上面修改即可
<?xml version="1.0" encoding="UTF-8"?>
<!DOCTYPE generatorConfiguration
        PUBLIC "-//mybatis.org//DTD MyBatis Generator Configuration 1.0//EN"
        "http://mybatis.org/dtd/mybatis-generator-config_1_0.dtd">
<generatorConfiguration>
    <context id="DB2Tables" targetRuntime="MyBatis3">
        <!--        生成没有注释的bean-->
        <commentGenerator>
            <property name="suppressAllComments" value="true"/>
        </commentGenerator>
        <!--        配置数据库连接信息-->
        <jdbcConnection driverClass="com.mysql.jdbc.Driver"
                        connectionURL="jdbc:mysql://localhost:3306/furns_ssm?characterEncoding=utf8"
                        userId="root"
                        //password="自己的密码">注意记得把//删掉然后写自己的密码和端口
        </jdbcConnection>
        <javaTypeResolver>
            <property name="forceBigDecimals" value="false"/>
        </javaTypeResolver>
        <!--        指定javaBean生成的位置-->
        <javaModelGenerator targetPackage="com.nlc.furn.bean" targetProject=".\src\main\java">
            <property name="enableSubPackages" value="true"/>
            <property name="trimStrings" value="true"/>
        </javaModelGenerator>
        <!--        指定sql映射文件生成的位置
        1. 要根据自己的实际情况指定
        -->
        <sqlMapGenerator targetPackage="mapper" targetProject=".\src\main\resources">
            <property name="enableSubPackages" value="true"/>
        </sqlMapGenerator>
        <!--        指定dao接口生成的位置, 也就是mapper接口-->
        <javaClientGenerator type="XMLMAPPER" targetPackage="com.nlc.furn.dao" targetProject=".\src\main\java">
            <property name="enableSubPackages" value="true"/>
        </javaClientGenerator>
        <!--        指定要逆向生成的表和生成策略-->
        <table tableName="furn" domainObjectName="Furn"></table>
    </context>
</generatorConfiguration>
创建文件\test\MBGTest.java
RunningMyBatis Generator , 生成相关bean, mapper 接口和mapper.xml 参考官方问题来修改, 并完成测试
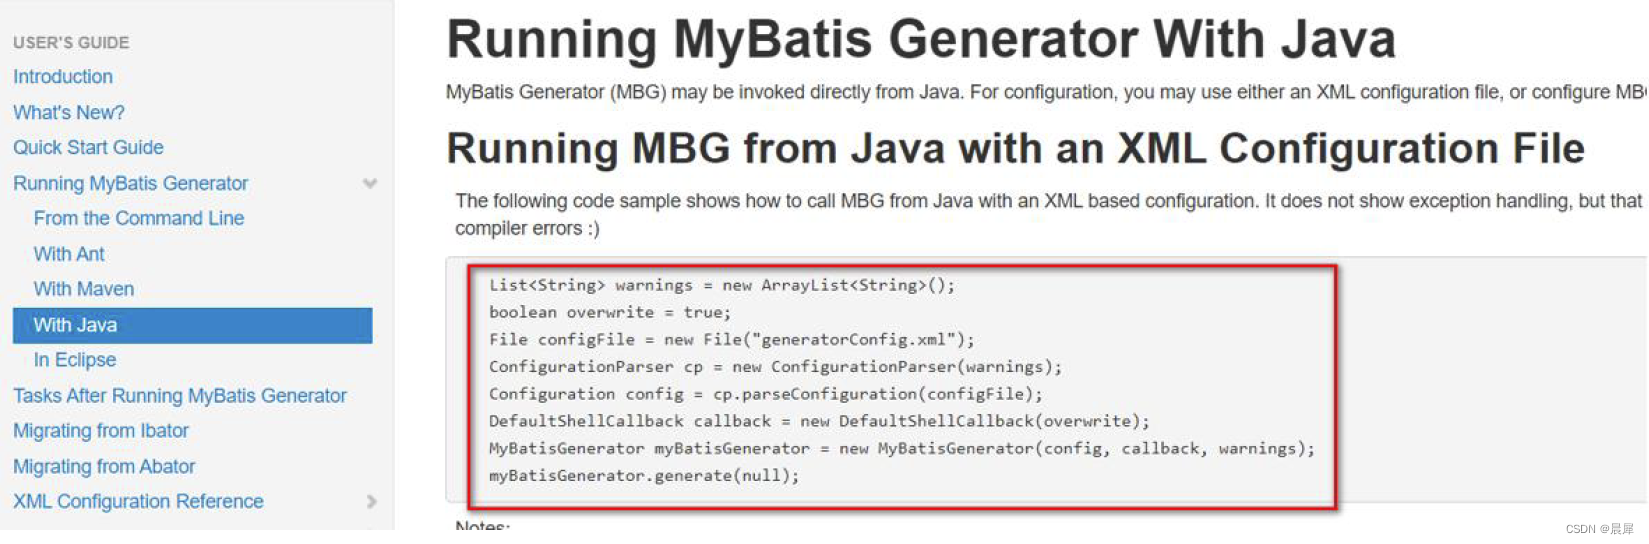
public class MBGTest {

    @Test
    public void generator() throws Exception {

        List<String> warnings = new ArrayList<String>();
        boolean overwrite = true;
        //这里要指定你自己配置的mbg.xml
        //如果这样访问,需要将文件放在项目下
        File configFile = new File("mbg.xml");
        ConfigurationParser cp = new ConfigurationParser(warnings);
        Configuration config = cp.parseConfiguration(configFile);
        DefaultShellCallback callback = new DefaultShellCallback(overwrite);
        MyBatisGenerator myBatisGenerator = new MyBatisGenerator(config, callback, warnings);
        myBatisGenerator.generate(null);
		System.out.println("逆向生成OK");
    }
}
使用Junit 测试Spring 和MyBatis 是否整合成功, 能通过MyBatis 添加furn 到数据库
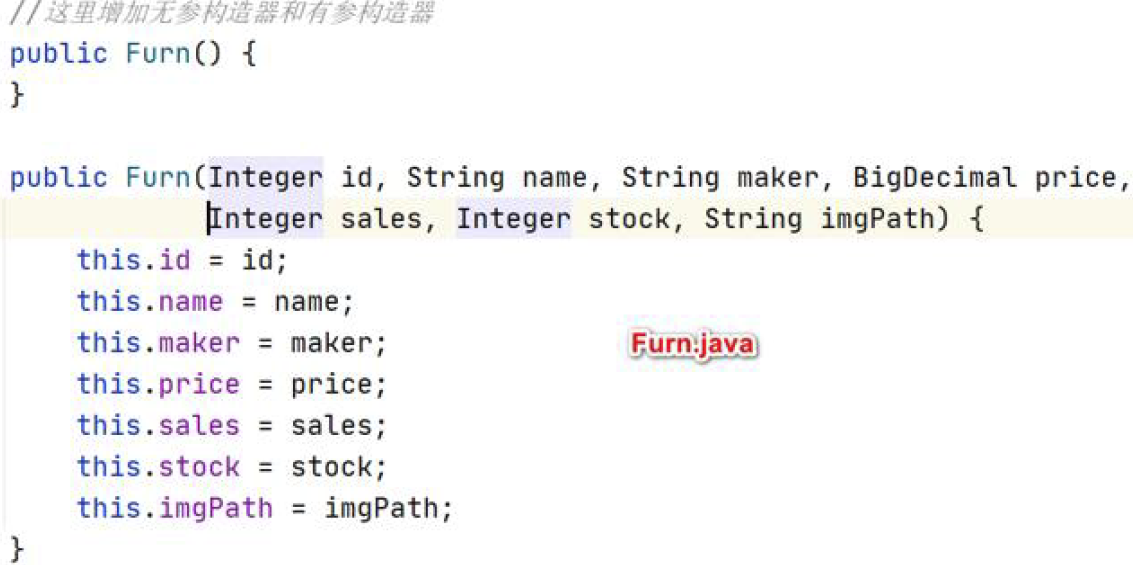
- 修改bean: Furn.java
创建furns_ssm\src\test\java\com\nlc\furns\dao\FurnMapperTest.java完成对furn 表的crud 测试操作
public class FurnMapperTest {

    @Test
    public void insertSelective() {

        //1. 获取到容器
        ApplicationContext ioc =
                new ClassPathXmlApplicationContext("applicationContext.xml");
        //2获取FurnMapper
        FurnMapper furnMapper = ioc.getBean(FurnMapper.class);
        //System.out.println("furnMapper--" + furnMapper.getClass());
        //3.添加数据
        Furn furn =
                new Furn(null, "北欧风格沙发~~", "与之家~~", new BigDecimal(180), 666,
                        70, "assets/images/product-image/1.jpg");

        int affected = furnMapper.insertSelective(furn);
        System.out.println("affected--" + affected);
        System.out.println("操作成功~");
    }


    @Test
    public void deleteByPrimaryKey() {

        //1. 获取到容器
        ApplicationContext ioc =
                new ClassPathXmlApplicationContext("applicationContext.xml");
        //2获取FurnMapper
        FurnMapper furnMapper = ioc.getBean(FurnMapper.class);

        int affected = furnMapper.deleteByPrimaryKey(6);
        System.out.println("affected--" + affected);
        System.out.println("操作成功");
    }

    @Test
    public void updateByPrimaryKey() {

        //1. 获取到容器
        ApplicationContext ioc =
                new ClassPathXmlApplicationContext("applicationContext.xml");
        //2获取FurnMapper
        FurnMapper furnMapper = ioc.getBean(FurnMapper.class);

        Furn furn = new Furn();
        furn.setId(5);
        furn.setName("风格家居-小沙发");

        //会修改所有的字段,如果没有设置字段对应的属性值,那么默认是null
        //int affected = furnMapper.updateByPrimaryKey(furn);

        //根据你设置属性对应字段,生成sql语句
        int affected = furnMapper.updateByPrimaryKeySelective(furn);
        System.out.println("affected--" + affected);
        System.out.println("操作成功~");

    }

    @Test
    public void selectByPrimaryKey() {

        //1. 获取到容器
        ApplicationContext ioc =
                new ClassPathXmlApplicationContext("applicationContext.xml");
        //2获取FurnMapper
        FurnMapper furnMapper = ioc.getBean(FurnMapper.class);

        Furn furn = furnMapper.selectByPrimaryKey(1);
        System.out.println("furn--" + furn);
        System.out.println("操作成功~");
    }
}
注意事项和细节说明
insertSelective 和insert 的区别
-
insertSelective–选择性保存数据;
比如User 里面有三个字段:id,name,age,password
但是只设置了一个字段;
User u=new user();
u.setName(“张三”);
insertSelective(u); -
insertSelective 执行对应的sql 语句的时候,只插入对应的name 字段;(主键是自动添加的,默认插入为空)
insert into tb_user (id,name) value (null,“张三”);
- 而insert 则是不论设置多少个字段,统一都要添加一遍,不论你设置几个字段,即使是一个
User u=new user();
u.setName(“张三”);
insert(u);
insert into tb_user (id,name,age,password) value (null,“张三”,null,null)


 3150
3150


 被折叠的 条评论
为什么被折叠?
被折叠的 条评论
为什么被折叠?
 到【灌水乐园】发言


