


后端:
全局异常处理器的作用:
当我们在项目中碰到很多不同的异常情况时,我们需要去处理异常
不过我们不可能每个异常都用try/catch,那样很不优雅
所以我们可以用这个全局异常处理器,来优雅的处理异常
这个全局异常处理器说白了就是把项目的所有异常统一管理,一起抛出
异常的走向:
因为我们是controller调用service再调用mapper,
只要碰到异常我们就会往上抛,如果mapper层碰到异常,就会一层一层抛到controller,然后再抛向浏览器
所以最后在浏览器页面上就会显示500(服务器端异常)
全局异常处理器怎么用:
1:定义封装异常类:
比如:
package com.usercenter.usercenterproject.exception;
import com.usercenter.usercenterproject.Pojo.ErrorCode;
/**
 * 自定义异常类
 *
 */
public class BusinessException extends RuntimeException {

    /**
     * 异常码
     */
    private final int code;

    /**
     * 描述
     */
    private final String description;

    public BusinessException(String message, int code, String description) {
        super(message);
        this.code = code;
        this.description = description;
    }

    public BusinessException(ErrorCode errorCode) {
        super(errorCode.getMessage());
        this.code = errorCode.getCode();
        this.description = errorCode.getDescription();
    }

    public BusinessException(ErrorCode errorCode, String description) {
        super(errorCode.getMessage());
        this.code = errorCode.getCode();
        this.description = description;
    }

    public int getCode() {
        return code;
    }

    public String getDescription() {
        return description;
    }
}
2:定义不同异常的提示:
这里我用的时枚举,当然创建一个类来定义这些不同异常的处理信息也行。
package com.usercenter.usercenterproject.Pojo;


/**
 * 错误码
 */
public enum ErrorCode {

    SUCCESS(0, "ok", ""),
    PARAMS_ERROR(40000, "请求参数错误", ""),
    NULL_ERROR(40001, "请求数据为空", ""),
    NOT_LOGIN(40100, "未登录", ""),
    NO_AUTH(40101, "无权限", ""),
    SYSTEM_ERROR(50000, "系统内部异常", "");

    private final int code;

    /**
     * 状态码信息
     */
    private final String message;

    /**
     * 状态码描述(详情)
     */
    private final String description;

    ErrorCode(int code, String message, String description) {
        this.code = code;
        this.message = message;
        this.description = description;
    }

    public int getCode() {
        return code;
    }

    public String getMessage() {
        return message;
    }

    // https://t.zsxq.com/0emozsIJh

    public String getDescription() {
        return description;
    }
}
3:定义全局异常处理器:
package com.usercenter.usercenterproject.exception;

import com.usercenter.usercenterproject.Pojo.BaseResponse;
import com.usercenter.usercenterproject.Pojo.ErrorCode;
import com.usercenter.usercenterproject.Pojo.ResultUtils;
import lombok.extern.slf4j.Slf4j;
import org.springframework.web.bind.annotation.ExceptionHandler;
import org.springframework.web.bind.annotation.RestControllerAdvice;

/**
 * 全局异常处理器
 *
 */
@RestControllerAdvice
@Slf4j
public class GlobalExceptionHandler {

    @ExceptionHandler(BusinessException.class)
    public BaseResponse<?> businessExceptionHandler(BusinessException e) {
        log.error("businessException: " + e.getMessage(), e);
        return ResultUtils.error(e.getCode(), e.getMessage(), e.getDescription());
    }


    @ExceptionHandler(RuntimeException.class)
    public BaseResponse<?> runtimeExceptionHandler(RuntimeException e) {
        log.error("runtimeException", e);
        return ResultUtils.error(ErrorCode.SYSTEM_ERROR, e.getMessage(), "");
    }
}
全局异常处理器中出现的注释:
@RestControllerAdvice = @ControllerAdvice + @ResponseBody
这个注解还可以把返回的Result对象封装成json格式的对象返回给前端。
@ExceptionHandler 这个注解也是用来表明我们需要捕获什么异常
这段代码中的参数Exception.class 表明我们要捕获所有的异常。
前端:
我主攻是后端,前端我就单纯只是记录一下,以后如果有在前端深造,我再回来补。
应用场景:我们需要对接口的通用响应进行统一处理,比如从response中取出data。
我觉得对于这种全局响应处理的操作,可以理解为SpringAOP。
代码:
/**
 * request 网络请求工具
 * 更详细的 api 文档: https://github.com/umijs/umi-request
 */
import {extend} from 'umi-request';
import {message} from "antd";
import {history} from "@@/core/history";
import {stringify} from "querystring";

/**
 * 配置request请求时的默认参数
 */
const request = extend({
  credentials: 'include', // 默认请求是否带上cookie
  prefix: process.env.NODE_ENV === 'production' ? 'http://user-backend.code-nav.cn' : undefined
  // requestType: 'form',
});

/**
 * 所以请求拦截器
 */
request.interceptors.request.use((url, options): any => {
  console.log(`do request url = ${url}`)

  return {
    url,
    options: {
      ...options,
      headers: {},
    },
  };
});

/**
 * 所有响应拦截器
 */
request.interceptors.response.use(async (response, options): Promise<any> => {
  const res = await response.clone().json();
  if (res.code === 0) {
    return res.data;
  }
  if (res.code === 40100) {
    message.error('请先登录');
    history.replace({
      pathname: '/user/login',
      search: stringify({
        redirect: location.pathname,
      }),
    });
  } else {
    message.error(res.description)
  }
  return res.data;
});

export default request;
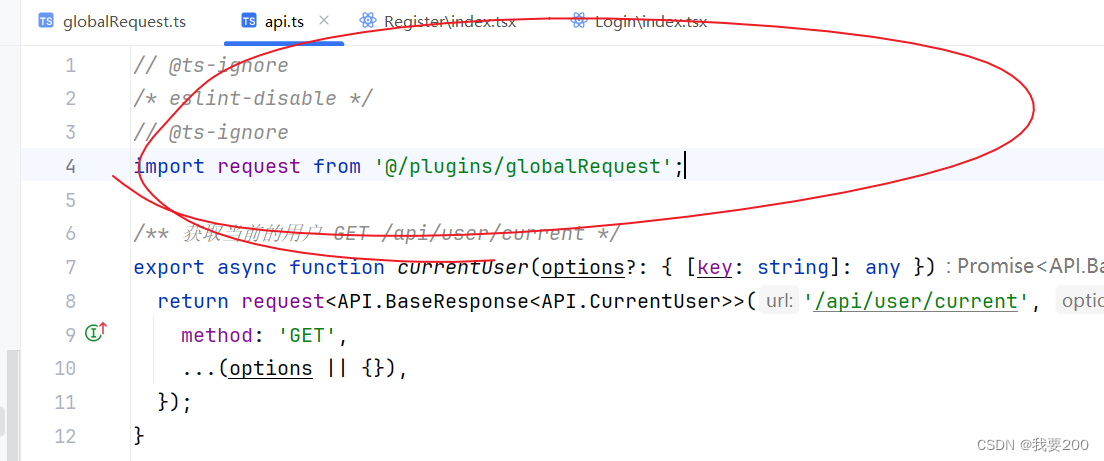
记录一下踩坑点:
就是你自己新写了一个处理器之后,你就要在你的api.ts文件中的引入你也得记得改
原来的是引用umi框架中的{request}
得换成自己写的这个
要不然就是出现你打开localhost:8080的时候,直接跳过登录页面,直接进去,并且查询不到任何信息。


 3万+
3万+


 被折叠的 条评论
为什么被折叠?
被折叠的 条评论
为什么被折叠?
 到【灌水乐园】发言


