


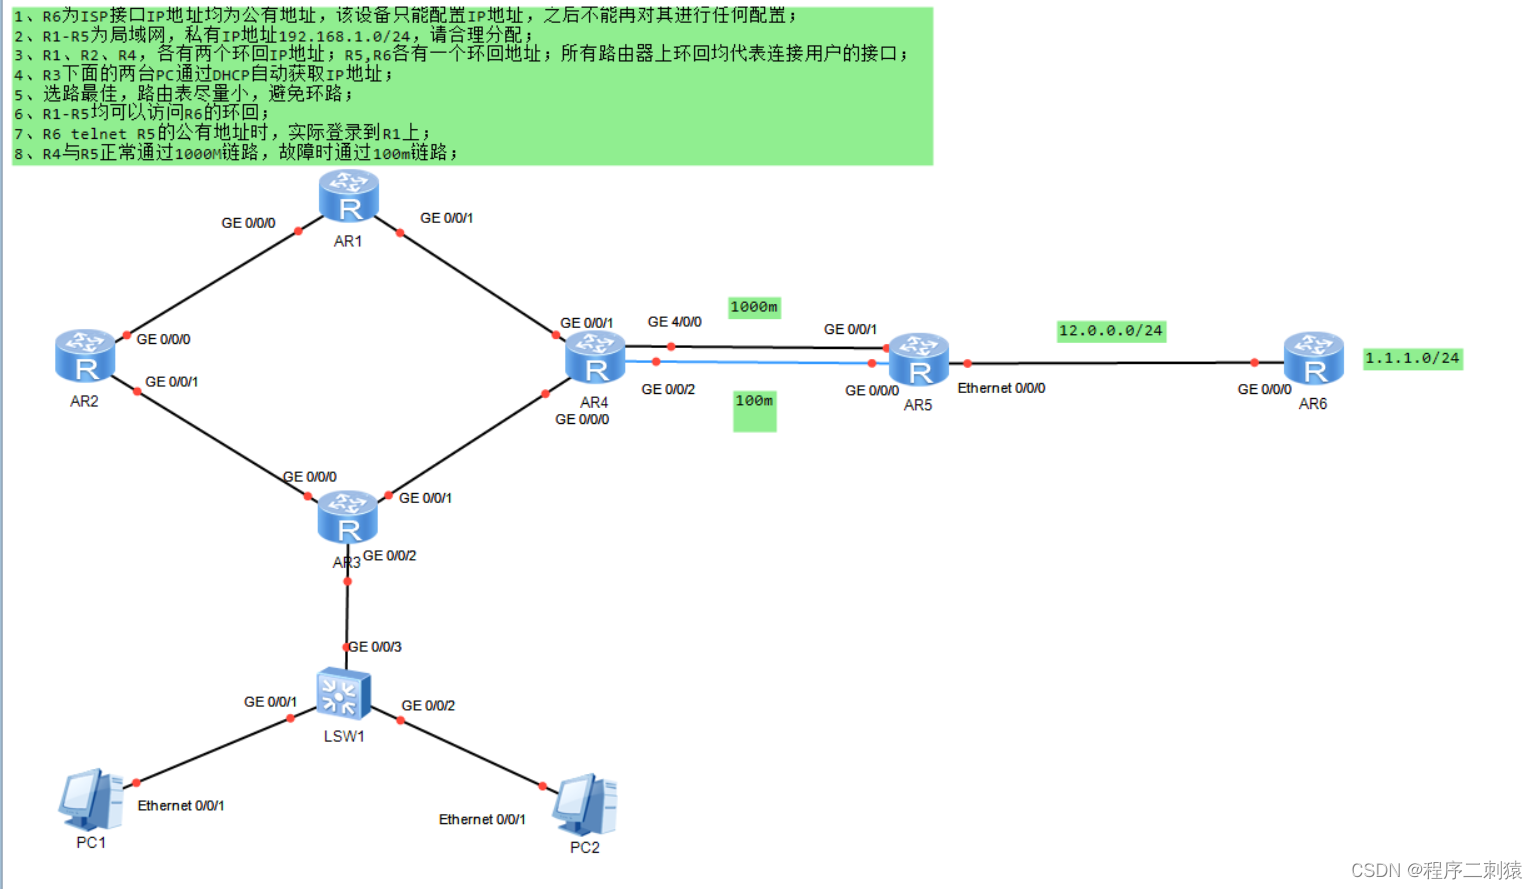
一. 实验要求 + 实验拓扑
二.实验思路
1.划分网段
2.分配ip
3.给路由器接口配置ip地址
4.配置R3的dhcp服务
5. 给内网的路由器(R1~R5)配置静态路由,并满足条件
6.给R5配置nat
7.R1配置telnet服务
8.将R4和R5 100m链路的优先级降低
9.测试
三.实验具体实现
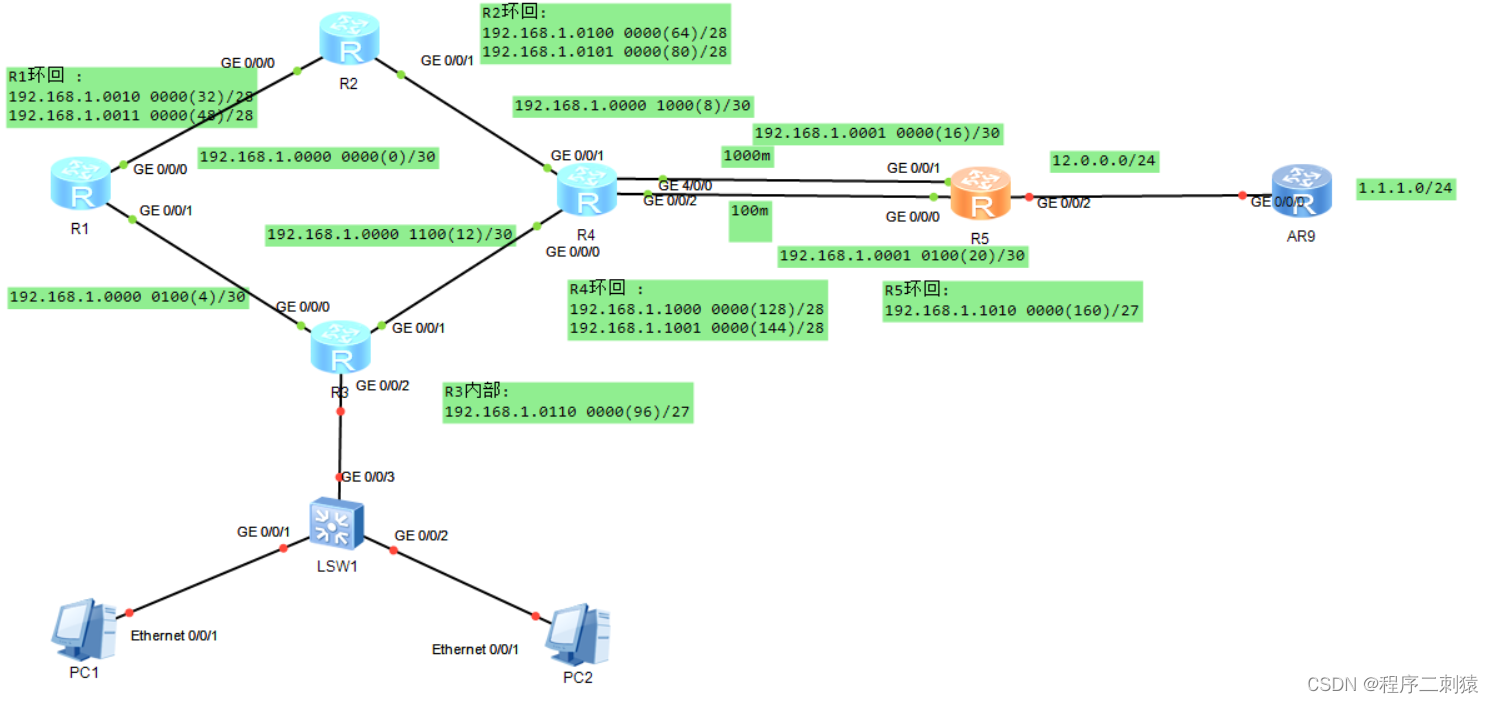
1.内网网段段的划分
加上环回接口总共有14个网段,但考虑到ip汇总,先划分成六个大网段
骨干链路 + R1环回 + R2环回 + R3 g0/0/2所处网段 + R4环回 + R5的环回
2.IP划分
先从192.168.1.0/24 分出3个主机位作为新的网络位划分大网段的IP
然后在大网段下给小网段划分ip
192.168.1.0000 0000/27 ----- 骨干链路
192.168.1.0000 0000/30 ----R1-R2
192.168.1.0000 0100/30 ----R1-R3
192.168.1.0000 1000/30 ----R2-R4
192.168.1.0000 1100/30 ----R3-R4
192.168.1.0001 0000/30 ----R4-R5(1)
192.168.1.0001 0100/30 ----R4-R5(2)
192.168.1.0001 1000/30
192.168.1.0001 1100/30
192.168.1.0010 0000/27 ----- R1环回
192.168.1.0010 0000/28
192.168.1.0011 0000/28
192.168.1.0100 0000/27 ----- R2环回
192.168.1.0100 0000/28
192.168.1.0101 0000/28
192.168.1.0110 0000/27 ----- R3局域网
192.168.1.0110 0000/27
192.168.1.1000 0000/27 ----- R4环回
192.168.1.1000 0000/28
192.168.1.1001 0000/28
192.168.1.1010 0000/27 ----- R5环回
192.168.1.1010 0000/27
如图:
3.接口IP配置
注意: sys进入配置模式
R1:
1.改名:
<Huawei>sys
[Huawei]sys R1
2:进入接口并配置IP
R1
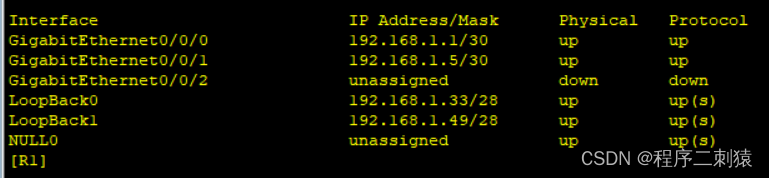
[R1]int g0/0/0
[R1-GigabitEthernet0/0/0]ip add 192.168.1.1 30
[R1]int g0/0/1
[R1-GigabitEthernet0/0/1]ip add 192.168.1.5 30
[R1]int LoopBack 0
[R1-LoopBack0]ip add 192.168.1.33 28
[R1]int LoopBack 1
[R1-LoopBack1]ip add 192.168.1.49 28
查看配置
[R1]display ip interface brief
---------------------------------------------------------------------------------------------------------------------------------
R2
改名(省略)
2:进入接口并配置IP
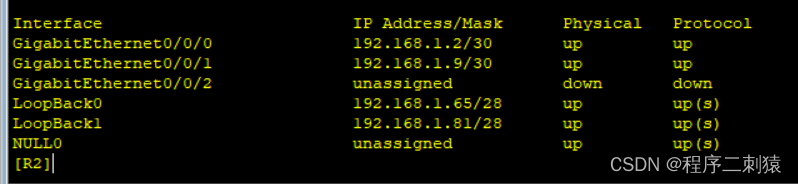
[R2]int g0/0/0
[R2-GigabitEthernet0/0/0]ip add 192.168.1.2 30
[R2]int g0/0/1
[R2-GigabitEthernet0/0/1]ip add 192.168.1.9 30
[R2]int loopback 0
[R2-LoopBack0]ip add 192.168.1.65 28
[R2]int LoopBack 1
[R2-LoopBack1]ip add 192.168.1.81 28
查看配置
[R2]display ip interface brief
---------------------------------------------------------------------------------------------------------------------------------
R3
改名(省略)
2:进入接口并配置IP
[R3]int g0/0/0
[R3-GigabitEthernet0/0/0]ip add 192.168.1.6 30
[R3]int g0/0/1
[R3-GigabitEthernet0/0/1]ip add 192.168.1.13 30
[R3]int g0/0/2
[R3-GigabitEthernet0/0/2]ip add 192.168.1.97 27
查看配置
[R3]display ip interface brief

---------------------------------------------------------------------------------------------------------------------------------
R4
改名(省略)
2:进入接口并配置IP
[R4]int g0/0/1
[R4-GigabitEthernet0/0/1]ip add 192.168.1.10 30
[R4-GigabitEthernet0/0/1]int g0/0/0
[R4-GigabitEthernet0/0/0]ip add 192.168.1.14 30
[R4-GigabitEthernet0/0/0]int loopback 0
[R4-LoopBack0]ip add 192.168.1.129 28
[R4-LoopBack0]int loopback 1
[R4-LoopBack1]ip add 192.168.1.145 28
[R4]int g0/0/2
[R4-GigabitEthernet0/0/2]ip add 192.168.1.21 30
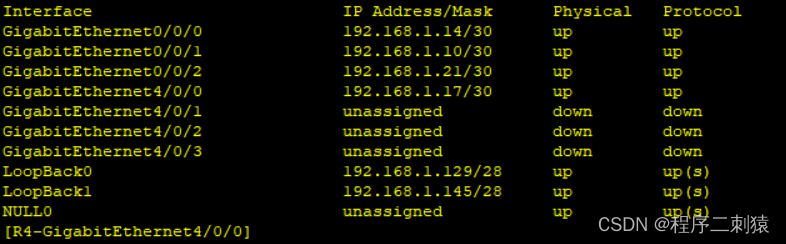
[R4]int g4/0/0
[R4-GigabitEthernet4/0/0]ip add 192.168.1.17 30
查看配置
[R4]display ip interface brief
---------------------------------------------------------------------------------------------------------------------------------
R5
改名(省略)
2:进入接口并配置IP
[R5]int g0/0/1
[R5-GigabitEthernet0/0/1]ip add 192.168.1.18 30
[R5-GigabitEthernet0/0/1]int g0/0/0
[R5-GigabitEthernet0/0/0]ip add 192.168.1.22 30
[R5-GigabitEthernet0/0/0]int l0
[R5-LoopBack0]ip add 192.168.1.161 27
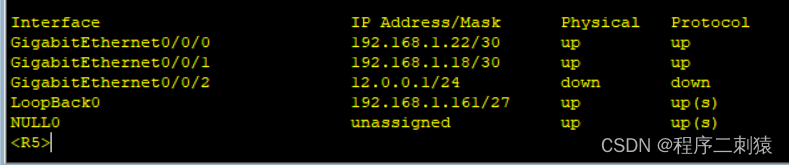
[R5]int G0/0/2
[R5-GigabitEthernet0/0/2]ip address 12.0.0.1 24
查看配置
[R5]display ip interface brief
 --------------------------------------------------------------------------------------------------------------------------------
R6
改名(省略)
2:进入接口并配置IP
[R6]int g0/0/0
[R6-GigabitEthernet0/0/0]ip add 12.0.0.2 24
[R6-GigabitEthernet0/0/0]int l0
[R6-LoopBack0]ip add 1.1.1.1 24
查看配置
[R6]display ip interface brief

----------------------------------------------------------------------------------------------------------------------------
4.R3配置DHCP服务
1.DHCP启动
[R3]dhcp enable
Info: The operation may take a few seconds. Please wait for a moment.done.
2.创建IP池
[R3]ip pool aa
Info: It's successful to create an IP address pool.
3.配置IP池的信息(网关,网段,DNS)
[R3-ip-pool-aa]gateway-list 192.168.1.97
[R3-ip-pool-aa]network 192.168.1.96 mask 27
[R3-ip-pool-aa]dns-list 114.114.114.114 8.8.8.8
4.在接口选择全局
[R3]int g0/0/2
[R3-GigabitEthernet0/0/2]dhcp select global
5.配置静态路由
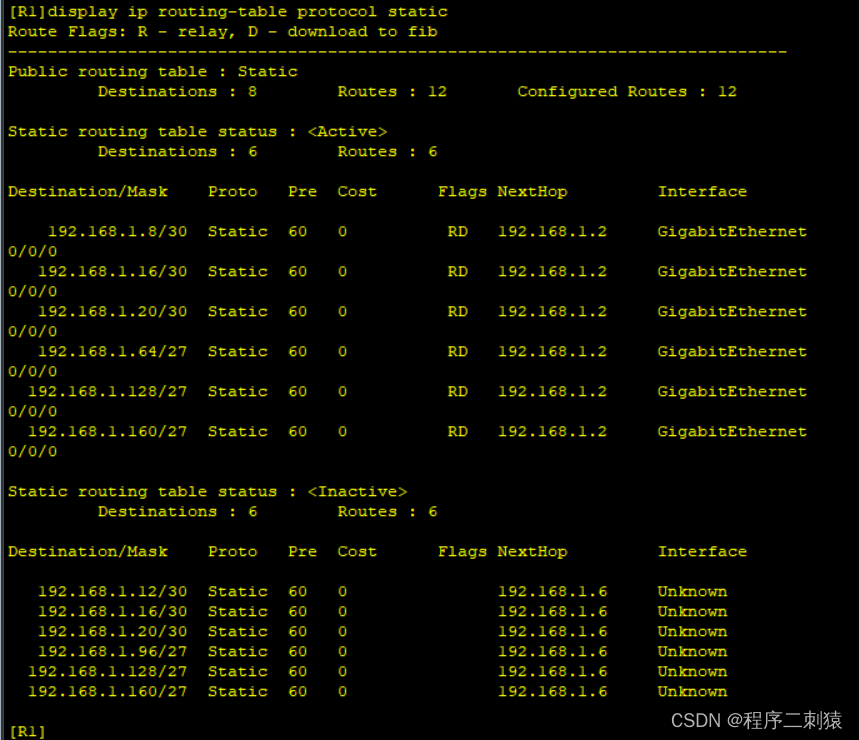
R1
[R1]ip route-static 192.168.1.64 27 192.168.1.2
[R1]ip route-static 192.168.1.8 30 192.168.1.2
[R1]ip route-static 192.168.1.128 27 192.168.1.2
[R1]ip route-static 192.168.1.128 27 192.168.1.6
[R1]ip route-static 192.168.1.16 30 192.168.1.6
[R1]ip route-static 192.168.1.16 30 192.168.1.2
[R1]ip route-static 192.168.1.160 27 192.168.1.2
[R1]ip route-static 192.168.1.160 27 192.168.1.6
[R1]ip route-static 192.168.1.20 30 192.168.1.6
[R1]ip route-static 192.168.1.20 30 192.168.1.2
[R1]ip route-static 192.168.1.12 30 192.168.1.6
[R1]ip route-static 192.168.1.96 27 192.168.1.6
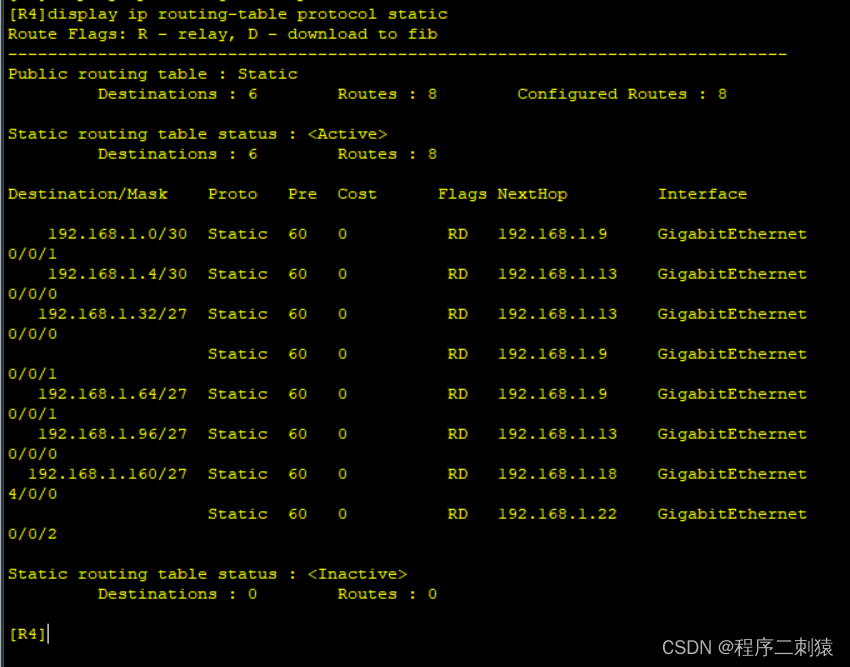
查看:
----------------------------------------------------------------------------------------------------------------------------
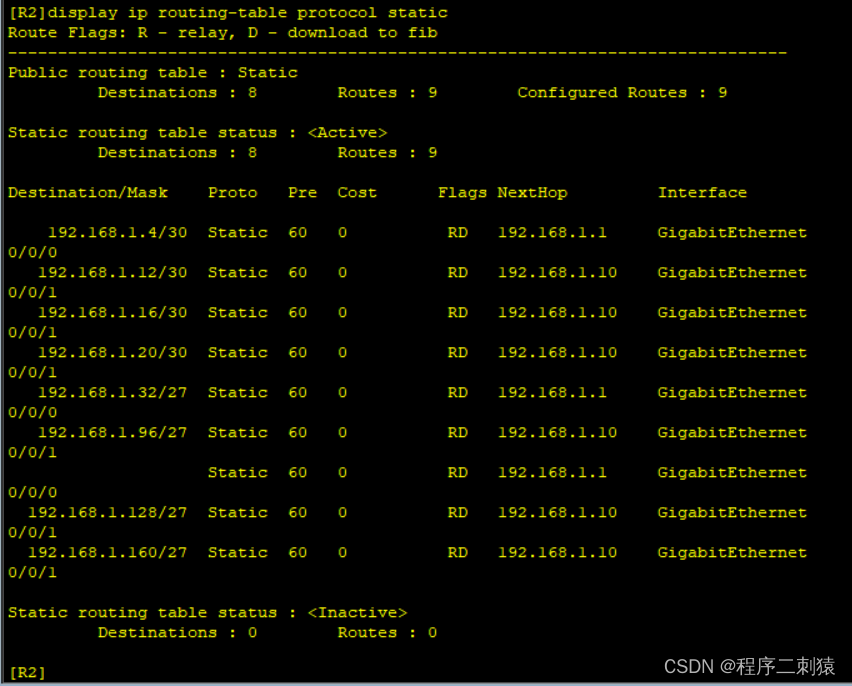
R2
[R2]ip route-static 192.168.1.128 27 192.168.1.10
[R2]ip route-static 192.168.1.16 30 192.168.1.10
[R2]ip route-static 192.168.1.20 30 192.168.1.10
[R2]ip route-static 192.168.1.160 27 192.168.1.10
[R2]ip route-static 192.168.1.12 30 192.168.1.10
[R2]ip route-static 192.168.1.27 96 192.168.1.10
[R2]ip route-static 192.168.1.96 27 192.168.1.10
[R2]ip route-static 192.168.1.96 27 192.168.1.1
[R2]ip route-static 192.168.1.4 30 192.168.1.1
[R2]ip route-static 192.168.1.32 27 192.168.1.1
查看:
----------------------------------------------------------------------------------------------------------------------------
R3
[R3]ip route-static 192.168.1.32 27 192.168.1.5
[R3]ip route-static 192.168.1.0 30 192.168.1.5
[R3]ip route-static 192.168.1.64 27 192.168.1.5
[R3]ip route-static 192.168.1.64 27 192.168.1.14
[R3]ip route-static 192.168.1.128 27 192.168.1.14
[R3]ip route-static 192.168.1.20 30 192.168.1.14
[R3]ip route-static 192.168.1.160 27 192.168.1.14
[R3]ip route-static 192.168.1.16 30 192.168.1.14
[R3]ip route-static 192.168.1.8 30 192.168.1.14
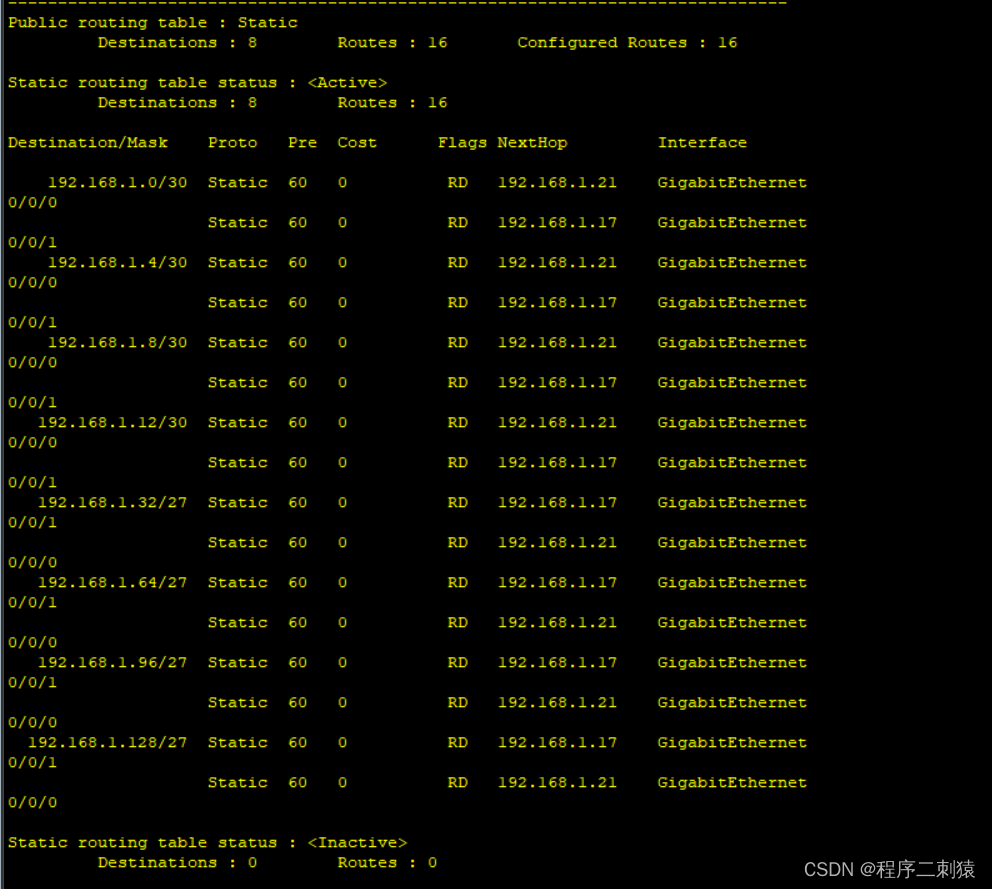
查看:

----------------------------------------------------------------------------------------------------------------------------
R4
[R4]ip route-static 192.168.1.160 27 192.168.1.18
[R4]ip route-static 192.168.1.160 27 192.168.1.22
[R4]ip route-static 192.168.1.96 27 192.168.1.13
[R4]ip route-static 192.168.1.4 30 192.168.1.13
[R4]ip route-static 192.168.1.32 27 192.168.1.13
[R4]ip route-static 192.168.1.32 27 192.168.1.9
[R4]ip route-static 192.168.1.0 30 192.168.1.9
[R4]ip route-static 192.168.1.64 27 192.168.1.9
查看
----------------------------------------------------------------------------------------------------------------------------
R5
[R5]ip route-static 192.168.1.128 27 192.168.1.17
[R5]ip route-static 192.168.1.128 27 192.168.1.21
[R5]ip route-static 192.168.1.12 30 192.168.1.21
[R5]ip route-static 192.168.1.12 30 192.168.1.17
[R5]ip route-static 192.168.1.96 27 192.168.1.17
[R5]ip route-static 192.168.1.96 27 192.168.1.21
[R5]ip route-static 192.168.1.4 30 192.168.1.21
[R5]ip route-static 192.168.1.4 30 192.168.1.17
[R5]ip route-static 192.168.1.32 27 192.168.1.17
[R5]ip route-static 192.168.1.32 27 192.168.1.21
[R5]ip route-static 192.168.1.0 30 192.168.1.21
[R5]ip route-static 192.168.1.0 30 192.168.1.17
[R5]ip route-static 192.168.1.64 27 192.168.1.17
[R5]ip route-static 192.168.1.64 27 192.168.1.21
[R5]ip route-static 192.168.1.8 30 192.168.1.21
[R5]ip route-static 192.168.1.8 30 192.168.1.17
查看
----------------------------------------------------------------------------------------------------------------------------
6.R5配置NAT
[R5]acl 2000
[R5-acl-basic-2000]rule permit source 192.168.1.0 0.0.0.255
[R5]int g0/0/2
[R5-GigabitEthernet0/0/2]nat outbound 2000
因为内网的路由器没有到达与公网相邻的接口的路由,所以要配置缺省
[R1]ip route-static 0.0.0.0 0 192.168.1.2
[R1]ip route-static 0.0.0.0 0 192.168.1.6
[R2]ip route-static 0.0.0.0 0 192.168.1.10
[R3]ip route-static 0.0.0.0 0 192.168.1.14
[R4]ip route-static 0.0.0.0 0 192.168.1.18
[R4]ip route-static 0.0.0.0 0 192.168.1.22
这里要配置R5缺省将内网的数据发出去
[R5]ip route-static 0.0.0.0 0 12.0.0.2
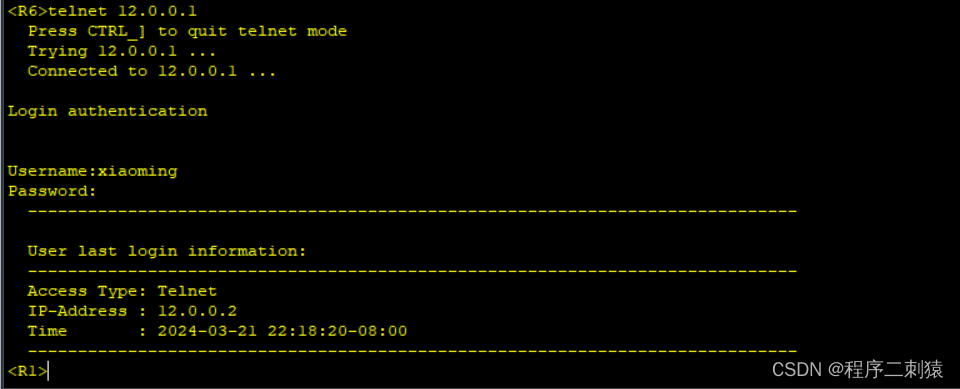
7.R1配置telnet服务
1.进入aaa模式
[R1]aaa
[R1-aaa]
2.创建用户
[R1-aaa]local-user xiaoming password cipher 12345 privilege level 15
Info: Add a new user.
3.配置服务
[R1-aaa]local-user xiaoming service-type telnet
4.配置虚拟通道
[R1]user-interface vty 0 4
5.设置登录方式(用户名 + 密码) --> aaa
[R1-ui-vty0-4]authentication-mode aaa
6.将内网的服务发布到公网上(在R5配置)
[R5-GigabitEthernet0/0/2]nat server protocol tcp global current-interface 23 ins
ide 192.168.1.1 23
Warning:The port 23 is well-known port. If you continue it may cause function fa
ilure.
Are you sure to continue?[Y/N]:y
搞定
8.将R4和R5 100m链路的优先级降低
R4 -> R5(所有100m的链路都要改):
[R4]ip route-static 0.0.0.0 0 192.168.1.22 preference 61
Info: Succeeded in modifying route.
[R4]ip route-static 192.168.1.160 27 192.168.1.22 preference 61
Info: Succeeded in modifying route.
R5 -> R4
[R5]ip route-static 192.168.1.0 30 192.168.1.21 preference 61
Info: Succeeded in modifying route.
[R5]ip route-static 192.168.1.4 30 192.168.1.21 preference 61
Info: Succeeded in modifying route.
[R5]ip route-static 192.168.1.8 30 192.168.1.21 preference 61
Info: Succeeded in modifying route.
[R5]ip route-static 192.168.1.12 30 192.168.1.21 preference 61
Info: Succeeded in modifying route.
[R5]ip route-static 192.168.1.32 27 192.168.1.21 preference 61
Info: Succeeded in modifying route.
[R5]ip route-static 192.168.1.64 27 192.168.1.21 preference 61
Info: Succeeded in modifying route.
[R5]ip route-static 192.168.1.96 27 192.168.1.21 preference 61
Info: Succeeded in modifying route.
[R5]ip route-static 192.168.1.128 27 192.168.1.21 preference 61
Info: Succeeded in modifying route.
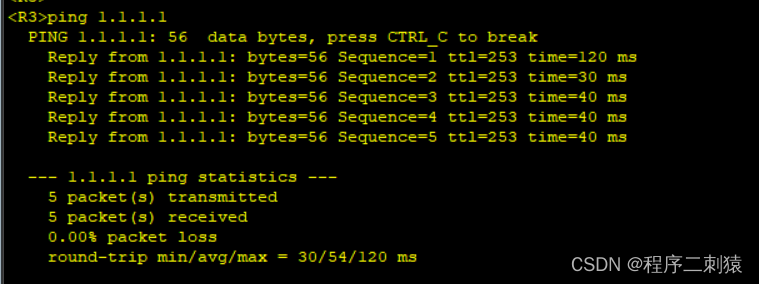
9.测试
ping测试(抽查):
R1 ping R6环回

R3 ping R6环回
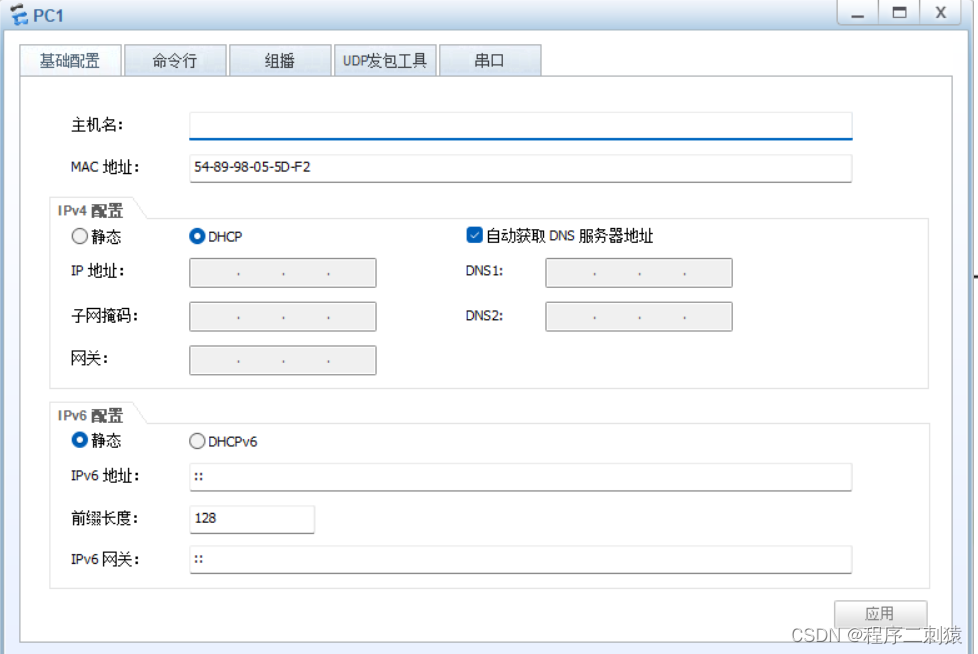
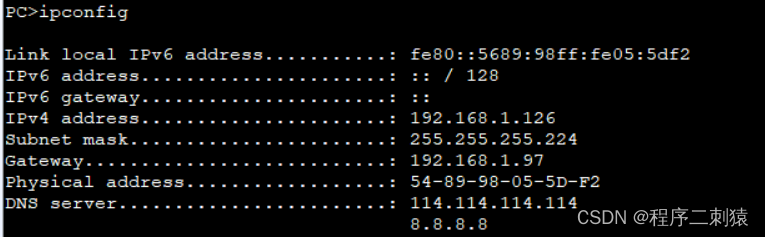
DHCP测试:
pc1:
telnet测试:


 1万+
1万+


 被折叠的 条评论
为什么被折叠?
被折叠的 条评论
为什么被折叠?
 到【灌水乐园】发言


